Entries tagged [painting]
Painting Tutorial: Aged Copper
Posted on Monday Apr 01, 2019 at 05:00pm in Tutorials
- by Iain Wilson
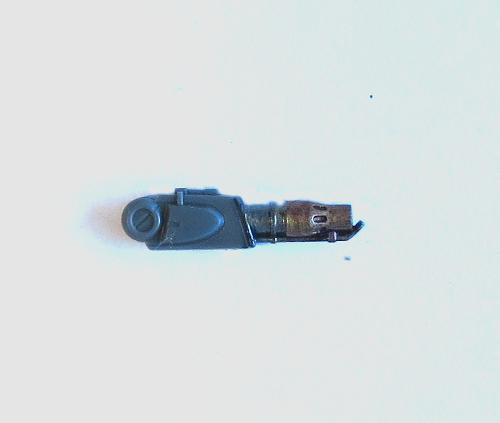
For a very long time, I tried to avoid painting anything copper, as none of the copper paints I had tried ever looked quite right. Since I started getting a little more adventurous with my terrain building, though, it became harder to avoid having to figure something out that I could be happy with, and so eventually I started experimenting again to see what I could work out. This week, I'm sharing a quick tutorial showing the method I settled on.
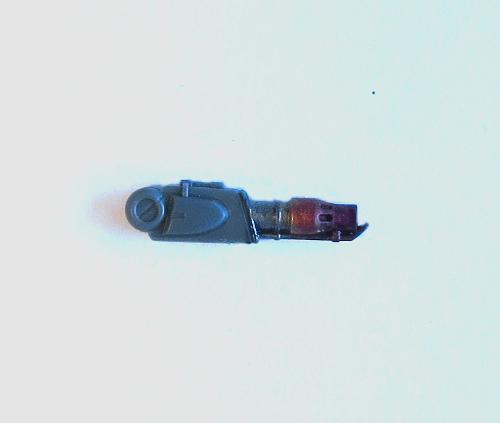
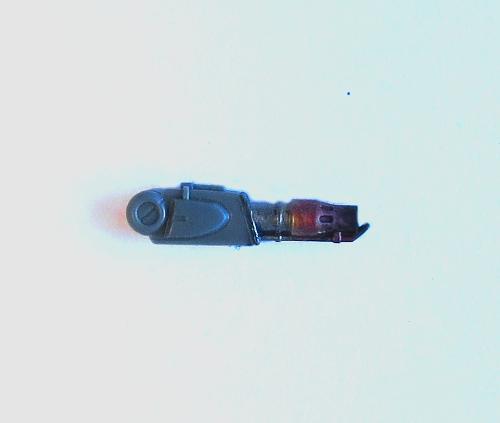
For my example piece, I'm using a piece of a 13mm drip irrigation fitting, with the large pipe fitting from the Maelstrom's Edge terrain sprue as a handy stand for it.
The first step is to undercoat with a medium green colour - I'm using Army Painter Army Green spray, but pretty much any green will do. This just gives a bit of a green tint anywhere that the copper paint winds up a little thinner, so the actual colour isn't too important.
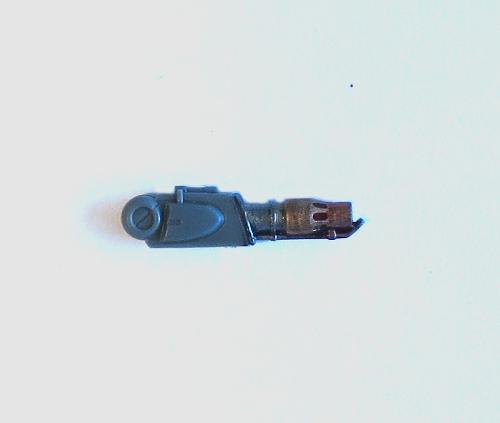
Next, paint on two coats of copper. Here, I've used some old (very old) Citadel Beaten Copper, but again you should be able to use whatever copper you have. Copper fittings tend to vary considerably in colour, so there's no 'right' shade to look for, other than what looks right to you.
The reason that copper paint tends to not look right is that unless it's polished (which brush-on copper paint doesn't convey) copper generally isn't actually metallic copper coloured. It's more of a dull, coppery brown. So, over the copper, paint a generous slathering of Army Painter Mid Brown wash and leave it to dry.
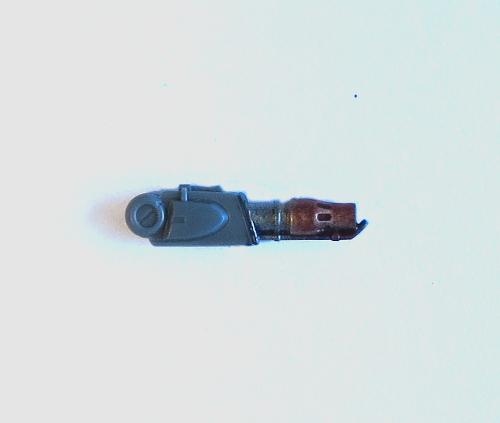
You could leave it there, with perhaps a light drybrush of copper over the top to pick up some highlights, or carry on and add some verdigris by drybrushing with a suitable blue-green colour. As with the copper itself, verdigris can range from a pale green through to more of a turquoise colour, so use whatever colour suits the look you want. I've used Vallejo Model Colour Emerald here, mixed with just a touch of white and drybrushed wherever it looks appropriate. You can leave as much or as little of the copper brown showing through as you want to get the desired look.
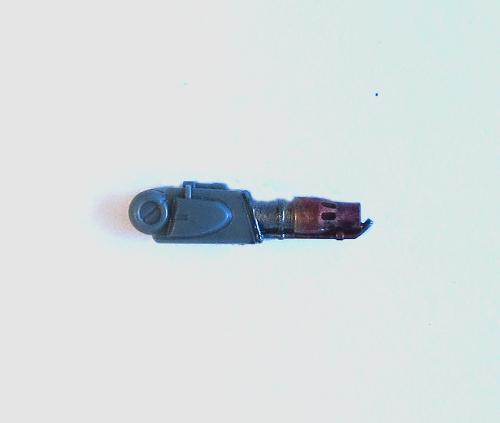
Finally, you can add some scratches with thin lines of black, highlighting the bottom edge of the line with copper. Light highlights and lines of copper without the black can also be used to show shallower scrapes and scuffs.
And that's about it. Go forth and copper up your terrain to your heart's content!
You can pick up the Maelstrom's Edge boxed game and model range from the webstore here.
As always, feel free to pop along and share your work, or ask any Maelstrom's Edge- or hobby-related questions on the Comm Guild Facebook page!
For other Maelstrom's Edge modeling articles, including tutorials and walkthroughs of a wide range of different building and miniature projects, check out the Hobby section of the Maelstrom's Edge website here.
Tags: painting terrain tutorial walkthrough
Painting Tutorial: Weathered Signs using Photo Paper Decals
Posted on Monday Mar 11, 2019 at 05:00pm in Tutorials
- by Iain Wilson
Marking your buildings and other urban features with signs, graffiti and other appropriate splashes of colour is a great way of adding some touches of realism to your wargaming terrain. This week, I thought I would share a simple technique for creating faded and worn signs and markings using decals made from photo paper!
This technique won't get you bright, new looking signs - for that, you can use regular decals, or print your sign out on paper and glue it in place. What we're aiming for here are signs that have been out in the elements for a while, and are battered, chipped and faded.
Start by drawing up the design you want to apply to the building in your drawing program of choice (I use Gimp). The final applied image will be duller than your original, so you may need to experiment a bit to find the right level at first - If you want a fairly bright and legible sign, use bright colours. Use more muted colours for a more faded effect.
You will also need to flip the image so it is a mirror-image. Then print onto gloss photo paper, and cut out the design using a sharp hobby knife or scissors. Leave a tab of extra paper on one side, and just score lightly along the edge of the image on the tab side.
Apply a thin layer of superglue to the surface of the image. You need to keep this thin enough that it won't squeeze outside the bounds of the image when you press it onto the terrain surface. Don't worry if you don't get the image covered perfectly, as this just creates some handy chipping on the final image.
Press the image face-first onto your painted surface and hold it in place until the glue has had a chance to set.
Grab the excess paper tab and gently peel the paper off. It should peel away leaving the ink and a very thin surface layer of the photo paper behind. Gently scrape the paper layer away with a finger nail to expose the coloured surface beneath.
For any remaining scraps of thin paper left behind, you can rub gently with a damp fingertip to clean then away. The moisture will make your image look brighter for a moment, and white parts may go transparent, but it will fade again as it dries.
If the end result is a little too faded, you can pick the colours up a little by painting on a thin layer of gloss varnish. It won't make a huge difference, but will brighten things up slightly.
From there, you can go ahead and add other detailing and weathering to your terrain as desired. See my guide to sponge weathering here, or the slightly more advanced salt weathering technique here.
As noted back at the start, while the end result is intended to be faded and weathered, you will get a brighter end result if you use stronger colours to begin with. Black shows through best of all, so you can add extra definition to the image by adding thin black borders around everything.
Give it a go! Feel free to share your efforts, or ask for help on the Comm Guild Facebook page!
You can pick up the entire Maelstrom's Edge model range, including the terrain sprue used for the terrain in this article, from the webstore here.
For other Maelstrom's Edge modeling articles, including tutorials and walkthroughs of a wide range of different building and miniature projects, check out the Hobby section of the Maelstrom's Edge website here.
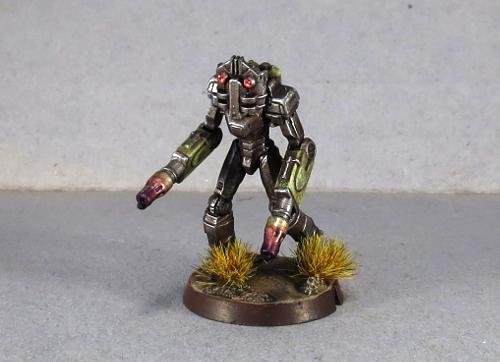
Painting Spotlight: Broken Forsaken Chieftain
Posted on Monday Mar 04, 2019 at 05:00pm in Tutorials
- by Iain Wilson
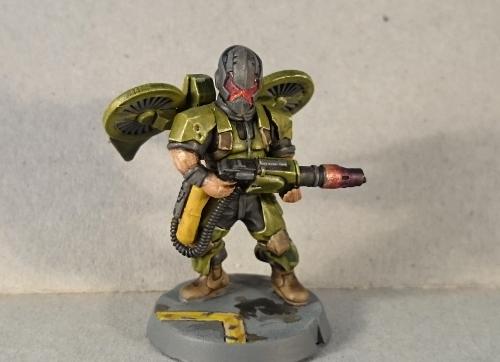
Time to get some paint on!
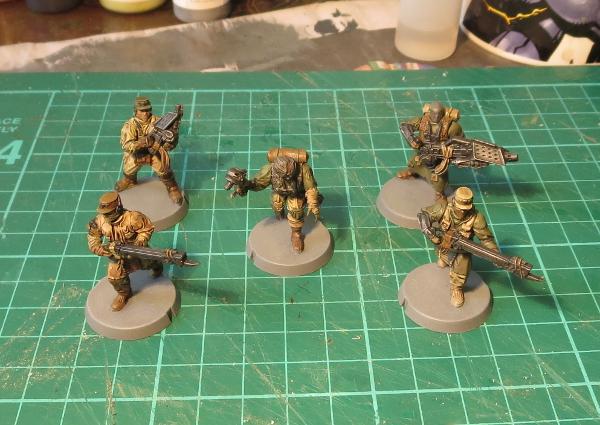
Despite building a bunch of Forsaken Chieftains for a conversion article a while back (This one!), I hadn't had a chance to get any of them painted up yet, so my Broken force has been languishing without a properly-attired leader for all this time. This week I decided to remedy this situation!
The model painted here was one of the resin conversions featured in the article linked above, with the normal Xeno Spotter and melee weapon replaced with bionic arms holding a Beam Blastgun and a grenade.
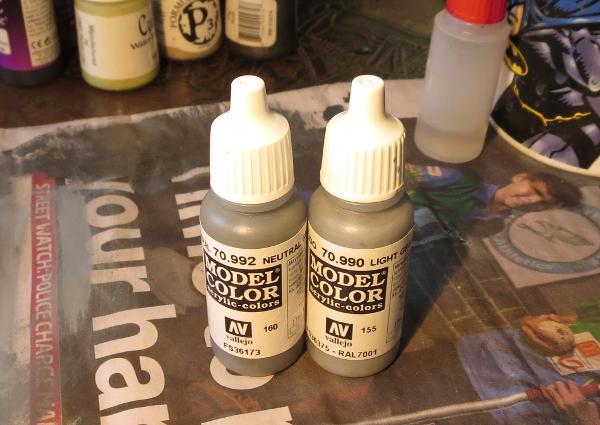
My broken troops were painted with a very quick 'base colours and a wash of brown ink' affair, which was shown in the article way back here. As a force's leader is a bit of a centrepiece, I wanted a paintjob that was going to look like it fitted in with the troops, but was a little more polished. I started out by spraying the model with Army Painter Army Green, as I had with the troops.
I then picked out the base colours, leaving the army green on the pants and shirt, and painting straps, pouches, boots and armour pads with Vallejo Heavy Brown and Beasty Brown, the coat with P3 Jack Bone, her face with Citadel Tallarn Flesh, and everything else with Vallejo Heavy Charcoal.
The next step was to add some highlights. I used Coat D'Arms Putrid Green to highlight the creases in the shirt and pants, and followed up with some touches of Jack Bone on the darker brown areas and face, and P3 Morrow White on the coat and lighter brown parts.
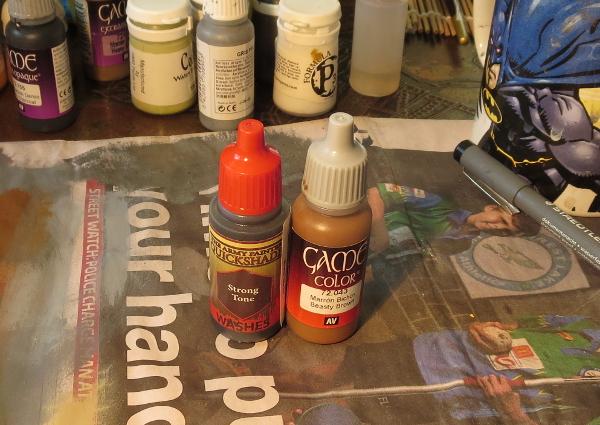
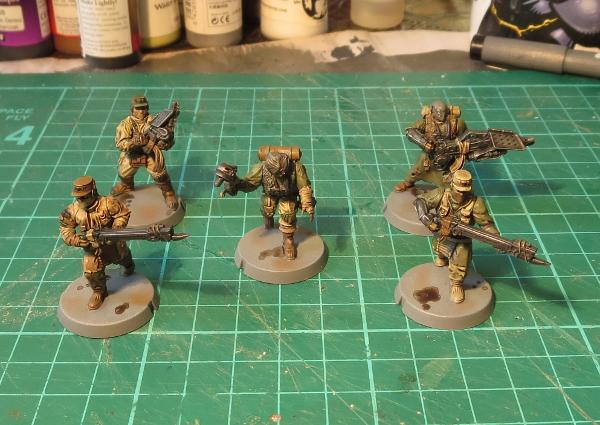
The green was then shaded with a wash of Army Painter Green Tone, and the brown areas and face with Army Painter Strong Tone. While that was drying, I added some white highlights to the hair, and painted the metal areas - the weapon was just given a light drybrush with P3 Pig Iron, and the other metal areas given a flat coat of the same.
Next up, the metal parts were given a highlight with Army Painter Shining Silver. I also painted the edge detail on the coat with some old Citadel Tentacle Pink, and shaded the coat with multiple light coats of Army Painter Soft Tone painted into the creases and concealed areas.
I then gave the metal parts a wash of Army Painter Dark Tone, and shaded the coat edge detail with some light coats of Army Painter Purple Tone.
That just left some final detail work - The eye was painted white and a black dot added in the middle. The bionic eye was painted with Vallejo Red and Army Painter Pure Red, with a highlight of white. For the yellow on the grenade, I started with a coat of Citadel Iyanden Yellow, a top layer of P3 Cygnus Yellow, some shading underneath with Soft Tone and a highlight of yellow with a little white mixed in. The straps on the gun were painted with Heavy Brown and given a wash of Strong Tone, as were the cross-straps on the back of the coat. Also on the back of the coat, I picked out the studs with Heavy Charcoal and added a highlight with Shining Silver.
And, finally, the base was painted with the same urban scheme that I've been using for several of my Maelstrom's Edge forces - you can find a how-to here.
The finished model, leading a Broken force into battle!
Keen to try putting together your own Broken force? You can find the resin Chieftain model and plastic Broken Infantry used here, along with the rest of the Maelstrom's Edge model range in the webstore here.
As always, feel free to pop along and share your work, or ask any Maelstrom's Edge- or hobby-related questions on the Comm Guild Facebook page!
For other Maelstrom's Edge modeling articles, including tutorials and walkthroughs of a wide range of different building and miniature projects, check out the Hobby section of the Maelstrom's Edge website here.
Terrain Spotlight: Abandoned Outpost
Posted on Monday Oct 29, 2018 at 06:00pm in Tutorials
- by Iain Wilson
As anyone who has been following these modeling articles may have noticed, I have all sorts of trouble looking at store-bought kits and not immediately coming up with various ways to hack them up and glue them back together again, and this week's article is no exception. There are a plethora of outstanding MDF building kits out in the market these days, which can be great options for inexpensive, easy to build terrain. Thanks to how easy it is to cut and glue, they can also form a great base for modification. I recently put together a basic desert building from Knights of Dice's Tabula Rasa range, with some extra detailing courtesy of the Maelstrom's Edge terrain sprue (If you missed it, you can find the article here), and this week, I'm taking a stab at a second building from this range. Intact buildings are just so pre-galaxy-spanning-apocalypse, however, so I'm taking the knife to this one and creating a small abandoned outpost:
The first step was to plan out exactly how I was going to destroy the building, so I popped the parts off their sheets and fitted the basic structure together with no glue. Then I took a pencil and drew a rough line around the outside where I wanted the walls to be damaged.
I cut the walls using a sharp exacto knife, by scoring through on the outside following the pencil line relatively closely, then scoring a roughly corresponding line on the inside of the wall piece (this wasn't an exact match, just eye-balled to be close enough) and then snapping the piece in two. The edge was then cleaned up using the knife to remove any fluffy or protruding parts.
When all of the cuts were completed, it was time to add some detail. The Tabula Rasa kits are deliberately plain, both to keep the cost down and to provide a generic structure for detail pieces to be added, and so they're a perfect base for the Maelstrom's Edge terrain sprue!
I took a door piece and used a razor saw to cut the door out of the frame, and broke the frame into several pieces. Some scarring was also added with the knife.
I widened both the exterior and interior doorways to match the terrain sprue door pieces. The door frame pieces were glued in place on the exterior doorway, and I added a second doorframe with the door also removed but the frame left intact into the inner doorway. Support struts cut to length were glued over the corner joints on the walls to hide them, and add a little more visual interest to the otherwise fairly plain, boxy building. On the first Tabula Rasa building I added detail over the window holes as well, but for this ruin it didn't seem necessary.
The courtyard has a low MDF wall that runs around it, but I wanted something a little more flashy, so I took a couple of ladders from the terrain sprue and cut off one side with a razor saw.
These were then cut to length and glue in place around the edges of the courtyard, after gluing the scrap pieces back into the locator holes for the original wall to fill them in.
To help turn this into an old, long-abandoned ruin that the jungle had started to reclaim, I built up some patches on the floor with air-drying clay.
I pressed a few castoffs pieces of MDF into the clay, and glued the distressed door down on the courtyard floor. Over this, I painted a thick layer of PVA glue and sprinkled on a generous layer of a gravel, sand and railway ballast mix that I like to use for building rubble as it has a lot of different textures in there.
When the PVA glue had dried, I tipped off the excess gravel mix, and then it was time to paint. I didn't have a brown spray to hand, so I undercoated with some flat black and, while it was still wet, followed up with a light coat of Army Painter Dragon Red.
Over this went a coat of a light cream colour, and then a highlight spray of white from above.
I went back over anything that I wanted to look like exposed metal and re-undercoated with Vallejo Beasty Brown, before drybrushing with P3 Pig Iron. The few bits of the original floor still peeking through the rubble were painted with Vallejo Basalt Grey and drybrushed with Vallejo Light Grey.
With that out of the way, I went to town with washes!
I gave the whole building a generous coat of Army Painter Strong Tone. The walls were painted with a medium-sized flat brush, using vertical strokes to create a streaky effect and allowing the wash to pool and run where it felt like it. When that first wash had dried, I went back over it, picking out small areas with extra dollops of Strong Tone and also adding some patches of Green Tone and Military Shader to give them a greenish, mossy tint.
Time to add some shrubbery!
I took a bunch of assorted fake plants. Most of these are cheap aquarium plants, although I also used a bunch of plastic greenery taken from a mat I found at a local hardware store for creating fake vertical gardens. It looks rubbish as an actual plant feature, but is a perfect resource for my purposes here.
Fake plants, particularly the cheaper kind, tend to be rather brightly coloured and slightly glossy, which just wouldn't do. I got around this by giving the plants a light spray with Army Painter Army Green - not enough to completely cover over the original colour, but enough to dull down the colour and shine. To add some extra colour differentiation, I very lightly misted the tips of some of the plants with white. The painted plants were then glued in place wherever seemed appropriate, but poking a hole through the rubble and into the underlying clay, applying some superglue to the plant stem and pushing it into the hole. I also cut some leaves off a few plants and glued them around on the ground.
The final step was to paint the fallen leaves with varying amounts of brown, and then a quick wash of Strong Tone. At this point, the ruin looked something like this:
To get all apocalyptic on your own building creations, you can pick up the Maelstrom's Edge terrain sprue along with the rest of the Maelstrom's Edge model range from the webstore here.
As always, feel free to pop along and share your work, or ask any Maelstrom's Edge- or hobby-related questions on the Comm Guild Facebook page!
For other Maelstrom's Edge modeling articles, including tutorials and walkthroughs of a wide range of different building and miniature projects, check out the article roundup here.
Tags: conversion modeling painting spotlight terrain terrainsprue tutorial walkthrough
Painting Tutorial: Energy Blades
Posted on Monday Oct 08, 2018 at 06:00pm in Tutorials
- by Iain Wilson
The Maelstrom's Edge Faction Expansion Sprue introduced a couple of cybel-powered edged weapons - the Cybel Blade and Cybel Glaive - to the Karist faction. These weapons give the Karist troops a wonderful, savage look and add even more nasty, close-quarters options to their units.
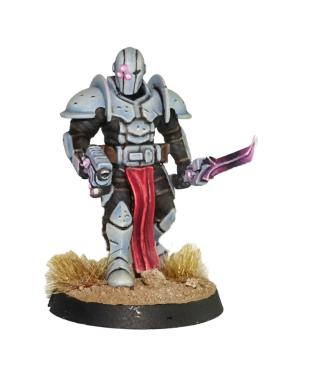
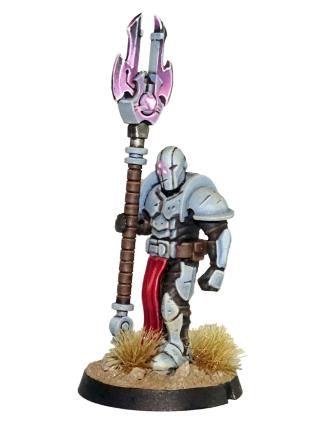
Painting these sorts of weapons is a great opportunity to add some eye-catching detail to your force, so I thought it might be useful to offer some suggestions on different ways to do so, to suit varying levels of painting prowess. There's no right or wrong way - you can feel free to use whatever technique suits your style, but the below ideas might give you a starting point if you're unsure of how to go about it.
For each of the below methods, paint up the rest of the weapon however suits your force's colours, and then go to town on your blade!
The Silver Wash Method
An easy one to kick things off. Start with a silver blade. Apply a wash of purple ink (I've used Army Painter Purple Tone). Let it dry, and you're done!
The White Wash Method
Similar to the above, except that you start with a white blade. Apply a wash of purple ink, and let it dry.
To lift it just a little, you can then use a fine detail brush and a little white paint to highlight the raised edges.
The Drybrush Method
Start with a silver or gunmetal blade. Apply purple ink to the back half of the blade, and let it dry.
Blend the purple into the metal by lightly drybrushing with the same metal colour that you used on the blade. This will also pick out the raised edges.
The Crystal Method
Start with a white blade. Using a fine detail brush, apply light coats of purple ink which each successive coat covering slightly less of the blade so that you build up a gradient of purple fading gradually to white . You don't want the ink to pool - the lighter you apply each coat, the better the end result will be.
Work with the shape of the blade - you want the brightest (whitest) part of the blade on the curved part of the edge, so the purple builds up from that point towards the tip and the back end of the blade. On the top half of the blade this is reversed, so the darkest purple is on the inside of the curve, fading out to white on the ends. Once you've built up your colour to the level you want it, highlight the raised edges with a little white.
And that's it - 4 different techniques for some very different results. You can vary these up some more by using different colours - I've gone with purple as that's the 'canon' colouring for cybel energy, but if you're using a different colour throughout your force (or looking to apply these techniques for a different miniature altogether) then you can easily substitute any colour ink.
If you're feeling inspired, you can pick up the Expansion Sprue from the Maelstrom's Edge online store here, and make sure you share your efforts on the Comm Guild Facebook page (https://www.facebook.com/groups/MaelstromsEdge)!
For other Maelstrom's Edge modeling articles, including tutorials and walkthroughs of a wide range of different building and miniature projects, check out the article roundup here.
Terrain Tutorial: Salt Weathering
Posted on Monday Oct 01, 2018 at 06:00pm in Tutorials
- by Iain Wilson
The Maelstrom's Edge Terrain Sprue lets you quickly and easily build some awesome-looking terrain to play your games around and over. Finishing that terrain off with a stand-out paintjob is sure to make your games look even better!
A while back, I shared a tutorial on sponge weathering, which is a great way to quickly and easily add chipping effects to your paintjob. This time around, I'm looking at salt weathering, which is a little more involved than doing it with a sponge, but gives a much more detailed and realistic effect.
While it may look daunting at first, the most complicated part of the salt weathering process is actually just planning out what colours to use. The paint goes on in 2 or more layers, depending on how involved you want your weathering to be. For this tutorial, I'm going to just use a base layer which will become the 'weathered' part, and a top layer which provides the core colour for the building.
What you'll need.
- A building to paint
- Salt. You can use ordinary tablesalt, or rocksalt, or anything in between. The coarseness of the salt changes how your weathering will appear, so some experimenting can be required to find the effect that you like most. I use a coarse rocksalt that I grind up finely with a mortar and pestle. This gives the grains a less consistent size than just using table salt, which I think enhances the overall effect.
- Hairspray. The cheaper, the better. It doesn't need to hold your fabulous 'do for the whole party, just keep some salt in place while you spray it.
- A small, stiff brush. An old toothbrush is ideal.
- Spray paint. You can use an airbrush for this technique if you have one, but if you don't then spraycans will do just fine - that's all I use.
First step - Apply the basecoat. This is the layer that will show through as your weathering. If you're after a chipped cement wall look, then a dark grey is appropriate. You can use a metallic colour if you want a painted metal feature, or a rusty brown for more weathered metal. If you want multiple effects over the building, then you can mix-and-match as required. If you're worried about the basecoat scratching off, which can be a problem with some plastic or metal materials, then also apply a generous coat of gloss sealer at this point.
For my building, I'm going for cement walls with rusty metal details, so I've sprayed the whole building grey, and then gone over the parts that will be metal with brown for the rust.
The next step is to apply the salt. Working one facing at a time, spray on a generous (but not dripping!) coat of hairspray, and then sprinkle on the salt where you want your weathering to appear. For the most realistic effect, concentrate on areas that would be most likely to see wear and tear - exposed corners, raised edges and the like.
Note - You can use water for this step instead of hairspray, using a spray bottle or a paintbrush to apply the water where you want the salt to go. This can be a little more precise, but requires much more careful handling as the water doesn't bond quite as strongly to larger grains of salt and takes longer to dry than the hairspray.
When you're done, your building will look something like this:
Once the hairspray has dried, you can apply your next coat of colour - I'm using a flat white. Keep this coat light, as too much paint will make it harder to remove the salt. Set aside for the paint to dry.
Now comes the fun part!
Using your brush, gently scrub off the salt. If your building is made from water-proof materials, you can hold it under some running water while you scrub. If you have used something cardboard, foamcore or similar, dip your brush in some water and keep it wet while trying not to soak the building too much as you scrub instead.
As the salt comes away, your base layer is exposed in a lovely chipped pattern.
Let it dry before applying any final detailing. Any leftover salt residue will dry as a white powder on your paint, so can need a little bit of cleanup with a damp cloth. At this point, I like to apply a coat of matte sealer to keep everything pretty while I do any detail work to the building, to avoid damaging the paint with the extra handling. This also helps to avoid any leftover salt absorbing moisture from the air later on, which can damage paper, card or foamcore components.
You can apply multiple layers of colour by repeating the above steps, either over the whole building to show different paint layers or more detail on corroded metal, or by masking off part of the building to apply specific detailing. Here, I'm adding a building ID to the top and front by taping a stencil in place.
Salt is applied over the stencil, followed by a spray of the new colour. Once you remove the stencil and scrub away the salt, you're left with detailing that looks as weathered as the rest of the building.
Once you have applied as many layers of weathering as you feel it needs, all that remains is to apply your final detailing
And that's essentially it. You can vary the amount of weathering by using more or less salt, and can create all sorts of nifty effects through layering and careful use of colours. A good idea if you're not sure of what will work is to google images of derelict buildings or machinery and use those for inspiration.
Why not give it a go? You can pick up the Maelstrom's Edge terrain sprue along with the rest of the Maelstrom's Edge model range from the webstore here.
As always, feel free to pop along and share your work, or ask any Maelstrom's Edge- or hobby-related questions on the Comm Guild Facebook page!
For other Maelstrom's Edge modeling articles, including tutorials and walkthroughs of a wide range of different building and miniature projects, check out the article roundup here.
Tags: painting terrain terrainsprue tutorial
Terrain Spotlight: 'Honest' Pete's Trading Post
Posted on Monday Sept 10, 2018 at 06:00pm in Tutorials
- by Iain Wilson
A few weeks ago, I picked up a couple of packs of scifi shipping containers from a company called 'Laser Cut Card'. They produce a range of different vehicles and building kits that are laser cut out of stiff cardboard, which are much cheaper and easier to work with than the more common MDF kits, and are surprisingly sturdy when assembled. I built four of the six containers I received as normal shipping containers, but then couldn't resist doing something a little different for the fifth one. And so for this week's modeling spotlight, I'm running through the construction of 'Honest' Pete's Trading Post!
The shipping containers come flat-packed in a set of three, with some pictorial building instructions on the back of the package insert, but assembly is essentially to roll a sheet of pre-scored card into an octagonal tube and then glue other bits onto the outside of it. I assembled mine with superglue, although you could use wood glue if you wanted to allow a little more working time to make sure you have everything lined up.
Obviously this wasn't going to be a particularly large shop, so the idea was to have a servery-style counter and awning rather than have customers go inside. So I began by cutting one of the large sections off the main body piece of the container, and then gluing the ends on to the result sideless tube.
A shop needs somewhere to put their merchandise, so I threw together a set of shelves from thin plasticard, to run along the back wall of the container. An angled bottom on the uprights allowed the shelves to sit flush against the container side.
Next up I cut another couple of strips of plasticard to create a counter, about a third of the height of the space in the container wall, and glued this in place.
For the finishing touches, I cut some 'concrete' stands for the container out of 5mm foamcore. These serve to lift the container up very slightly to allow a little extra head-clearance for the awning, and make the structure look more stable. The exposed foam center was sealed with a generous coat of PVA glue so that it wouldn't dissolve when hit with spray paint.
I added some corner reinforcing to the bottom of the front edge of the awning piece using some scrap card pieces, and built some corner support posts using the small pipe fitting from the Maelstrom's Edge terrain sprue, some plastic tube and a couple of lengths of plastic cut from the sides of the terrain sprue itself.
Finally, I took a large pipe fitting from the terrain sprue and added a fan cut from a piece of thin plasticard. I trimmed the edges of the pipe fitting away so that it would fit neatly over the circular detail on the roof of the container.
At this point, the trading post was looking like this:
With an MDF base added, and some paint on:
The sign on the awning was a last-minute addition. I was originally going to have the trading post sign on the front of the counter, but realised that this wouldn't be hugely visible on the gaming table, so built a quick rooftop sign from some more scraps of card. I also added a mesh grill above the counter after painting inside the container, to make the interior of the store less accessible.
The container was sprayed with black and then Army Painter Army Green, before being sponge-weathered with Vallejo Heavy Charcoal and dirt weathering drybrushed into the creases with Vallejo Beasty Brown. The text for the signs was created in Gimp, printed, and glued on prior to weathering so that it would match the rest of the container.
I added grafitti on the back and sides of the container to give it a little character and to make sure that all the interesting bits weren't on the front.
The grafitti was sketched in with a black fineliner pen, and then painted in whatever colours seemed appropriate.
The roof was left plain, with just the weathering to break up the green.
As an extra little detail, I printed up a shipping carton and some bottle labels using Gimp, adapting the fronts I made for my Vending Machine templates a few weeks back (article here). The shipping carton was cut and folded, and then weathered with a little Army Painter Soft Tone, while the bottle labels were glued to some bottle bombs taken from the Broken Infantry weapons sprue with their rag wicks cut off.
And with that, 'Honest' Pete's is ready for the table!
You can pick up the Maelstrom's Edge terrain sprue along with the rest of the Maelstrom's Edge model range from the webstore here.
As always, feel free to pop along and share your work, or ask any Maelstrom's Edge- or hobby-related questions on the Comm Guild Facebook page!
For other Maelstrom's Edge modeling articles, including tutorials and walkthroughs of a wide range of different building and miniature projects, check out the article roundup here.
Tags: buildings conversion modeling painting spotlight terrain terrainsprue tutorial walkthrough
Terrain Spotlight: Cardboard Tube Storage Tank
Posted on Monday Jul 30, 2018 at 05:00pm in Tutorials
- by Iain Wilson
It's been a few weeks since I built any terrain and I'm starting to feel withdrawal symptoms, so this week I have busted out the foamcore and terrain sprues, raided the recycling bin, and built a quick little storage tank for my newly assembled elite Epirian SecDef units to hide behind.
The main body of the tank is made from a small Pringles can. This of course requires you to remove the Pringles from said can, which my wife was happy to take care of for me. If you don't know anyone willing to make this sacrifice for you, you could use any other appropriately-sized tube. For the tank on my plantation dome, I used a metal tin. You could also use soft drink cans, cardboard postal tubes, or even roll your own out of cardboard or plastic sheet.
I used foamcore for the end supports. For the uninitiated, foamcore (also sometimes called foamboard) is a craft board that is comprised of a thin sheet of expanded polystyrene foam sandwiched between two sheets of stiff paper or thin card. Because it's lightweight but fairly strong, it's a fantastic material for building terrain.
I marked out the shapes that I wanted on the foamcore with a pencil, and then cut them out using a sharp hobby knife and a steel ruler.
As I wanted a worn concrete look for the ends, I used the hobby knife to roughly shave away the edges along the top and sides, and then used fine sandpaper to smooth the cut edges of the paper down.
For the access port on the top of the tank, I took the square hatch and corner reinforcing from the Maelstrom's Edge terrain sprue and cut a piece of plasticard sheet to an appropriate size to fit them all on it with a little room to spare for visual effect.
I then cut four strips to run around the outside of the top plate. To replicate the curve of the tank for the two strips that would run across it, I positioned the bottom of the Pringles can on the plasticard lined up with the bottom corners of the strip and traced around it with a pencil, and then cut along the resultant arc with my hobby knife. Because the bottom aluminium strip on the can is slightly larger in diameter than the actual can, this doesn't create a perfect fit, but it gets it close enough that you can sit it in place to see where it needs a little shaving with the knife to sit flush.
The strips were glued in place with plastic cement, and when that was set I flipped the construction over and glued the terrain sprue components in place as well.
To add a little detail to the outsides of the tank ends, I cut some sections off the long support struts on the terrain sprue, and also assembled a little computer terminal by trimming down the comm panel and cutting a piece off the end of the lintel piece.
One end got two of the support strut pieces, and the other end another two strut pieces, the computer terminal and a small pipe fitting, all glued in place with superglue.
I then glued the foamcore pieces onto the ends of the tube with superglue. One end of the tube is rolled cardboard, which glues just fine to the foamcore. For the tube's aliminium end, I gave the superglue a little extra help with a primer from an 'all plastics' two-part superglue.
A little more superglue was used to stick the access port in place on top.
The final step before painting was to paint the exposed foam on the foamcore sections with PVA glue. This protects the foam when the base coat is sprayed on, as most spraypaints will partially eat the foam. If you're painting with a brush, or with a specific foam-friendly spray, this step is unnecessary.
I basecoated the whole tank with a Rustoleum quick-drying grey primer to get a consistent base for painting over, and then hit the tank itself with a spray of Army Painter Dragon Red.
I could have saved some repainting here by masking off the ends to avoid overspray from the red, but it didn't really seem worth the bother. I just used a large, flat brush to add another coat of grey (in this case Vallejo Neutral Grey) over the end pieces, added some weathering to the red using a sponge and some Vallejo Heavy Charcoal (you can find my tutorial on sponge weathering here) and added a layer of Vallejo Beasty Brown over the terrain sprue components.
To create a nice concrete look, I drybrushed over the end pieces with Vallejo Light Grey, and then added a highlight with a lighter drybrush of P3 Morrow White. The brown components received a heavy drybrush of Citadel Boltgun Metal (now called 'Leadbelcher', but I'm still working through a lot of old paint!)
Next up, I gave all of the metal parts a generous wash of Army Painter Strong Tone, and put it aside to dry.
While the wash was doing its thing, I cut an 8"x8" square of masonite, sprayed it with a coat of grey primer, and drybrushed with the Light Grey and some white. I also marked out a square in front of where the pipe fitting would sit on the end of the tank, and painted in some hazard stripes. (If you are interesed, you can find a tutorial on painting hazard stripes here.) Then I glued the tank in place using some superglue on the bottoms of the end pieces (this was fine as I had included the underside edges when I painted the exposed foam with PVA glue. Don't put superglue directly onto expanded polystyene - it doesn't end well) and added some patches of drybrushed Beasty Brown to dirty everything up. Which left the tank looking like this:
To build your own storage tank, you can pick up the Maelstrom's Edge terrain sprue, or any of the rest of the Maelstrom's Edge model range, from the webstore here.
As always, feel free to pop along and share your work, or ask any Maelstrom's Edge- or hobby-related questions on the Comm Guild Facebook page!
For other Maelstrom's Edge modeling articles, including tutorials and walkthroughs of a wide range of different building and miniature projects, check out the article roundup here.
Tags: buildings modeling painting spotlight terrain terrainsprue walkthrough
Painting Spotlight: 120-point Epirian SecDef Force
Posted on Tuesday Jul 24, 2018 at 12:49pm in Models
- by Iain Wilson
Last week, I built a 120-point force using the fantastic new Epirian SecDef models. If you missed it, you can find the article here: http://www.thecommguild.com/roller/thecommguild/entry/modeling-spotlight-120-point-epirian.
This week, my aim was to get this force painted up to a basic tabletop standard. This can be helpful for getting past the 'sea of grey' stage and allowing you to field a painted army faster than might happen if you're painting each unit up to a fully detailed level, or if you just want a quick and easy paintjob on your army and aren't interested in getting bogged down in detail work. The end result isn't going to win any painting awards, but looks fine on the table and can be updated later.
So, the painted force:
For painting up armies quickly I tend to rely heavily on ink washes, as they are so handy for adding shading quickly (if sometimes a little messier than doing it by a more manual and time-consuming method would allow for). This force was no exception to that. I started with a basecoat of Army Painter Army Green spray, and when that was dry added a wash of Army Painter Military Shader.
When the wash was dry, I went over the armour plates with Army Painter Ash Grey, the exo-skeleton sections in Vallejo Basalt Grey and the weapons on Vallejo Heavy Charcoal, before adding a layer of Army Painter Dark Tone over these areas with a detail brush. Any slight spillover onto the green is fairly unnoticeable, but excess wash was quickly removed with a wet brush where necessary.
On the Ash Grey armour plates, rather than covering them completely with the wash, I just painted a thin coat of the wash onto the lower surfaces of the plates, or on the innermost half of the thigh plates.
I then painted the face and neck with Citadel Tallarn Flesh, chosen by virtue of being the first flesh tone I came across in my paint box. I also painted the flesh tone over the goggles, to provide a nice base layer for the red that would come later. The pouches, straps, rifle stocks and boots were painted with Vallejo Heavy Brown and then the flesh and brown parts were washed with Army Painter Strong Tone.
Finally (for now) I painted the base with Vallejo Neutral Grey and the goggle lenses with Army Painter Pure Red. The helmet chinstrap had originally been painted in the Heavy Brown, but after the wash I found that the tone was too similar to the flesh colour, so I went over the brown with black, and also used a black fineliner pen to darken the lower frame of the goggles, around the bottom of the lenses and up the nose. I also used the Neutral Grey to add a quick drybrush over the black on the weapons to pick out the detail - I wanted them dark, but to still be recogniseable on the table.
At this point, all of the main colours are in place and they're ready for the table. To finish them off later, I can add a highlight to the green with some light green, some light brown or bone on the brown parts, and add some shading and a reflective spot on the goggle lenses, which gets something that looks more like this:
I will also need to go through and drybrush the bases and add some detail so that they match my other urban bases.
So, the 'finished' units:
Lieutenant
Tactical Teams
Snipers
Annihilator Teams
Recon Walker
The gang all together:
To start assembling your own SecDef force, you can pick up the Secdef sprue, or any of the rest of the Maelstrom's Edge model range, from the webstore here.
As always, feel free to pop along and share your work, or ask any Maelstrom's Edge- or hobby-related questions on the Comm Guild Facebook page!
For other Maelstrom's Edge modeling articles, including tutorials and walkthroughs of a wide range of different building and miniature projects, check out the article roundup here.
Painting Tutorial - Konstantin Moor, Veteran Bot Handler
Posted on Monday May 21, 2018 at 05:00pm in Tutorials
- by Iain Wilson
Last week, I ran through a conversion tutorial for a veteran Master Bot Handler who I'm calling Konstantin Moor, a nasty, multi-weaponed individual built, along with his faithful drone companions, from the new Epirian Master Bot Handler kit (If you missed last week's article, you can find it here).
Well, now it's time to get some paint on him!
Before I start, a quick note on paints: I tend to use paints from a few different ranges, as I collect whichever paints I like rather than sticking to a single brand. If you're looking to match any of the paints I use, you might find this Paint Compatibility Chart somewhat handy!
I'm painting Konstantin for gaming rather than display, so this is a fairly quick and easy paintjob, with nothing too complicated or fancy going on. I started out by basecoating all three models with Army Painter Army Green spray.
Next, I painted armour sections and the drone chassis with Vallejo Yellow Green, and metal sections with Vallejo Heavy Charcoal. I also gave Konstantin some Vallejo Neutral Grey pants, and a base layer of skin using Citadel Scorched Brown.
Once that was done, I went over the yellow green with a light wash of Army Painter Green Tone, and the metal, grey and skin with Army Painter Dark Tone.
When the washes had dried, I went back over the green sections with a fine brush and a little more green wash, applying very thin layers onto downward-facing surfaces to give them a little more shading. Then I applied a light highlight to raised edges using Coat D'Arms Putrid Green. The metal areas were given a similar highlight with P3 Pig Iron, and I used Vallejo Light Grey on Konstantin's pants. For his skin, I highlighted by lightly drybrushing with Citadel Tallarn Flesh.
Finally, the models were all transplanted to fresh bases, painted up in my urban scheme. I added some light grey onto Konstantin's eyebrows, and painted the lenses on his Neural Nodes with Army Painter Pure Red before giving them a spot of white in the centre. For the laser tips and the shield generator on the firefly drone (Cassio), I painted on a layer of Citadel Ultramarine Blue before drybrushing with Citadel Ice Blue and finishing with white. A few other details, like the red eye lenses on the drones (Pure Red, shaded with the red mixed with a little black and then a highlight spot of white), the Epirian badge on Konstantin's chest (Pig Iron, with a spot of P3 Cygnus Yellow), and picking out the missile tips on the spider drone (Iago), and the trio were ready for the table!
Group shot:
Stay tuned for an unofficial rules card to use Konstantin in your own games, coming later this week to the Force Listing section of the Maelstrom's Edge website!
What have you done with your Master Bot Handlers? We would love to see your creations on the Comm Guild Facebook page!
To pick up this or any of the rest of the Maelstrom's Edge model range, visit the webstore here.
For other Maelstrom's Edge modeling articles, including tutorials and walkthroughs of a wide range of different building and miniature projects, check out the article roundup here.
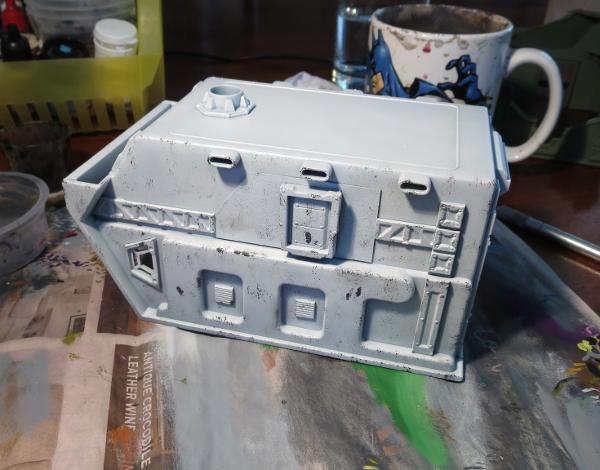
Painting Tutorial: Sponge Weathering
Posted on Sunday Mar 25, 2018 at 05:00pm in Tutorials
- by Iain Wilson
We can wind up spending a lot of time painting miniatures for our games, so it can often be tempting when it comes time to paint terrain to just slap on a quick coat of spray and call the job a good'un. There are a number of quick and easy ways to add a little more detail (and subsequent awesomeness) to your terrain, though, and the difference it makes on the visual impact during your games is well worth making that little bit of extra effort. With that in mind, I would like to share a simple sponge method for adding chips and weathering to your building paintwork.
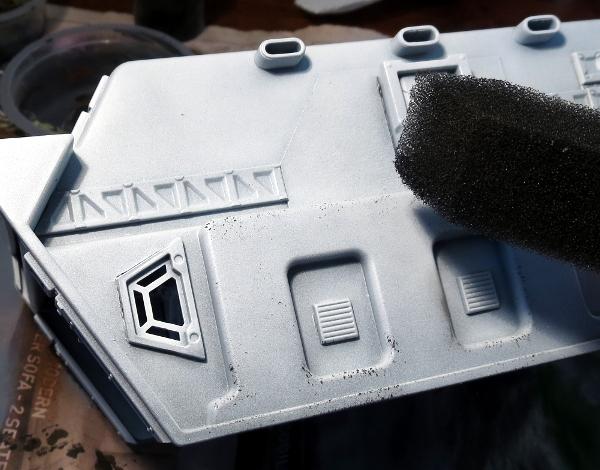
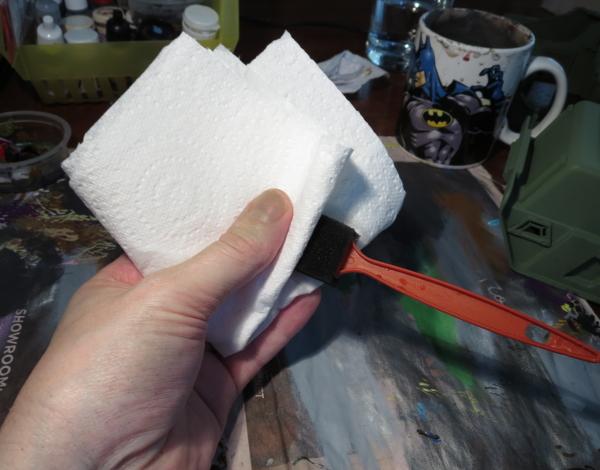
You will need a craft sponge - something fairly soft and fine-weave. I like to use a painting sponge like the one pictured below, as the pointed tip helps to get into difficult corners where necessary. You will also need something to put some paint in or on, some newspaper or paper towel, and (obviously) some paint. This method looks best when applied as dark chipping over a lighter shade of paint. I tend to use Vallejo Heavy Charcoal as a bit of a catch-all. It's darker than most of the colours I use on my buildings, and is indeterminate enough to cover for cement or aged metal. I avoid metallic paints for this sort of weathering, as they can look a little weird unless they catch the light just right. If you want some metalic touches, you can always use a dark grey and then highlight the bigger patches of chipping with a little metal colour.
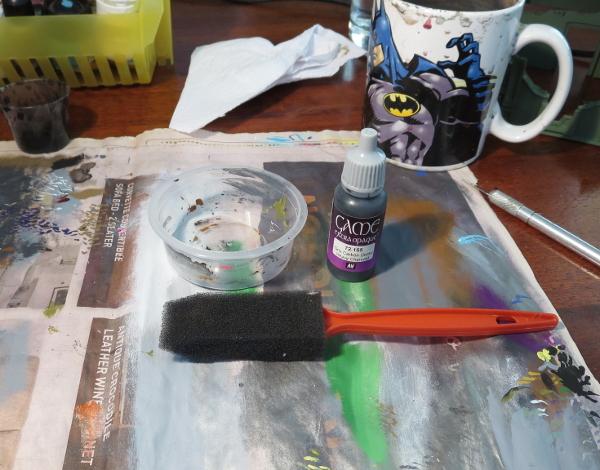
The weathering is applied once you have the basic colour and any higlighting done on your building, and the process is really simple - Drop out some paint onto whatever palette you are using and dip the tip of your sponge in the paint.
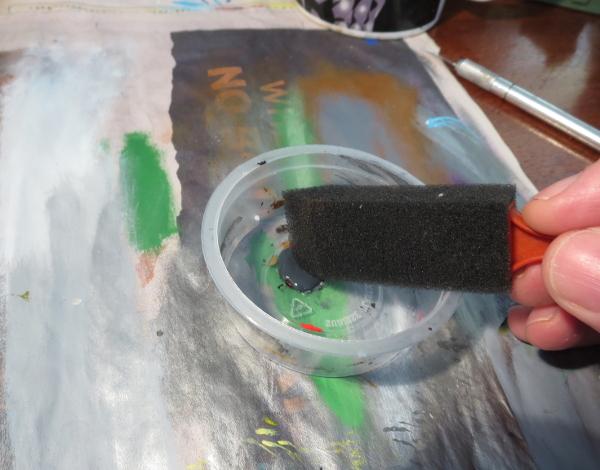
Rub the sponge on the paper to remove any excess paint. You want the sponge to be wet, but not have any gloopy patches of paint. If in doubt, press the sponge against a clean section of the paper and check the result - you're aiming for small specks of colour, not big blobs.
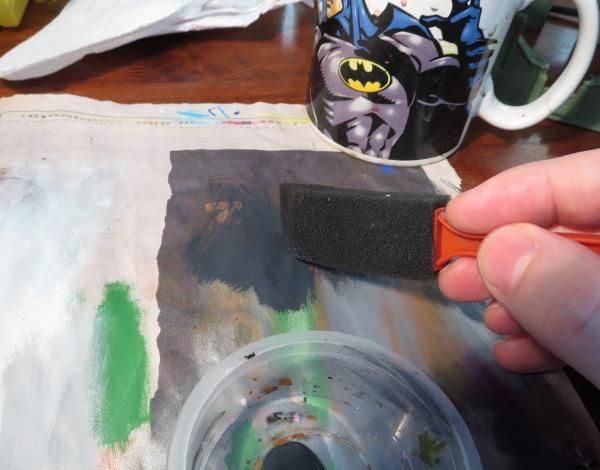
Press the sponge onto your terrain, using a straight up and down motion. You want to dab the paint on, not brush it. Experiment with turning the sponge different ways and using different amounts of pressure to vary the way the chipping is applied, reapplying paint to the sponge as necessary. Apply heavier weathering to places on the terrain that would naturally get knocked or abraded more, like protruding corners of walls or the edges of doors and windows.
Keep going until you have worked over the whole building.
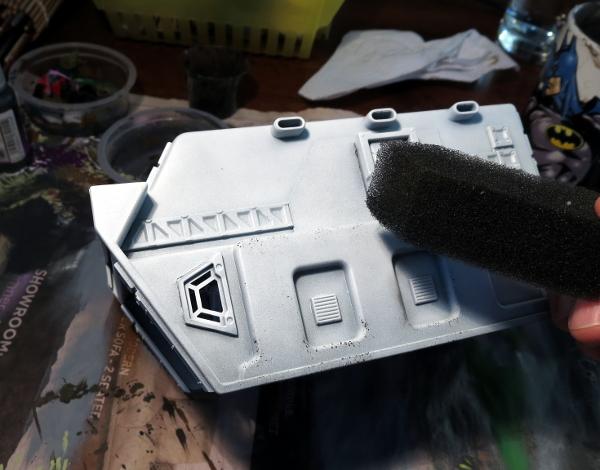
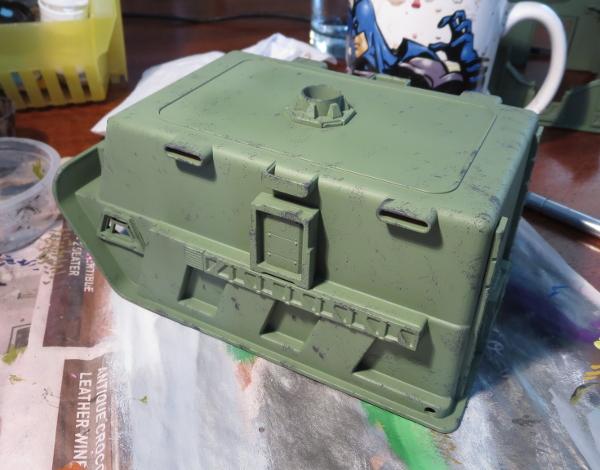
Here's the same thing on a green building.
If the sponge starts to get tacky with drying paint, you can wash it out, squeeze out as much water as you can, and then squeeze it between a couple of sheets of paper towel to get it as dry as possible before going back to the paint.
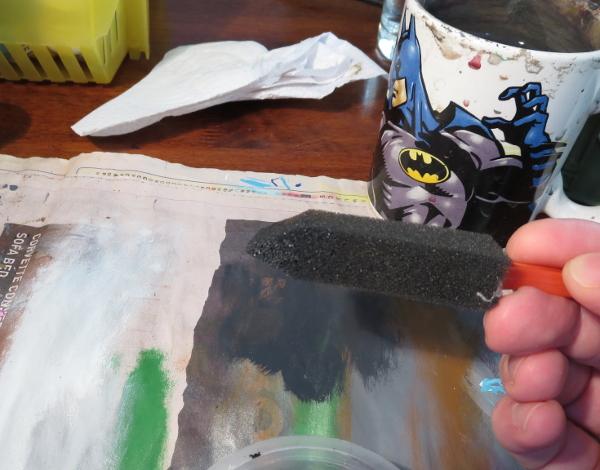
Once you're happy with your chipping, you can add other details or weathering as required. A strategic drybrush of brown in high-traffic areas, or just here and there for a bit of added grime, can go a long way to complete the weathered look.
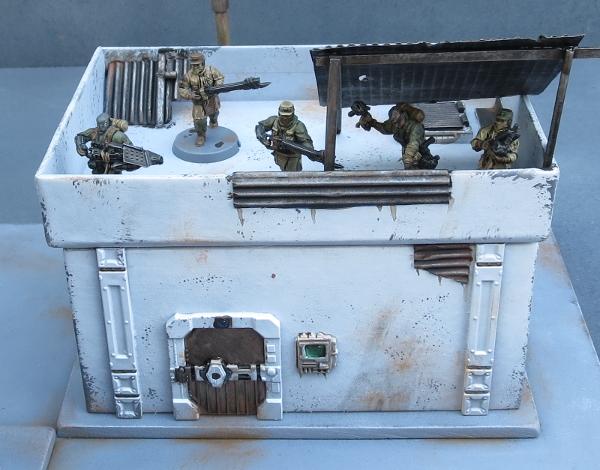
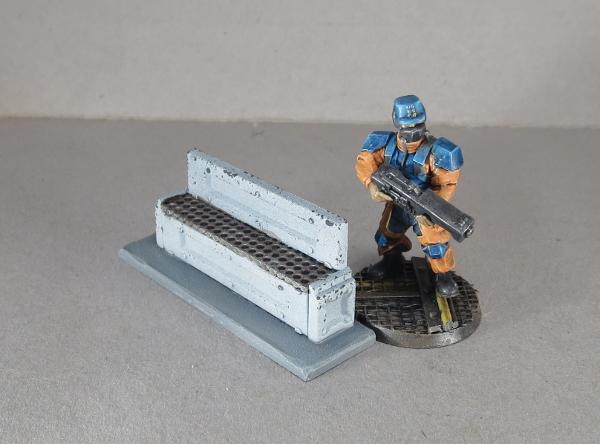
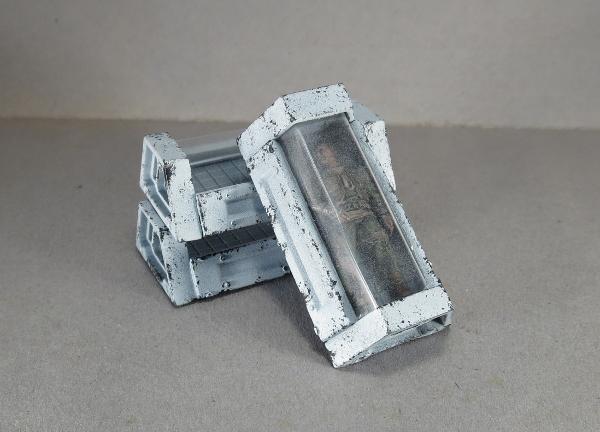
Here's some finished examples of the technique in action:
Broken Settlement building (Tutorial)
Park Bench (Tutorial)
Sleeper Caskets (Tutorial)
Hab Dome (Tutorial)

You can find the Maelstrom's Edge terrain sprue along with the rest of the game range in the webstore here. As always, we would love to see your creations on the Comm Guild Facebook page!
For other Maelstrom's Edge modeling articles, including tutorials and walkthroughs of a wide range of different building and miniature projects, check out the article roundup here.
Quick-painting the Broken
Posted on Monday Nov 06, 2017 at 05:00pm in Tutorials
- by Iain Wilson
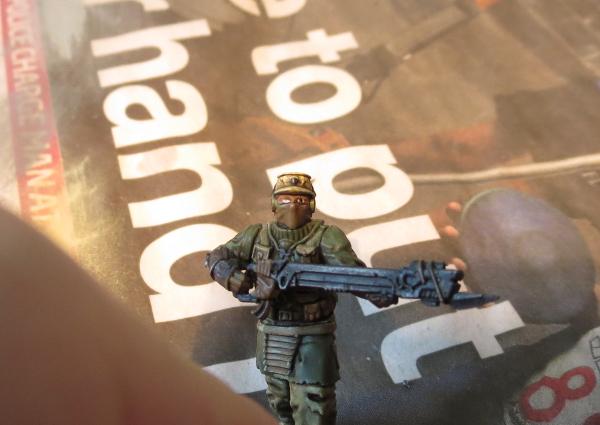
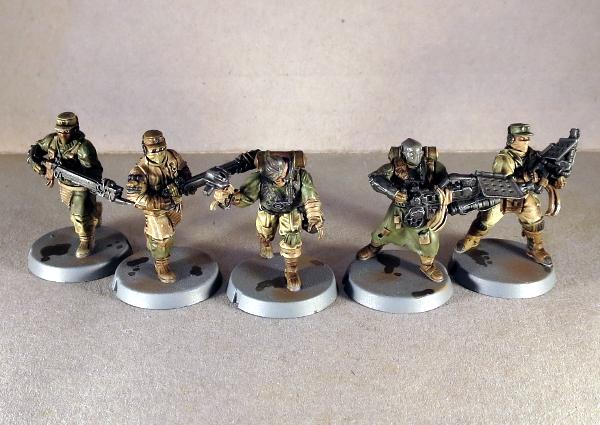
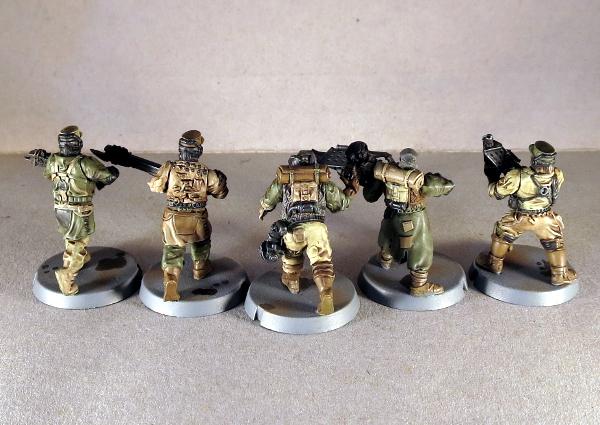
The arrival of the Broken into Maelstrom's Edge adds a new element to the game: Vast, raggedy hordes of cheap troops swarming all over the battlefield shooting stuff and stealing all the good boots. Which, of course, means lots of shiny new models to paint! You might be happy taking your time with this, but for those a little more time-poor, or who just want to get their new models on the table as quickly as possible, here's a guide to quick-painting your Broken recruits.
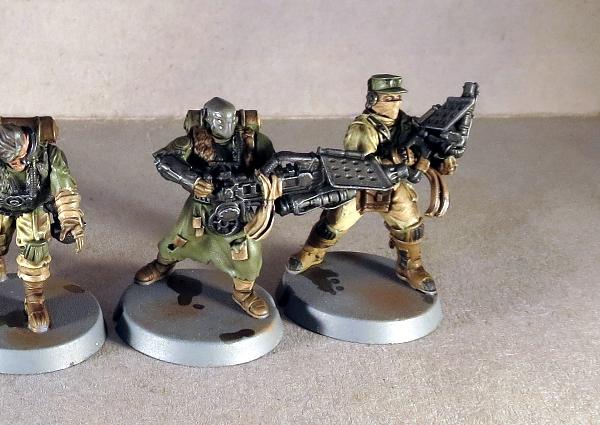
I'm painting up an Assault squad that I have assembled and ready to go, but obviously this could just as easily work for any of the Broken units.
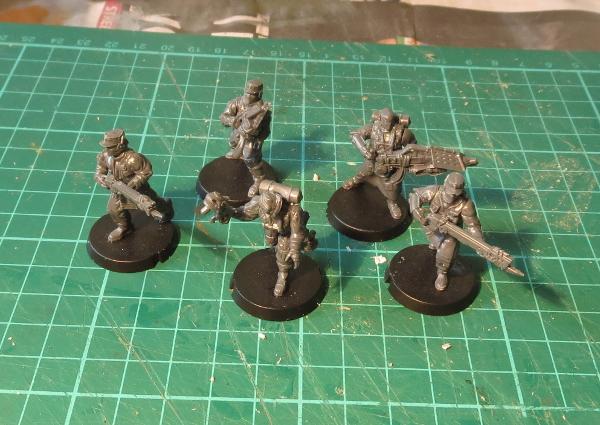
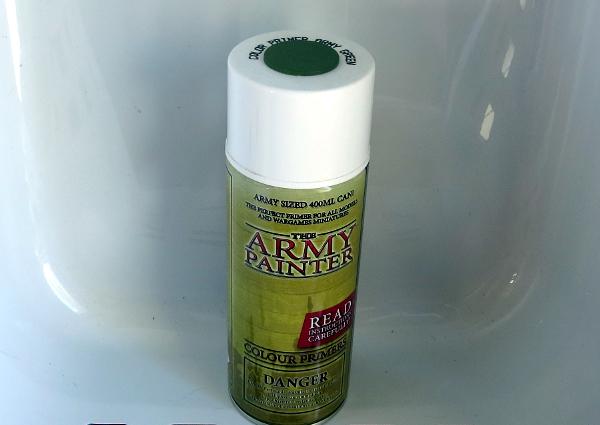
I started out with a basecoat of Army Painter Army Green primer.
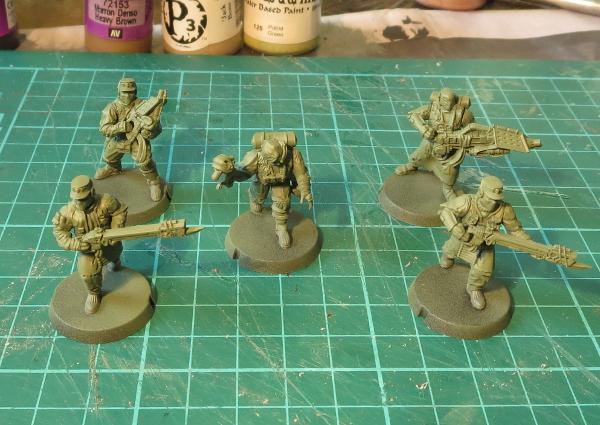
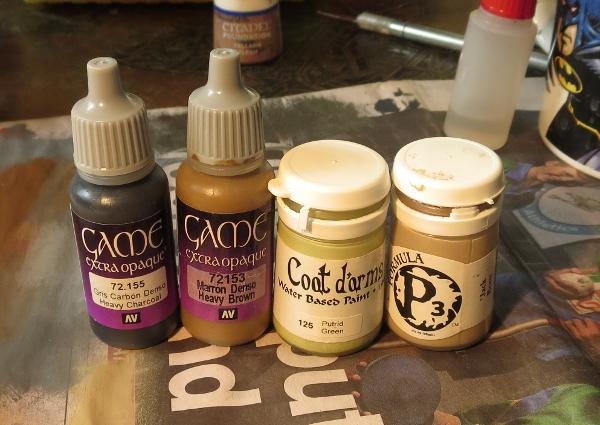
To get a suitably rag-tag look, I used a range of brown and grey tones, but the specific colours you choose aren't particularly important. The idea is to create a random distribution of different coloured clothing, while keeping to a limited colour palette to maintain some cohesiveness throughout the force. Weapons were painted with Vallejo Heavy Charcoal, and skin with Citadel Tallarn Flesh.
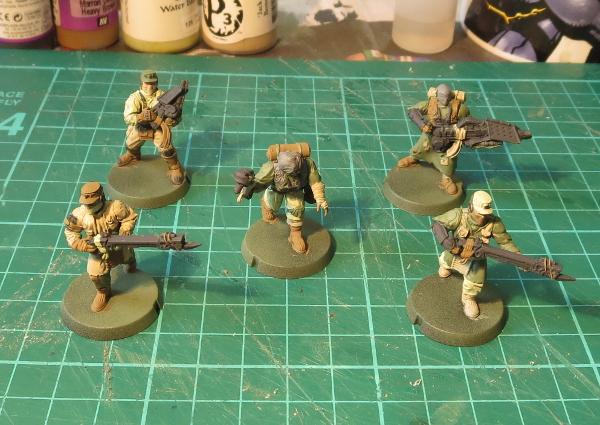
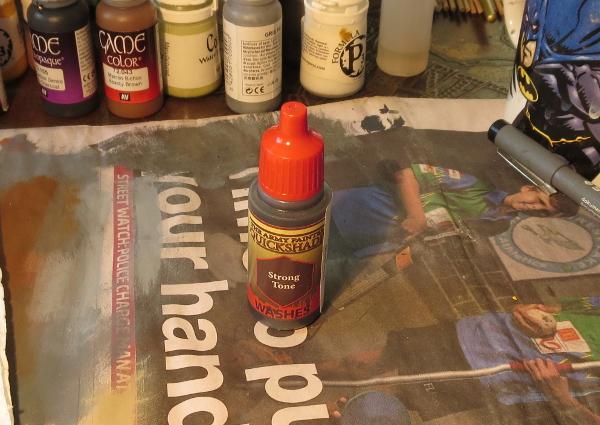
Everybody then got a wash coat of Army Painter Strong Tone. This settles nicely into the creases to add shading, and 'dirties' everything up a little.
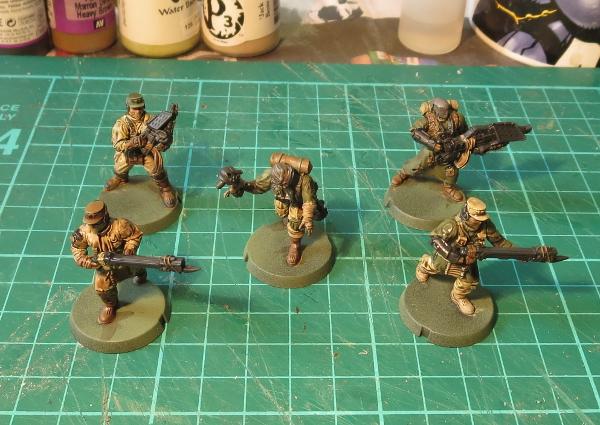
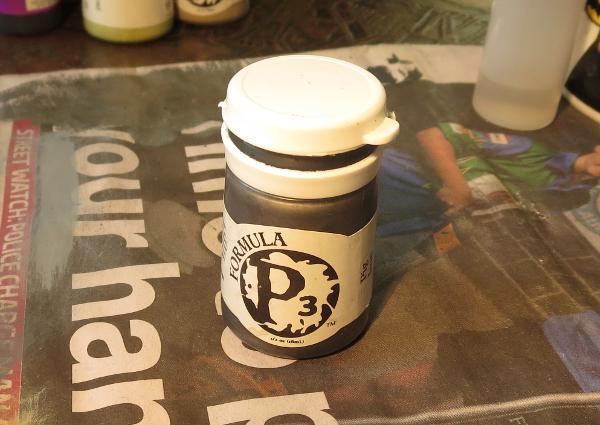
Once the wash was set, I gave the weapons and other metal parts a light drybrush with P3 Pig Iron.

At this point, you could also give the clothing a light drybrush or a little edge highlighting with the original colours - This will lighten them up slightly if the wash was too heavy and has left them too muddy and homogenous, but otherwise isn't really necessary.
Bases were done to match my urban board set-up. This was done with a coat of Vallejo Neutral Grey, drybrushed with Light Grey.
To finish up the bases, I added some patches of drybrushed Vallejo Beasty Brown and some puddles of Strong Tone.
At this point, you could easily plonk these on the table and have at it, but I always like to add eyes wherever possible to finish off my models. This is done with a fine detail brush and some white paint for the whites of the eyes, with a dot of black added either with the same fine brush or with a fineliner pen.
The black should cover most of the white, and touch both the top and bottom of the eye to avoid a wide-eyed, crazy look. Unless, obviously, you want a wide-eyed, crazy look.
And with that, the squad is ready for action!
To paint up your own vast, screaming horde of rabble, you can pick up the Maelstrom's Edge Broken Infantry pack from the webstore here. As always, feel free to share your creations on the Comm Guild Facebook page!
For other Maelstrom's Edge modeling articles, including tutorials and walkthroughs of a wide range of different building and miniature projects, check out the article roundup here.
Painting Tutorial: Hazard Stripes
Posted on Monday Sept 25, 2017 at 05:00pm in Tutorials
- by Iain Wilson
Battlefields are a dangerous place, but that's no reason not to follow reasonable occupational health and safety protocols. So here's a quick and easy tutorial for painting hazard stripes on your terrain, to make sure that your settlement's managing body doesn't find themselves with unexpected compensation claims on top of their post-battle repair bills!
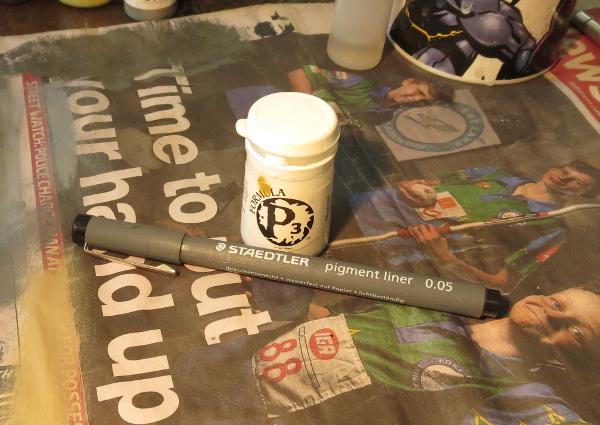
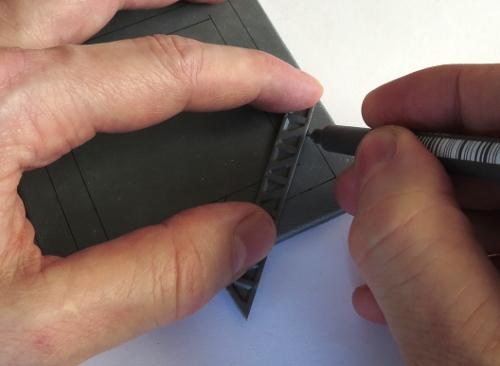
Start by marking out the area that you want to draw attention to with a ruler and a fine line black pen - I'm using a Staedtler 0.05 'Pigment Liner' here.
You can use a ruler to mark out the width that you want for the striped area, but I find it quicker and easier to just grab an appropriately-sized strip of plasticard or (as shown here) a spare support strut from the Maelstrom's Edge terrain sprue and use it as a guide.
Once you have marked out the area to be striped, it's time to start adding in the lines for the striping itself. I generally use something around about a 45-degree angle, but the precise angle doesn't really matter. Place your guide strip where you want the first stripe (I started at the corner here, because it seemed like the obvious place) and draw a line either side of the strip. If you're working to the right, move the strip to line up the left hand edge with the right hand stripe, and draw a new line along the right of the strip. Repeat all the way along.
If your hazardous area has corners, there are a couple of ways to approach them. The easiest way is to just run your stripes past the corner, so that the angle of the stripes reverses around the corner.
Once you're all marked out, it's a good idea to either set the piece aside for a couple of hours to let the pigment from the pen set properly, or hit it with a coat of fixative spray (which you should be able to get in the sealer section of any decent craft store) to avoid it smudging. Then it's time to fill in every second stripe with yellow. Here, I've used a basecoat of Iyanden Darksun followed by a coat of P3 Cygnus Yellow. It doesn't matter if it's a little patchy, unless you're going for a new and pristine look to your terrain.

The above shows how the stripes 'flip' when they go around the corner. Alternatively, you can run the stripes to the corner, and then start another run of stripes in the new direction. This can be fiddly for odd angles, but works fairly well for 90-degree corners.
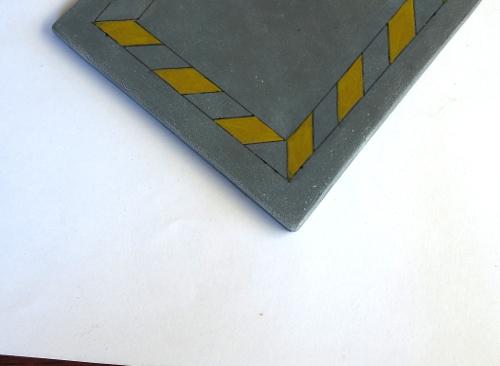
It's also worth mentioning that if you are worried about painting neatly in the lines, you can minimise the need to do so a little by painting the whole area yellow before marking the stripes in. That way, you only have to be neat with the black, which is a little more forgiving since messy bits that run over the lines can just be turned into weathering anyway.

Extra tip - If your striped area runs up to a wall, cutting the end of your template strip at an angle lets you get it
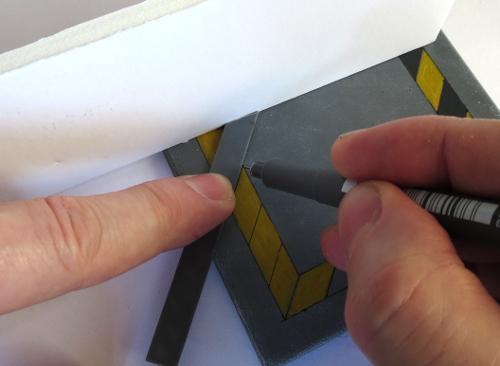
Next, fill in the 'black' areas. I prefer to use a dark grey rather than a black, as it looks a little more natural. Here, I'm using Vallejo Heavy Charcoal, from their Game Colour 'Extra Opaque' range.
If you're in a hurry, you can leave it there and it will look quite presentable. Or carry on for a little more detail...
Add some chips and scratches with your pen, wherever seems appropriate. This is a great way to conceal any spots where your paint wasn't completely inside the lines, and also adds some extra detail to the finished piece.

Then highlight the edges of the hazard stripes and the scratches with lighter yellow and grey - I just mix a little white into whichever yellow I used for the stripes, and some Vallejo Basalt Grey for the 'black' sections. I have also used some Vallejo Light Grey to highlight the scratches on the surrounding cement area.
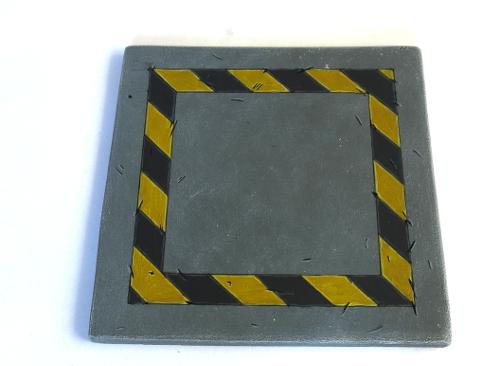
You can 'fade' the stripes, to give them a more worn appearance, by drybrushing with a little of the same colour as the area around them. My cement on this piece is Vallejo Basalt Grey drybrushed with Light Grey, so I've drybrushed over the stripes with some more light grey. The heavier you go with the drybrush, the more faded the end result.
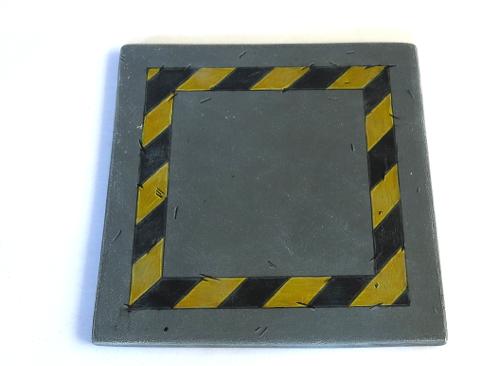
Finally, a bit of brown drybrushed into the middle of the yellow stripes gives them some more depth, with some more brown (Vallejo Beasty Brown here) drybrushed around to dirty things up.
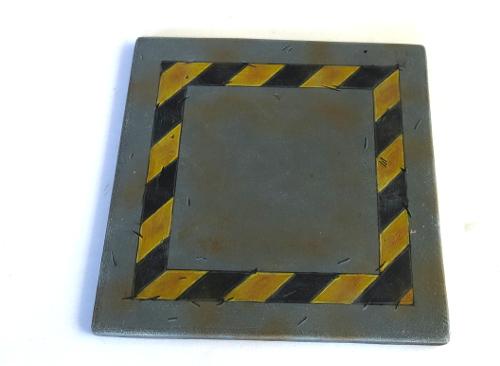
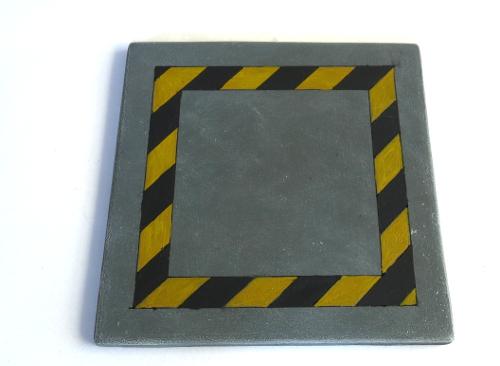
And that's about it. Go forth and hazard up your terrain wherever seems appropriate.
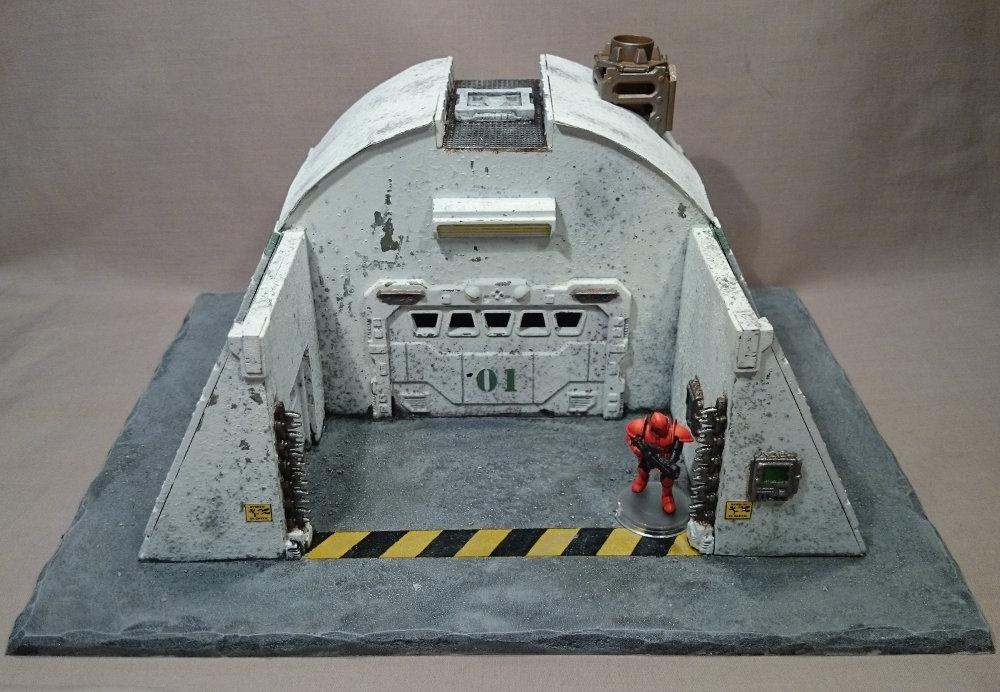
Gateways, energy fences, holes, hatchways, heat vents, and anything else that could conceivably crush, spindle or make your day unpleasant is a good candidate for some serious warning stripes.
To build your own hazardous terrain, you can pick up the Maelstrom's Edge terrain sprue from the webstore here. As always, feel free to share your creations on the Comm Guild Facebook page!
For other Maelstrom's Edge modeling articles, including tutorials and walkthroughs of a wide range of different building and miniature projects, check out the article roundup here.
Painting Tutorial: Heat Stress
Posted on Monday Sept 18, 2017 at 05:00pm in Tutorials
- by Iain Wilson
If you're tired of painting your weapon barrels silver and calling the job a good'un, this week's tutorial is for you! Here, we're going to run through how to paint a heat stress effect using Army Painter inks, perfect for Clingfire sprayers or Maglock Chainguns to make them really pop on your models.
Start with a basecoat of metal. Here, I've used P3 Pig Iron, equivalent to Citadel Leadbelcher (Boltgun Metal, for the old-timers).
Paint the part that you want to be heatstressed with gold. I've used Coat D'arms Bright Gold here, but any gold will do.
Next, leaving a thin strip of gold at the end furthest from the weapon muzzle, paint the gold area with several thin coats of Army Painter Red Tone. Avoid trying to rush it by slopping the coats on too heavy, as that can cause the colour to go all blotchy. Keep the coats thin and let them dry thoroughly in between (which doesn't take long if you're keeping them thin!), and start each coat just a little bit further away from the start of the gold section, so that you build a natural transition from the gold to the red. Don't be concerned if the first coat or two doesn't look like it's actually doing much - it's a cumulative effect and the colour will build up as you keep going over it.
(in case you're wondering, we're doing this with inks rather than normal paints because the ink lets the metallic sheen show through.)
Once you have built up the red to a level you're happy with, switch to Purple Tone. Leave a section of red, and then build up a few layers of purple, starting each layer a little closer to the muzzle of the weapon to build up the transition from red to purple. As before, use thin coats and let each one dry thoroughly before starting the next.
You can also stretch it out a little on longer barrels by using some Blue Tone in between the red and the purple, to give a more gradual transition from red to lighter bluish-purple to darker purple.
Finally, paint the muzzle of the weapon black. Thin the paint a little and work it back into the purple slightly, giving a sooty appearance to the muzzle area.
If you like your weapons looking a little cleaner, you can leave off that last step and just finish with the purple.
To build your own army of scorchy, melty doom, you can pick up the full range of Maelstrom's Edge miniatures and terrain accessories from the webstore here. As always, feel free to share your creations on the Comm Guild Facebook page!
For other Maelstrom's Edge modeling articles, including tutorials and walkthroughs of a wide range of different building and miniature projects, check out the article roundup here.
Tags: modeling painting tutorial walkthrough
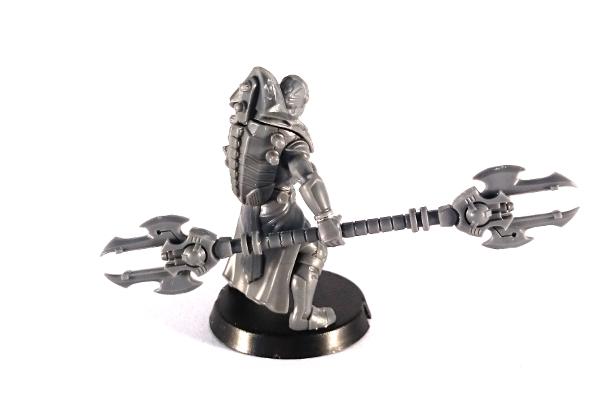
Conversion Spotlight: Kaddar Militant
Posted on Monday Sept 04, 2017 at 05:00pm in Models
- by Iain Wilson
The range of plastic miniatures available for Maelstrom's Edge covers all of the units and options currently available in the game. There's a lot of fun to be had by taking those miniatures and exploring other options beyond the current limits of the game, whether to field with home-brew rules or just for one-off display pieces to flex the creative muscles. This week, we're looking at a model from the latter category, built just for fun, because it never hurts to have a bigger stick.
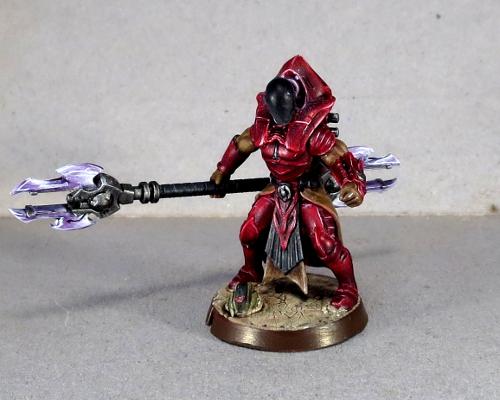
When the Faction Expansion Sprue was released, I took one look at the awesome cybel glaive on the sprue and couldn't resist the urge to create a double-ended version by sticking the head of one glaive onto the bottom end of the shaft of a second. The resultant, admittedly slightly over-the-top, marvel of blades and energy emitters needed a suitably awe-inspiring model to carry it, so I turned to the ever-imposing Kaddar Nova kit.

The head is taken from the Karist Trooper kit, with the front sanded down smooth.
Painting started out with a basecoat of Army Painter Dragon Red. From there, I built up shadows using thin, multiple layers of Army Painter Purple Tone, before higlighting the edges with white and then a final wash of Army Painter Red Tone over the top to mesh everything together.
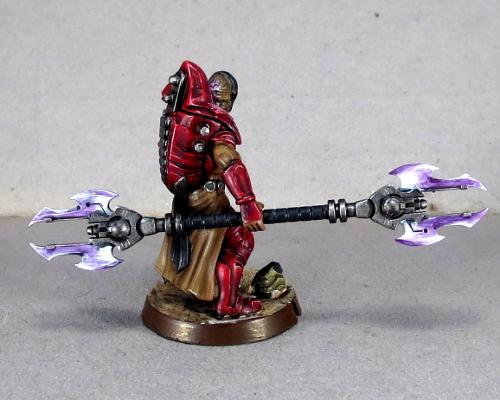
The cloth parts were painted with Vallejo Heavy Brown, and then shaded with layers of Army Painter Strong Tone. Similarly, the black parts were painted with Vallejo Heavy Grey, highlighted with some Vallejo Neutral Grey and then shaded with Army Painter Dark Tone.
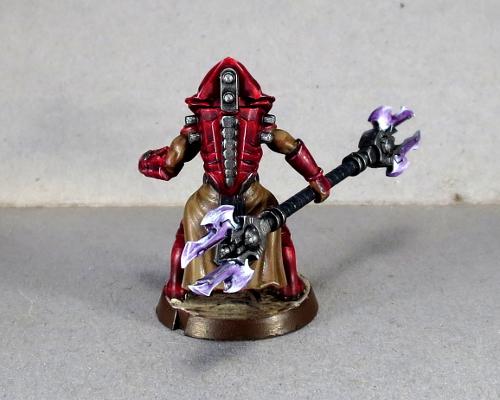
Metal parts started with some more Heavy Grey, and then a coat of P3 Pig Iron, and finally a wash with Dark Tone to give it some depth. Finally, the glaive blades were painted white and then worked up to the purple with layers of Purple Tone. The panel behind his head was given some purple light with a layer of Citadel Warlock Purple, drybrushed with a little Citadel Tentacle Pink and then a final drybrush of white.
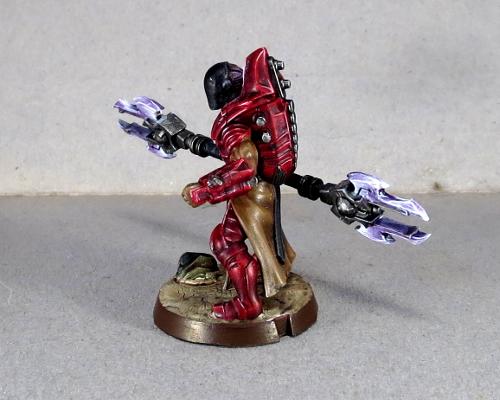
The end result is a spiky, sinister-looking character who will probably wind up spawning yet another Karist force in my collection. I'm thinking of this guy as a 'Kaddar Militant' - a subsect of the Kaddar Priest class, who lean a little more towards brutal subjugation to get their way than is the norm for Karist forces. Stay tuned - there may well wind up being a rules card at some point in the not too distant future, tweaking the standard Kaddar Nova rules to allow for the double-ended Glaive and some revision to the normal unit selection matrix.
If this has inspired you to get creative with some plastic, you can pick up the Maelstrom's Edge terrain sprue from the webstore here. As always, feel free to share your creations on the Comm Guild Facebook page!
For other Maelstrom's Edge modeling articles, including tutorials and walkthroughs of a wide range of different building and miniature projects, check out the article roundup here.
Tags: conversion kaddar karist modeling painting