Entries tagged [terrain]
Modeling Tip: UV Resin Windows!
Posted on Monday Aug 09, 2021 at 06:00pm in Tutorials
There are a few different options out there for filling in open windows on terrain. In the past, I've used clear plastic or aluminium mesh cut to shape and glued in. I recently picked up some Ultraviolet Resin intended for creating water effects, and it occurred to me that this might be a fun alternate way of adding panes to some windows.
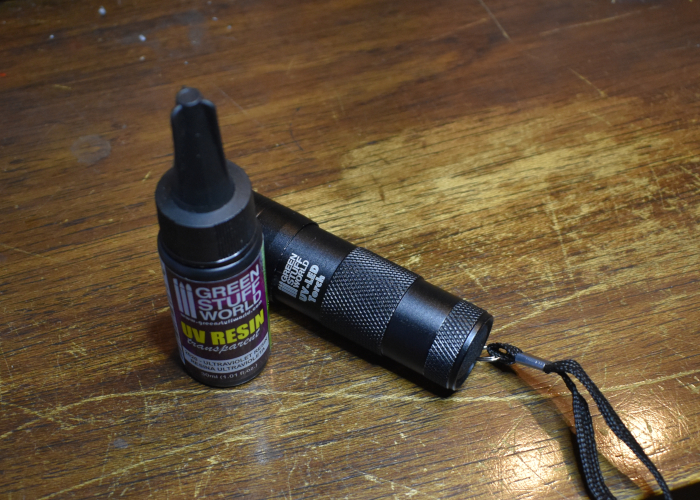
The resin I'm working with is sold by Green Stuff World. It's a super-clear gel that you squeeze from the bottle and then set with a UV light, or by leaving it out in the sun. They also sell a UV torch, which I couldn't resist picking up.
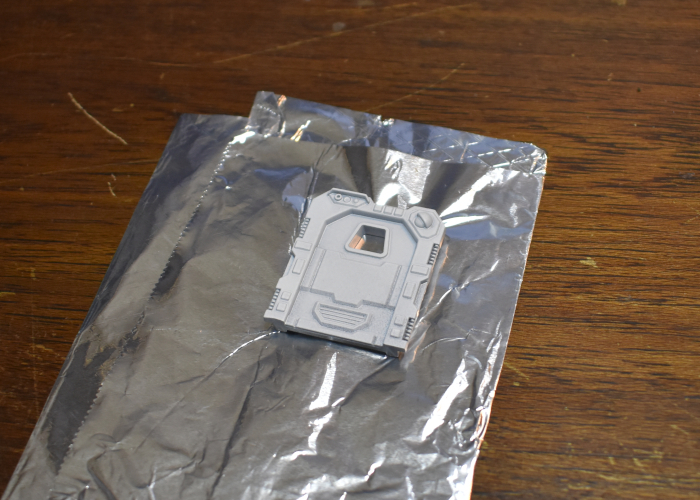
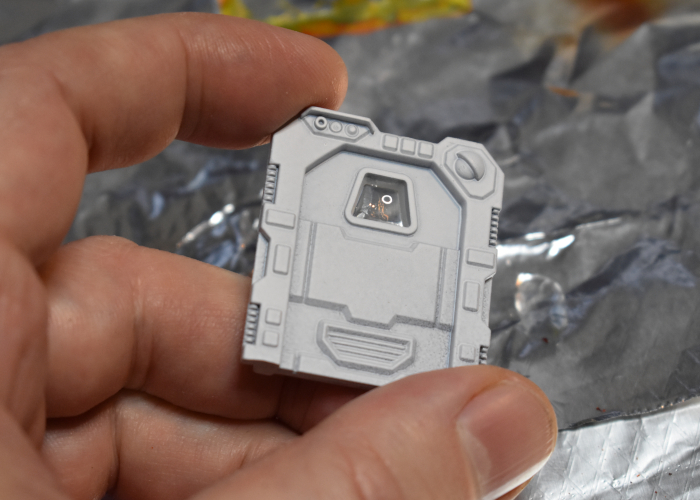
To create a window pane, I took a painted door from the Maelstrom's Edge terrain sprue and laid it down on some aluminium foil, with a small piece of thin plasticard in behind to push the foil snug against the back of the window frame.
(I used a painted door as it was going to be impossible to paint the inside of the window frame once the resin was in place.)
I then added a drop of resin into the middle of the window, leaving it a minute or so to settle out to the edges of the frame. There were very few airbubbles in the resin, but I used a pin to gently poke the few that were there to make them go away.
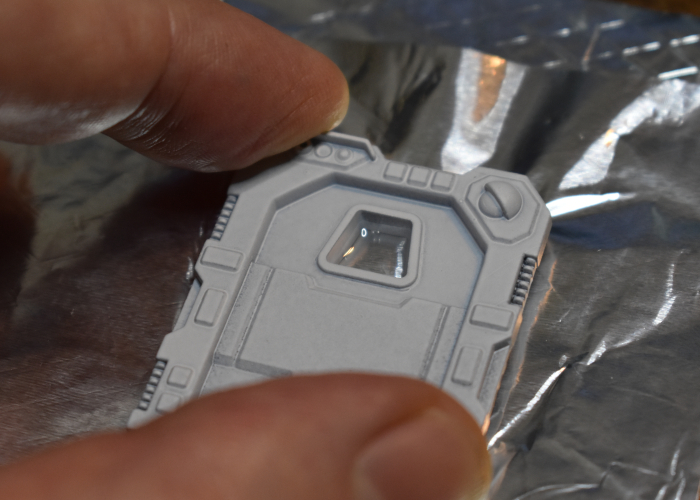
To set the resin, I sat the UV torch on top of the doorframe pointing directly at the window, and left it for a couple of minutes to let it do its thing. From further experimentation later, the resin starts to cure within a few seconds, but I wanted to leave it long enough to make sure.
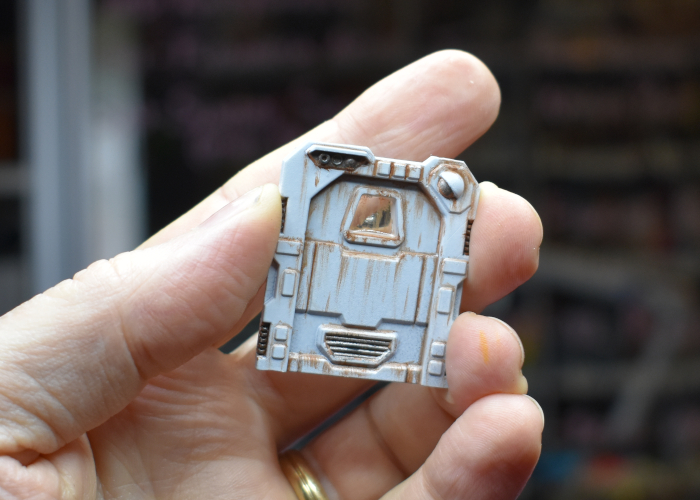
From there, the door was ready to be glued into a piece of terrain and detailed.
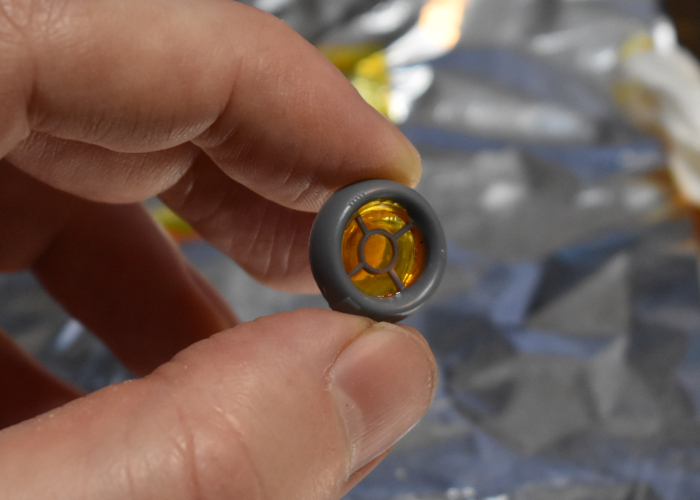
For coloured window glass, transparent paint gives a nice tint. This porthole was filled with resin in the centre, and then once set I painted the back of the resin with two coats of Tamiya Clear Orange.
To make your own windows of transparent doom, you can pick up the Maelstrom's Edge terrain sprues along with the rest of the Maelstrom's Edge range from the webstore here.
What are you working on? We would love to see your models and terrain in the Comm Guild Facebook group!
For other building ideas, modeling tutorials, army spotlights and conversion walkthroughs, check out the Hobby section of the Maelstrom's Edge website here.
Tags: modeling terrain terrainsprue tutorial
Terrain Spotlight: Pop-up Lamp Reactor!
Posted on Monday May 17, 2021 at 05:00pm in Tutorials
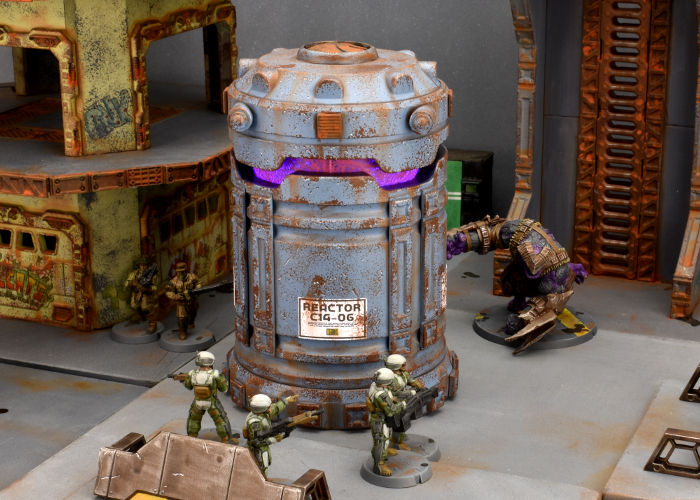
I came across this idea a little while ago in a Facebook group, and thought it was too good to not give it a go. Turns out, there are a bunch of pop-up LED lanterns currently floating about that are just perfect for turning into fantastic light-up reactors!
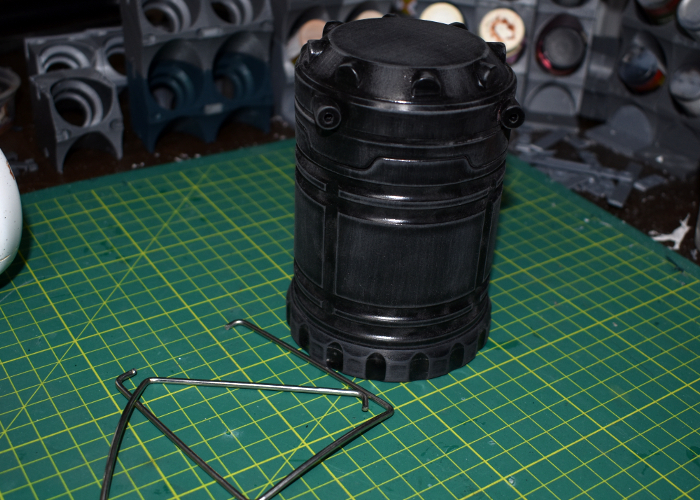
So, the foundation for this build is a pop-up lantern that I found on Amazon. There are variations available all over the place, all with a very similar design. The light comes on automatically when you lift the top of the lantern, and goes off when you push it closed.
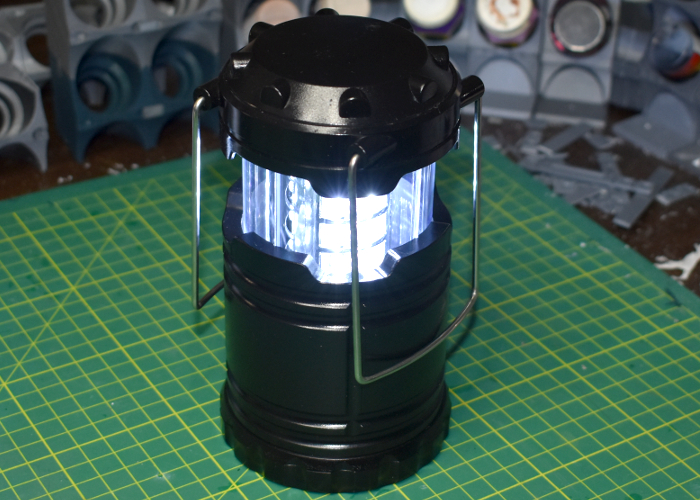
These look pretty amazing just painted up as-is, but I couldn't resist tweaking a little. The handles are spring steel wire, pushed into holes in the top of the lamp, so I removed these and put them aside. Then I gave the outside of the lamp a light sand with fine sandpaper. This part isn't essential, but I like to do it with unfamiliar plastic as it can help the glue and paint stick better.
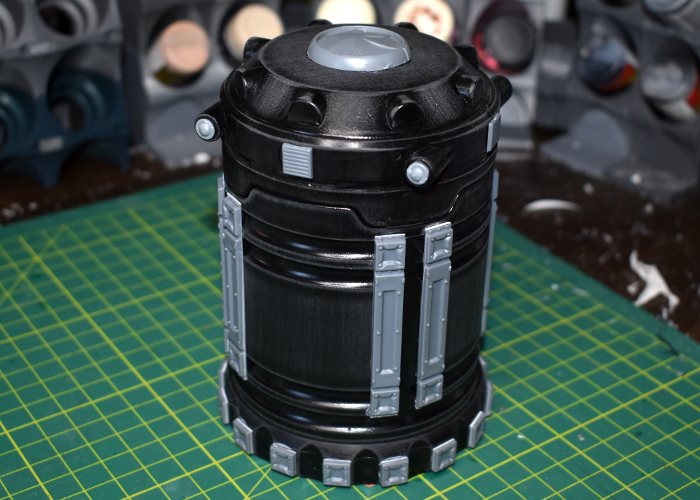
From there, I took the Maelstrom's Edge terrain sprues and added some details. I cut down some support struts from the first terrain sprue to make some bracing for the sides, and added the square end pieces from the struts onto the small protrusions spaced around the base of the lamp. I also cut the tops from some railing posts from the second terrain sprue to cover over the handle holes, and added an iris portal to the top as a heat vent.
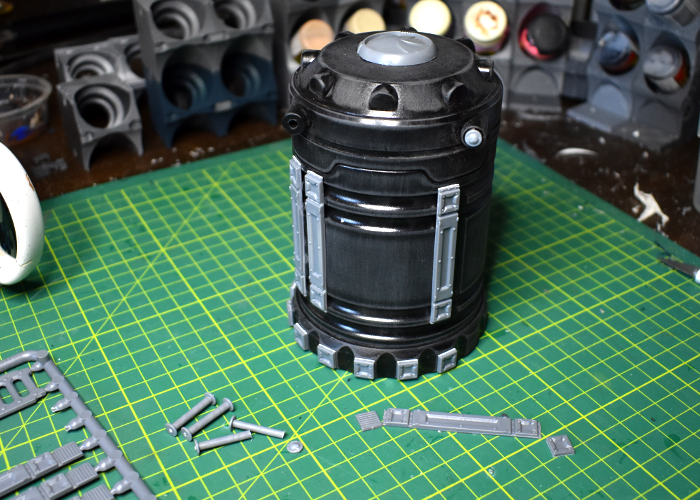
It looked like it needs just one last thing, so I used the vent pieces from the support struts to add a little more detail around the top of the lamp, and then it was ready for paint.
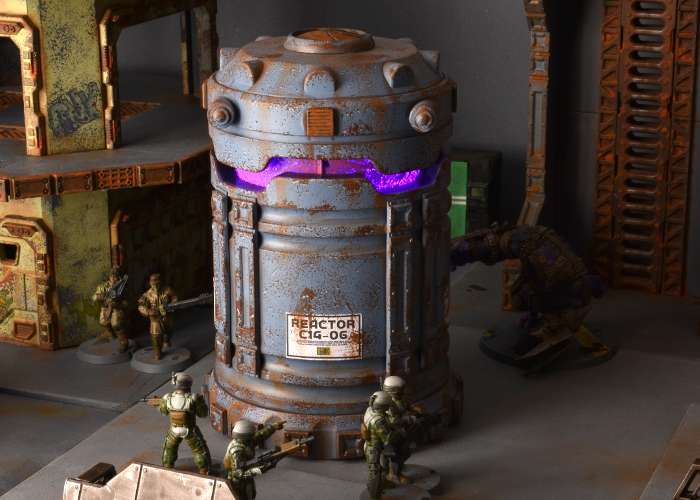
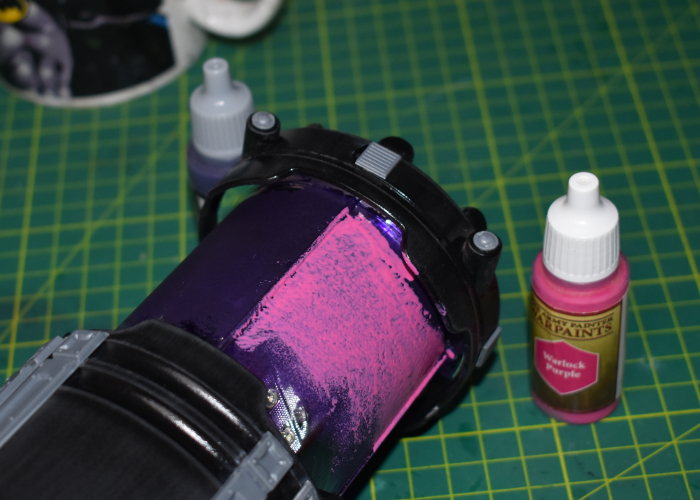
To paint up the reactor, I started with the clear plastic light cover. I used a sponge to apply a rough layer of Scalecolor Elandil Violet (a dark purple) and then when that was dry, a layer of Army Painter Warlock Purple. Normally I would do this on the inside of the clear plastic, to protect the paint, but it proved impossible to disassemble the lamp without breaking parts, so it went on the outside, and then I sealed it with a coat of Testor's Dull Coat.
To paint the rest, I started with a basecoat of Army Painter Wolf Grey, drybrushing white onto the upper edges. After gluing on some printed signs worked up in Gimp, I then sponged on some weathering using Army Painter Dirt Spatter, adding scattered white highlights on some of the broken grey. The metal grills and iris were given a coat of Dirt Spatter, a sponge of Vallejo Heavy Charcoal, a light drybrush with P3 Ember Orange, and finally a touch of Army Painter Dry Rust. To finish up, I drybrushed some more Dirt Spatter and Vallejo Beasty Brown into the creases.
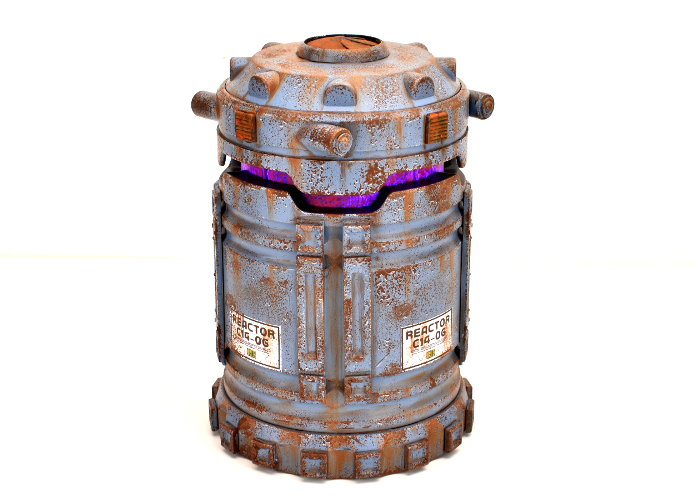
Because the fit of the light tube is rather tight, it does run the risk of rubbing the paint off by lifting or lowering it, so I've settled for turning it on and off by just taking the batteries out, instead. But other than that, I think it turned out quite well. The light is not as bright as it was originally, but it still gives a noticeable glow, even with the lights on!
Put together your own evil reactor of purple-powered doom by picking up the terrain sprues, along with the rest of the Maelstrom's Edge range from the webstore here.
Then pop on over to the Comm Guild Facebook group to show us what you're working on!
For other building ideas, modeling tutorials, army spotlights and conversion walkthroughs, check out the Hobby section of the Maelstrom's Edge website here.
Tags: buildings kitbash modeling scratchbuild terrain terrainsprue
Karist Secret Cache Objective Marker Kitbash
Posted on Monday Jan 18, 2021 at 05:00pm in Tutorials
In games of Maelstrom's Edge, along with whatever objectives apply to the mission being played, each faction has an additional themed objective of their own. For the factions in the Battle for Zycanthus box, there are cardboard counters to use as faction objective markers, but it's always nice to have physical models to represent them instead. I shared a conversion some time ago for a kitbash of the Epirian's Automated Uplink Relay Drone (with a new, all-plastic version of this build coming up in a future article very soon!), and this seemed like a good time to balance things out with a Secret Cache marker for the Karist Enclave!
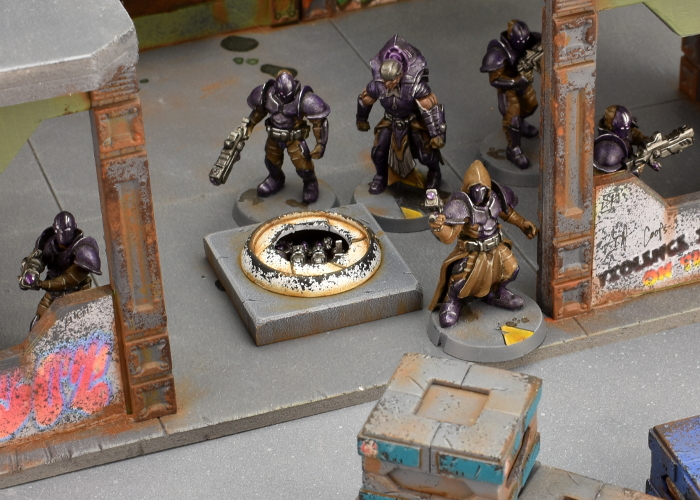
I was looking at the Maelstrom's Edge terrain sprue for a completely different project when it occurred to me that the iris hatch was a nearly perfect size for the Karist objective. The Secret Cache is a small objective, which means a model to represent it goes on a 25mm base, and as it happens, the iris is 25mm in diameter. So as an incredibly quick and easy option, you could just use the iris portal as-is. To keep things accurate, you can measure to the iris, ignoring the surround, or if your opponent agrees you could just measure to the outer edge of the portal, making it a 30mm objective marker instead of 25.
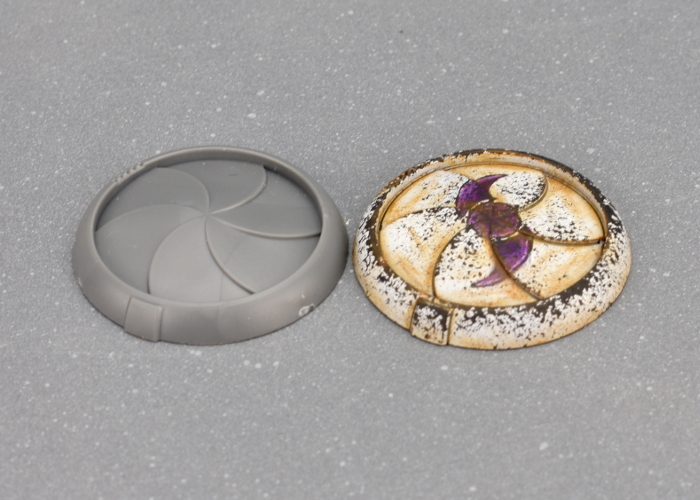
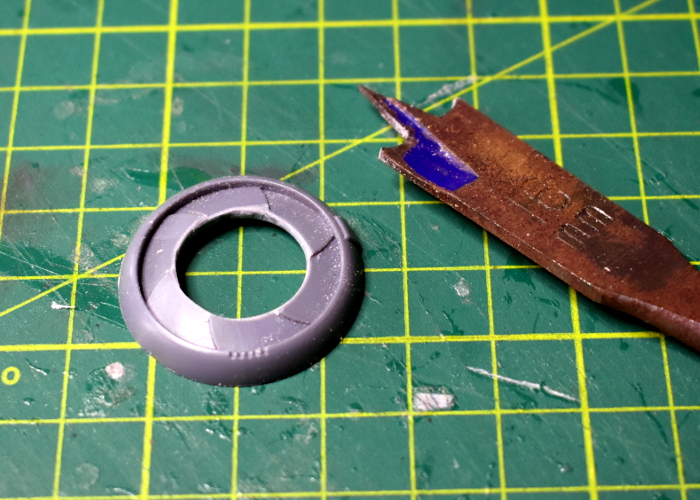
For a slightly more elaborate version, I took a portal and used a 16mm spade bit to drill out the middle of the iris.
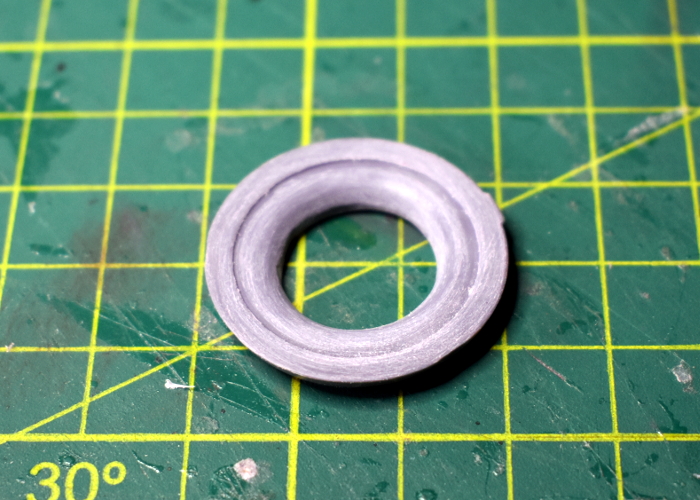
Wrapping a small piece of sandpaper around my index finger, I flipped the portal over and sanded around the underside to make it concave.
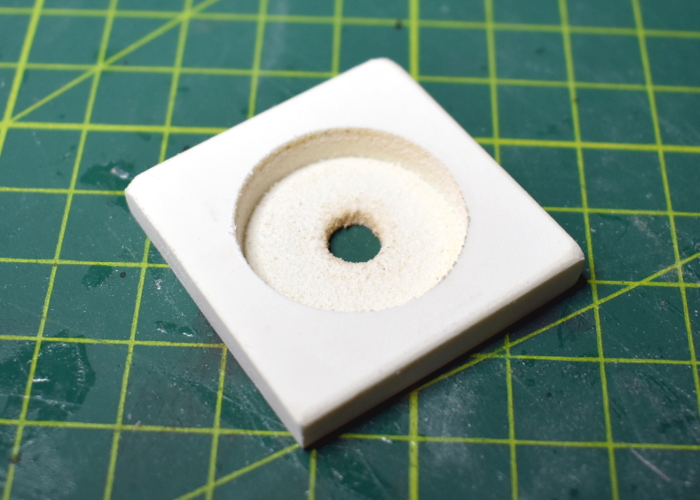
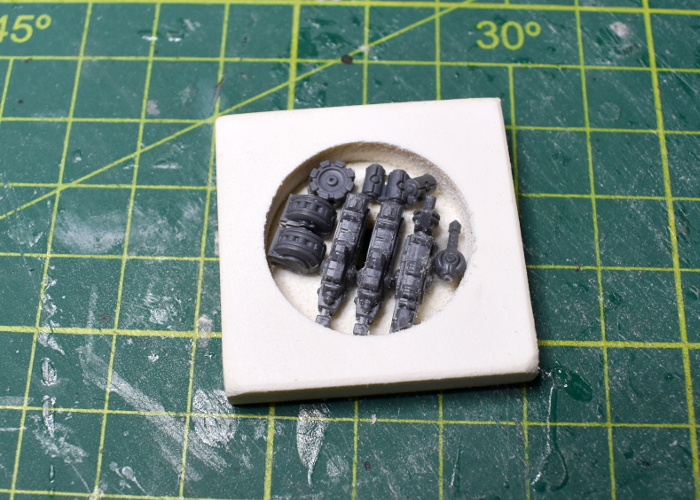
To make the base of the cache piece, I cut a small square of 6mm foamed PVC, and then drilled most of the way through the middle of it with a 25mm spade bit, before giving it a light sand.
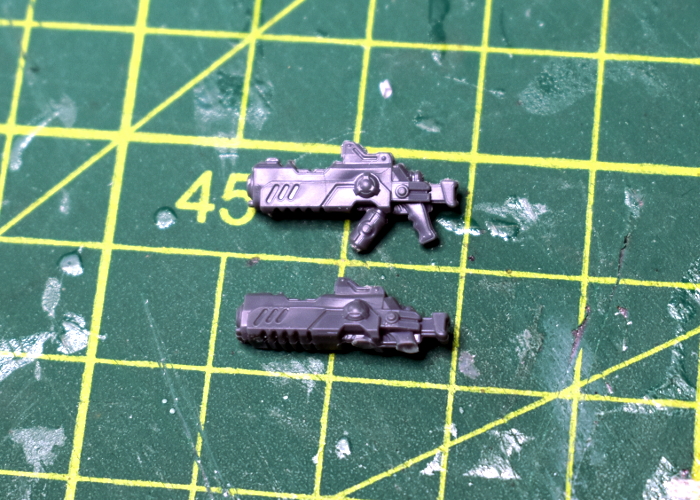
To fill the cache, I took a bunch of assorted Karist weapons from the Faction Expansion Sprue. I trimmed the bottom of the rifles down flat, sanding the bottom so that they fit neatly inside the cache cavity. If you don't have the expansion sprue handy, you could also just use spare weapons from the Karist Trooper sprue, cutting the hands off the bottom - either way, the bottoms of the weapons won't be visible once the cache is sealed up, so either way works just fine.
I glued the rifles in place, and then filled the space around them with grenades and a couple of ammo drums cut from grenade launchers. I also glued a small circle of plasticard into the drill bit guide hole in the bottom of the cache.
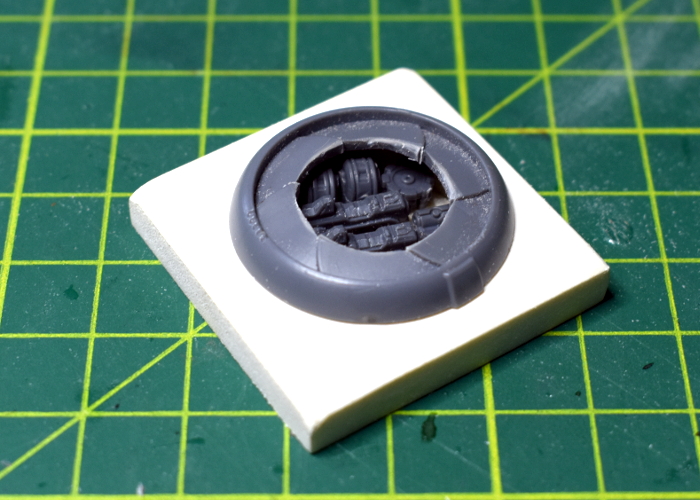
The final step before painted was to check that the portal fit neatly on top. At this point, I also used a hobby knife to cut some vertical lines into the inside of the hole in the iris, to delineate the tips of each petal. I left the portal separate for painting, gluing it in place at the end.
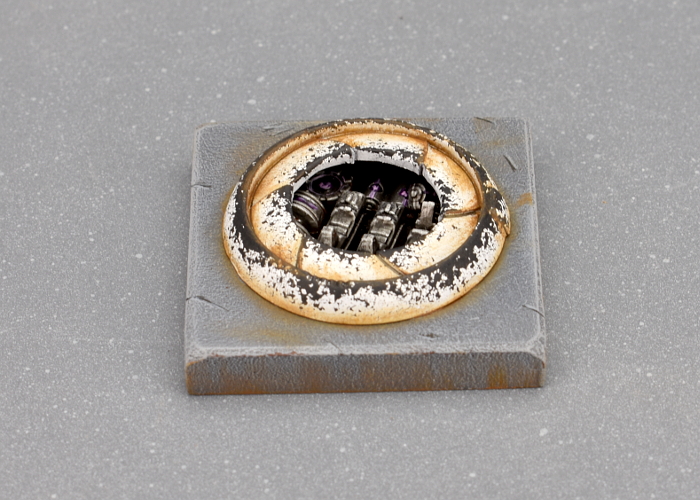
And speaking of painting, with some colour on the portal wound up looking like this:
Put together your own secret cache of pre-prepared doom by picking up the plastic terrain sprue, along with the rest of the Maelstrom's Edge range from the webstore here.
Then pop on over to the Comm Guild Facebook group to show us what you're working on!
For other building ideas, modeling tutorials, army spotlights and conversion walkthroughs, check out the Hobby section of the Maelstrom's Edge website here.
Tags: conversion karist modeling objective terrain terrainsprue tutorial walkthrough
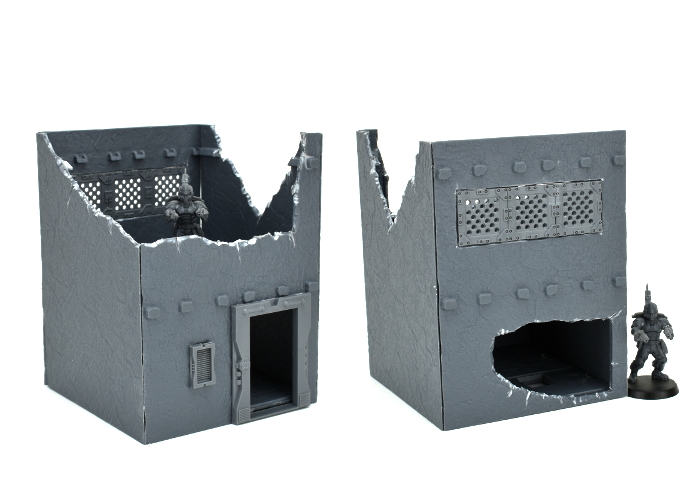
Terrain Spotlight: Aircon Ducting Barracks
Posted on Monday Jan 11, 2021 at 05:00pm in Tutorials
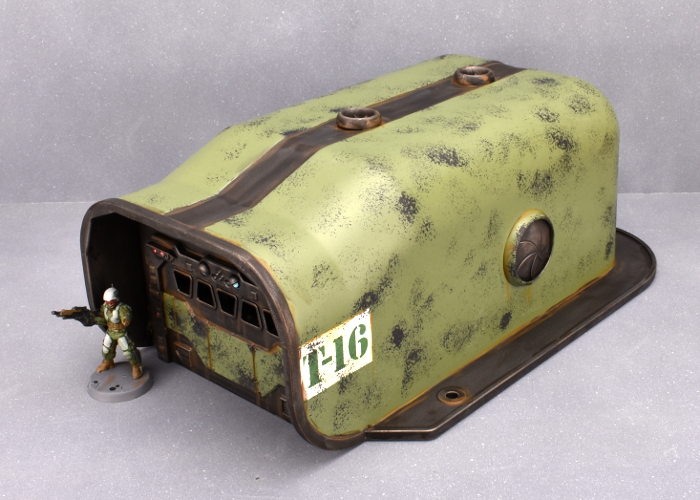
Over the Christmas break, I found myself in a local hardware store picking up some supplies for a few jobs around the house, and as so often happens I got a little distracted by random pieces of plastic. As a result, this week's modeling article is a sci fi barracks building made from components from the Maelstrom's Edge terrain sprues and a piece of plastic air conditioner ducting!
I have plundered the aircon ducting display before, resulting in a battlement-roofed bunker (which you can see here). This time around, I had picked up a longer piece that is usually used to cover over the spot where cables or drain hoses turn to go through a wall.
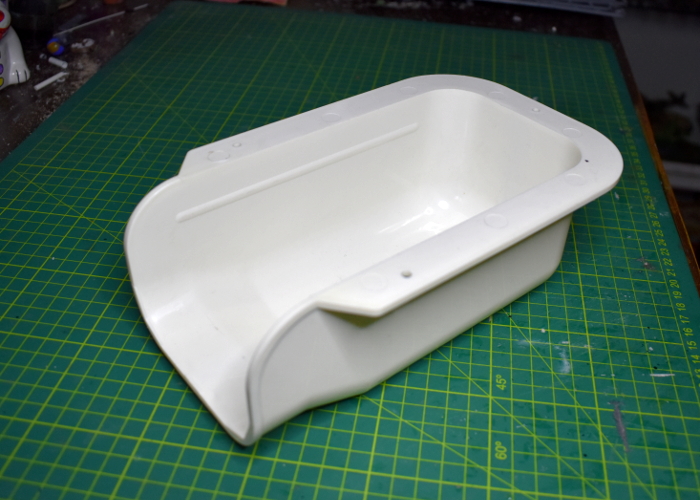
Because the shape was so perfect as is, there was very little that needed doing here, but it did need a front wall. For this, I used a piece of 3mm foamed PVC. Sitting the ducting end-on on top of the PVC, I traced around the inside with a pencil to get an accurate cutting pattern for the wall.
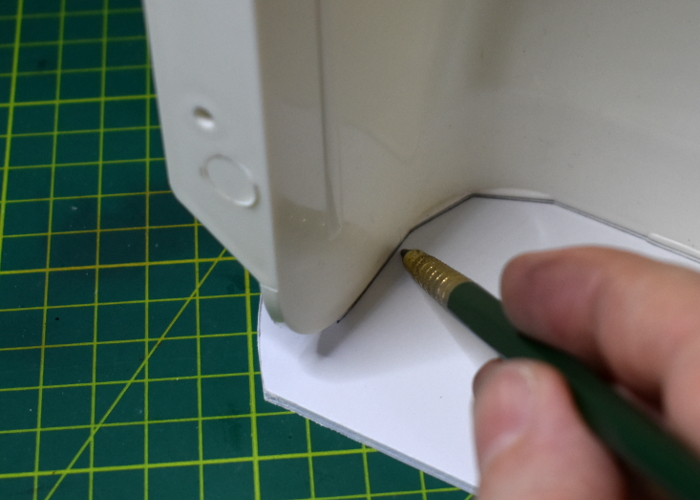
In the middle of the wall piece, I cut a rectangle to fit the garage door from Terrain Sprue #1.
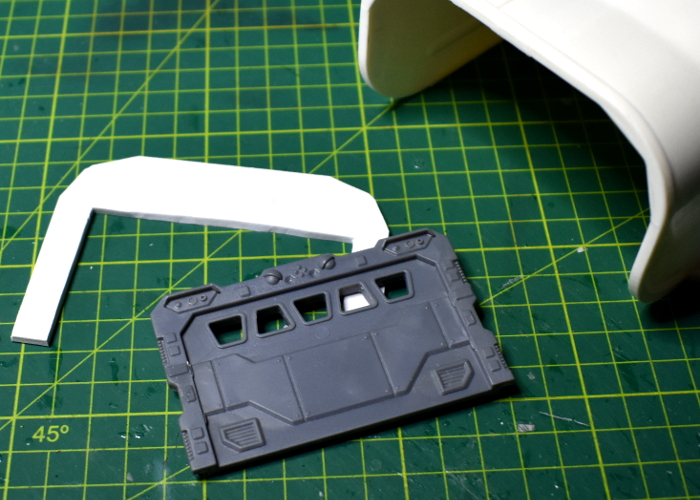
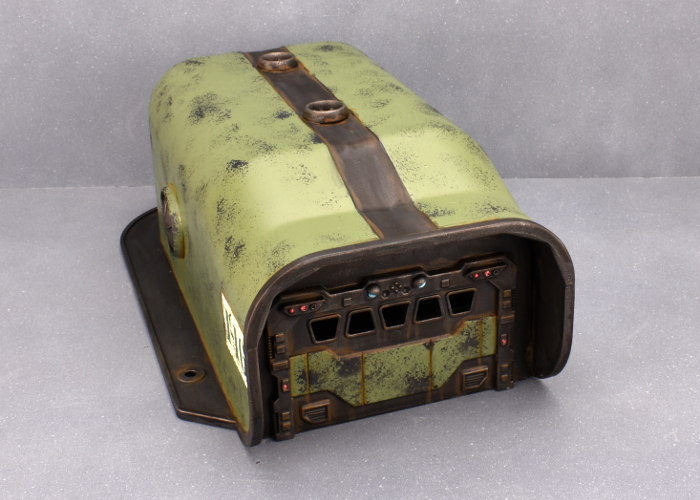
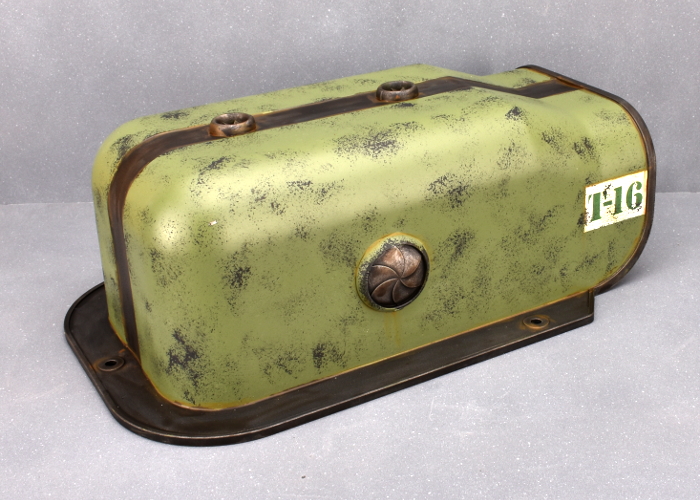
Before gluing everything in place, I gave the ducting a light sand all over. This breaks up the shiny outer surface of the plastic, allowing glue and paint to stick better. With that done, I glued the front wall in place inside the ducting, and added some iris windows and exhaust fans from Terrain Sprue #2 for some extra detail.
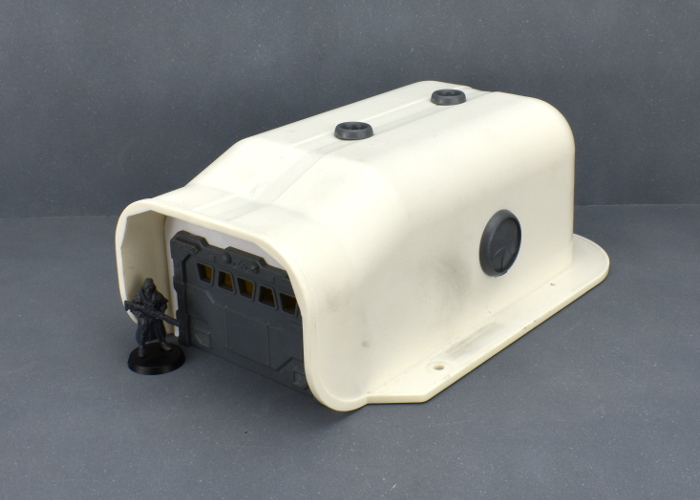
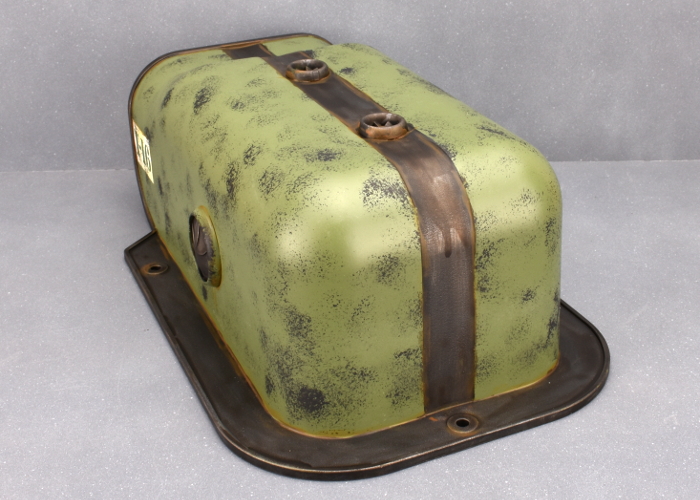
I decided against adding a base, as it didn't really seem necessary. The flange around the ducting makes it nice and stable on the tabletop, and this way it will fit in with whatever style of battlefield I choose to plonk it onto.
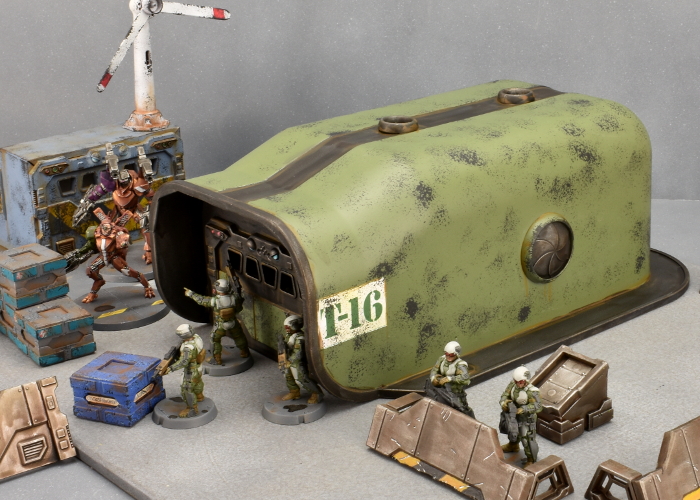
So, with some paint on, the barracks looks like this:
Put together your own sci fi barracks (of doom?) by picking up the plastic terrain sprues, along with the rest of the Maelstrom's Edge range from the webstore here.
Then pop on over to the Comm Guild Facebook group to show us what you're working on!
For other building ideas, modeling tutorials, army spotlights and conversion walkthroughs, check out the Hobby section of the Maelstrom's Edge website here.
Tags: buildings modeling terrain terrainsprue tutorial walkthrough
Terrain Spotlight: Converted Renedra Desert Buildings
Posted on Monday Dec 07, 2020 at 05:00pm in Tutorials
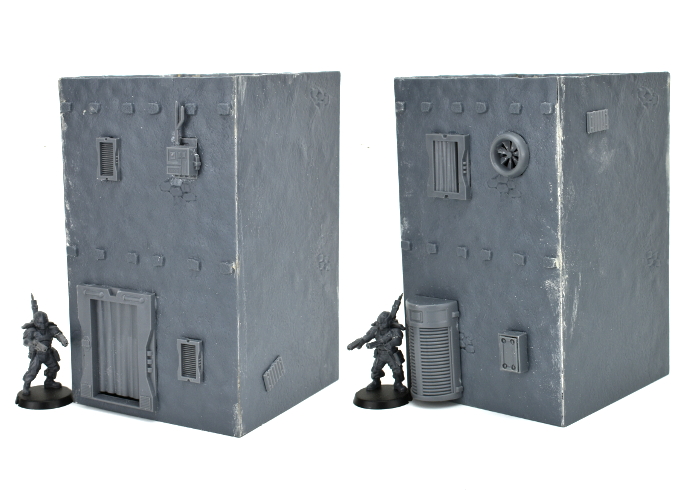
Browsing around online a few weeks back, my eye was caught by a neat looking new release from Renedra. They have a slowly-growing range of plastic historical building kits, and had just added to it with some two-story desert houses. While these are intended for historical settings, I thought it would be fun to see how they prettied up with the addition of some Maelstrom's Edge terrain sprue parts for a rustic sci-fi look. After a short and impatient wait for the post, I came up with this:
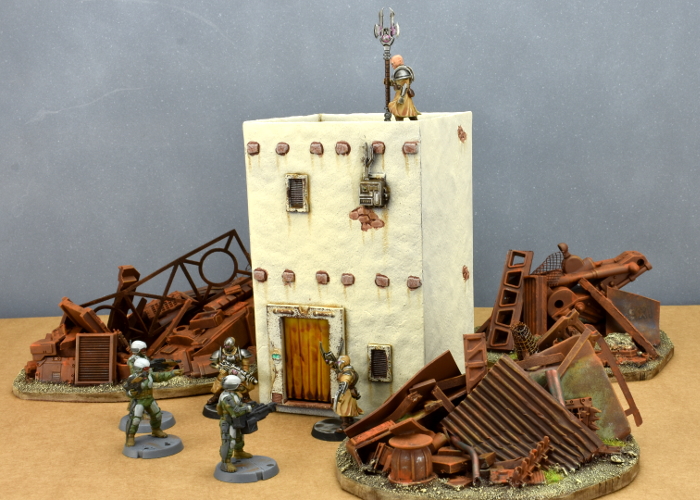
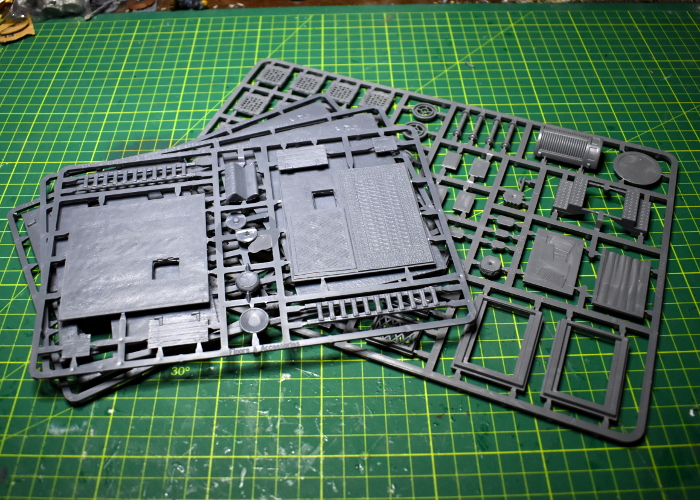
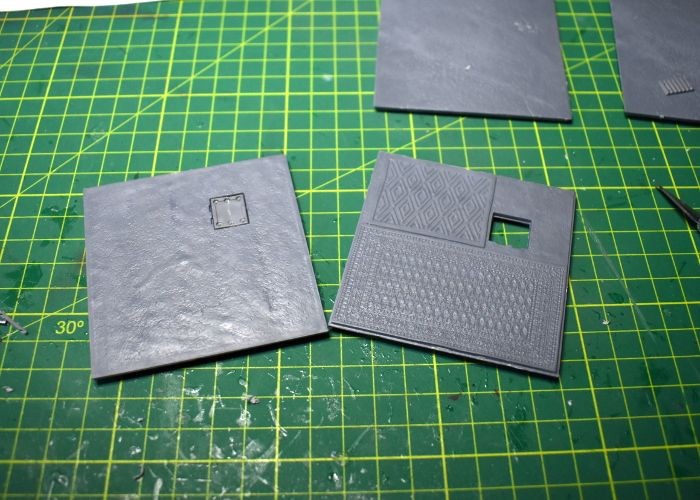
The pack I ordered includes parts for three houses. They all utilise the same floor and roof sprue, so are all the same width, just having different configurations of windows and doors, and differing overall heights. There are three sprues per building - the floor/roof sprue, and two identical wall sprues. To these, I added a Maelstrom's Edge terrain sprue.
The doorways on the buildings are quite small, and have timber doors that fit into them. That wasn't going to do here, though, so I took a doorway from the Maelstrom's Edge sprue and laid it over the existing doorway, using it as a guide to trace around with my hobby knife. Then, tracing gradually deeper cuts into that guideline, I carefully cut out the hole for the new doorway.
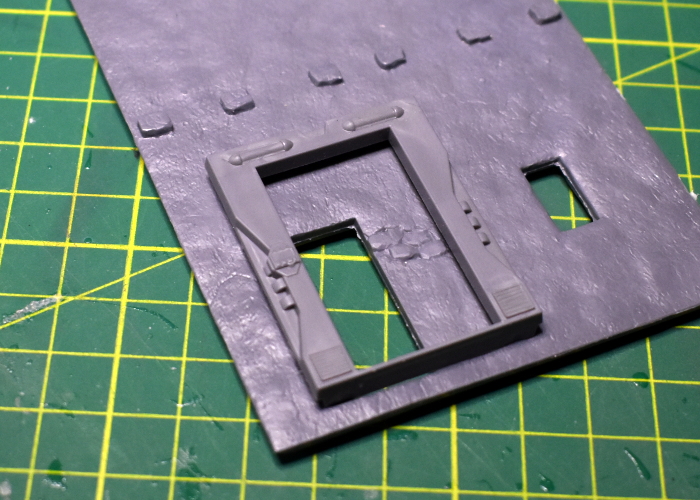
With the new door glued in place, I covered over the window cavities and the second doorway with various bits from the terrain sprue. As with the doorway, I used the curtained window as a guide to trace around in order to enlarge the original window hole.
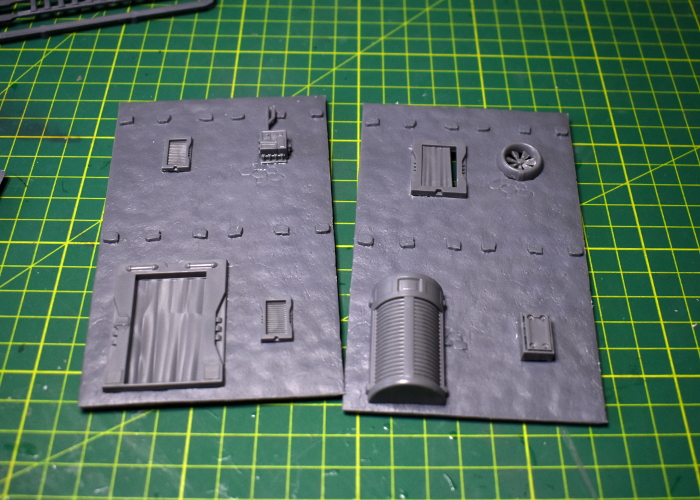
I left the side walls largely as is, adding just a couple of corrugated patches so they weren't identical.
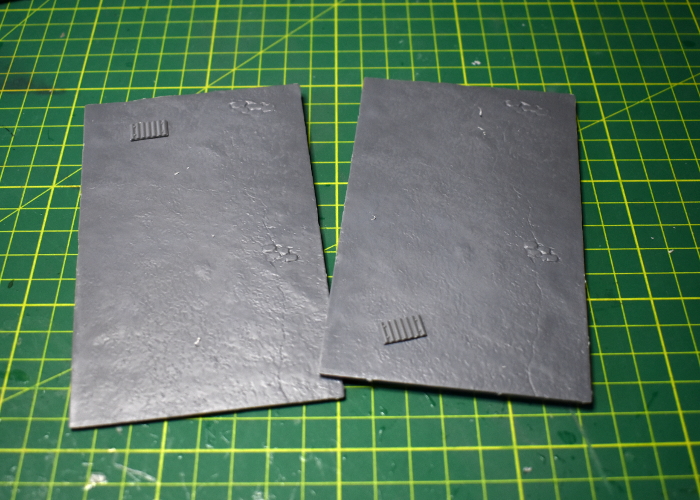
The floor/roof pieces were also left alone, although I replaced the wooden trapdoor in the roof with a metal one made from two strut panels trimmed to fit.
From there, I just had to glue everthing together. I also added a little filling putty along the corner seams and around the edge of the roof to neaten everything up a little.
With a quick coat of paint, it wound up looking like this:
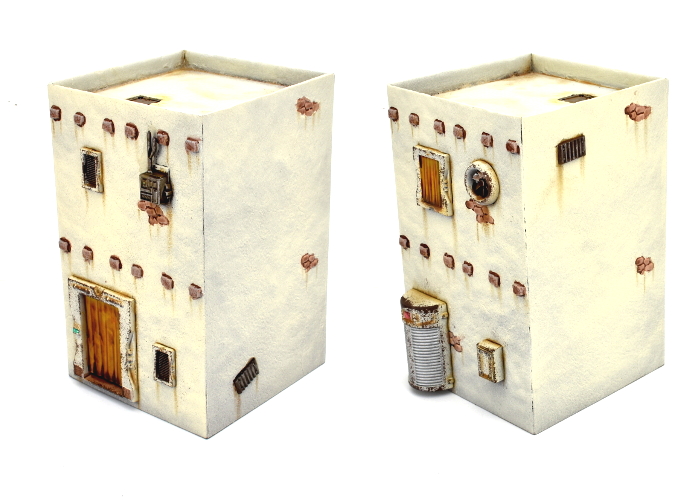
Now to get the other two finished off!
Why not give it a go? You can find the Maelstrom's Edge terrain sprues for your own terrain re-imaginings, along with the rest of the Maelstrom's Edge range from the webstore here.
What are you working on? We would love to see your models and terrain in the Comm Guild Facebook group!
For other building ideas, modeling tutorials, army spotlights and conversion walkthroughs, check out the Hobby section of the Maelstrom's Edge website here.
Tags: buildings conversion modeling spotlight terrain walkthrough
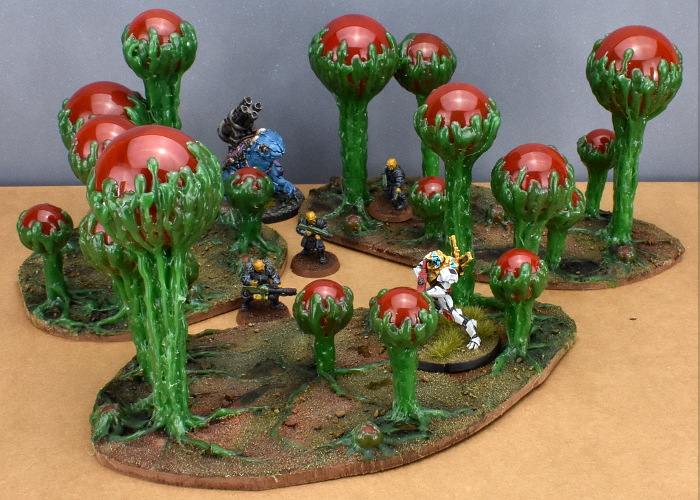
Terrain Spotlight: Hot Glue & Christmas Bauble Alien Trees!
Posted on Monday Nov 02, 2020 at 05:00pm in Tutorials
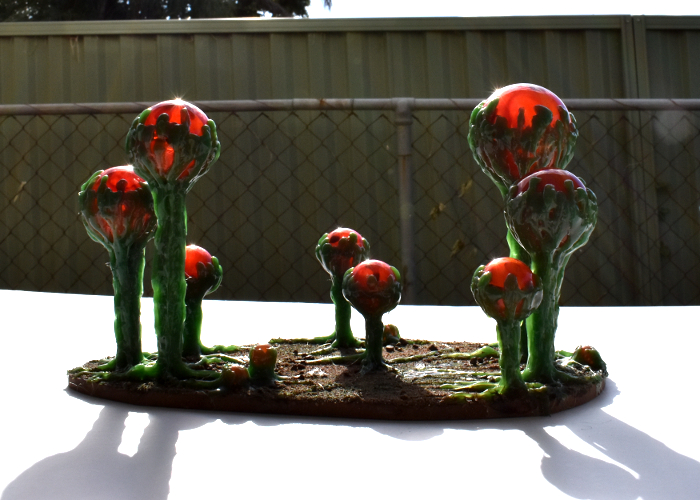
I've been having a lot of fun lately coming up with different ways to make trees that look like they belong on alien worlds. You might have seen my previous articles with silicon aquarium plant trees, or my boab-inspired expanding foam trees. This week, I drew some inspiration from the Titan AE animated movie, working up some forest bases made from Christmas baubles and coloured hot glue!
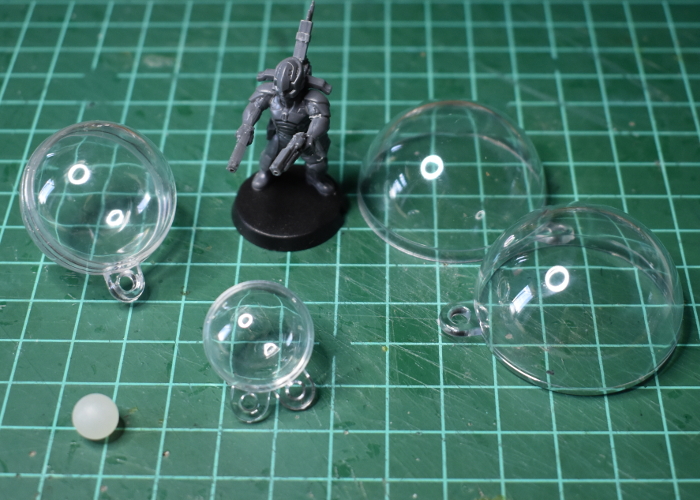
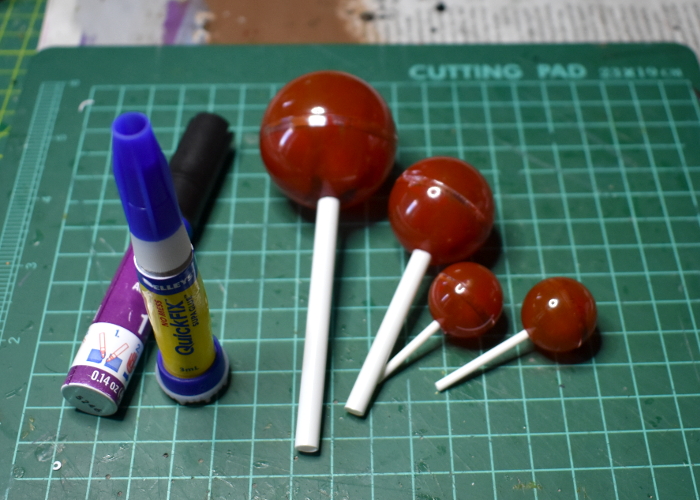
The basic idea with these is a plant that has a ball-shaped sac, filled with lighter-than-air gas of some kind (the cartoon plants they're based on are highly explosive!). To make these, I sourced a bunch of clear, plastic Christmas bauble shells in a range of sizes from Ali Express. These didn't go down as small as I wanted, so for the smallest size I wound up with some 8mm solid plastic balls.
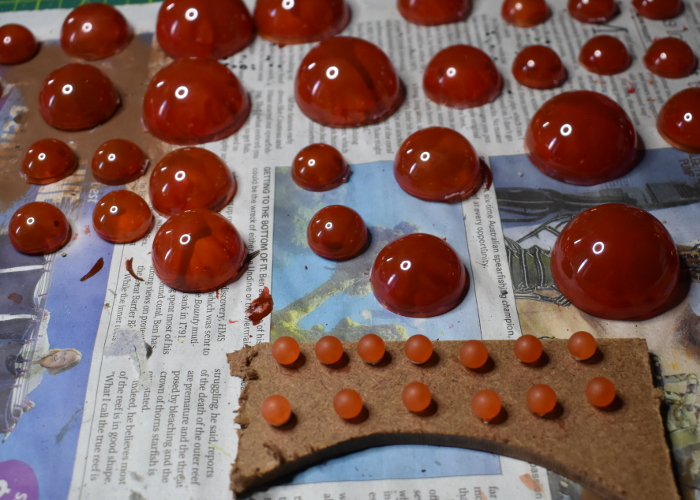
To create the gaseous effect, I wanted the sacs to be mostly opaque, with swirling colour and just a hint of translucency. So, after trimming off the hanging tabs, I painted the insides of the baubles with Citadel Gryph-Hound Orange Contrast, and then dabbed in some blobs of Mig Blood Red, letting this run wherever it liked through the orange. For the solid balls, I just painted on a coat of the orange Contrast.
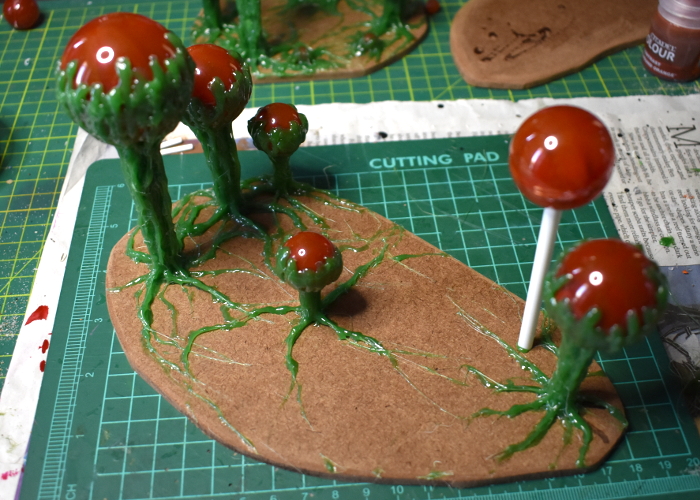
Once the baubles were dry, I fitted the halves together, and then used some superglue to stock different length stems onto them, making sure the joint lines on the baubles were running more or less horizontally. For the most part, the larger the bauble, the longer the stem it got, although I did mix this up a little here and there to keep things a little chaotic and organic.
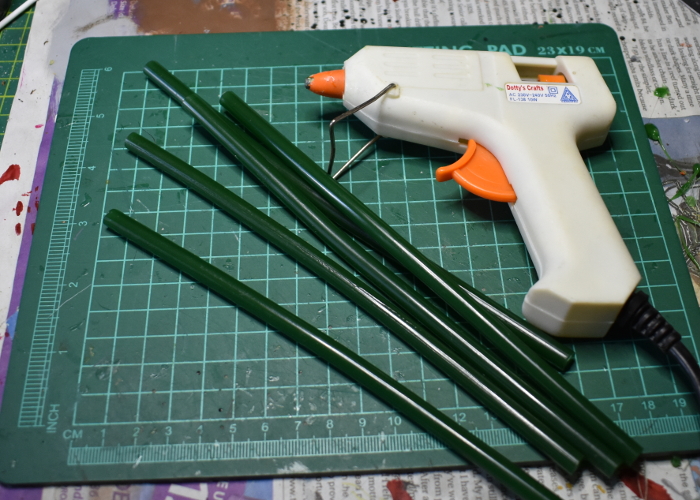
For adding the trunks, I used some green hot glue, also from Ali Express, although as with the baubles you might be able to find this in local craft stores, depending on where you are in the world.
A note on safety: If you plan on having a go at this, I feel compelled to point out the obvious: Hot glue is hot! Be careful to keep fingers away from the melty end of the glue gun, and avoid getting drips of glue onto your skin, as it can burn. Also, use in a well-ventilated area!
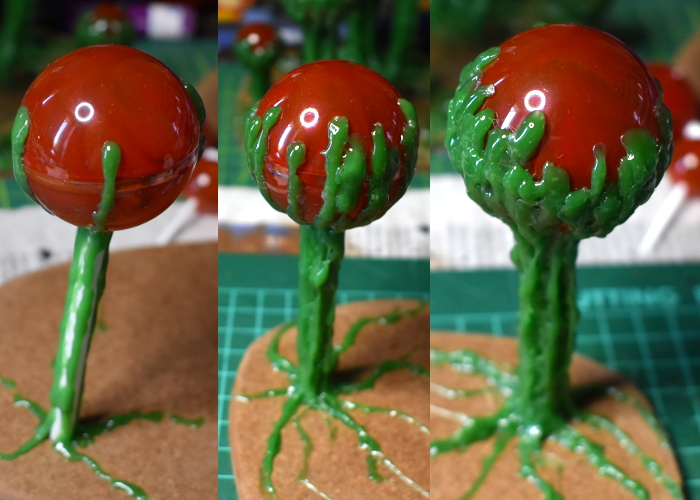
After gluing the stem to a hardwood base, I ran a line of glue from about two-thirds of the way up the bauble, all the way down, and then outwards to form a root shape along the top of the base.
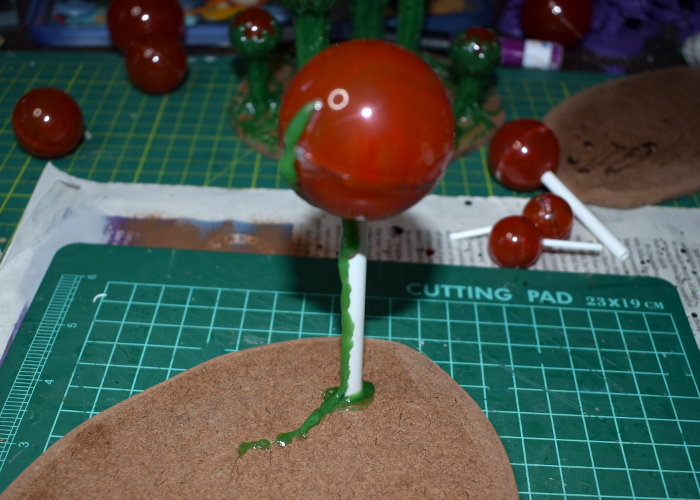
From there, I added successive strips down the length of the tree, keeping some space between each new strip and the immediately preceding one, to give them time to cool and set. The aim was to coat all of the outside of the stem, and most of the lower two-thirds of the bauble. Some parts of the lower half of the bauble show through the glue for effect, and to help light shine through the finished tree top, but the glue completely covers the joint line to hide it.
Here's a video of the gluing in process!
With the first tree done, I glued the next stem to the base, and repeated the process, continuing until I had a good number of trees on the base. There's a balance between having enough on there to be convincing as a 'forest' base, while still leaving enough room to position models. When in doubt, always err on the side of playability, as this is supposed to be gaming terrain, after all!
The small balls were used to create new growth without much height to it. For these, I glued the ball directly to the base, and then added blobs of glue around the circumference.

I decided on a boggy base to go with these trees, so started out by gluing some fine sand on with PVA glue, leaving the tree roots exposed. I also left some patches of the hardwood exposed, to make a few open puddles.

With the PVA dry, I painted over the sand with a mix of Army Painter Mid Brown and Green Tone Quickshades. You could paint the tree trunks to cover over the glue if you want, but I decided I liked the shiny green on them, so left them as is.
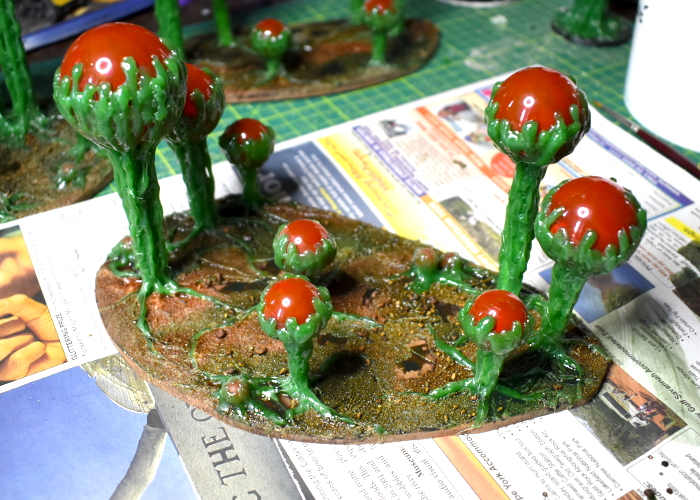
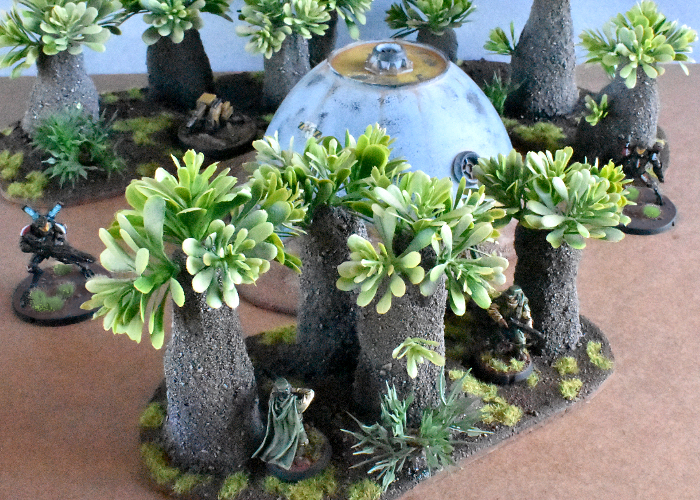
Finally, I added a light drybrush of Coat D'Arms Putrid Green over the sand, and painted some gloss varnish onto the 'puddle' areas. The end result looked something like this:
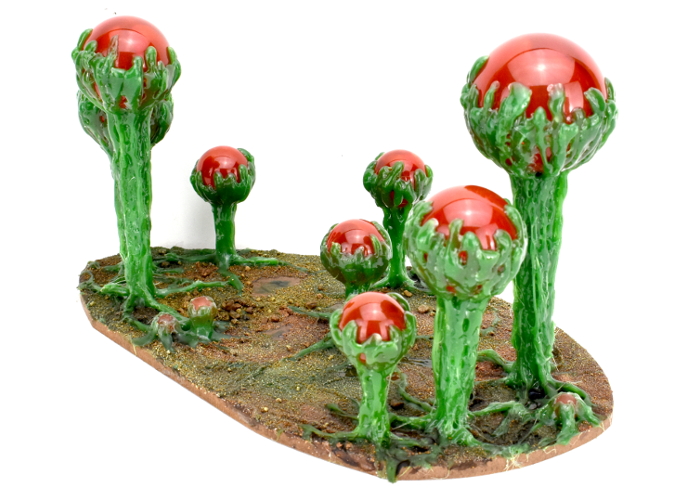

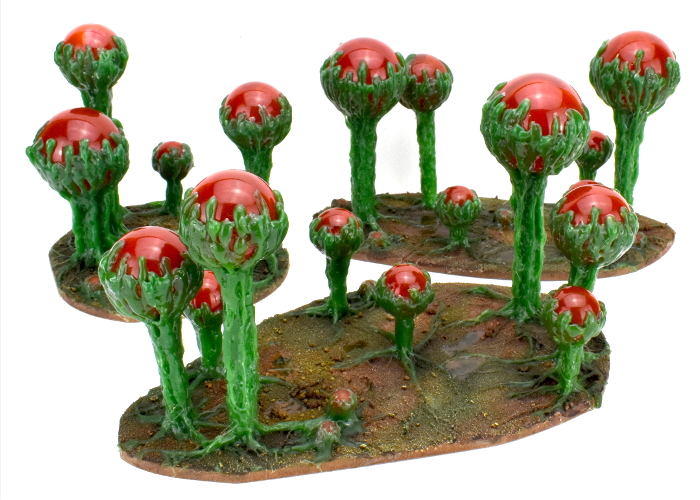
And a shot out in the sun, to show the light shining through the gas sacs!
Feel like giving some alien trees a go? Be sure to share what you come up with on the Comm Guild Facebook group!
Pop on over to the Maelstrom's Edge webstore here to find our plastic and resin model range, including the ever-popular Maelstrom's Edge terrain sprues.
And for other building ideas, modeling tutorials, army spotlights and conversion walkthroughs, check out the Hobby section of the Maelstrom's Edge website here!
Tags: scratchbuilding spotlight terrain trees tutorial walkthrough
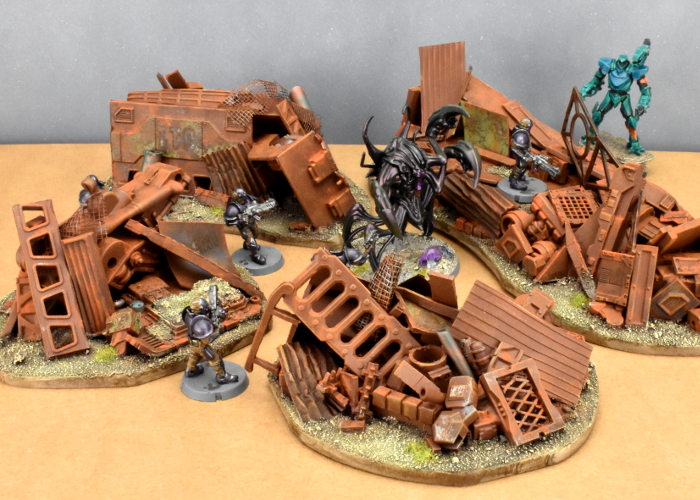
Terrain Spotlight: Junkyard!
Posted on Monday Oct 19, 2020 at 05:00pm in Tutorials
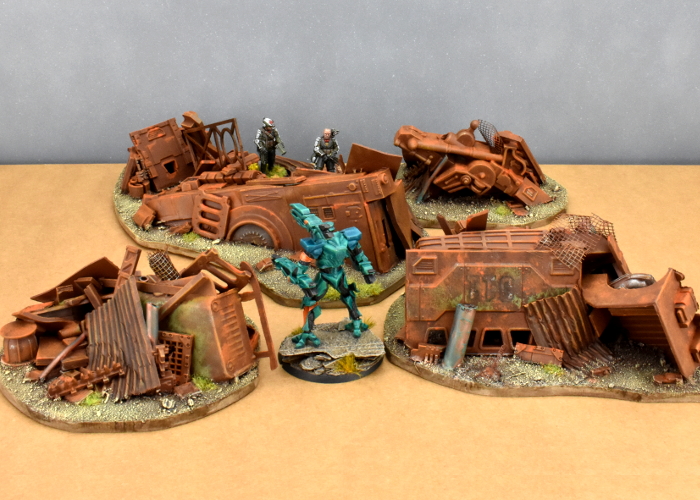
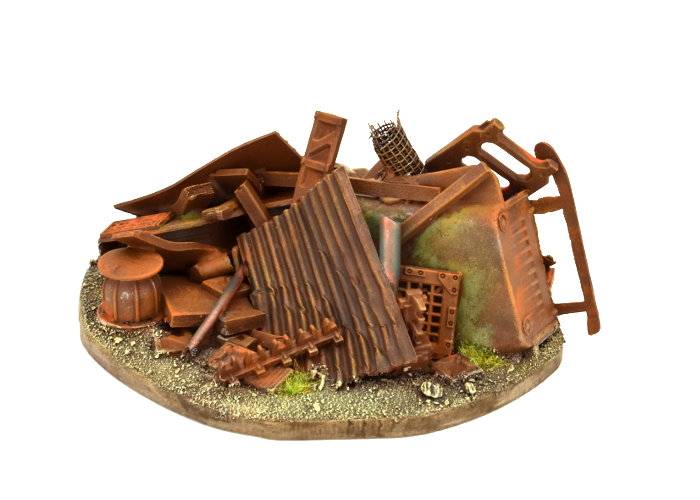
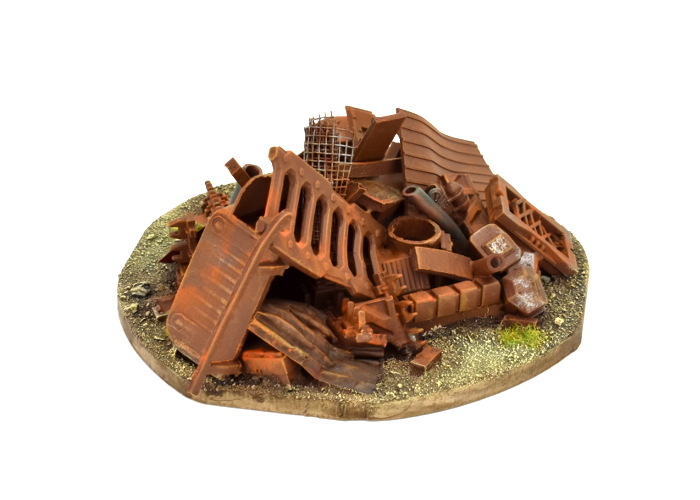
When you do a lot of conversion work on models or terrain, you tend to accumulate an ever-growing collection of discarded remnants - model or terrain components that have been cut up to use specific parts or them, leftover parts from different kits, random off-cuts of plasticard or cardboard, and other odd bits and pieces collected because they were interesting. Unless you have bottomless storage, it's handy to clean these out from time to time. Since I hate throwing anything away, however, I wanted a way to make use of these parts that I otherwise might not have an immediate project for. And so, I decided to make some junkyard terrain!
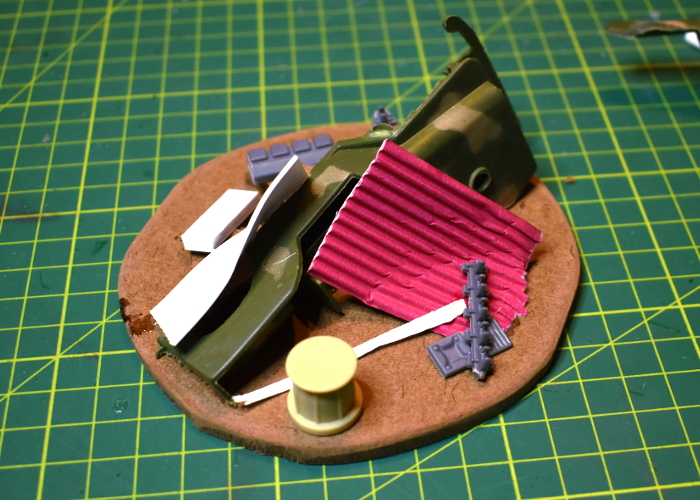
I wanted junk piles that would, at least in part, completely obscure human-sized models, so needed a bit of bulk to get started. For this purpose, I used some military vehicles from my daughters' toy soldier collection that had broken parts that couldn't be easily fixed. Cutting these more or less in half diagonally provided some interesting shapes to build on, and also doubled the number of terrain pieces I could potentially make from them!
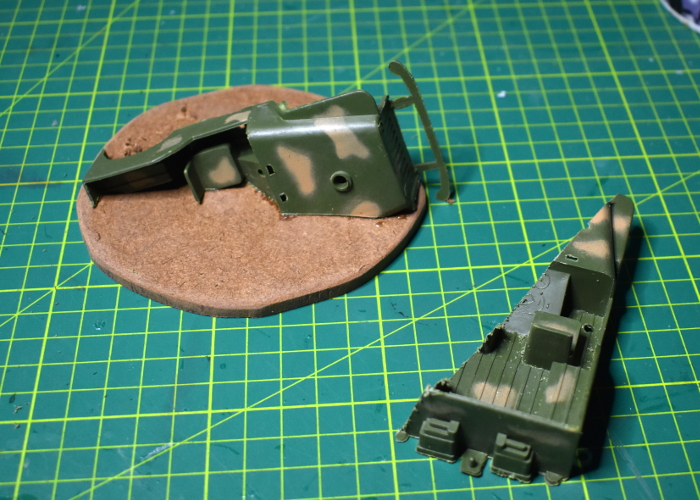
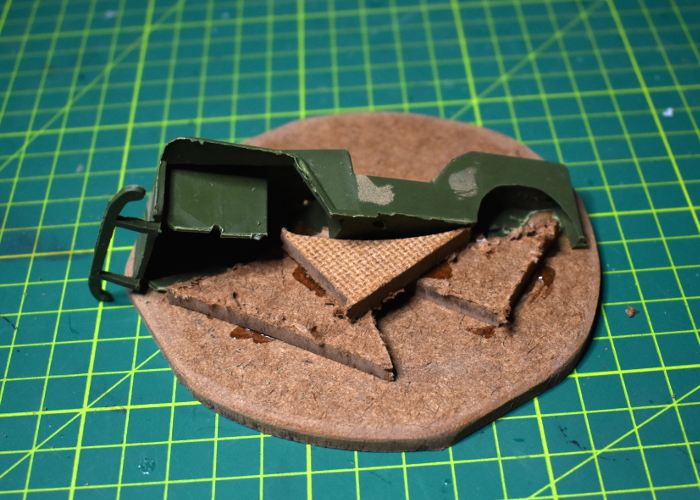
The vehicle parts were glued down onto some irregular pieces of hardboard, using Power Grip (a 'glue anything to anything else' sort of glue). I used some small hardboard off-cuts to add a little more bulk as well.
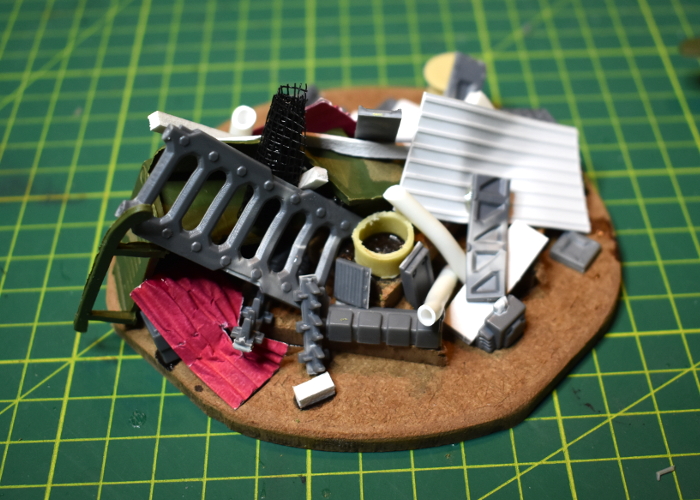
From there, it was simply a matter of grabbing interesting bits of this and that and gluing them on wherever seemed appropriate. As mentioned above, this included model and terrain parts, in some case chopped up a bit, bent, or otherwise cut or dented up in places to make them look more junk-worthy, and also whatever other scraps of building materials I had to hand, including plasticard, foamed PVC, plastic tubing, corrugated cardboard, flyscreen, and a few other odds and ends.
I kept piling up bits until I was happy with the amount of detail and cover on the base.

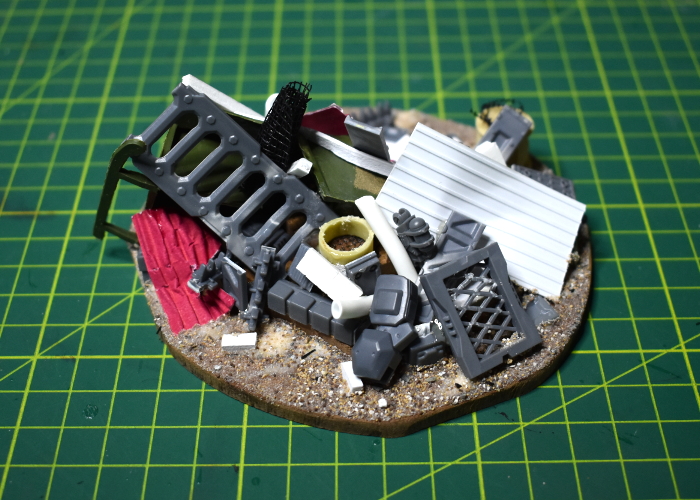
To finish up, I glued on some light gravel and sand mix anywhere on the hardboard where there was empty space.
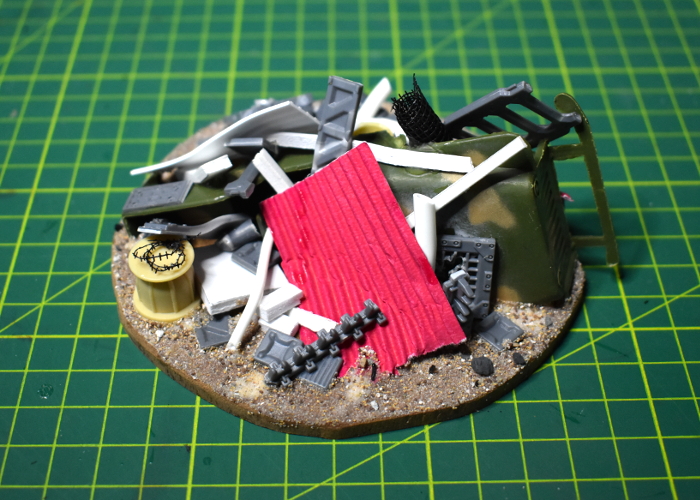
That just left painting. There were a few different potential ways to go here: painting everything up as heavily rusted and old, making it a newer junkyard with lots of shinier metal and painted parts, or something in between. To help disguise the mix of different building materials used, I decided on the first option.
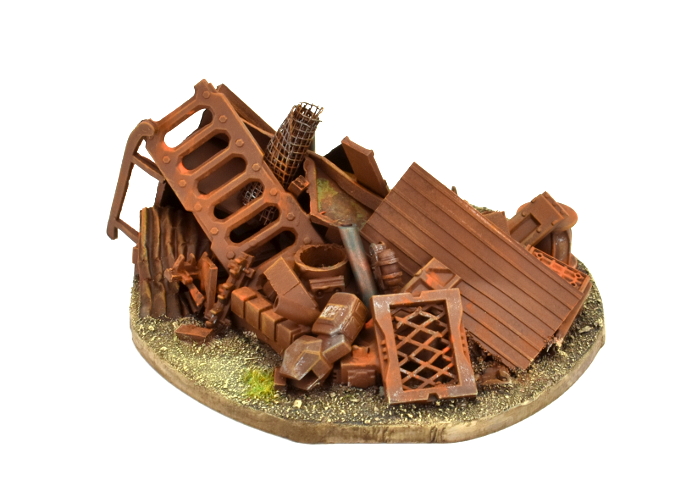
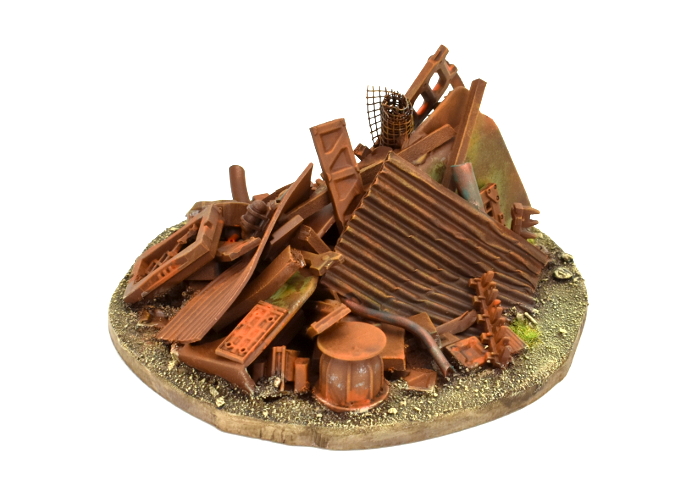
For the most part, I used the same rusted metal technique as for my shanty buildings and elsewhere. Some panels have some weathered paintwork still showing, and I couldn't resist adding in some aged copper pipes for a little extra colour, using the same method as in my copper tutorial. The gravel around the junk was painted in the same style as I used for my crystal outcrops, to provide some contrast to the rusty metal.
To get in some terrain action of your own, you can pick up the Maelstrom's Edge terrain sprues along with the rest of the model range from the webstore here.
For other building ideas, modeling tutorials, army spotlights and conversion walkthroughs, check out the Hobby section of the Maelstrom's Edge website here.
What are you working on? We would love to see your models and terrain in the Comm Guild Facebook group!
Tags: conversion modeling painting spotlight terrain terrainsprue tutorial walkthrough
Terrain Spotlight: Light-up Grill
Posted on Monday Sept 28, 2020 at 05:00pm in Tutorials
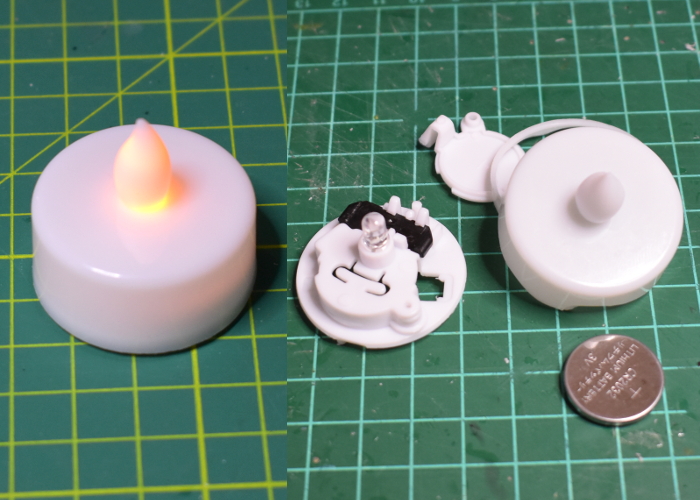
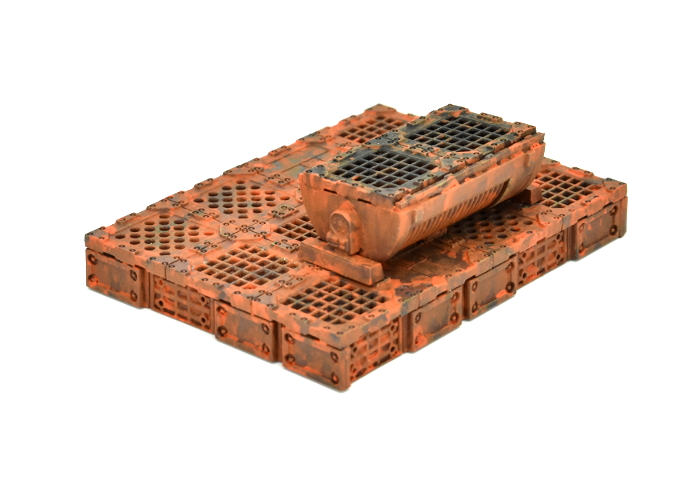
I've had a bunch of battery-powered 'tealights' sitting in my 'cut this up for something interesting' pile for some time now. They're cheap and dodgy, and would be absolutely useless as an actual light source, but I thought they might be useful for making some illuminated explosion markers, or something similarly unnecessary but pretty. Being Australian, the thought of standing outside, cremating anything within reach on a hot barbeque is always present in my mind, and so it occurred to me that a lit up grill would be a fun modeling project.
The tealights in question are a plastic shell with an extremely convincing and lifelike 'flame' on top, containing an orange LED hooked up to a large button cell and a basic switch that just moves a wire on and off the side of the battery. The first step was to extract the useful parts from the outer shell.
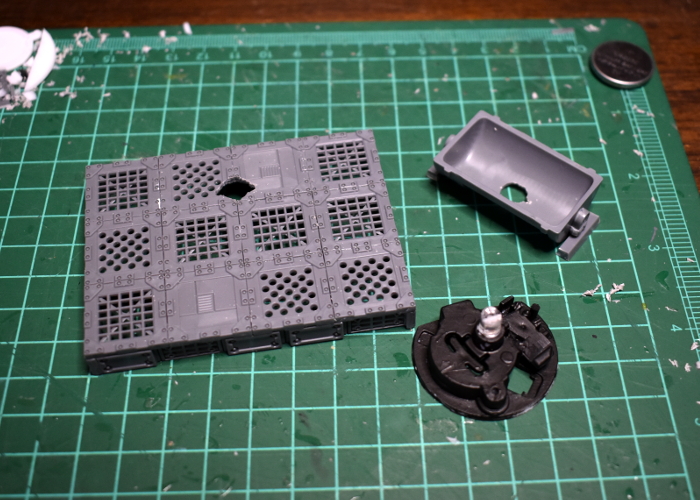
Rather than pulling all of the parts out and rewiring everything, I decided to leave the interior of the candle mostly intact, just trimming away as much as possible of the protruding parts to slim it down. Then I build a platform using parts from the Maelstrom's Edge Terrain Sprue #2 to make a platform, under which the battery compartment would be concealed.
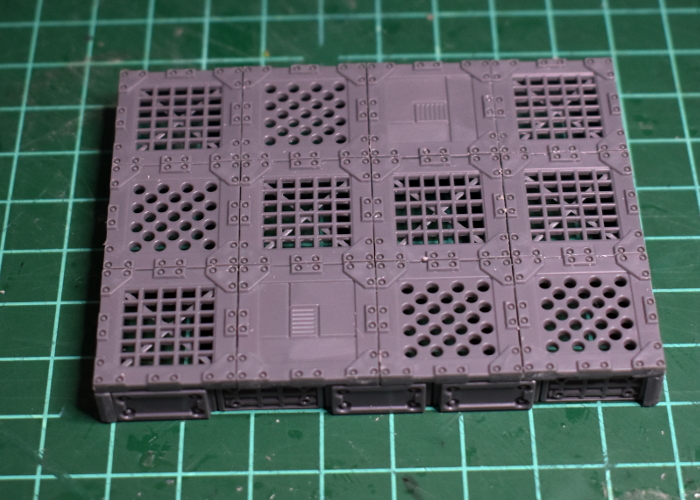
For the grill, I used an assortment of parts taken from the terrain sprue. A generator piece with a hole cut in the middle for the LED to poke through formed the main section of the grill. This left the LED a fraction too tall, so I used a razor saw to trim the top off the clear outer casing, being careful to leave the working parts of the LED intact.
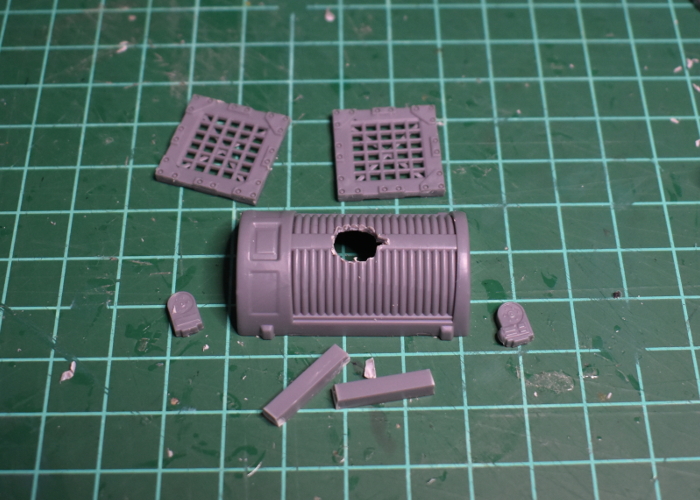
I cut a matching hole in the platform's floor, and painted the candle parts black, so that they would hide more-or-less invisibly underneath the platform.
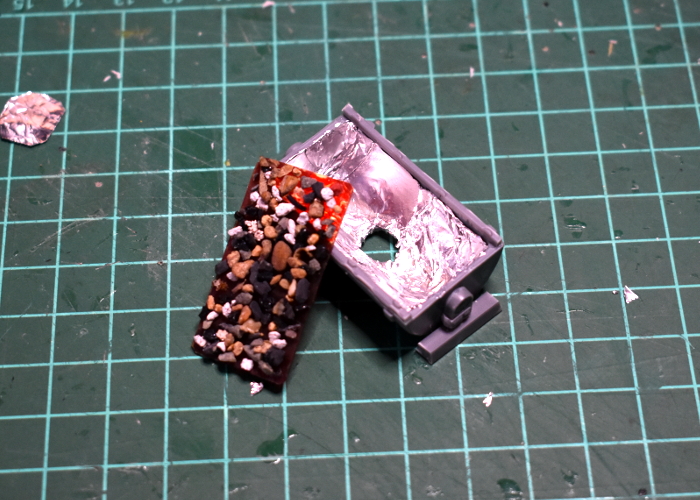
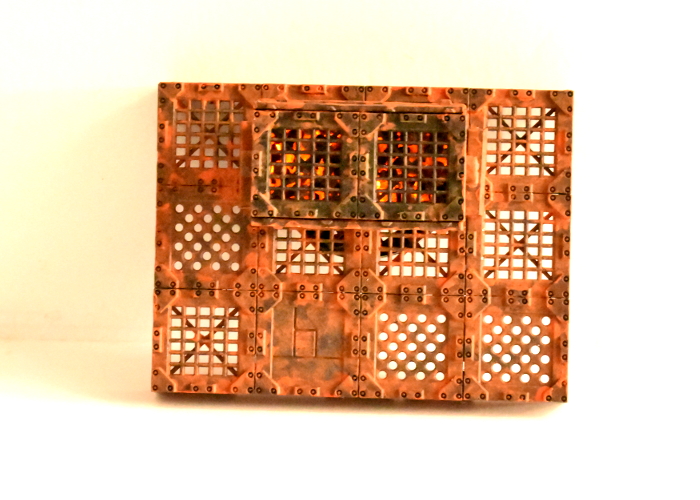
The LED isn't particularly bright, so to give it a helping hand I lined the inside of the generator with some aluminium foil to serve as a reflector. My hope was that with another small piece of foil glued on top of the LED, this would bounce the light around enough to spread the glow down the length of the grill interior. To go over the top, I took a piece of clear plastic, painted it with transparent red paint, and glued some gravel sprinkled across one side.
With some more transparent red on the outside of the LED, it was time to get some colour on the parts before gluing everything together. I also added a little putty around the LED, to close up any gaps where the light could shine back down where it doesn't belong.

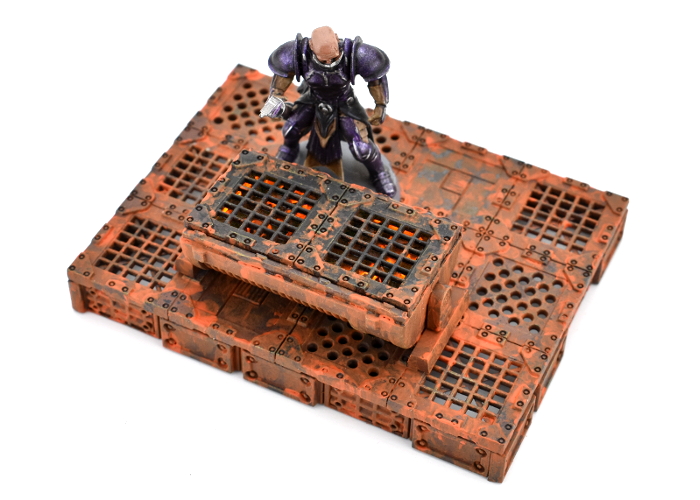
With the top glued on, and the final rust effect layer in place, the platform wound up looking like this:
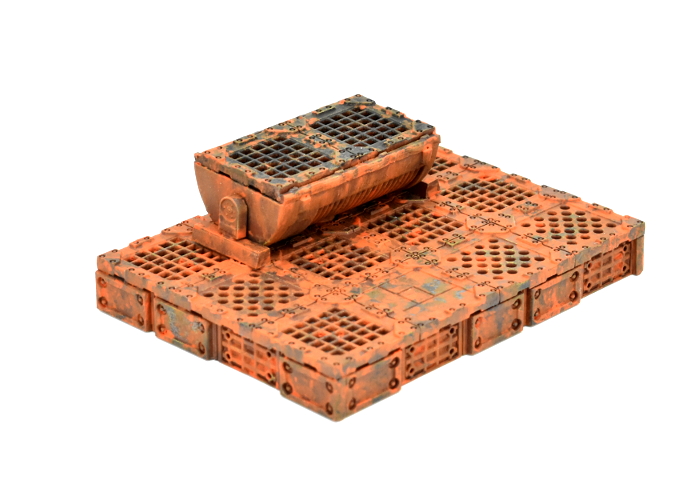
The glow doesn't show up particularly well under the photographic lights, but less bright, ambient light, it looks something like this:
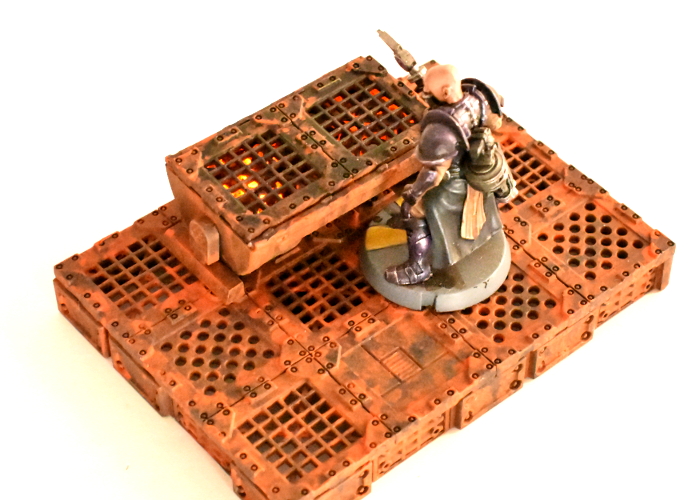
The next step will be to see what else I can add to the platform to bring it to life a little. Stay tuned!
To build your own cookplate of charcoaled doom, you can pick up the terrain sprue along with the rest of the Maelstrom's Edge model range from the webstore here.
For other building ideas, modeling tutorials, army spotlights and conversion walkthroughs, check out the Hobby section of the Maelstrom's Edge website here.
What are you working on? We would love to see your models and terrain in the Comm Guild Facebook group!
Tags: modeling spotlight terrain terrainsprue tutorial walkthrough
Terrain Spotlight: Expanding Foam Trees!
Posted on Friday Aug 28, 2020 at 05:00pm in Tutorials
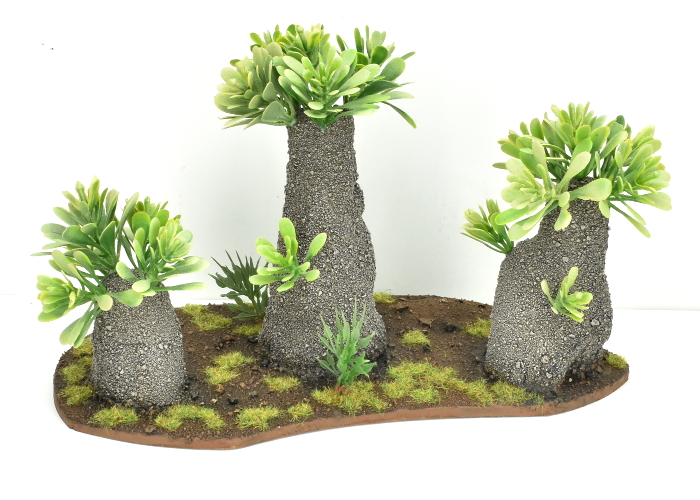
Most of my terrain building focuses on buildings and other urban-styled features, because tinkering with plastic terrain sprues is just too much fun. Sometimes, though, I like to venture outside the urban sprawl and into the forest. Previously, I've dabbled with old-school, polystyrene ball cacti and alien forest bases made from silicon aquarium plants. This week, I'm working on some boab-inspired trees made from expanding foam!
There are various tutorials floating around for expanding foam trees, but all of those that I found were using twigs or plastic tree trunks with the foam used for filling in foliage. I wanted to turn that idea upside down, using plastic plants for foliage, and the foam used for the trunk. (For the uninitiated, expanding foam is sold in hardware stores for filling holes in walls and the like. It comes in an aerosol can, and when you spray it out it expands to around 300% of its original volume, setting into a lightweight, hard-shelled foam)
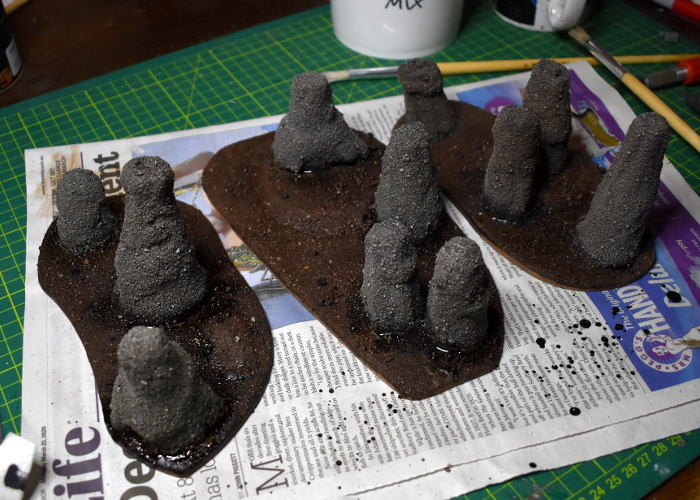
My first attempt used large bases with a piece of sprue stuck vertically on them as a support, with the foam sprayed around it, but this wasn't overly successful - they just settled into giant blobs of foam. So instead, I hit on the idea of using a mould for them. I took a screwdriver and used its handle to make a number of vaguely-conical holes in some damp playsand, and then sprayed the foam into these holes, leaving it to set.
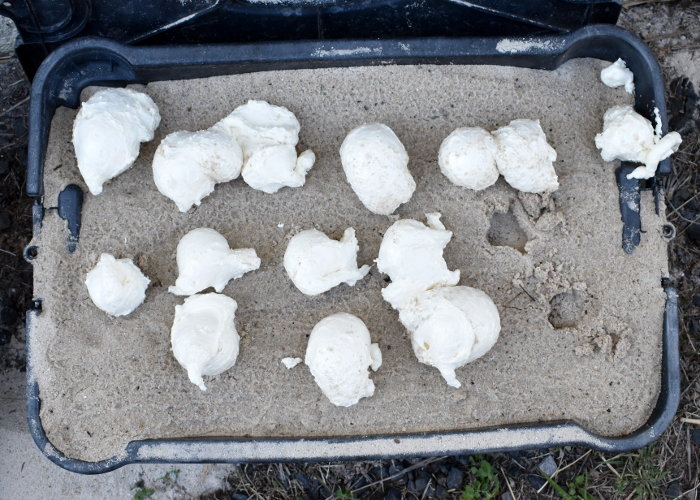
Once the foam was set, I pulled the pieces out of the holes, brushing off any loose sand. Because the foam is quite sticky when it is setting, they wound up with a layer of sand quite firmly glued to the outside, which made a nice texture on the trunks.
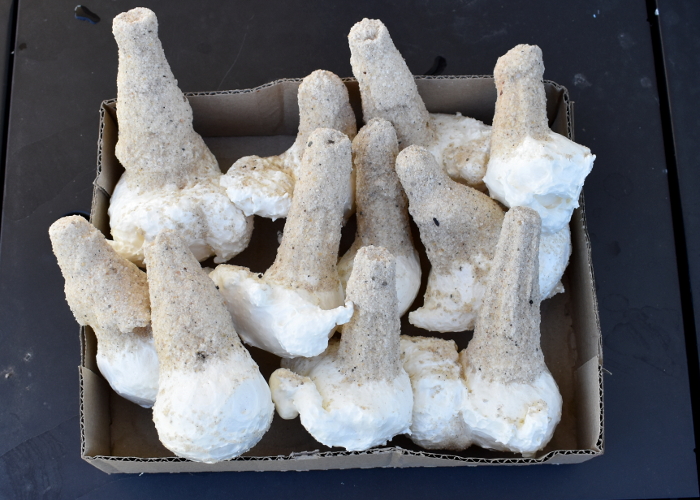
I used a mitre saw to cut the blobby excess bits off the bottom of the trunks, and then glued them down to some hardboard. A knife probably would have done this job, as the foam is quite easy to cut, but the deep-bladed saw made it easy to get a nice, flat cut.
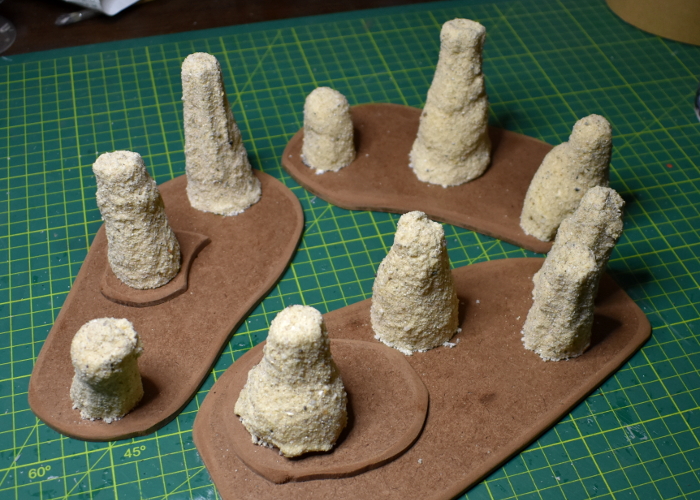
After texturing the bases with some light gravel and sand mix, I tried painting the trunks with a coat of the same charcoal wood stain that I used for last week's wood stain painting tutorial. While it worked great on the models, here it just tinted the sand but left the lighter, yellowy foam peeking through, so I painted over the top with a coat of Army Painter Ash Grey, and also basecoated the base with some Army Painter Leather Brown.
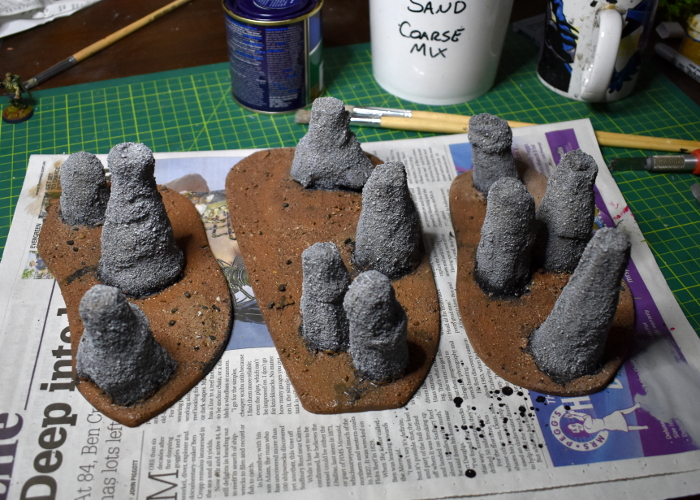
I then went over the whole lot with a generous coat of Army Painter Strong Tone.
To finish up the painting, I gave the bases a light drybrush with some more Leather Brown, also painting the edges with the same colour. Then I glued on some patches of static grass, and a few bushes made from plastic indoor decorating plants - these come from large sheets of plants that are sold for making artificial garden walls.
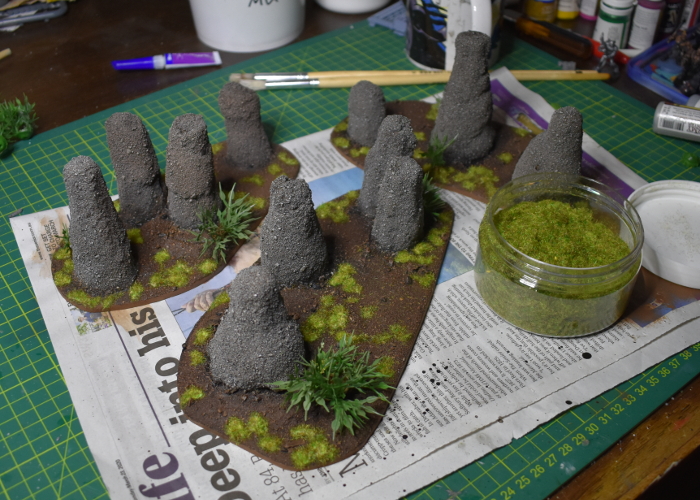
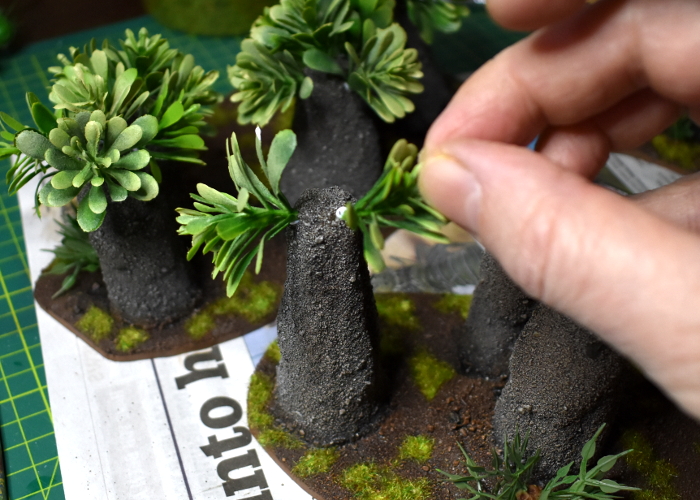
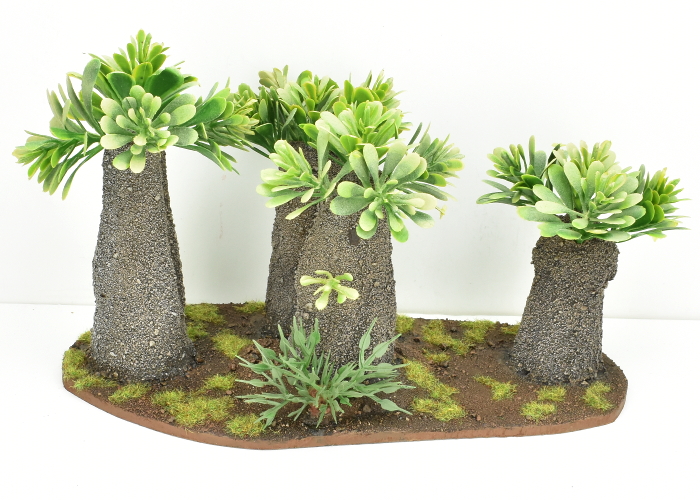
At this point, these terrain pieces could easily pass for rocky outcrops or some sort of giant insect mounds, but I decided to go the final step and foliage them up. Using some more decorative plastic sheet plants, I pierced around the top of the trunks with a spike, and then glued clumps of plants on to form a canopy.
The end result:
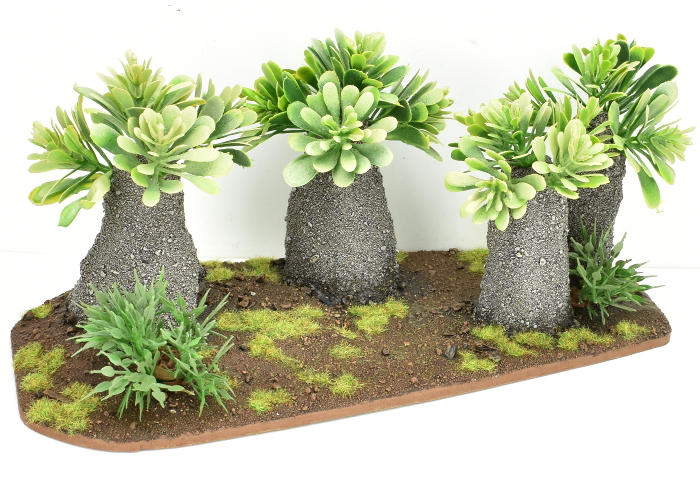
And the forest cluster, all together:
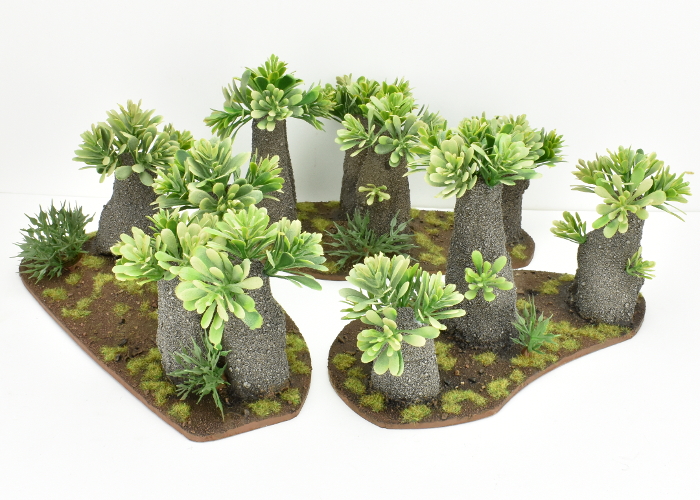
The texture on the trunks winds up a little unusual for bark, but given that they're intended for a sci-fi table it could easily be something other than wood as we know it - maybe some sort of calcium deposit, or a silicon-based extrusion on which the plants grow. It might also give an interesting bark effect to paint over the sand with some crackling, desert-earth texture paint.
If you feel like building your own alien forest of water-retaining doom, be sure to show your results in the Comm Guild Facebook group!
Meanwhile, don't forget that you can pick up the entire Maelstrom's Edge model range from the webstore here.
For other building ideas, modeling tutorials, army spotlights and conversion walkthroughs, check out the Hobby section of the Maelstrom's Edge website here.
Terrain Spotlight: Derelict Water Tank
Posted on Thursday Jul 30, 2020 at 05:00pm in Tutorials
I've bought a couple of different materials for making water terrain features over the years, but other than using a tiny bit of Woodland Scenics' 'Realistic Water' in the watering trough in my Sci Fi Stockyard some time ago, I've never really done anything with it. So this week, I decided it was time to get my toes wet.
The main part of this water tank was originally the lid of a cylindrical gift box.
I flipped the lid upside down and used it as a template to cut a circle out of a sheet of foamed PVC for the lid to fit neatly into. A plastic plate served as a template for a larger circle around the tank. (Note: if you're using plates for circle templates, plastic is best. China or ceramic plates are often not perfectly circular!)
After gluing the tank and surround down to a square of hardboard, I started detailing. A thread spool that I had tucked away in my 'to be turned into terrain' pile looked like a perfect base for an overflow pipe, with additional detailing added from some more foamed PVC and a porthole and exhaust fan from the 2nd Maelstrom's Edge terrain sprue.
I also took a bunch of floor grates and pillars from Terrain Sprue #2, and half of a ladder from the Terrain Sprue #1 to make a platform. Onto this, I glued a control panel made from an antennae array from sprue #2 and a couple of trimmed down trapezoid windows from sprue #1, with a piece of plastic tube to finish it off. I made sure this would fit where I wanted it, but held off on gluing it in place until it was painted.
To add some detail around the outside of the tank, I took some loose strut panels from sprue #2 and curved them slightly over a marker pen before supergluing them in place at intervals around the tank.
Some small pipe fittings, a little plastic tubing and a piece of sprue cut from Terrain Sprue #1 served to make a smaller fill pipe. And finally, because it's against the law to make a water feature for a sci fi table and not have a barrel floating in it, I dug one out of the bits collection. After cutting through it at an angle with a razor saw, this gave me two barrels to glue in place inside the tank.
Painting consisted of spraying the whole thing with a brown 'Rust Basecoat', adding a coat of Army Painter Gun Metal around the outside, and then going to town with browns, oranges and Army Painter Dry Rust. On the inside of the tank I also added some swirls of green, before gluing the platform in place and filling the tank with several layers of Woodland EZ Water and Realistic Water, adding drops of Army Painter inks in between to provide some swirly patches of colour. This wasn't entirely successful, as the inks reacted with the Realistic Water and made it dry a bit lumpy - the key would seem to be to make sure that the inks are fully dry before adding the 'water'... or using Woodlands own pigments that are actually intended for this job!
To build your own water tank of icky, muddy doom, you can pick up the terrain sprues along with the rest of the Maelstrom's Edge model range from the webstore here.
For other building ideas, modeling tutorials, army spotlights and conversion walkthroughs, check out the Hobby section of the Maelstrom's Edge website here.
What are you working on? We would love to see your models and terrain in the Comm Guild Facebook group!
Terrain Spotlight: Paint Bottle Fuel Pylon
Posted on Friday Jul 17, 2020 at 05:00pm in Tutorials
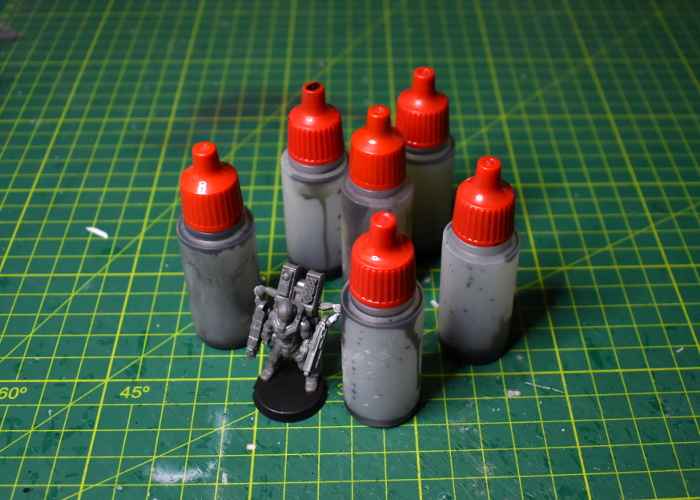
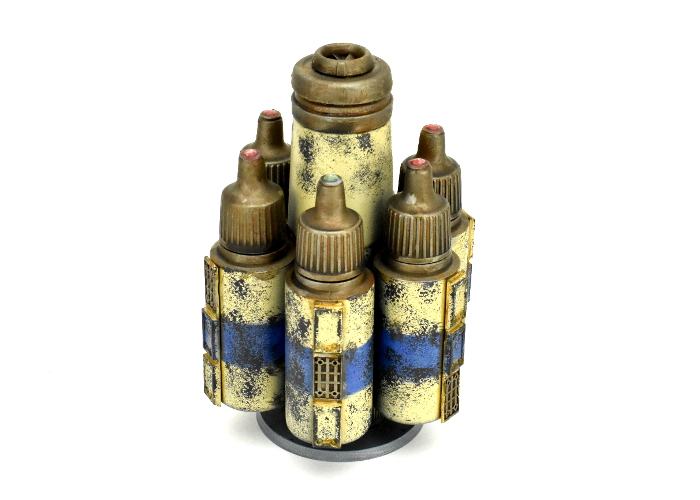
Building as much terrain as I do, I go through a lot of paint. Going through a lot of paint obviously results in a lot of empty paint bottles, and it always seems a shame to just throw them out. It's handy to hang onto a few for mixing colours. I also use an Army Painter dropper bottle for adding water to my palette, and another for dishwashing liquid for wet blending colours. This week, though, I thought I'd see what I could come up with for using up a few more of the bottles piling up in my 'I really should throw this lot out' box. This fuel storage pylon is the end result.
I use a lot of Army Painter Strong Tone in my painting, so had accrued a pile of empty dropper bottles. These, I decided, would be the bulk of the structure, as I love the shape of the tops.
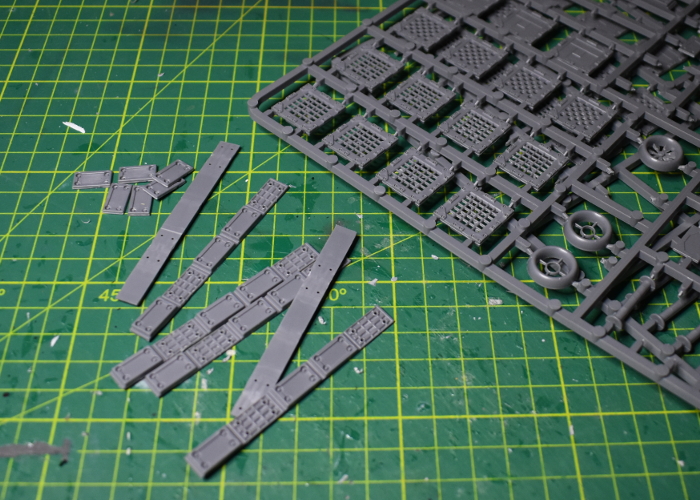
To jazz them up a little, I took a bunch of reinforcing struts from the 2nd Maelstrom's Edge terrain sprue. These, trimmed down to three sections each, fit perfectly up the sides of the bottles.
For the core of the pylon, I took an old P3 paint bottle, and a tub of glitter from a pack I bought a while back as I thought they were a useful shape. After emptying out the glitter and purging it with fire (the only sensible thing to do with glitter) I glued the two together with some 'Power Grip' glue, and also added an exhaust fan from terrain sprue #2 to the top. This created a tall pillar that I could glue the dropper bottles onto. I initially used the Power Grip to glue the dropper bottles onto the glitter tub, but found that the much softer plastic of the droppers didn't adhere well - they fell off if knocked at all. So I reglued them with superglue with an 'all-plastic' primer, which seemed to do the trick.
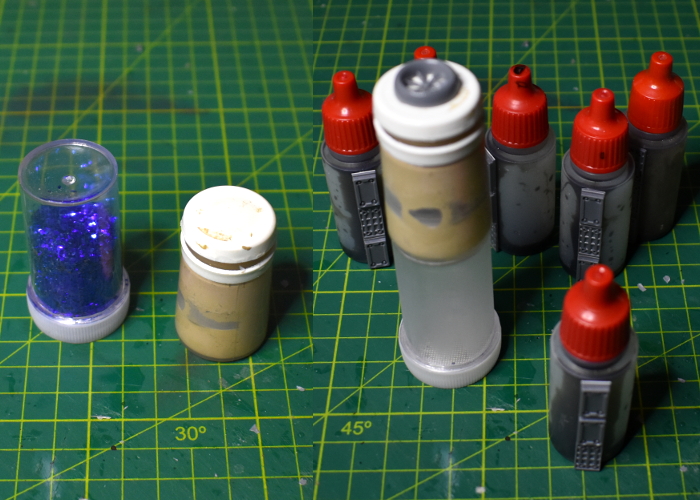
To finish up, I took a spare base and added a control panel using part of a reinforcing strut and a computer panel from terrain sprue #2, and a trapezoid window from terrain sprue #1. I also trimmed the tops off six posts from terrain sprue #2 to glue onto the tops of the dropper bottle lids.

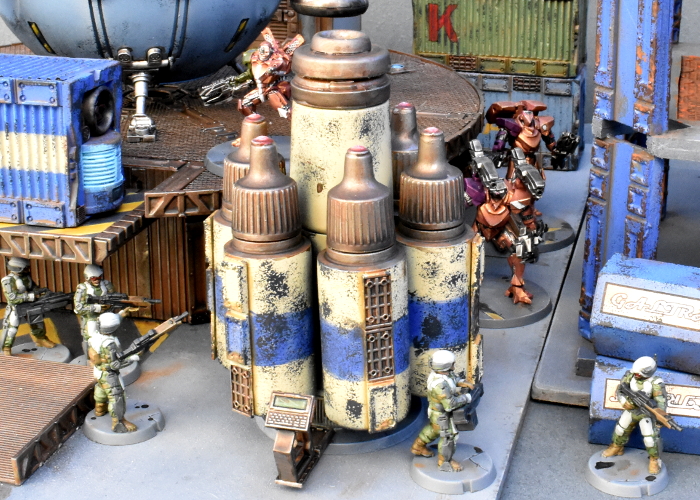
With some paint on, the pylon looked like this:
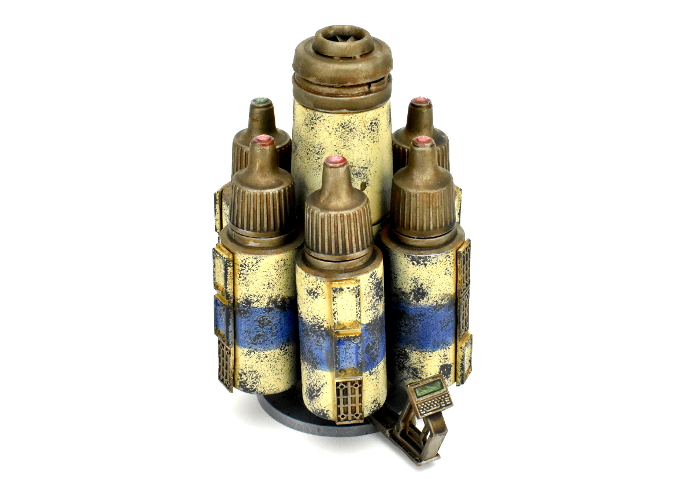
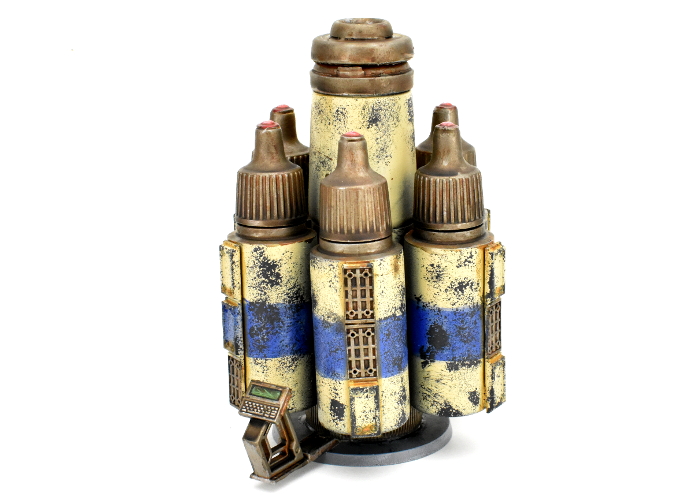
With the paint on, the origin of the parts is still rather obvious. That's not always a problem, particularly for those of us who started off our terrain collections back in the day by just spraypainting whatever interestingly-shaped junk we came across... I would possibly consider adding a ring of plasticard around the top of the dropper bottles, or some piping running from the bottles to the core, if I build any more of these.
To build your own paint bottle fuel pylon, you can pick up the terrain sprues along with the rest of the Maelstrom's Edge model range from the webstore here.
For other building ideas, modeling tutorials, army spotlights and conversion walkthroughs, check out the Hobby section of the Maelstrom's Edge website here.
What are you working on? We would love to see what your models and terrain in the Comm Guild Facebook group!
Terrain Spotlight: Hamster Igloo Environment Dome
Posted on Friday Jul 10, 2020 at 05:00pm in Tutorials
Pet supplies can be a fantastic source of supplies for terrain projects. Previously, I've shown some alien forest terrain made from silicon aquarium plants, and more recently a spherical space ship constructed from a plastic rodent ball with detailing from the Maelstrom's Edge terrain sprues. For this week's article, I came across a plastic hamster igloo on Amazon that looked just perfect for turning into a hazardous environment building.
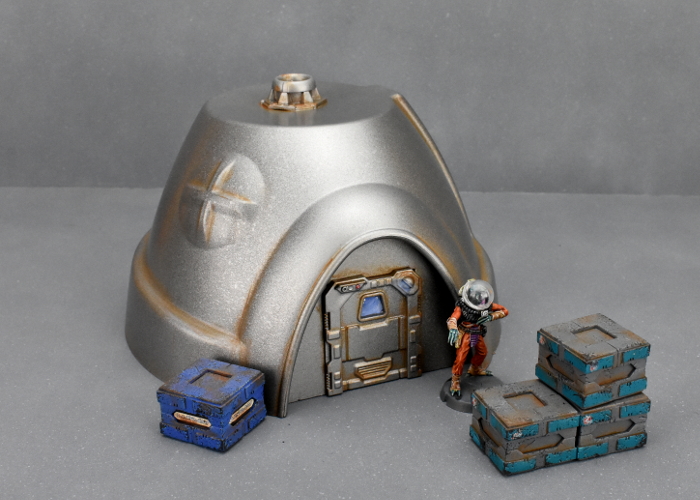
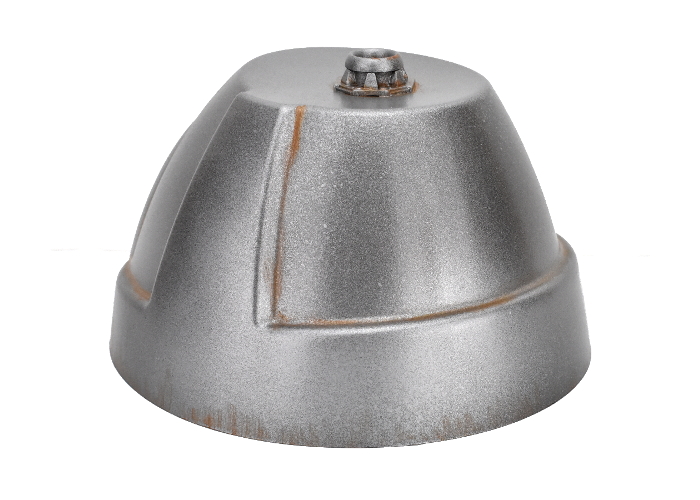
The igloo is a single piece of moulded plastic. They come in a few different sizes, but this one seemed like a good starting point for a small habitat building or utility building.
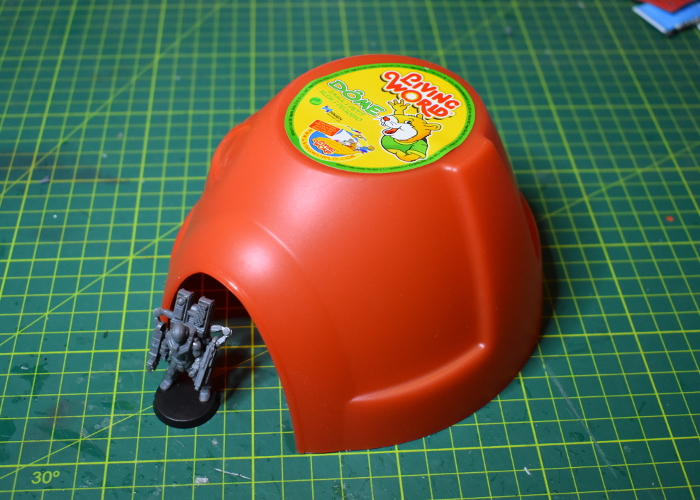
This build really didn't need a lot of detailing, but at the very least it needed a door. I took a piece of 3mm foamed PVC, and sat it against the doorway of the igloo. This formed a handy guide for me to trace around with a pencil, about 5mm out from the doorway.
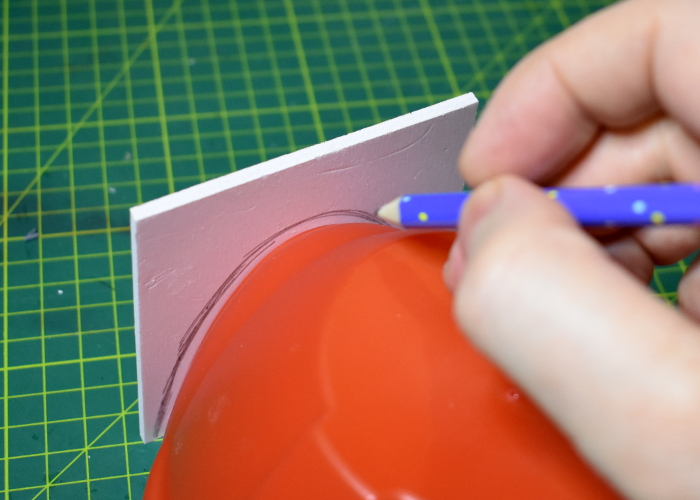
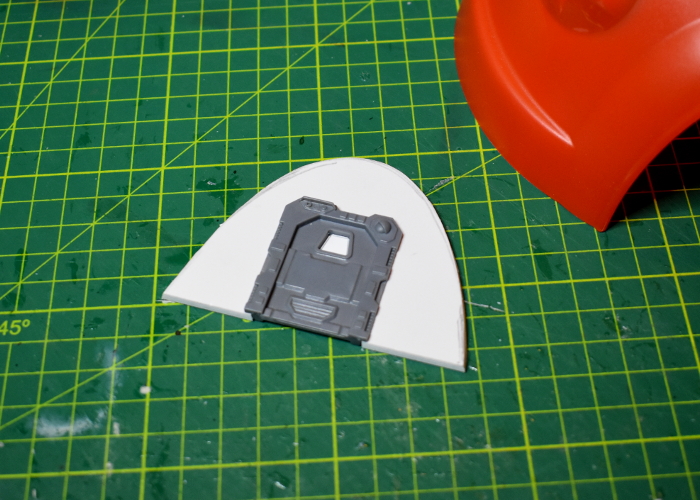
Using an exacto knife, I cut along the pencil line at an angle, so it would sit neatly inside the doorway section. Then I took a door from Terrain Sprue #1, used it as a guide to cut a rectangular hole for it in the middle of the PVC panel, and then glued the door in place. I also cut a small piece of plasticard to size and glued it into the window hole.
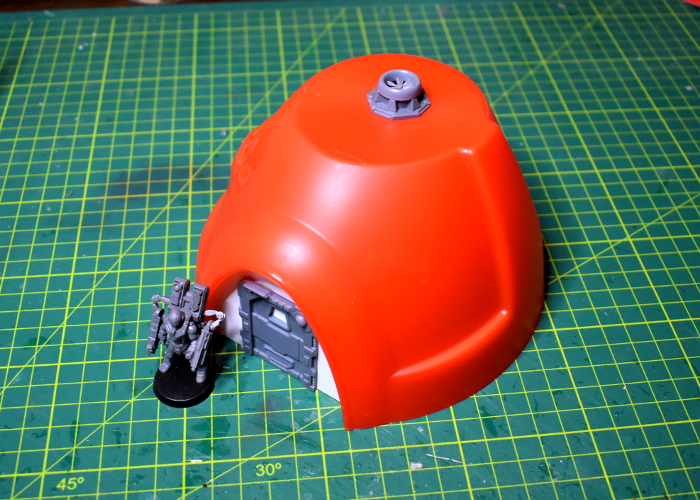
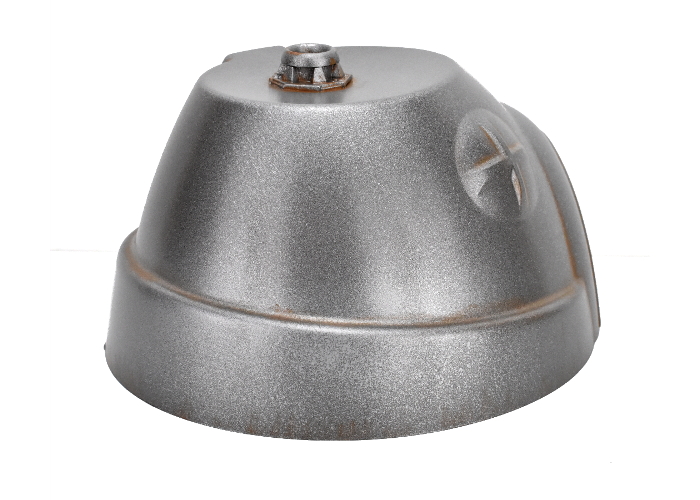
Using a heavy duty 'Power Grip' glue, I glued the door in place inside the igloo doorway. I left the rest of the structure as is, to keep things simple, aside from adding an exhaust fan on the roof to conceal the plastic injection point from the manufacturing process. This was made from the large pipe fitting from Terrain Sprue #1, and the fan from Terrain Sprue #2.
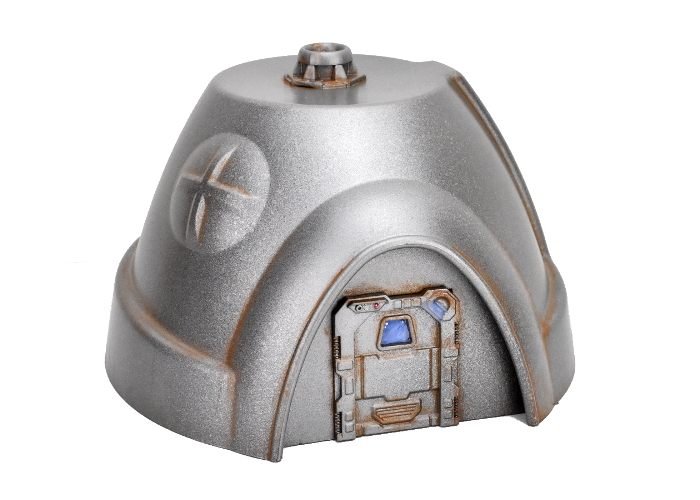
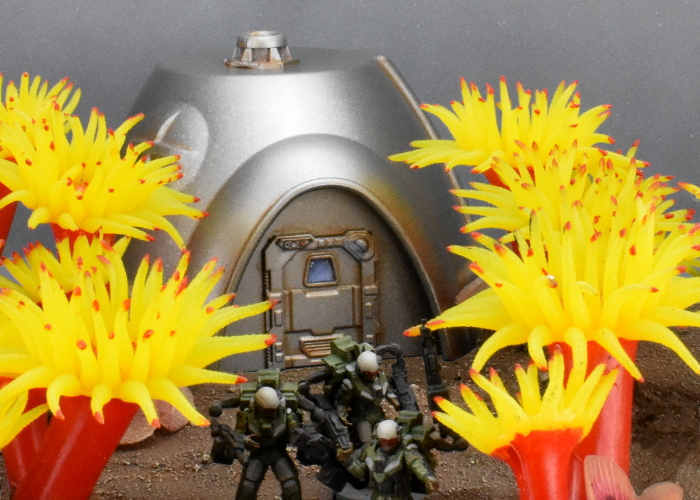
That just left painting. I sprayed the whole thing inside and out with AK Interactive Rust Basecoat. This gave a consistent colour base for the rest of the paint, and including the inside was intended to make sure the plastic igloo was fully opaque. I then sprayed with Army Painter Gun Metal, and then added a light coat of Army Painter Platemetal to highlight everything. While I wanted to keep things fairly shiny overall, I added a light drybrush of Vallejo Beasty Brown in to the creases to give things a little definition. With some blue and white for the window and door light, and a final red lens on the door sensor, the building was ready for the table.

To build your own environment building, you can pick up the terrain sprues along with the rest of the Maelstrom's Edge model range from the webstore here.
For other building ideas, modeling tutorials, army spotlights and conversion walkthroughs, check out the Hobby section of the Maelstrom's Edge website here.
What are you working on? We would love to see what your models and terrain in the Comm Guild Facebook group!
Terrain Spotlight: Tissue Box Building
Posted on Friday Jun 19, 2020 at 05:00pm in Tutorials
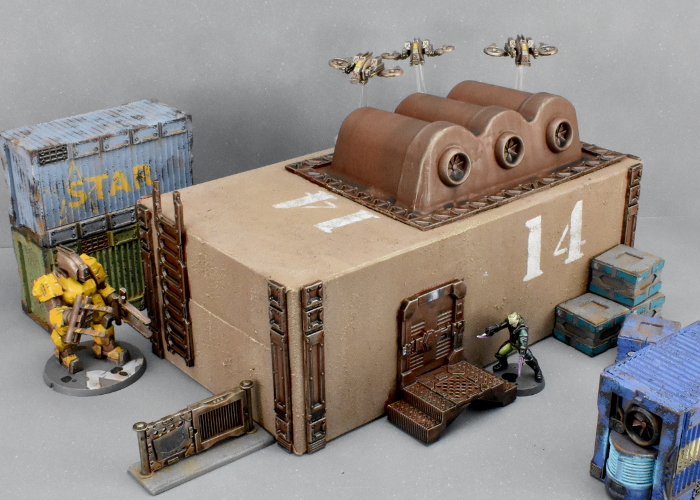
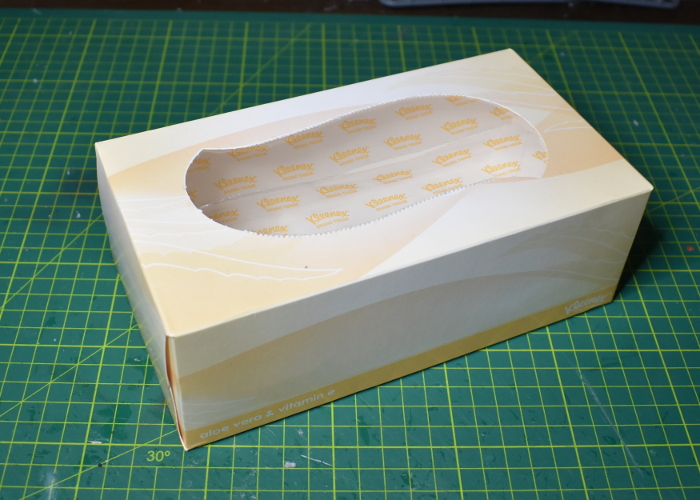
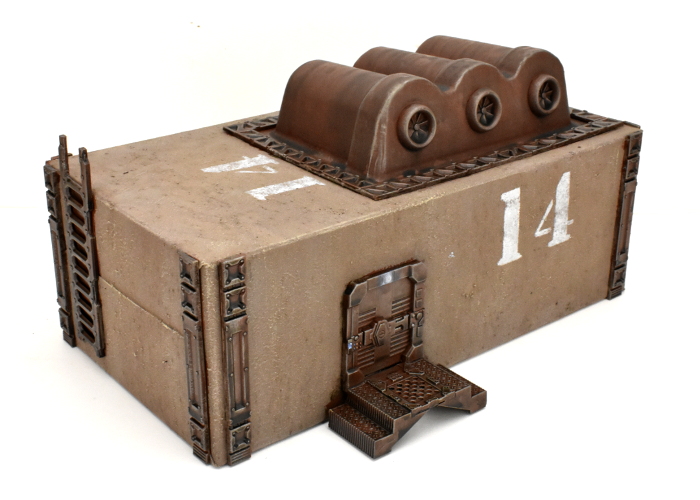
The big joy of the Maelstrom's Edge terrain sprue, for me, is that wandering around the house turns up an endless wealth of items just waiting to be turned into wargaming scenery by slapping some bits on it and painting it up. This week, I turned my attention to the recycling bin, where a humble tissue box was just calling out to be saved from the weekly rubbish collection. With a little cutting and gluing, and a lick of paint, I had Atmospheric Modification Plant #14 ready for the table!
The base for this building, as mentioned above, was an empty tissue box. This isn't as robust a structure as some of my builds, but it does have the benefit of being inexpensive and with two small children in the house we have an endless supply of these to hand!
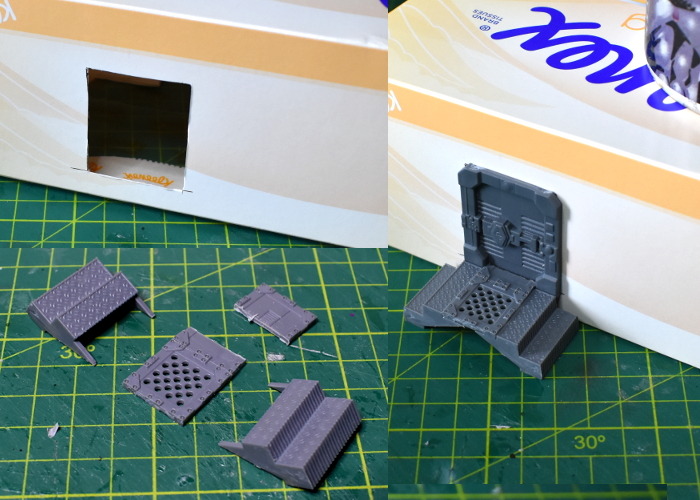
As I just intended this to be a quick and easy build, I didn't get too carried away with detailing. To be a functional building, however, it obviously needed a door. I used a door from Terrain Sprue #1 for this one, as the height of the doors on that sprue fit the box sides better than those on the newer sprue. I cut a hole for the door frame using an exacto knife, and also built a small landing using a couple of stair pieces and floor grates from Terrain Sprue #2, with a little trimming to make the solid floor piece fit neatly into the bottom of the doorway.
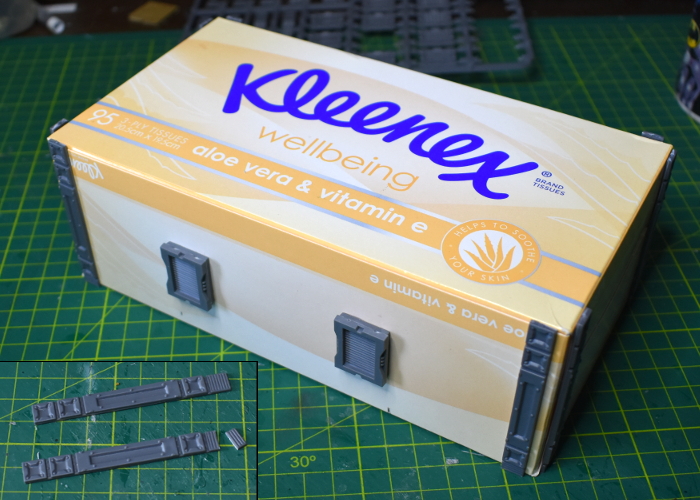
I added some reinforcing struts from Terrain Sprue #1 on the walls of the building, setting them in slightly from the corners. As well as adding some visual detail, this served to conceal the sides of the box flaps on the ends. The original sprue's struts were perfect for this as the vent pieces on the end could be easily trimmed down to make the strut the right height.
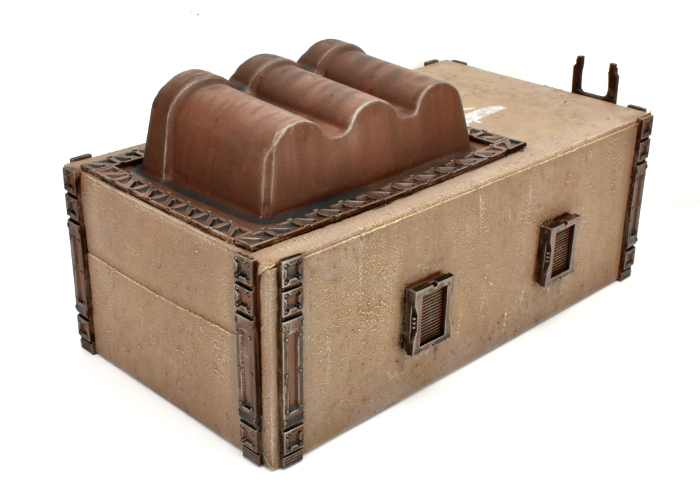
Spaced along the rear wall, I also added a pair of vent windows from Terrain Sprue #2. To avoid weakening the box structure any more than absolutely necessary, I just glued the windows directly onto the wall, rather than cutting holes and insetting the frames.
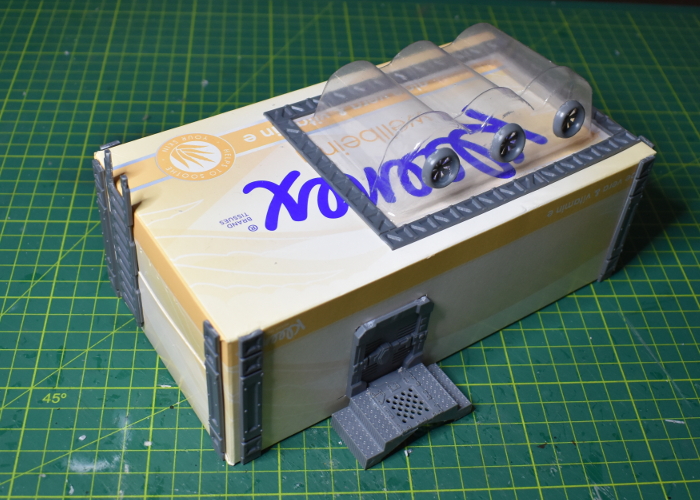
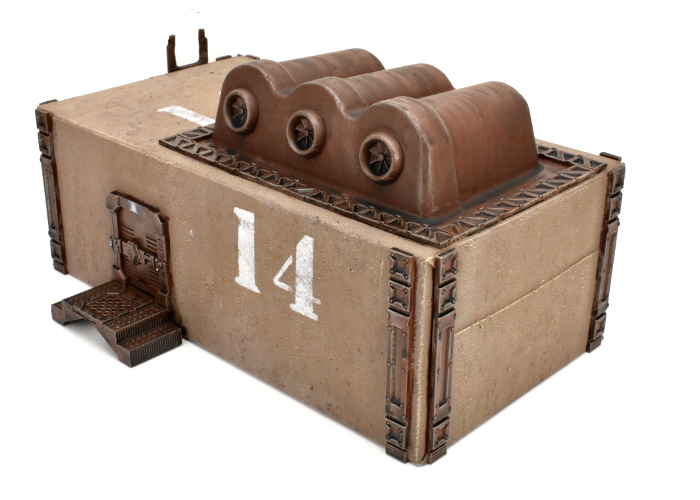
Plain box-shaped buildings are easy to build, but can be a little boring on the table, so I decided to add some raised detail on the roof to break it up a bit. Rummaging on my desk, I found a blister packet from some tubs of glitter that I picked up for a different project, that seemed like it would be an interesing shape with some paint on. So I glued it to the roof, added some industrial reinforcing struts from Terrain Sprue #1 around it to conceal the edges of the plastic, and also glued on some exhaust fans from Terrain Sprue #2.
Having cover on the roof is obviously not much use if models can't get up there, so I also added a ladder from sprue #1 on the end wall. I trimmed top couple of rungs off to make an extended handrail above the roof surface, to make that clamber onto the roof a little easier.
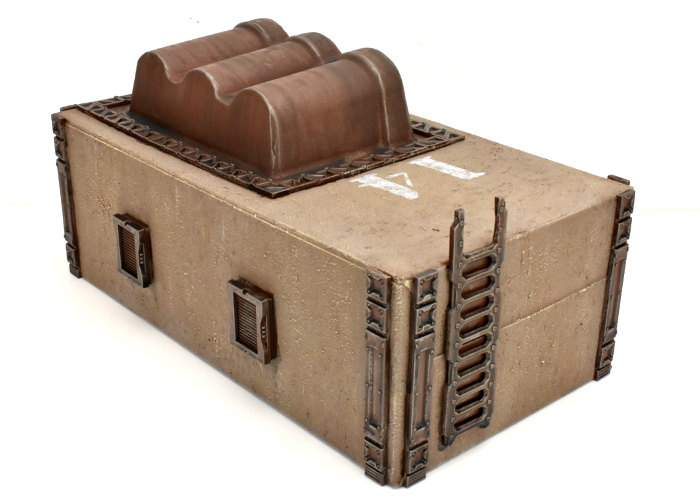
I could have also added some corrugated cardboard or textured plasticard to the remaining roof surface, but chose not to for this build. Instead, I painted the cardboard parts with some textured brown paint, drybrushing with a little bone. The metal parts were painted dark brown, drybrushed with Citadel Boltgun metal and then washed with Army Painter Strong Tone. With a little final detail work, the building looked like this:
To build your own tissuebox building, you can pick up the terrain sprues along with the rest of the Maelstrom's Edge model range from the webstore here.
For other building ideas, modeling tutorials, army spotlights and conversion walkthroughs, check out the Hobby section of the Maelstrom's Edge website here.
What are you working on? We would love to see what your models and terrain in the Comm Guild Facebook group!
Tags: buildings modeling spotlight terrain terrainsprue walkthrough
Painting Spotlight: Escape Pod Diorama
Posted on Thursday May 21, 2020 at 05:00pm in Tutorials
There are a lot of examples out there in internet land of huge, sprawling, super-detailed dioramas that you can pore over for hours and dream of one day having the time (or the storage space!) to make something like that yourself... This is not one of those. Dioramas can also be just a quick, simple exercise in putting together something different to whatever else you're currently working on. I love putting together armies, but sometimes I just want to do something unrelated, or I'll have a little flash of inspiration for a mini scene, and letting that out and building whatever it leads to is a great way of flexing those creative 'muscles'.
That's sort of what happened here. When I put together my kitbashed escape pod a couple of weeks ago, I had the idea to throw together part of a launching bay for it, just to give it something to hang from for the photos. I hadn't originally even intended to paint this, but looking at it sitting on the table afterwards, I decided that it would make for a cute little mini-diorama. So, I broke out a few extra parts, slapped on some paint, and this was the end result:
To get started, I had to snap the escape pod off the hanging struts, as it had been glued in place to photograph it for the previous article. Luckily, I had used superglue here, and it snapped away cleanly without breaking anything. I then finished detailing around the door by adding a thin strip of foamed PVC into the gap between the door and the floor grating, and fleshing out the sides of the doorway with some more PVC and a couple of strut pieces from the terrain sprue to widen it out to match the floor.
A lot of my terrain tends to be rather worn and dirty-looking. I wanted this piece to be old and worn, but not as dirty, simulating a ship or station interior rather than a planet-based facility. To that end, I began painting with a base coat of Army Painter Wolf Grey spray, following by a downwards spray of white. This is sometimes called 'zenithal painting', and is used to allow the spray to natural add highlights and shading as the second spray catches raised areas while leaving the darker basecoat in the crevasses and undersides of detail pieces.
I used Citadel Boltgun Metal to pick out some exposed metal pieces, which I then washed with a layer of Army Painter Strong Tone. On the middle strip on the door, I applied a a coat of Vallejo Heavy Brown and then a couple of layers of Army Painter Pure Red. This was a little messy around the edges, due to the difficulty of painting around the protruding floor piece, so I had to clean up around the edges of the red with a little more grey and white.
At this point, it was time for detailing. I printed up a small sign for the middle of the door and stuck it in place with some PVA glue. On the upper edges of the red door strip, I added a highlight with some old Citadel Titillating Pink, and then applied some sponge weathering over the white and red areas with Army Painter Heavy Charcoal. I went back over the red on the door with some more pink to highlight the edges of the weathering, and blacklined around the white parts with a finepoint black pen to help pick out the details.
My initial intention was to have the floor painted the same as the walls, to accentuate that cleaner spaceship look, but in practice it just killed the detail on the floor grating and made the whole think look a bit bland. So I went back over the floor with some Army Painter Dark Tone, and then gave it a light drybrush with white.
While I wasn't intending to cram a whole heap of docking bay detail into this little diorama, I did want something other than the escape pod in there. I decided to throw in a service robot, assembled from most of an Epirian Scarecrow, with clamp-hands taken from the Master Handler kit and a head made from a trimmed down Firefly Drone turbine, with an eye lens cut from one of the Scarecrow heads.
The robot was painted with a spray of Army Painter Plate Metal, then a wash of Strong Tone. Over that, I gave it a light drybrush with some more Plate Metal, and then picked out some red bits using the same steps as the red on the door. Finally, I painted in the blue eye lens using some Vallejo Electric Blue, black and white. (You can find a handy tutorial on painting lenses here!)
The final detail before assembling everything was to print out a picture of the Maelstrom, to glue in behind the door to provide a nice view out the windows. I played around with various orientations of this for a bit to find what looked best, and then trimmed it to fit behind the door and glued it into place with some superglue. With the robot and pod glued in position, the diorama was done!
To build your own escape pod, you can pick up the terrain sprues, along with the rest of the Maelstrom's Edge model range from the webstore here.
What are you working on? We would love to see what your models and terrain in the Comm Guild Facebook group!
For other Maelstrom's Edge modeling articles, including tutorials and walkthroughs of a wide range of different building and miniature projects, check out the Hobby section of the Maelstrom's Edge website here.
Tags: diorama modeling painting spotlight terrain terrainsprue
Terrain Sprue Kitbash: Escape Pod
Posted on Friday May 08, 2020 at 02:11am in Tutorials
It probably won't surprise anyone who has been following my articles for any length of time that I spend a lot of time looking at sprues and figuring out different ways to fit parts together in new and interesting ways. This week, the power generators on Terrain Sprue #2 caught my eye, and I decided it was time to get away from it all, with a compact escape pod!
The main hull of the pod was built from two generators, and two reinforcing struts split into two and three segment pieces.
I glued the longer strut pieces, detail-side in, along the long edges of the back of the generator, and then trimmed the short pieces to fit neatly along the short edges, before fitting the second generator onto the other side.
For the jet nozzle on the rear of the pod, I used two large pipe fittings from Terrain Sprue #1, glued back-to-back. The inside piece needed some slight trimming on the flat edges to fit neatly between the protruding ends of the struts.
The viewport on the front of the pod was built from more parts from Terrain Sprue #2: a light, a round window and the base of the weapon mount with the sliderail trimmed down.
As a final step, I added some extra detail over the flat strut backs, using the energy fence posts from Terrain Sprue #1 with the bases cut off. For the bottom of the pod, I clipped off the energy projectors and sanded the post face down flat, gluing it with the back of the of the post facing out. On the top, I wanted a couple of clamps to hang the pod with, so I cut the top and bottom energy projector segments off the post, and then just trimmed, sanded and flipped the middle section.
That just left painting. I used a basecoat of Army Painter Necrotic Flesh, and then a wash of Citadel Iyanden Yellow Contrast, followed with a sponge of Vallejo Heavy Charcoal to weather it. For the metal sections, I used Citadel Boltgun Metal with a wash of Army Painter Strong Tone, followed by a light drybrush of Army Painter Shining Silver, and AK Interactive Pure Black over the jet exhaust. The viewport was painted with a mix of Army Painter Matt White, Ice Storm and Ultramarine Blue, and the lights on the rear panels with white, Army Painter Pure Red and AK Pure Black.
To build your own escape pod, you can pick up the terrain sprues, along with the rest of the Maelstrom's Edge model range from the webstore here.
What are you working on? We would love to see what your models and terrain in the Comm Guild Facebook group!
For other Maelstrom's Edge modeling articles, including tutorials and walkthroughs of a wide range of different building and miniature projects, check out the Hobby section of the Maelstrom's Edge website here.
Tags: conversion kitbash modeling spotlight terrain terrainsprue tutorial walkthrough