Entries tagged [spotlight]
Modeling Spotlight: Pa'ku Artillery
Posted on Monday Nov 26, 2018 at 06:00pm in Tutorials
- by Iain Wilson
This past month saw the release of the Pa'ku for the Broken faction, taking to the field with their gigantic Quad EMP Cannon strapped to their rather large backs. This is another brilliant model in a slowly growing collection of characterful alien creatures for the faction, and so in my usual style, I figured it would be fun to take a hobby knife to it and see what happened!
The fantastic studio model below shows the Pa'ku in all his warty glory. He's big, he's ugly, but nobody's going to tell him that so long as he has that gigantic quad cannon pointed in their general direction!
The Pa'ku is a resin model, and comes in 6 pieces, along with a 45mm base. The arms are on ball joints that allow for a bit of posing movement, and the cannon barrels have a round locator piece, so can be swivelled around to whatever orientation you prefer.
The immediate, obvious conversion opportunity is to replace the quad cannon with a larger-bore, single cannon. On the below model, I added a ring of plastic tube over the rear tube assembly, and replaced the barrel section with a new, larger, single barrel made from layered plastic tubing, with some plastic rod struts on the sides to give it a little extra detail.
As an extra bonus, you can also put him on the table with the unofficial rules card in the Force List section of the Maelstrom's Edge website here. You could easily leave off the side detailing and just use a single piece of 10mm tubing for a less detailed but much easier conversion, or use a different gun entirely for other heavy weapon variants.
Venturing a little further outside the box, the slow moving, steady Pa'ku seemed like an ideal candidate for ferrying around notable Broken characters who prefer not to dirty their own boots any more than necessary. With that in mind, I took a Pa'ku and assembled it without the gun, and then added a platform onto the back with a little plasticard, and added a rider built from the Broken Infantry sprue. The handrail is cut from a ladder from the Maelstrom's Edge terrain sprue, and the sheath of extra harpoons is a piece of plastic tube filled with offcuts of 1mm rod, attached with a rivet piece from the previously-hacked-up ladder.
Of course, it's possible that not all Pa'ku are as slow and deliberate in their actions as the species is renowned for. What happens to those more headstrong, battle-hungry Pa'ku? I'd like to think they turn out something like this:
The jetpack was made from the main section of two quad guns, with help from a little putty, Epirian drone parts and plasticard. The head was repositioned by cutting and bending the neck, and the forearms twisted in hot water and guns added from the Broken Infantry sprue. I'll be sharing a more detailed build of this one in an upcoming article, once I get some paint on him!
To add some giant-cannon-goodness to your own Broken force, you can pick up the Pa'ku along with the rest of the Maelstrom's Edge model range from the webstore here.
As always, feel free to pop along and share your work, or ask any Maelstrom's Edge- or hobby-related questions on the Comm Guild Facebook page!
For other Maelstrom's Edge modeling articles, including tutorials and walkthroughs of a wide range of different building and miniature projects, check out the article roundup here.
Conversion Spotlight & Rules: Gnolti Berserker!
Posted on Monday Nov 12, 2018 at 06:00pm in Tutorials
- by Iain Wilson
Big, burly, slow to anger but nigh on unstoppable when they get rolling, the Gnolti is an impressive sight on the table, and is one of my favourite models. A while back, I got to thinking about the different ways that the ongoing battles around the Maelstrom's Edge would affect these massive, generally peaceful aliens, and started exploring this with my 'Longhorn' conversion. At the other end of the scale from the implacable veteran, I thought it would be an interesting contrast to have a much younger Gnolti who handles the constant call to arms in a much more direct fashion - and so the Gnolti Berserker was born:
As with my previous Gnolti conversions, this was built from the standard Gnolti model.
I wanted to give him a charging pose, as this guy was definitely not the 'sit back and take a breather' type of fighter! So I started by cutting the left leg off with a razor saw, and then reattaching it with the leg pivoted to the rear.
In place of the Gnolti's normal field generating bucklers, I thought it would be fun to give the berserker an array of scavenged blades to fight with. Using a sharp exacto knife, I cut off the existing detail from the shields, added some cracks and dents, and glued on some blades cut from the resin casting tab that the parts came on. (Waste not, want not!) As the left hand's fingers are slightly flattened on the bottom where they normally sit on the base, I also reshaped these by carefully rounding them off with the knife and adding in some knuckle lines.
For my Longhorn, I had gone with the idea that the Gnolti's horns would grow as they age. Running that idea backwards, a younger Gnolti would therefore need shorter horns. I figured that reducing his beard would also be fitting, and so I cut away the back couple of sections of the horns, removed all of his beard, and also sliced open the mouth with a razor saw and, holding it under some hot water, carefully bent it open.
I used 'Green Stuff' putty to replace the missing detail around his neck where the horns and beard were originally, resculpted a smaller beard and added a layer over the lower lip to reshape it.
Similarly, I filled in the gap created by re-posing the leg, and also removed the blanket roll from the Gnolti's back just to create a little visual difference from the others, and sculpted in new draped cloth in its place.
Finally, I glued on the arms and did a little final gap-filling where the reposing of the arms caused them to not fit flush at the elbow joints.
Painting was largely the same as my original Gnolti conversion, although I used a very slightly darker grey on the scales and made his beard a brighter orange.
Conversions are only part of the fun, of course - What about getting the models on the table? You can find unofficial rules cards for the Gnolti Longhorn and Gnolti Berserker in the Force List section of the Maelstrom's Edge website here, or download a printable version in the 'Unofficial Cards' PDF compilation here.
If you want to give them a try but aren't as confident in your converting, you can very easily use the standard Gnolti model as a fill-in - for the Berserker, paint him without the light on the shields and maybe make him a bit dirtier, and for the Longhorn just glue on an appropriate gun in the right hand, and you're good to go!
Family Shot!
To put together your own mountain of xenos rage, you can pick up the Gnolti kit along with the rest of the Maelstrom's Edge model range from the webstore here.
As always, feel free to pop along and share your work, or ask any Maelstrom's Edge- or hobby-related questions on the Comm Guild Facebook page!
For other Maelstrom's Edge modeling articles, including tutorials and walkthroughs of a wide range of different building and miniature projects, check out the article roundup here.
Terrain Spotlight: Generator Made From Bubblegum Tape Dispensers!
Posted on Monday Nov 05, 2018 at 06:00pm in Tutorials
- by Iain Wilson
One of the most enjoyable aspects of terrain building for me is to find everyday things that, with a little bit of tinkering, suddenly turn into something that looks at home on the battlefield. This has resulted in me spending more time than is healthy wandering through hardware stores and discount shops looking for new fodder for the workbench - it's often a little surprising where that perfect next project piece will show up.
This week's build is based on an idea that I have come across in several different incarnations online, and thought it looked too cool to not try it out. So after a quick trip to the local grocery store, I found myself building a generator out of bubblegum tape dispensers!
I picked up two packs of grape-flavoured Hubba Bubba. Obviously, the flavour doesn't make any difference to the build, but if you're buying bubblegum anyway, is there any logical reason to buy any flavour other than grape?
The first step was to remove the bubblegum from the packs, and remove the labels. The labels mostly peeled off easily, but needed a little cleanup with some Tea Tree Oil to remove the sticky residue - If you don't have access to Tea Tree Oil, use whatever local equivalent you have for cleaning sticky residue off things.
Then I may have got momentarily distracted...
One side of the pack has an internal ridge running down each long side of the opening, and a pair of tongues that close over into the other half. These needed to be removed, which I did with a sharp exacto knife. They're made from a fairly soft plastic, so cut easily.
This left four almost-identical, semi-circular pieces.
To join the segments together, I took four 25mm bases and cut them in half with a razor saw. The arc markers on the Maelstrom's Edge bases serve as a handy guide for this, but if you are using different bases then some measuring and marking would be involved here.
I cut a piece of masonite to an appropriate size for a base, and then a smaller piece of foamed PVC for the generator to sit on. I could have used another piece of masonite here, but figured the plastic gum dispenser would glue better to the PVC. On the PVC, I marked out where the dispenser pieces would sit, and added a 25mm-wide centre strip to serve as a guide for gluing the base pieces on.
Then, I sat each dispenser piece in turn onto the marks and glued the base sections in position on both sides using an all-plastics glue.
(The 'all-plastics' glue that I use is a 2-part system that has a tube of superglue and a 'primer' pen. You prime the contact points on both parts to be glued before applying the glue, and it creates a super-fast and extremely strong bond with just about any type of plastic).
It was around about this time that I noticed that there were small recycling symbols embossed on two of the dispenser pieces, so I carefully shaved these off with the exacto knife and lightly sanded down the surface. Then I moved on to the ends. Due to the dispenser having that tongue that I cut off back at the start, one side was left with a flat plate, while the other had a hole where the tongue originally slotted in. I took the cut piece of tongue and glued it into this gap.
Then I took eight support struts from the Maelstrom's Edge terrain sprue, and cut off the vent sections on their ends. These were glued in pairs into the dispenser opening.
The four sections of dispenser were then glued down onto the base, with the 25mm base sections on each touching the matching section on the next.
I felt that the generator needed a control panel, so quickly threw one together using a console and two trapezoid windows from the terrain sprue, with a square of foamed PVC as a base.
With that glued in place onto the masonite base, the generator was ready for some paint!
I painted it up using my normal weathered metal technique (which you can find in the tutorial here).
To build your own generator, you should be able to find the bubblegum tape just about anywhere that sells bubblegum, and can pick up the Maelstrom's Edge terrain sprue along with the rest of the Maelstrom's Edge model range from the webstore here.
As always, feel free to pop along and share your work, or ask any Maelstrom's Edge- or hobby-related questions on the Comm Guild Facebook page!
For other Maelstrom's Edge modeling articles, including tutorials and walkthroughs of a wide range of different building and miniature projects, check out the article roundup here.
Tags: buildings conversion spotlight terrain terrainsprue tutorial
Terrain Spotlight: Abandoned Outpost
Posted on Monday Oct 29, 2018 at 06:00pm in Tutorials
- by Iain Wilson
As anyone who has been following these modeling articles may have noticed, I have all sorts of trouble looking at store-bought kits and not immediately coming up with various ways to hack them up and glue them back together again, and this week's article is no exception. There are a plethora of outstanding MDF building kits out in the market these days, which can be great options for inexpensive, easy to build terrain. Thanks to how easy it is to cut and glue, they can also form a great base for modification. I recently put together a basic desert building from Knights of Dice's Tabula Rasa range, with some extra detailing courtesy of the Maelstrom's Edge terrain sprue (If you missed it, you can find the article here), and this week, I'm taking a stab at a second building from this range. Intact buildings are just so pre-galaxy-spanning-apocalypse, however, so I'm taking the knife to this one and creating a small abandoned outpost:
The first step was to plan out exactly how I was going to destroy the building, so I popped the parts off their sheets and fitted the basic structure together with no glue. Then I took a pencil and drew a rough line around the outside where I wanted the walls to be damaged.
I cut the walls using a sharp exacto knife, by scoring through on the outside following the pencil line relatively closely, then scoring a roughly corresponding line on the inside of the wall piece (this wasn't an exact match, just eye-balled to be close enough) and then snapping the piece in two. The edge was then cleaned up using the knife to remove any fluffy or protruding parts.
When all of the cuts were completed, it was time to add some detail. The Tabula Rasa kits are deliberately plain, both to keep the cost down and to provide a generic structure for detail pieces to be added, and so they're a perfect base for the Maelstrom's Edge terrain sprue!
I took a door piece and used a razor saw to cut the door out of the frame, and broke the frame into several pieces. Some scarring was also added with the knife.
I widened both the exterior and interior doorways to match the terrain sprue door pieces. The door frame pieces were glued in place on the exterior doorway, and I added a second doorframe with the door also removed but the frame left intact into the inner doorway. Support struts cut to length were glued over the corner joints on the walls to hide them, and add a little more visual interest to the otherwise fairly plain, boxy building. On the first Tabula Rasa building I added detail over the window holes as well, but for this ruin it didn't seem necessary.
The courtyard has a low MDF wall that runs around it, but I wanted something a little more flashy, so I took a couple of ladders from the terrain sprue and cut off one side with a razor saw.
These were then cut to length and glue in place around the edges of the courtyard, after gluing the scrap pieces back into the locator holes for the original wall to fill them in.
To help turn this into an old, long-abandoned ruin that the jungle had started to reclaim, I built up some patches on the floor with air-drying clay.
I pressed a few castoffs pieces of MDF into the clay, and glued the distressed door down on the courtyard floor. Over this, I painted a thick layer of PVA glue and sprinkled on a generous layer of a gravel, sand and railway ballast mix that I like to use for building rubble as it has a lot of different textures in there.
When the PVA glue had dried, I tipped off the excess gravel mix, and then it was time to paint. I didn't have a brown spray to hand, so I undercoated with some flat black and, while it was still wet, followed up with a light coat of Army Painter Dragon Red.
Over this went a coat of a light cream colour, and then a highlight spray of white from above.
I went back over anything that I wanted to look like exposed metal and re-undercoated with Vallejo Beasty Brown, before drybrushing with P3 Pig Iron. The few bits of the original floor still peeking through the rubble were painted with Vallejo Basalt Grey and drybrushed with Vallejo Light Grey.
With that out of the way, I went to town with washes!
I gave the whole building a generous coat of Army Painter Strong Tone. The walls were painted with a medium-sized flat brush, using vertical strokes to create a streaky effect and allowing the wash to pool and run where it felt like it. When that first wash had dried, I went back over it, picking out small areas with extra dollops of Strong Tone and also adding some patches of Green Tone and Military Shader to give them a greenish, mossy tint.
Time to add some shrubbery!
I took a bunch of assorted fake plants. Most of these are cheap aquarium plants, although I also used a bunch of plastic greenery taken from a mat I found at a local hardware store for creating fake vertical gardens. It looks rubbish as an actual plant feature, but is a perfect resource for my purposes here.
Fake plants, particularly the cheaper kind, tend to be rather brightly coloured and slightly glossy, which just wouldn't do. I got around this by giving the plants a light spray with Army Painter Army Green - not enough to completely cover over the original colour, but enough to dull down the colour and shine. To add some extra colour differentiation, I very lightly misted the tips of some of the plants with white. The painted plants were then glued in place wherever seemed appropriate, but poking a hole through the rubble and into the underlying clay, applying some superglue to the plant stem and pushing it into the hole. I also cut some leaves off a few plants and glued them around on the ground.
The final step was to paint the fallen leaves with varying amounts of brown, and then a quick wash of Strong Tone. At this point, the ruin looked something like this:
To get all apocalyptic on your own building creations, you can pick up the Maelstrom's Edge terrain sprue along with the rest of the Maelstrom's Edge model range from the webstore here.
As always, feel free to pop along and share your work, or ask any Maelstrom's Edge- or hobby-related questions on the Comm Guild Facebook page!
For other Maelstrom's Edge modeling articles, including tutorials and walkthroughs of a wide range of different building and miniature projects, check out the article roundup here.
Tags: conversion modeling painting spotlight terrain terrainsprue tutorial walkthrough
Modeling Spotlight: Karist Kaddar Nova
Posted on Monday Oct 22, 2018 at 06:00pm in Models
- by Iain Wilson
This week, I'm having a play around with another of the original models released with the Battle for Zycanthus boxed set: The Kaddar Nova!
The Kaddar Nova is a member of the Karist Enclave priesthood, but they are often granted operational control on the battlefield due to their experience and the reverence paid to them by members of the Enclave. Equipped with an incredibly powerful cybel reactor that serves as both a power source and a weapon, the Kaddar Nova is a distinctive figure. Their bodies are enlarged and twisted by their constant exposure to cybel energy, and their ravaged faces cut a stark contrast to their powerful frames.
As the leader and figurehead of the Karist forces, the Kaddar Nova needed a suitably impressive model kit, and so the sprue comes with a nice array of parts to build them. But as always, of course, the sprue is only the starting point, and below I'll go through some quick and easy ways to further customise this fearsome individual.
Building your Kaddar Nova straight off the sprue lets you choose from three different sets of legs, two different arms for each side, two different heads, and an optional crown piece for the more formal-dressing Kaddar.
The indents in the crown mimic the extra eyes of the alien Angels that often accompany Karist forces. You can use this to make a more mysterious Kaddar Nova by taking the head with the scull-cap, trimming his nose down flat and gluing the crown piece on upside down over his face, so that the upper rim sits just below his eyes.
Headswaps are another easy way to mix things up on your models. The necks on the original Karist sets weren't all interchangeable (something that we've corrected in later Maelstrom's Edge models) but thanks to them being plastic that's easily fixed with a little cutting or filing. On the below model, I have used a head from the Tempest Elite set, with the helmet crust removed as it would hit up against the cybel reactor.
A more inscrutable look can be achieved using a Karist Trooper helmet with the neck trimmed down to fit, and the eye lenses sanded down to produce a blank faceplate. The staff on this model is a modified Cybel Glaive from the Faction Expansion sprue.
An advancing pose can be created with some careful cutting - trim a wedge out of the groin area where the legs join, so that they can be attached in a less spread position, and glue them so that one leg is to the rear slightly. Once the glue has set, cut or file the waist down flat and assemble the rest of the model - his robes largely hide the joint, but you can use a little modeling putty to fill any resulting gaps.
Alternatively, you can look for legs from elsewhere in the range. Trooper legs are too small, as they're not cybel-enhanced like the more elite Karist warriors, but by cutting through the waist of a Tempest Elite model with a razor saw, you can replace the Kaddar Nova's robed legs with walking, armoured legs instead.
Shadow Walker legs also work, although they're a fraction shorter. This Kaddar Nova is obviously just not quite as cybel-swollen as his compatriots yet.
The Kaddar Nova is only one aspect of the Kaddar priesthood, and others will be fleshed out eventually. In the meantime, though, it's fun to see where mashing bits together can lead you... The below model is a combination of Kaddar Nova and Shadow Walker parts, with some small tentacles taken from a couple of Mature Angel kits. I call him a 'Kaddar Noctis'.
Hopefully, this has given you some inspiration for your own Kaddar Nova builds! To get started, you can pick up the Kaddar Nova along with the rest of the Maelstrom's Edge model range from the webstore here.
As always, feel free to pop along and share your work, or ask any Maelstrom's Edge- or hobby-related questions on the Comm Guild Facebook page!
For other Maelstrom's Edge modeling articles, including tutorials and walkthroughs of a wide range of different building and miniature projects, check out the article roundup here.
Tags: conversion kaddar karist modeling nova spotlight tutorial
Terrain Spotlight: Building made from foamed PVC and the Maelstrom's Edge Terrain Sprue
Posted on Monday Sept 24, 2018 at 06:00pm in Tutorials
- by Iain Wilson
I've showcased a couple of customised Plast Craft Games buildings in the past - a scifi-d up pagoda, and a similarly modified western building. These kits are made out of a foamed PVC board which was really fantastic to work with, so I decided to track down some similar board to have a crack at putting together some of my own designs with it, with the below result:
Slightly unusually for my projects, I started this one by sketching out a plan to see how everything would fit together. This was partly due to my desire to take advantage of the flexibility of the PVC by adding a curved front wall to the building, so I wanted to make sure that I had my dimensions correct before I started cutting.
Once I was confident that I had it all worked out, I pencilled up the various panels that made up the building onto the sheet of PVC, and then used a steel ruler and hobby knife to cut it all out. The foamed PVC cuts really easily with a knife, and also sands well. It feels almost like something halfway between cardboard and foamcore*, without the inherent frailties, like the risk of damage from moisture or spraypaint.
*For the uninitiated, Foamcore, also sometimes called Foam Board, is a material made up of a thin sheet of expanded polystyrene sandwiched between layers of paper or thin card, and is a common building material for wargaming terrain and scale building construction.
Once everything was cut out, I did a quick dry-fit to check that everything slotted in where it should.
The curved panel on the front was made by cutting the piece to the right size and then laying it over an old baby formula tin while heating it with a hair dryer. This achieved the desired curve, but I suspect the hair dryer was a little too hot for the material as it caused it to swell on some of the cut edges. Next time around, I'll try just immersing it in hot water for a minute instead.
The door and windows are taken from the Maelstrom's Edge terrain sprue. I cut the holes in the wall panels for those by sitting them in place, drawing around them with a pencil, and then cutting the resultant rectangles out with a hobby knife.
I wanted a walled roof area for troops to take cover on, so marked down 20mm inside each wall and glued in some strips of leftover PVC to act as support.
The walls, door and windows were all glued into place, and the roof dropped into place with a little more glue. I used superglue for assembly - this grabs really well, and quite quickly, on the foamed PVC.
As the last step before painting, I took support struts from the terrain sprue and glued them over the exposed joints on the walls.
That left me with the building itself assembled, and a few details to add on once the walls were painted. For some added sturdiness, I glued the building down to a square of 5mm masonite.
To kick off the painting, I sprayed with red right around the top of the walls.
I then applied a line of masking tape over the red paint, just below the tops of the walls. I lined this up with one of the panels on the support struts, to make it look neater.
The whole building received a coat of a nice, sandy brown colour.
This was followed up with a spray of white from above, leaving the sandy brown in the crevasses and undersides of the detail.
(And yes, it does feel a little absurd to take a white building, and apply three different coats of paint just to wind up with a white building again!)
Once the spray was dry, I peeled off the masking tape, and painted the base and the roof with Vallejo Basalt Grey.
Everything was weathered with a sponge and some Vallejo Heavy Charcoal (for a how-to on sponge weathering, check out the article here!), and the base and roof were drybrushed with Vallejo Light Grey and a little white.
I dirtied everything up with a generous drybrush here and there with Vallejo Beasty Brown.
The lower edges of the weathering on the red strips was highlighted with a little Citadel Tentacle Pink and Army Painter Pure Red, and I blacklined some of the deeper detail lines on the terrain sprue components. The 'puddle' stains were added with Army Painter Strong Tone and Dark Tone, by dripping small drops onto the board and leaving it to dry.
For the finishing steps, I added a fan on one wall using the large pipe fitting from the terrain sprue some plasticard, built a small pipe coming out of the back wall using some more terrain sprue pipe fittings, a couple of short pieces of plastic tube and a piece of sprue cut from the terrain sprue, and hung a ladder on the back wall. To add handrails to the top of the ladder, I trimmed away the top rung, and cut a couple of pieces of sprue that looked about right, added a ninety-degree bend with by bending carefully with pliers, and then gluing it all in place. The ladder was painted using my normal weathered metal technique.
The end result looks like this:
You can pick up the Maelstrom's Edge terrain sprue along with the rest of the Maelstrom's Edge model range from the webstore here.
As always, feel free to pop along and share your work, or ask any Maelstrom's Edge- or hobby-related questions on the Comm Guild Facebook page!
For other Maelstrom's Edge modeling articles, including tutorials and walkthroughs of a wide range of different building and miniature projects, check out the article roundup here.
Tags: buildings modeling spotlight terrain terrainsprue walkthrough
Modeling Spotlight: Epirian SecDef Heavy Weapons Team conversion & rules!
Posted on Monday Sept 17, 2018 at 06:00pm in Tutorials
- by Iain Wilson
The addition of the SecDef to the Epirian lineup adds a much more 'military' feel to the faction, and I've been having a lot of fun exploring that with the models. I previously added my own homebrew SecDef Lieutenant and Scout Walker unit cards to the force builder (and if you missed the article, you can see how they were built here), and this week, I'm fleshing them out a little more with the addition of a dedicated heavy weapons team, based on the Master Bot Handler exo-suit.
My idea was for a slower-moving, but more heavily-armed team variant, for those situations that call for a little more firepower. With that goal in mind, I grabbed some parts from the SecDef and Master Handler sprues, and went to work!
From the Master Handler sprue, I took a torso and backpack, the weapon support arms and two weapons (I used the flakk guns, but it doesn't really matter which you use as you only want the mounting ring on the back of them). From the SecDef sprue, I took a head, two arms, two legs and a pair of machine guns.
I didn't want these guys to be quite as heavily armed as the Master Handler, so the first step was to remove the missile racks from the top of the backpack. I sliced them off using a razor saw, and cleaned up with a hobby knife to get rid of any rough cut marks.
As the SecDef arms have small shoulder pads on them, I removed the ridges that sit directly over the Master Handler's shoulders on each side of the torso. Otherwise, the arms would wind up sitting too low.
For the weapons, I cut the mounting ring from the back of the Master Handler's guns, and the grip and trigger assembly from the top of the SecDef gun, and then glued the mounting ring to the back of the machine gun's butt.
From there, the body was assembled pretty much as you would expect...
And finally, the weapons were glued onto the outside of the forearms - I didn't bother adding any specific mounting for them, as I figure they would magnetically lock to the SecDef exoskeleton's wristbands. Then I glued the support arms in place, and the model was ready for painting!
The same process works with the chainguns on the SecDef sprue, although in that case I also removed the weapon butt before attaching the mounting rings, to avoid the weapon looking too long against the model's arms.
For the team sergeant, I used a pointing arm, and for something different I put the gun for that arm in a 'standby' position. When he needs it, the support arm would drop it down and it would maglock to his wrist, ready for action.
Of course, pretty models are only half of the story! I have also generated an unofficial rules card for the heavy weapons team, which you can find in the Force Builder section of the Maelstrom's Edge website here.
To build your own heavy weapons team, you can pick up the Master Handler and SecDef sprues along with the rest of the Maelstrom's Edge model range from the webstore here.
As always, feel free to pop along and share your work, or ask any Maelstrom's Edge- or hobby-related questions on the Comm Guild Facebook page!
For other Maelstrom's Edge modeling articles, including tutorials and walkthroughs of a wide range of different building and miniature projects, check out the article roundup here.
Terrain Spotlight: 'Honest' Pete's Trading Post
Posted on Monday Sept 10, 2018 at 06:00pm in Tutorials
- by Iain Wilson
A few weeks ago, I picked up a couple of packs of scifi shipping containers from a company called 'Laser Cut Card'. They produce a range of different vehicles and building kits that are laser cut out of stiff cardboard, which are much cheaper and easier to work with than the more common MDF kits, and are surprisingly sturdy when assembled. I built four of the six containers I received as normal shipping containers, but then couldn't resist doing something a little different for the fifth one. And so for this week's modeling spotlight, I'm running through the construction of 'Honest' Pete's Trading Post!
The shipping containers come flat-packed in a set of three, with some pictorial building instructions on the back of the package insert, but assembly is essentially to roll a sheet of pre-scored card into an octagonal tube and then glue other bits onto the outside of it. I assembled mine with superglue, although you could use wood glue if you wanted to allow a little more working time to make sure you have everything lined up.
Obviously this wasn't going to be a particularly large shop, so the idea was to have a servery-style counter and awning rather than have customers go inside. So I began by cutting one of the large sections off the main body piece of the container, and then gluing the ends on to the result sideless tube.
A shop needs somewhere to put their merchandise, so I threw together a set of shelves from thin plasticard, to run along the back wall of the container. An angled bottom on the uprights allowed the shelves to sit flush against the container side.
Next up I cut another couple of strips of plasticard to create a counter, about a third of the height of the space in the container wall, and glued this in place.
For the finishing touches, I cut some 'concrete' stands for the container out of 5mm foamcore. These serve to lift the container up very slightly to allow a little extra head-clearance for the awning, and make the structure look more stable. The exposed foam center was sealed with a generous coat of PVA glue so that it wouldn't dissolve when hit with spray paint.
I added some corner reinforcing to the bottom of the front edge of the awning piece using some scrap card pieces, and built some corner support posts using the small pipe fitting from the Maelstrom's Edge terrain sprue, some plastic tube and a couple of lengths of plastic cut from the sides of the terrain sprue itself.
Finally, I took a large pipe fitting from the terrain sprue and added a fan cut from a piece of thin plasticard. I trimmed the edges of the pipe fitting away so that it would fit neatly over the circular detail on the roof of the container.
At this point, the trading post was looking like this:
With an MDF base added, and some paint on:
The sign on the awning was a last-minute addition. I was originally going to have the trading post sign on the front of the counter, but realised that this wouldn't be hugely visible on the gaming table, so built a quick rooftop sign from some more scraps of card. I also added a mesh grill above the counter after painting inside the container, to make the interior of the store less accessible.
The container was sprayed with black and then Army Painter Army Green, before being sponge-weathered with Vallejo Heavy Charcoal and dirt weathering drybrushed into the creases with Vallejo Beasty Brown. The text for the signs was created in Gimp, printed, and glued on prior to weathering so that it would match the rest of the container.
I added grafitti on the back and sides of the container to give it a little character and to make sure that all the interesting bits weren't on the front.
The grafitti was sketched in with a black fineliner pen, and then painted in whatever colours seemed appropriate.
The roof was left plain, with just the weathering to break up the green.
As an extra little detail, I printed up a shipping carton and some bottle labels using Gimp, adapting the fronts I made for my Vending Machine templates a few weeks back (article here). The shipping carton was cut and folded, and then weathered with a little Army Painter Soft Tone, while the bottle labels were glued to some bottle bombs taken from the Broken Infantry weapons sprue with their rag wicks cut off.
And with that, 'Honest' Pete's is ready for the table!
You can pick up the Maelstrom's Edge terrain sprue along with the rest of the Maelstrom's Edge model range from the webstore here.
As always, feel free to pop along and share your work, or ask any Maelstrom's Edge- or hobby-related questions on the Comm Guild Facebook page!
For other Maelstrom's Edge modeling articles, including tutorials and walkthroughs of a wide range of different building and miniature projects, check out the article roundup here.
Tags: buildings conversion modeling painting spotlight terrain terrainsprue tutorial walkthrough
Conversion Spotlight and Rules: Broken Skyboarders
Posted on Monday Sept 03, 2018 at 06:00pm in The Broken
- by Iain Wilson
Back when the plastic Broken Infantry kit was released, I cobbled together a conversion of a broken warrior riding a hovering skateboard-type affair, which featured in my 'Easy Broken Rabble Conversions' article. At the time, it was just something made for a little fun, but I found myself thinking that this would make for a cool unit option for the Broken, and so decided to sit down and write up some rules for them. Below you''ll find some ideas for building your own skyboarders using asorted components and some plasticard, and a link to the (unofficial) rules card to use them in your own Maelstrom's Edge games!
The primary consideration when putting together any sort of vehicles for the Broken is that they rely on scavenging and trading for whatever they can get, for the most part. As a result, there is very little uniformity in clothing and equipment, and I really wanted to carry this across to the skyboard unit. This meant coming up with three different designs for the three models in the unit, although you could just as easily stick with a single design and custimise them with additional bits and pieces stuck on, or simply with individualised paint schemes on the boards.
The first board is the one I build for the original article. I didn't take any in-progress pics of this at the time, but it's a fairly basic constructions - I glued two rectangles of textured plasticard together for the board itself, and then took four turbines (two left and two right) from Epirian Firefly drones, cut away the mounting pins and glued them onto the sides of the board. The rider was assembled from standard broken parts, posed to look like he is balancing on the board, which didn't actually require any converting.
My second board was also based on Firefly turbines, but this time I used two of them with the mounting pegs and trailing wings removed with a sharp hobby knife, as below:
I measured out the board on a piece of 2mm plasticard, allowing space for the turbines at either end with room for the rider to stand in between them. Then I drilled out holes the size of the turbines using a spade bit - a 10mm bit was very slightly too small, but was all I had. A little sanding after drilling the hole pushed it out to the right size.
I cut the board shape out, sanded down the edges, and glued the turbines in place in the holes. I also added a 'motor' piece using the heat shield cut from a torch (flamethrower) and a trimmed down overcharged powercell, but found on the Broken Infantry sprue.
For the final board, I made use of a part of a pipe fitting piece I had left over from the Maelstrom's Edge terrain sprue, from a building project a while back. I had cut through the pipe fitting to make it shorter, which left a nice circular piece that looked just perfect for a turbine surround. I cut a matching hole in a piece of 2mm plasticard using a 12mm spade bit, and then cut the plasticard to the shape I wanted.
I made the turbine fan itself out of a circle of 1mm plasticard, and added a circle of mesh to go over the top side of the hole, and a strut to hold the fan, using an injection point cut from an old model sprue. With all of this glued in place, I finished up with another overcharged powercell added for some sort of nod towards functionality.
After building riders for the two new boards, again just using components from the Broken Infantry sprue with minimal modification, I drilled holes in the bottoms of the boards to attach flight stems at suitably jaunty angles. With some paint thrown on, the skyboarder unit wound up looking like this:
Obviously, this is only a starting point - you can let your imagination out for a run and come up with different skyboard designs using whatever components you have on hand. The sky's the limit! (Sorry...)
As promised back at the start, I write up a rules card to include these guys as a Vanguard option in your Broken force. You can find this in the Force Builder section of the Maelstrom's Edge website here.
To build your own Skyboarders, you can pick up the Broken Infantry kit along with the rest of the Maelstrom's Edge model range from the webstore here.
As always, feel free to pop along and share your work, or ask any Maelstrom's Edge- or hobby-related questions on the Comm Guild Facebook page!
For other Maelstrom's Edge modeling articles, including tutorials and walkthroughs of a wide range of different building and miniature projects, check out the article roundup here.
Terrain Spotlight: PVC Pipe and PC Fan Cooling Towers
Posted on Monday Aug 27, 2018 at 06:00pm in Tutorials
- by Iain Wilson
On one of my periodic rambles through the plumbing department at the local hardware store (because how else would I spend my weekends?) I came across some pipe fittings that I thought would be just perfect for some different line-of-sight-blocking terrain to break up the sea of square buildings on my urban table setup. With the addition of a couple of old computer fans and a few components from the Maelstrom's Edge terrain sprue, I had a trio of cooling towers ready for the table.
The part that I used for the main body of the tower is a 'round socket downpipe' intended for rain guttering on a house.
As the downpipe is made of PVC, and is quite shiny, I started out by giving it a light sand with some fine grade sandpaper. This provided a better surface for glue and paint to adhere to, and also allowed me to remove the embossed manufacturer logo on the side.
Cooling towers tend to be largely featureless constructions of plain concrete, but that's a bit boring for a gaming table. So I grabbed four reinforcing struts from the Maelstrom's Edge terrain sprue, and chopped off the two square sections from the end, so that the remaining length would fit neatly onto the wider portion of the downpipe. Then I glued the pieces on using an 'all plastics' superglue, which is a two-part superglue that has the normal glue plus a 'primer' that goes on first to help strengthen the bond. For a more flush fit, I could have sanded down the side of the downpipe where the strut pieces would sit to form a flat strip on the curved surface, but the struts are narrow enough that the gaps that result from gluing them straight to the curved side aren't really noticeable, so I didn't bother.
To add some detail to the inside of the tower, I dug out an old computer fan from my box of assorted 'probably use this for terrain one day'
On the inside of the downpipe, there is a ridge where the thinner and thicker sections meet. I cut a piece of 2mm thick plasticard to fit neatly onto that ridge, providing a platform for the fan to sit on. I glued the plastic strip in place, but left the fan unglued for now, to make painting easier.
Painting went through a process that is probably familiar to anyone who has been following these articles. I started by undercoating with flat black spray.
Next I sprayed with a medium grey, and to add some texture to the flat surface added a light spray of light grey while the first coat was still wet. This creates a nice, dappled, concrete-like effect. As I only had gloss grey sprays on hand, once the grey was dry I gave the tower a generous coat of Testors spray lacquer. This both kills the gloss and protects the paint from scratching off the PVC as easily.
Next, I gave the strut pieces a coat of Vallejo Beasty Brown...
...followed by a quick drybrush of P3 Pig Iron...
...and finally a wash of Army Painter Strong Tone. While all of this was going on, I also cut a square of Masonite for a base, sprayed it grey, drybrushed with light grey and white, and added some hazard stripes that I created in Gimp and printed out. These were glued in place with PVA glue, and then weathered with a sponge and some medium grey (you can find a tutorial on sponge weathering here).
The fan was sprayed with some Rustoleum Aged Brass, and then given a light drybrush with Pig Iron, before being glued in place inside the tower.
The tower was glued onto the base - I lightly sanded the bottom of the downpipe to remove any spray paint, and then used the 'all plastic' superglue again. Finally, some weathering was added with a large drybrush and some more Beasty Brown.
I had bought three downpipes, but found that I only had two computer fans that matched. Rather than use a mismatching fan in the third tower, I decided to make one battle-damaged by cutting away a chunk of one side. I left a part of the fan platform to provide a place for a model to stand, and glued the pieces of the tower side inside and underneath the platform to give it some support. Obviously the tower was hit with some sort of implosion device, or a cleanup crew sorting out the damaged tower just threw all of the rubble inside to get it out of the way until the tower could be replaced.
The three towers together, ready for gaming:
To build your own cooling tower, you can pick up the Maelstrom's Edge terrain sprue, or any of the rest of the Maelstrom's Edge model range, from the webstore here.
As always, feel free to pop along and share your work, or ask any Maelstrom's Edge- or hobby-related questions on the Comm Guild Facebook page!
For other Maelstrom's Edge modeling articles, including tutorials and walkthroughs of a wide range of different building and miniature projects, check out the article roundup here.
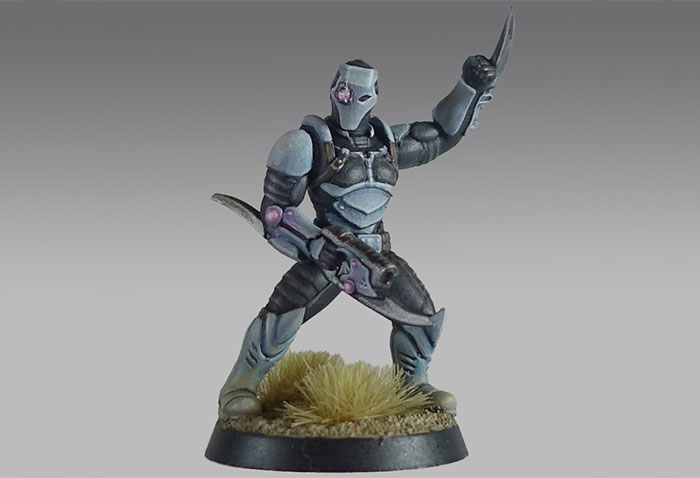
Modeling Spotlight: Karist Shadow Walkers
Posted on Monday Aug 20, 2018 at 06:00pm in Tutorials
- by Iain Wilson
I'm taking a little break from new releases this week to have a look back at another of the original release units - The Karist Shadow Walker!
The Shadow Walker sprue contains two different torsos (twisted in different directions from the front) and two of each arm in different poses. This allows you to create two very different, dynamically posed models from those parts. You can find the general assembly guide on the Maelstrom's Edge website here.
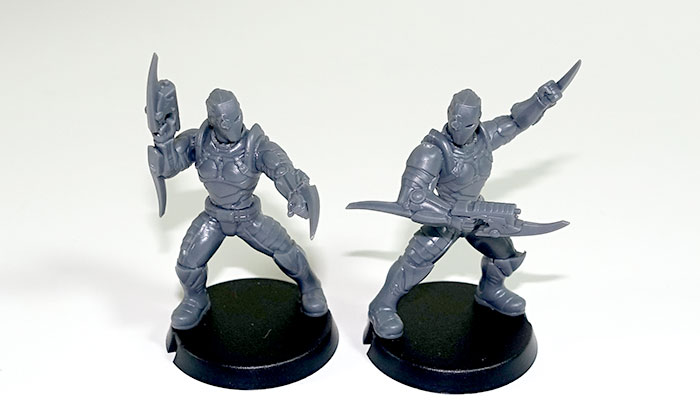
Somewhere along the design process, the sprue went from being intended to create a single model to including parts for two full models with the lack of only a second head. Luckily, several other Karist kits come with extra heads, so it's not too difficult to purloin a leftover in order to build that second Walker. The right hand model below uses the bare head from the Karist Trooper sprue, and there's another bare head available on the Faction Expansion Sprue.
Alternatively, the resin Karist Heavy Weapons set comes with two troopers and three heads - two helmeted, and one bare. The helmeted heads are very similar in style to the Shadow Walker's, with a couple of extra eye lenses. The model below has also been reposed slightly, with the right arm extended and filled with 'green stuff' putty, and the right shin repositioned so that his front foot matches his line of fire.
While we're reposing our models, it is really easy to add a little more motion to the pose by cutting off the bent leg just below the knee and reattaching it at a sharper angle and off the ground, to create a 'lunging' pose. The below Shadow Walker has clearly just Rifted in and is charging into the action:
Borrowing parts from different kits does, of course, work both ways. The Karist Praetorians below were given Shadow Walker legs to help them stand out a little from regular troopers and to create a more dynamic pose than is possible from the Trooper legs. The added loincloths are from the Faction Expansion sprue.
As I was working through these models, I found myself wondering what it would look like if Shadow Walkers had their own specialised mini-factions. From there, I wound up with the 'Shadow Dancer', carrying a regular cybel blade on place of the usual Shadow Walker's wrist-mounted version, and with an added prehensile, mechanical topknot which, I expect, would whip around as the Dancer flips and whirls about his opponents, and shoot out toxic darts or hallucinogenic gas from the emitter on its tip. The cybel blade was taken from the faction expansion sprue, and the topknot made from a piece of guitar string and the muzzle from a Karist radwave emitter.
By contrast, the 'Shadow Stalker' eschews close range combat where possible, opting instead to carry out his work from afar with his nox rifle. This model has an assault rifle arm taken from the new Broken Forsaken Tech Chieftain model with the bayonet and muzzle removed and a silencer made from a length of plastic tube attached. The head is the bare head option from the Karist Heavy Weapons pack.
I don't have a name for this next one yet (feel free to leave suggestions in the comments!) but how about a Shadow Walker sect that has found an alternative to teleporting? Using arcane science to fuse Angel DNA to the human form, this Shadow Walker variant is equipped with void-gel wings!
Of course, if you're going to have bizarre sub-sects of the Karist Walker breed, it wouldn't be too surprising to have a clandestine offshoot of the regular Kaddar priesthood overseeing them. And so the Kaddar Noctis was born - like the flying Walker above, this model fuses Human and Angel DNA, with the traditional Shadow Walker cybel blade replaced with an Angel's void-gel tentacles. The legs and torso are from the Kaddar Nova sprue, with most of the Cybel reactor removed and replaced with a modified cybel glaive head from the Faction Expansion sprue. Arms and head are from the Shadow Walker sprue, with the small tentacle parts taken from a pair of Mature Angel models.
To add some sneaky, pointed 'negotiation' to your own Karist Force, you can pick up the Shadow Walker along with the rest of the Maelstrom's Edge model range from the webstore here.
As always, feel free to pop along and share your work, or ask any Maelstrom's Edge- or hobby-related questions on the Comm Guild Facebook page!
For other Maelstrom's Edge modeling articles, including tutorials and walkthroughs of a wide range of different building and miniature projects, check out the article roundup here.
Tags: conversion converting karist modeling models spotlight
Modeling Spotlight: Converting Broken Chieftains
Posted on Monday Aug 06, 2018 at 06:00pm in Models
- by Iain Wilson
This week we released the second of our resin Forsaken Chieftain models for the Broken faction. These two models allow Chieftains to take a few extra options that weren't available from the plastic kit, and are a wonderfully characterful pair of models. However, since I find it physically painful* to assemble models the way they were intended to be built, I thought I would take this opportunity to slice a few of them into pieces and see what interesting conversion possibilities they opened up.
*May not be an actual medical condition, but why take the chance?
Built straight out of the package, the two models each come with a pair of weapon options. The 'regular' chieftain has a xeno spotter perched on his/her (it's deliberately ambiguous) raised right hand, and also has a two separate left forearms, one with a poisoned blade and the other with a trophy melee weapon. The 'tech' chieftain has two separate right arms, with a custom beam blastgun and a custom slug rifle.
You can easily double-up your command options by using the leftover weapons on plastic Broken Rabble bodies. On the below models, I equipped one with the leftover slug rifle by slicing off the locator peg and gluing it on in place of a regular plastic arm. The other has the leftover trophy weapon in place of the plastic forearm, which just requires cutting the lower arm off just below the elbow and gluing the weapon arm piece in its place.
Parts can also be mix-and-matched onto the resin Chieftain models to switch around the available options a little. On the below tech Chieftain model, I left off the resin right arm and equipped him with a plastic arm and beam pistol from the Rabble sprue, and cut off his left arm at the elbow and attached a trophy weapon from the other Chieftain model.
On the regular Chieftain below, I replaced the right forearm with a plastic one, and added a regular blastgun from the Rabble weapon sprue. I also cut off a plastic left forearm and added a grenade.
For a more action-posed Chieftain, I cut the legs off this one at the waist, using a razor saw. Then I glued on a pair of running legs from the Rabble sprue, added a slightly modified slug pistol hanging off the belt, and glued the xeno spotter on tilted just a little bit forwards.
Since I now had a pair of leftover Chieftain legs, I did the obvious thing and glued them to a Karist heavy weapon trooper torso I had left over from a previous conversion. This Chieftain has the right arm with custom beam blastgun from the tech Chieftain, and a left arm and alien head from the Rabble sprue.
Mixing things up a little more, I added a xeno spotter and trophy weapon to a Broken Sig Jammer body, to create a less ostentatious Chieftain model. A head and left hand from the Rabble sprue finished the conversion off nicely.
And finally, a Chieftain equipped with a trophy weapon from a more civilised age, which is apparently less clumsy and random than a blaster. The laser sword is made from an overcharged powercell from the Rabble sprue, with a cut-down blade stolen from a Star Wars figurine. I also cut the left arm off, carefully cutting around the cape so that a plastic arm would fit in neatly underneath it. This Chieftain will no doubt take to the battlefield and display his displeasure at the lack of faith shown by his underlings...
Hopefully, that's inspired you to have some fun with your own Chieftains. You can pick up the resin Chieftain models, the plastic Broken Rabble sprues, or any of the rest of the Maelstrom's Edge model range, from the webstore here.
As always, feel free to pop along and share your work, or ask any Maelstrom's Edge- or hobby-related questions on the Comm Guild Facebook page!
For other Maelstrom's Edge modeling articles, including tutorials and walkthroughs of a wide range of different building and miniature projects, check out the article roundup here.
Tags: broken chieftains conversion modeling models spotlight
Terrain Spotlight: Cardboard Tube Storage Tank
Posted on Monday Jul 30, 2018 at 05:00pm in Tutorials
- by Iain Wilson
It's been a few weeks since I built any terrain and I'm starting to feel withdrawal symptoms, so this week I have busted out the foamcore and terrain sprues, raided the recycling bin, and built a quick little storage tank for my newly assembled elite Epirian SecDef units to hide behind.
The main body of the tank is made from a small Pringles can. This of course requires you to remove the Pringles from said can, which my wife was happy to take care of for me. If you don't know anyone willing to make this sacrifice for you, you could use any other appropriately-sized tube. For the tank on my plantation dome, I used a metal tin. You could also use soft drink cans, cardboard postal tubes, or even roll your own out of cardboard or plastic sheet.
I used foamcore for the end supports. For the uninitiated, foamcore (also sometimes called foamboard) is a craft board that is comprised of a thin sheet of expanded polystyrene foam sandwiched between two sheets of stiff paper or thin card. Because it's lightweight but fairly strong, it's a fantastic material for building terrain.
I marked out the shapes that I wanted on the foamcore with a pencil, and then cut them out using a sharp hobby knife and a steel ruler.
As I wanted a worn concrete look for the ends, I used the hobby knife to roughly shave away the edges along the top and sides, and then used fine sandpaper to smooth the cut edges of the paper down.
For the access port on the top of the tank, I took the square hatch and corner reinforcing from the Maelstrom's Edge terrain sprue and cut a piece of plasticard sheet to an appropriate size to fit them all on it with a little room to spare for visual effect.
I then cut four strips to run around the outside of the top plate. To replicate the curve of the tank for the two strips that would run across it, I positioned the bottom of the Pringles can on the plasticard lined up with the bottom corners of the strip and traced around it with a pencil, and then cut along the resultant arc with my hobby knife. Because the bottom aluminium strip on the can is slightly larger in diameter than the actual can, this doesn't create a perfect fit, but it gets it close enough that you can sit it in place to see where it needs a little shaving with the knife to sit flush.
The strips were glued in place with plastic cement, and when that was set I flipped the construction over and glued the terrain sprue components in place as well.
To add a little detail to the outsides of the tank ends, I cut some sections off the long support struts on the terrain sprue, and also assembled a little computer terminal by trimming down the comm panel and cutting a piece off the end of the lintel piece.
One end got two of the support strut pieces, and the other end another two strut pieces, the computer terminal and a small pipe fitting, all glued in place with superglue.
I then glued the foamcore pieces onto the ends of the tube with superglue. One end of the tube is rolled cardboard, which glues just fine to the foamcore. For the tube's aliminium end, I gave the superglue a little extra help with a primer from an 'all plastics' two-part superglue.
A little more superglue was used to stick the access port in place on top.
The final step before painting was to paint the exposed foam on the foamcore sections with PVA glue. This protects the foam when the base coat is sprayed on, as most spraypaints will partially eat the foam. If you're painting with a brush, or with a specific foam-friendly spray, this step is unnecessary.
I basecoated the whole tank with a Rustoleum quick-drying grey primer to get a consistent base for painting over, and then hit the tank itself with a spray of Army Painter Dragon Red.
I could have saved some repainting here by masking off the ends to avoid overspray from the red, but it didn't really seem worth the bother. I just used a large, flat brush to add another coat of grey (in this case Vallejo Neutral Grey) over the end pieces, added some weathering to the red using a sponge and some Vallejo Heavy Charcoal (you can find my tutorial on sponge weathering here) and added a layer of Vallejo Beasty Brown over the terrain sprue components.
To create a nice concrete look, I drybrushed over the end pieces with Vallejo Light Grey, and then added a highlight with a lighter drybrush of P3 Morrow White. The brown components received a heavy drybrush of Citadel Boltgun Metal (now called 'Leadbelcher', but I'm still working through a lot of old paint!)
Next up, I gave all of the metal parts a generous wash of Army Painter Strong Tone, and put it aside to dry.
While the wash was doing its thing, I cut an 8"x8" square of masonite, sprayed it with a coat of grey primer, and drybrushed with the Light Grey and some white. I also marked out a square in front of where the pipe fitting would sit on the end of the tank, and painted in some hazard stripes. (If you are interesed, you can find a tutorial on painting hazard stripes here.) Then I glued the tank in place using some superglue on the bottoms of the end pieces (this was fine as I had included the underside edges when I painted the exposed foam with PVA glue. Don't put superglue directly onto expanded polystyene - it doesn't end well) and added some patches of drybrushed Beasty Brown to dirty everything up. Which left the tank looking like this:
To build your own storage tank, you can pick up the Maelstrom's Edge terrain sprue, or any of the rest of the Maelstrom's Edge model range, from the webstore here.
As always, feel free to pop along and share your work, or ask any Maelstrom's Edge- or hobby-related questions on the Comm Guild Facebook page!
For other Maelstrom's Edge modeling articles, including tutorials and walkthroughs of a wide range of different building and miniature projects, check out the article roundup here.
Tags: buildings modeling painting spotlight terrain terrainsprue walkthrough
Painting Spotlight: 120-point Epirian SecDef Force
Posted on Tuesday Jul 24, 2018 at 12:49pm in Models
- by Iain Wilson
Last week, I built a 120-point force using the fantastic new Epirian SecDef models. If you missed it, you can find the article here: http://www.thecommguild.com/roller/thecommguild/entry/modeling-spotlight-120-point-epirian.
This week, my aim was to get this force painted up to a basic tabletop standard. This can be helpful for getting past the 'sea of grey' stage and allowing you to field a painted army faster than might happen if you're painting each unit up to a fully detailed level, or if you just want a quick and easy paintjob on your army and aren't interested in getting bogged down in detail work. The end result isn't going to win any painting awards, but looks fine on the table and can be updated later.
So, the painted force:
For painting up armies quickly I tend to rely heavily on ink washes, as they are so handy for adding shading quickly (if sometimes a little messier than doing it by a more manual and time-consuming method would allow for). This force was no exception to that. I started with a basecoat of Army Painter Army Green spray, and when that was dry added a wash of Army Painter Military Shader.
When the wash was dry, I went over the armour plates with Army Painter Ash Grey, the exo-skeleton sections in Vallejo Basalt Grey and the weapons on Vallejo Heavy Charcoal, before adding a layer of Army Painter Dark Tone over these areas with a detail brush. Any slight spillover onto the green is fairly unnoticeable, but excess wash was quickly removed with a wet brush where necessary.
On the Ash Grey armour plates, rather than covering them completely with the wash, I just painted a thin coat of the wash onto the lower surfaces of the plates, or on the innermost half of the thigh plates.
I then painted the face and neck with Citadel Tallarn Flesh, chosen by virtue of being the first flesh tone I came across in my paint box. I also painted the flesh tone over the goggles, to provide a nice base layer for the red that would come later. The pouches, straps, rifle stocks and boots were painted with Vallejo Heavy Brown and then the flesh and brown parts were washed with Army Painter Strong Tone.
Finally (for now) I painted the base with Vallejo Neutral Grey and the goggle lenses with Army Painter Pure Red. The helmet chinstrap had originally been painted in the Heavy Brown, but after the wash I found that the tone was too similar to the flesh colour, so I went over the brown with black, and also used a black fineliner pen to darken the lower frame of the goggles, around the bottom of the lenses and up the nose. I also used the Neutral Grey to add a quick drybrush over the black on the weapons to pick out the detail - I wanted them dark, but to still be recogniseable on the table.
At this point, all of the main colours are in place and they're ready for the table. To finish them off later, I can add a highlight to the green with some light green, some light brown or bone on the brown parts, and add some shading and a reflective spot on the goggle lenses, which gets something that looks more like this:
I will also need to go through and drybrush the bases and add some detail so that they match my other urban bases.
So, the 'finished' units:
Lieutenant
Tactical Teams
Snipers
Annihilator Teams
Recon Walker
The gang all together:
To start assembling your own SecDef force, you can pick up the Secdef sprue, or any of the rest of the Maelstrom's Edge model range, from the webstore here.
As always, feel free to pop along and share your work, or ask any Maelstrom's Edge- or hobby-related questions on the Comm Guild Facebook page!
For other Maelstrom's Edge modeling articles, including tutorials and walkthroughs of a wide range of different building and miniature projects, check out the article roundup here.
Modeling Spotlight: 120-point Epirian SecDef Force
Posted on Monday Jul 16, 2018 at 05:00pm in Models
- by Iain Wilson
With this week's article, I'm continuing the SecDef love because, well, they're awesome!
As nice as it is to include some elite supertroops in amongst the Epirian bots and contractors, I thought it would be fun to build an entire SecDef force. Obviously, with only a single Hammer option currently in the official rules, this required a bit of creativity, but two mocked-up new unit cards and a bunch of sprues later, my first 120 points were assembled and ready for painting.
To build even a bare-bones force within the army selection rules for Maelstrom's Edge, a Command unit is required. While there will no-doubt be a SecDef officer option released down the track, I'm far too impatient to wait for that, so I ran up an unofficial unit card for a lower-level officer, a Lieutenant, to command smaller SecDef strike forces. The aim was to create a commander on about the same level as the Journeyman Bot Handler, and one that could be built from existing parts with minimal conversion required. So I took a bare bones SecDef trooper built from the sprue, on the assumption that SecDef field officers would likely look little different to their troops, and just swapped his rifle for a pair of pistols taken from the Contractor sprue.
To allow for a viable force, the Lieutenant has the 'SecDef Commander' rule, which allows him to take up to two SecDef Tactical Teams as Core choices instead of in their usual Hammer slots. In the interests of fielding as many big guns as possible (because the SecDef heavy weapons look cool) I choose to give each of the Core teams two LM14 Machine Guns, and added two extra warm bodies to each to bring them up to full strength.
The models throughout the force are assembled largely straight off the sprue with minimal conversion. I switched around some of the leg pairs (as explained in last week's Modeling Spotlight) and changed around the left hands on the unit Sergeants to add some variety to their poses without having them all holding their rifles twp-handed like their troops, to help them stand out a little.
With the two available Core options filled, I decided to include a sniper unit in the Hammer slot (because why wouldn't you?). To keep them extra sneaky and to stay within my chosen 120 points, I went with the base unit of three, and gave the two troopers each a sniper rifle.
There was clearly not enough firepower on the table here yet, which called for some Chainguns! Rather than fill up my last remaining Hammer slot for the detachment, I made use of the Tactical Team rule that causes teams equipped with two CG100 Chainguns to become Anvil selections, and built up two five-man units accordingly.
To round out the detachment, I liked the idea of a SecDef force having access to a light vehicle that would serve as an advance scout, and potentially as a beacon to guide in teams arriving by Aerial Insertion. After some searching online, I found the Heron Light Battlewalker, a resin kit from Hexy-Shop. This is a small walker with an enclosed cockpit but a detailed interior, which allowed me to cut away the roof and part of the sides to create an open cockpit.
I replaced the Heron's original weapons with a pair of CG100 Chainguns glued together side-by-side, and added a driver by cutting up a pair of SecDef legs, re-assembling them in place in the seat and then filling in the resulting gaps with 'green stuff' putty.
There were no controls in the Heron's cockpit other than a screen down between the driver's feet, so I added a control loom made from a leftover resin piece and the pistol grip from a SecDef assault rifle. I also added some roll bars on the sides of the cockpit (these pieces normally go on the platform on the rear of the Heron), but these are only sticky-tacked in place so I can take them off for painting - this should make it easier to get into the nooks and crannies in the cockpit.
The final touch was to shorten the legs slightly, as the Heron turned out to be a bit taller than I had expected and wanted it to be. This was done by cutting out the lowest section of the legs and reattaching the legs to the ankle ball-joint.
All up, with an 11-point Lieutenant and 12-point walker, the above force comes in at 119 points - perfect for getting started, and ready to be taken as a detachment in a larger Epirian force or fleshed out later if and when more SecDef units are added to the roster. If you would like to build something similar, you can find the unit cards for the Lieutenant and the walker in the Force Builder section of the Maelstrom's Edge website here.
Next week - Painting!
To start assembling your own SecDef force, you can pick up the Secdef sprue, or any of the rest of the Maelstrom's Edge model range, from the webstore here.
As always, feel free to pop along and share your work, or ask any Maelstrom's Edge- or hobby-related questions on the Comm Guild Facebook page!
For other Maelstrom's Edge modeling articles, including tutorials and walkthroughs of a wide range of different building and miniature projects, check out the article roundup here.