Entries tagged [broken]
Tactics: Broken Forsaken Chieftains
Posted on Thursday Aug 02, 2018 at 04:42am in Gaming
With the release of our second Broken Chieftain model, we've also updated its unit card in our online Force Builder rules here, finally unveiling the full suite of equipment options that Broken Chieftains have available to them. This article will look to update your Chieftain knowledge, focusing on their two new upgrade options: Customized Weapons and Enhanced Cybernetics.
CUSTOMIZED WEAPONS
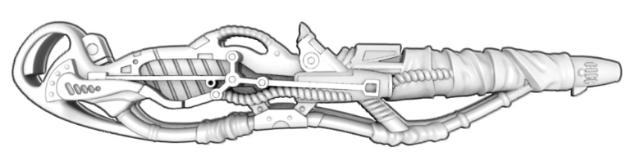
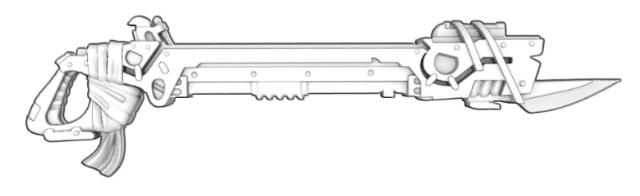
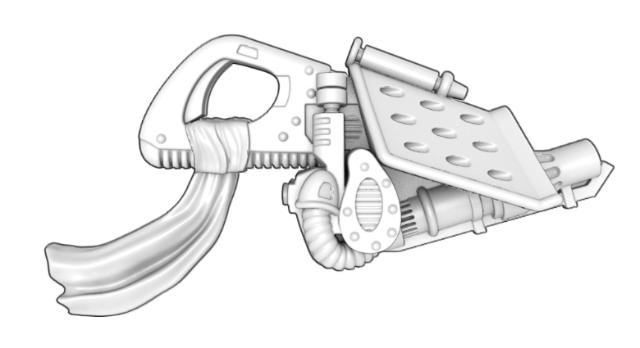
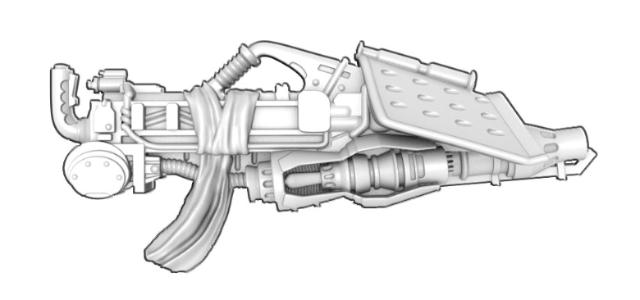
Though Broken Weaponsmiths work tirelessly to keep the weapons of their fighting force repaired and functioning properly, they are also constantly prodded by their Chieftain to find new avenues for how Broken weaponry can be made ever more deadly. In other words, Weaponsmiths, and Broken society in general, are obsessed with making their guns as powerful as possible, regardless of how dangerous this makes them to the wielder. While Broken weapons can never match the accuracy or reliability of the more sophisticated enemy factions they face, the Broken instead rely on a near endless supply of desperate bodies clamoring to get their hands on a customized weapon, even when it is prone to lethal malfunctions.
Anytime Broken forces manage to steal, capture or purchase weapons off the black market, a portion of these are tithed to their Chieftain, who turns them over to their Weaponsmith in the name of 'weapons development'. The disassembling, tinkering, and soldering in a Weaponsmith's shop often continues days at a time. No method used to improve a weapon is off the table: overcharged powerpacks, larger caliber ammunition, oversized magazines, fusing multiple weapons together, etc. If it can be dreamed of, a Weaponsmith has attempted it. The more powerful the conversion, the more rare and coveted the weapon is amongst the Broken, and the more likely it will find its way into the hands of a high-ranking individual like a Chieftain, who views it both as a potent weapon and also as a way of reinforcing their status over those they command.
Rules-wise, customized weapons are an upgrade for a Chieftain that cost 2 points, and gives them the following benefits:
---
Customized Weapons
All weapons this model is equipped with permanently gain +1 PEN, +1 DAM and the Unstable ability (if they don’t already have it). Grenades & CQ Explosives are excluded.
---
As this upgrade affects any weapon a Chieftain takes (excluding grenades & CQ Explosives, of course), it gives you tremendous versatility towards deciding how you want to improve your Chieftain's shooting. For example, with weapons that provide a lot of shots but are only DAM 1, like a Slug Rifle or Chem Pistol, the Customized Weapon upgrade suddenly turns them into DAM 2 weapons. This means that every successful penetration is going to kill a standard MAS 2 infantry model outright, making these weapons now capable of mowing down enemy rank and file models. On the other hand, weapons that are already DAM 2, like a Beam Pistol or Beam Blastgun, now become DAM 3, allowing the Chieftain to become a big game hunter and seriously wound large models like Hunter Warmechs or Mature Angels. This upgrade also benefits any melee weapons the Chieftain may take, such as a Trophy Melee Weapon, Poisoned Blade and even the melee profile of the Beam Blastgun, turning the Chieftain into a formidable foe at close quarters.
Of course, the negative aspect of using customized weapons is that the weapon also gains the Unstable ability, which means that any '1's the Chieftain rolls to hit end up putting suppression tokens onto his unit equal to the DAM of the attack. While this can certainly be annoying when it happens, it is generally a small price to pay to seriously upgrade the offensive capabilities of your Chieftain.
EXTENSIVE CYBERNETICS
While many Broken soldiers eventually have some part of their anatomy replaced with cyerbnetics (usually due to injuries they've suffered on the battlefield), some Chieftains choose to go a step beyond and command their Weaponsmith to give them extensive cybernetic limb and/or organ replacements as a means to improve their strength and durability. This is represented by the Extensive Cybernetics upgrade, which cost 2 points:
---
Extensive Cybernetics
This model permanently improves its MAS characteristic by +1.
---
Boosting a model's MAS by +1 provides both defensive and offensive benefits. The most obvious improvement is that a MAS 3 model requires doesn't suffer an injury until at least 3 points of damage are allocated to it. For example, when a Chieftain leads a Broken Rabble squad, whenever there are only two DAM 1 penetrations remaining to be allocated (a frequent occurrence), you can now elect to put them onto the MAS 3 Chieftain, which means instead of losing a Rabble model, the unit will suffer no permanent damage! In other words, having a MAS 3 Chieftain not only means that model is more durable, but any unit the Chieftain joins effectively becomes more durable as well.
On the offensive side, a model's MAS characteristic is utilized in close quarters fighting with a melee weapon, both to determine how many shots the melee weapon makes, but also to figure out the PEN characteristic of that weapon. A MAS 3 Chieftain gets to make 5 attacks with a melee weapon (instead of the 4 it makes when it is MAS 2) and all those attacks are made with +1 PEN. For example, a Chieftain with Extensive Cybernetics and a Trophy Melee Weapon gets to attack 5 times in close quarters fighting, with each of those shots being a quite powerful PEN 5 and DAM 2. Even crazier, if the model also has taken the Customized Weapons upgrade, they combo together and those five shots are instead PEN 6 & DAM 3! That's enough potential damage to make any foe quake at the thought of facing a Chieftain in CQ fighting.
With these new upgrade options available, a Chieftain is easily the most customizable command model currently in the game. You can go with a super-cheap 7 point Chieftain that just has a couple of pistols, which allows you to fit more Broken units into your force, or alternatively you can take every upgrade and have a 13 point beast that has all kinds of tactical capabilities...the choice is ultimately yours!
Ready to try out your own cybernetic Chieftain? You can pick up the new resin Chieftain models along with the rest of the Maelstrom's Edge model range, from the webstore here.
If you have any rules queries, tactics suggestions, or modeling progress to share, you can join in on the Comm Guild Facebook Group page here.
Modeling Spotlight: Converted Gnolti Longhorn
Posted on Monday Jun 04, 2018 at 05:00pm in Tutorials
- by Iain Wilson
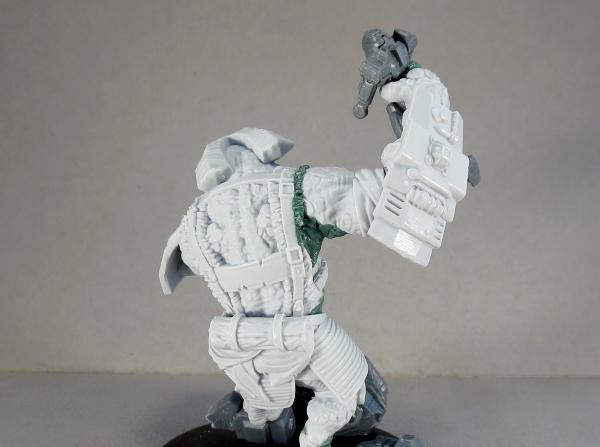
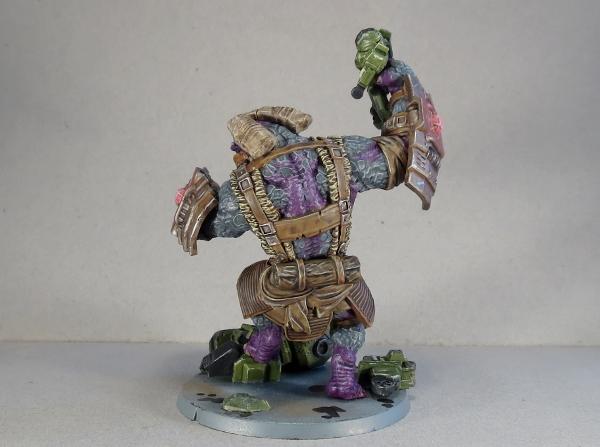
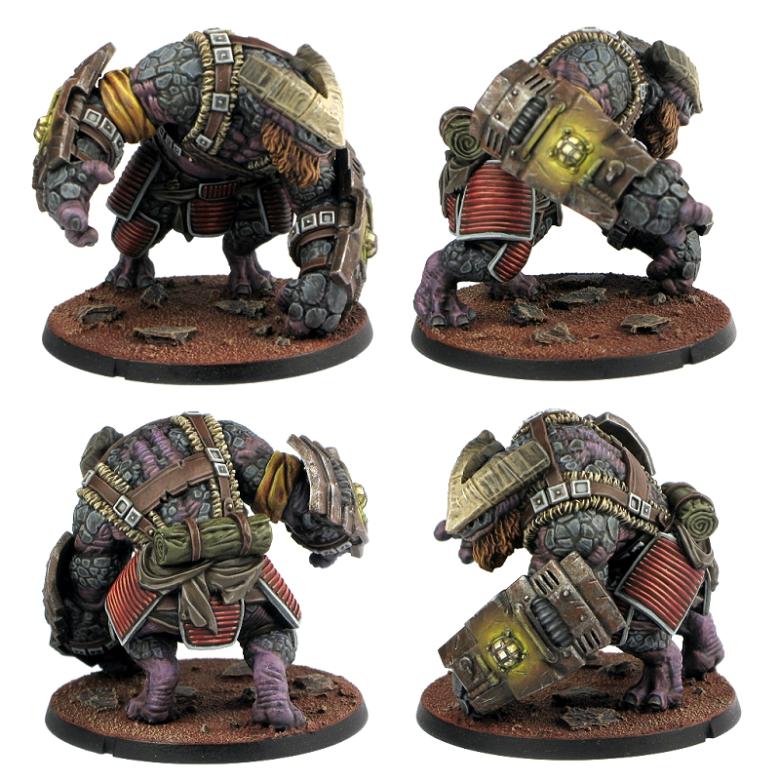
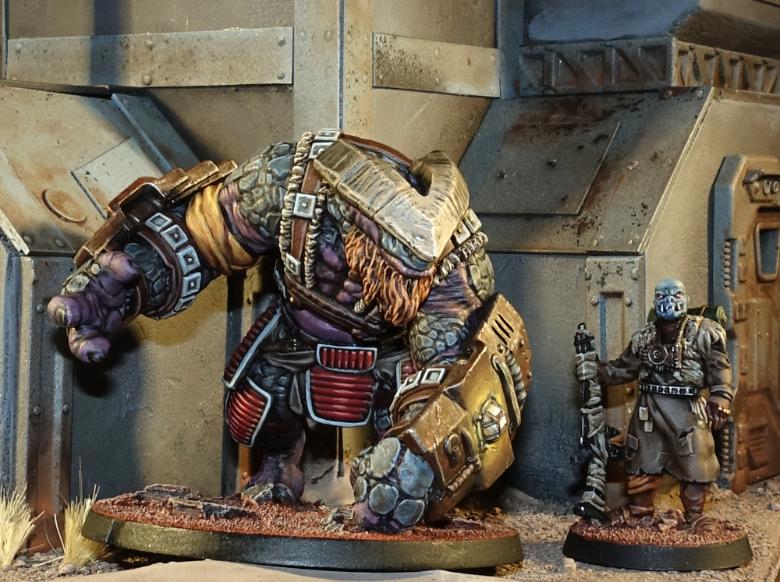
Slow to anger, but difficult to put down once roused, Gnolti form an implacable, craggy backbone of the Broken forces. As awesome as a regular Gnotli is, I thought it might be interesting to explore the different ways that being forced into warfare might affect different Gnolti. I thought it might be likely that younger, more headstrong Gnolti would be more ready to turn to anger, while older, experienced veterans would be more prone to careful consideration and strategy. With the seeds planted, I grabbed some putty and a few extra bits and pieces, and the Gnolti Longhorn was born!
Obviously, the core of this model is the fantastic, resin Gnolti model.
To make him stand out a little, I wanted some suitably scavenged-looking armour, although this would be more for decoration than anything, given the Gnolti's craggy hide. So I grabbed the front half of an Epirian Hunter Mech torso and removed the lower section.
With some battle damage and careful trimming added with a hobby knife, the torso front fit nicely on over the right shoulder.
To create the eponymous 'longhorns', I drilled into the ends of the horns, and glued in some curled lengths of steel wire.
I reshaped the locator pin on the bottom of the torso a little so that I could twist the torso slightly to the side. Then I heated the right leg in hot water and bent back slightly, allowing the legs to be posed on a low piece of rubble.
The Longhorn was going to lack the shield generators worn by regular Gnolti, but removing the forearm shields completely would have required considerable resculpting of the arms, so instead I removed all of the tech details and added a bunch of battle damage, turning them into ordinary, garden variety bracers.
To allow the left arm to be angled closer in to the torso to rest it on the left knee, I hollowed out the elbow joint with a hobby knife, and slightly reshaped the elbow end of the upper arm.
At this point, it was time to break out the putty. The horns received an initial bulking-out layer.
Once this was set, I added additional putty and smoothed it into the horn shape, and then added striations to match the existing horn sections using a silicon clay shaper.
Rather than worrying too much about getting the horns identical lengths, I made one shorter and squared off the end, to make it look like it had been broken off.
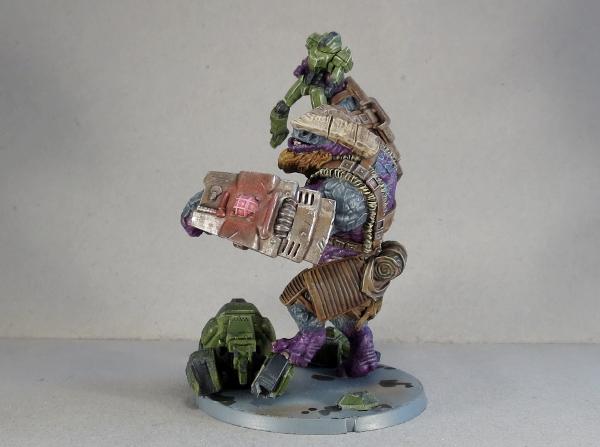
The right hand needed repositioning to hold the gun properly, so I sliced through the wrist with a razor saw, and reattached it at a better angle. The gun itself was borrowed from a Mantic Veer-min Nightmare, with some grips added from plastic tube. I'm picturing this as a Chem Cannon, but haven't fully settled on rules yet.
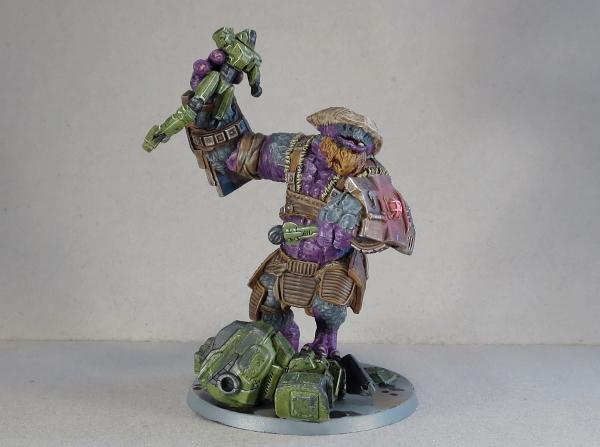
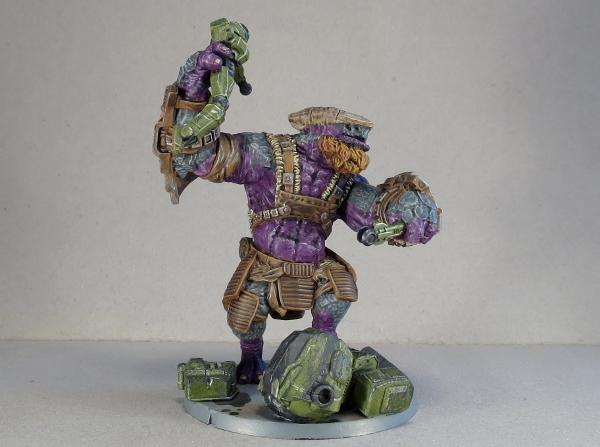
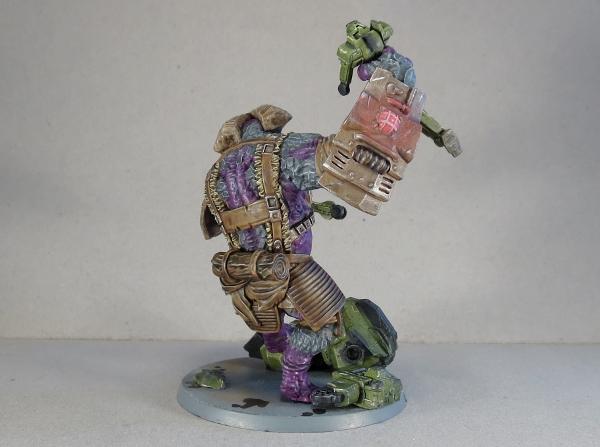
After final assembly and some minor gap-filling here and there, the Longhorn looked something like this:
Painting was very similar to my previous Gnolti conversion, although I went for a slightly more stark highlight on the scales and a white/grey beard to help convey his veteran status.
The skin is Citadel Liche Purple, drybrushed with P3 Jack Bone and then washed with Army Painter Purple Tone. Scales were painted with Vallejo Neutral Grey, washed with Army Painter Dark Tone and then given a careful drybrush of white.
The harness, cloth and leather armour plates were painted with various shades of brown and washed with Army Painter Strong Tone, and the metal armour was painted with Vallejo Beasty Brown, drybrushed with P3 Pig Iron, washed with Strong Tone and then given a drybrush of Army Painter silver. The darker tone on the weapon was from a black basecoat, a heavy drybrush of Pig Iron and then two coats of Dark Tone.
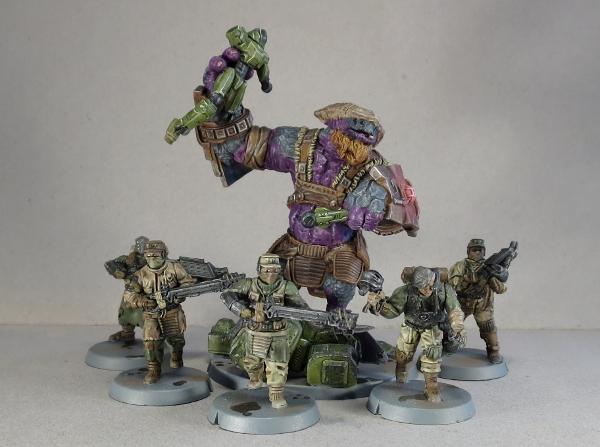
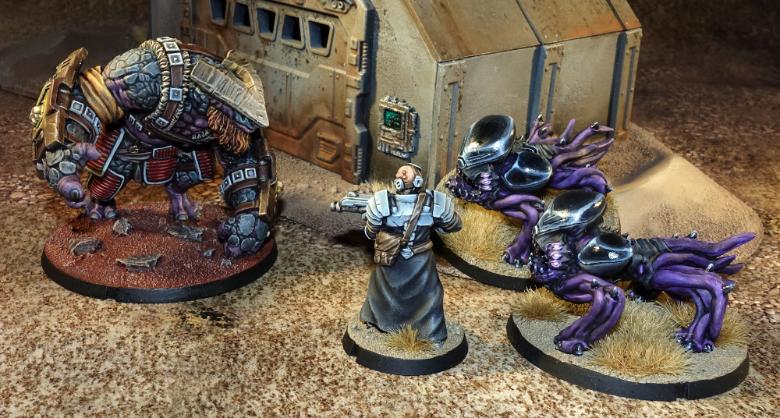
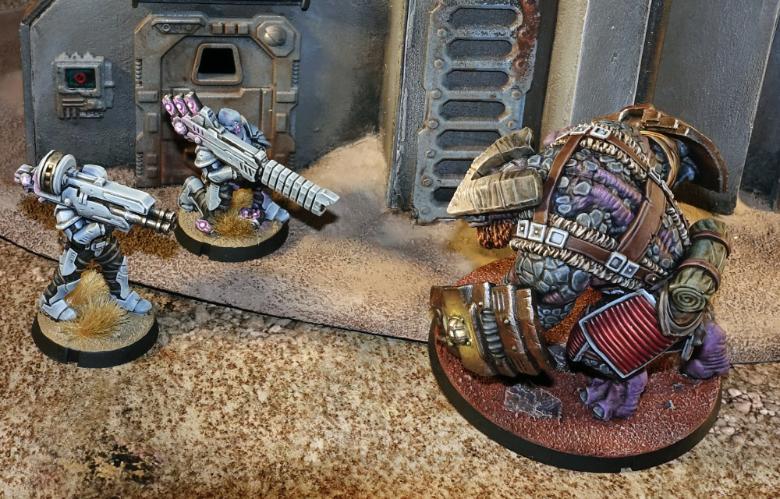
With basing in my standard Urban theme, Grampa Gnolti was ready for the table.
The other end of the spectrum is, of course, the young, impetuous (relatively speaking) Gnolti. Stay tuned!
What have you done with your Gnolti? We would love to see your creations on the Comm Guild Facebook page!
To pick up the Gnolti kit, or any of the rest of the Maelstrom's Edge model range, visit the webstore here.
For other Maelstrom's Edge modeling articles, including tutorials and walkthroughs of a wide range of different building and miniature projects, check out the article roundup here.
Tags: broken conversion gnolti modeling spotlight tutorial walkthrough
New Forsaken Chieftain for the Broken, now available!
Posted on Thursday May 31, 2018 at 12:01pm in The Broken
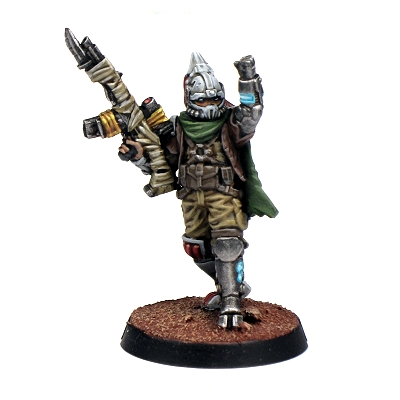
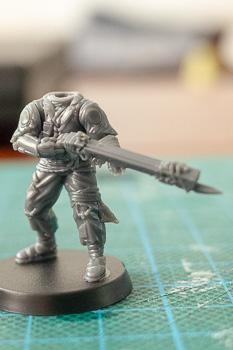
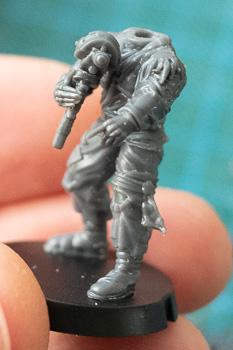
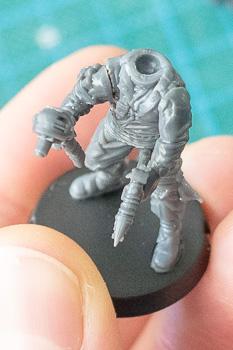
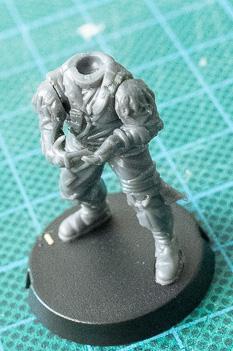
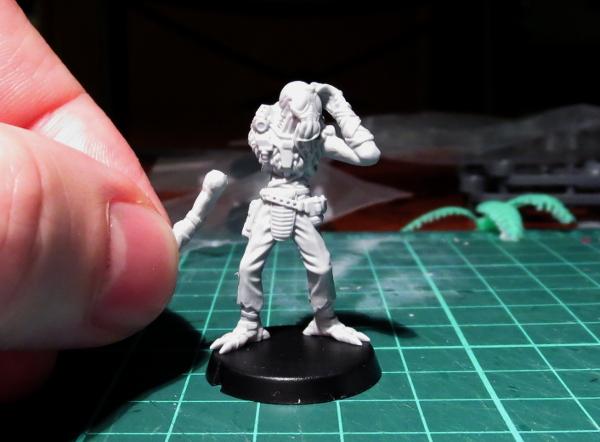
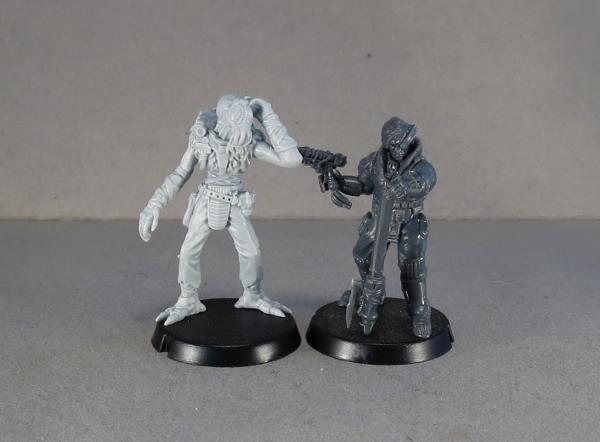
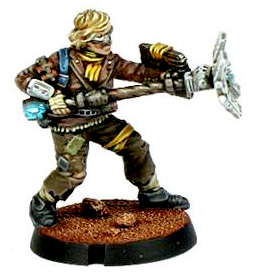
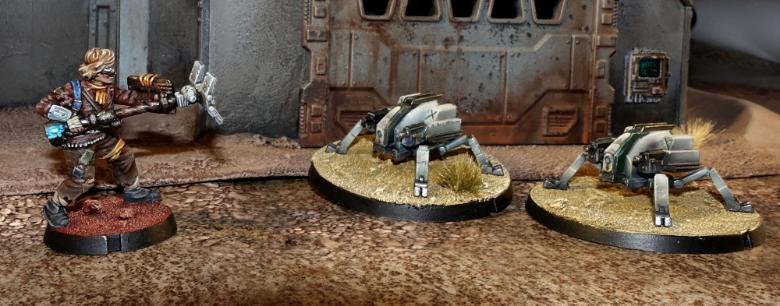
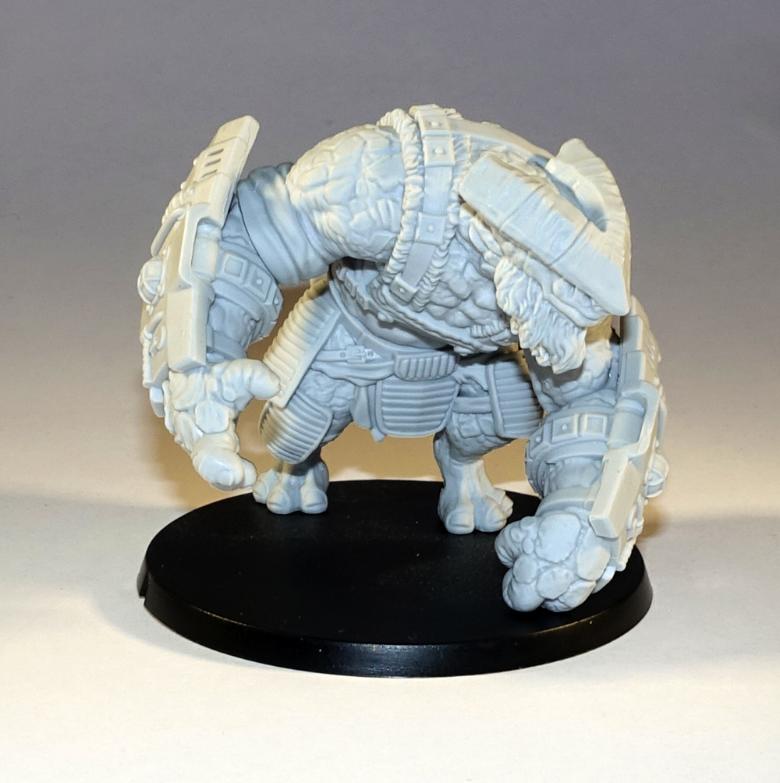
The Forsaken are commonly dismissed as simple, degenerate pirates, but the truth is that they usually attack only out of necessity. Piracy is many times the only way their community can survive a hostile galaxy: stealing food, fuel, ammunition and anything else of value they can get their hands on. The Forsaken rarely send out their forces en masse, knowing that a single crushing defeat could mean the end of their entire tribe's existence. Instead, they strike in small patrols, typically led by a Chieftain.

Though a Chieftain is granted his or her position of authority by The Assembly, they must first earn the respect of their fellow Forsaken to even be nominated. A Chieftain must be equal parts fighter, diplomat and cunning tactician. Knowing that their forces can never win a stand-up fight against a prepared opponent, a Chieftain leads his warriors to strike unseen from the shadows, quickly fading away before the enemy can root them out and respond in kind. Many an opposing force has underestimated the ingenuity of a Broken force led by a Chieftain, only realizing too late their folly, as improvised booby traps decimate their defensive positions and Broken secretly approach from their rear.
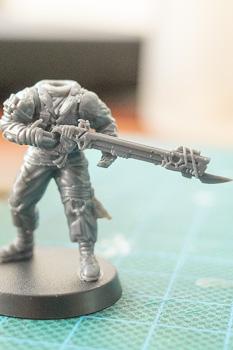
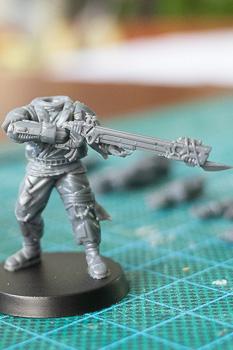
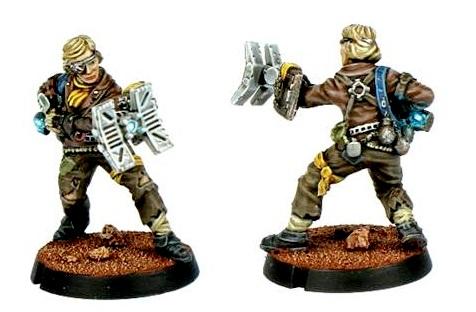
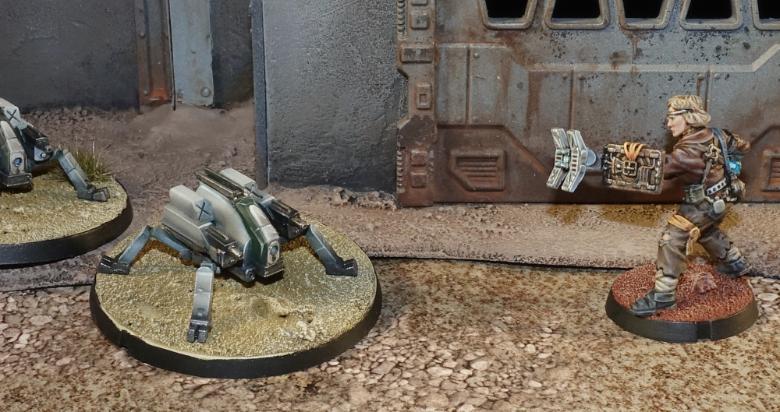
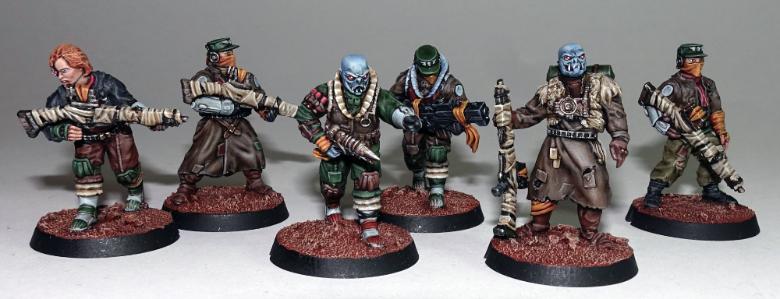
The appearance of a Chieftain can vary wildly both based upon the culture of their original homeworld, but also from that of the Broken Freeport they are now a part of. Chieftains tend to have slightly nicer clothing and equipment than standard Broken rabble, and many see it as almost their duty to show that even amongst the ranks of the Broken, an individual can still rise up and carry themselves with dignity and class. When the Broken do manage to defeat an enemy officer with particularly fancy clothing or an heirloom weapon, a Chieftain will confiscate these valuable items. A Chieftain wears these purloined treasures into battle, as both a reminder of their past victory, and to display their status as an iconic Broken leader.
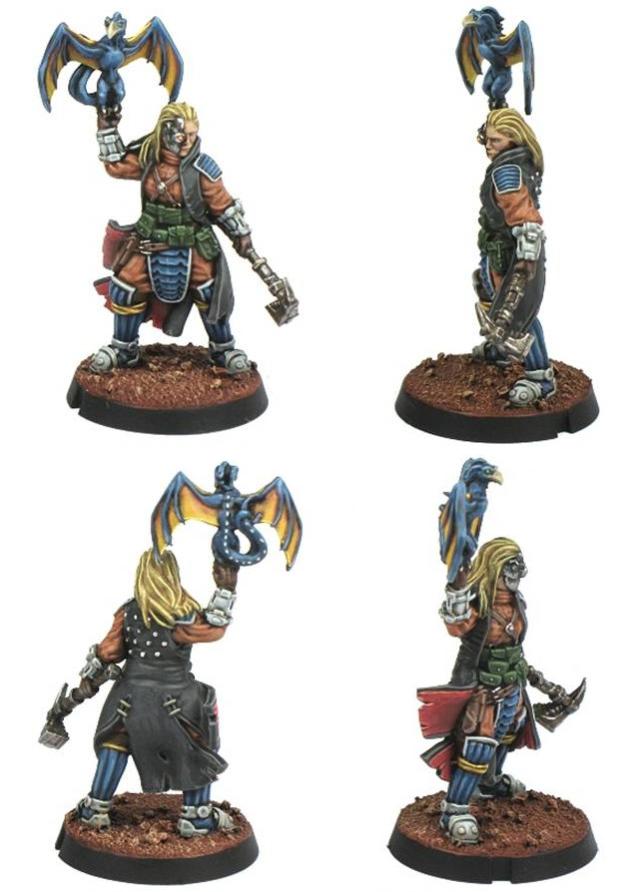
This high detail resin model contains two alternate weapons for the left hand and a xeno spotter in the right hand, and is available now from the webstore here! You can also find the rules for this model in the Force Builder section here.
Broken infantry sprue: which arms fit which weapons?
Posted on Wednesday May 30, 2018 at 05:00pm in Tutorials
Originally posted on Dakkadakka by Sgt.Oddball.
Hi all,
The Broken Infantry sprues have a total of 13 different weapons (not counting grenades) and 36 different pairs of arms. I thought it would be convenient to know which arms fit which weapons.
Scientific testing was set up:
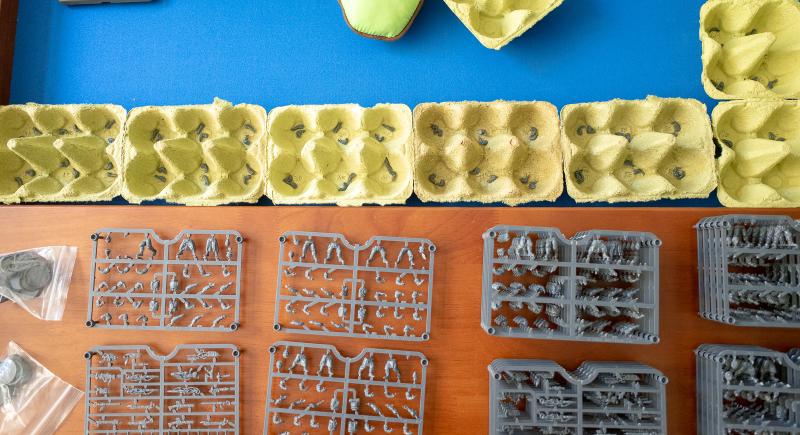
Egg crates full of arms.
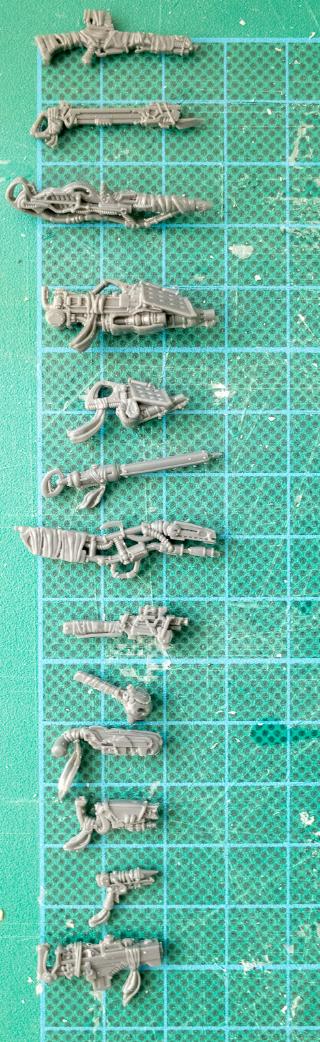
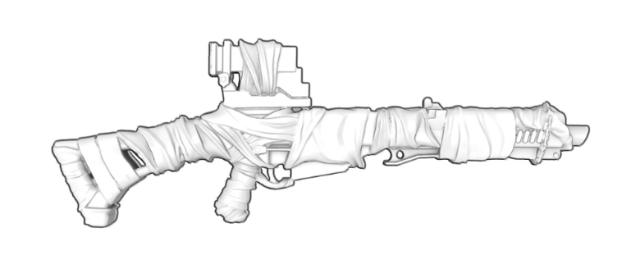
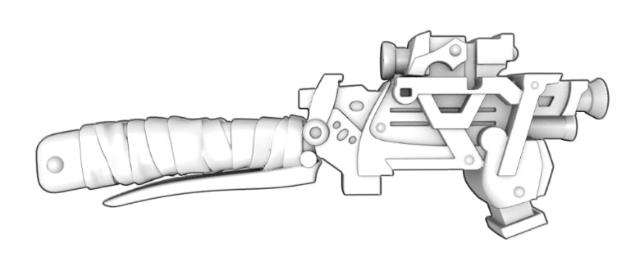
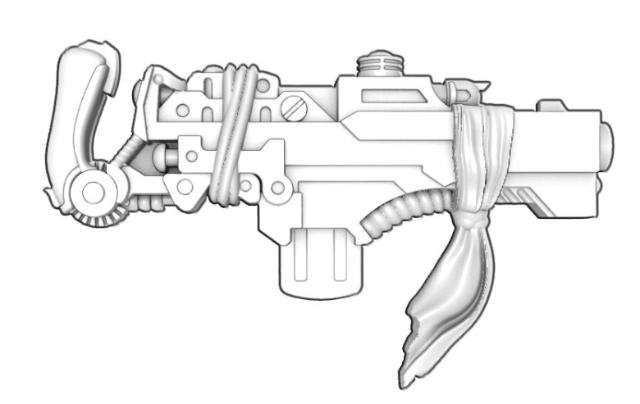
Weapons to be tested (from top to bottom, name/part: slug rifle/w0, beam blastgun/w1, longbeam rifle/w3, massive torch/w4, torch/w5, EMP Harpoon/w6, Glue Rifle/w7, Slug Pistol/w13, Chem Pistol/w14, Chem Launcher/w16, Glue Carbine/w17, Beam Pistol/w18, Auto Slugger/w29.
Before relaying the results, a disclaimer:
- I only used the one torso/leg combination (legs 3 and torso 3). I think the pairings will work for most torso/leg combinations, but see a little addendum at the end on torso number 6 which is definitely different. I also stuck to the arms as paired on the sprue (didn't mix and match left and right).
- I stuck the arms to the torso with tacky glue and dry-fitted the weapons. Hence, stuff will fit a little nicer when you actually glue it properly. Also, I couldn't take pictures of some combos for lacking three hands.
- It's a rough guide: not all the fits shown are ideal, I might have missed one that kinda fits as well, and of course if you're a little creative and/or do a tiny bit of converting, more fits are possible.
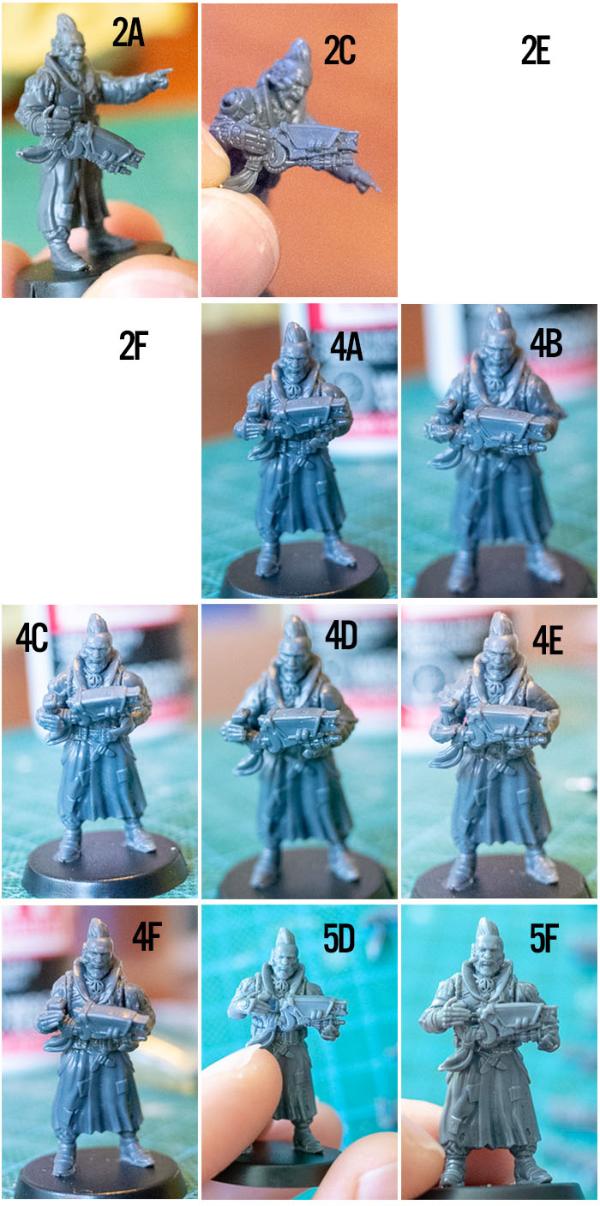
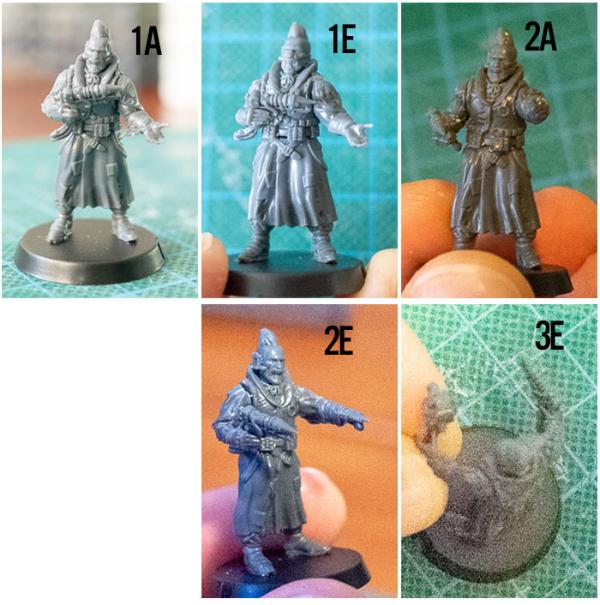
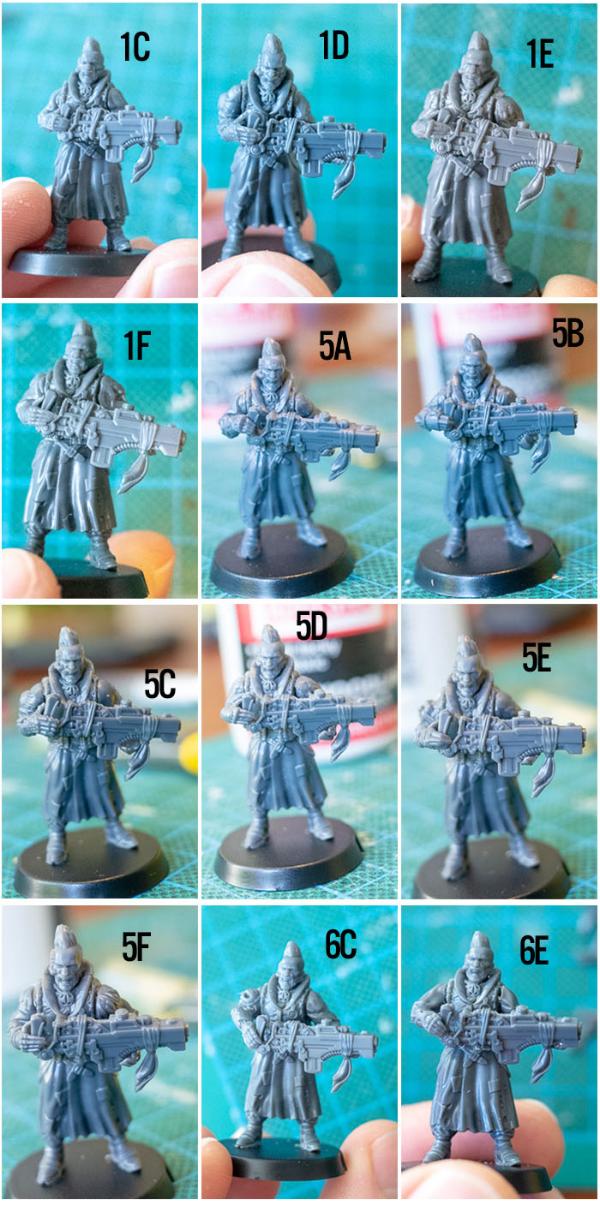
Then, finally, with the Broken sprues it's useful to know that all the '1' arms create a similar hold, all the '2' arms create a similar hold, etc. The numbers for the arms in no way match specifically with the torsos that are on the same sprue, that's totally unrelated. Generally the 1 arms are good for the Slug Rifle, Beam Blastgun, Longbeam Rifle (but 5 is better), Massive Torch and EMP Harpoon. The 2 arms are good for pistols. The 3 arms are good for having your gun resting on the ground. 3E will do a dual pistol. The 4 arms are good for the Torch and Glue Carbine. The 5 arms are good for the Auto Slugger and Longbeam Rifle. The 6 arms are good for the Glue Rifle, Slug Rifle, Beam Blastgun and EMP Harpoon.
So, results:
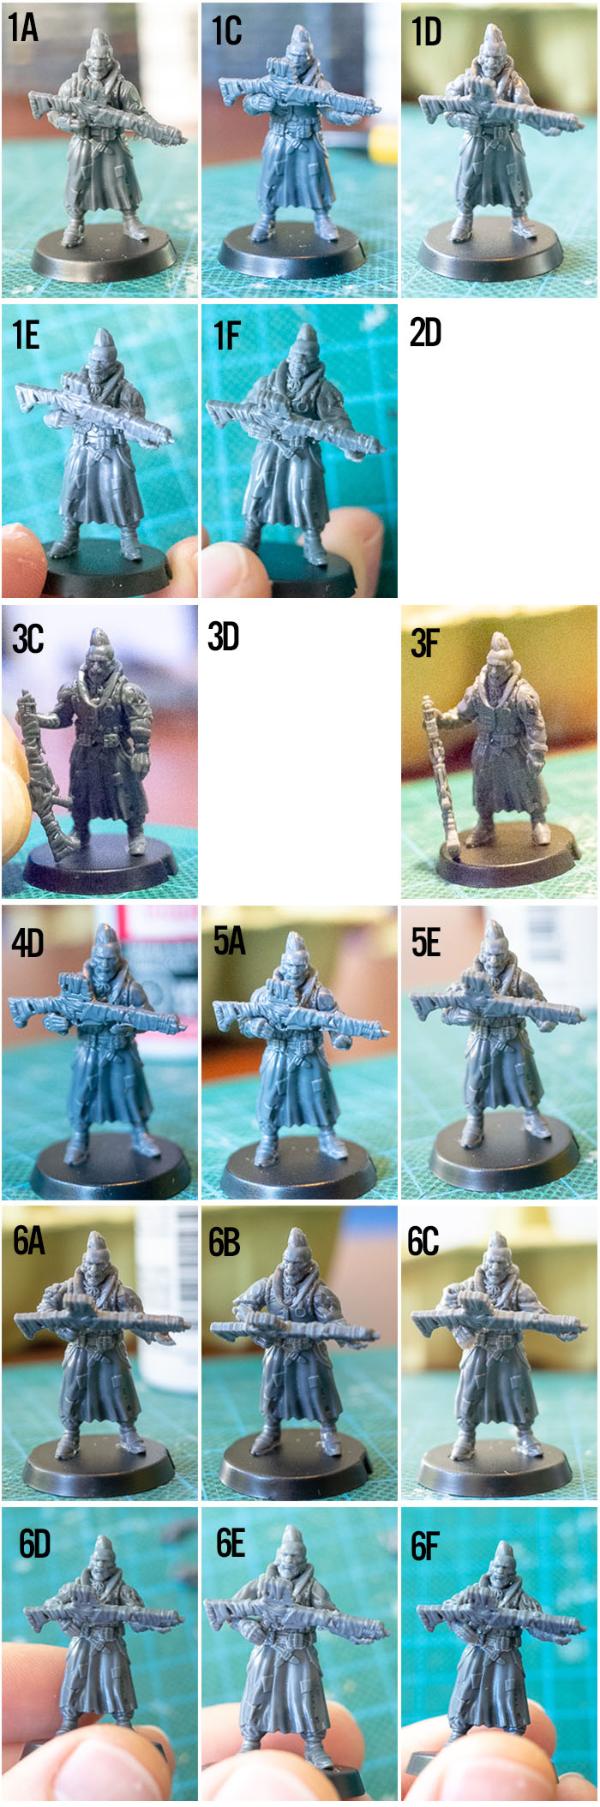
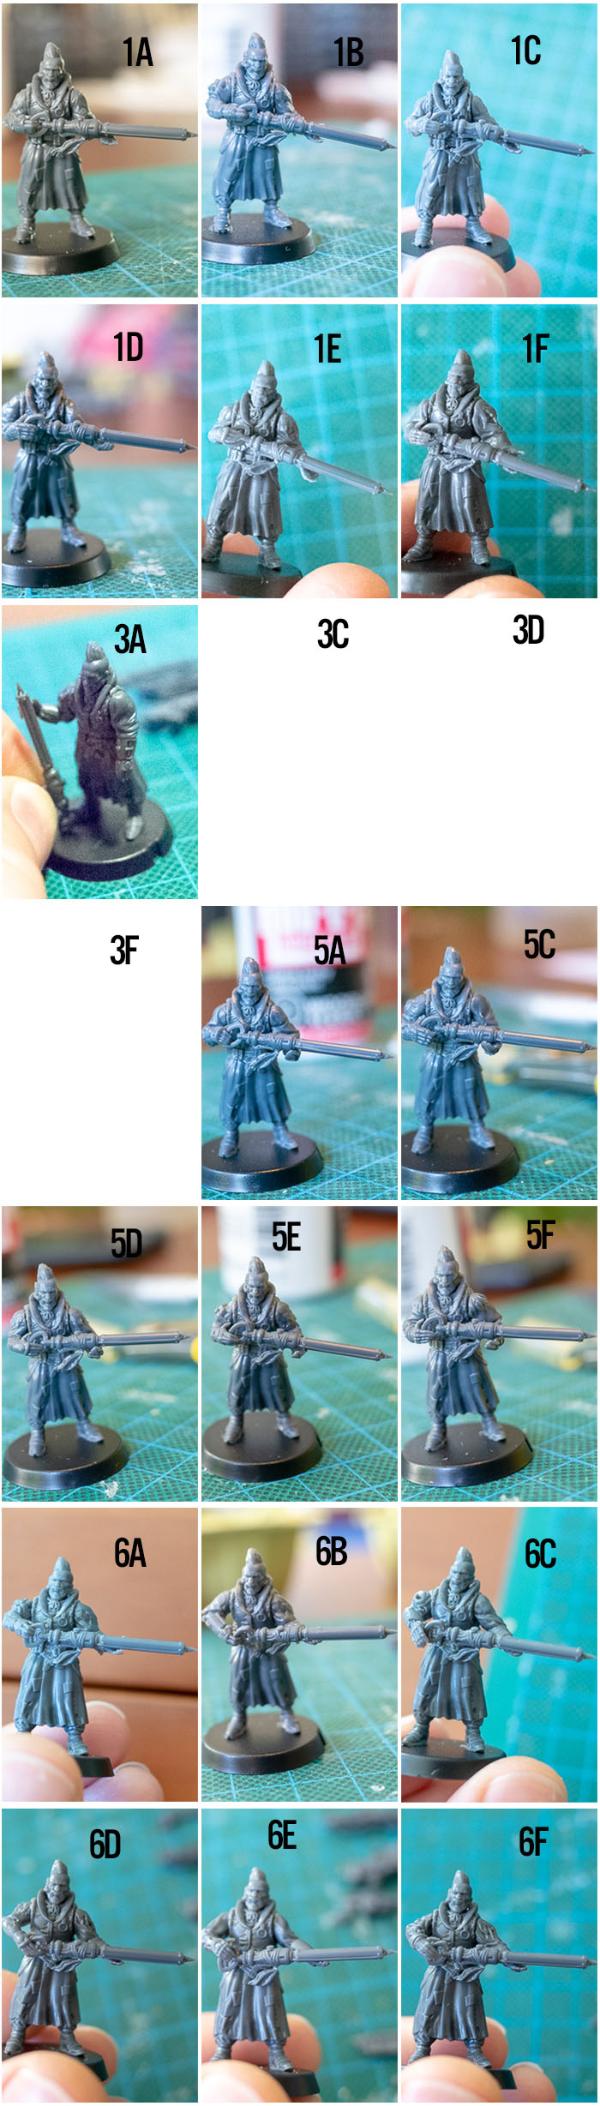
Slug Rifle works with: 1A, 1C, 1D, 1E, 1F, 2D, 3C, 3D, 3F, 4D, 5A, 5E, 6A, 6B, 6C, 6D, 6E, 6F.
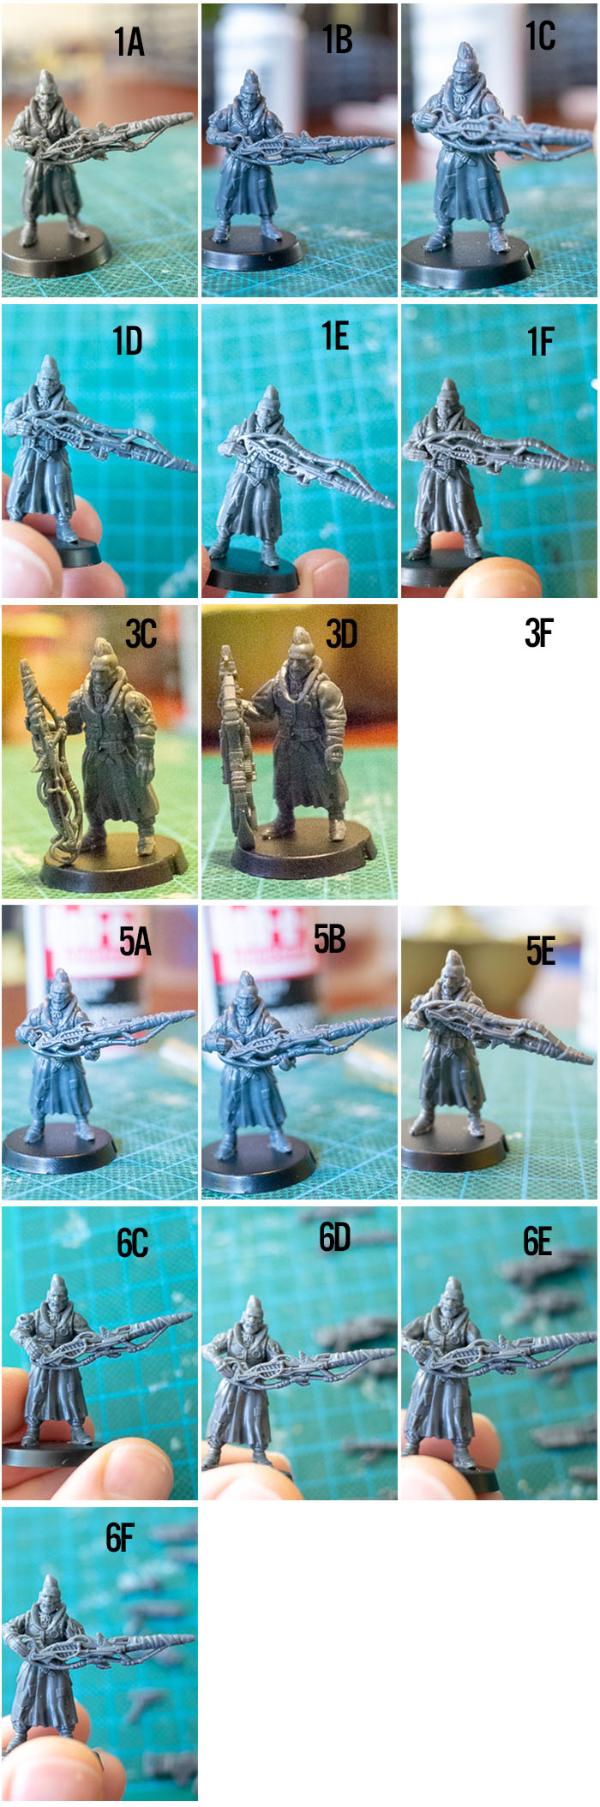
Beam Blastgun works with: 1A, 1B, 1C, 1D, 1E, 1F, 3C, 3D, 3F, 5A, 5C, 5D, 5E, 5F, 6A, 6B, 6C, 6D, 6E, 6F.
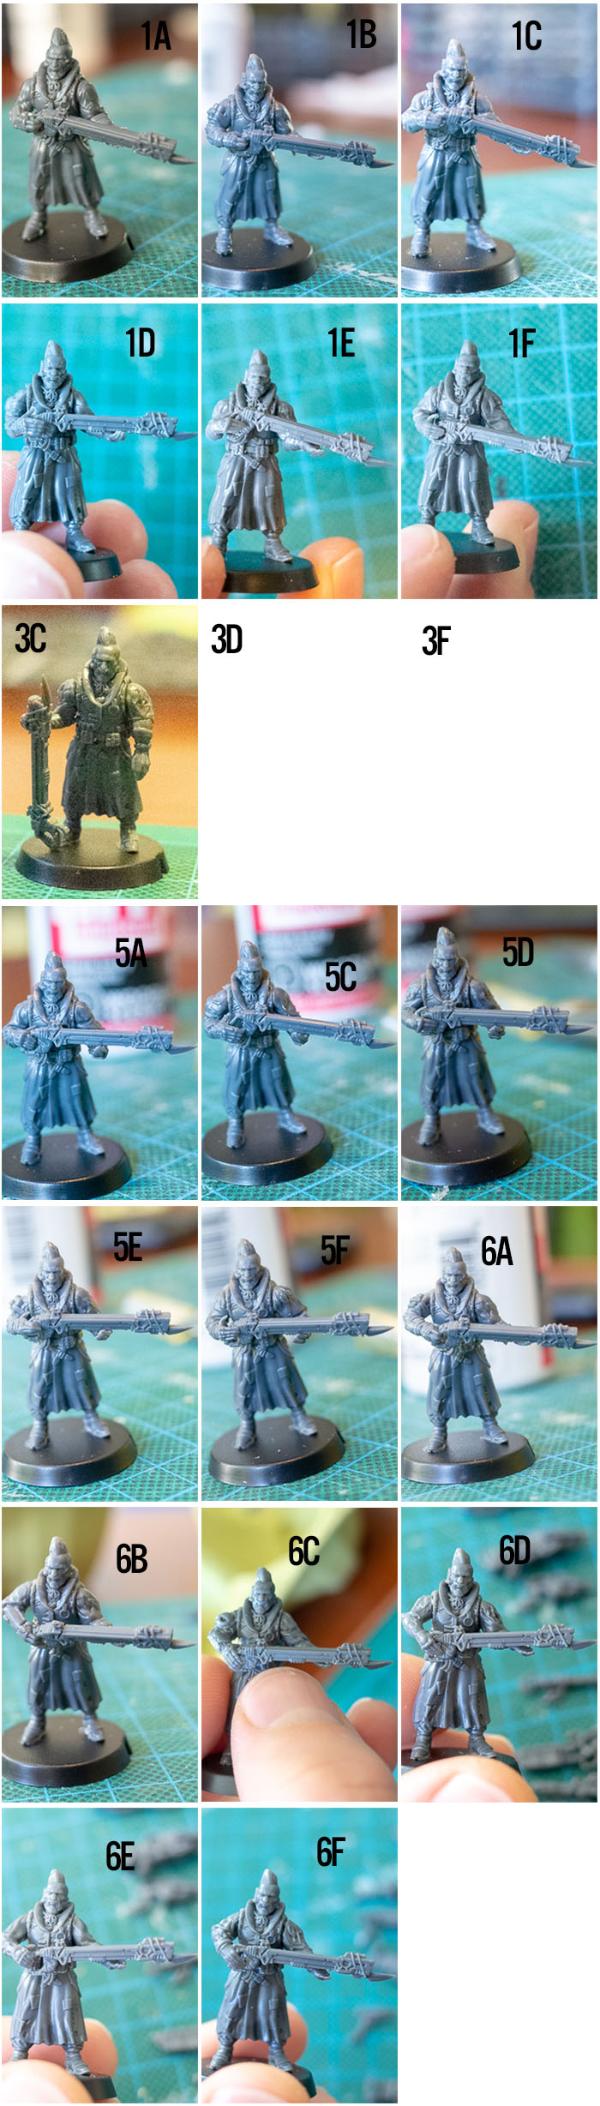
Longbeam Rifle works with: 1A, 1B, 1C, 1D, 1E, 1F, 3C, 3D, 3F, 5A, 5B, 5E, 6C, 6D, 6E, 6F.
Massive Torch works with: 1A, 1B, 1C, 1D, 1E, 1F, 5E, 6A.
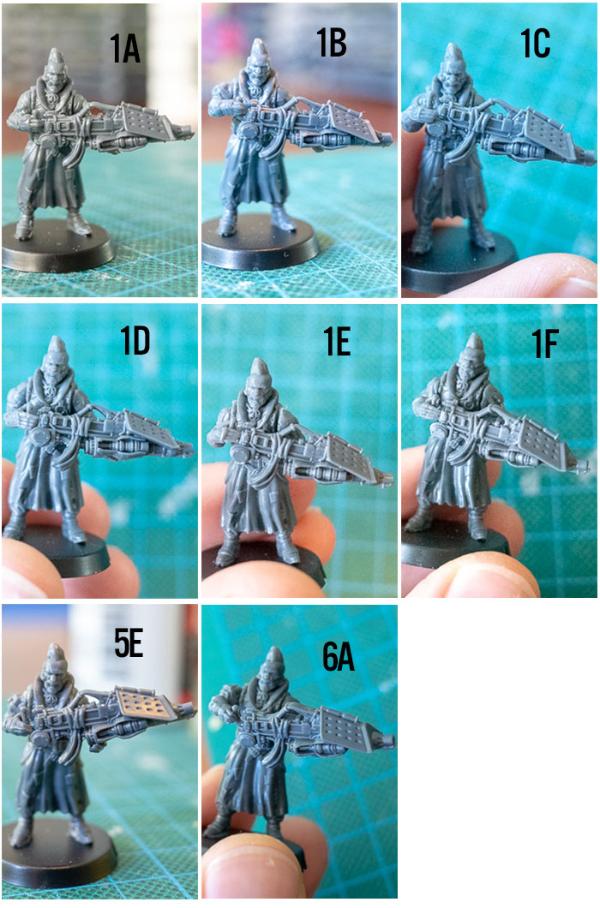
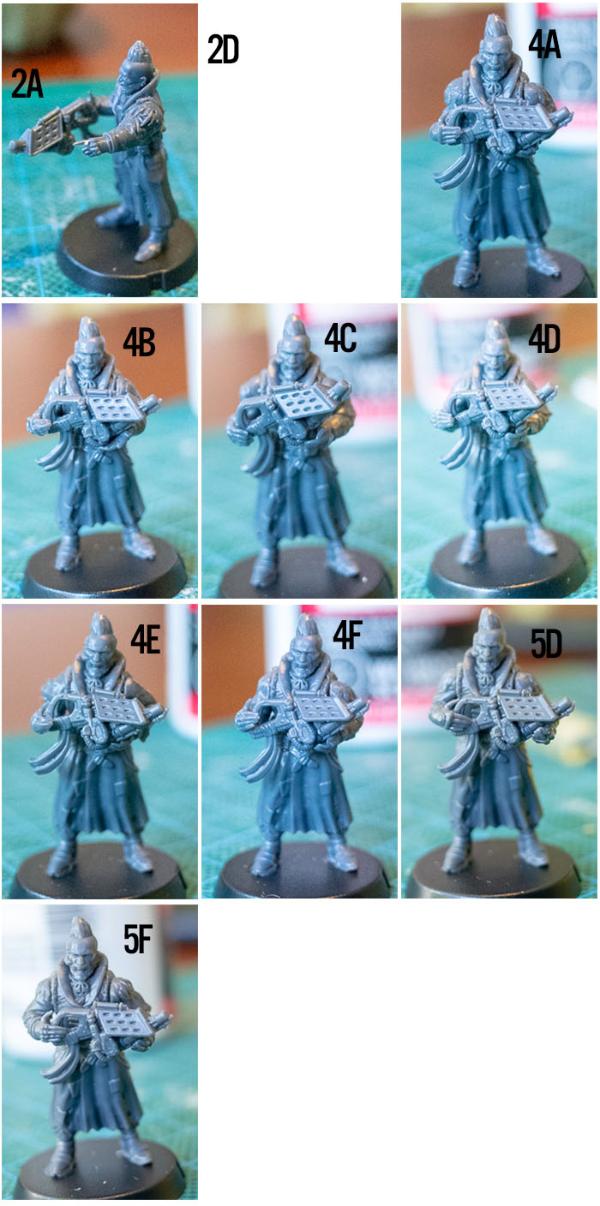
Torch works with: 2AS, 2D, 4A, 4B, 4C, 4D, 4E, 4F, 5D, 5F.
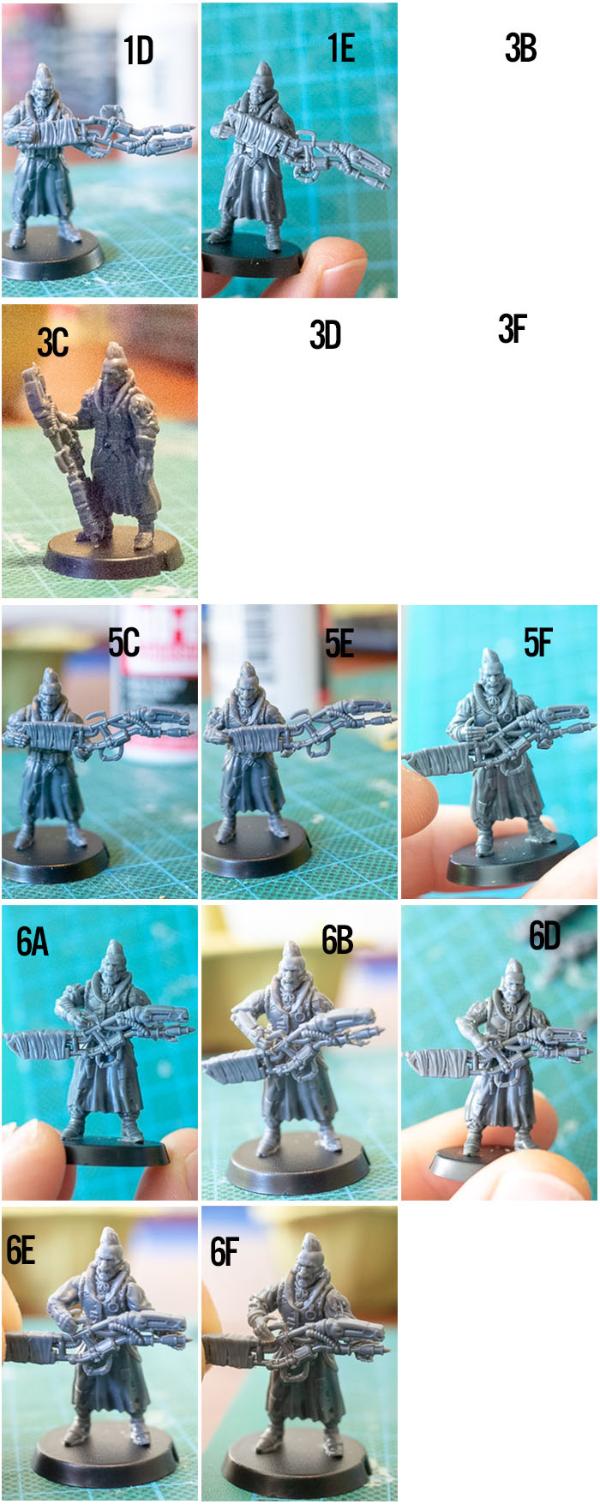
EMP Harpoon works with: 1A, 1B, 1C, 1D, 1E, 1F, 3A, 3C, 3D, 3F, 5A, 5C, 5D, 5E, 5F, 6A, 6B, 6C, 6D, 6E, 6F.
Glue Rifle is a bit odd as there's several ways one might hold it. I have my preference but just showed them all. Note that the gun is upside down in one of the pics. I think this might be because I dropped it and then redid the photo without noticing I held the gun wrong, which would mean this combo should work the right way up, but I'm not sure ;). Works with: 1D, 1E, 3B, 3C, 3D, 3F, 5C, 5E, 5F, 6A, 6B, 6D, 6E, 6F.
Slug Pistol works with: 2A, 2B, 2C, 2E, 2F, 5C, 5D, 5E, 5F.
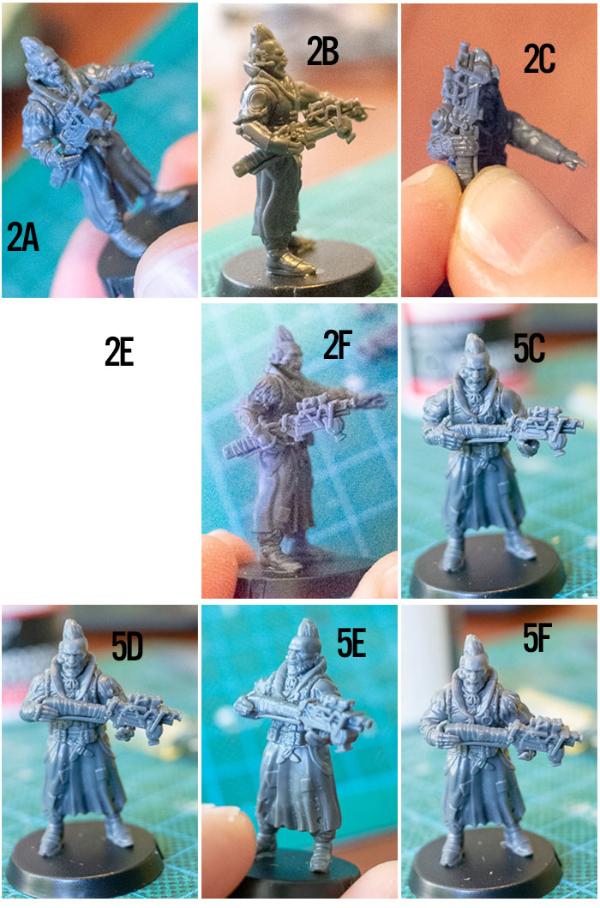
Chem Pistol works with: 2A, 2B, 2E, 2F, 3E.

Chem Launcher works with: 1D, 1E, 2F, 5A, 5D, 5E.

Glue Carbine works with: 2A, 2C, 2E, 2F, 4A, 4B, 4C, 4D, 4E, 4F, 5D, 5F.
Beam Pistol works with: 1A, 1E, 2A, 2C, 2D, 3E.
Auto Slugger works with: 1C, 1D, 1E, 1F, 5A, 5B, 5C, 5D, 5E, 5F, 6C, 6E.
Small addendum regarding torso number 6, which I think is the only one that makes a serious difference for the arms:
In general, torso 6 points the hands closer together. This makes arms 3 and 4 almost useless, but gives a lot of options for the torch and glue carbine as those shorter guns now take advantage of the many arms that usually accommodate longer guns. It's surprisingly hard to find any arm combination to actually fit the basic Slug Rifle, so beware of that. I did slightly less extensive research on this torso (no pics of every combo), but here's my results:
Slug Rifle: 6C, 6F.
Beam Blastgun: 1A, 1B, 1C, 1D, 1F, 5D, 5E, 6A, 6B, 6C, 6D, 6E, 6F.
Longbeam Rifle: 1A, 1B, 1C, 1D, 6A, 6C, 6D, 6F.
Massive Torch: 1A, 1B, 1D, 1E, 6A.
Torch: 1A, 1B, 1D, 1E, 1B, 2D, 2E, 2F, 5B, 5D, 5E.
EMP Harpoon: 1A, 1B, 1C, 1D, 1E, 1F, 6A, 6B, 6D, 6E, 6F.
Glue Rifle: 5E, 6A, 6C, 6D, 6F.
Slug Pistol: 2A, 2B, 2C, 2D, 2E, 2F.
Chem Pistol: 1A, 2A, 2B, 2C, 2D, 2E, 2F, 3E.
Chem Launcher: 2B, 2D, 2E, 5E, 6C, 6D, 6E, 6F.
Glue Carbine: 1C, 1D, 2B, 2C, 2D, 2E, 2F, 5A, 5B, 5D, 5E, 5F.
Beam Pistol: 2A, 2B, 2C, 2D, 2E, 2F, 3E.
Auto Slugger: 1C, 1D, 1E, 1F, 6C, 6F.
General pose of the 1 arms:
General pose of the 2 arms:
3 arms are basically useless with this torso (unless you do a little bit of converting), but you can still do double pistols:
4 arms aren't much use for weapons, but might work if you want to model somebody gesturing whilst talking ;)
General pose of the 5 arms:
General pose of the 6 arms:
Tags: broken modeling tutorial walkthrough
Modeling Spotlight: The Broken Marsayan Hypnotist
Posted on Monday Apr 02, 2018 at 05:00pm in Tutorials
- by Iain Wilson
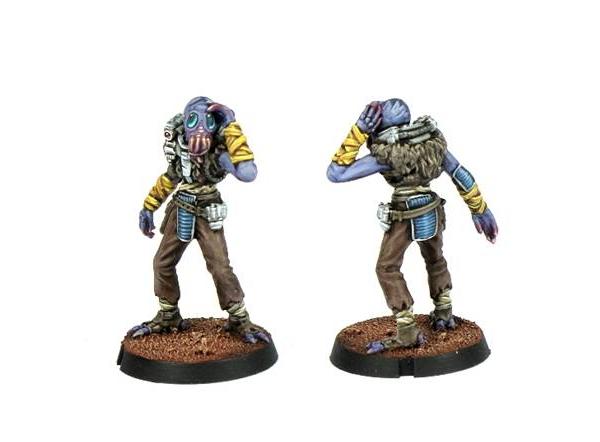
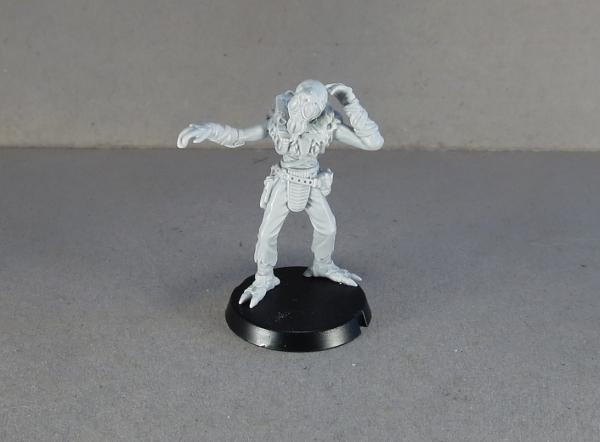
This month sees the release of a new type of unit to Maelstrom's Edge, with the addition of the Marsayan Hypnotist to the Broken faction. Rather than a unit in his own right, the Hypnotist is fielded as an upgrade to other units - an idea that will be carried across to other factions later to help mix things up a little. While he doesn't have any weapons or ability to directly hurt enemy units, the Hypnotist uses his inate abilities to interfere with enemy attacks directed towards his unit. Here, we have a look at some modeling options for this great resin model.
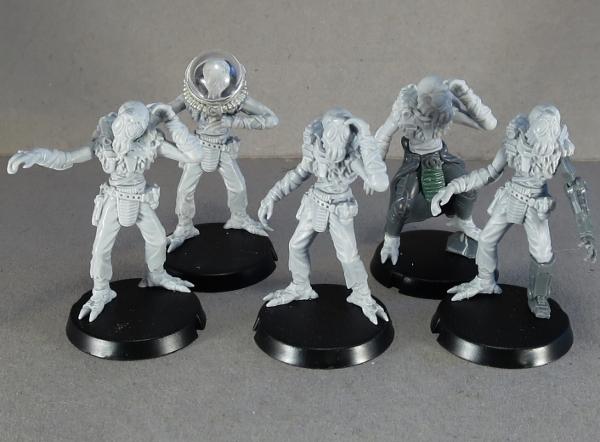
The Marsayan Hypnotist is a two-piece resin model, and comes with a 25mm base. If you haven't worked with resin models before, you might want to check out the handy guide here.
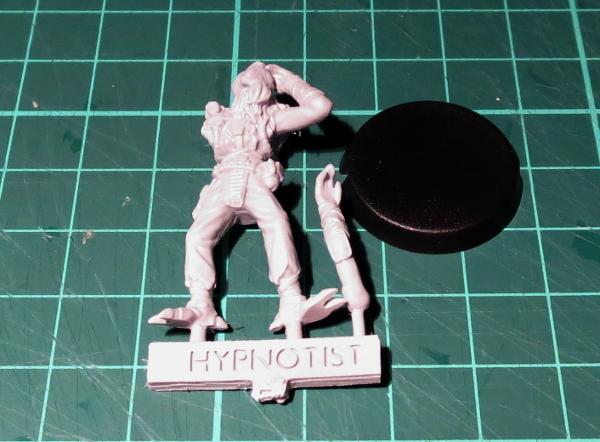
Assembly is simple - cut the model from the frame, glue his feet to the base with superglue or a fast-setting epoxy (I use superglue with an all-plastic primer, for some extra grip without messing about with plastic.
The assembled model is a little taller than a human, but slightly more slender.
Due to the nature of the Broken as scavengers and refugees, it can be fun to mix up the models a bit by using components from other kits. Here, I replaced the Hypnotist's legs with the legs from a Karist Kaddar Nova.
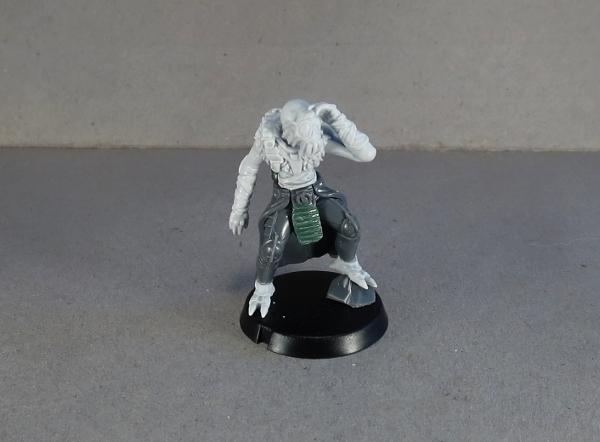
For something slightly more ambitious, on this one I carefully cut through the resin where the fingertips touch the model's head, and then cut through the neck. The neck was trimmed away and replaced with a new one sculpted from 'Green Stuff' sculpting putty, and the head reattached facing to the right instead of the left. I also cut the left hand off at the wrist and reattached it at a slightly different angle, so that the fingertips still touch the head.
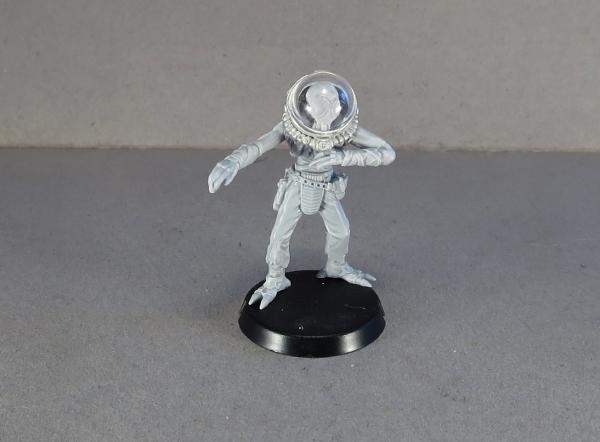
Some worlds are less comfortable for some species than others. On this model, I cut through teh left arm at the shoulder and rotated it downwards to cross the model's chest. I also removed the head and repositioned it slightly, flattened off the top of the shoulders, and added a domed helmet from Bombshell Miniatures.
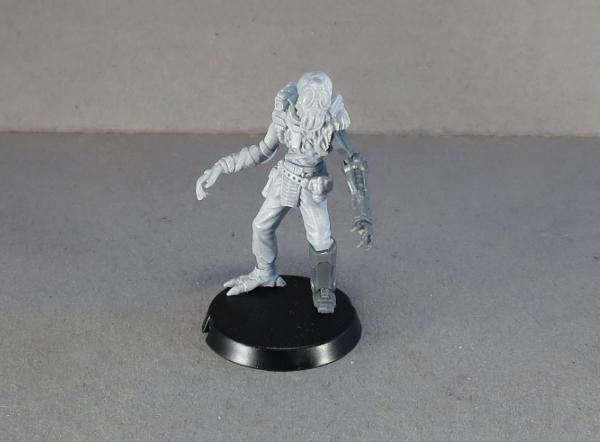
Finally, bionic limbs are a common feature amongst the Broken. While these have no specific in-game effect, they're a great way to add some character to your models. Here, I have replaced the Hypnotist's lower leg and left arm with parts taken from an Epirian Scarecrow bot.
What have you done with your Hypnotists? We would love to see your creations on the Comm Guild Facebook page!
To pick up the Marsayan Hypnotist, or any of the rest of the Maelstrom's Edge model range, visit the webstore here.
For other Maelstrom's Edge modeling articles, including tutorials and walkthroughs of a wide range of different building and miniature projects, check out the article roundup here.
New Broken alien - The Marsayan Hypnotist is available now!
Posted on Saturday Mar 31, 2018 at 04:58am in The Broken
The Marsayan Hypnotist is the next resin release for the Broken faction in Maelstrom's Edge. The first 'Add-On' unit type available for the Broken, the Marsayan Hypnotist can be added to different Broken squads to help protect them from enemy fire, as detailed on the model's profile card in the online unit card section of the Maelstrom's Edge website.
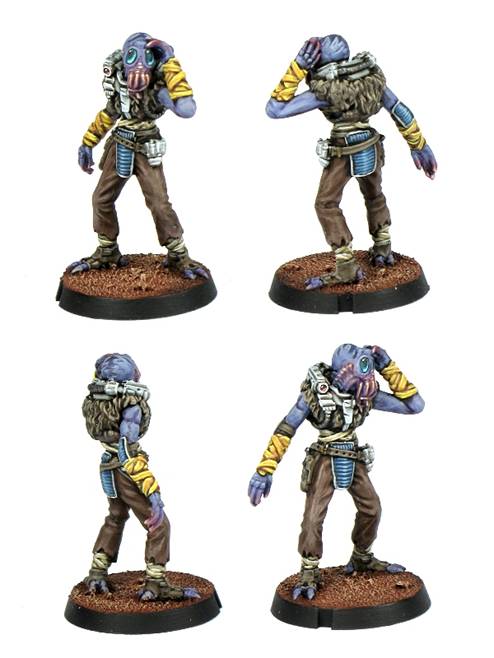
Marsays are not naturally gifted fighters, nor are they a particularly good shot. With their long limbs, clumsy gait and large bulbous eyes, Marsays don't seem a threat. Disguised behind those eyes, however, is their remarkable ability to influence the mind of others. This is a slumbering ability that most Marsay cannot consciously steer, only presenting itself when the Marsay is angry or fearful. There are some, however, who can exercise this power at will, giving them frightening control over those around them. At a distance, a Marsay can subtly suggest to the enemy to perhaps choose a different target to fire at. Up close, they can create much more intense hallucinations or make an opponent become violently ill.
There are rumours that a great Marsayan empire existed, comprising dozens of worlds, stretched across multiple systems. Driven by the most influential telepaths, the Marsayan Empire was thought to be deeply unequal and aggressive towards other cultures. Neighbouring human worlds, either threatened or jealous of the Marsayan abilities, banded together to attack, and most of the Empire was exterminated. The surviving Marsays fled their home worlds and learned to hide amongst human populations. All official records of the Marsayan civilization were wiped out by the arrival of the Maelstrom. Today, Marsays are mostly black market merchants by trade. Common sights in bazaars across the Arm, they are respected for their business acumen and the quality of their wares. Marsayan Ranja is an especially popular liqueur. Equally well known, however, is the Marsayan Swindle. Many an unsuspecting buyer at a Marsay market stall has suddenly felt a little nauseous and returned home with a purchase they can't quite explain.
Marsays still hold a deep fear of being imprisoned or killed for their gifts, and deny or downplay their telepathic potency. This fear of human government drives them to hide amongst the shadows of society, and even with the approach of the Maelstrom few are willing to risk being caught influencing their way onto an evacuation ship. Marsays are naturally drawn to Broken Freeports, where humans and xenos peacefully intermingle away from the sight of authoritarian government. Marsays often join Broken fighting forces to procure plundered goods they can later trade on the black market, and it is on the battlefield that their hidden talent for manipulation is often revealed. Marsayan hypnotists are valued on Broken patrols, as they can silently neutralize threats and do not care for even the thickest armour. Whilst these slight, frail creatures are not physically imposing, when they delve into the minds of their enemies, they can make the most hardened warrior flee in terror.
Pick up your Marsayan Hypnotist from the Maelstrom's Edge webstore here!
Modeling Spotlight: Assembling the Broken Sig Jammer
Posted on Monday Feb 26, 2018 at 05:00pm in Tutorials
- by Iain Wilson
The Broken Sig Jammer adds some elite tech skill to the Broken faction, taking to the field with Tech Disruptor and Targeting Scrambler in hand to make life awkward for oppressors and invaders alike. This week, we're having a closer look at this fantastic resin model.

The ramshackle fleets of the Broken don't possess extensive R&D departments or mass production facilities, but what they lack in investment, they make up for in unregulated ingenuity and daring invention. The Broken is a haven for technological savants and rebellious hackers, rulebreakers ostracised and hunted by a society scared of their technological prowess. Whether driven to the Broken by the Maelstrom or the authorities, these maverick inventors are encouraged to experiment and tinker. These 'Jammers' soon thrive among the Broken ranks, using their skills to break into computer networks, disrupt signals, and generally set technology against their users. It is a rare mercurial talent to be able to invent the kind of disruptive equipment the Jammers carry, and sending a Jammer Savant deep into enemy territory is not a viable strategy. Instead, Broken leadership encourages anyone with a natural aptitude for technology to become an apprentice, or 'Sig Jammer'. In peacetime, these neophytes are a mixture of servant and apprentice, taking care of a Savant's every need, or searching for the particular parts needed to complete the Savant's latest technological masterpiece.
The Sig Jammer model comes in 5 parts - body, head, Targeting Scrambler and the shaft and emitter for the Tech Disruptor.
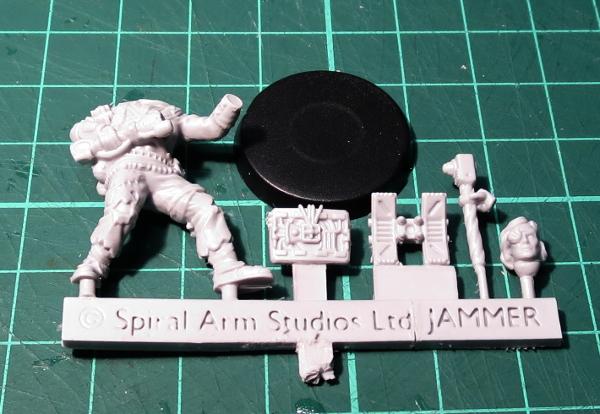
Assembly is nice and easy, although if you haven't built resin models before you might want to check out my handy guide to working with resin.
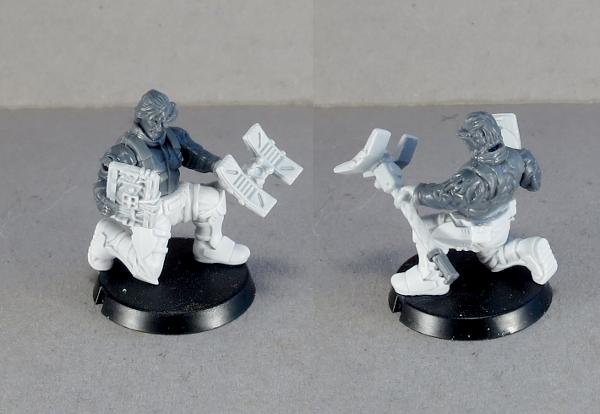
The emitter piece for the Tech Disruptor glues neatly on the end of the shaft with a locator socket to seat it firmly in place. The bottom end of the shaft then glues into the haft, and the left hand joins to the extended arm. It's worth dry-fitting the disruptor before you try to glue it in place, just in case the arm isn't sitting quite right - if the disruptor doesn't fit neatly in place, check out the "Nothing to get bent out of shape about..." section in the article linked above.

The Targeting Scrambler is designed to glue onto the model's left forearm, but goes quite neatly on either shoulder, on the model's leg, or even on the back.

Finally, the head sockets into the torso, with the ball joint allowing for a wide range of movement.

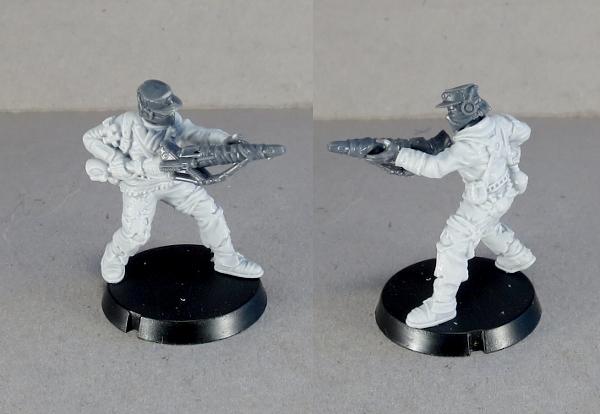
The head is compatible with the rest of the Broken range, so you can easily mix up your Jammers a little by using any of the plastic heads from the Broken Infantry Pack.

You can vary the posing a little with the addition of some other parts of the Broken infantry sprue as well. The model below has the Scrambler attached to the haft of the Distruptor, and an aerial-style Disruptor made using part of an EMP harpoon and a left hand from the infantry sprue.

In keeping with the scavenging nature of the Broken, you can also mix-and-match parts from the other factions. The below model has legs from a Karist Heavy Weapon trooper and the torso from an Epirian Contractor, with arms and head from the Broken Infantry Pack.
With a little creative trimming and chopping, the Jammer model also makes a great fire support team member. Here, I have used the front half of a Longbeam Rifle in place of the Disruptor.
Do you have a Sig Jammer model to show off? Need help with assembly, painting or gaming? Pop along to the Comm Guild Facebook page and share your work!
To pick up the Sig Jammer or any of the rest of the Maelstrom's Edge model range, visit the webstore here.
For other Maelstrom's Edge modeling articles, including tutorials and walkthroughs of a wide range of different building and miniature projects, check out the article roundup here.
The Broken's first Elite - The Sig Jammer available now!
Posted on Friday Feb 23, 2018 at 11:15am in The Broken
The Sig Jammer is the latest resin release for Maelstrom's Edge and helps the Broken counter the technological superiority of their adversaries. As usual, the unit's rules can be found in the online unit card section of the Maelstrom's Edge website, where you are able to learn about the specific rules of the Tech Disruptor (pile on those Suppression Tokens!) and the other equipped weapons of the Sig Jammer.
The ramshackle fleets of the Broken don't possess extensive R&D departments or mass production facilities, but what they lack in investment, they make up for in unregulated ingenuity and daring invention. The Broken is a haven for technological savants and rebellious hackers, rulebreakers ostracised and hunted by a society scared of their technological prowess. Whether driven to the Broken by the Maelstrom or the authorities, these maverick inventors are encouraged to experiment and tinker. These 'Jammers' soon thrive among the Broken ranks, using their skills to break into computer networks, disrupt signals, and generally set technology against their users. It is a rare mercurial talent to be able to invent the kind of disruptive equipment the Jammers carry, and sending a Jammer Savant deep into enemy territory is not a viable strategy. Instead, Broken leadership encourages anyone with a natural aptitude for technology to become an apprentice, or 'Sig Jammer'. In peacetime, these neophytes are a mixture of servant and apprentice, taking care of a Savant's every need, or searching for the particular parts needed to complete the Savant's latest technological masterpiece.

Once the Broken go to war, Sig Jammers are given disruption tech and thrust towards the enemy to cause havoc. A Sig Jammer's average lifespan doesn't tend to be terribly long, yet there is never a shortage of souls looking to become one. In fact, in some Broken societies, a lottery has to be held to select new Sig Jammers from amongst all the hopefuls. This is easier to understand when the alternative is being drafted into a Broken Rabble unit, which is roughly akin to being thrown into a meat grinder. In battle, Sig Jammers sneak near enemy lines and wage short-ranged technological warfare on the enemy, degrading their weapon systems and disrupting their broadcast frequencies. Sig Jammers project a localised disruptive field from their Tech Disruptor beam weapons to hamper electronic devices, disorienting or shutting down enemy targeting and support systems. Sig Jammers also use their arm-mounted targeting scrambler for protection, sending out dozens of false positives to enemy targeting computers, causing additional confusion and pandemonium amongst their adversaries.
Modeling Spotlight: Converted Broken Gnolti
Posted on Tuesday Jan 30, 2018 at 07:06am in Tutorials
- by Iain Wilson
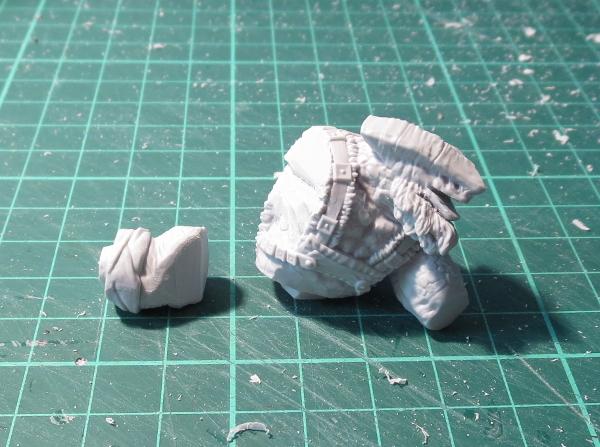
This week saw the arrival of the biggest model yet for Maelstrom's Edge: The Gnolti!
A gigantic chunk of brawn and armoured hide, the Gnolti is slow to anger, but unstoppable when roused. So as impressive as the model is, I decided I wanted to build one that showed a Gnolti really letting it all out. This was the end result:

The Gnolti is a multi-part resin kit, with a little posability in the forearms due to the circular connections. One of his hands is open, and this seemed like it was just asking to be holding something breakable. So, I sliced off the forefinger so that I could close in his grip a little, and reattached it with some green stuff, and gave him a little friend to play with, courtesy of the Epirian Scarecrow kit.

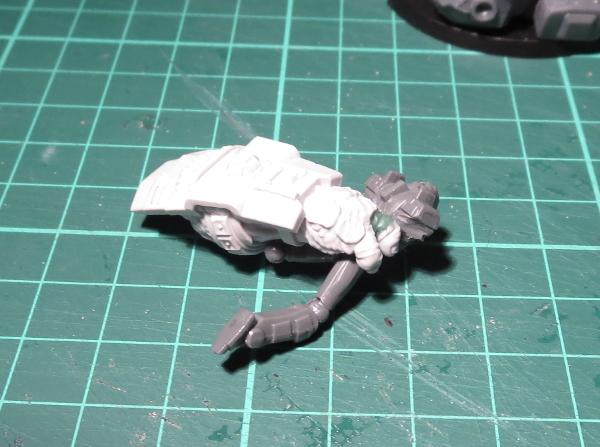
The left hand is in a closed fist, and is designed to sit knuckles-down on the base. I reshaped the flattened bottom surface of the fingers to make them more rounded, and then pinned the scarecrow's left forearm into the Gnolti's grip.
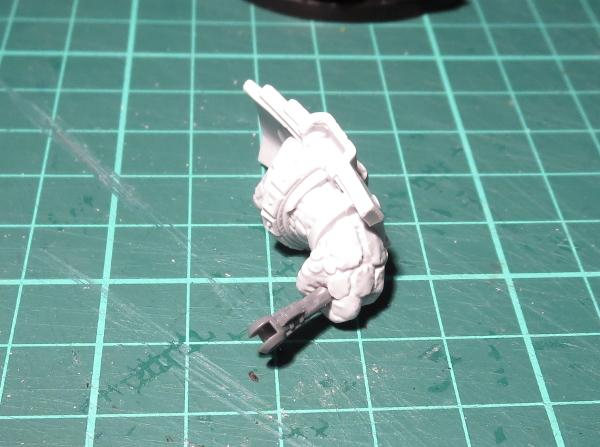
To create a more upright stance, I ran the legs under some hot water and carefully bent the lower right leg out and back. Apparently, I wasn't careful enough, as I managed to snap it off through the shin, but with a little drilling and pinning, I wound up with legs positioned how I wanted them.
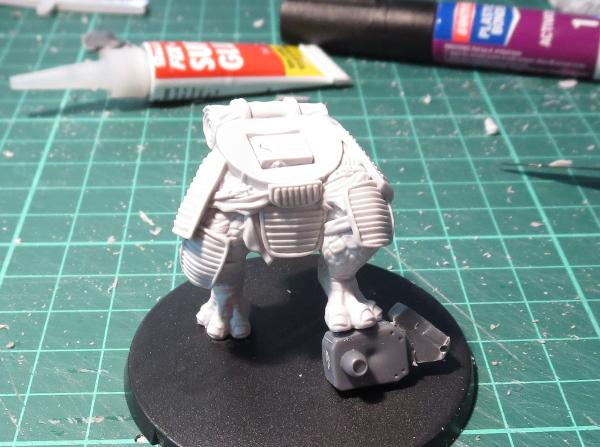
Adding a Hunter mech's leg for the Gnolti to stand on, I glued the legs in place on the base, and added a piece of sprue to fill in the slot for the torso's locator peg.
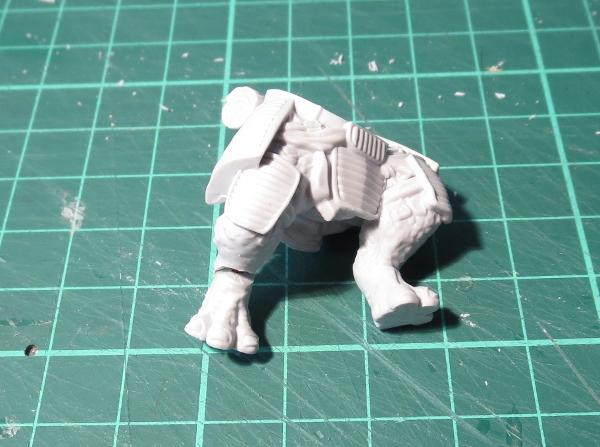
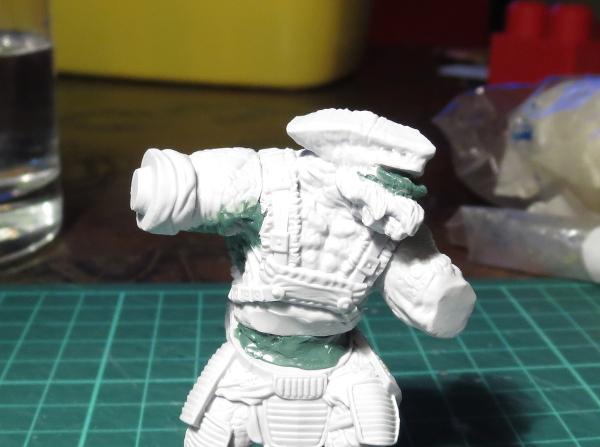
Taking the torso piece, I used a razor saw to slice off the right arm at the shoulder, cutting out a wedge on the top so that it could be reattached in a more raised position. I also cut a thin wedge out from his chin at the top of his beard, and then added a cut between his lips so that I could bend his lower lip down into a mouth-open position.
The torso was then glued in place, with the sprue in the waist-hole allowing the torso to sit upright.

The lower lip was padded out with some green stuff to repair the minor damage from sawing it open. I also filled in the cavity in his waist, and started added detail back in under the right arm.
Another layer of green stuff gave him some abdominal muscles, a tongue, and a single flat tusk in his lower jaw.
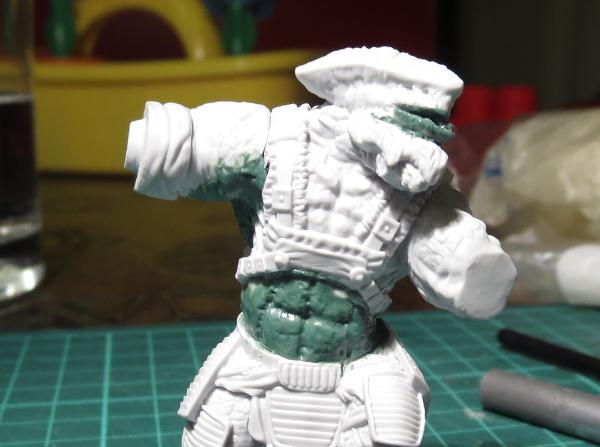
Finally, the forearms were glued on, and a last run of green stuff added to replace the fur trim on his right shoulder strap.
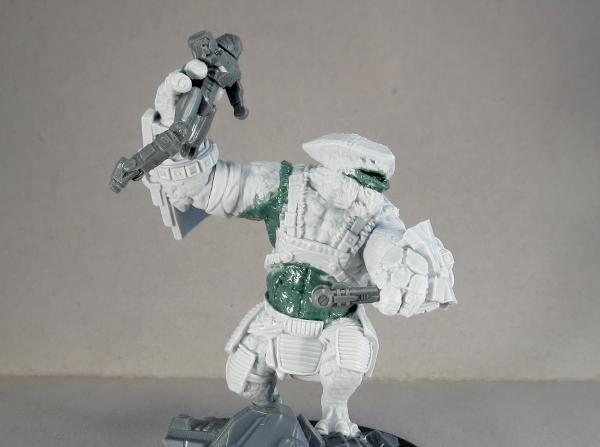
With that, it was time to paint!
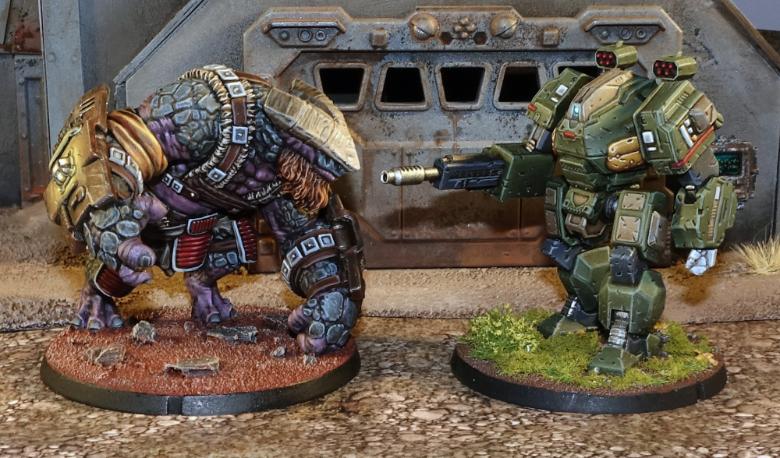
I went with a colour scheme that was reminiscent of that used on the studio model shown here, but with slightly more muted colours to fit in with my quick, wash-painted Broken colour scheme.
Ready for action!
To pick up your own wee beasty of broken doom, or any of the rest of the Maelstrom's Edge model range, visit the webstore here. As always, be sure to show off your work on the Comm Guild Facebook page!
For other Maelstrom's Edge modeling articles, including tutorials and walkthroughs of a wide range of different building and miniature projects, check out the article roundup here.
Tags: broken conversion gnolti model modeling spotlight tutorial walkthrough
Maelstrom's Edge Largest Ever Model - The Broken Gnolti
Posted on Friday Jan 26, 2018 at 10:30am in Models
Spiral Arm Studios are proud to present their latest release - the Gnolti - a large, brutish alien which fights alongside the Broken. This four part resin model is the biggest we've ever made and is available now on the Maelstrom's Edge webstore.
The Gnolti are large, slow moving creatures with strength many times that of a human. Gnolti evolved on the high gravity moon orbiting the gas giant Encelasa, and were amongst the first alien species met by humanity. Many Gnolti remain on their homeworld, but some take up a nomadic life across the Spiral Arm, earning money with their bulky frames to send back home. Originally hired and transported to systems requiring extreme manual labour or exposure to elements lethal to humans, their normally calm, thoughtful temperament made Gnolti easy to integrate into human society. Gnolti are extremely loyal to those who treat them well, gladly risking themselves to protect their friends. Despite being incredibly useful, Gnolti are often denied berths on planetary evacuation ships due to their extreme size. Gnoltis have few opportunities to escape the Maelstrom, and stranded Gnolti are a common recruit into the ragtag warbands of the Broken, where their physical power can be a huge asset.
It takes an incredible amount of punishment to bring down a Gnolti in battle. Besides their massive strength and incredible toughness, Gnolti are blessed with an extreme regenerative trait that allows them to heal in just minutes massive wounds that would easily fell other species. Gnolti may be slow to anger, but once roused, their rage is hard to quench. A rampaging Gnolti is an image impossible to forget for those lucky enough to survive their attack. Frequently a Broken ringleader won't even arm their Gnolti comrades, as the spectacle of an enraged charging Gnolti can disrupt all but the most disciplined defensive lines. This near legendary reputation means that on the battlefield, Gnolti become a primary target of the enemy, regardless of whether they should be or not. The Broken gladly leverage this notion and use Gnolti as a screen for their more vulnerable units. The ferocity and size of a Gnolti is even used as a distraction tactic, drawing the fire of enemy troops so that other Broken can manoeuvre unhindered, to devastating effect. The Broken do not take the sacrifice of Gnolti lightly. At the end of each battle, Gnolti are given first pick of any loot that was captured, and every member of the warband stops by to wish thanks to the Gnolti they served with, or to pay homage to those Gnolti that didn't survive.
The Gnolti rules are available as always at the Maelstrom's Edge website, in the Force Listings section. Equipped with the ability to regenerate, and with massive fists to plow through enemy lines, this powerful model is a solid centrepiece for Broken detachments.
This is a four part resin model which has some posing flexibility at the forearms. Overall, the Gnolti has a mostly fixed pose designed to show the lumbering power of the model.
The Gnolti is available for purchase right now in the Maelstrom's Edge webstore.
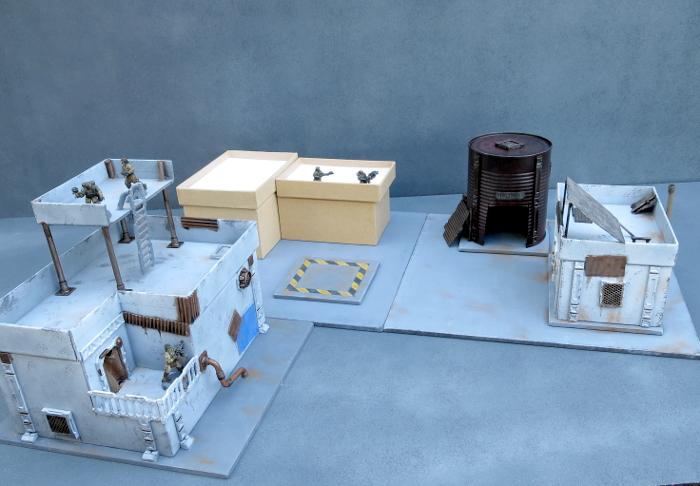
Terrain Spotlight: Broken Settlement, part 2
Posted on Monday Nov 20, 2017 at 05:00pm in Tutorials
- by Iain Wilson
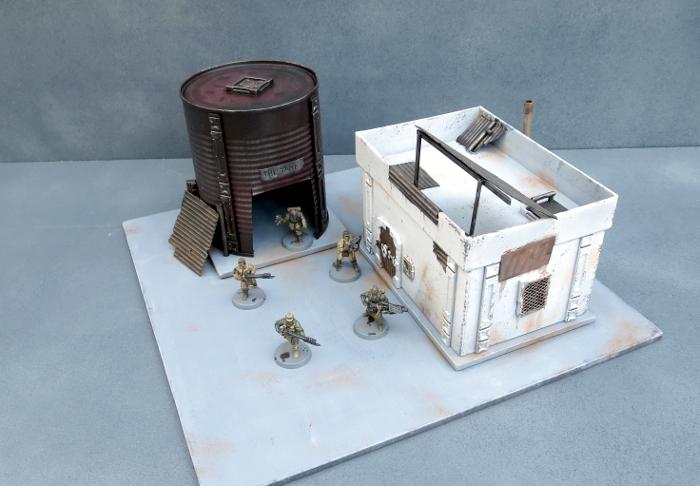
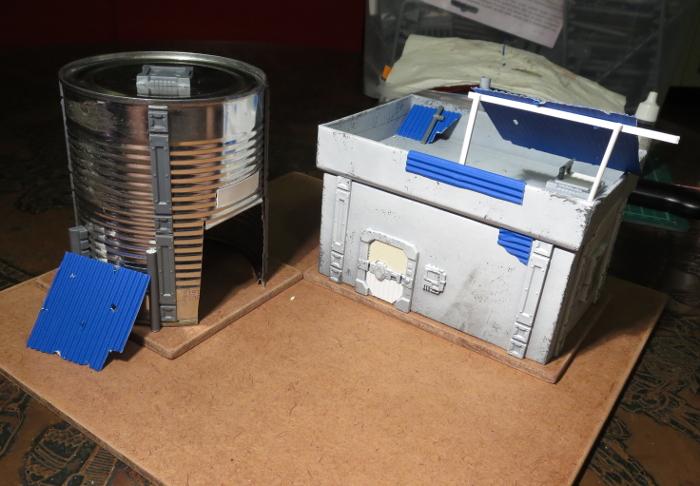
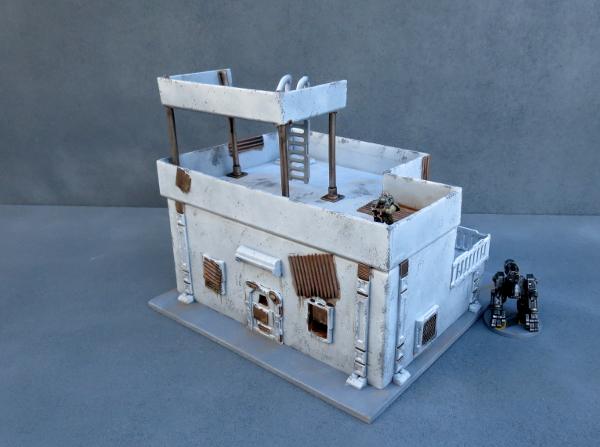
This week, I'm continuing on with the construction of the Broken settlement that I started a few weeks back, which you can find round about here, by adding in another 'renovated' building and a converted water tank shelter.
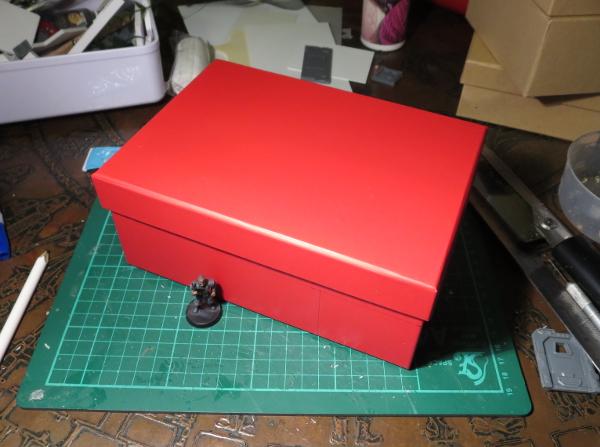
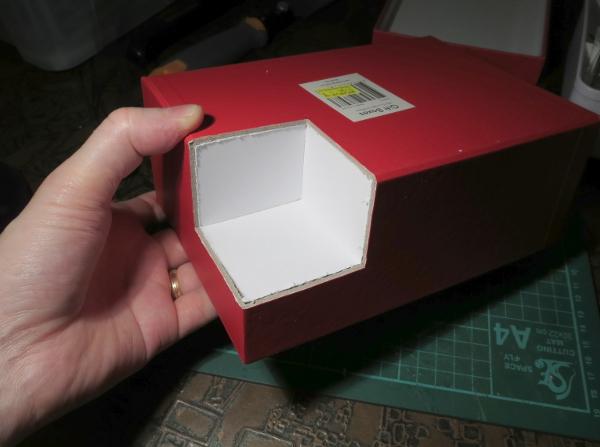
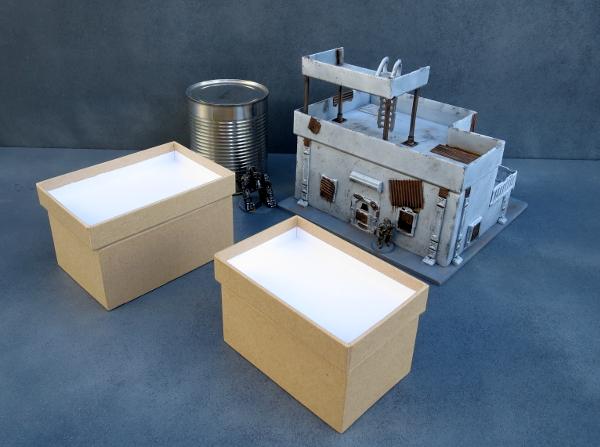
I fast-forwarded a little on construction by grabbing a small building that I made some time ago for a video showing how to make a building from a cardboard gift box and the Maelstrom's Edge terrain sprue (which you can find on Youtube here). This was partly painted as a test run for the sponge-weathering that I used on the first building for this settlement.
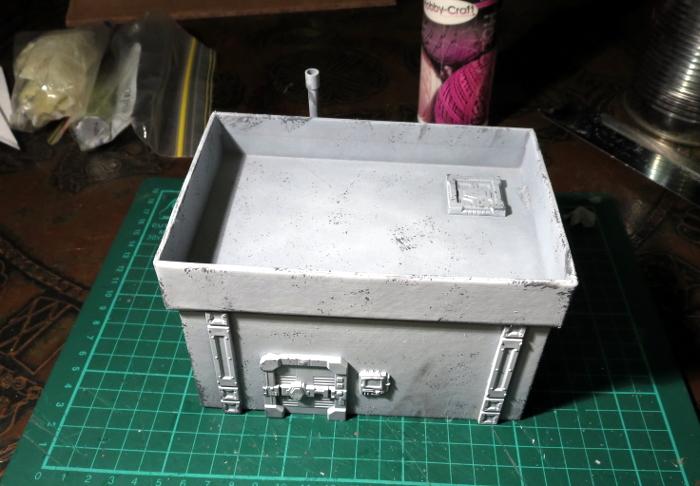
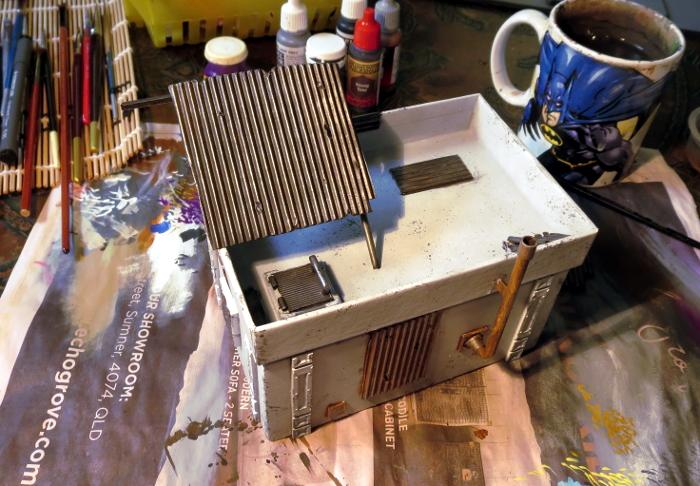
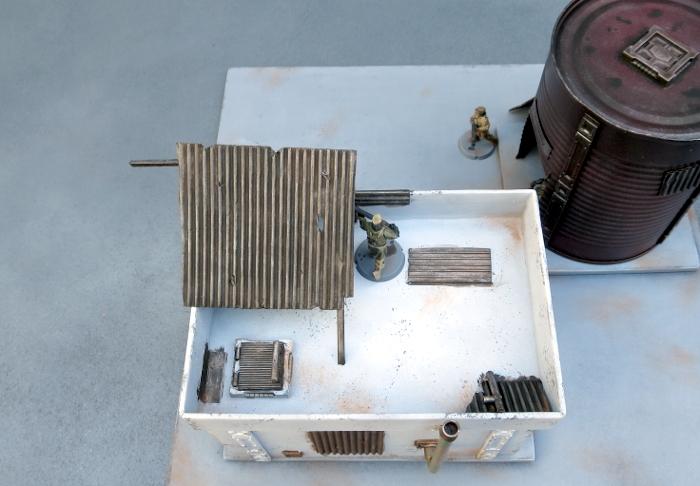
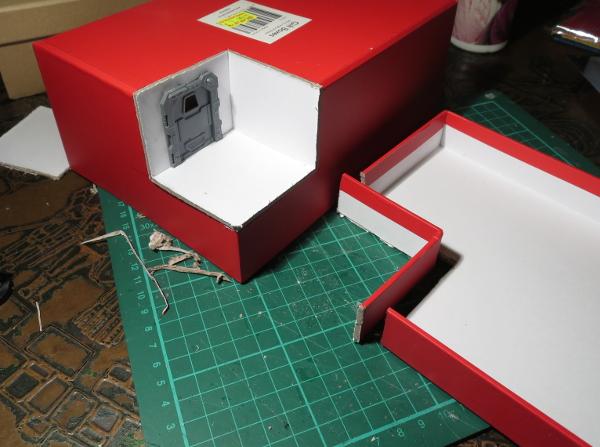
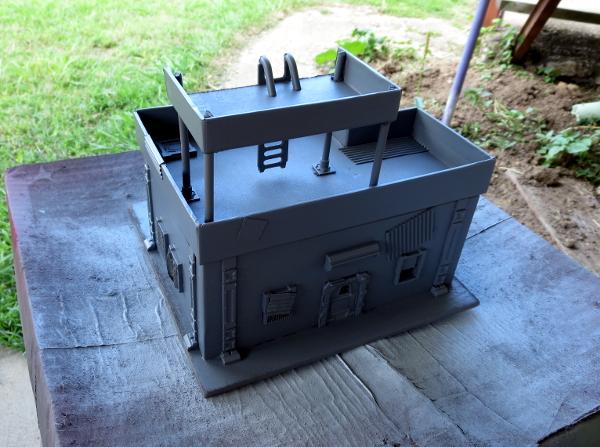
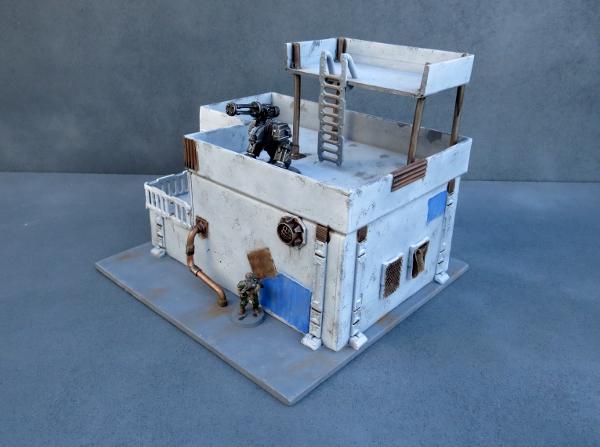
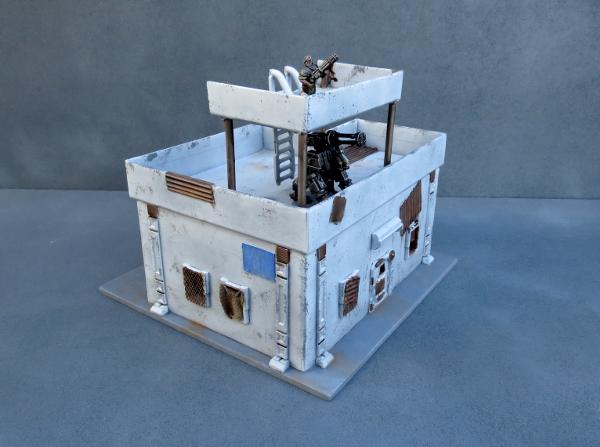
Clearly, this building was still far too pretty looking to fit into a Broken settlement, so I added a bunch of patch-plating using plasticard and corrugated cardboard, and added some mesh over the windows on the sides. I also built a framework on the roof to create a makeshift shelter or sentry point.

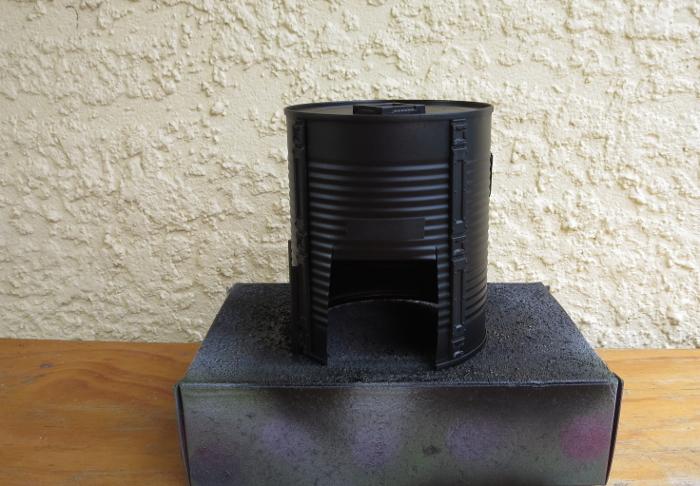
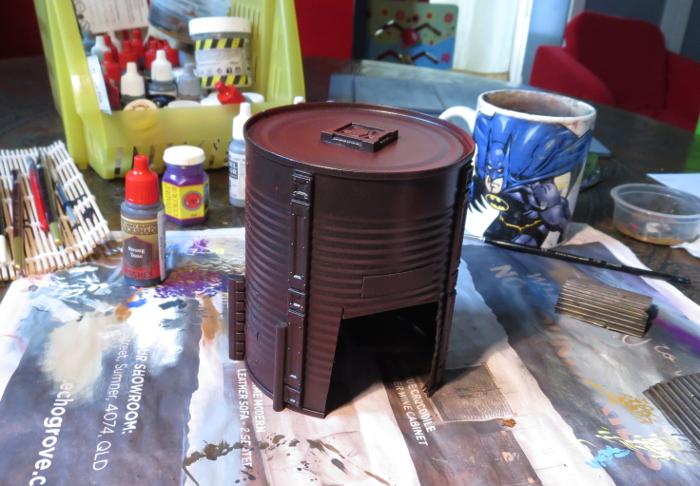
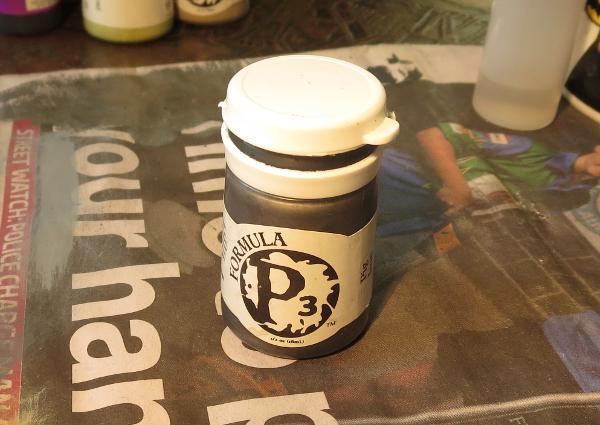
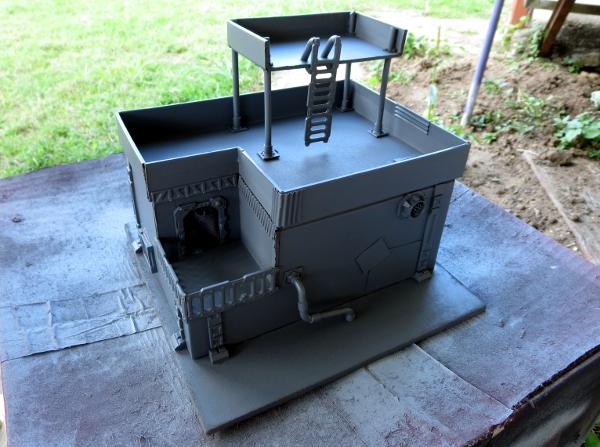
The companion building for the gift box one is made from an old fruit tin. This received a good wash and had the label removed, and then I cut a squarish hole in the side to serve as a doorway.
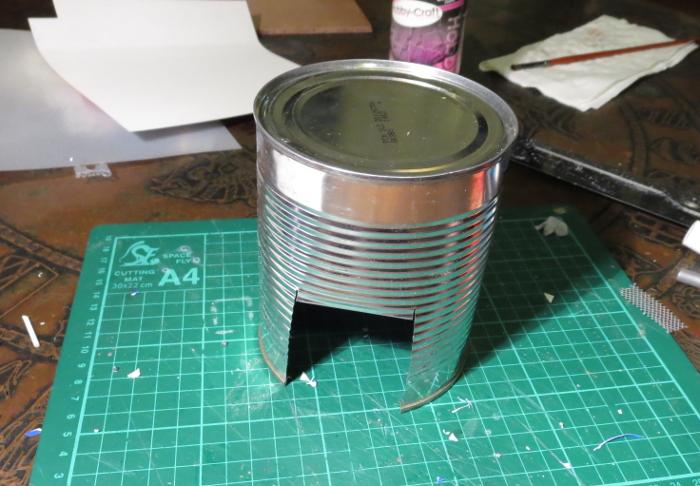
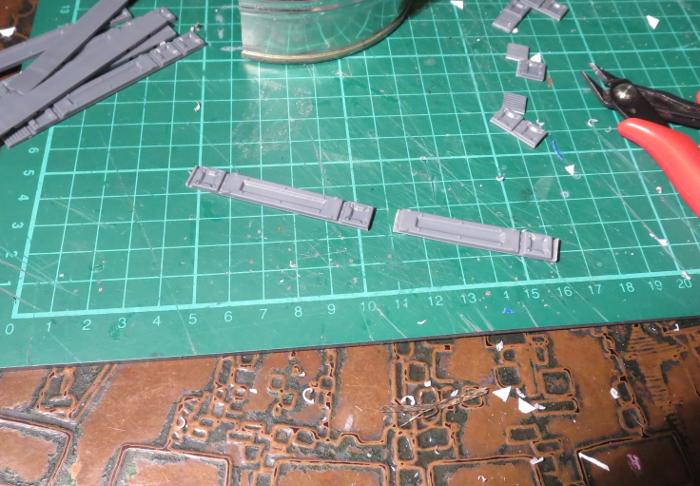
I cut a bunch of reinforcing struts from the terrain sprue to fit neatly down the sides of the tin.
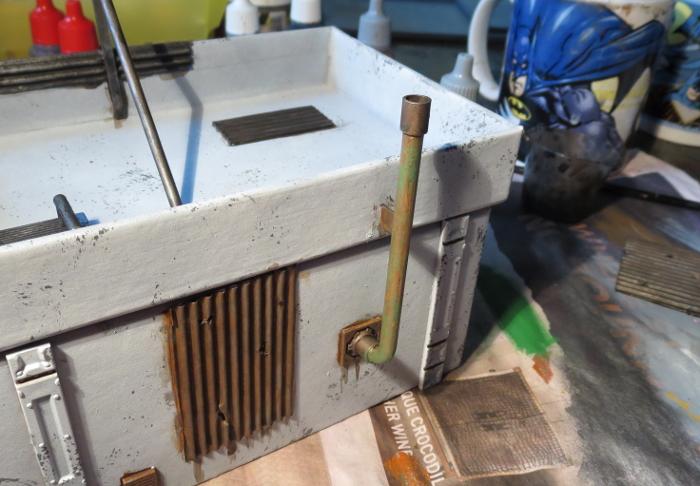
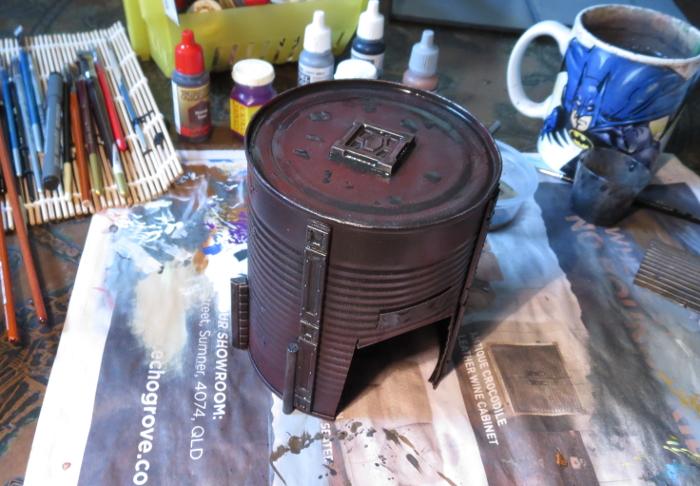
With the addition of some patches, a hatch on the roof and a lean-to on the side, the old tank was ready for painting.
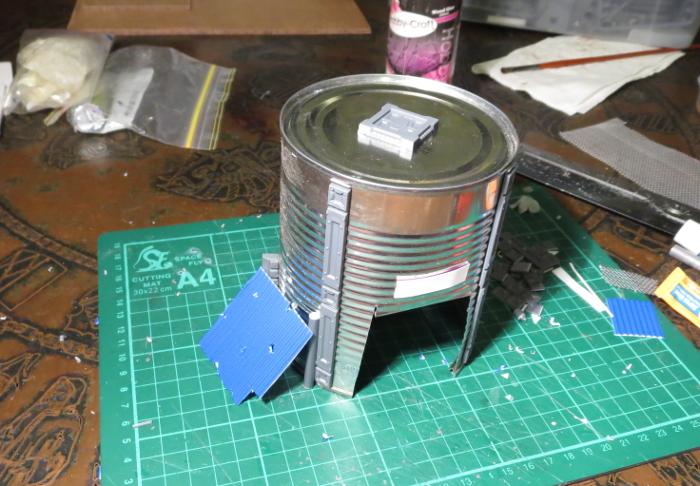
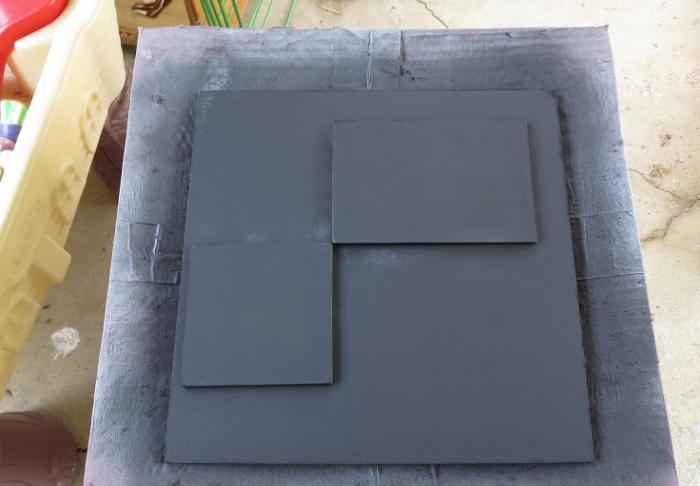
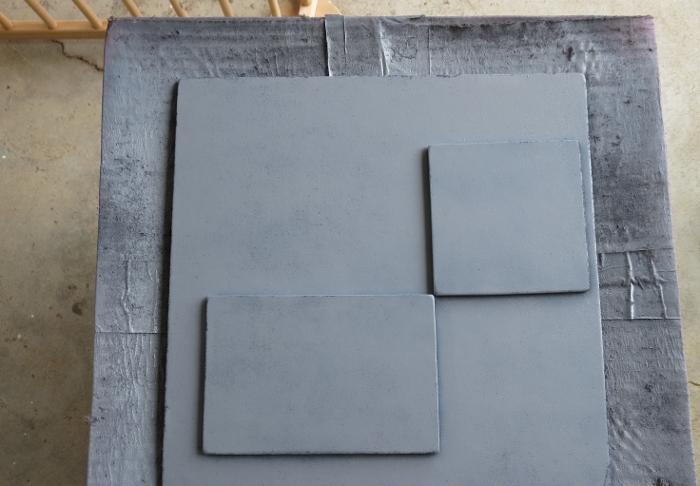
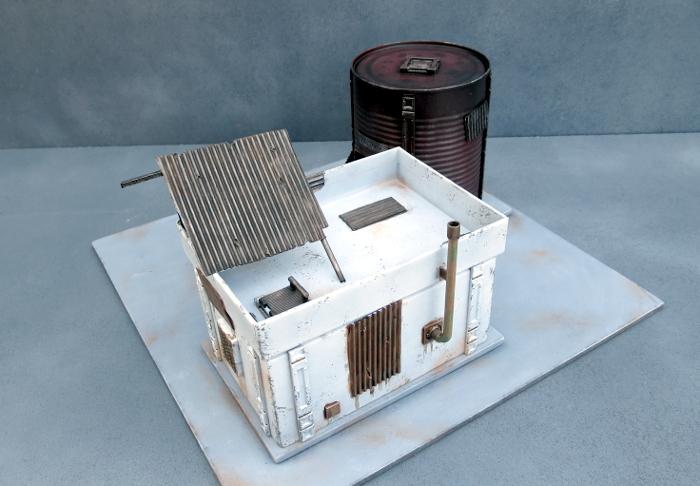
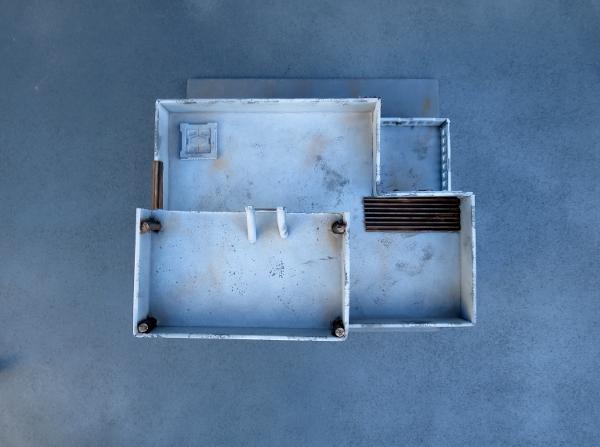
To sit the buildings on, I cut a 12" square of masonite, with a couple of smaller pieces glued on top - a rectangle for the gift box building and a square for the tank. These were cut to size and then sanded around the edges to smooth down the burrs. I then gave the top surface a light sand to break up the shine and give it some texture for drybrushing later, and then glued the building foundation pads on with PVA glue.
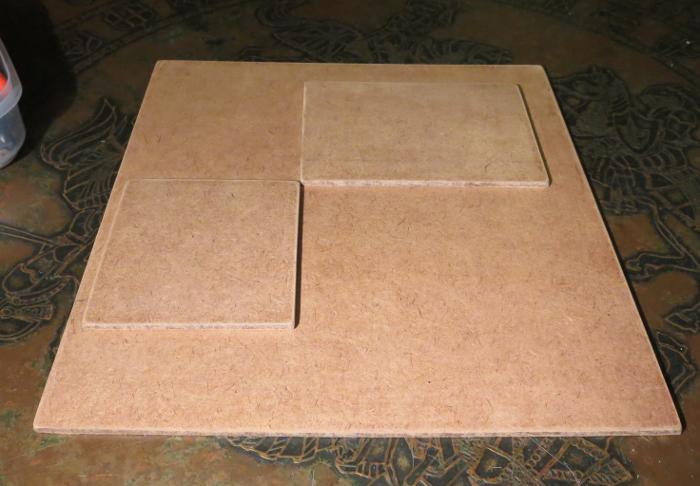
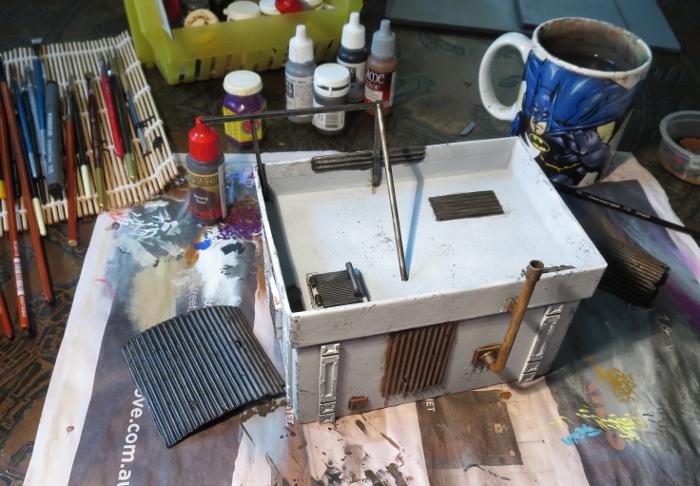
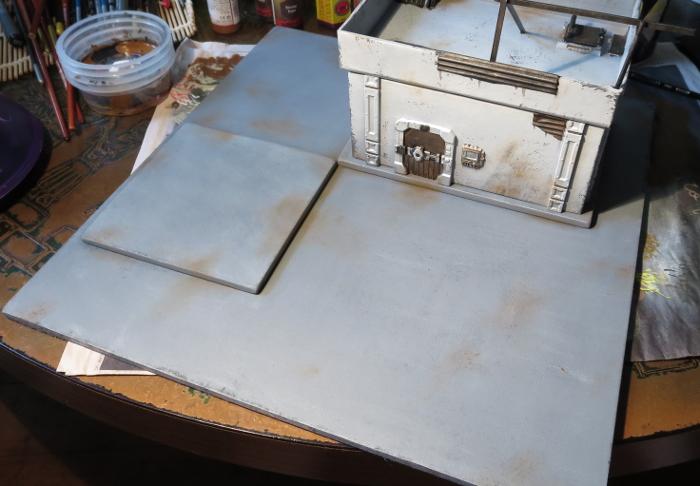
Everything in place, ready for painting:
Because the gift box building was already mostly painted, I could skip straight to the detail work. To check how the main bit was done, check out the first article linked back up at the start of this one.
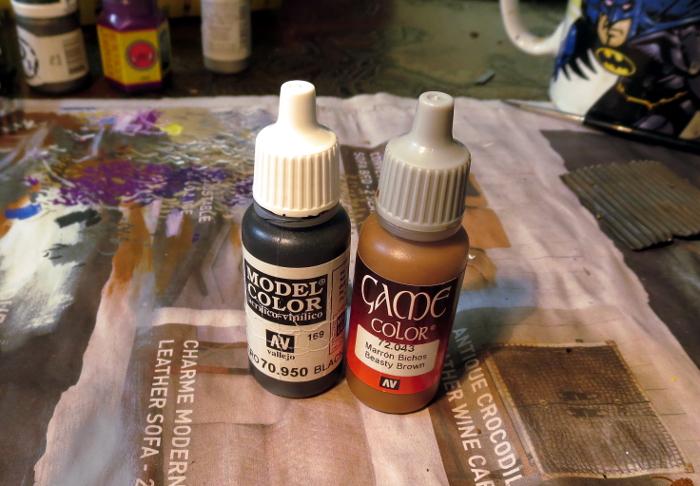
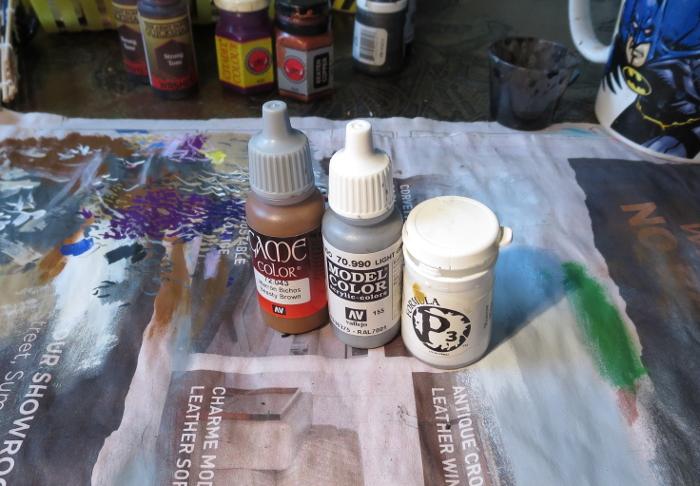
The various metal patches were given a coat of a rough mix of Vallejo Beasty Brown and black.
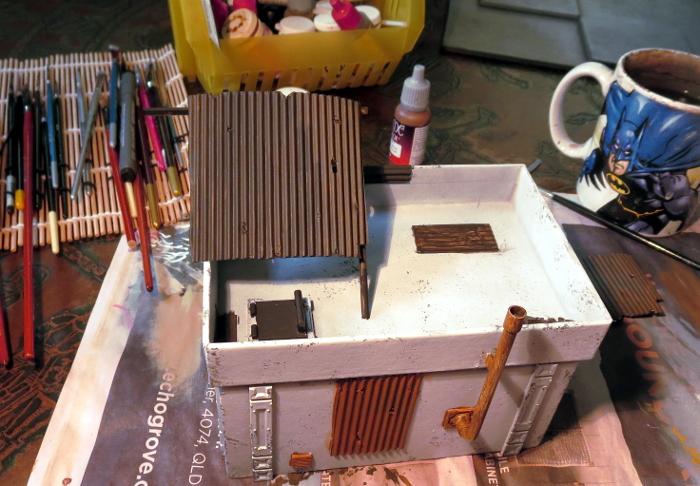
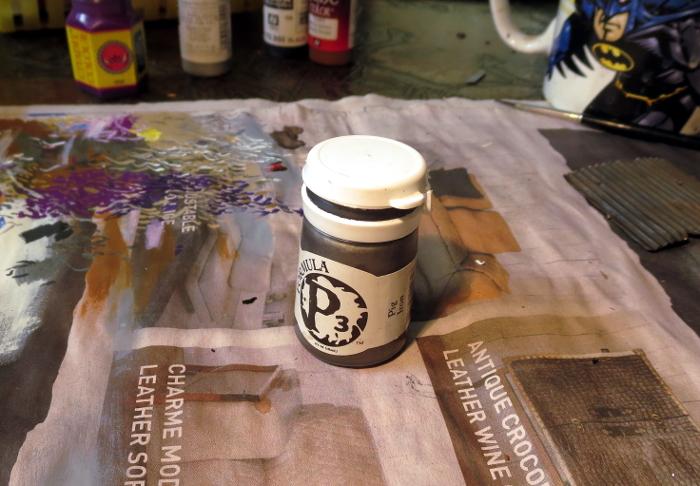
Over this went a light drybrush of P3 Pig Iron.
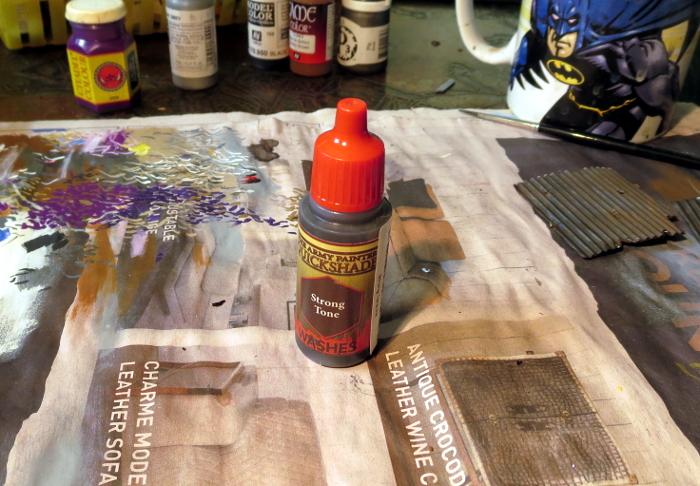
This was followed by a generous coat of Army Painter Strong Tone.
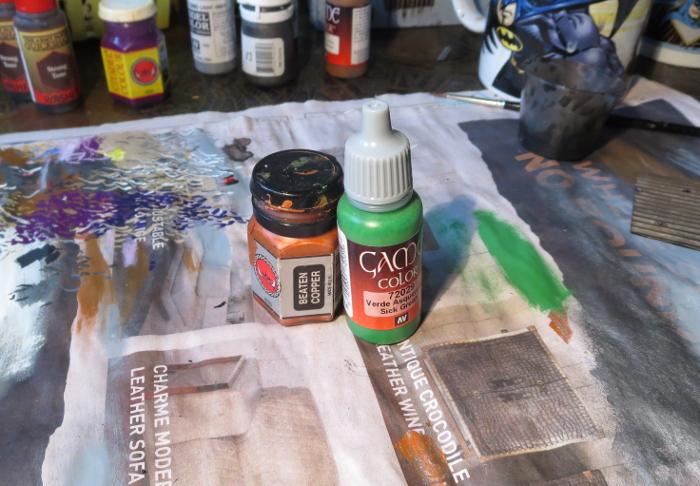
The pipe on the back wall was painted with a coat of Citadel Beaten Copper, and then given a light drybrush of Vallejo Sick Green.
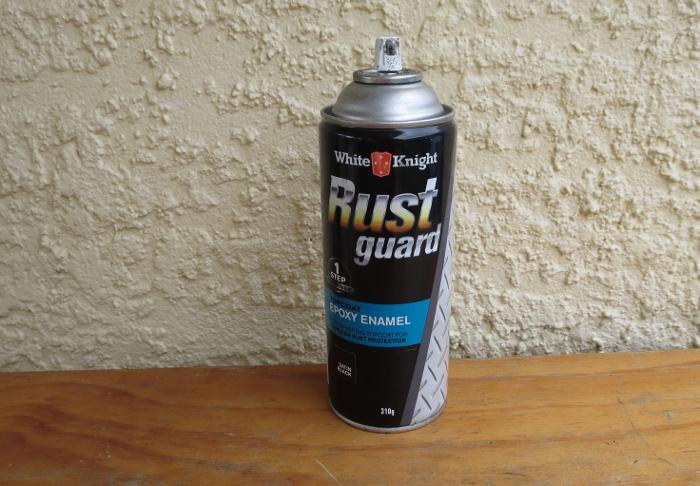
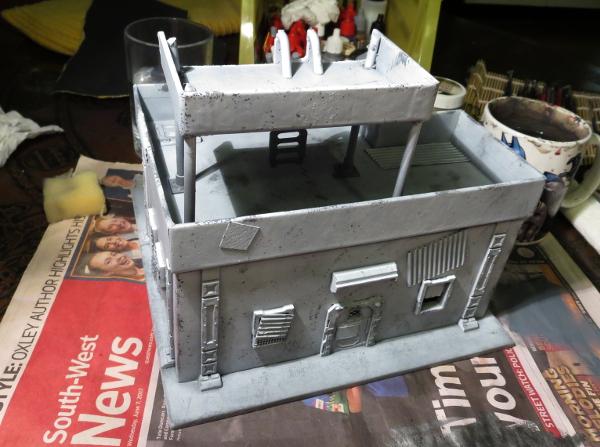
Meanwhile, the tank was given a spray inside and out with black Rustguard, to prevent it from rusting through the paint down the track.
I then masked off the detail parts of the tank building with some masking tape.
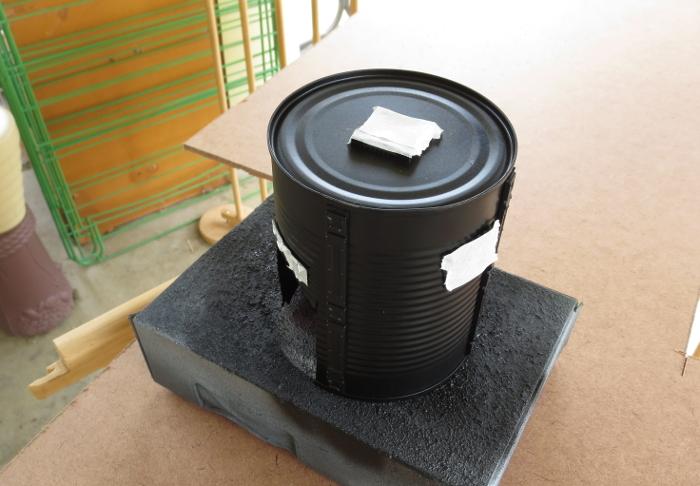
The came a coat of Rust-oleum Oil Washed Bronze. This is a rust-preventing primer like the black, so could have actually gone straight over the bare tin without the layer of black, but I wanted to make sure it was good and dark. The black base helps this without having to spray the bronze on too heavy, as it gets a bit goopy and rough.

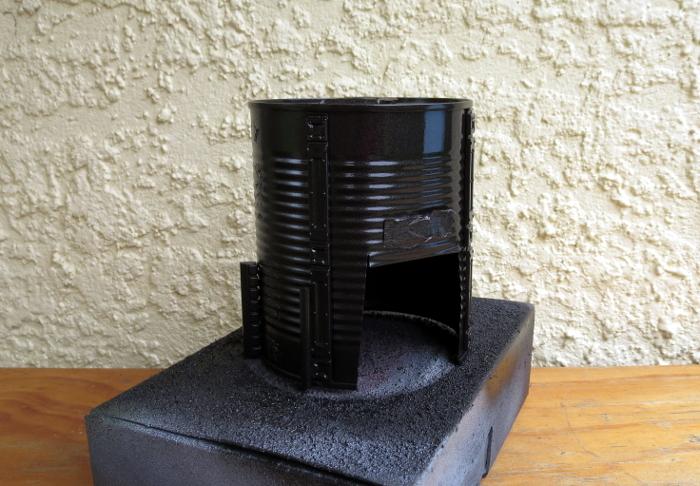
When the bronze was dry, I sprayed lightly over the top surface of the tank with some Army Painter Dragon Red, and then flipped the tank upside down and sprayed lightly around it so that the red caught in the undersides of the tin's corrugations without coating the whole thing in red.
I then drybrushed the whole thing lightly with Pig Iron, going a little heavier on the detail parts to make them stand out a little from the darker tank. The detail parts were then washed with some Strong Tone, and a few puddles of Strong Tone scattered around on the top surface.
While all of this was going on, I undercoated the based board with some flat black, and then gave it a coat of a flat medium grey. I deliberately use a range of different greys to basecoat my 'concrete' terrain bases, to help reduce the uniformity of the vast expanse of concrete on the table. If you look around in a city that has a lot of concrete structures, the colours vary considerably depending on the age of the concrete and the specific mix used, so it creates a better sense of realism on the gaming table if you carry this across in your painting.
To finish off the base, it was given a drybrush of Vallejo Light Grey mixed roughly with white, and then some patches of worn grime were added with a light drybrush of Beasty Brown, on both the base and the gift box building.
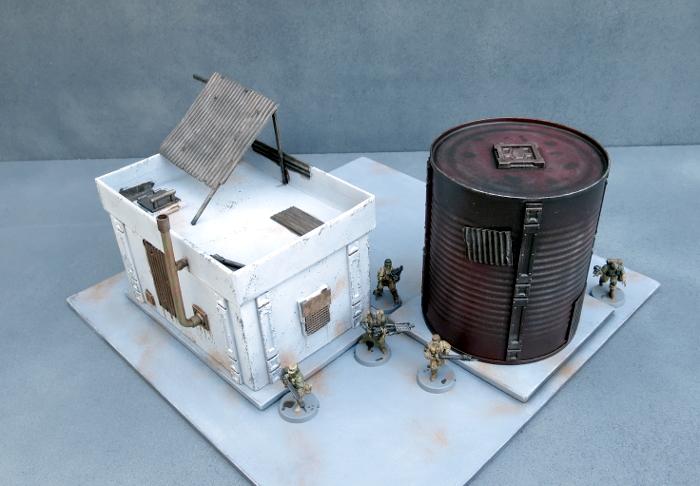
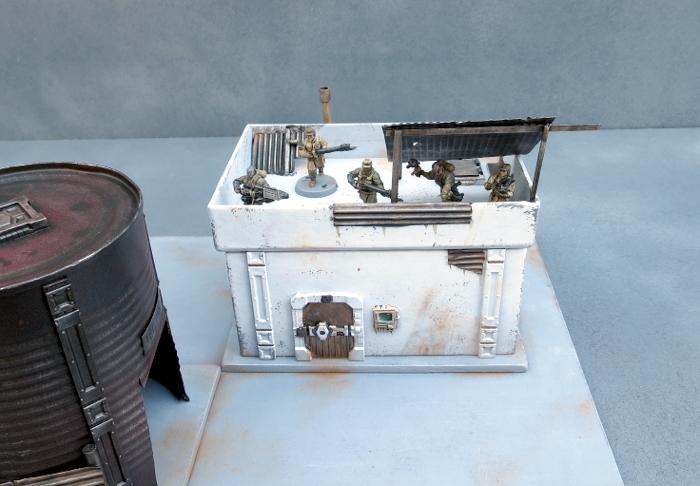
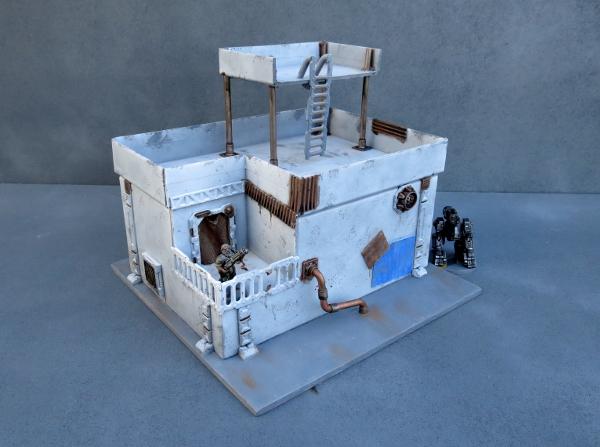
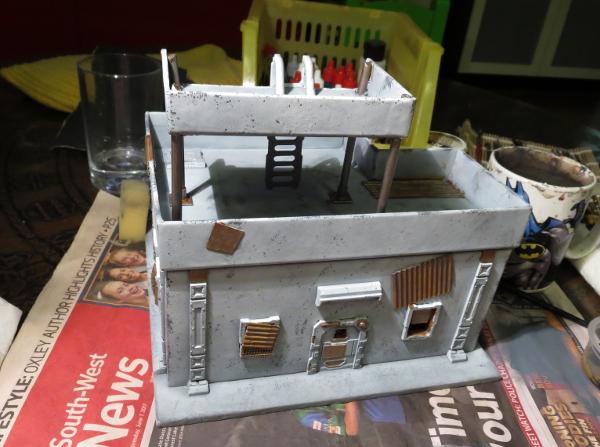
With the addition of a couple of final details (some lettering above the tank's doorway, the light above the door and the comm panel screen), this little building cluster is about done for now.
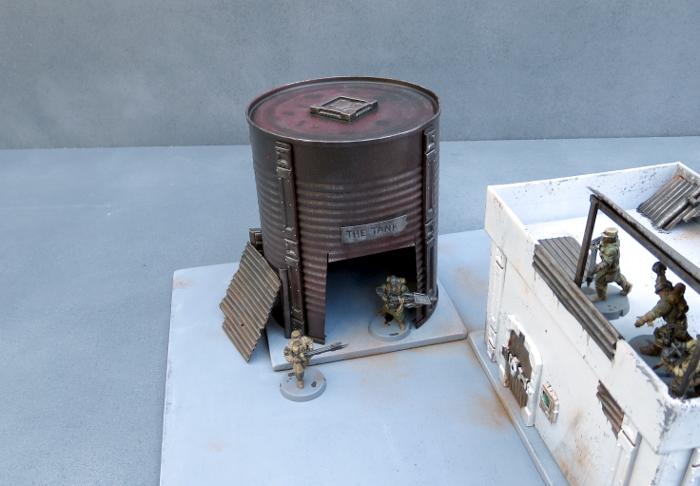
The tank still needs a blanket door covering, which I'll be going through in an upcoming tutorial, and I will go back over all of the buildings in the settlement to add some more characterful detailing once I have some more of the bulking out done, but it's at a point where it's not going to look out of place on the table as-is.

So what's next?
Aside from the door covering for the tank, I'll be moving on to another building section that will have some challenges in the roofing department and some sort of interesting detail in the courtyard.
Stay tuned for more!
To build your own stellar refugee settlement, you can pick up the Maelstrom's Edge terrain sprue from the webstore here. As always, feel free to share your creations on the Comm Guild Facebook page!
For other Maelstrom's Edge modeling articles, including tutorials and walkthroughs of a wide range of different building and miniature projects, check out the article roundup here.
Tags: broken buildings modeling models spotlight terrain terrainsprue walkthrough
'The Broken' Rules - Part 4: Broken Weaponry
Posted on Friday Nov 10, 2017 at 11:00am in Gaming
In a previous article, we talked a bit about the weaponry the Broken favor, namely that they like to customize and overcharge their weapons to make them deadlier, even when doing so means that they have a tendency to break down, overheat or even explode! Today we're going to take a closer look at the different classes of weapons that you'll find on the Broken Rabble sprue.
SLUG WEAPONS
The most commonly found type of ranged weapon throughout the spiral arm, slug weapons are cheap to produce and easy to maintain, making them the workhorse of the Broken armory. Broken tend to favor slug weapons with a high rate of fire, even though their ability to penetrate armor isn’t very good.
An Auto Slugger starts life as a 'liberated' Epirian Foundation Maglock Assault Rifle. However, as the Broken can't easily replicate the Foundation's caseless Maglock ammunition, their weaponsmiths instead convert its chassis to fire a smaller, jacketed round. This conversion creates a weapon that has a much higher rate of fire but unfortunately a lot more recoil.
BEAM WEAPONS
The Broken have a long history of weaponizing lasers, converting them from a wide-range of industrial applications. Invariably, Broken weaponsmiths set the damage output for these weapons at their absolute maximum, firing short, but incredibly powerful beams capable of melting through even the toughest enemy armor. However, this also makes the weapon highly unstable: prone to overheating, shorting out and on occasion, bursting into flames.

Beam Blastguns are sturdy and incorporate a blade at the tip of their barrel, making them double as perfect melee weapons for close-quarters fighting.
TORCH WEAPONS
Combustible liquids are quite easy to find and manufacture, providing the Broken with weaponry even when supplies of more traditional ammunition are running low. Torch weapons are also the perfect fit for short-ranged firefights, precisely how the Broken prefer to face their foes.
CHEM WEAPONS
Many cultures in the spiral arm refuse to utilize chemical weapons, deeming them morally repugnant or abiding by longstanding, often totally outdated, treaties that ban their use outright. The Broken have no such qualms, and the relative ease with which the components to concoct chemical weapons can be found amongst the black markets makes them a popular choice. Chem Launchers hurl a small pellet, smashing open upon impact and spraying the area with a lethal combination of liquid acid and a potent airborne poison. However, as most Broken aren't equipped with any kind breathing protection, these poisons are designed to disperse incredibly quickly, affecting only a small targeted area.


EXOTIC WEAPONS
Broken weaponsmiths are renowned for making weapons out of junk that other factions would never dream of using. One example is the EMP Harpoon, which utilises gas-powered harpoons, each with a ‘liberated’ Epirian Foundation EMP charge housed inside, perfect for penetrating fields and pulling the enemy out from cover.
Plastex is an incredibly sticky industrial adhesive used in construction by the Foundation. The Broken use this substance to make their glue weapons, which can completely incapacitate their targets in a messy goo. Unfortunately, Plastex is not designed to be deployed so rapidly, meaning glue weapons often jam or misfire, splattering their operator or those Broken unfortunate to be around them.

BROKEN GRENADES
The Broken favor simple weapons that are easy to procure, and their choice of grenades is no different. Cluster grenades are the most common anti-personnel grenade in the spiral arm and any military shipment or installation the Broken manage to raid invariably provides them with crates of cluster grenades.

Molotov bombs are handmade explosives created simply by filling a common container full of combustible liquid.
Overcharged powercells are standard-issue batteries used throughout the spiral arm for portable power, but which are set to dangerous levels, causing them to detonate with frightening power.
Quick-painting the Broken
Posted on Monday Nov 06, 2017 at 05:00pm in Tutorials
- by Iain Wilson
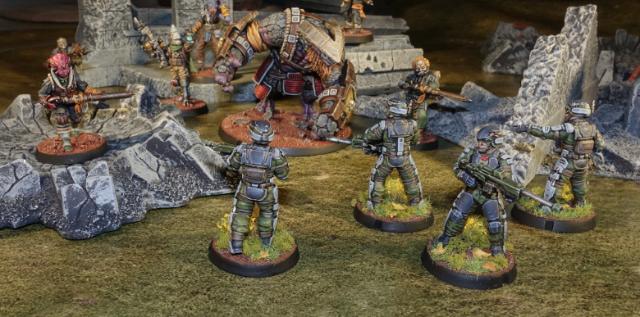
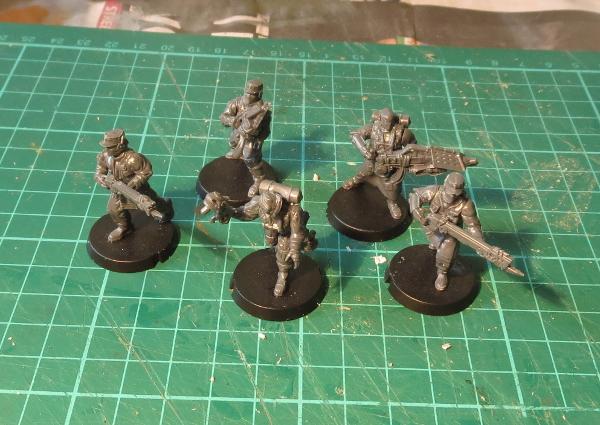
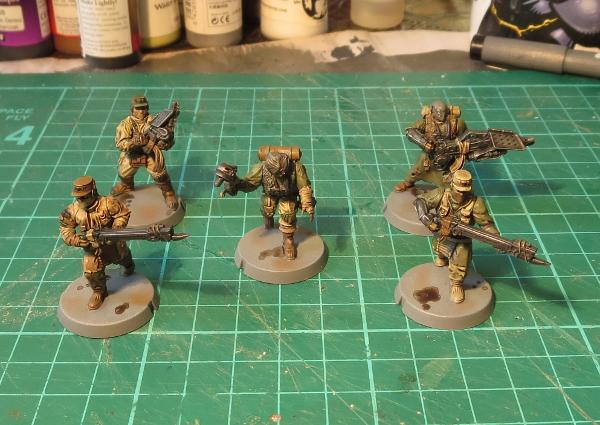
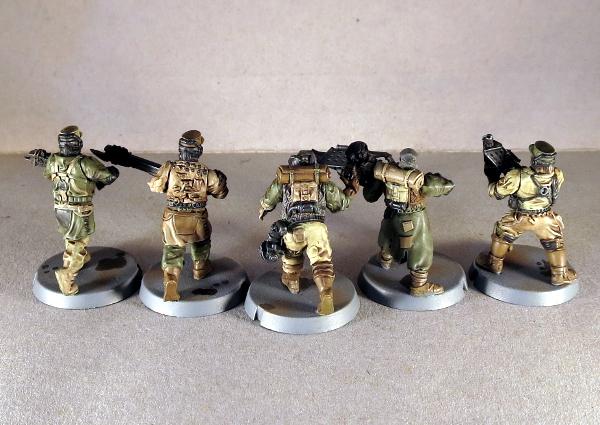
The arrival of the Broken into Maelstrom's Edge adds a new element to the game: Vast, raggedy hordes of cheap troops swarming all over the battlefield shooting stuff and stealing all the good boots. Which, of course, means lots of shiny new models to paint! You might be happy taking your time with this, but for those a little more time-poor, or who just want to get their new models on the table as quickly as possible, here's a guide to quick-painting your Broken recruits.
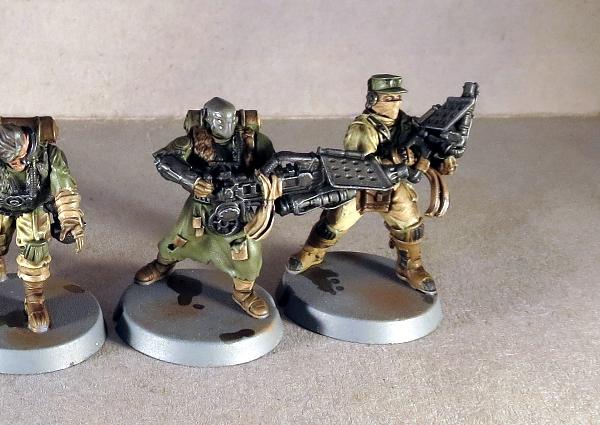
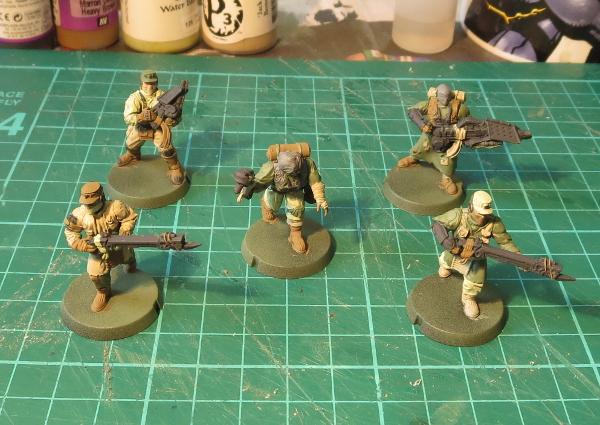
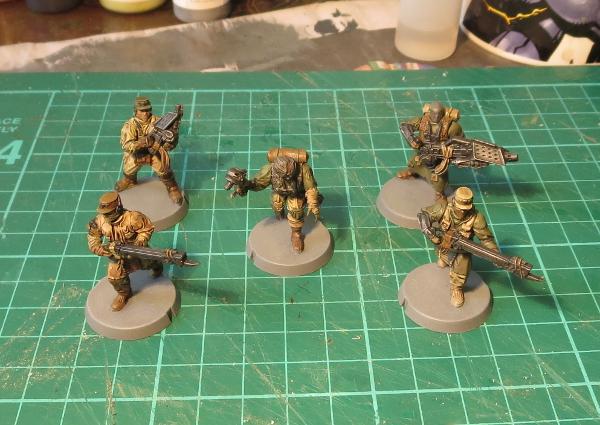
I'm painting up an Assault squad that I have assembled and ready to go, but obviously this could just as easily work for any of the Broken units.
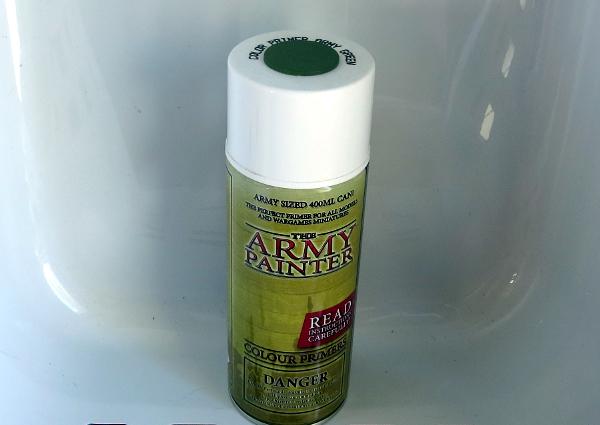
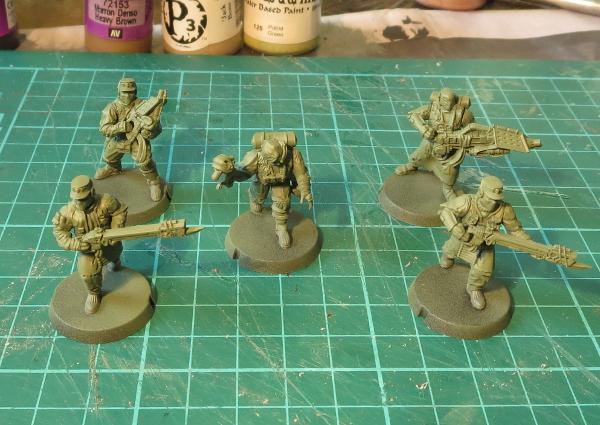
I started out with a basecoat of Army Painter Army Green primer.
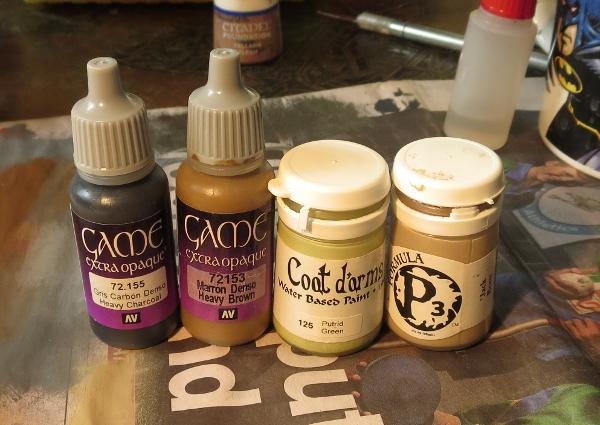
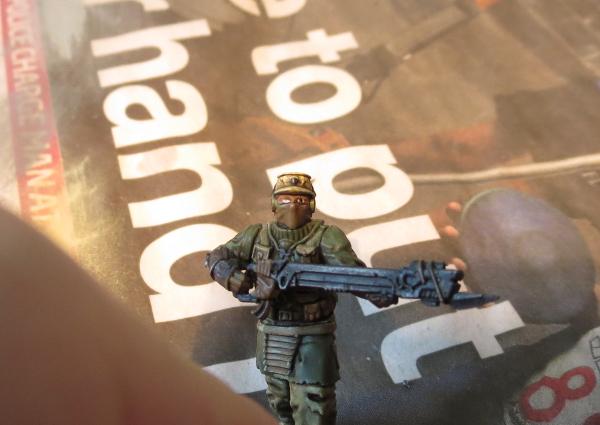
To get a suitably rag-tag look, I used a range of brown and grey tones, but the specific colours you choose aren't particularly important. The idea is to create a random distribution of different coloured clothing, while keeping to a limited colour palette to maintain some cohesiveness throughout the force. Weapons were painted with Vallejo Heavy Charcoal, and skin with Citadel Tallarn Flesh.
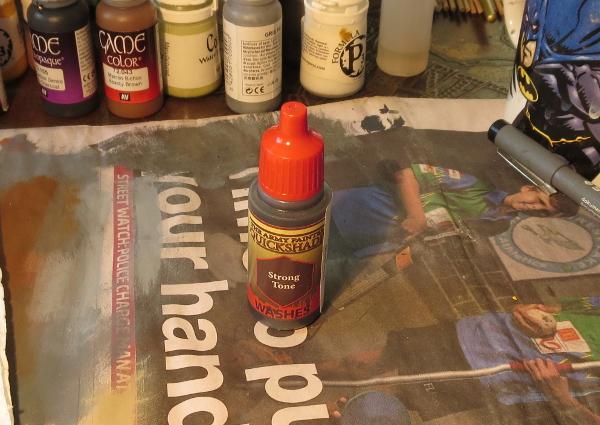
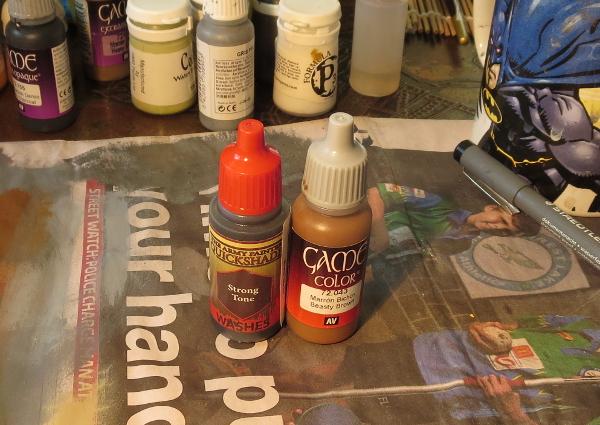
Everybody then got a wash coat of Army Painter Strong Tone. This settles nicely into the creases to add shading, and 'dirties' everything up a little.
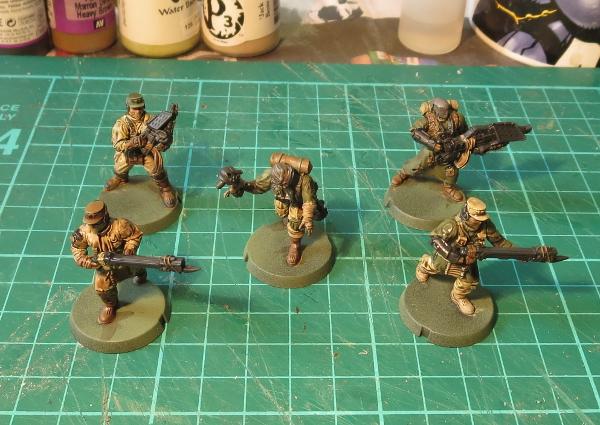
Once the wash was set, I gave the weapons and other metal parts a light drybrush with P3 Pig Iron.

At this point, you could also give the clothing a light drybrush or a little edge highlighting with the original colours - This will lighten them up slightly if the wash was too heavy and has left them too muddy and homogenous, but otherwise isn't really necessary.
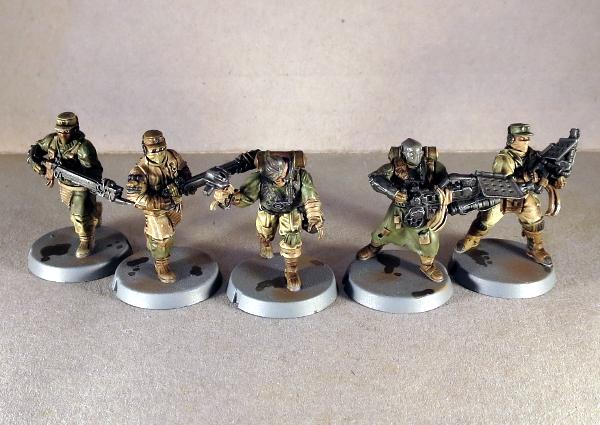
Bases were done to match my urban board set-up. This was done with a coat of Vallejo Neutral Grey, drybrushed with Light Grey.
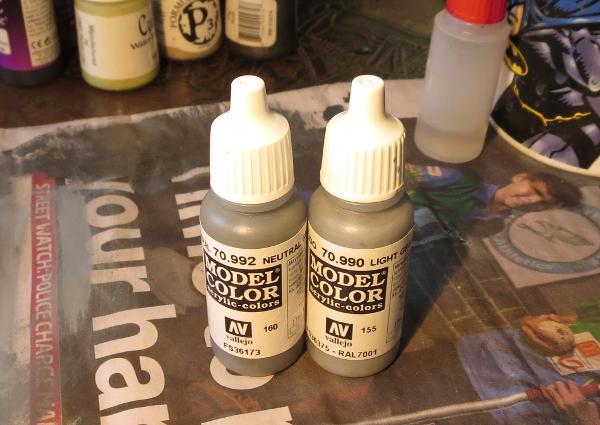
To finish up the bases, I added some patches of drybrushed Vallejo Beasty Brown and some puddles of Strong Tone.
At this point, you could easily plonk these on the table and have at it, but I always like to add eyes wherever possible to finish off my models. This is done with a fine detail brush and some white paint for the whites of the eyes, with a dot of black added either with the same fine brush or with a fineliner pen.
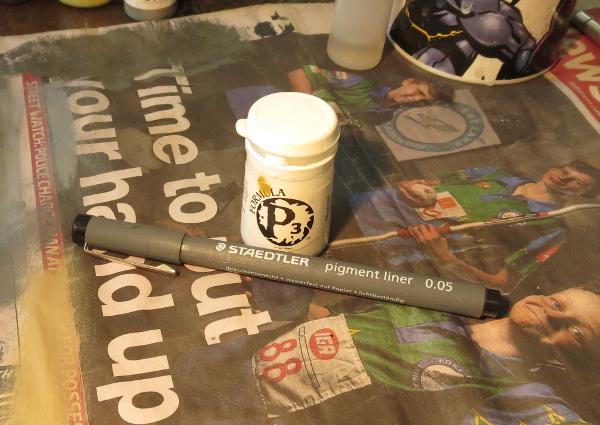
The black should cover most of the white, and touch both the top and bottom of the eye to avoid a wide-eyed, crazy look. Unless, obviously, you want a wide-eyed, crazy look.
And with that, the squad is ready for action!
To paint up your own vast, screaming horde of rabble, you can pick up the Maelstrom's Edge Broken Infantry pack from the webstore here. As always, feel free to share your creations on the Comm Guild Facebook page!
For other Maelstrom's Edge modeling articles, including tutorials and walkthroughs of a wide range of different building and miniature projects, check out the article roundup here.
Terrain Spotlight: Broken Settlement, part 1
Posted on Monday Oct 30, 2017 at 05:00pm in Tutorials
- by Iain Wilson
With the release of the Broken adding a long-awaited third faction to the Maelstrom's Edge universe, it seemed fitting to take a break from tinkering with the shiny new models to add some appropriate terrain to the table. So this week, I broke out some gift boxes that I had waiting for an opportune moment, grabbed some terrain sprues and got to work!
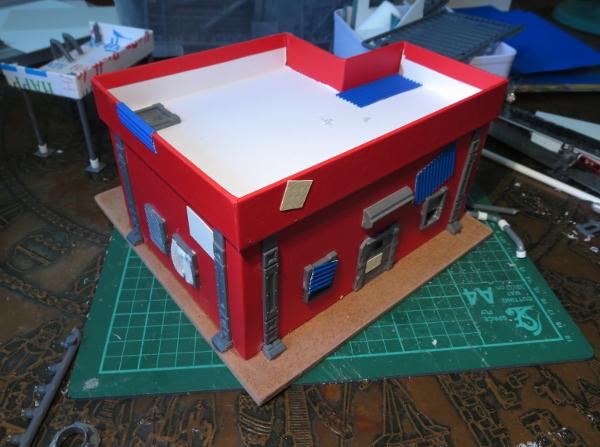
The core of the first building for my new Broken settlement is a 20cm x 15cm cardboard gift box. The plan was to more or less follow the style of my earlier gift box buildings, but with the addition of some faction-appropriate wear and tear and rough repair work.
I started by cutting out holes in the box for windows and doors, using a sharp hobby knife.
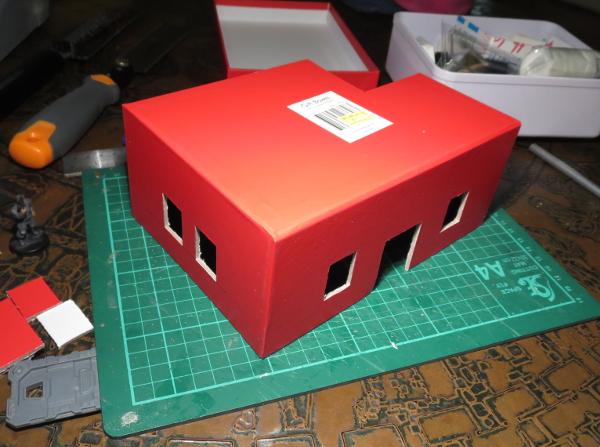
To break up the box shape a little, I cut away one corner of the box, 6cm along each side. Flipped over, this corner piece fits back in place as a recessed balcony.
I cut a hole in one wall of the balcony to add a door, and cut a matching corner off the box lid, which would form the walled roof of the building.
From there, it was time to glue the box onto a square of masonite, and start detailing. To make the building look like it had been through some rough times, I modified the rectangular shutter windows from the terrain sprue. For the first one, I carefully cut out the shutter using a hobby knife, and then glued some aluminium mesh over the front of the window frame.
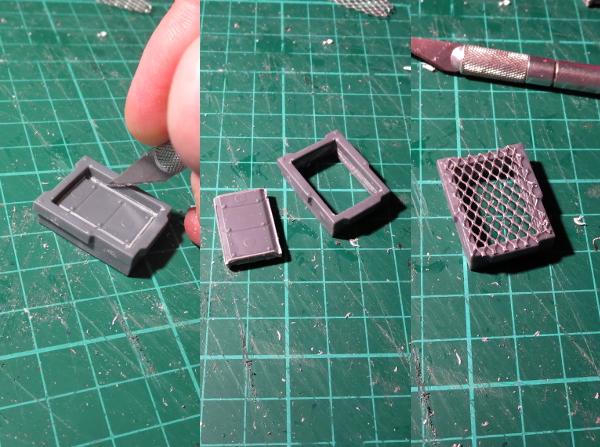
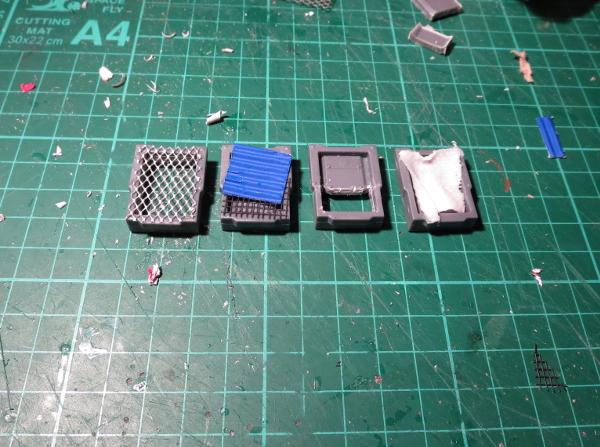
Rather than making all of the windows the same, I made different modifications to the other windows. On one, I glued some plastic flyscreen and a square of corrugated cardboard over the front of the frame, another had the shutter replaced with a piece of crepe bandage soaked in watered-down PVA glue, and on the last one I cut away just the lowest section of the shutter.
The terrain sprue parts were glued in place with superglue, and then I added some patches cut from thin plasticard and corrugated cardboard to the walls of the building.
The door on the balcony received a blanket in place of the original door with another piece of glue-soaked bandage, and a couple of ladders were used to create a railing. A pipe made from pieces of sprue joined with some plastic tubing and a vent made from a large pipe fitting with some aluminium mesh glued inside finished off the detailing on the back.
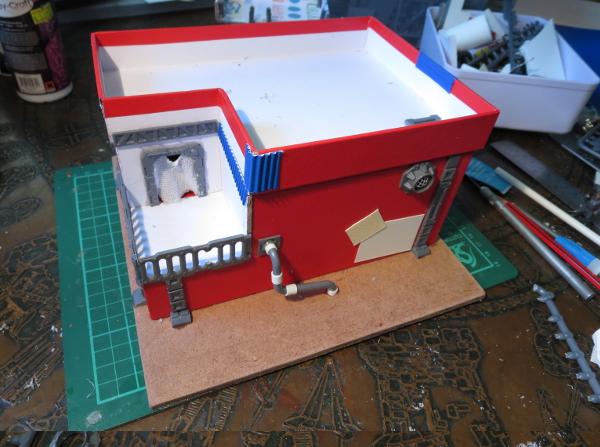
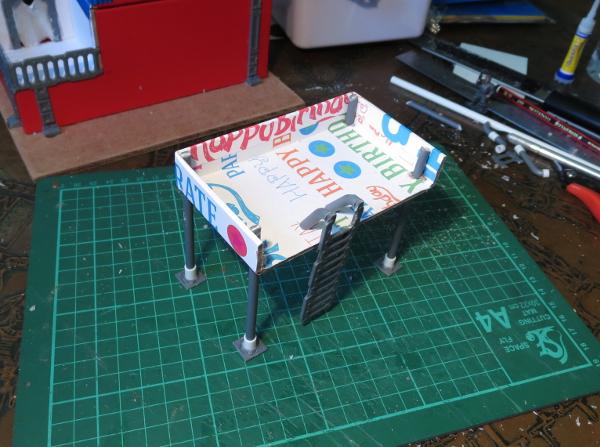
The building was still looking a little boxy, so I decided to break up the silhouette a bit more with the addition of a watchtower on the roof. This was constructed from a piece of gift box lid left over from a previous project, and some pieces cut from the ends of the terrain sprue. The ladder was glued in place with another couple of sprue pieces forming the hand grips at the top.
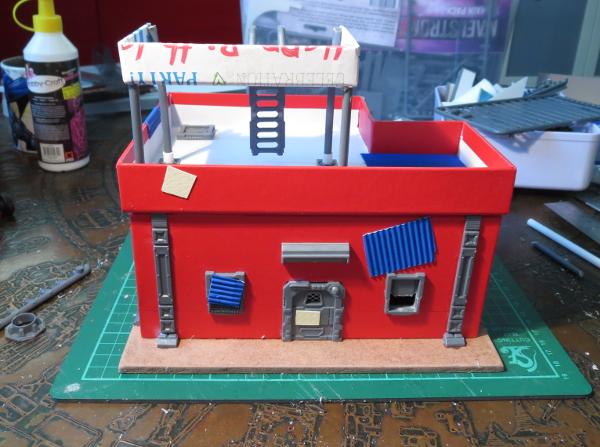
With construction complete, it was time to break out the paint. I started with a base coat of flat grey.
Over that went a thin layer of flat white. I didn't want this to be perfectly smooth and pristine, shining white, so kept the coat thin enough for the grey to show through a little. Once the spray was dry, some weathering was added with a sponge and some Vallejo Neutral Grey.
The metal patches and any other parts that I wanted bare metal were painted with a coat of Vallejo Beasty Brown, and then given a rough coat of P3 Pig Iron.
The base was painted with a coat of Vallejo Neutral Grey, and then a drybrush of Vallejo Light Grey, with some patches of Beasty Brown added to dirty things up a little. A splash of Army Painter Strong Tone over the metal bits and blankets, and a rough coat of Citadel Ultramarines Blue over a couple of the metal patches, and the building was pretty much table-ready.
There is still a little detail work to go, but some of that will wait until I get some more of the settlement completed so that I can match details across the different buildings to tie everything together.
So what's next?
I will be adding a couple of smaller gift box buildings with some varying levels of damage and delapidation, and I have some plans for a large peach tin that was rather conveniently opened the other day. The outsides of the buildings will gain some awnings and banners and the like, and I'll scatter some scrap around to add some flavour (and also some handy cover).
Stay tuned for more!
To build your own stellar refuge settlement, you can pick up the Maelstrom's Edge terrain sprue from the webstore here. As always, feel free to share your creations on the Comm Guild Facebook page!
For other Maelstrom's Edge modeling articles, including tutorials and walkthroughs of a wide range of different building and miniature projects, check out the article roundup here.
Tags: broken buildings modeling models spotlight terrain terrainsprue walkthrough
'The Broken' Rules - Part 3: Sub-factions of The Broken
Posted on Thursday Oct 26, 2017 at 11:10am in Gaming
Every group of survivors that manage to band together to escape the Maelstrom eventually forms a distinct Broken community with its own goals and moral codes. However, there are some broad classifications of the different Broken societies that they tend to fall within:
- The Forsaken - The most common type of Broken, these are the general bunch of rag-tag survivors who turn to piracy throughout the Maelstrom's Edge simply as a means to survive. The Forsaken have a strong moral code, and see themselves as better than the rest of the spiral arm that has cast them out, therefore they attack only out of necessity. Of the different Broken sub-factions, the Forsaken tend to have a slightly higher level of technology, as their societies provide a good refuge for outcast Weaponsmiths looking to ply their trade.
- Jackals - Bands of despots and marauders, who look only to further their own interests in a galaxy gone mad. Believing that might is always right, Jackals will attack anyone and take everything they can manage to steal. Jackals live for the glory of combat, and usually go to war hopped up on a potent cocktail of combat drugs that makes them all but impervious to minor flesh wounds. Sociopaths and criminals filter in from across the spiral arm towards the Maelstrom's Edge in order to join some of the more famous Jackal hordes.
- Spiral Arm Revolutionary Army - The SARA are Broken who have banded together to overthrow those they see as corrupt regimes and corporations who have failed the common man by leaving billions behind to die by the Maelstrom. SARA is more regimented and militaristic than other Broken societies, usually founded by former military who rebelled and fled when they discovered that their government didn't actually have any plans to save them from the Maelstrom. Despite being labeled as terrorists, SARA cells receive funding and equipment from secret benefactors sympathetic to their cause. SARA regularly utilizes counterinsurgency and propaganda as weapons, and like the Jackals, they get a steady stream of recruits from throughout the spiral arm who believe that humanity should be doing more to save itself from the plight of the Maelstrom.
So how will these sub-factions actually work in the game? You'll essentially choose which sub-faction you're fielding based on which command unit(s) you decide to take in your force. So if you chose to take Forsaken command units, then you'd have a Forsaken force and you wouldn't be able to include any Jackal or SARA command units as part of the same force. Naturally, dependent on which sub-faction you use, you'll get different abilities and bonuses for your units. But beyond the command units that are dedicated to a particular sub-faction, all of the other Broken units we make will be playable in any type of Broken force.
As you may have already pieced together, so far we've only released rules for the Forsaken sub-faction, in the form of the Forsaken Chieftain. More than the other Broken sub-factions, the tactics of the Forsaken rely on cunning and misdirection to win the day, and the two unique abilities the Chieftain has, highlight this. First, let's take a look at 'Booby Traps':
During its main action, this model may expend one of its allocated command points to trigger a booby trap, up to a maximum of (X) times per turn. When a booby trap is triggered, select an enemy unit which is both taking cover and visible to the model triggering it. That unit gains D3+1 STs. A single enemy unit cannot be affected by more than one booby trap per turn.This ability is great because it can be used exactly when and where it will be most helpful to you. Got an enemy unit that is teetering on the edge of being shell-shocked? Hit them with a booby trap. Got an enemy unit that's got absolutely no suppression on it? Nail them with a booby trap to at least force them to take a discipline check when activating. Sure, it costs a command point to trigger a booby trap, but its the kind of ability that can change the course of a battle when used smartly.
The other ability the Chieftain has is 'Shadow Master':
For each model with this ability, one additional friendly unit can utilize the Shadow StrIke ability in each end phase (instead of just 1 unit) and during deployment, an additional friendly unit in reserve can be declared as arriving via Shadow Strike (instead of just 1 unit). In addition, a friendly unit within 18” of a model with this ability automatically passes its shadow strike discipline check, unless the unit is shell-shocked.This really is the defining ability of the Forsaken, as it allows them to utilize Shadow Strike on multiple units per turn. So if you have 2 Chieftains in your force, that means you could use Shadow Strike on 3 of your units per turn. That opens up all kinds of tactical options unavailable to other factions, such as being able to suddenly put several of your units right into the enemy's vulnerable rear arcs, or to redeploy several of your units onto objective markers that are on the far side of the table.
The last piece of the Forsaken puzzle is their faction objective 'Now You See Me':
Partial: (each end phase) This turn, if at least one of your units was put into reserve via shadow strike and the now you don’t ability was not utilized at all, gain 1 VP.This objective at its base level just rewards a Forsaken force with Victory Points for using Shadow Strike on at least 1 of its units per turn. But if you don't really need to gain a Victory Point on a particular turn, you can instead cash that Victory Point in for two really amazing options: either removing 3D3 suppression from a unit, or returning a model killed previously in the battle back into the unit. So say your opponent has spent the entire turn pounding on one of your key units, building up a ton of suppression on it. In the end phase of that turn, if the unit is within 18" of a Chieftain, you can automatically remove it from the table (without having to take a discipline check thanks to the Chieftain's Shadow Master ability), get rid of 3D3 suppression and then next turn you'll be able to put that unit back anywhere on the table that is in cover and more than 12" from the enemy...not too shabby!
Full: (end of game) If at least one of your models on the table has the Forsaken designator, gain all of this objective’s remaining VPs.
Now You Don’t: Once per turn, when you remove one of your units from the table via shadow strike, you may either immediately remove 3D3 STs from it, or return 1 model back to the unit that had previously been removed as a casualty.
When the time comes for us to release Jackal and SARA command units, we'll talk more about how those forces from those sub-factions will fight. Until then, if the imagery/theme of the Jackals/SARA sub-faction appeals to you right off the bat, you should feel free to paint/convert your models into those themes, as all you'll need to do to change your force from one sub-faction to another is to take a different command unit.