Search Results for 'buildings'
Entries found for "buildings": 75Showing 21 - 30 of total 75 search results
Terrain Spotlight: Trash Processing Unit
Posted on Thursday Nov 21, 2019 at 05:00pm in Tutorials
Way back in the day, the original version of Games Workshop's Necromunda game came with a small table's worth of industrial-styled terrain that was constructed from printed cardboard and held together with plastic bulkheads. Many battles were fought over my set of this terrain, and so when a friend and I started talking about revisiting the original Necromunda rules, I thought it would be fun to put together an updated set of terrain inspired by that original battlefield. This week I put together the first of the large platform structures.
I started this build by sketching up a rough design for the structure. The aim wasn't to duplicate the original version, but to create something similar to it, with an eye towards making the structures look a little more like actual structures with some sort of purpose rather than just random platforms.
3mm foamed PVC has become my go-to for buildings, as it's easy to work with and lightweight, but quite durable. So to kick things off, I grabbed out the PVC and some support struts from the first Maelstrom's Edge terrain sprue, and put together eight bulkheads. These were made from a single piece of PVC cut to shape, with two support struts running vertically up the sides of each face.
Four of the bulkheads were left as standalone pieces, while the other four were joined into corner pieces for the front of the structure.
I used some more PVC to put together a box shape for the tower. The cutaway at the bottom of the front wall would be used to add a trash receptacle - my thought was for the tower to be some sort of trash processing unit.
The roof of the tower has four exhaust fans, taken from the second terrain sprue. I mounted these onto floor panel pieces, just shaving off a little around the bottom edge of the fan to make them fit neatly inside the bracing pieces on the panels.
The door for the trash unit was made from pieces of foamed PVC, cut to fit neatly into the opening to look like it's jammed open.
To conceal the joins on the tower walls, I ran a strip of support struts from terrain sprue #2 up each joint on the front and back, and then glued on the roof and a control panel for the trash unit.
For the floor of the first level, I used two layers of PVC, with some holes cut in to insert some floor mesh pieces from terrain sprue #2.
I glued the bulkheads onto the underside of the floor piece, and glued the plastic floor panel pieces into the holes. With a very minor bit of trimming, ladders from terrain sprue #1 fit neatly into the central hole in the grating sections, hanging down to about an inch above ground level - low enough for someone (or at least, someone with upper-body strength!) to grab the lower rungs and haul themselves up.
On the back of the tower, I added a generator piece from terrain sprue #2, bulked out with a little PVC to make it protrude enough to provide a neat little covered firing point.
For the upper level, I put together a catwalk using floor mesh pieces from terrain sprue #2.
The support braces for the catwalk were cut from the sides of a ladder. The ladder up to the catwalk has some of the rungs leftover from cutting the supports glued to the back, to space it out from the wall slightly.
High catwalks aren't very pleasant places to be in battle without some cover, so I added a balustrade using posts from terrain sprue #2 and some offcuts of PVC. A trimmed down ladder added some access to the roof level.
The other side wall needed some detail, so I grabbed the junction box from terrain sprue #2, and some aluminium rod and installed some exposed wiring. The clamp pieces were made from short sections of plastic rod and some sections cut from the support struts from terrain sprue #1. The lower end of the thinner cable will drape over the first level floor, having been severed from wherever it was originally attached to.
Finishing up by adding a light to the front wall and an access hatch to the bottom left wall of the tower, I also added a 10' square of PVC as a slab base for the structure. At the moment, the base, first level and tower are all separate pieces, and the ladders are all similarly unglued. I will glue the base onto the bottom of the bulkheads after painting the underside of the first level, and glue the tower and ladders in place once they are painted. I'll probably also add a larger piece of hardboard under the whole thing for some extra rigidity and also to give it some more weight on the table - better to prevent it sliding around.
Painting will come later - I'll get a few more structures made up over the coming weeks, and then go through painting everything together!
Stay tuned!
To give it a go yourself, you can pick up the Maelstrom's Edge terrain sprues, along with the rest of the Maelstrom's Edge range, from the webstore here.
As always, feel free to share your models and terrain, or ask any Maelstrom's Edge- or hobby-related questions on the Comm Guild Facebook page!
For other Maelstrom's Edge modeling articles, including tutorials and walkthroughs of a wide range of different building and miniature projects, check out the Hobby section of the Maelstrom's Edge website here.
Tags: buildings scratchbuild spotlight terrain terrainsprue walkthrough
Terrain Spotlight: Basic Sci Fi Quonset Hut
Posted on Thursday Oct 17, 2019 at 05:00pm in Tutorials
Time for another building!
I don't know why, but I've always loved the shape of the humble Quonset hut. Some time back, I built some vaguely-Quonset styled buildings from plastic drainage channel, but the new terrain sprue gave me an excuse to revisit the idea and build something closer to the original design.
The bulk of the structure is 3mm foamed PVC. For the front and back walls, I grabbed a handy round thing and used it to trace out a pair of semi-circles, which I then cut out with a sharp hobby knife.
I also cut a rectangular piece for the floor, and a bracing strut to connect the tops of the walls.
I took a pair of curtain windows and a curtain doorway from the new terrain sprue and sat them in place on the walls before tracing around them with a sharp pencil and cutting out the resultant rectangles with a hobby knife. Then I used some superglue to stick them in place.
Using some more superglue, I fit the walls, floor and support strut together.
The roof was constructed from corrugated cardboard. I cut three pieces, one for each side, and a third to run over the top. Bending these short pieces over the curve was easier than it would have been to do it with one single, long piece, and the sections create a layered joint to give the roof a little bit of detail.
I started by gluing the side pieces in place along the bottom edges.
After giving the glue time to set properly, I added more glue up along the wall tops and carefully pressed the roof sections down onto the curve.
I used a similar process for the top section, initially gluing the centre line in place along the support strut, and then gluing the sides of the section down overlapping the side pieces.
A few final details from the terrain sprue, and the hut was ready for painting:
For a quick and easy paintjob, I gave the hut a basecoat of AK Interactive Rust Basecoat. Over this, I sprayed a light and rough coat of Army Painter Plate Armour, and then added rust by dabbing on Army Painter Dry Rust. Some quick details like lights and curtains, and then a drybrush in the creases with Vallejo Beasty Brown finished it off.
To give it a go yourself, you can pick up the new terrain sprue, along with the rest of the Maelstrom's Edge range, from the Maelstrom's Edge webstore.
As always, feel free to share your models and terrain, or ask any Maelstrom's Edge- or hobby-related questions on the Comm Guild Facebook page!
For other Maelstrom's Edge modeling articles, including tutorials and walkthroughs of a wide range of different building and miniature projects, check out the Hobby section of the Maelstrom's Edge website here.
Tags: buildings modelling spotlight terrain terrainsprue walkthrough
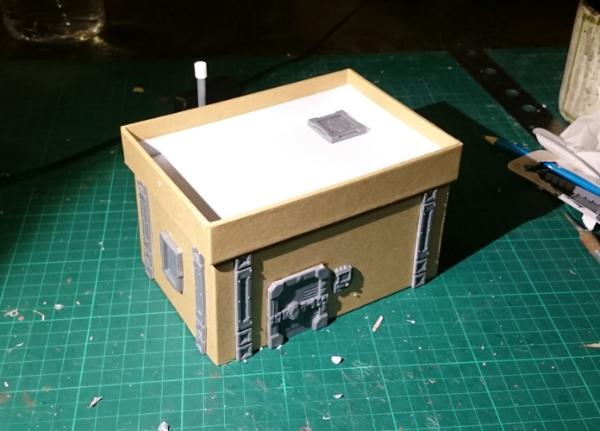
Terrain Spotlight: Raised Building using gift boxes and the new terrain sprue!
Posted on Thursday Oct 03, 2019 at 05:00pm in Tutorials
I've spent the last couple of weeks happily playing with the new Maelstrom's Edge terrain sprue and building up a nice collection of delapidated buildings for my Broken force to defend - or loot, as the mood may strike them! This week, however, I thought I might take a break from painting rust and see how something a little better maintained might look with the new components to hand.
I have turned to the ever-useful discount store cardboard gift box for this build. These boxes are perfect for creating buildings, as they come in a wide range of different sizes, are inexpensive, and are quite solid.
I started by flipping the box upside down, and cutting a hole in the side for the door frame from the terrain sprue by tracing around the back of the frame and then cutting with a sharp hobby knife. For the door itself, since I wanted something that wasn't all patched up, I went with a shutter-style door made from pieces cut from the support struts from the original terrain sprue.
My previous giftbox buildings have generally had flat roofs, so I decided to make this one angled, just for something different. I took the lid of the box and cut the sides away at a diagonal along the short edges.
I glued the lid upside down onto the bottom of the box (the top of the building, since the box is upside down!), glued the cut-off pieces of the short edges into the middle for reinforcing, and then stuck a piece of corrugated cardboard on top. I also added the vent windows on two walls, tracing and cutting as with the door frame.
To make this building stand out some more, I wanted to put it on a raised slab. For this, I used the lid of a larger giftbox.
On the so-far blank short wall, I gave the building some independent power using the generator from the new terrain sprue and linking it to the control box using some plastic tube and aluminium rod.
To finish up, I glued the base slab to a piece of hardboard, and added some stairs and small vents from the terrain sprue. I also fenced in the top of the slab using the upright posts and grating pieces, which fit nicely around the edge.
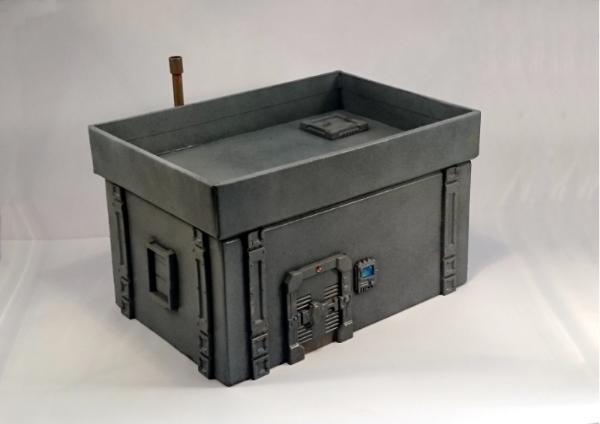
With some paint on, the finished building looks like this:
The new terrain sprue will be available from the Maelstrom's Edge webstore here from October 7th!
In the meantime, feel free to share your models and terrain, or ask any Maelstrom's Edge- or hobby-related questions on the Comm Guild Facebook page!
For other Maelstrom's Edge modeling articles, including tutorials and walkthroughs of a wide range of different building and miniature projects, check out the Hobby section of the Maelstrom's Edge website here.
Tags: buildings modeling spotlight terrain terrainsprue tutorial walkthrough
Terrain Spotlight - An experiment in eroded rocky outcrops from foamed PVC.
Posted on Thursday Sept 26, 2019 at 05:00pm in Tutorials
I came across a tutorial online a little while ago for making eroded rocky outcrops using stacks of corrugated cardboard coated in filling plaster, and then distressed with a wire brush. It was really effective, but I'm not a huge fan of using plaster on gaming terrain as it tends to chip easily. So I thought I'd have a go at making something similar, using foamed PVC.
From putting together buildings, I tend to wind up with a lot of small off-cuts of foamed PVC sheet. This would potentially work with any thickness of sheet, but the thicker the better. Here, I'm using 3mm sheet as that's what I had to hand.
I cut a series of roughly oval shapes from the sheet, slowly decreasing in size so that they would stack up to form the shape of the outcrop.
Using superglue, I glued the layers together, trying to not get glue right out to the edges of the PVC pieces as this would interfere with the texturing later on.
Next, I used a hobby knife to smooth down the layers, more or less. These didn't have to be perfectly blended, but enough to disguise the separate layers of PVC once the texturing was applied.
To apply the rock texture, I scraped horizontally around the edge of the outcrop with a wire brush. The aim here was to vary the depth and length of the scrapes to give a random, rock texture, without cutting in too deep and making it all too flimsy.
With a spray coat of black, and a drybrush of a mix of brown and grey paints, the outcrop was ready for the table.
It's not perfect - it could use some more defined layers running around the circumference, level with the flat areas. This would give it more of a stacked-rock effect and look less like a single lump. But it was an interesting experiment, and a fun way to use up some scraps. I'll have to tinker with the idea a little more and see where I can take it!
Do you have terrain creations you'd like to share? You can get feedback on your work, or ask any Maelstrom's Edge- or hobby-related questions on the Comm Guild Facebook page!
You can pick up the entire Maelstrom's Edge model range, including our plastic urban terrain detail sprue in the webstore here.
For other Maelstrom's Edge modeling articles, including tutorials and walkthroughs of a wide range of different building and miniature projects, check out the Hobby section of the Maelstrom's Edge website here.
Tags: modeling spotlight terrain walkthrough
Terrain Tutorial: Rocky Outcrops.
Posted on Thursday Sept 12, 2019 at 05:00pm in Tutorials
Buildings are all well and good, but sometimes you want to get out of the urban sprawl, and wage apocalyptic war surrounded by nature! I've shared articles previously covering alien forest bases made from silicon aquarium plants and cactus clumps made from foam balls, but this week we're tackling the ever-popular stacked rock outcrops.
These rocky terrain features are made from sheets of expanded polystyrene. I've used pieces cut from an old foam vegetable box here, because that's what I had laying about. You can generally buy expanded polystyene by the sheet in various grades and thicknesses from hardware stores or foam specialty stores, but if you're more thrifty-minded it's worth asking your local fruit and vegetable retailer if they have any old boxes laying around, or you can save the packaging inserts from electrical equipment.
Expanded polystyrene is composed of loads of small balls of foam pressed together to form a sheet. For this sort of project, you want polystyrene composed of relatively small beads (under 2mm), as the larger sort is much harder to cut cleanly and is more prone to damage.
The first step is to cut a piece of foam to form the base of the outcrop. This can be whatever shape you like, just remember to leave one or more flat spots for the stacked rock spires. For cutting the foam, you can buy heated wire cutters specifically for the purpose, but generally a sharp knife will do the job - just don't use the good kitchen knives, as cutting foam does tend to blunt the knife fairly quickly.
Next, cut rocks for the stacks, starting larger and making each successive rock a little smaller, for however many you want to stack up. Rocks come in all sorts of different shapes and textures, so the actual shape here isn't too important, but I like to use largely flat cuts to create a faceted look. Avoid making really sharp edges on the foam, as these will be fragile. Make your rocks different thicknesses, and you can angle the tops a little to avoid the stack looking too artificial.
Once you have your rocks cut, glue the stacks in place with PVA glue. Don't use superglue or plastic cement, as these will melt the foam. For a little extra strength, you can push toothpicks or wooden skewers cut to an appropriate length down the centre of the rock spires. Push this in until it is sitting just below the surface of the topmost rock, and then glue a scrap piece of foam into the hole to plug it up.
Now we need to disguise the foam a little, as just painting over the foam with regular paint tends to look like, well, painted foam.
So instead, paint the outcrop with a textured paint. Again, the specific texture is more or less up to you depending on the look you want, but here I'm using a Dulux 'River Rock' textured paint. This is an acrylic, indoor house paint with a fine sand texture mixed through it. You can generally pick up sample pots of similar paint from hardware or paint stores, or check out their clearance bins for mis-tinted paving paint, which you can sometimes grab for cheap. If you can find a colour that you want to use as a base colour (as I've done here) that's great, but otherwise you can just paint over it, so the actual colour of the textured paint isn't too important. You can also just use regular paint and stir in some fine sand - silversand (sold in pet stores) is ideal for this.
Dab the paint on with an old brush, rather than brushing it. This avoids brushstrokes and helps to clump the texture. The paint I'm using takes two coats to build up the level of texture I wanted for this outcrop, but coverage will vary depending on the paint you use.
To add some visual interest, glue some sand and/or small gravel to the top surface of the base of the outcrop with PVA glue, and once the glue is dry, undercoat with a similar colour to your textured surface - a few shades darker or lighter is fine, once again just depending on the look you want.
Finally, choose a lighter colour and drybrush over the whole thing. Here, I've used Army Painter Ash Grey, as it's a nice, pale grey with a slight brownish tinge, so it ties into the textured basecoat nicely. If you're unfamiliar with drybrushing, you take a large brush, dip it in your paint, wipe it on some paper until there is hardly any colour still coming off, and then brush that over the surface to be painted. With so little paint on the brush, it just picks up the raised detail, leaving the base coat in the crevasses. You can slowly build up the colour in this way until you get the level of highlighting that you want. It's a great technique for painting rough surfaces like rocks or fur, or for getting worn metal effects.
The finished outcrop, ready for the table:
You can glue your outcrop down to a piece of hardboard to give it some extra weight if you wish - this can be a help in preventing it from sliding around the table!
Keen to give it a go? Be sure to share your creations, or ask any Maelstrom's Edge- or hobby-related questions on the Comm Guild Facebook page!
You can pick up the entire Maelstrom's Edge model range, including our plastic urban terrain detail sprue in the webstore here.
For other Maelstrom's Edge modeling articles, including tutorials and walkthroughs of a wide range of different building and miniature projects, check out the Hobby section of the Maelstrom's Edge website here.
Painting Tutorial: Rusted Shanty Buildings
Posted on Thursday Sept 05, 2019 at 05:00pm in Tutorials
Our new, upcoming terrain sprue is themed around Broken terrain - delapidated, cobbled-together structures either repaired from abandoned ruins or cobbled together from salvage. I've been putting together a series of run-down shanty buildings and thought I would share my method for painting them up and making them all grubby and rusty!
The building I'm painting up here is the one shown in the walkthrough in the first preview article here.
The first step is a basecoat of dark brown. The exact colour doesn't matter too much, but here, I'm using an AK Interactive Rust Basecoat.
Over the brown goes a spray of cream, sprayed downwards at an angle to let the brown form some natural shading. I'm using a Dulux Chalky Finish cream spray, as it gives a fantastic, non-glossy surface finish.
Over the areas of exposed metal, re-undercoat with a dark brown. For painted metal areas, like the reinforcing struts, apply the dark brown with a sponge. (You can find a tutorial on sponge weathering here). The exact shade of brown doesn't matter too much, as rust comes in a wide range of shades dependong on age and exposure, but I've used AK Interactive Shadow Rust here.
For areas of lighter rust, apply a sponge of dark gray over the brown. This will give the effect of old but unrusted metal showing through the rust in places. Where you want heavier rust, like on the roof, leave this off. For this building, I used Vallejo Heavy Charcoal for this step. I have also painted the base with Vallejo Neutral Grey at this stage.
On the larger rusted surfaces, like the roof and door, apply a rough drybrush of orange. This doesn't need to be particularly even - you're aiming to create a rough highlight to accentuate the patchiness of the rust.
Now the magic part! The final coat of rust is applies with Vallejo Dry Rust. This is a worryingly bright orange paint that goes on gloopy and dries down to a very flat finish. Applied over the brown, the orange is dulled down to a perfect rust finish. Use an old brush and just dab it on, working downwards so that the rust collects most strongly on upper surfaces. As with the drybrush layer, the aim isn't to evenly coat everything, but to create a blotchy effect with the rust heavier on raised, exposed areas and lighter on undersides.
Around this time, drybrush the base with Valljeo Light Grey or similar.
Once the rust has dried, it's time to add some dirt. But first, paint in any remaining details - lights, control panels, grafitti or other markings on the walls, are all best added in now, so that the weathering goes over the top and they don't look out of place with the rest of the structure.
Then, use a medium brown (Vallejo Beasty Brown here) and drybrush around the bottom edges of the walls, in any vertical raised recesses, along the edge of the roof under the corrugated card, and along the tops of doors and windows. This is also a good time to drybrush some dirty patches on the base.
Finally, use a small drybrush to add some more brown along any remaining upper surfaces, like the tops of each segment on the reinforcing struts, the rim of the light fitting and anywhere else that dirt and dust would collect. I also like to add some oil (or other fluid) stains around the base by applying small drops of Army Painter Quickshade wash and leaving them to dry.
The new terrain sprue will be available soon. In the meantime, you can still pick up the original terrain sprue along with the rest of the Maelstrom's Edge model range in the webstore here.
As always, feel free to pop along and share your creations, or ask any Maelstrom's Edge- or hobby-related questions on the Comm Guild Facebook page!
For other Maelstrom's Edge modeling articles, including tutorials and walkthroughs of a wide range of different building and miniature projects, check out the Hobby section of the Maelstrom's Edge website here.
Tags: buildings modeling painting terrain terrainsprue tutorial
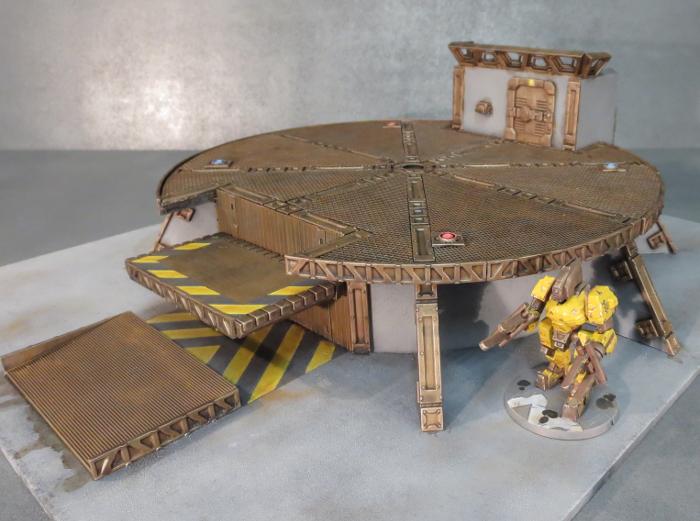
Terrain Spotlight: Firepoint Emplacement
Posted on Thursday Aug 29, 2019 at 05:00pm in Tutorials
As I mentioned in last week's article, we have a new terrain sprue coming!
Because new terrain gets me as excited as a very excited thing on a special day to be excited, I'm currently locked in my office, figuring out the best ways to make use of the new bits and pieces on the sprue and putting together new buildings for the ever-expanding terrain collection. One of the new pieces I put together this week was a small firepoint, just perfect for holding the line against incursions of lawless rabble!
The bulk of this structure is made up of floor grates from the new terrain sprue, and a combination of 3mm foamed PVC and 6mm foamcore for the walls.
I started out by laying out a floorplan, and gluing the grates together edge to edge. Then I cut the PVC and foamcore into sections to fit neatly around the three straight edges of the floor.
The sprue includes some posts which can be used to make low walls. For this build, I'm using a couple of them as floor supports, so trimmed off the rounded top.
Some stairs were needed to get up to the floor level in the firepoint. The stairs on the new sprue are designed to stack up on top of each other, and two stair pieces stacked come to almost exactly the same height as the floor grates sitting on the posts.
With the wall pieces glued together, the lower PVC sections form a support rail, on which the floor grates will sit.
To cover over the exposed ends of the foamcore, I took some support struts from the original terrain sprue and cut them to the same height as the walls. Four of these attach to the corners, neatly sealing over the foam.
The short, leftover pieces of the support struts were a nice length to form some bracing for the walls. I cut some small triangles of PVC and foamcore, which when glued together are exactly the same width as the struts.
That just left the top edges of the wall exposed. To seal that over, I cut a piece of foamed PVC in a lopsided 'U' shape to match the path of the wall, making it wide enough to overlap slightly on both sides, just to look prettier.
With the structure complete, I glued the firepoint down to a piece of hardboard. I wanted the firepoint to have some dirt piled up against the front, so I cut some expanded polystyrene to form the bulk of the dirt pile, and glued that in place around the front and the sides.
Finally, I gave the expanded polystyrene and the remaining exposed hardboard a generous coat of PVA glue and sprinkled a sand/gravel mix over it.
Ready for paint!
With some paint on, the finished firepoint looks like this:
The exact release date for the new terrain sprue is still to be confirmed based on production scheduling, but should be in the next few months. I'll be showing off some more previews in coming weeks to reveal other components included on the sprue.
In the meantime, you can still pick up the original terrain sprue along with the rest of the Maelstrom's Edge model range in the webstore here.
As always, feel free to pop along and share your creations, or ask any Maelstrom's Edge- or hobby-related questions on the Comm Guild Facebook page!
For other Maelstrom's Edge modeling articles, including tutorials and walkthroughs of a wide range of different building and miniature projects, check out the Hobby section of the Maelstrom's Edge website here.
Tags: buildings modeling spotlight terrain terrainsprue walkthrough
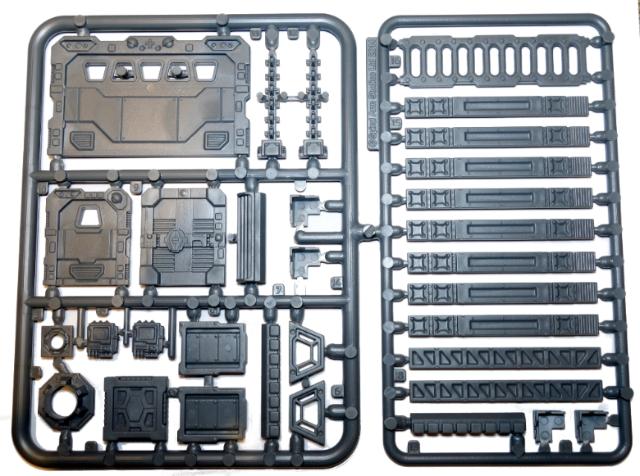
Terrain Spotlight: Giftbox Building with Removable Roof!
Posted on Thursday Jul 25, 2019 at 05:00pm in Tutorials
There are two common ways to create buildings for use in wargames - making them solid and either treating them as impassable structures or using abstract rules to represent models being inside where appropriate, or using buildings with removable roofs so that models can actually be placed inside and positioned accurately when required. I generally prefer to go the former route, as it makes buildings a lot simpler to put together, and is less fiddly during a game than having to take a roof off - particularly if there are models on it!
Sometimes, though, it's handy to be able to go that extra distance, so I thought I would show a quick and easy way to create a building with a removable roof from a cardboard giftbox, with a little help from the Maelstrom's Edge terrain sprue.
For the core of this building, I used a plain black cardboard giftbox, purchased from a local discount store.
Usually when I'm building terrain, I just go from the idea in my head and hope for the best. In this case, though, I sketched out a quick plan to make sure that the interior all fit into place as intended. The plan changed slightly along the way, but it provided a handy reference as I was putting everything together.
I started out by drawing around the base of the box on a piece of 2mm foamed PVC and cutting out a hole for the box to sit in. This serves to conceal the bottom edge of the box, which has a slightly rounded edge.
Next, I took a large door from the terrain sprue, sat it in place on one of the short edges of the box, traced around it with a pencil and then cut out the resultant rectangle to create a door cavity.
I did the same on one of the long edges of the box with a small door from the terrain sprue. This door is largely featureless on the back (as it wasn't really designed for use where you would see both sides of it), so I cut a piece of thin cardboard to duplicate the raised panelling from the front.
For the interior walls, I used more foamed PVC, with doorways cut in using the small door frame as a template. I checked that these walls fit where I wanted them, but didn't glue them in at this point so that I could get at the interior easier to add more detail.
The building needed some windows. I tend to default to the shutter windows on my builds and use the trapezoid windows for more interesting things, but for this building I had another plan for the shutters. So I spaced out some of the trapezoid windows on the long sides, cut holes by tracing around them with an exacto knife and then glued them in place. Using the knife instead of a pencil to trace gives a tighter fit, which is useful since the trapezoid windows don't have a flange to conceal a loose fit like the doors do.
I kitted out the interior with some bits and pieces made from an assortment of terrain sprue parts. All of this was glued in place, except for the ladder. I left that separate to make it easier to paint behind it.
And now, the important part! I took the lid of the box and glued four corner braces from the terrain sprue upside down around the corners of the lid top. These were spaced to fit neatly inside the box, so that the lid could be sat in place upside-down to create a walled roof.
Of course, this could also be done much more easily by just sitting the lid on the way it normally goes, but I like having a lot of buildings with walled roofs to allow for models to have some cover up there.
I finished up with a few extra detail pieces here and there, and another sheet of PVC on the bottom to form a base.
To paint, I gave the inside a spray with a Rustoleum dark brown primer, and then a light coat of Dulux chalky beige. The outside received a coat of Army Painter Army Green.
I gave the doorframes and windows a coat of Vallejo Heavy Brown, and then a layer of P3 Jack Bone. The base and roof are my usual urban mix of Vallejo Basalt Grey with a drybrush of Vallejo Light Grey.
As I wanted the weathering to be heavier on the outside then in, I gave the exterior metal parts a base coat of Citadel Scorched Brown, a very light drybrush of P3 Pig Iron, and then a generous dabbing of Army Painter Dry Rust. The interior metal parts got the same base coat, a heavier layer of Pig Iron, and then a wash with Army Painter Strong Tone.
Everything was dirtied up with a sponge of Vallejo Heavy Charcoal and a drybrush of Vallejo Beasty Brown into all the crevasses and corners, again going heavier on the outside of the building.
With some final detailing and a few printed posters, the building was ready for the table!
To build your own rooftop of removable doom, you can pick up the Maelstrom's Edge terrain sprue, along with the rest of the Maelstrom's Edge model range in the webstore here.
As always, feel free to pop along and share your creations, or ask any Maelstrom's Edge- or hobby-related questions on the Comm Guild Facebook page!
For other Maelstrom's Edge modeling articles, including tutorials and walkthroughs of a wide range of different building and miniature projects, check out the Hobby section of the Maelstrom's Edge website here.
Tags: buildings modeling spotlight terrain terrainsprue tutorial walkthrough
Terrain Spotlight: Building Ideas Roundup
Posted on Thursday Jul 04, 2019 at 05:00pm in Tutorials
The Maelstrom's Edge terrain sprue comes with a whole slew of assorted bits and pieces that can be added to basic building shapes to pretty them up for the gaming table. Over the past couple of years, I've shared quite a few different ideas for base structures for those buildings, and I thought it might be useful to do a bit of a round-up to compile them all in one handy reference.
One of my favourite options, that I've gone back to many times over the years, is the cardboard gift box.
With minimal effort, these can be quickly turned into table-ready terrain with the addition of some detail bits and some paint.
For a few ideas, here's some previous build articles:
For a slightly more detailed, but still mostly pre-made option, go for a wander through your local hardware store and look for interesting plastic shapes. Plastic storage trays, storm drain sections and various assorted plumbing fittings can all make great bases for buildings with a little imagination and some added detail.
You can find some tutorials and walkthroughs for putting these together here:
On a sort-of related note, you can find all sorts of handy bits and pieces around the kitchen as well - Never throw anything out!
Some handy articles:
If you feel are happy with building from scratch, you can of course work up whatever building shapes you want using standard modeling materials. Foamcore (AKA foamboard), plasticard, sturdy cardboard and foamed PVC can all be useful for creating more freeform shapes to suit yourself.
Some scratch-built building ideas:
Finally, there are a whole host of premade and often inexpensive buildings out there on the market these days, made from MDF, cardboard or PVC which can be spruced up into something special with a few extra details here and there.
Check out these examples of kits given a little extra love:
Do you have any clever building ideas that we haven't covered here? We'd love to see them in the Comm Guild Facebook group!
To get started on your own terrain adventure, you can pick up the Maelstrom's Edge terrain sprue, along with the rest of the Maelstrom's Edge model range in the webstore here.
For other Maelstrom's Edge modeling articles, including tutorials and walkthroughs of a wide range of different building and miniature projects, check out the Hobby section of the Maelstrom's Edge website here.
Tags: buildings modeling roundup terrainsprue tutorials walkthrough
Terrain Spotlight: Mirrored Glass Building
Posted on Monday May 20, 2019 at 05:00pm in Tutorials
Metal and concrete buildings are all well and good, but I thought it might be fun to build something a little shinier for a change. Nothing says 'futuristic city' quite like mirrored-glass-wall buildings, after all!
I've had a play in the past with some clear plastic and mirror-effect sprays, without managing to achieve the effect I was after. Then I came across some lovely, shiny silver card in a discount store, and an idea was hatched.
The basic idea was to make a structure out of 5mm foamcore, using the support struts from the Maelstrom's Edge terrain sprue to form a framework to hold the cardboard. I started by plotting out a rough design using a bunch of struts trimmed to appropriate lengths, so I could get the foamcore dimensions correct.
After marking out the wall dimensions on the formcore, I cut them out using an exacto knife and a steel ruler.
I made a base for the structure from two stacked squares of 2mm foamed PVC. The upper, smaller square created a framework for the foamcore to sit up against, to ensure the building was square and give it some extra strength.
With the outer wall constructed, I added some reinforcement on the inside corners using some offcuts of PVC.
To create the framework for the card to slide into, I glued 5mm plasticard strips onto the walls, tracing the pattern of the support struts.
The strips are narrower than the struts, so with the strut centered on the strip a 1mm overhang was created on each side.
To help avoid the building just being a boring, square box, I left a cutaway to allow for an angled doorway. To fill this in, I cut a square of foamcore to fit across the opening, and cut a rectangle out for a door from the terrain sprue.
With the wall structure complete, I started building up the roof layers with some more PVC, cut to overhang the walls just slightly to close off the tops of the card slots. These weren't glued in place yet - that had to wait until the card was in place.
I joined the three roof levels together using angled pieces of PVC. This served the dual purpose of giving the roof an interesting shape, and also making the whole roof structure into a single piece that could be lifted on and off, which would be easier for painting than separate pieces.
At this point, it was time to paint! I decided to keep it fairly simple, as the main focus on this building was going to be the mirrored walls. I gave the whole exterior a base coat of AK Interactive Rust spray, and then a layer of a satin black spraypaint, leaving the rust in the crevasses for some natural weathering.
When the spray had dried, I cut strips of the silver card to fit into each of the wall slots.
Once all the strips were in place, I glued the roof on top.
For the final detailing, I painted the base with Vallejo Neutral Grey, drybrushed with Vallejo Light Grey. I also gave the black a light drybrush with the light grey, and then added some dirt weathering with Vallejo Beasty Brown. I also added some signage, with Epirian logos made from strips of the silver card and some gold card from the same pack for the 'yellow' lower squares. All ready for the table!
You can pick up the Maelstrom's Edge terrain sprue, along with the rest of the Maelstrom's Edge model range in the webstore here.
As always, feel free to pop along and share your creations, or ask any Maelstrom's Edge- or hobby-related questions on the Comm Guild Facebook page!
For other Maelstrom's Edge modeling articles, including tutorials and walkthroughs of a wide range of different building and miniature projects, check out the Hobby section of the Maelstrom's Edge website here.