Entries tagged [spotlight]
Modeling Spotlight: The Angel Hellblaster (or 'Fun with Resin!')
Posted on Monday Nov 13, 2017 at 05:00pm in Tutorials
- by Iain Wilson
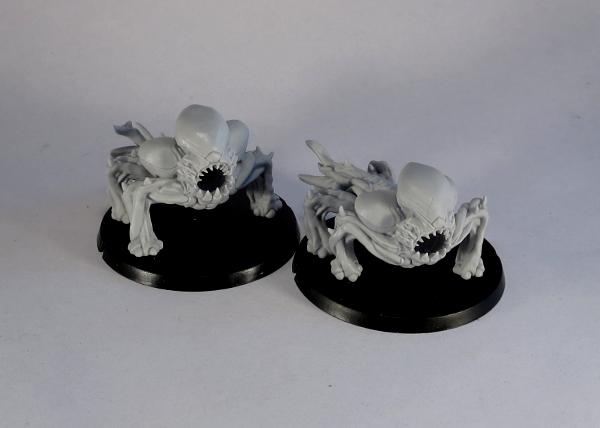
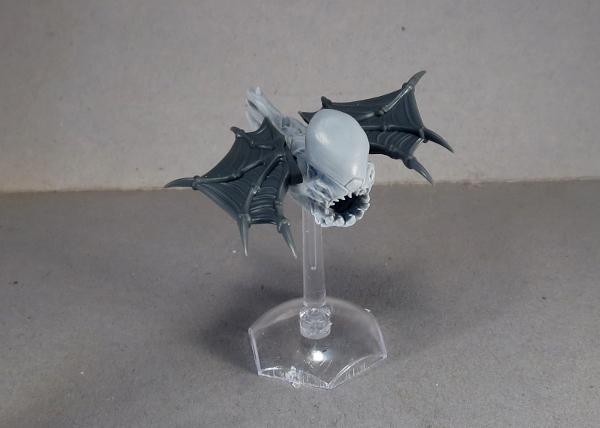
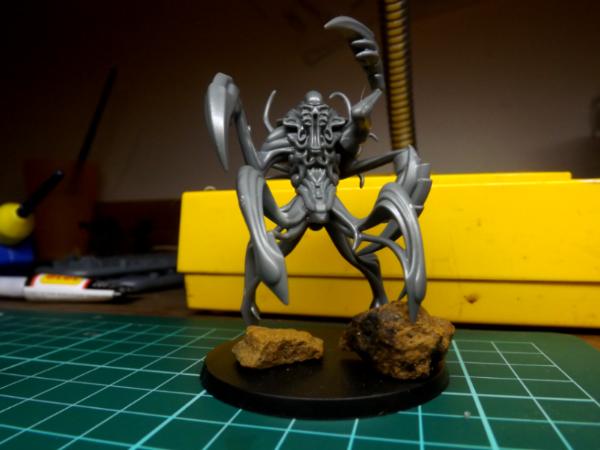
The Karist Hellblaster is the first of a range of resin models for Maelstrom's Edge, to help flesh out the factions with some more fun and freaky options. This week, I'm having a look at some modeling options with this great little kit.
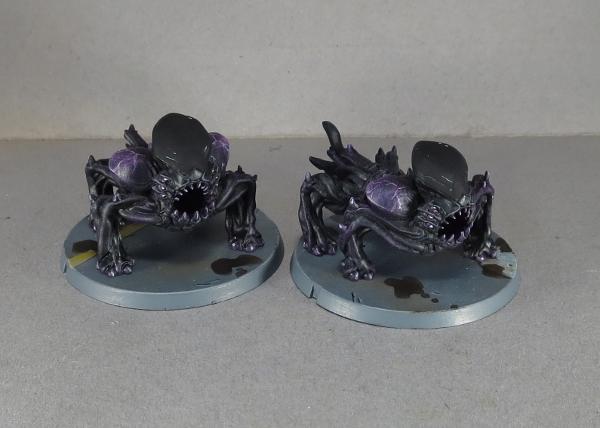
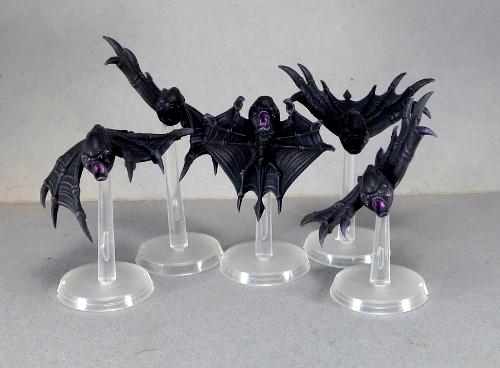
The Hellblaster comes in a pack of two variants, with slightly different posing and tail tentacles.
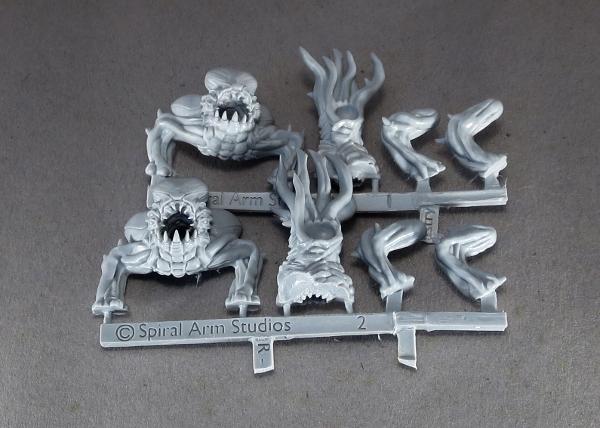
Assembly is really easy - It's always a good idea to wash resin models in warm, soapy water before assembly, to clean off any mould release residue (this may affect paint adhesion, otherwise), then cut off the sprue and trim off any mould lines, glue the head piece to the front of the torso, and the rear legs into their sockets. There's a little posability in the rear legs, as the sockets allow for some movement.
If you want to branch out a little from stock poses, one of the really fun aspects of resin models is that they can be easily reshaped. Drop the part you want to reshape into some hot water for a minute or so. When the part has had time to warm through, fish it out and quickly bend it into the shape you want. Then pop it into some cold water to set it in that shape.
Obligitary safety warning: It's always a good idea to avoid breathing in fumes from heated resin or plastic, so boil your miniatures somewhere with good ventilation. And use an appropriate tool (tweezers, long-nose pliers, etc) to fish the resin pieces out of the hot water and handle hot parts with care.
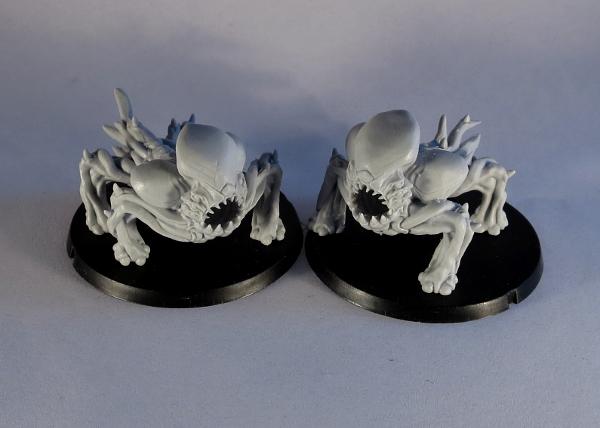
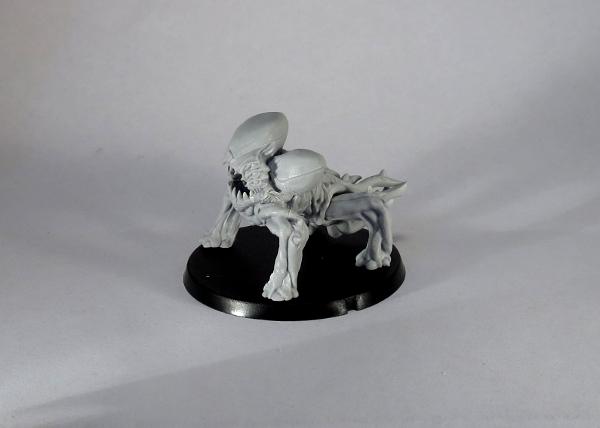
Using this method, you can add a bit of a bend to the Hellblaster's torso, to give it more of a sinuous, in-motion appearance.

You can also reposition legs and tentacles to suit. It helps that angels don't have a fixed skeletal structure - tentacles are fairly forgiving when it comes to finding appropriate poses!
Note that as an alternative to the hot water technique above, you can achieve a similar result using a hair dryer to heat smaller parts. As above, through, handle with care to avoid damage to both the parts and yourself.
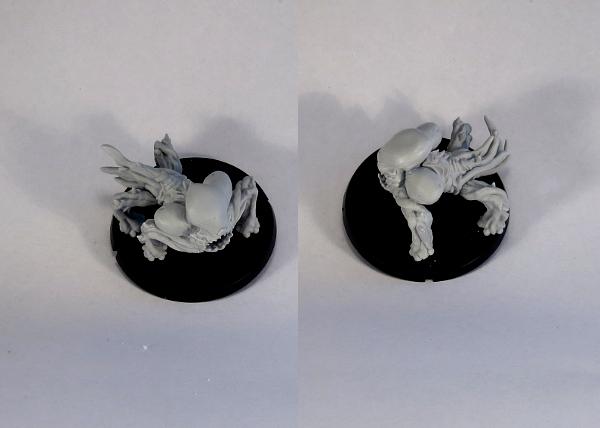
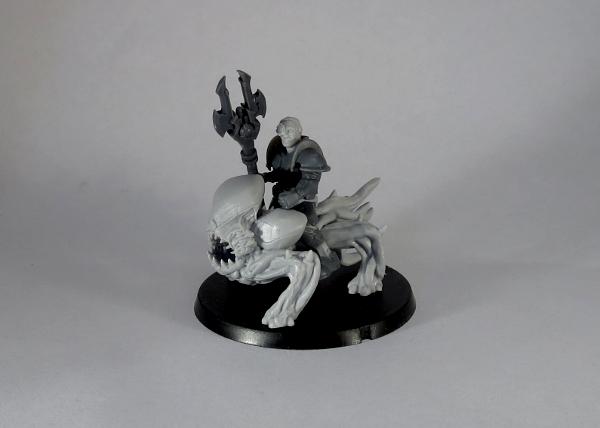
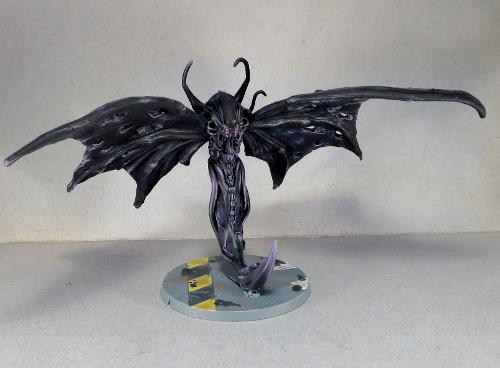
With a little more work, you can carefuly cut through in between the cheek sacs and the tops of the forelimbs, to allow for more movement. In the below example, I have stretched the legs out to raise the head and shoulders up higher, and added a slight forwards arch to the angel's back.
Painted up in an appropriate colour scheme, the Hellblaster fits in nicely with the Mature Angels and Minnows to add a bit more variation to an angel force.
But where to from here?
There's no reason to stop with basic reposing! Angels love nothing more than experimenting with different forms, and while the Hellblaster is a form forced on them by Karist Keepers, it also makes a good base for some different angel types, like the (very work-in-progress) examples below:
Snake-angel, converted using the front of a Hellblaster, the wings from a Minnow and a wire armature covered in 'green stuff' putty.
The snake body will be smoothed out with another layer of putty, and some exterior tentacles added for some detail.
Shrike-angel, converted using a Hellblaster body with the forelimbs and energy sacs cut off, and the wings from a Minnow.
The body of the Hellblaster is considerably bigger than a Minnow's, so this guy has a much smaller wing to body ratio, but I think it's still close enough to work, particularly given angels fly using gravitic manipulation and the wings are largely just for show anyway. As with the snake, this model still needs some putty work to join the wings properly to the torso and fill in the flat spots where the legs and sacs were removed. I may also trim down the crest a little, to something more closely resembling the head of the Minnow.
Or, for something completely different, how about angel cavalry?
(Ok, this one's stretching the background a little - chances are that anyone trying to ride an angel wouldn't be riding it for very long... But it was too fun an idea to not have a play with it!)
To build your own shape-changing army of alien doom, you can pick up the Hellblaster along with the rest of the Maelstrom's Edge range from the webstore here. As always, feel free to share your creations on the Comm Guild Facebook page!
For other Maelstrom's Edge modeling articles, including tutorials and walkthroughs of a wide range of different building and miniature projects, check out the article roundup here.
Tags: angel conversion converting hellblaster modeling spotlight tutorial walkthrough
Terrain Spotlight: Broken Settlement, part 1
Posted on Monday Oct 30, 2017 at 05:00pm in Tutorials
- by Iain Wilson
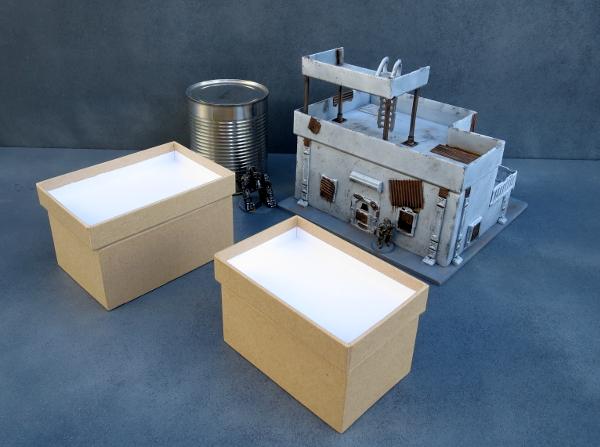
With the release of the Broken adding a long-awaited third faction to the Maelstrom's Edge universe, it seemed fitting to take a break from tinkering with the shiny new models to add some appropriate terrain to the table. So this week, I broke out some gift boxes that I had waiting for an opportune moment, grabbed some terrain sprues and got to work!
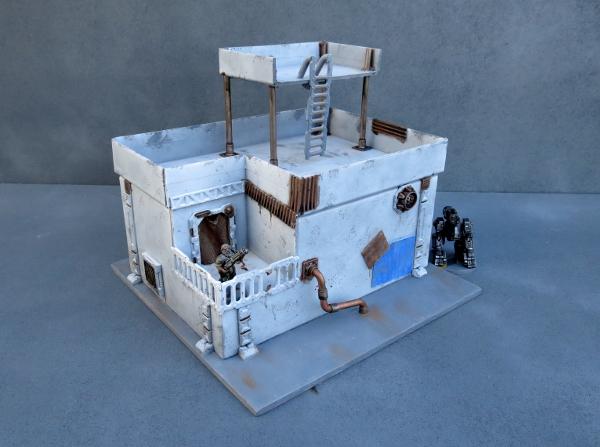
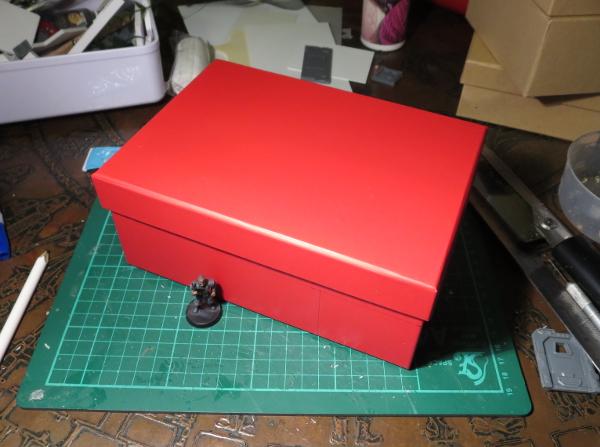
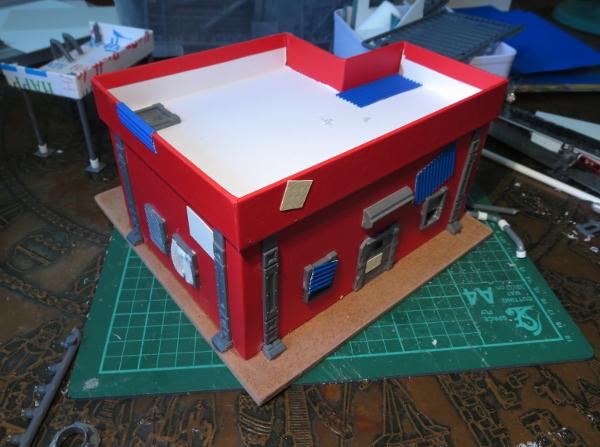
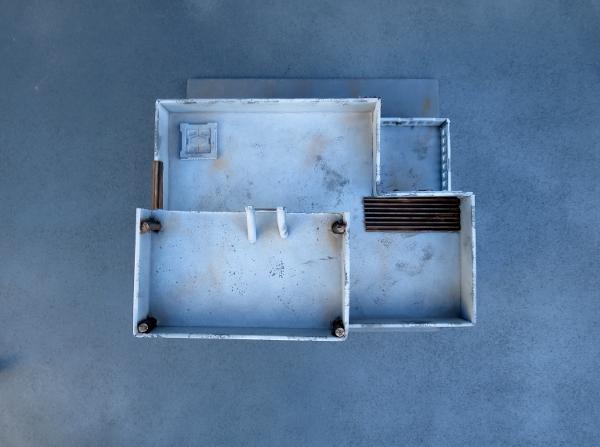
The core of the first building for my new Broken settlement is a 20cm x 15cm cardboard gift box. The plan was to more or less follow the style of my earlier gift box buildings, but with the addition of some faction-appropriate wear and tear and rough repair work.
I started by cutting out holes in the box for windows and doors, using a sharp hobby knife.
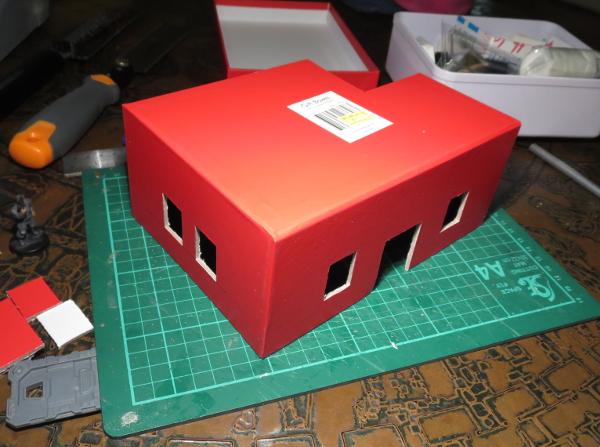
To break up the box shape a little, I cut away one corner of the box, 6cm along each side. Flipped over, this corner piece fits back in place as a recessed balcony.
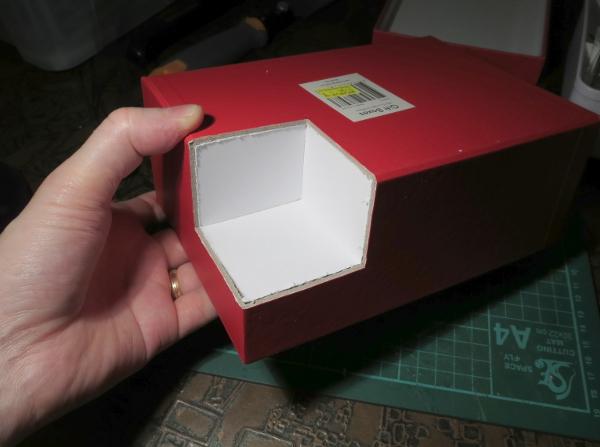
I cut a hole in one wall of the balcony to add a door, and cut a matching corner off the box lid, which would form the walled roof of the building.
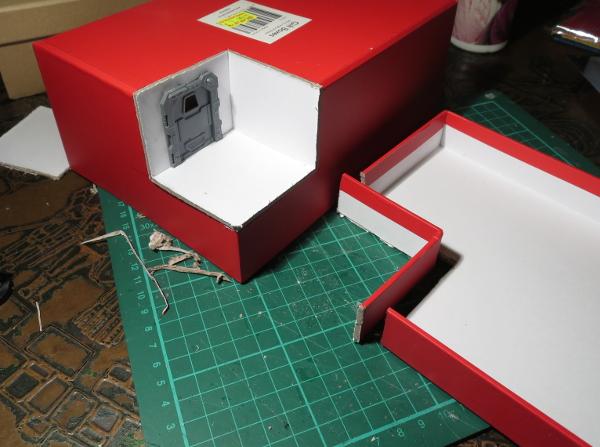
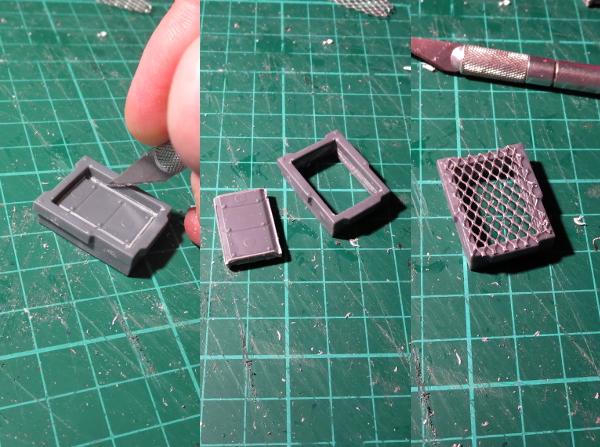
From there, it was time to glue the box onto a square of masonite, and start detailing. To make the building look like it had been through some rough times, I modified the rectangular shutter windows from the terrain sprue. For the first one, I carefully cut out the shutter using a hobby knife, and then glued some aluminium mesh over the front of the window frame.
Rather than making all of the windows the same, I made different modifications to the other windows. On one, I glued some plastic flyscreen and a square of corrugated cardboard over the front of the frame, another had the shutter replaced with a piece of crepe bandage soaked in watered-down PVA glue, and on the last one I cut away just the lowest section of the shutter.
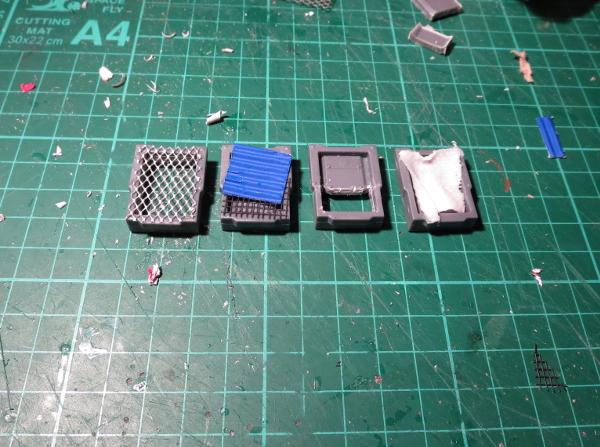
The terrain sprue parts were glued in place with superglue, and then I added some patches cut from thin plasticard and corrugated cardboard to the walls of the building.
The door on the balcony received a blanket in place of the original door with another piece of glue-soaked bandage, and a couple of ladders were used to create a railing. A pipe made from pieces of sprue joined with some plastic tubing and a vent made from a large pipe fitting with some aluminium mesh glued inside finished off the detailing on the back.
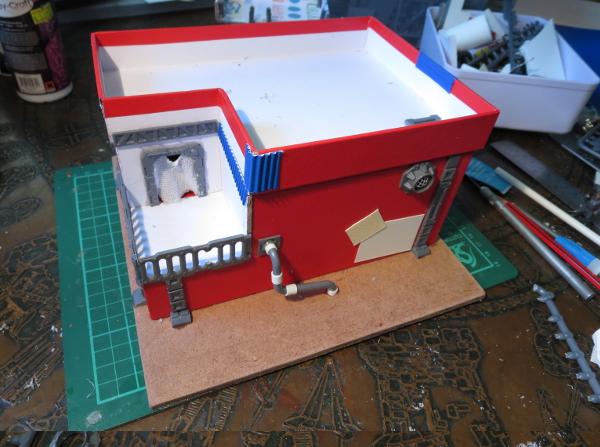
The building was still looking a little boxy, so I decided to break up the silhouette a bit more with the addition of a watchtower on the roof. This was constructed from a piece of gift box lid left over from a previous project, and some pieces cut from the ends of the terrain sprue. The ladder was glued in place with another couple of sprue pieces forming the hand grips at the top.
With construction complete, it was time to break out the paint. I started with a base coat of flat grey.
Over that went a thin layer of flat white. I didn't want this to be perfectly smooth and pristine, shining white, so kept the coat thin enough for the grey to show through a little. Once the spray was dry, some weathering was added with a sponge and some Vallejo Neutral Grey.
The metal patches and any other parts that I wanted bare metal were painted with a coat of Vallejo Beasty Brown, and then given a rough coat of P3 Pig Iron.
The base was painted with a coat of Vallejo Neutral Grey, and then a drybrush of Vallejo Light Grey, with some patches of Beasty Brown added to dirty things up a little. A splash of Army Painter Strong Tone over the metal bits and blankets, and a rough coat of Citadel Ultramarines Blue over a couple of the metal patches, and the building was pretty much table-ready.
There is still a little detail work to go, but some of that will wait until I get some more of the settlement completed so that I can match details across the different buildings to tie everything together.
So what's next?
I will be adding a couple of smaller gift box buildings with some varying levels of damage and delapidation, and I have some plans for a large peach tin that was rather conveniently opened the other day. The outsides of the buildings will gain some awnings and banners and the like, and I'll scatter some scrap around to add some flavour (and also some handy cover).
Stay tuned for more!
To build your own stellar refuge settlement, you can pick up the Maelstrom's Edge terrain sprue from the webstore here. As always, feel free to share your creations on the Comm Guild Facebook page!
For other Maelstrom's Edge modeling articles, including tutorials and walkthroughs of a wide range of different building and miniature projects, check out the article roundup here.
Tags: broken buildings modeling models spotlight terrain terrainsprue walkthrough
Modeling Spotlight: Easy Broken Rabble Conversions
Posted on Monday Oct 23, 2017 at 05:00pm in Tutorials
- by Iain Wilson
The new, plastic Broken Infantry kit has been out for a few weeks now, and I've been having a ball exploring the modeling options available from these sprues. With build articles now up showing how to put together your Chieftains, Rabble squads (which also serves for the Fire Support unit) and Assault units, it seemed like a good time to look at some easy ways to customise your Broken models a little.
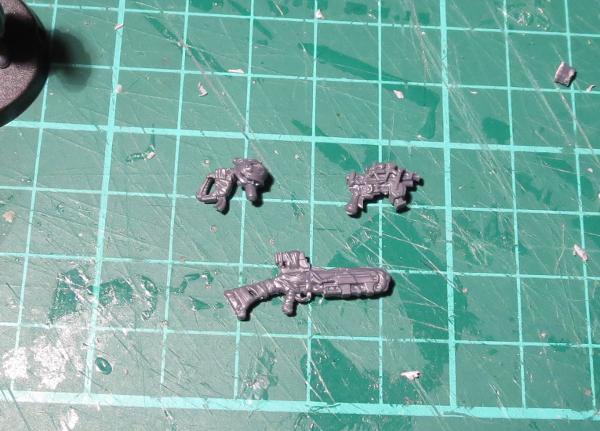
Let's kick things off with guns. Broken have a lot of different weapons, and they're all cobbled together from whatever parts they can scrounge. You can accentuate this a little by swapping grips between the different weapons. Below I have swapped the Chem Pistol grip out in favour or the firing grip from a Beam Blastgun, given a Slug Pistol the pistol grip from a Beam Pistol, and replaced the curved handle on the Chem Launcher with the back half of a Slug Rifle.
With Broken forces being made up of refugees from all walks of life, and equipped with whatever gear they can beg, borrow or steal, the other Maelstrom's Edge plastic kits are a great resource for personalising your forces. A trimmed down Karist Trooper shoulder pad is a great way to single out your unit Bosses from their otherwise equally-scruffy charges.
Karist Trooper and Epirian Contractor arms and heads can also be used to add some extra variety when scattered through with the Broken parts. The necks may be a little tight on some of the Broken torsos, but you can shave them down with a sharp hobby knife or a modeling file to make them fit.
The model on the left below also has Contractor legs. The Broken torsos and legs have multiple belts and straps, but the thicker belt on the Contractor leg pieces can make this look a little strange and results in the model being very tall, so in this case I have removed the belt from the bottom of the torso with a sharp knife before attaching to the legs.
To venture a little out of the box, the below Chieftain model has been given a melee weapon (just for show) made from a cut-down EMP Harpoon with a blade from a knife taken from the Faction Expansion Sprue.
A gunslinger Chieftain can be made using the pistol arms from the Epirian Bot Handler sprue. You can cut the pistols off just above the tops of the hands and attach Broken weapons instead, but in this case I liked the look of the Epirian pistols so left them there, where they will probably sub as Slug Pistols for now. I also added a long coat and lifted the collar with 'green stuff' putty.
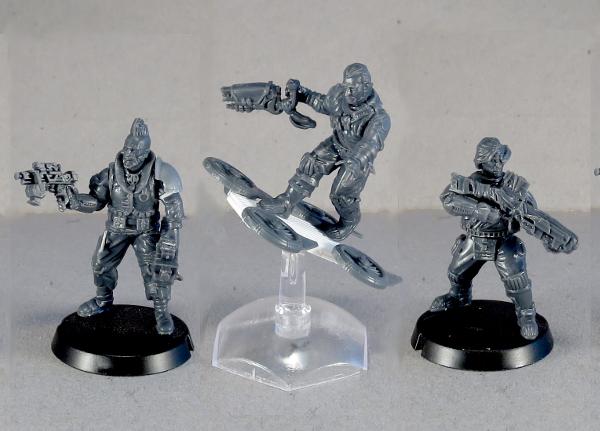
Last, but not least, the more speed-happy Broken may want a better way across the battlefield than walking like everyone else, and what better way to travel than a custom-made skyboard?
The board was made from a strip of plasticard, with some leftover turbines from Epirian Firefly Drones added onto the sides. Obviously, there are no rules for these, but the idea was too much fun to not put it together, so I'm planning to put together a unit of these guys and work up some homebrew rules for them. Watch this space!
To get to work on your own Rabble horde, you can find the Broken Infanty kit in single, double or triple packs in the Maelstrom's Edge webstore here, along with the rest of the Maelstrom's Edge plastic model range. As always, feel free to share your creations on the Comm Guild Facebook page!
For other Maelstrom's Edge modeling articles, including tutorials and walkthroughs of a wide range of different building and miniature projects, check out the article roundup here.
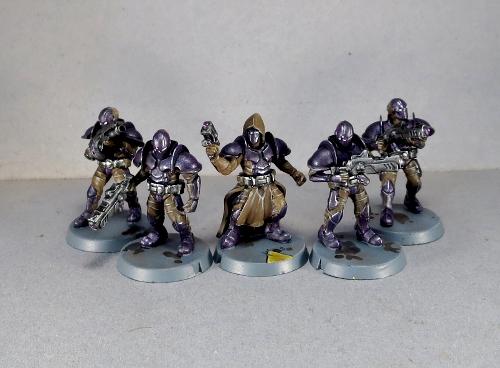
Army Spotlight - Karist Strike Force
Posted on Monday Aug 28, 2017 at 12:00am in Models
- by Iain Wilson
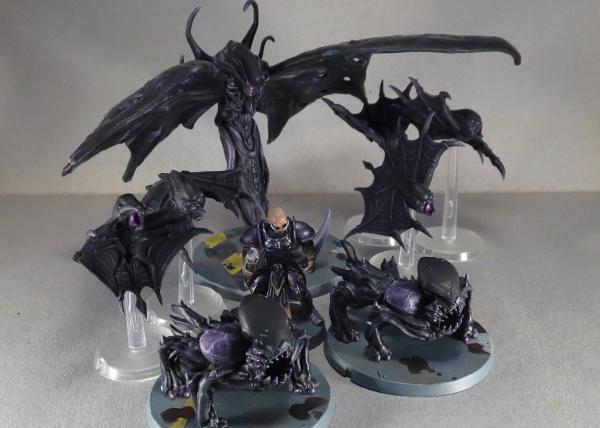
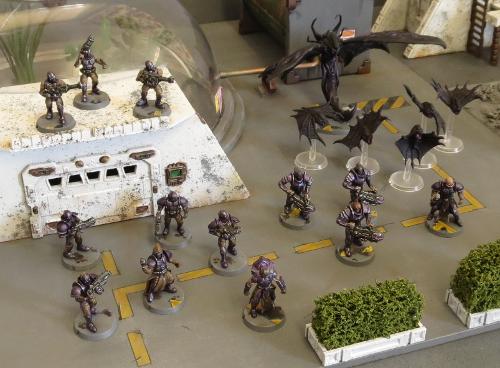
A little while ago I shared an Epirian bot army that I had been assembling, which you can find here if you missed it the first time. It didn't seem like the done thing to let all of those blasphemous machines hog the limelight, and so this week it's time for the pure and wholesome forces of the Karist Enclave to shine.
I wanted a Karist leader with a bit of presence - the sort of no-nonsense character who would stride about the battlefield secure in the rightness of his cause and confidence in his inevitable victory. So I took the Kaddar Nova kit and modified the legs slightly to give him a walking pose.
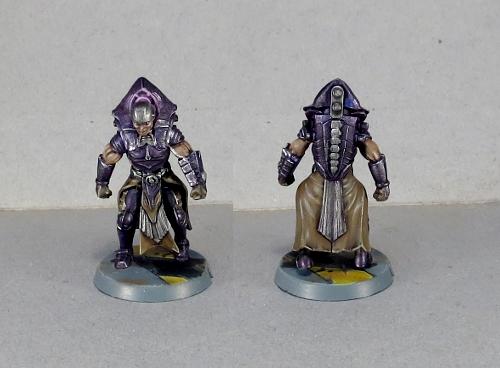
The conversion involved cutting some plastic away from the groin where the two leg pieces join, to bring the legs in for a more upright pose. One leg was angled slightly back by rotating at the waist joint, and the ankles were carefully twisted to straighten them out. The end result is a walking but slightly bow-legged pose, which helps to show the weight that the Nova is carrying around with that backpack!
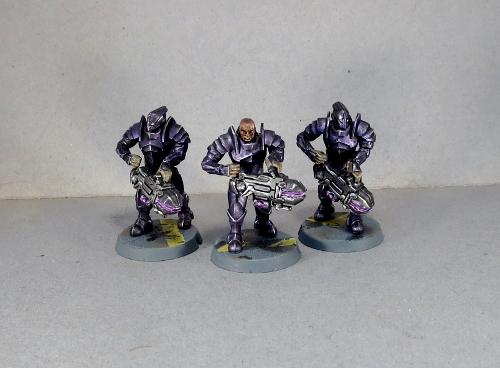
The painting on this force is quite simple, as I wanted something quick and easy that I could expand on later as I add more models to the roster. The purple is an old Citadel metallic purple washed with Army Painter Dark Tone. The brown cloth sections painted with Vallejo Heavy Brown and washed with Army Painter Strong Tone form a nice contrast to the purple, and the weapons are painted in a no-nonsense metal scheme using P3 Pig Iron washed with Dark Tone.
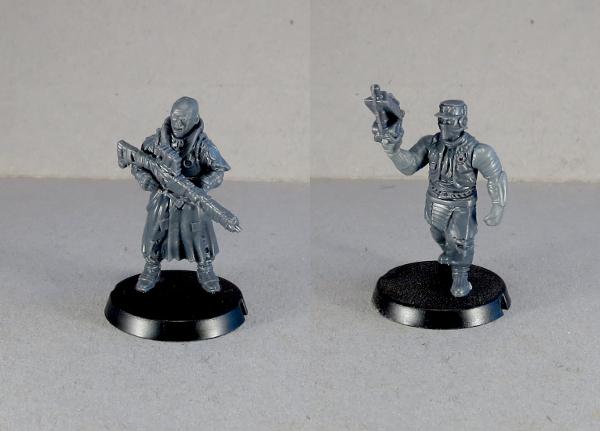
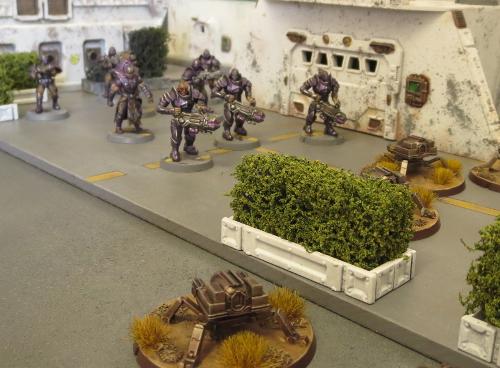
While I was aiming for a fairly small, elite force this time around, I still needed a unit of Troopers to fill in the required Core slot. I decided to go for a 5-man unit, to help them stand out from the more compact specialist units I was going to include and to give help them last a little longer once they get in range of all those Epirian guns.
The Quintarch for this unit was based loosely on an early piece of Maelstrom's Edge artwork, with robes made from a leftover Kaddar Nova robe and some green stuff putty.
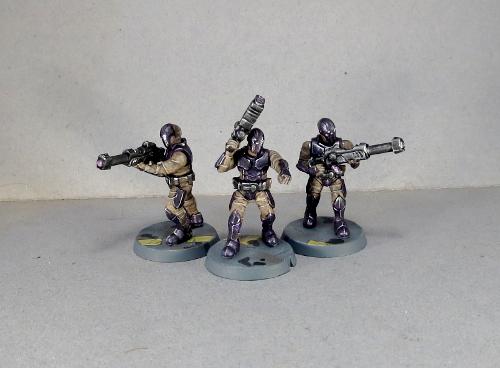
A unit of Tempest Elites provide some fire support, with their fearsome Hellstorm Energy Mortars.
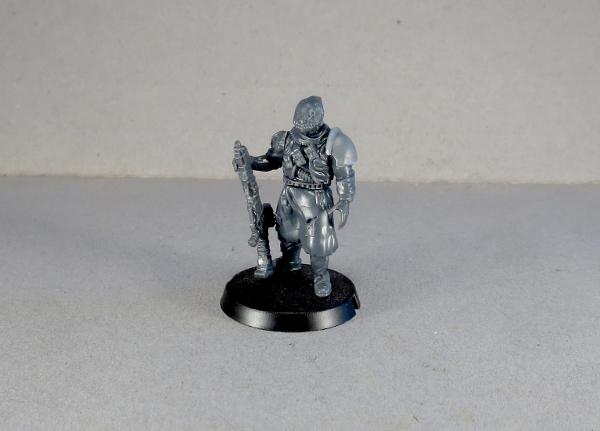
For some extra firepower where it counts, I included a Reaper Cadre. This is a homebrew unit that I put together for an article a while back. They're basically elite troopers armed with a long rifle version of the Pulse Carbine. You can find the conversion article and a rules card here.
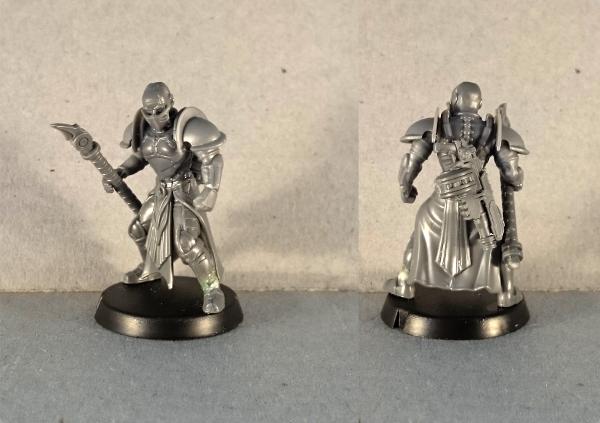
I obviously needed to include some angel units, and to keep them in line I also took along an Angel Keeper. He forms the HQ option for a second detachment.
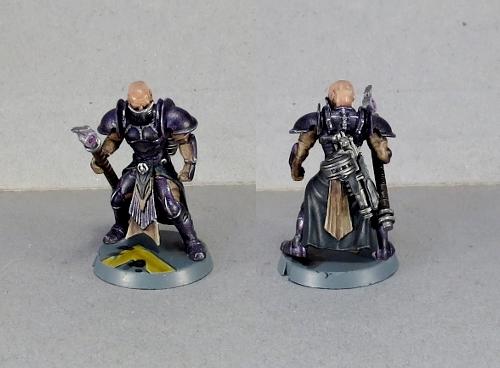
The Keeper is a playtest unit offered up some time ago for those who wanted some extra angel-related shenanigans in their forces. The model is a conversion using parts from a few different kits, as there is no official model (yet!) for it - you can find the conversion tutorial and rules card here.
In the Keeper's charge are a unit of Minnows. These were converted to add some extra motion to their poses, by mixing up the pairing of the wing parts and filling in any resultant gaps with a little green stuff.
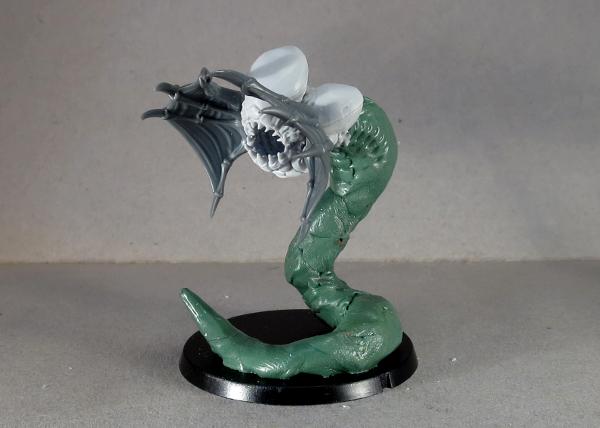
The Minnows' big brother rounds out the second detachment for now. I put together a model of a Mature Angel in its flight form a while ago, and so he had to go into this force. This model was built using the body from the Mature Angel kit, a tail made from green stuff and some wings from a demon model from the Reaper Bones range. You can find a walkthrough of the conversion here
The force all together:
This leaves me with a roster that looks something like this:
Detachment 1
Command: Kaddar Nova - 15 points
Core: Karist Troopers
- Ripper Grenade Launcher - 18 points
Hammer: Tempest Elites
- Hellstorm Energy Mortars - 25 points
Vanguard: Reaper Cadre
- 2 Pulse Lances - 15 points
Detachment 2
Command: Angel Keeper
- Ripper Grenades - 10 points
Core: Angel Minnow Pack - 10 points
Anvil: Mature Angel - 23 points
Total - 116 points.
If you would like to put together your own Karist strike force, you can pick up the various Maelstrom's Edge kits from the webstore here. As always, feel free to share your creations on the Comm Guild Facebook page!
For other Maelstrom's Edge modeling articles, including tutorials and walkthroughs of a wide range of different building and miniature projects, check out the article roundup here.
Terrain Spotlight: The Galactic Wanderer
Posted on Monday Aug 21, 2017 at 05:00pm in Models
- by Iain Wilson
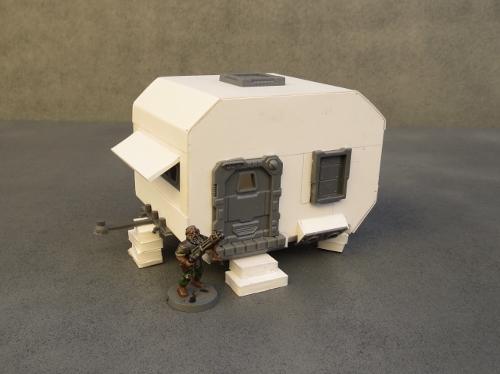
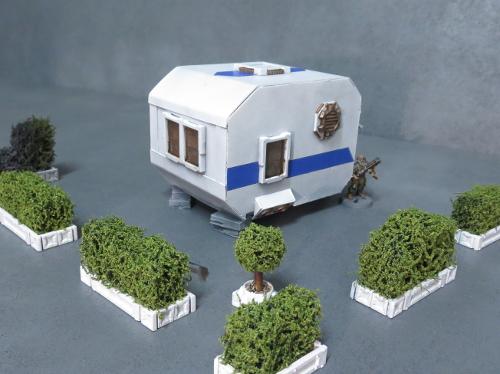
When I shared my Hedge Tutorial a few weeks ago, there was a comment made that they looked like they would be right at home in some sort of scifi trailer park. Well, I'm not one to let a challenge like that go unanswered, and so... the Galactic Wanderer was born.
Like many of my terrain builds, this all started with some foam core and a bunch of parts from the Maelstrom's Edge terrain sprue.
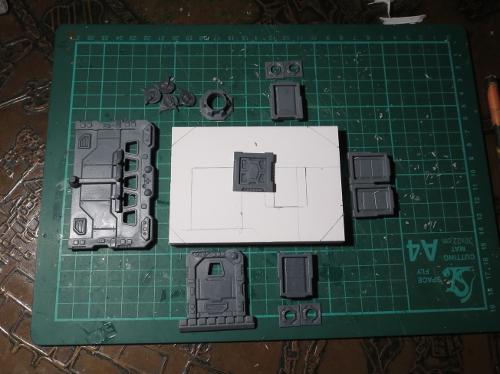
I cut a fairly basic, old-school caravan shape from the foamcore, and cut holes for a door and some windows.
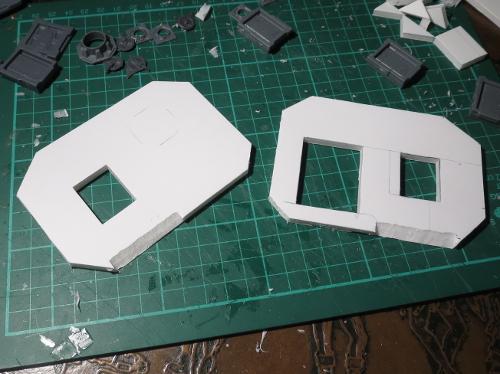
The body of the caravan was glued together with foam glue (a white glue that I picked up a while back. It may well just be overpriced PVA glue, but it does a good job of gluing foam and grabs a little faster than a lot of PVA glues that I have tried) and the door and windows glued in place.
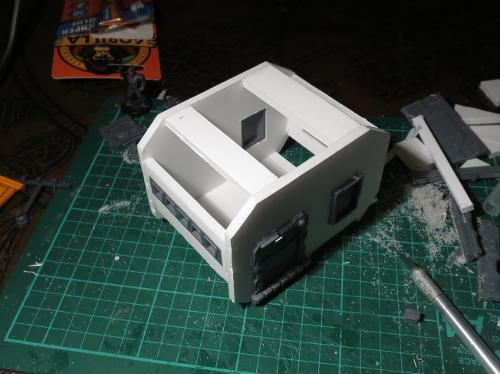
A strip of windows cut from a garage door fit quite nicely along the front wall.
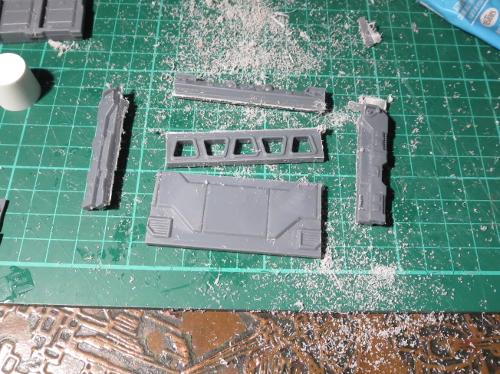
An awning cut from a piece of 2mm plasticard provides a nice break in the regular shape of the caravan, and is totally there for aesthetic reasons and not at all to help conceal the fact that the strip of windows actually wound up just a little bit wonky. I also added a towbar made from a section of old sprue, a hatch in the roof, and rested the construction on some 'bricks' cut from discarded pieces of foamcore.
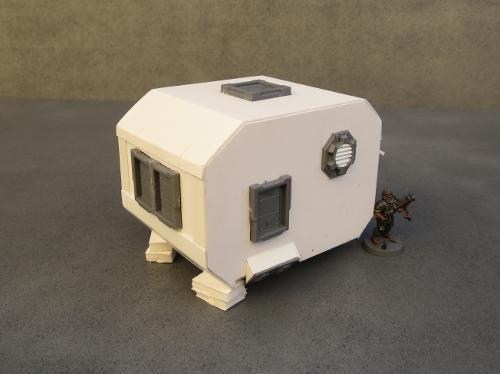
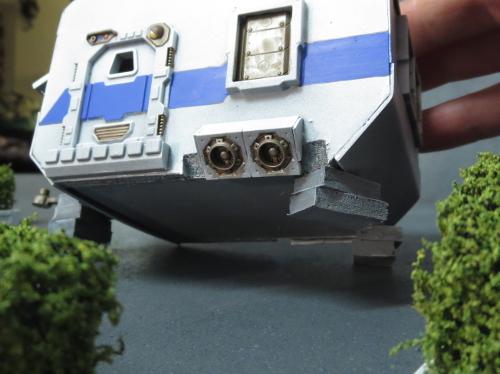
To help with the scifi vibe, unstead of wheels this caravan has some turbines made from the small pipe fitting from the terrain sprue with some turbines from the Epirian Drone sprue behind them. And finally, a large pipe fitting, trimmed off with a razor saw and with some strips of plasticard glued inside provides some ventilation.
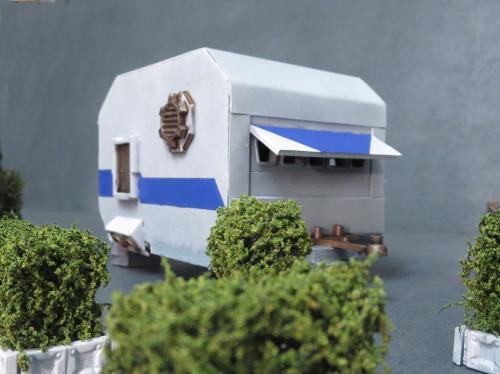
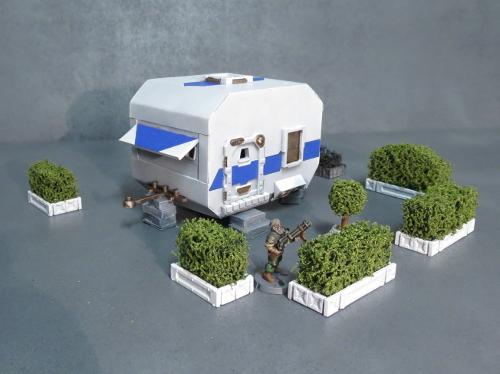
A quick spray and some striping later, and the compact, budget-conscious home of the future is ready for housing stellar refugees or indulging the wanderlust of the more well-to-do.
A better look at the caravan's 'wheels':
To build your own holiday villa or mobile refugee camp of the future, you can pick up the Maelstrom's Edge terrain sprue from the webstore here. As always, feel free to share your creations on the Comm Guild Facebook page!
For other Maelstrom's Edge modeling articles, including tutorials and walkthroughs of a wide range of different building and miniature projects, check out the article roundup here.
Tags: buildings modeling spotlight terrain terrainsprue walkthrough
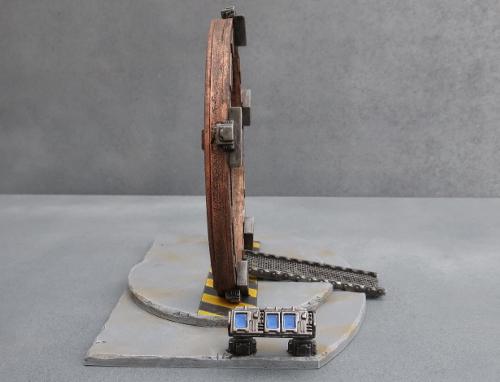
Terrain Spotlight: Experimental Cybel Gate
Posted on Monday Jul 10, 2017 at 05:00pm in Models
- by Iain Wilson
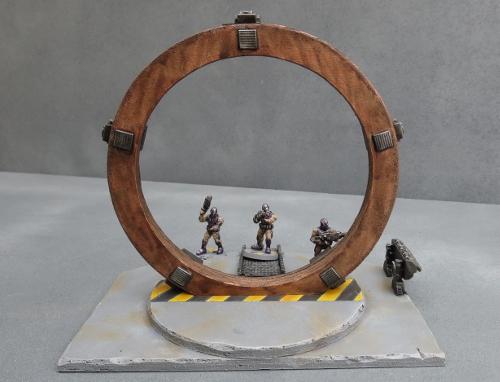
As the Maelstrom's apocalyptic conflagration closed in on the planet Devlin IV, rumours began to circulate amongst those still desperately trying to find passage off-world that scientists in a secret Epirian Foundation facility had been working on a new kind of Cybel gate that might prove to be their salvation. Whilst most Cybel gates are massive, space-borne affairs, this gate would supposedly operate from the planet's surface! While the rumour would ultimately lead to disappointment, as the project had been a dismal failure, it nevertheless gave temporary hope to many who had given up on escaping the Maelstrom's wrath and fueled a frantic search for this device.
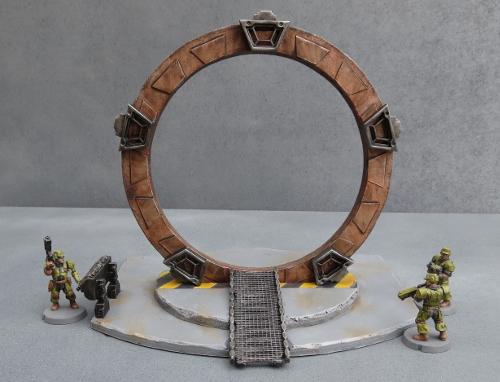
I had an idea a while back for a table themed around a Cybel gate research facility, where the experimental gate would form a centrepiece that would double as both a cool focal point and a potential objective for scenario-driven games. Capturing a resource such as this would, of course, be a worthy goal for any of the various forces encountered in Maelstrom's Edge, and there is all sorts of additional potential for thematic events when the gate is activated. Below is what I came up with, built from foamcore, cardboard, and components from the Maelstrom's Edge terrain sprue.
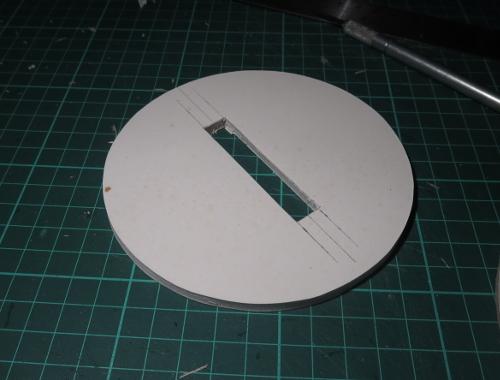
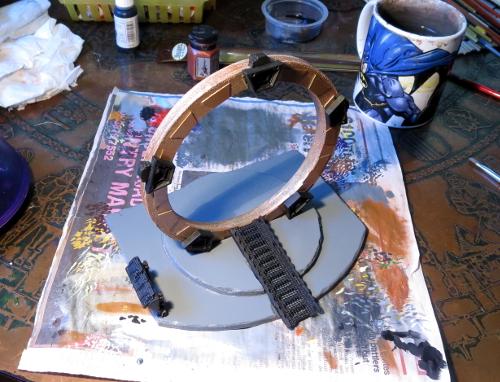
I started out creating the basic shape for the gate by tracing two concentric circles onto a sheet of 5mm foamcore and cutting the resultant ring out with a hobby knife.

I then used the foamcore ring as a template to make two more rings from thick card.

The circle cut from the inside of the foamcore ring was the perfect size to act as a base, with a channel cut down the middle for the ring to sit in.
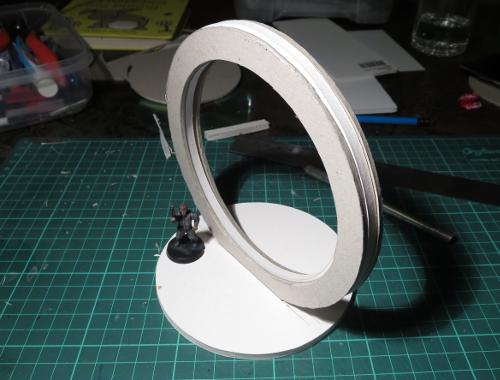
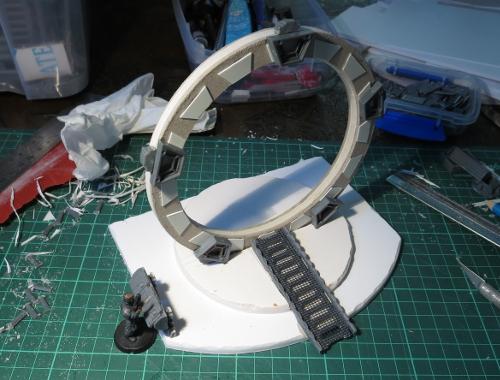
The three rings were glued together, and set in place to check the fit.
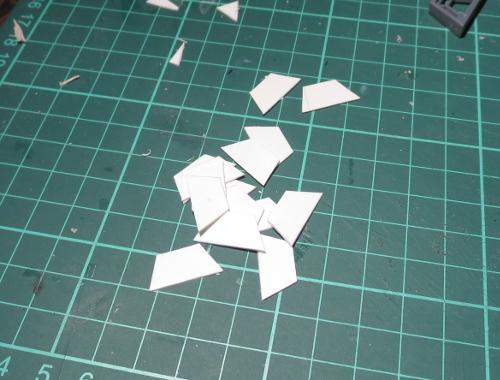
Next, I cut a bunch of trapezoid shapes from plasticard, sized to fit neatly inside the trapezoid window from the Maelstrom's Edge terrain sprue.
These were glued at intervals around one side of the ring.
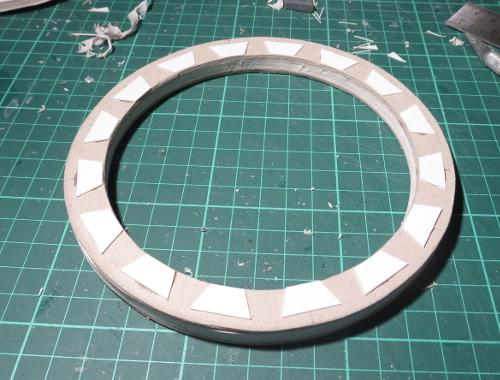
Over these, I glued 5 trapezoid windows, with power units cut from the bottom of the energy-fence posts glued around the outside of the ring.
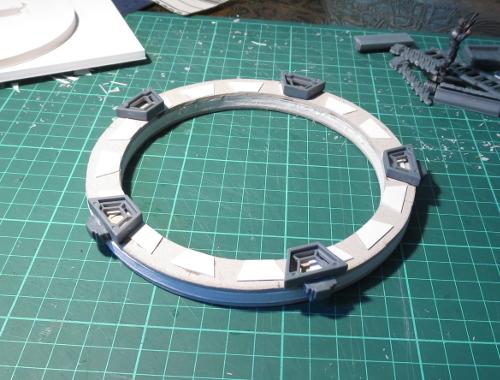
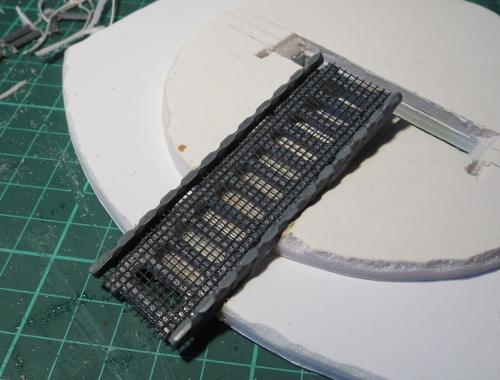
I took a ladder and cut the outside edges off with a razor saw.
A second ladder was glued to a sheet of flyscreen, and then the flyscreen trimmed around the edges of the ladder and the cut pieces from the first ladder glued onto either side.
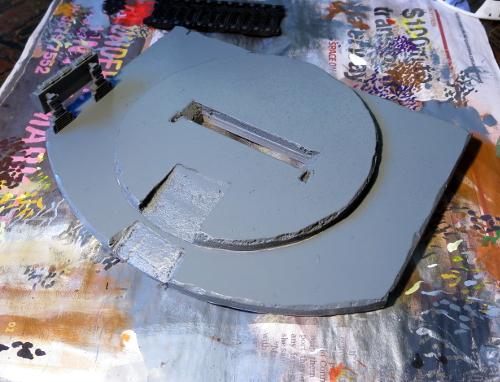
The base was bulked up a little with another layer of foamcore.
I then used a file to carve out an angled ramp down the front of the base.
The ladder assembly slots neatly into the ramp recess.
Finally, I put together a control panel using a light fixture and three trimmed computer panels.
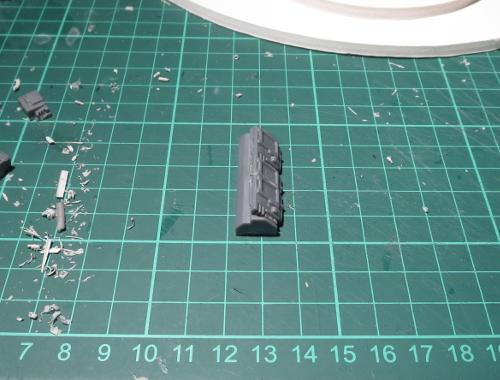
With the addition of some legs made from trimmed down energy-fence posts, the control panel was glued in place, and the gate was ready for painting.
I wanted a bit of contrast in the gate assembly, so decided to go with a coppery ring and darkened steel details. To get started, I sprayed the ring with Army Painter Army Green, partly to give a nice base layer for the copper and partly because I didn't have a lot of time for painting this week, and the Army Painter sprays dry nice and quickly...

Over the green, I did a couple of coats of some old Citadel copper that I had laying around.

The base was sprayed with a medium grey colour.
I then picked out the steel parts with black. It's a little hard to see in this lighting, but I also drybrushed the base with a light grey and added some dirt scuffing with some lightly drybrushed brown.
The ring was given a couple of coats of Army Painter Strong Tone, and the steel parts drybrushed with P3 Pig Iron and then washed with Army Painter Dark Tone.
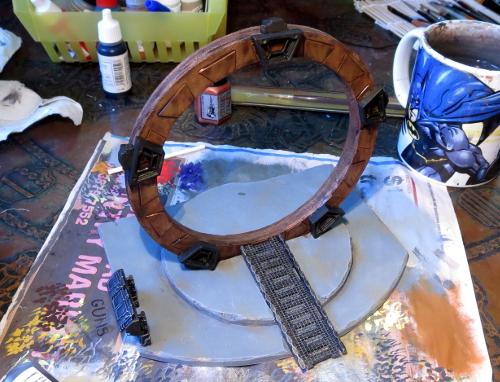
Finally, the control panel screens and some hazard lines were added, and the ring was given a light drybrush with silver to lift the edges a little.
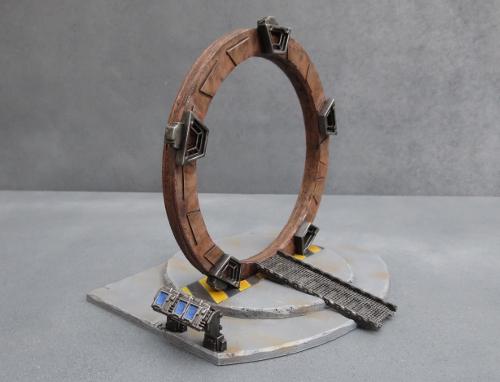
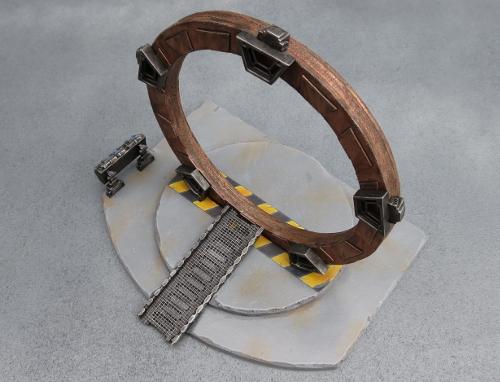
If you would like to build your own experimental Cybel gate, you can pick up the Maelstrom's Edge terrain sprue from the webstore here. As always, feel free to share your creations on the Comm Guild Facebook page!
For other Maelstrom's Edge modeling articles, including tutorials and walkthroughs of a wide range of different building and miniature projects, check out the article roundup here.
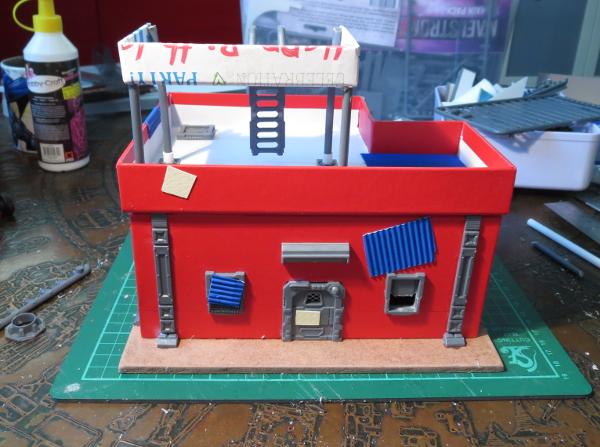
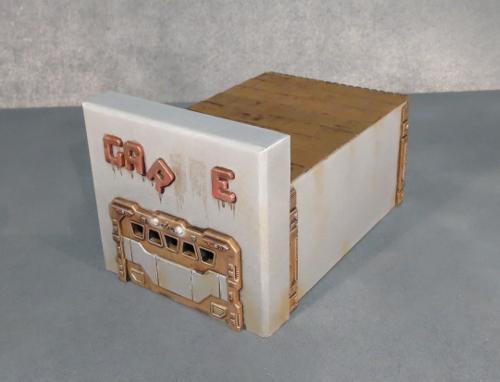
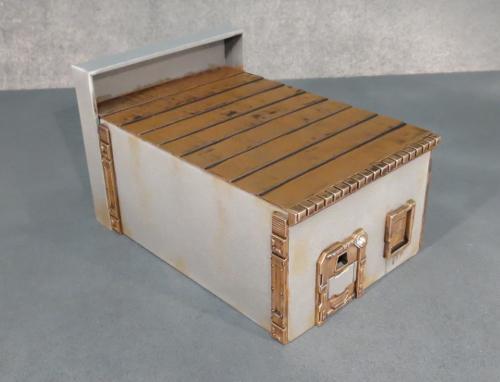
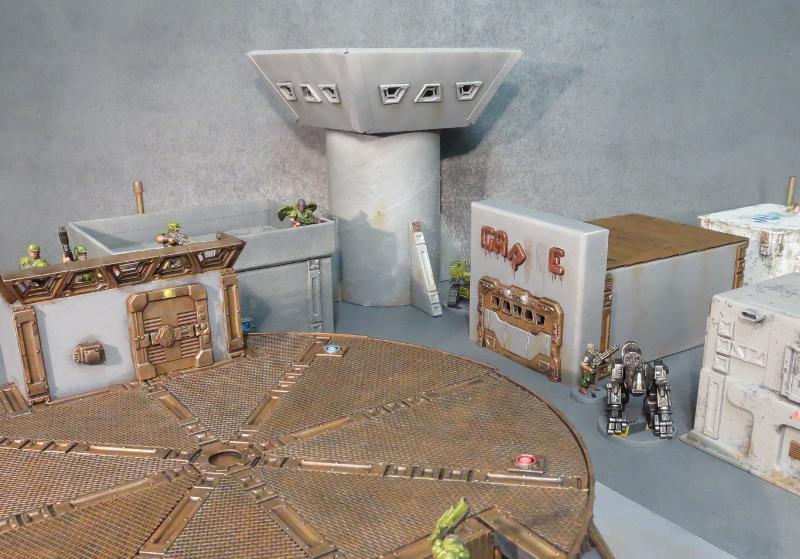
Terrain Spotlight: Giftbox Garage
Posted on Monday Jul 03, 2017 at 05:00pm in Models
- by Iain Wilson
A while back, I shared a scifi western-themed building constructed from a Plast Craft Games plastic kit and the Maelstrom's Edge terrain sprue. This week, I wanted to have another try at that vaguely-western, raise-facade, scifi styling, but with more of a mass-produced, cheap colony building sort of vibe. Something a little more urban, but with a nod back to the frontier. This is what I came up with:
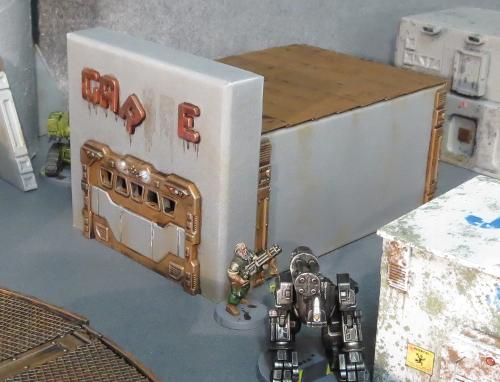
This is built from one of my favourite bases - the good old cardboard giftbox.
You can pick these up from just about anywhere that sells giftwares or from many craft shops, and they're generally fairly inexpensive. Craft shops will also often have raw cardboard versions without the printing on the outside, which does have the bonus of looking slightly less hideous while you're putting it together, but can have a rougher surface texture.
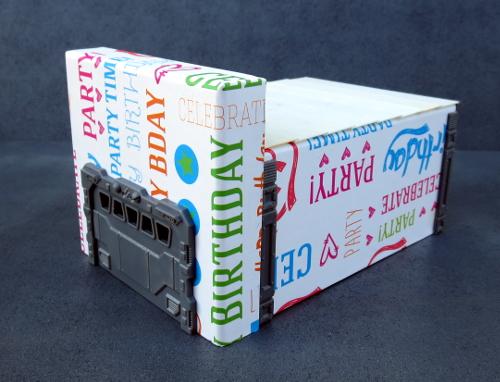
For my previous giftbox buildings, I used the lid upside down on top to form a walled-in roof area. This time, I used the lid for the facade. So the first step was to cut the lid to the height that I wanted the front of the building. I also cut away the end wall of the box, so that the hole for the front door only needed to go through the facade - The door inset is deeper than the width of the card, so would I otherwise have needed to cut a second door hole in the end of the box and hope that they lined up properly.
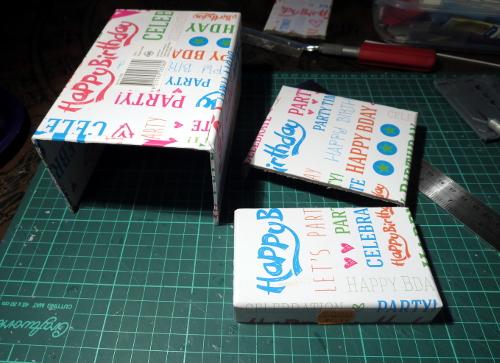
Speaking of a door hole: I took the garage door from the terrain sprue, sat it in place against the facade, and traced around the back of it before cutting out the resultant rectangle. The garage door was then glued in place.
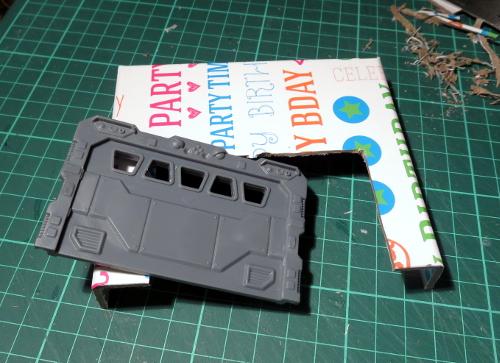
The same process was used on the intact end of the box to add a small door and shutter window from the terrain sprue.
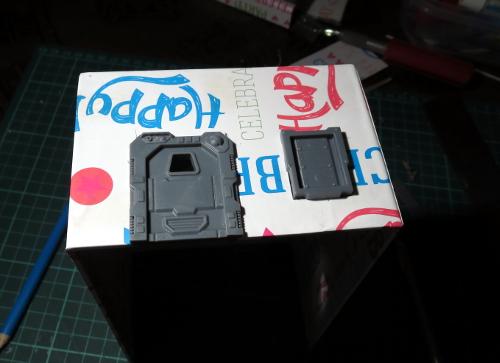
The facade was then glued in place.

I glued a couple of support struts onto either side of the building, for a little texture.
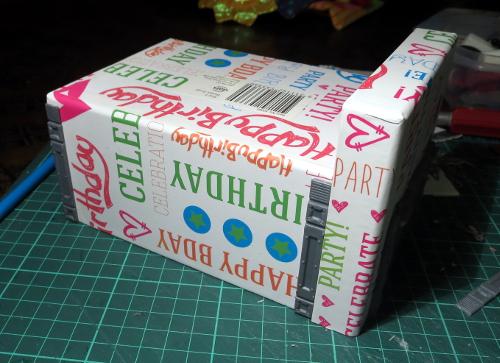
A row of lintel pieces from the terrain sprue were glued onto the top edge of the back wall.
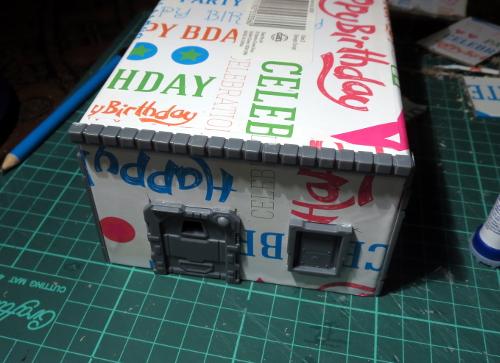
I then layered strips of plasticard along the roof, working up towards the front of the building.
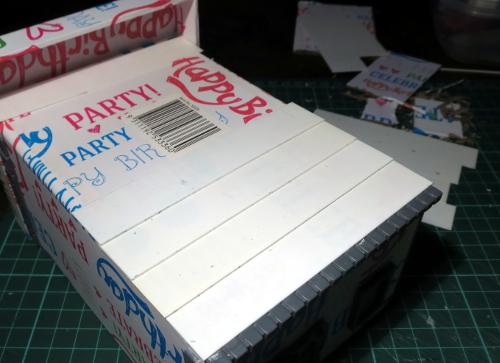
The final building, ready for painting:
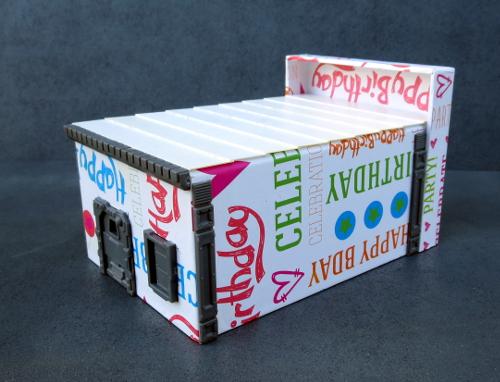
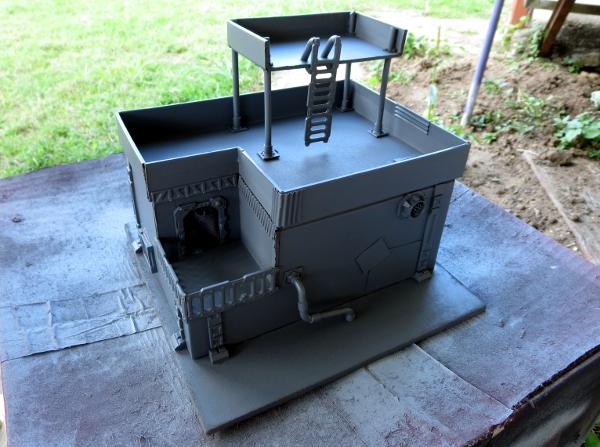
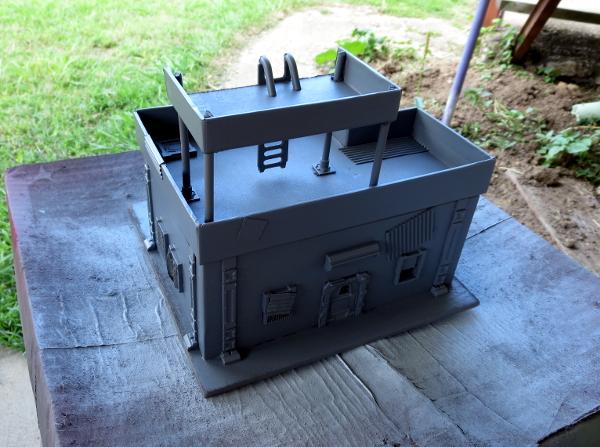
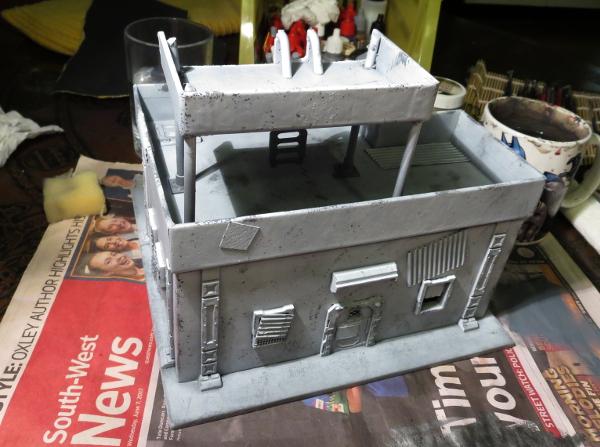
Quick and easy paintjob, that will be quite familiar for anyone who has been following these articles. I started with a black spray undercoat, to give a solid layer to cover over the printing.
This was followed by a spray of flat grey, and while this was still wet I oversprayed this from above with a lighter grey to add a little bit of a natural highlight.

The metal parts were then picked out with Vallejo Beasty Brown.
Then a drybrush of P3 Pig Iron.
Then a wash of the most useful paint on the planet: Army Painter Strong Tone.
A final drybrush of silver over the metal bits and some detail work, and the newest addition to the table is ready to go.
This design can be very easily tailored to different buildings through using different sized boxes and choosing different sprue components. If you would like to build your own, you can pick up the Maelstrom's Edge terrain sprue from the webstore here. As always, feel free to share your creations on the Comm Guild Facebook page!
For other Maelstrom's Edge modeling articles, including tutorials and walkthroughs of a wide range of different building and miniature projects, check out the article roundup here.
Tags: buildings conversion modeling spotlight terrain terrainsprue tutorial walkthrough
Terrain Spotlight: Comm Tower
Posted on Monday Jun 05, 2017 at 05:00pm in Models
- by Iain Wilson
One of the things I really enjoy about working with the Maelstrom's Edge terrain sprue is that with a little imagination and a sharp knife, there are so many potential uses for most of the parts. I think I've used the ladders, energy fences and pipe fittings far more as other things than I have for their original purposes.
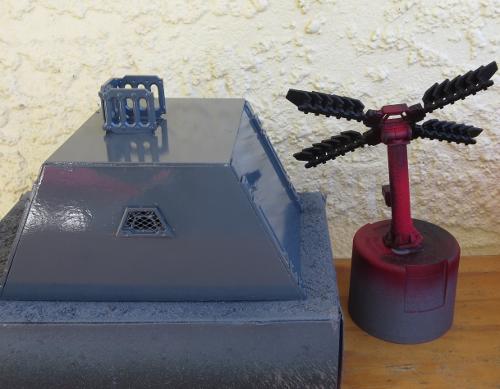
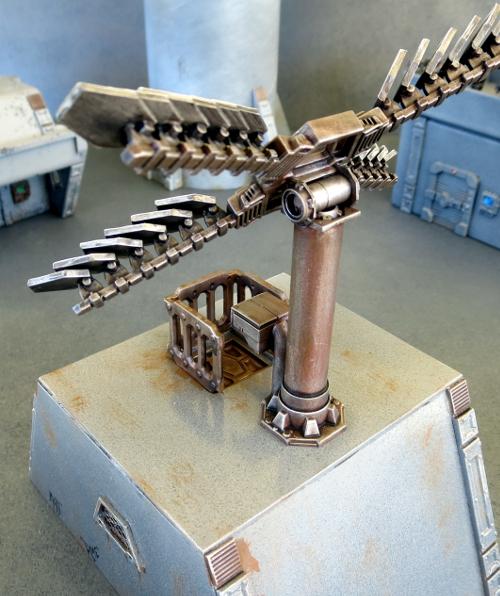
This week's build is no exception, as I had a bit of a brain-flash as I was looking at the energy fence posts and decided to build a communications array!
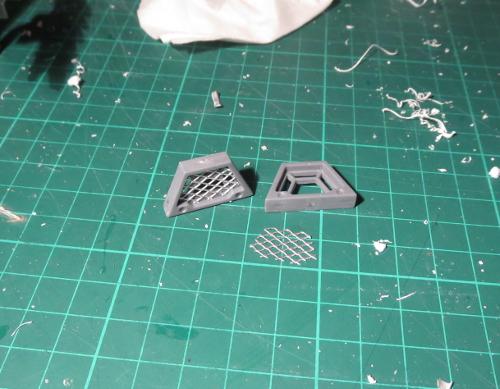
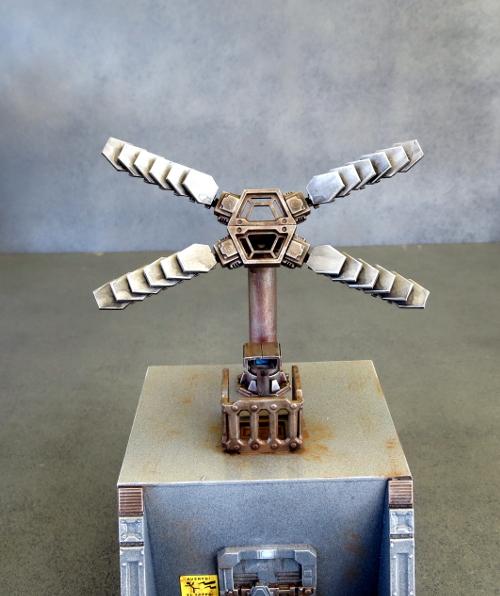
The main focus of this terrain piece is, of course, the cross-shaped array on the roof. The transceiver panels on this array are each built from a fence post and a series of hexagonal shapes cut from a sheet of plasticard. I cut a few test panels from cardboard to get the size and shape right, and then used one of those cardboard testers as a template to mark out the plasticard.
Once cut and cleaned up, the panels had a small length of plastic rod glued to the back, and then glued in place onto the fence post.
The four resultant transceiver arms were glued onto a pair of trapezoid windows to form the array. I sat this on a post made from plastic tubing and some pipe fittings, with a control panel mounted on the front for servicing and fine-tuning - because as any sci-fi buff would tell you, intergalactic regulations require any piece of important equipment to have a control interface positioned somewhere accessible from outside, but exposed to enemy shooting.
The array obviously needed something to stand on, so I made a basic building frame out of foamcore.
I set a hatch into the roof, and surrounded this with a railing made from a cut-up ladder - because while the control panel needs to be exposed, the Epirian Foundation still (on paper, at least) follows strict OH&S standards.
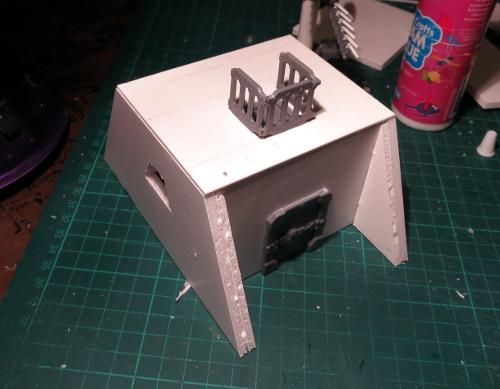
I wanted to use trapezoid windows in the sides of the building, to tie back to the shapes in the array, but they needed to look different to the array centre to reduce the number of people looking at the building and asking why it had windows on its aerial. So I cut some pieces of aluminium mesh to fit snugly inside the window frames.
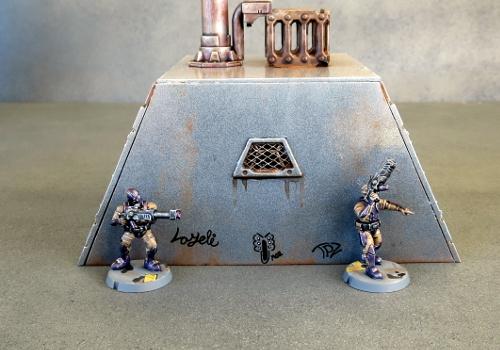
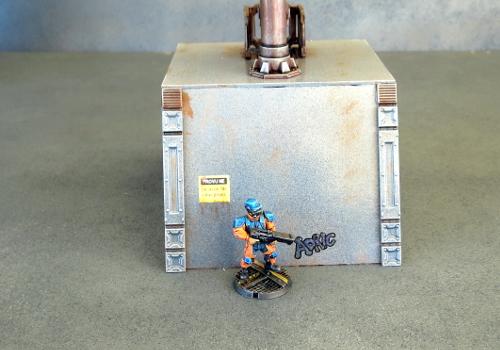
With everything glued in place, the comm building looks like this:
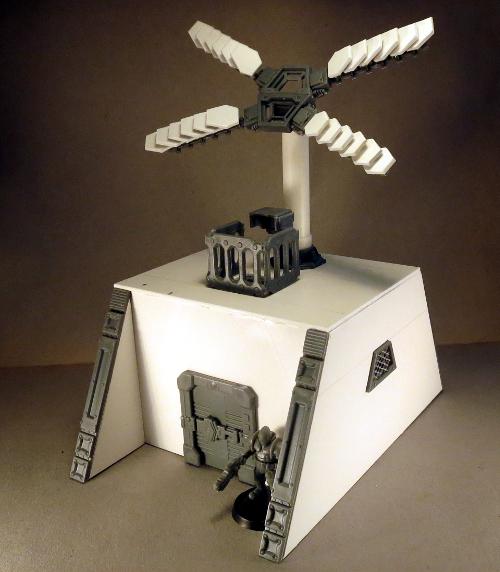

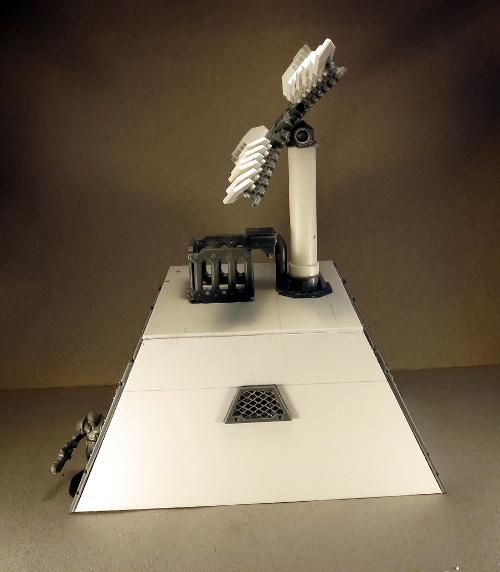
I kept the painting on this one a fairly simple grey, to match some other terrain from previous articles. The building section was sprayed with a medium grey undercoat, and the array sprayed red on the less important parts and black on the transceiver plates and 'moving' parts.
The building then had a light spray with a lighter grey, pitched from above so that the darker grey would stay in the indentations and form some natural shadows. The array and the metal parts on the building were painted using the weathered metal recipe from the article here. Then I finished up with weathering added with drybrushed brown, the door light and control panel screen painted in blue, and then added a couple of printed signs and some fineliner graffiti on the side and back walls.
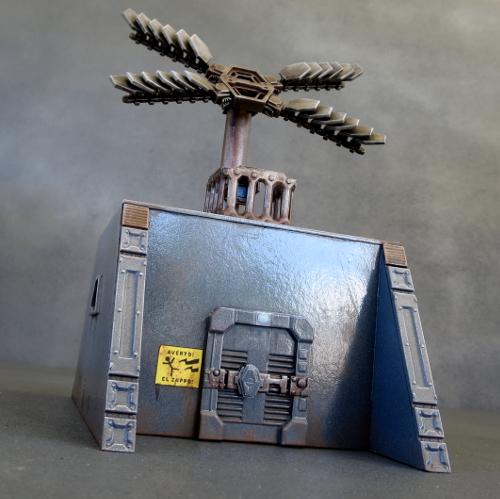
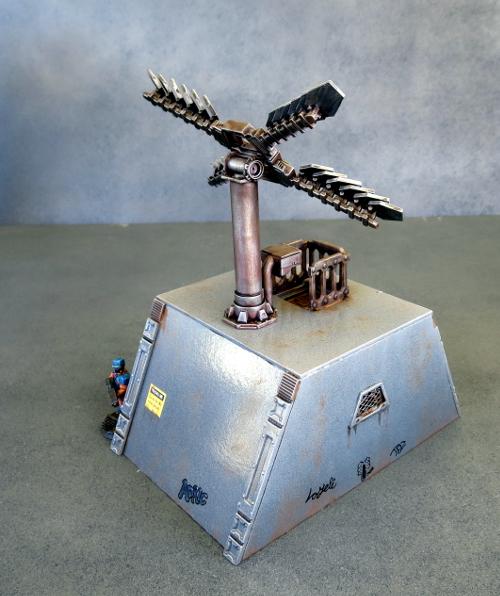
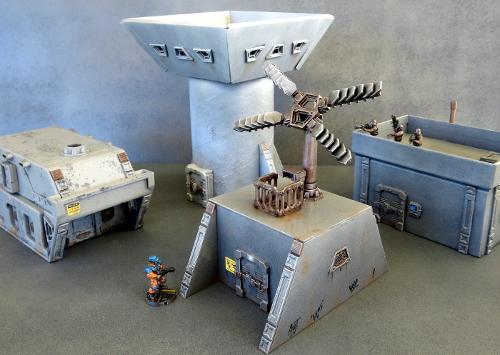
A cheery, grey city in progress...
If you would like to build your own communications array, you can pick up the Maelstrom's Edge terrain sprue from the webstore here. As always, feel free to share your creations on the Comm Guild Facebook page!
For other Maelstrom's Edge modeling articles, including tutorials and walkthroughs of a wide range of different building and miniature projects, check out the article roundup here.
Tags: buildings modeling models spotlight terrain terrainsprue walkthrough
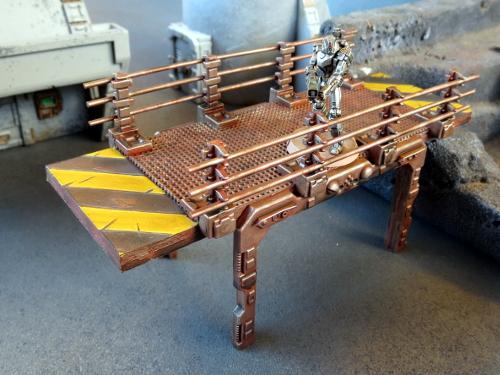
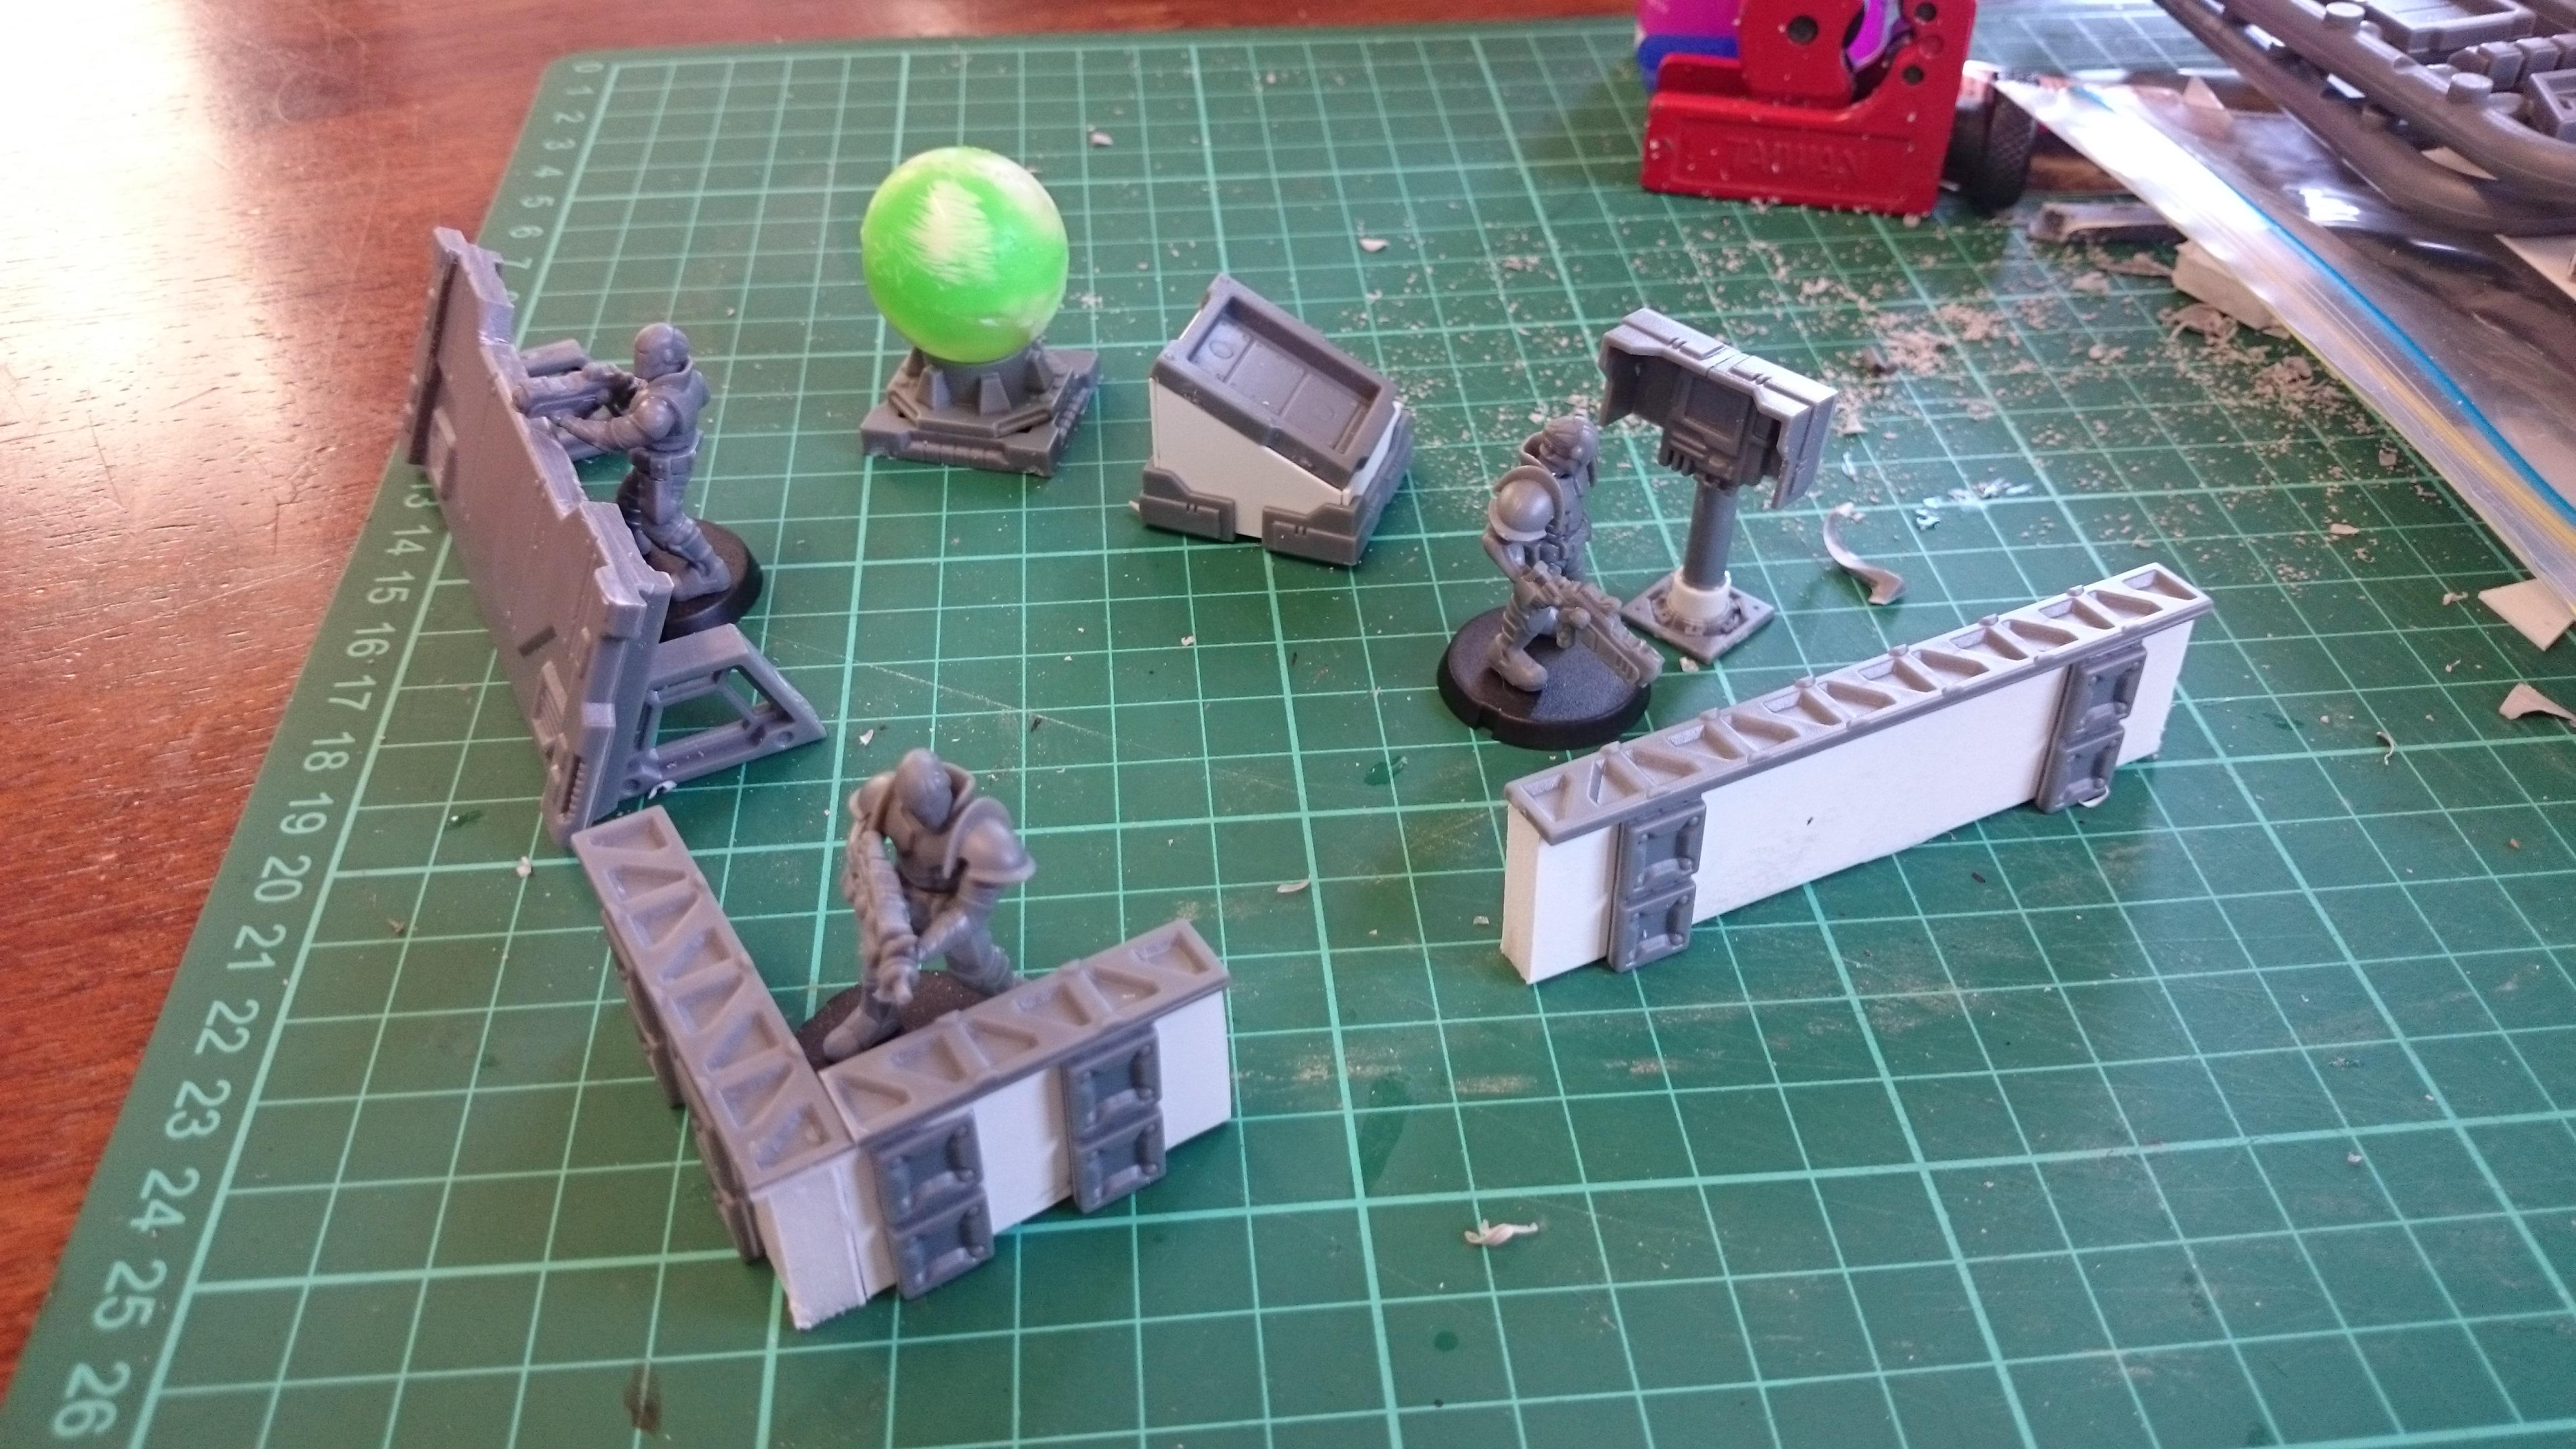
Terrain Spotlight: Catwalks
Posted on Monday May 22, 2017 at 05:00pm in Models
 - by Iain Wilson
As the Maelstrom creeps inexorably across the galaxy bringing Armageddon to world after world, many wars are fought in the shadow of once great cities. Where once were towering beacons of hope, the shining pinnacle of human endeavour, now lies ruin - seething hives of scum and villainy where only the strong survive.
For those inclined to less flowery prose: I thought it might be fun to explore what could be done to create multi-level terrain using the Maelstrom's Edge terrain sprue, for games set within the gloomy nether regions of gigantic cities on those worlds where everything has just gone a little bit wrong. Within these cities would be various tall structures linked by ladders and catwalks - essential if you want to get around without having to leap onto the roof of a passing taxi!
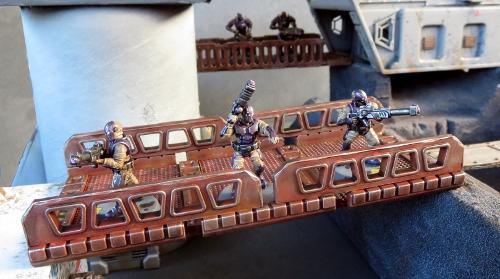
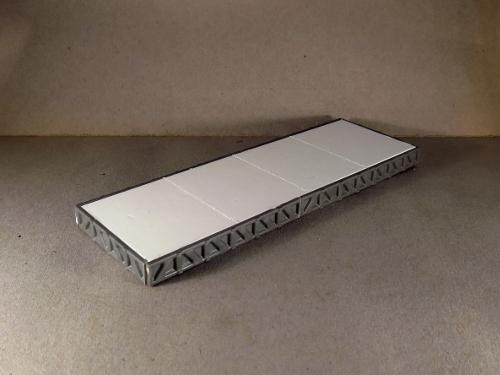
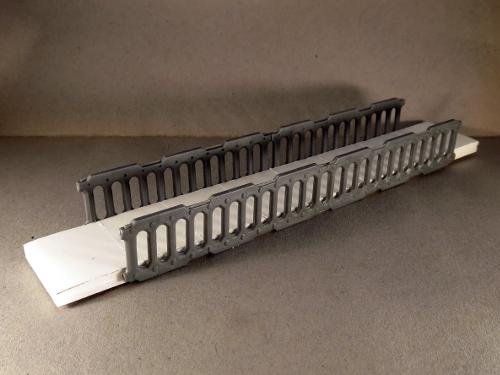
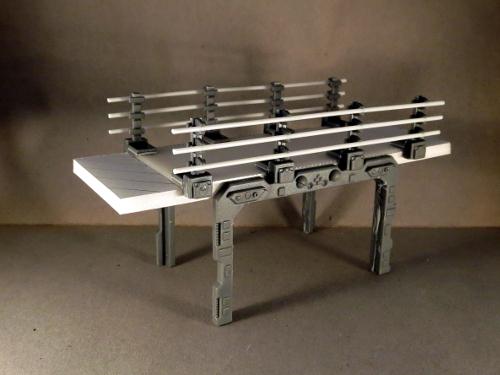
So this week, I'll be presenting a few ideas for different ways to construct catwalks to link your buildings together. Starting with the bare bones, Evil-Overlord-thinks-minions-don't-deserve-handrails version:
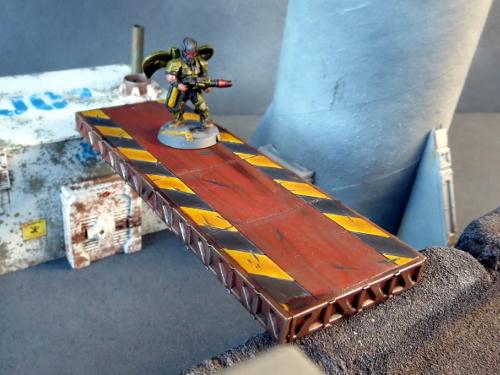
This is simply a strip of 5mm foamcore cut to an appropriate length, with some panel lines scored across at intervals with a razor saw (you could do the same with a hobby knife, but the saw helps to keep a consistent width and depth). The edges are covered up with reinforcing struts from the Maelstrom's Edge terrain sprue.
For the slightly more OH&S-conscious city builder, here's example 2:
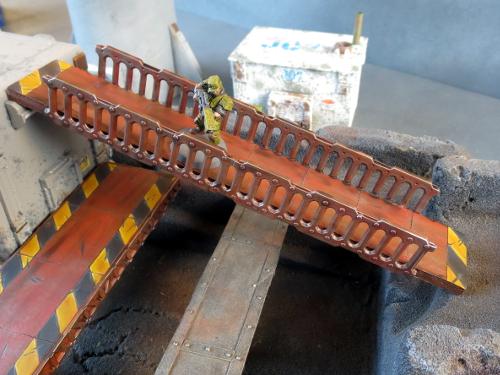
This is another strip of 5mm foamcore, but this time I've used ladders from the terrain sprue glued sideways along the edges to create handrails.
This catwalk is also a little narrower than the first. Varying the width of your catwalks allows for some visual variety, and also mixes up how the catwalk will function in-game, by changing what can fit on it, and whether or not troops will be able to easily block off enemy advances along it.
For something with a little more texture, example 3:
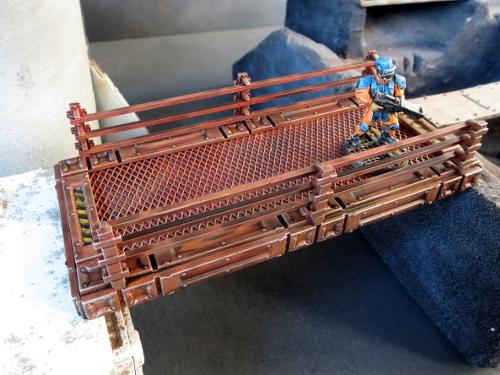
This one starts with another strip of foamcore, but this time I have glued a sheet of aluminium mesh to the top. Support struts from the terrain sprue are cut to size and glued around the perimeter of the top to hold the mesh down and cover the cut edges, and more support struts run around the outside edge of the foamcore to pretty things up.
The handrails are made using the top halves of half a dozen energy fence poles, with the railings cut from lengths of 1.5mm x 2mm plastic rod.
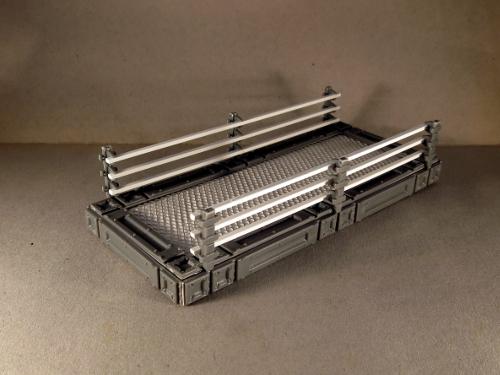
For a break from foamcore, the base of the catwalk can be made from plasticard or sturdy cardboard:
This catwalk uses 1.2mm plasticard, with some embroidery mesh cut to size and glued on top to add some texture, interspersed with support struts from the terrain sprue. The handrails are made from lintel pieces from the terrain sprue topped with leftover window strips cut from doors I used a few weeks back for barriers in my scatter terrain article.
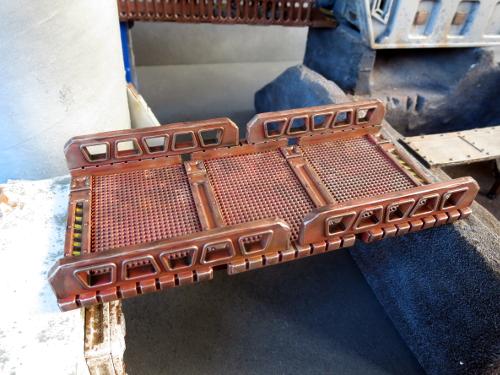
And finally, the freestanding version:
Back to the foamcore for this one, with the embroidery mesh once again providing some detail on the top. The handrails use the bottom halves of the fence posts used for the 3rd catwalk, with railings made from 1.6mm round plastic rod. The legs are door frames that were also left over from the scatter terrain article.
These are obviously just scratching the surface. You can easily mix up these designs by changing the dimensions or detailing. Replacing the foamcore with sturdy mesh gives you a more open, industrial style. You could even build some junction pieces and lay out catwalks on the table for a space corridor bug-fight!
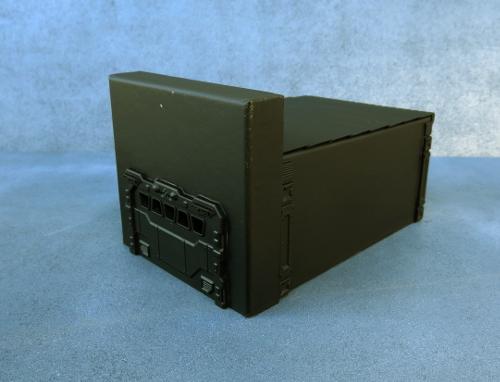
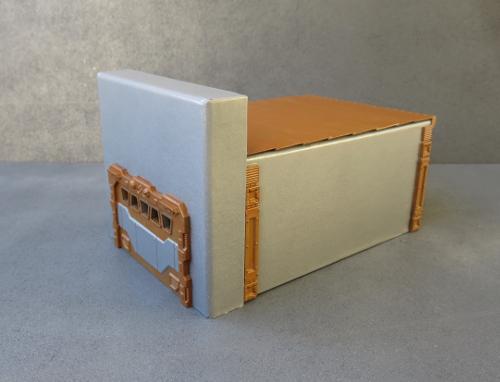
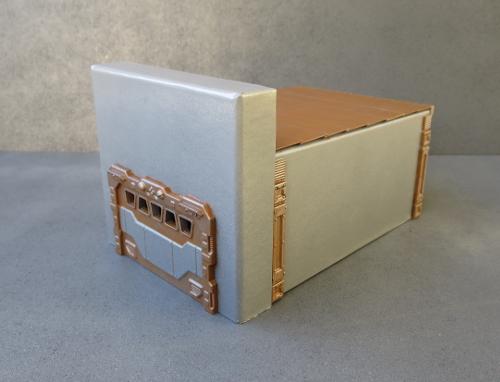
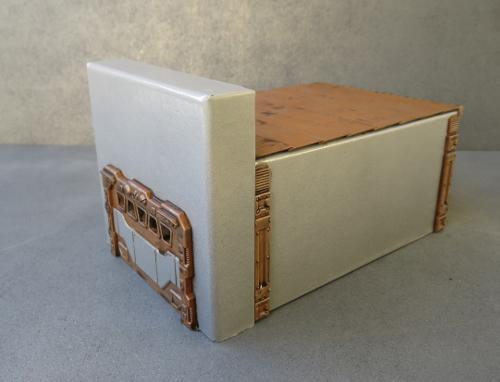
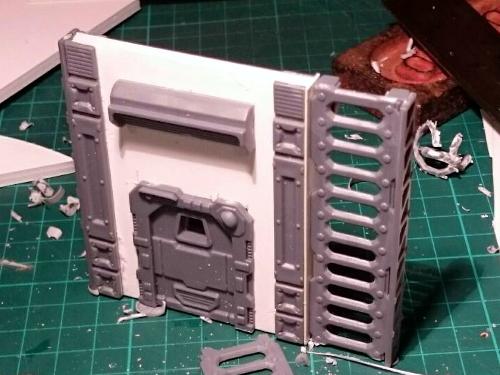
Where to from here? One of my next projects will be to create some matching buildings to hang these off, based around modular bulkheads like this:
If you're feeling inspired and need more catwalks in your life, you can pick up the Maelstrom's Edge terrain sprue from the webstore here. As always, feel free to share your creations on the Comm Guild Facebook page!
For other Maelstrom's Edge modeling articles, including tutorials and walkthroughs of a wide range of different building and miniature projects, check out the article roundup here.
Tags: buildings conversion modeling spotlight terrain terrainsprue walkthrough
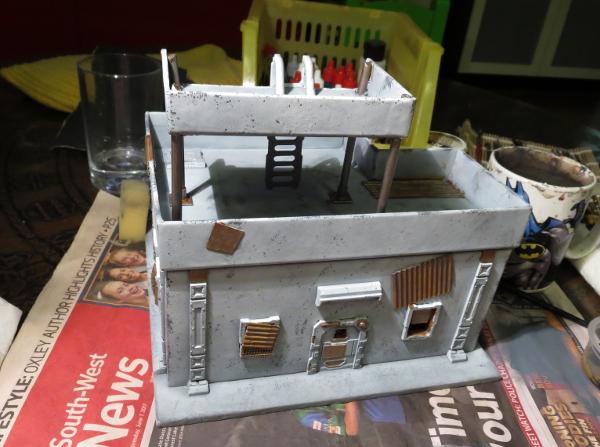
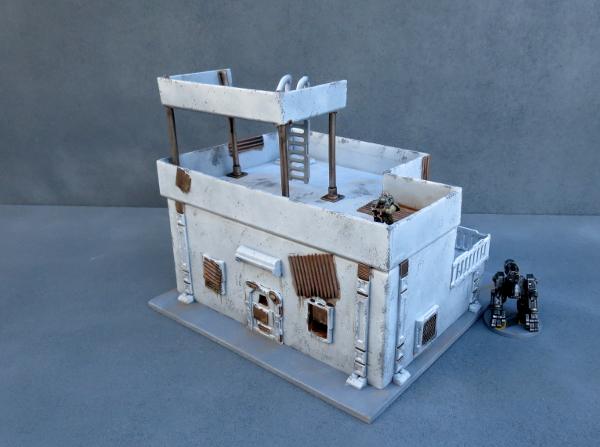
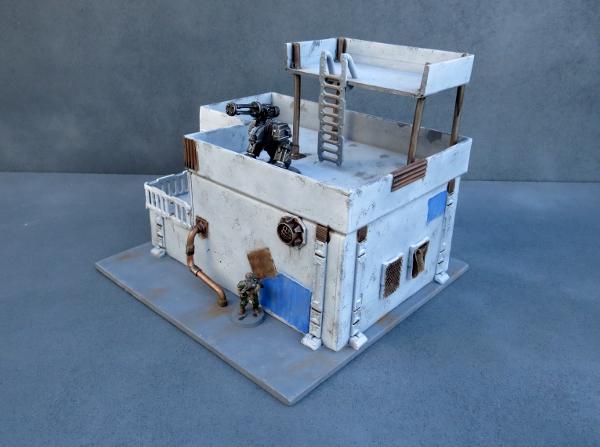
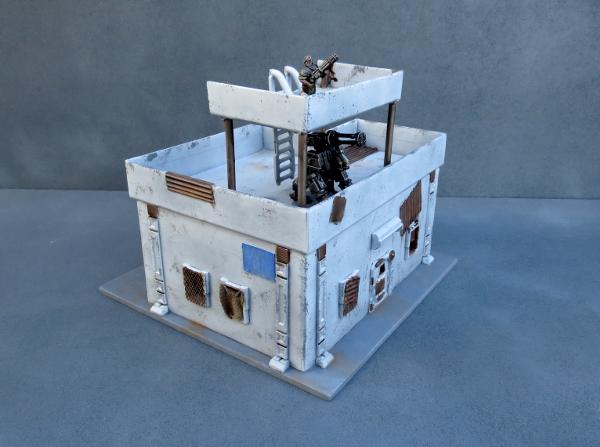
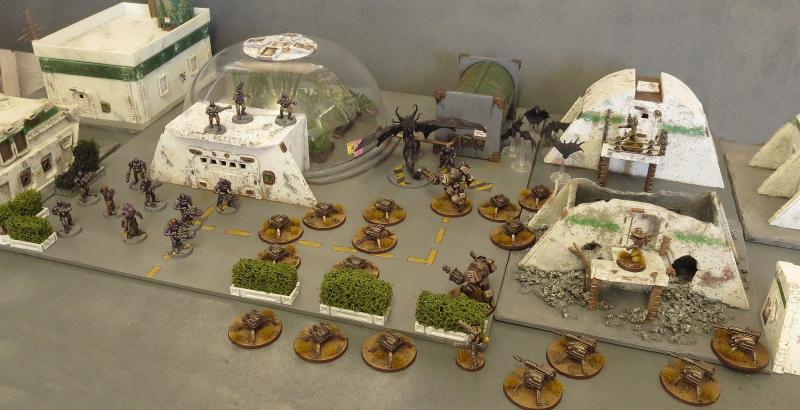
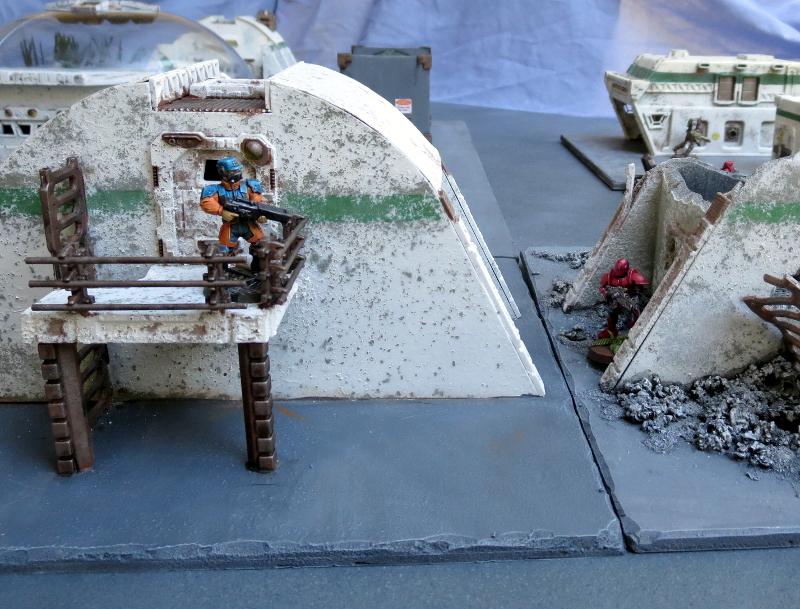
Terrain Spotlight: Welcome to Hamilton!
Posted on Monday Mar 27, 2017 at 05:00pm in Models
- by Iain Wilson
The frontier world listed in the Epirian Foundation directory as PG-4215 [designation pending] is a barely-habitable planet on the outer fringe of populated space. At the time the Maelstrom approached the system, PG-4215 possessed a single official settlement, known as 'Research & Terraforming Implementation Facility Alpha' by the Foundation and as 'Hamilton' by those unfortunate enough to have been posted there.
With PG-4215's few small, equatorial landmasses being hot, dry, and generally unpleasant, Hamilton's small population very early on had committed themselves to paving over and urbanising as much of it as possible.
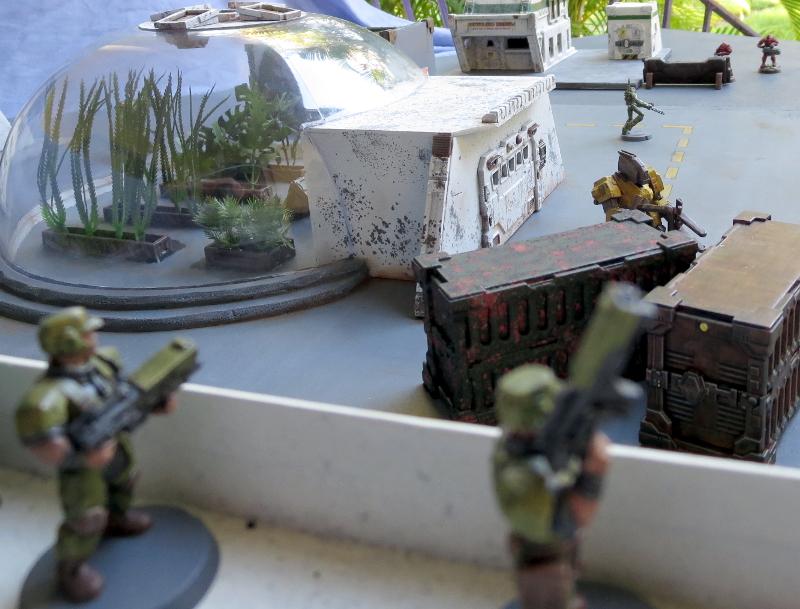
Oblivious to impending conflict, an Epirian cargo drone shunts shipping containers for unloading.
Hamilton is the first table setup that I've finished off so far for my own Maelstrom's Edge games. I've used it somewhat as a test-bed for trying out different ideas, with the end result being a bit of a hodge-podge of styles.
Taking up position on the roof of the refectory, the squad watches an automated uplink relay trundle down the laneway.
Buildings have been constructed from a range of different materials, with the components from the Maelstrom's Edge terrain sprue helping to tie it all together into a more-or-less coherent whole. The building above is made from a cardboard giftbox with the lid flipped upside down.
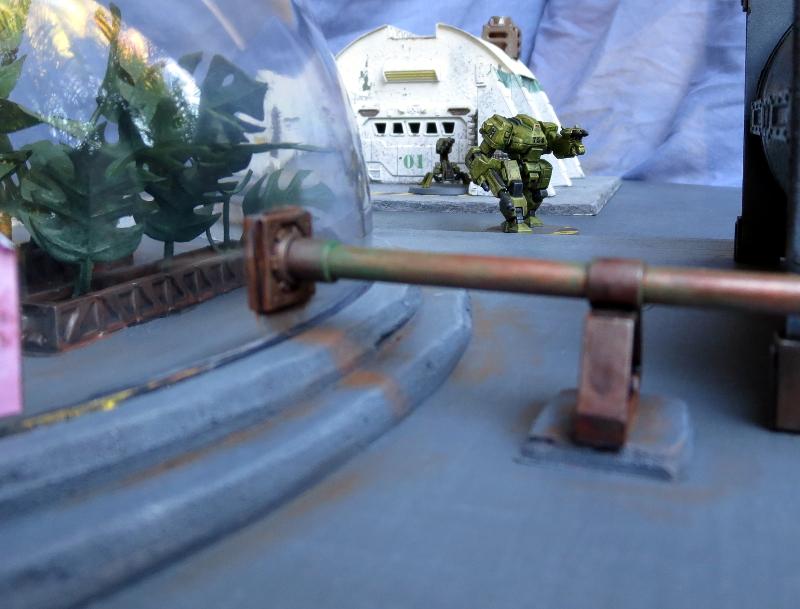
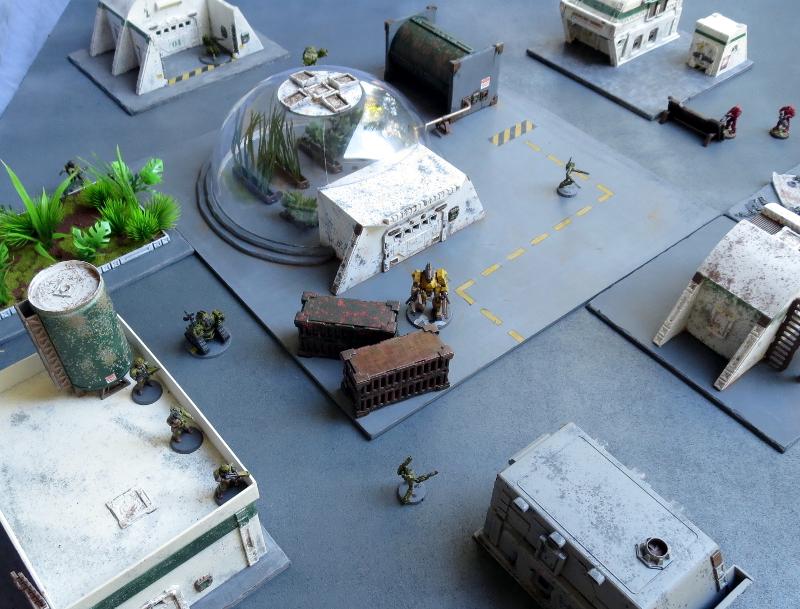
In the distance, past the plantation dome, a squad of heavy armoured Karists approaches, weapons at the ready.
The plantation dome was constructed from a plastic salad bowl, with foamcore used for the enclosed area at the front. You can see how this was put together in the walkthrough here.
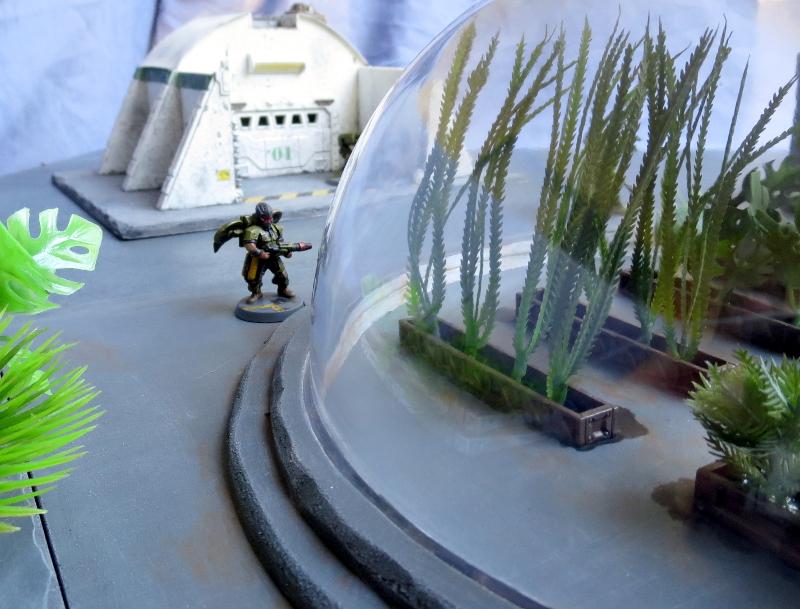
A Warden conducts a routine maintenance check on the exterior of the planation dome.
Trimmed-down and repainted aquarium plants were used for the plantation beds inside the dome. In the background is one of my first foamcore constructions.
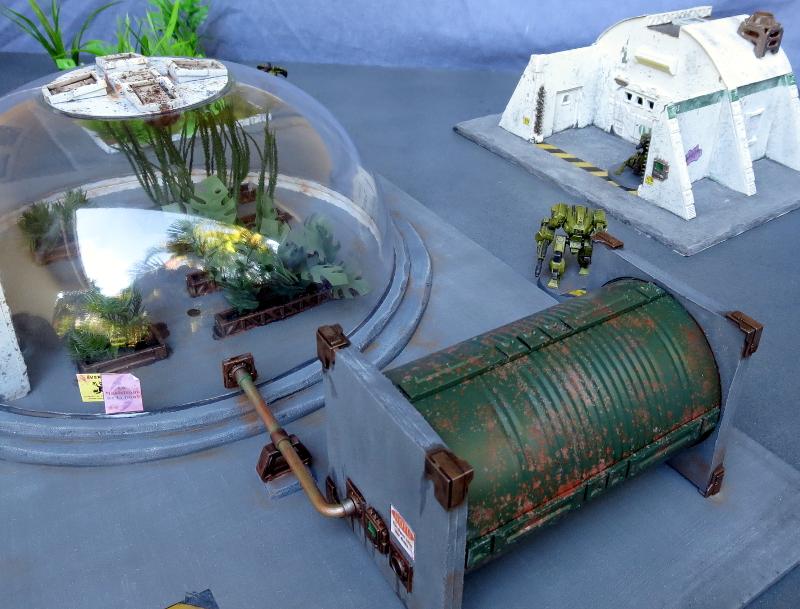
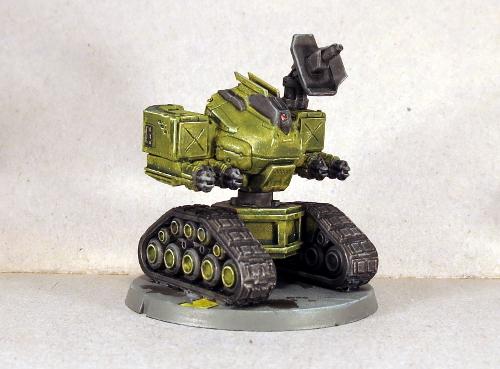
A Hunter warmech on patrol.
Cover is extremely important in Maelstrom's Edge, so wherever possible I have tried to include protruding elements for models to potentially hide behind, as can be seen in the buttressing on the building behind the Hunter.
A Scorpion drone lurks in the courtyard, awaiting instructions from its Handler.
Of course, some details aren't particularly useful for cover, and are just there to look pretty.
On the other side of town, a Hunter on loan from the Swamp Research Team surveys the laneway.
Painting has mostly been kept fairly simple, with the buildings all painted white with some salt weathering to make them look like they've been exposed to the elements on an unfriendly world. I wanted a unified colour scheme to help tie the disparate buildings together, so they would look like the town was cobbled together from various sources, but would still look like it was purpose built for a single organisation.
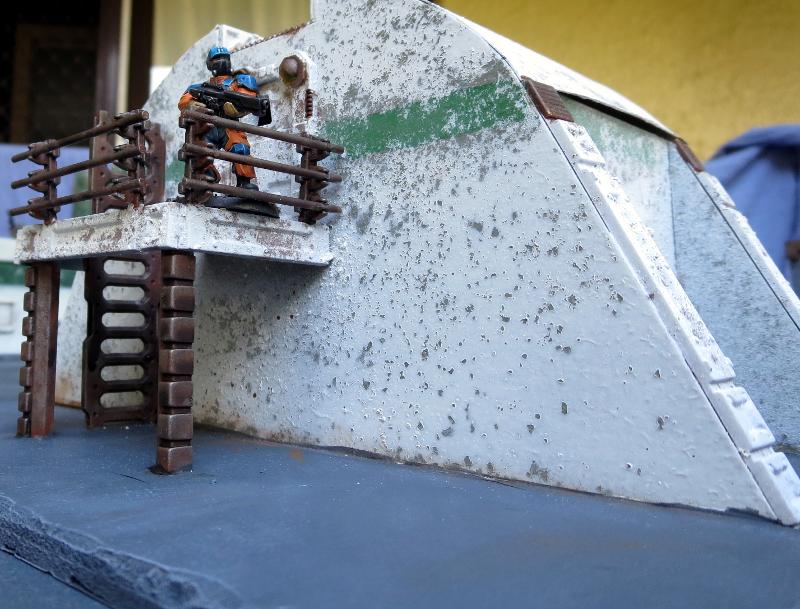
Lieutenant Bob takes up position on the balcony.
Variations on a basic design can help create a 'kit-home' look, with some different buildings that all clearly belong together. The above building was constructed using a similar template to the first foamcore structure, but with the courtyard removed and a balcony added. You can see the construction of this building in a short video here.
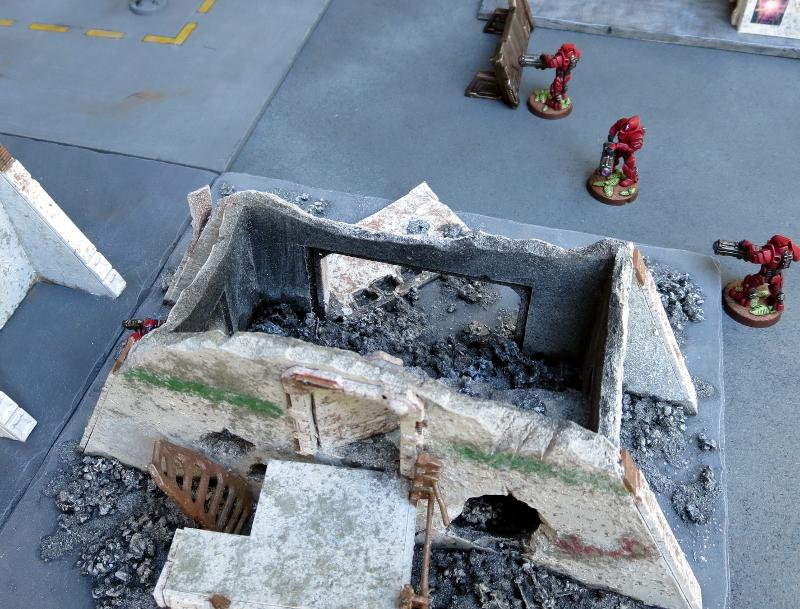
The Karists advance.
If you're aiming for an urban-themed board, it's a good idea to add in some area terrain elements rather than just having a table filled with solid buildings, as this mixes things up a bit for movement and cover. The same template used for Lieutenant Bob's balcony building was used to create a ruin, just by cutting off the roof, bashing things up a bit and adding some rubble on the base.
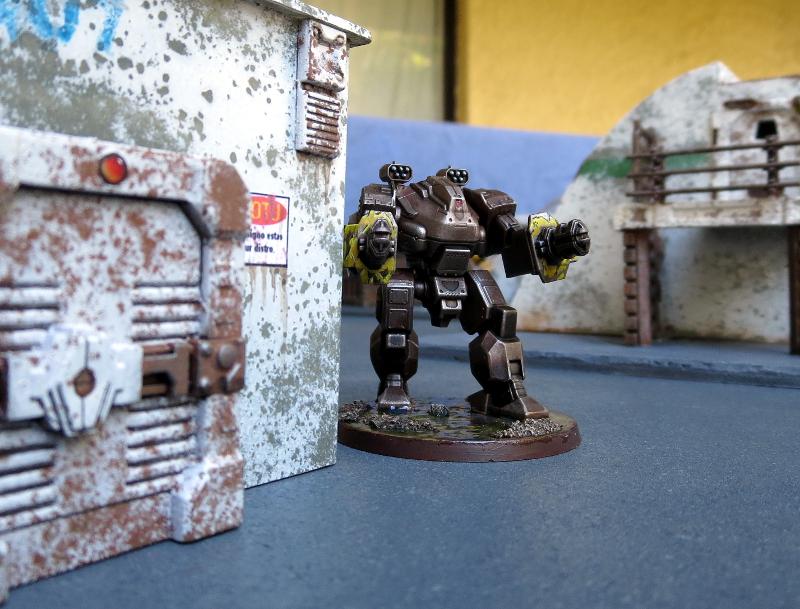
A lone Karist trooper lurks between the buildings.
In the background above you can see another building made from a plastic storage tray. Check out the build video here.
Scarecrows move to intercept the intruders.
Playing on a themed table is a great way to bring your games to life, as it helps to create the illusion of an actual battlefield, rather than just having a random assortment of different terrain.
Despite imminent conflict, Bob can't resist trying out his new camera drone...
Still to do: I have several more buildings still on the workbench for this board, including a bot storage building and some more small multi-purpose buildings. I'd also like to add some sort of water-treatment pond. This will help to expand out from 4'x4' to a more rounded 4'x6', which is better for standard games. It would also benefit from the addition of more scatter terrain to break up the firelanes a little, which will be my next terrain project:
All of the decorative elements on the buildings shown here are from the Maelstrom's Edge terrain sprue. You can find this in a handy two-pack in the Maelstrom's Edge online store here. You can share your terrain creations on the Comm Guild Facebook page!
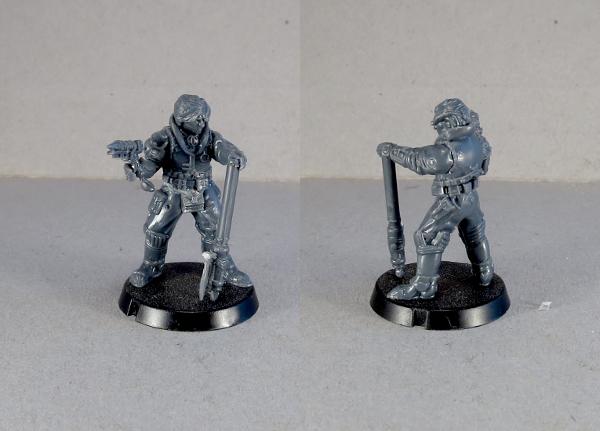
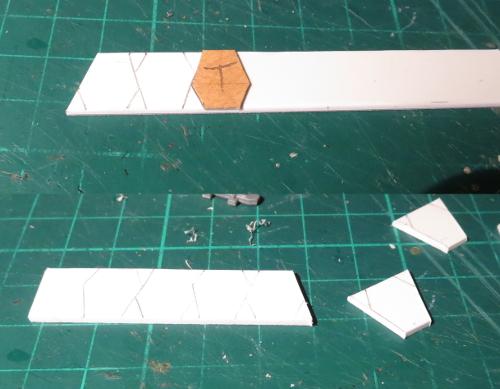
Conversion Spotlight: Epirian Automated Uplink Relay
Posted on Monday Mar 20, 2017 at 05:00pm in Models
- by Iain Wilson
The dependence on robotic units and information warfare means that the Epirian Foundation relies on
electronic communication to function as an effective fighting force. When pursuing conflicts outside of its zone of control, the Foundation uses portable uplinks that link to orbital satellites and airborne recon, providing battlefield intelligence about enemy positions and weaknesses and allowing Bot Handlers to remotely interface with Epirian drones on the ground.
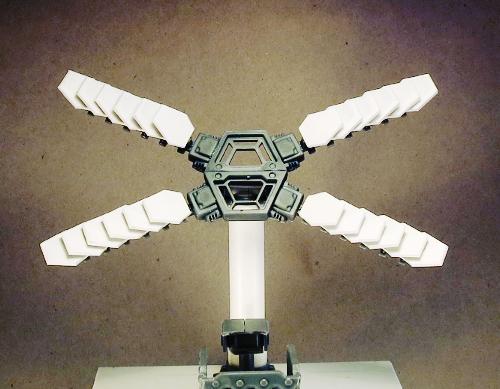
The Maelstrom's Edge rules include an automated uplink relay as a faction-specific objective for the Epirian forces. The uplink itself is represented with a cardboard standee, as it represents a physical object that moves around the board, but I thought it might be nice to have an actual model to represent it. And so, I came up with this:
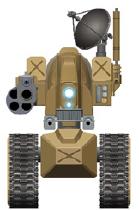 My kitbash differs a bit from the artwork on the card - the artwork was done while the game was still in its early design stages, before the models were finalised. As a result, the drone chassis that forms the basis of the upper body of the uplink is really too small for the job. The card version also wound up with only a single gun, while the finished version of the uplink, ruleswise, is supposed to have two flakk batteries.
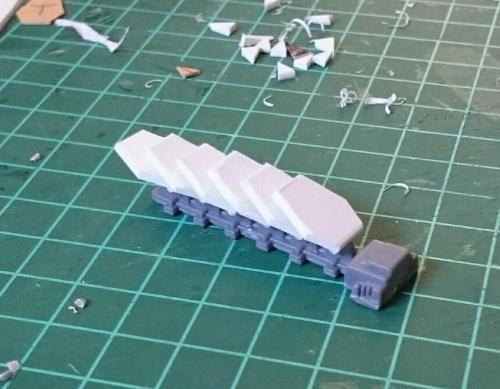
So after initially looking at various ideas using a drone chassis, I went with a Hunter torso instead.
The track unit was purloined from a Counterblast Mekkus Defender robot. Quick and easy to assemble - just two track units and a central hub to which they both attach.

I then took a Hunter torso and cut it off at the waist joint.
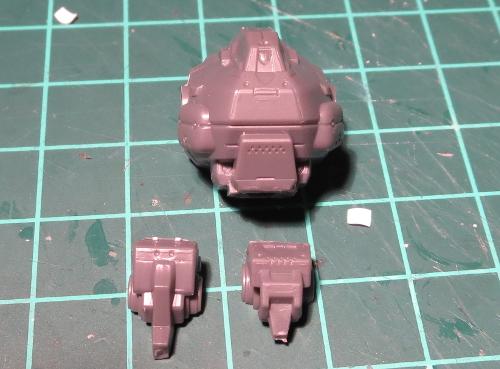
A new waist joint was constructed from plastic tubing, to slot neatly into the waiting cavity in the top of the track unit's central hub.

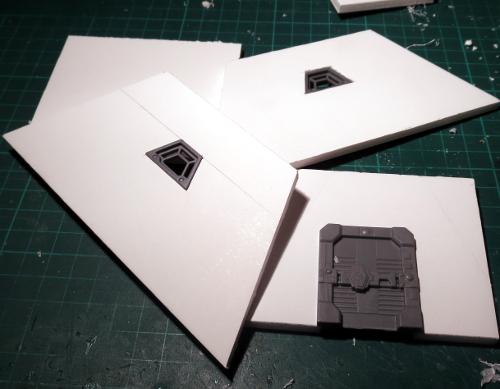
The flakk batteries were constructed from the flakk guns on the drone sprue. I took the two weapon mount parts and joined them together, glued a flakk gun onto each mount and added a third flakk gun, slightly shaved down on either side, inset between the other two. These were then attached to the forearm magazine piece from the hunter to create something reminiscent of the boxy 'shoulders' of the drone chassis from the original uplink artwork.
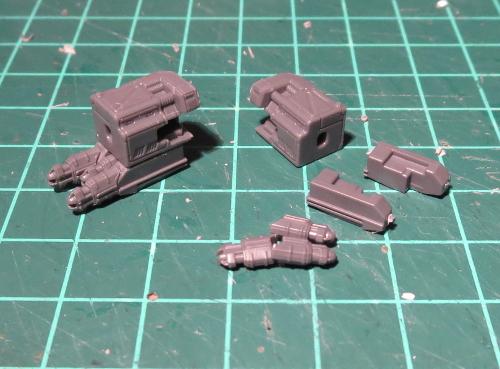
One of the big, obvious details in the artwork is the big satellite dish mounted on the uplink's left shoulder. I didn't have anything suitably rounded to hand, but in a flash of inspiration grabbed the flakk cannon from the Hunter sprue and chopped through the exposed parts of the cannon barrels. The shield section was then attached at a jaunty angle to the muzzle end of the cannon, and an antenna made from the coaxial barrel from the Hunter's chaingun.

The shoulder sockets were trimmed at an angle so that the weapon arms would sit horizontal. The weapon arms were then glued in place, and the satellite dish and an auxiliary antenna made from the 'spare' weapon on the drone sprue attached to the left shoulder. I also added a square of plasticard to the front of each shoulder to cover over the original weapon attachment sockets. These have an 'X' shape scribed into them to once again tie back to the drone shoulder design. As a final nod to the drone chassis (although this is a detail on the final drone model that is absent from the uplink illustration) I added a pair of rails running along the top of the head, cut from thin plasticard.


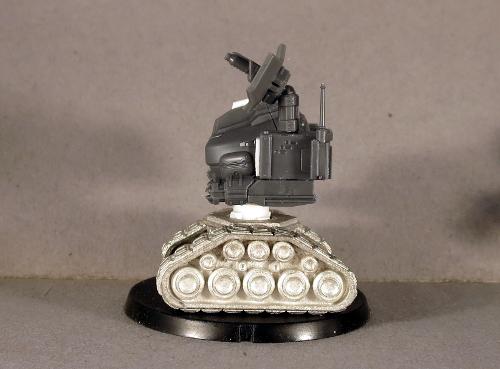
I decided to paint this one up to match my original Epirian colour scheme, using Vallejo Yellow Green with a wash of Army Painter Green Tone, and the metal parts painted Vallejo Basalt Grey with a couple of coats of Army Painter Dark Tone.
The tracks were given a light drybrush with Citadel Boltgun Metal (aka Leadbelcher) and then another wash, this time with Army Painter Strong Tone.
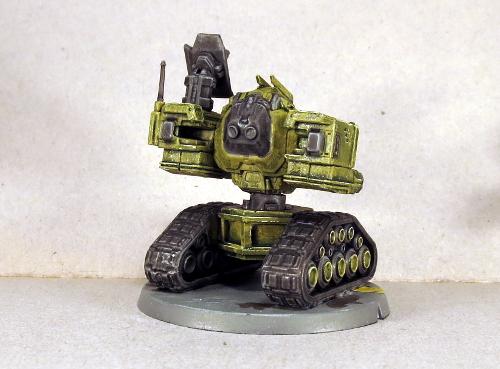
The base was urban-ised with a basecoat of Vallejo Neutral Grey and a drybrush of Vallejo Light Grey. Some oil stains splotched on with Army Painter Strong Tone, some chipping, and some yellow line markings complete the scene.
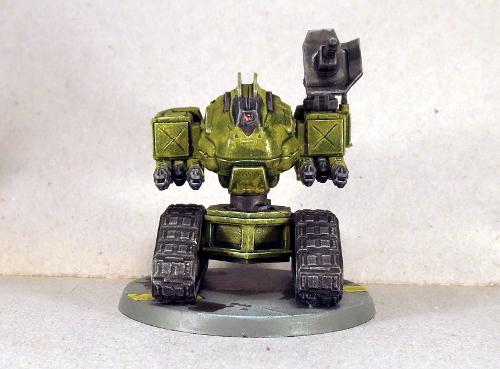
And so there it is: One Automated Uplink Relay. Size-wise, it comes in as a perfect match height=wise for the card version. A little more sideways bulk, but that suits it with the size of the base anyway.
It's not a perfect match for the artwork, but I think it's close enough to be recognisable for what it's supposed to be, and is a really easy conversion.
If you would like to have a go at this yourself, you'll need the track unit from Counterblast (or something else like it - there are a fair few options out there for small, tracked weapon units), and a Maelstrom's Edge Hunter (which will also give you the base for the uplink) and two Drone sprues - You'll have enough parts left over to still build complete drones from those sprues with the other weapon options. You can find the Maelstrom's Edge sprues in the online store here.
Be sure to share your version of the completed uplink relay on the Comm Guild Facebook page!
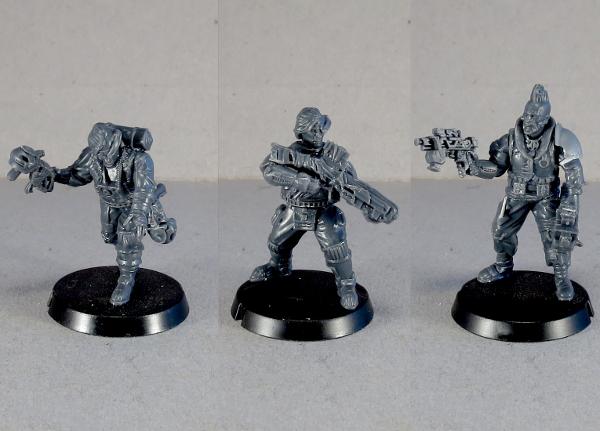
Spotlight: Epirian Contractors
Posted on Monday Oct 31, 2016 at 05:00pm in The Epirian Foundation
It feels like an eternity since we first released images of the Epirian Contractors. Our first sculpt with a new sculptor and manufacturer, getting the scale right took a number of back-and-forth attempts but after a few revisions we were able to create a model that was in scale with our Karist range and served as the starting point for the full Epirian range.
The Epirian sprue has a nice crisp level of detail and managed to cram a lot more on than we thought possible, which is why there are two pistols on each sprue. 5 heads and 5 pairs of arms opens up a lot of nice options for posing. Our Epirian models have a slight lean to them which makes them very difficult to photograph effectively but this is something we think we have continued to improve at. The lean does mean that the models look very nice when they are posed with a slightly raised leg, standing on a rock or similar.
The Epirian hats proved to be a dividing aesthetic. Some people love them, some people hate them. Fortunately, we were able to provide helmets as an alternative option for those who prefer to avoid the more casual hat look. A marmite feature!
The Epirian Contractors are our second best selling models, and are available in sets of 6 from the Maelstrom's Edge website.
Tags: contractor epirian model spotlight
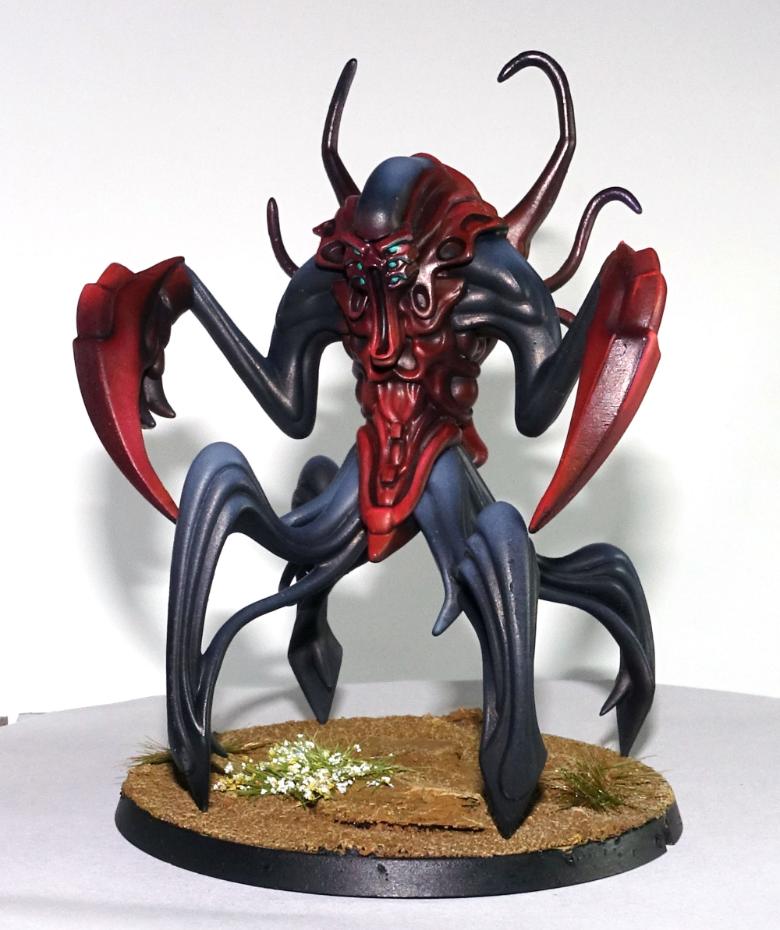
Spotlight: The Mature Angel
Posted on Monday Oct 24, 2016 at 05:00pm in The Karist Enclave
The Karist Angel was the final sculpt which we completed from the Battle for Zycanthus set. While the core of the model was completed quite early on, one of our first sculpts in fact, the limbs and details were quite a challenge to create. Here are some early pieces of concept art for the mature angel...

We wanted the Karist centrepiece model to be visually striking and much taller than anything else in the box set, which meant we had quite a lot of limitations with regards to sprue size and cost restrictions which stopped us from doing plastic wings. Each angel has three different morphing modes of which wings is just one option, so not getting wings in to the set was not a big issue for us. Trying to come up with some limbs that did not look comical and still showed the model capable of flowing and reforming took a lot of design iterations though.
Ultimately the mature Angel ended up as a fairly static pose for such a dynamic creature, with two alternate sets of claws that had little major difference between them, but with the benefit that the model is very easy to convert. Between the shapes being the easiest thing to sculpt (sausages of putty!), and the existing model being very easy to repose, we've seen a great range of conversions, and the model being so forgiving allows all manner of experimentation. Even boiling the plastic allows it to soften and be reposed in any shape without the obvious distortion you'd see from a model with sharp edges and lines.
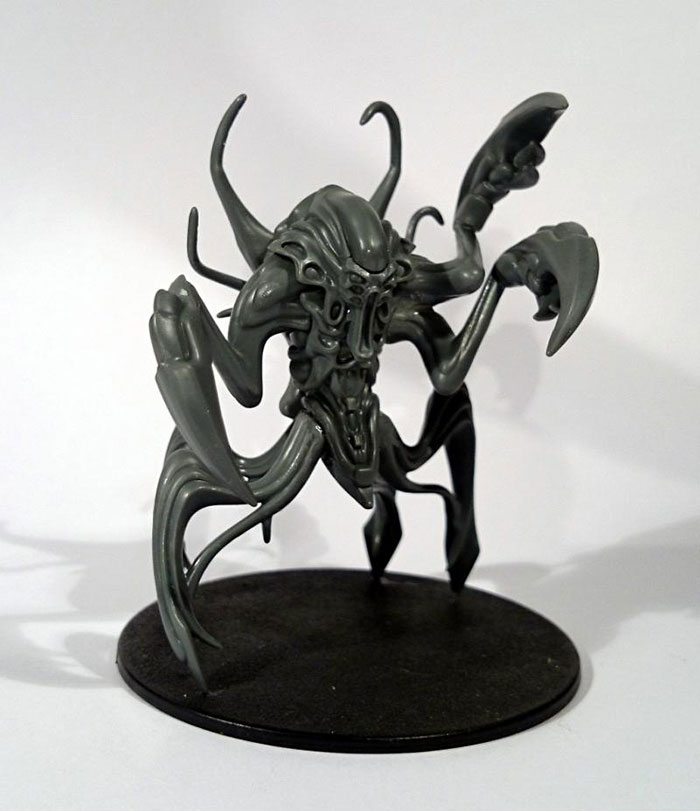
The sprue is a sliding core sprue which makes such a large model have practically no visible seams, despite being completely made of plastic.
The legspan of the model is huge as well, and led to the creation of our huge bases. This was possible thanks to success in our kickstarter project allowing us to fund the tooling.
Spotlight: The Digital Rulebook
Posted on Monday Oct 10, 2016 at 05:00pm in General
The Maelstrom's Edge Digital Rulebook is the fastest way to get started with the universe and rules of the Maelstrom's Edge tabletop game. It has 144 full colour pages, and is crammed with background fiction, model images, artwork and clear, coherent diagrams. The digital rulebook also has a full bookmark structure, making it easy to skip to the rules you want to read, and is automatically updated for free as and when FAQs are needed (only once to date so far!)
The rulebook is also supplemented nicely by our game walkthrough document, which can be read online as a webpage on maelstromsedge.com, or downloaded as a free PDF here.
Community Spotlight: SexierThanYou13's Blog
Posted on Wednesday Sept 14, 2016 at 05:00pm in General
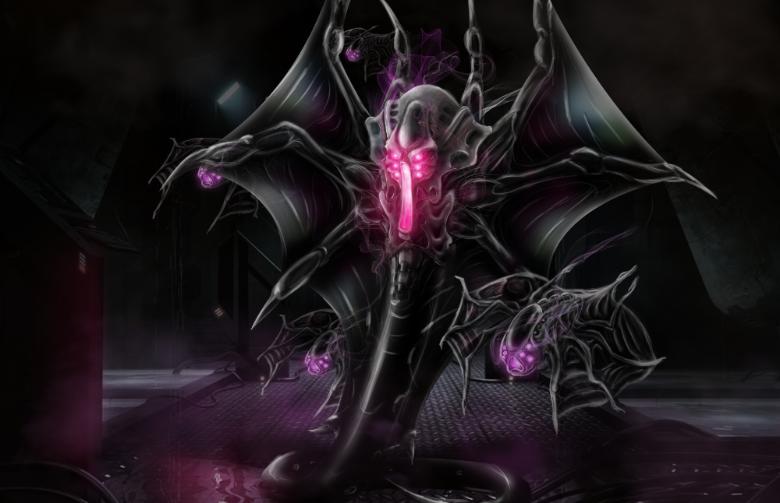
For our third week of converted Angel images in a row, here's a great lunging Angel from Dakka user SexierThanYou13
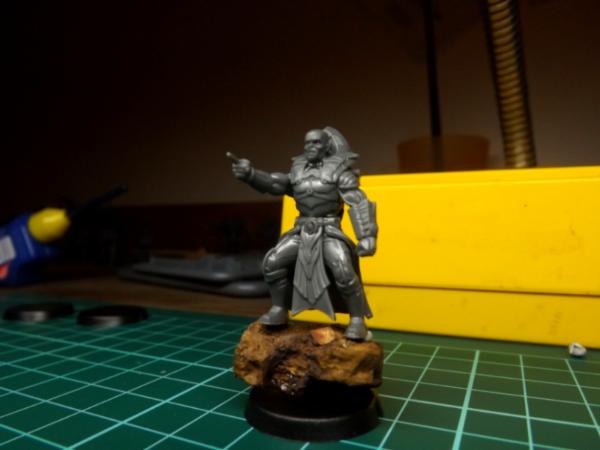
There's also a great Kaddar Nova that has massive presence when mounted on some cork
Along with some nicely posed Scarecrows
The Comm Guild's community spotlight focuses on sharing something from the Maelstrom's Edge community each week, if you have anything you'd like to get in to the queue, please get in touch with us via the Maelstrom's Edge website