Entries tagged [painting]
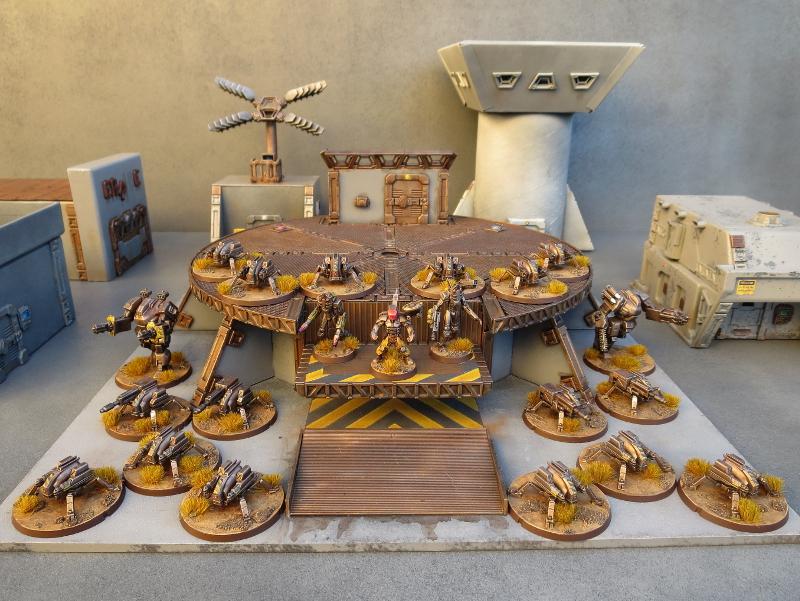
Army Spotlight - Karist Strike Force
Posted on Monday Aug 28, 2017 at 12:00am in Models
- by Iain Wilson
A little while ago I shared an Epirian bot army that I had been assembling, which you can find here if you missed it the first time. It didn't seem like the done thing to let all of those blasphemous machines hog the limelight, and so this week it's time for the pure and wholesome forces of the Karist Enclave to shine.
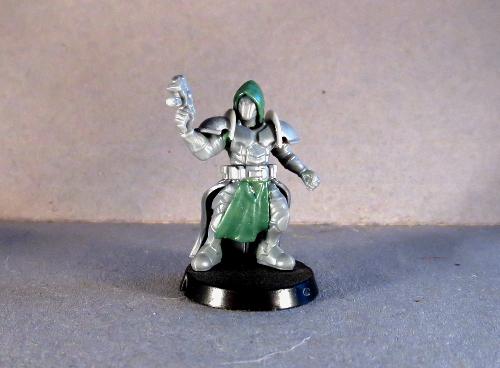
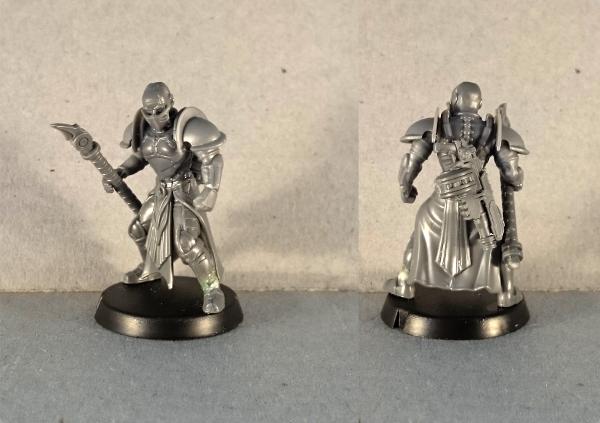
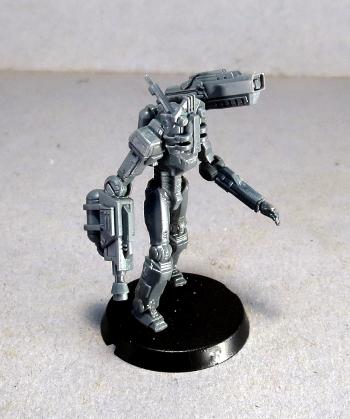
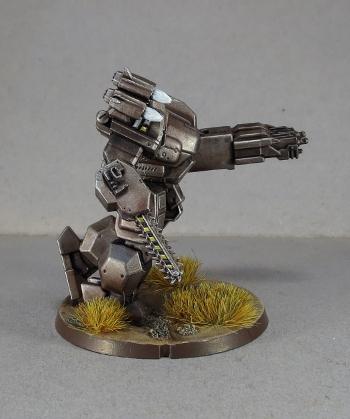
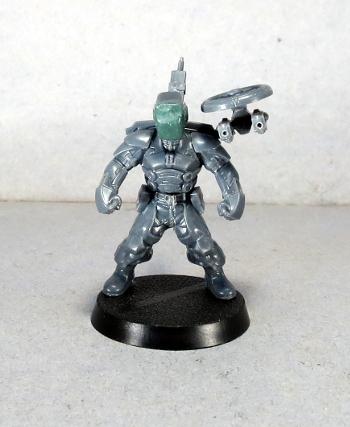
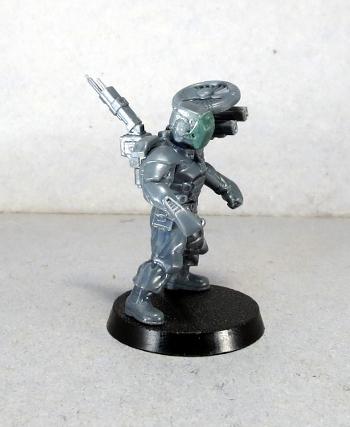
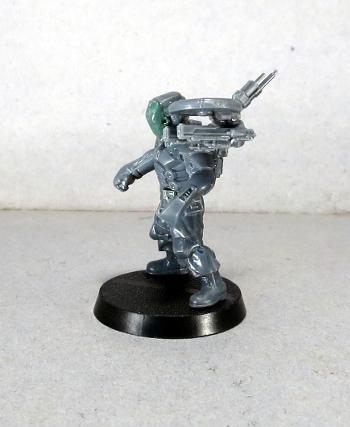
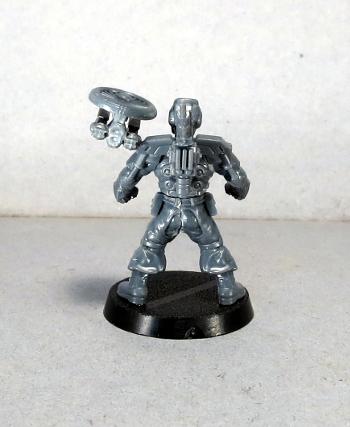
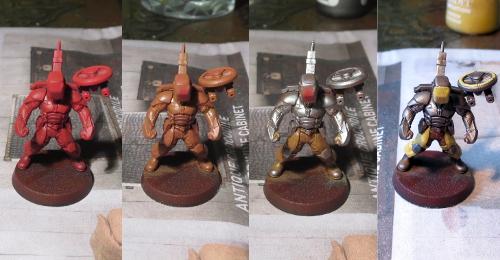
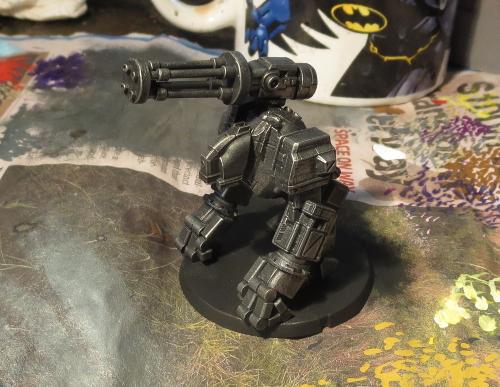
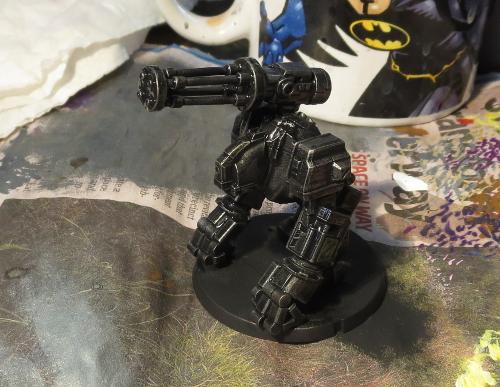
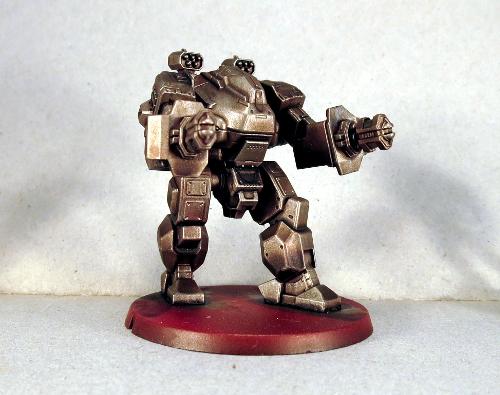
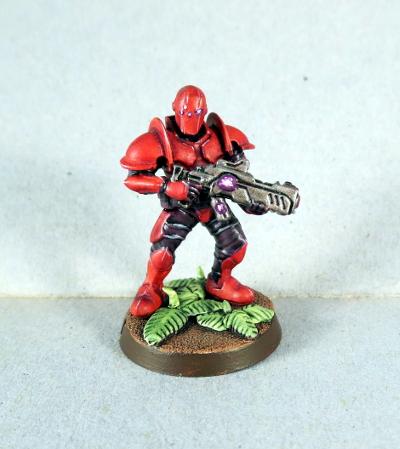
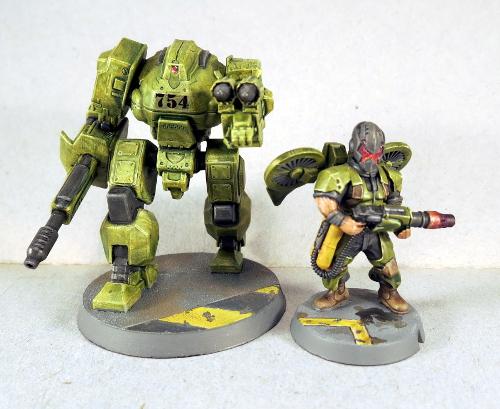
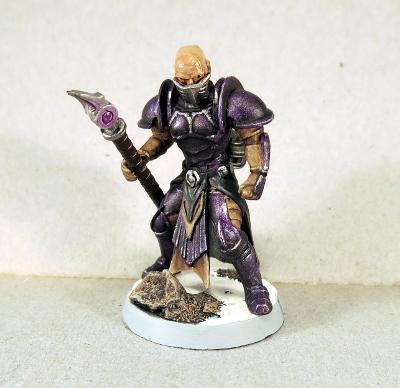
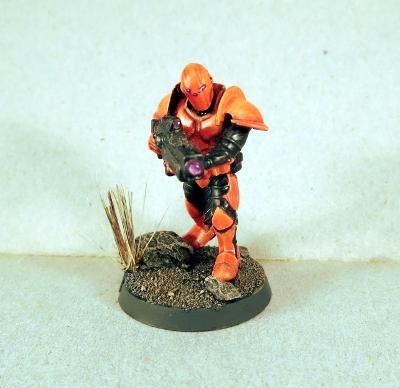
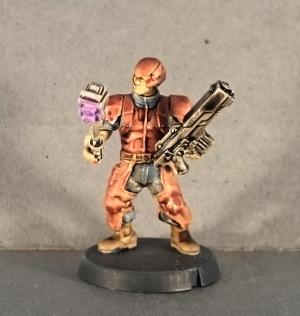
I wanted a Karist leader with a bit of presence - the sort of no-nonsense character who would stride about the battlefield secure in the rightness of his cause and confidence in his inevitable victory. So I took the Kaddar Nova kit and modified the legs slightly to give him a walking pose.
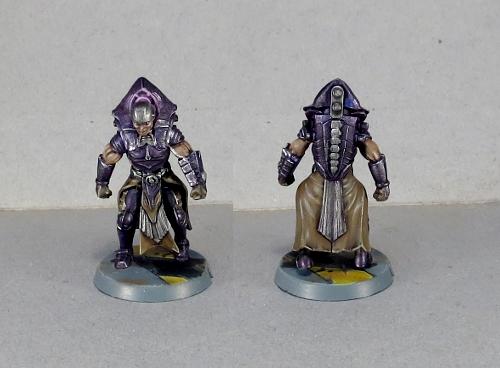
The conversion involved cutting some plastic away from the groin where the two leg pieces join, to bring the legs in for a more upright pose. One leg was angled slightly back by rotating at the waist joint, and the ankles were carefully twisted to straighten them out. The end result is a walking but slightly bow-legged pose, which helps to show the weight that the Nova is carrying around with that backpack!
The painting on this force is quite simple, as I wanted something quick and easy that I could expand on later as I add more models to the roster. The purple is an old Citadel metallic purple washed with Army Painter Dark Tone. The brown cloth sections painted with Vallejo Heavy Brown and washed with Army Painter Strong Tone form a nice contrast to the purple, and the weapons are painted in a no-nonsense metal scheme using P3 Pig Iron washed with Dark Tone.
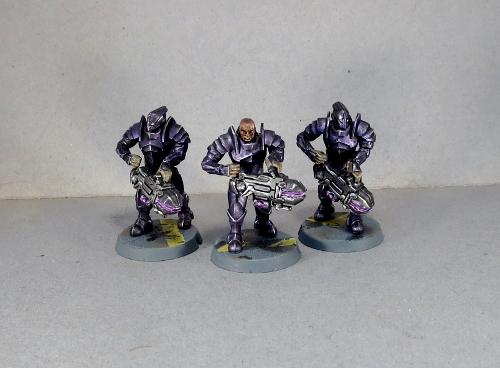
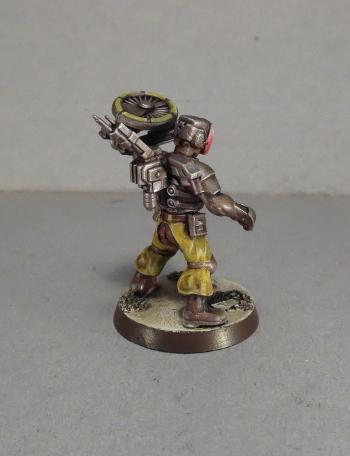
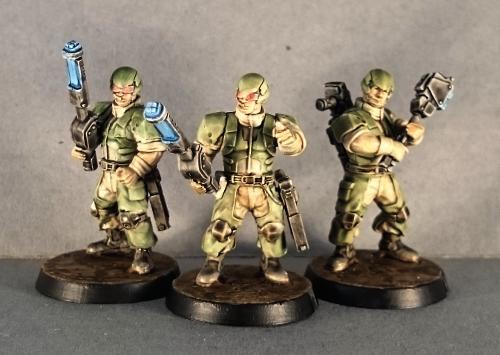
While I was aiming for a fairly small, elite force this time around, I still needed a unit of Troopers to fill in the required Core slot. I decided to go for a 5-man unit, to help them stand out from the more compact specialist units I was going to include and to give help them last a little longer once they get in range of all those Epirian guns.
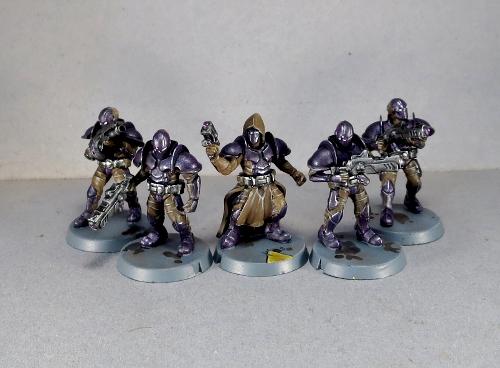
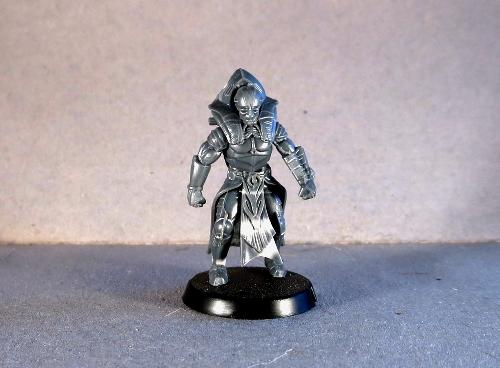
The Quintarch for this unit was based loosely on an early piece of Maelstrom's Edge artwork, with robes made from a leftover Kaddar Nova robe and some green stuff putty.
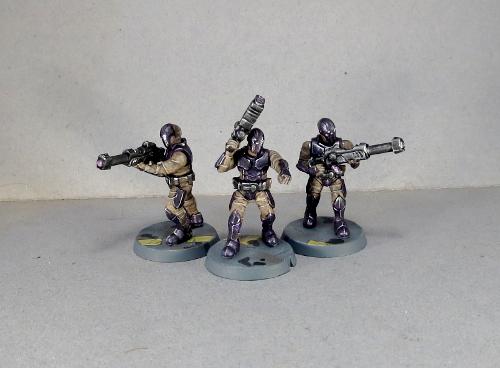
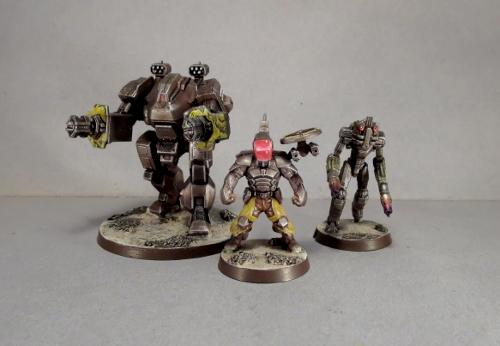
A unit of Tempest Elites provide some fire support, with their fearsome Hellstorm Energy Mortars.
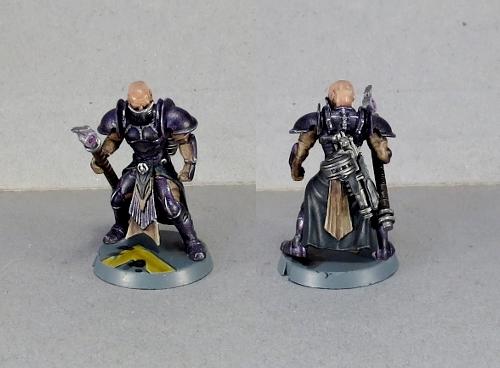
For some extra firepower where it counts, I included a Reaper Cadre. This is a homebrew unit that I put together for an article a while back. They're basically elite troopers armed with a long rifle version of the Pulse Carbine. You can find the conversion article and a rules card here.
I obviously needed to include some angel units, and to keep them in line I also took along an Angel Keeper. He forms the HQ option for a second detachment.
The Keeper is a playtest unit offered up some time ago for those who wanted some extra angel-related shenanigans in their forces. The model is a conversion using parts from a few different kits, as there is no official model (yet!) for it - you can find the conversion tutorial and rules card here.
In the Keeper's charge are a unit of Minnows. These were converted to add some extra motion to their poses, by mixing up the pairing of the wing parts and filling in any resultant gaps with a little green stuff.
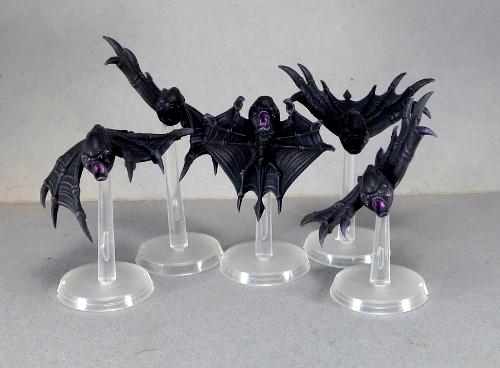
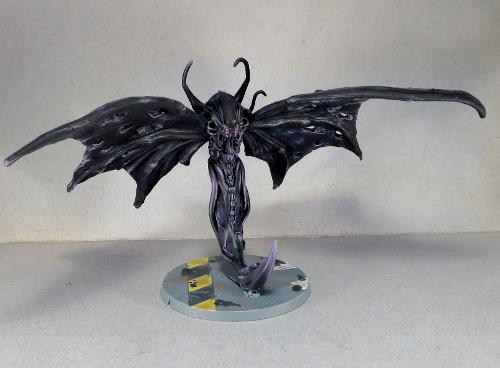
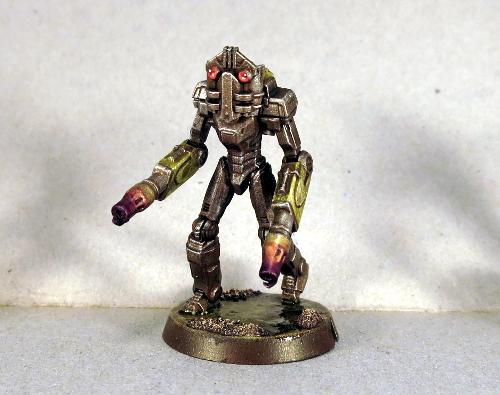
The Minnows' big brother rounds out the second detachment for now. I put together a model of a Mature Angel in its flight form a while ago, and so he had to go into this force. This model was built using the body from the Mature Angel kit, a tail made from green stuff and some wings from a demon model from the Reaper Bones range. You can find a walkthrough of the conversion here
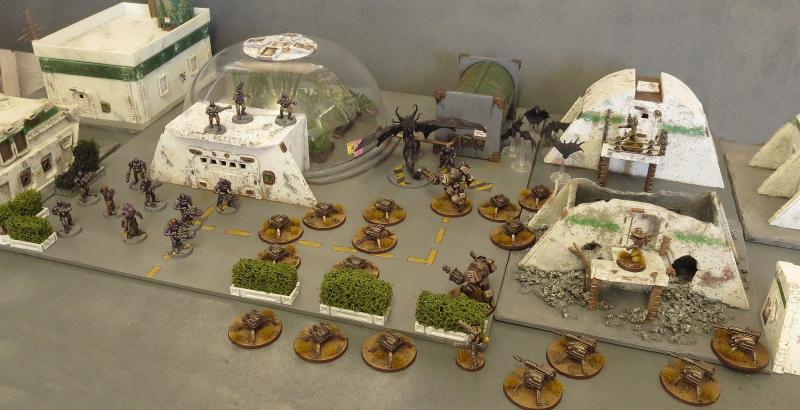
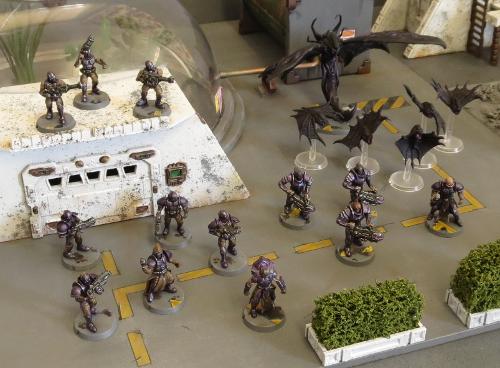
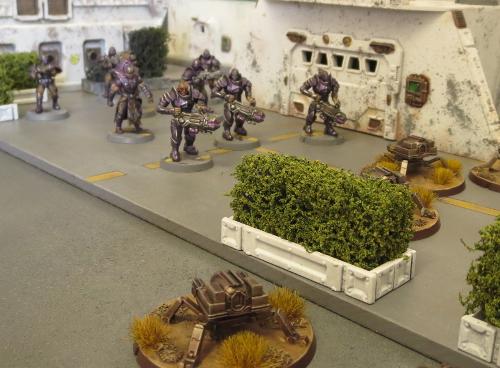
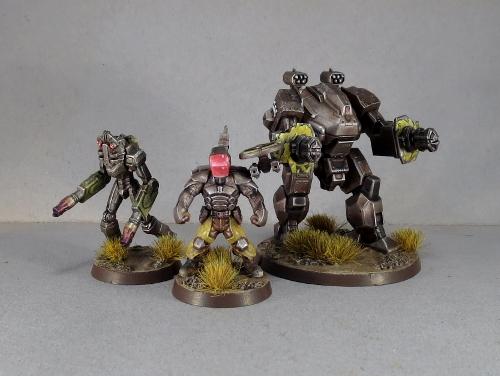
The force all together:
This leaves me with a roster that looks something like this:
Detachment 1
Command: Kaddar Nova - 15 points
Core: Karist Troopers
- Ripper Grenade Launcher - 18 points
Hammer: Tempest Elites
- Hellstorm Energy Mortars - 25 points
Vanguard: Reaper Cadre
- 2 Pulse Lances - 15 points
Detachment 2
Command: Angel Keeper
- Ripper Grenades - 10 points
Core: Angel Minnow Pack - 10 points
Anvil: Mature Angel - 23 points
Total - 116 points.
If you would like to put together your own Karist strike force, you can pick up the various Maelstrom's Edge kits from the webstore here. As always, feel free to share your creations on the Comm Guild Facebook page!
For other Maelstrom's Edge modeling articles, including tutorials and walkthroughs of a wide range of different building and miniature projects, check out the article roundup here.
Army Spotlight - Epirian Bot Army, Detachment Two
Posted on Monday Jul 24, 2017 at 05:00pm in Models
- by Iain Wilson
Last week, I shared part 1 of an Epirian Bot army that I've been putting together, which you can find here. This week, I'm fleshing it out with a second detachment, to bring the force up to the 120 point mark, suitable for small games.
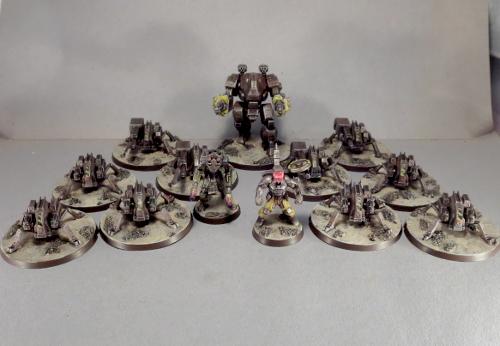
Unsurprisingly in a bot-themed force, the second detachment is comprosed of a whole bunch of extra robots!
To keep with the bot theme, I wanted the second Command unit to be a Scarecrow rather than another Bot Handler.
Scarecrows are shifted to a Command slot if you give them a Command Array. That's slightly problematic, since I've been using the Command Array part to put masks on my Scarecrows. I got around this by taking one of the aerials that had been cut off the array and gluing it onto the side of the Scarecrow's head, behind the mask.
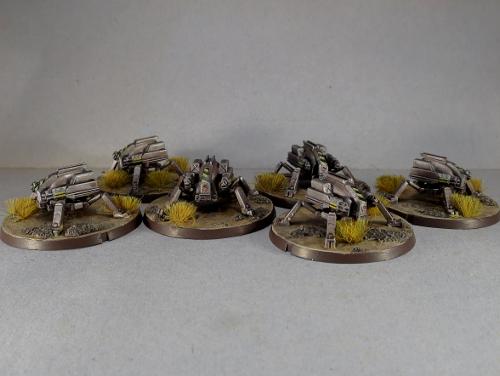
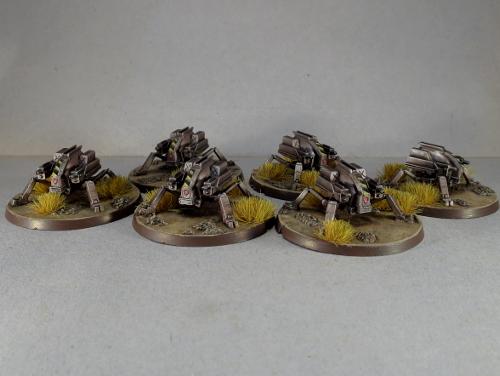
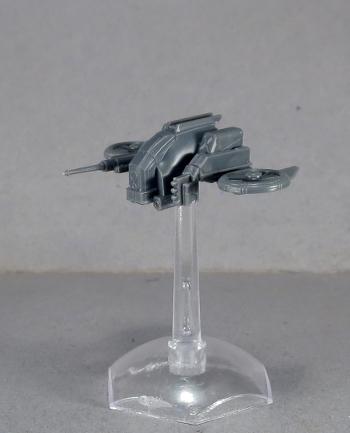
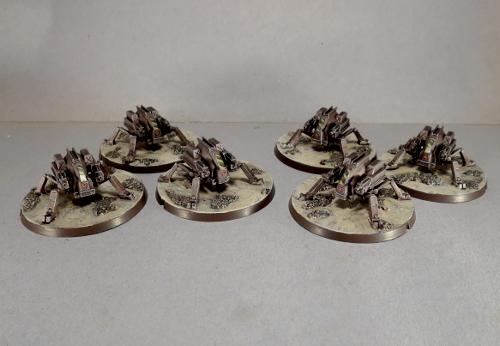
The Scarecrow commander is required to take at least two Core units, so I needed another two units of Spider drones. This time around, I went with Flakk Guns instead of the Cutters, for a bit of close-range supporting fire.
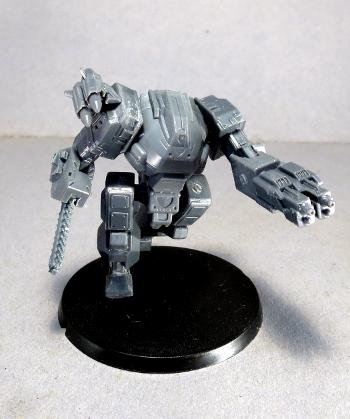
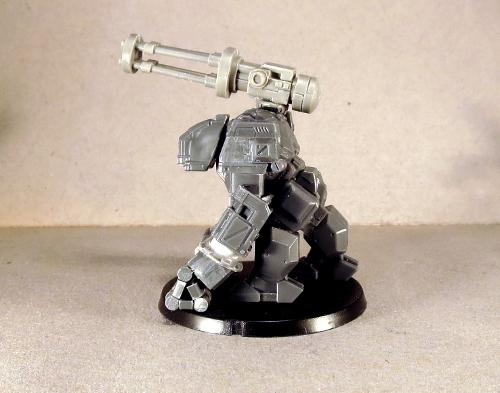
To round out the detachment, I selected another Hunter for my force.
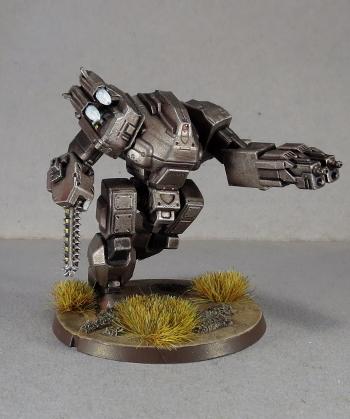
I had built this bot a while back, just to find out how the Hunter would look with a chainsaw in place of the Hydraulic Fist. The saw blade is taken from a Games Workshop Space Wolf kit. Rules-wise, it will still count as the fist.
The bases on this detachment were a slight change from last week. I hadn't been entirely happy with the bases on the first detachment, and so I changed to a slightly darker colouring (Vallejo Heavy Brown, washed with Army Painter Strong Tone and then drybrushed with P3 Jack Bone) and added some grass tufts for a little extra pop. To keep things consistent, this obviously meant going back and redoing the bases on the first detachment as well...
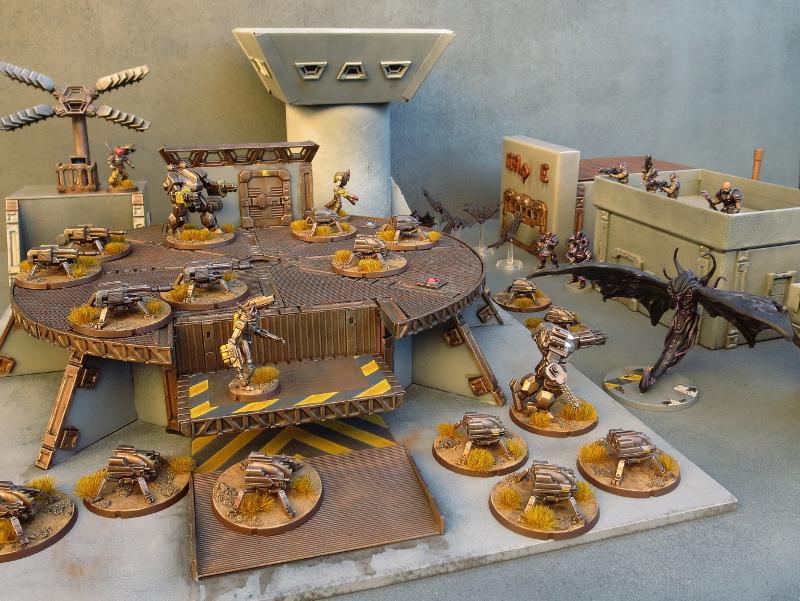
And so, the full force combined:
2nd Detachment:
Command: Scarecrow Sniper
- Command Array - 14 points
Core: Spider Drones
- Flakk Guns, replace Apprentice Bot Handler - 8 points
Core: Spider Drones
- Flakk Guns, replace Apprentice Bot Handler - 8 points
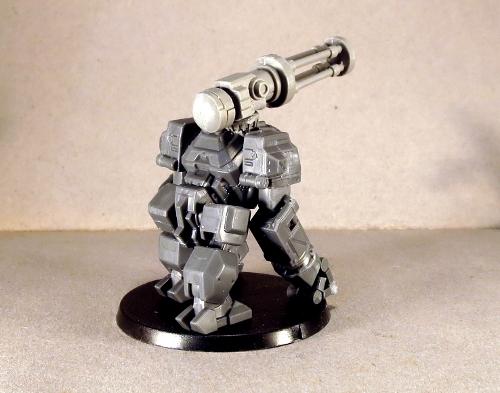
Anvil: Hunter-class Warmech
- Suppressor Dual Machine Gun, 2 Strike Missile Pods, Overdrive - 10 points
Total - 40 points.
Combined with Detachment 1: 120 points.
So, what's next for this force?
The obvious choice is to add some Fireflies, and I'll definitely be doing that as soon as I can. I'm also playing with some more homebrew rules, to create a spotter drone that would work in concert with heavy weapon-equipped robot units, possibly by being able to allocate a Command point to a friendly heavy unit within a certain radius that shares LOS to a selected target.
I also built a prototype for a Scarecrow spotlight article a while back, of a Scarecrow that replaces its legs with turbines from the Firefly kit. This was equipped with twin Clingfire sprayers, but I'm thinking that a unit of these equipped with twin Maglock Assault Rifles might be a fun option for encouraging enemy units to keep their heads down.
I'm picturing these guys as being able to move freely over obstacles, but being fairly slow moving and not particularly robust, due to the delicate balance required to keep such unwieldy creations airborne.
Stay tuned - I'll post another update on this force when I get these finished off!
If all of these robots are leaving you feeling inspired, you can pick up the full range of Maelstrom's Edge models from the webstore here. As always, feel free to share your creations on the Comm Guild Facebook page!
For other Maelstrom's Edge modeling articles, including tutorials and walkthroughs of a wide range of different building and miniature projects, check out the article roundup here.
Tags: bots conversion epirian modeling painting
Army Spotlight - Epirian Bot Army, Detachment One
Posted on Monday Jul 17, 2017 at 05:00pm in Models
- by Iain Wilson
The Epirian Foundation utilises a wide array of different bots on the battlefield, and the Maelstrom's Edge roster system allows you to create a force that makes the most use of them in place of human troops. And really, why wouldn't you? Robots!
I had a few assorted bots put together in a weathered metal colour scheme for a few previous articles, and so I decided this week that it would be fun to flesh them out into a usable force.
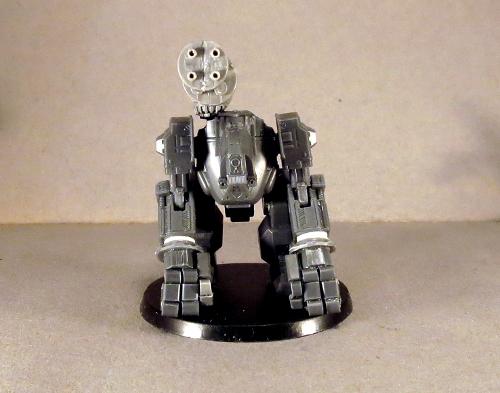
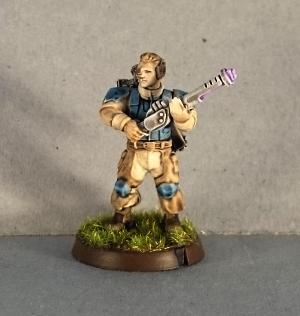
An army, of course, needs a leader. There are a couple of HQ options currently for Epirian forces, but I already had a Journeyman Bot Handler that I put together a while back and then never did anything with, so decided he would have the somewhat dubious honour of being the lone human in the force.
This guy was built from the Bot Handler sprue, with a few modifications.
The head was taken from the Contractor sprue with a face shield added with some 'green stuff' putty.
I gave him the spread-leg pose by taking both sets of legs from the handler sprue and cutting them apart vertically through the groin, and gluing the opposing halves with the matching straight legs together.
Rather than having him holding his pistols, I thought a mini gun-drone would be fun, so I mounted two pistols under a single turbine taken from a Firefly drone. This little drone is pinned to the Journeyman's shoulder, to give it the appearance of flight without needing a flight stand.
Painting was kept fairly simple, to match the bots that I had already built, and so used the weathered metal process that I've shown in several articles now - red undercoat, followed by a coat of brown, then a metal layer, and then a wash with Army Painter Strong Tone.
Yellow chaps and a shiny red faceplate tie in with the more subdued highlights used on the rest of the force while letting him stand out a little from the crowd of bots.

With paint in place, the Journeyman joins the Hunter mech that I originally painted up for the weathered metal tutorial, and a slightly modified Scarecrow that I built for a spotlight article on the lanky, elite units.
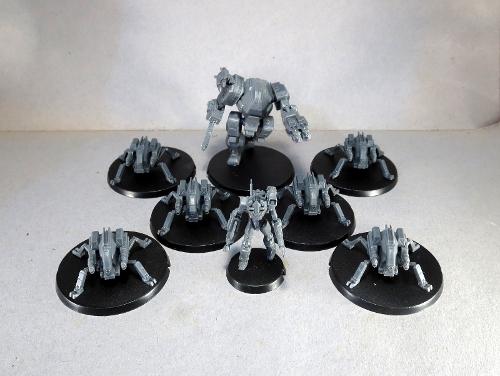
The army wasn't going to get far without troops, and so I grabbed a few Drone sprues and put together two units of Spider drones. To stick with the bot-theme, I made use of the upgrade option to replace the Apprentice handler who normally accompanies units of Spiders with a third drone instead.
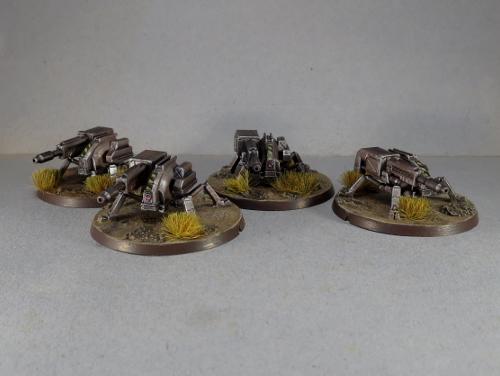
To round out this first detachment, I added some fire support from two units of Scorpion Drones. These are a home-brew unit that I created for an article a while back, rather than a standard Maelstrom's Edge unit - You can find their rules card and a tutorial for building them here.
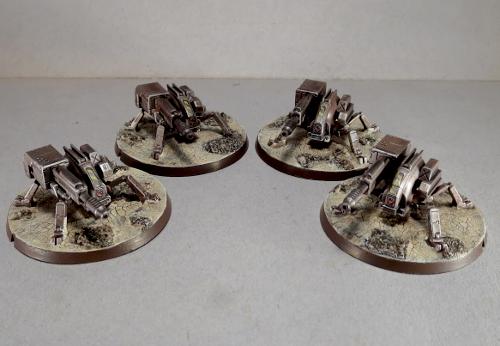
That rounds out the first detachment, which comprises around half of the planned force. Roster-wise, it looks like this:
Command: Journeyman Bot Handler
- second pistol, Command Booster - 17 points
Core: Spider Drones
- replace Apprentice Bot Handler - 9 points
Core: Spider Drones
- replace Apprentice Bot Handler - 9 points
Hammer: Scarecrow Sniper
- 2 linked clingfire sprayers, Overdrive - 5 points
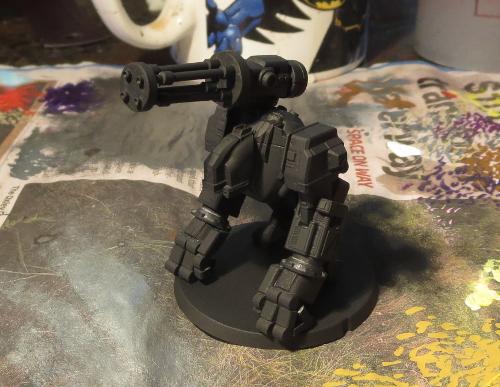
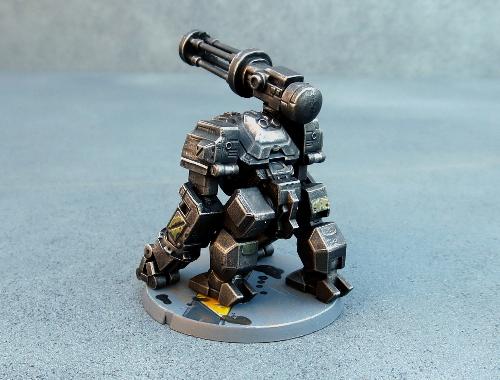
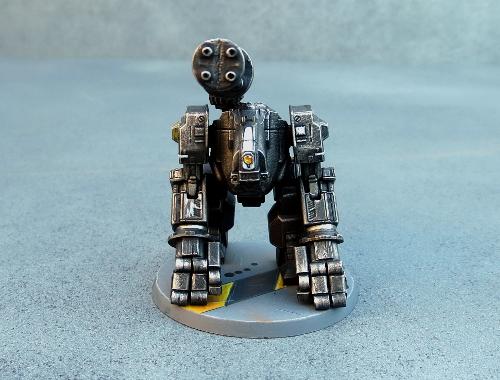
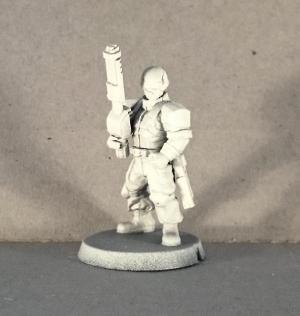
Anvil: Hunter-class Warmech
- 2 flakk cannons, 2 cluster missile pods - 20 points
Anvil: Scorpion Drones - 10 points
- 2nd unit (Multi-unit selection) - 10 points
Total - 80 points.
Next week: Detachment 2.
Spoiler: There will be robots!
If you would like to build your own robot army of doom, you can pick up the various Maelstrom's Edge kits from the webstore here. As always, feel free to share your creations on the Comm Guild Facebook page!
For other Maelstrom's Edge modeling articles, including tutorials and walkthroughs of a wide range of different building and miniature projects, check out the article roundup here.
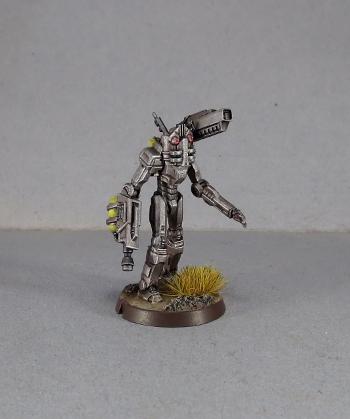
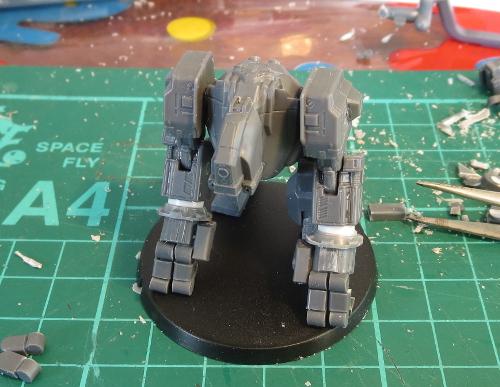
Conversion Spotlight: "Silverback" Mercenary Fire Support Mech
Posted on Monday Jun 26, 2017 at 05:00pm in Models
- by Iain Wilson
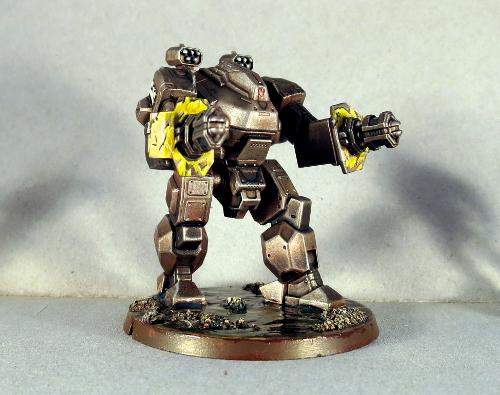
A variation on the Hunter War Mech chassis, the Silverback was an attempt by Epirian engineers to develop a mobile platform for heavy support weapons. Trading in speed for stability, initial deployments showed promising results, however over time the mech's ponderous movement began to be perceived as a liability. When this was compounded by some odd personality quirks that tended to develop in the experimental twinned bot cores used to give the Silverback increased tactical capability, the model was slowly phased out by Epirian forces. Some were sold to planetary security forces, while others found their way onto the black market, where they became a favourite of mercenaries who favoured a more blunt approach to martial engagement.
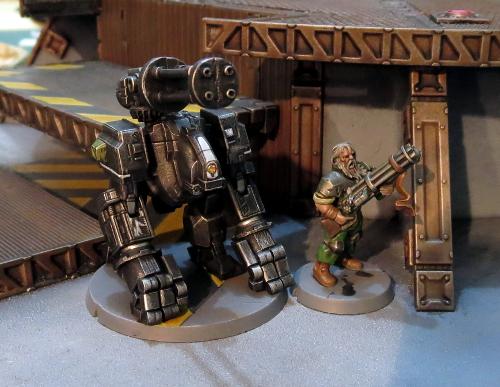
A mercenary bot handler and his Silverback charge.
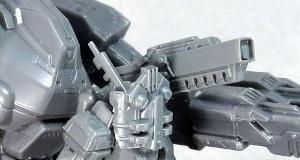
The Epirian Hunter is a fantastic kit which presents some fun modeling possibilities straight out of the box. Sometimes, though, it's fun to do something a little more extreme, and it's from this that the Silverback was born. This wasn't made with any rules in mind, just something fun to build... although now of course I have some ideas percolating around for mercenary units, so this may be something I come back to in a future article.
To give the Silverback more gorilla-like proportions, I cut down the tops of the thighs level with the top of the protruding panel on the side. This also required slicing off the locating pin and reattaching it lower down. I also added a bit more of a bend to the left leg by slicing carefully through the top of the knee joint, cutting out a small wedge, and regluing the leg at the new angle.
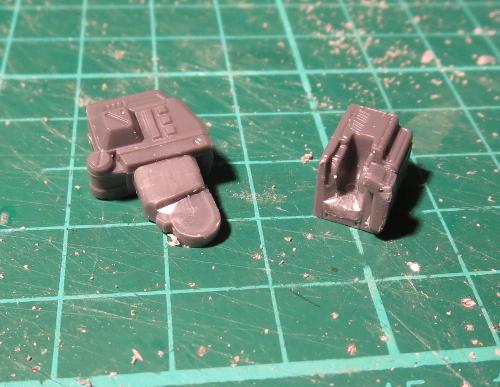
With the torso angled forwards, the top of the existing 'head' serves admirably as a neck. To add a new head, I used a razor saw to slice a drone chassis in half.
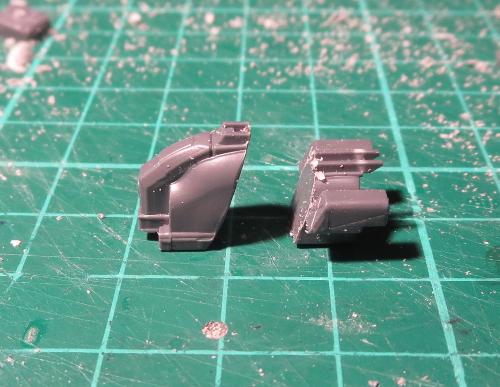
The front piece was then glued in place on the torso.

I wanted the arms a little straighter than is allowed by the hunter's elbow arrangement. So I trimmed away the back of the forearm piece, allowing more movement in the joint.
I then took some small pipe fittings from the Maelstrom's Edge terrain sprue and trimmed the square border off.
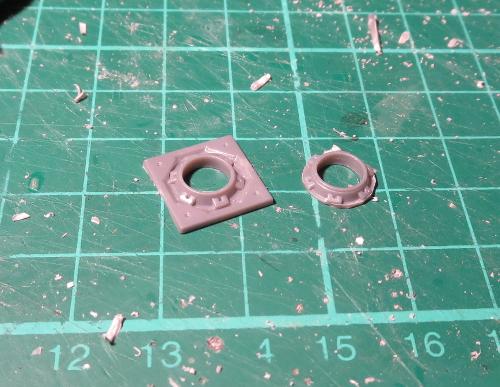
A small piece of plastic tube was then slipped into the fitting, and this glued in place against the 'hand' end of the forearm.
The hands were constructed from the back half of the drone chassis and small pieces cut from the drone's sprue (recycling for the win!).
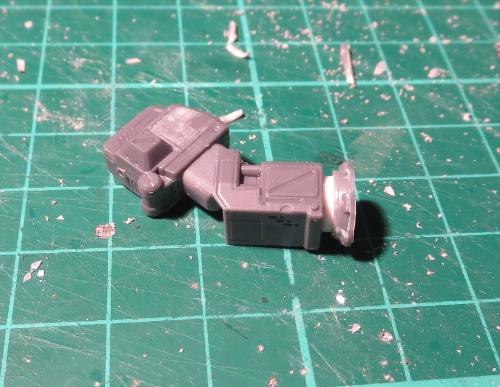
With everything glued together, the arm was glued in place.
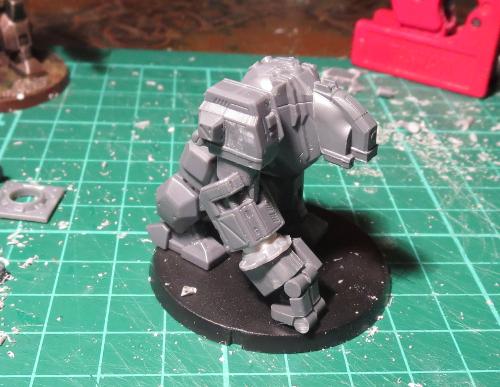
I initially only had two joints on each finger, but it just didn't look quite right, so I added an extra joint when I built the second arm, and then went back and did the same to the first one.
Another couple of small sprue pieces formed the ends of the thumbs, and I added a weapon purloined from a Games Workshop Tau battlesuit kit.
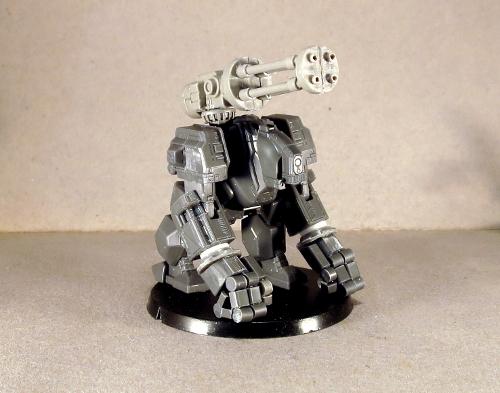
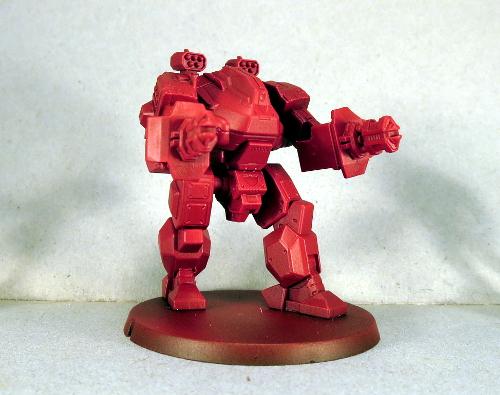
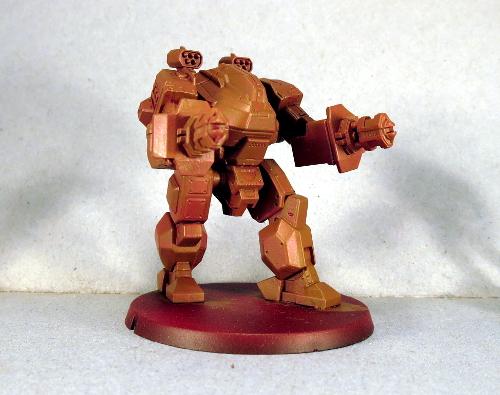
I wanted a dark, slightly sinister paintjob to emphasise the brutish nature of the mech, so started with a black undercoat.
Over this I did a heavy drybrush of P3 Pig Iron.
Then I washed the whole thing with a generous coat of Army Painter Dark Tone.
Once the wash dried, I lightly drybrushed all over with some more Pig Iron, and then did the detail work. A few panels here and there are picked out in different colours to give it a bit more of a ramshackle appearance, in keeping with its mercenary nature. It's not an award-winning paint-job, but is a nice, quick method for getting a table-ready model.

Feeling the urge to hack up a Hunter or two of your own? You can pick up the Hunter, Drone or terrain sprue from the Maelstrom's Edge webstore here. As always, feel free to share your creations on the Comm Guild Facebook page!
For other Maelstrom's Edge modeling articles, including tutorials and walkthroughs of a wide range of different building and miniature projects, check out the article roundup here.
Tags: conversion hunter modeling painting
Conversion Spotlight - Kaddar Nova Mini-Diorama
Posted on Monday Jun 12, 2017 at 05:00pm in Models
- by Iain Wilson
Sometimes it's nice to take a break from putting together armies and just paint something for fun. There's nothing better than taking some plastic and doing something new and shiny with it for getting some creative juices going, and it's a great way to explore the rich background of the game.
When I first got my hands on the plastic Kaddar Nova kit, I had an image of him standing in some imposing fashion unleashing a minnow like a trained hunting bird. I built the bare bones of this little diorama some time ago, but only just found the time to get it finished off and painted.
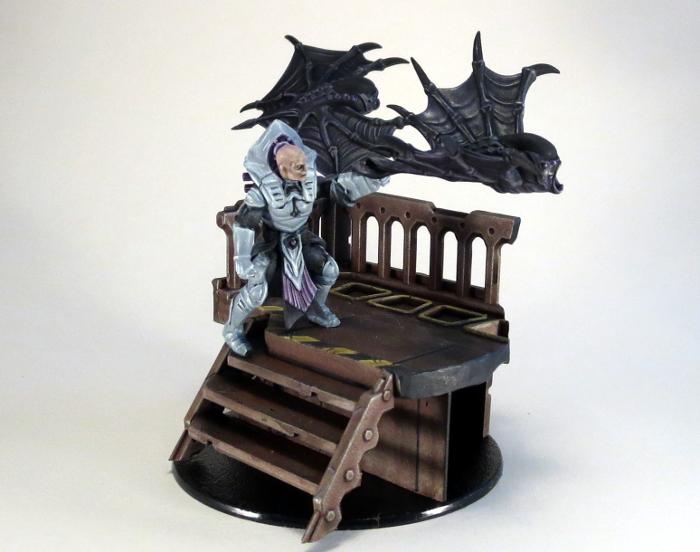
This piece was assembled from 3 different kits. The balcony was assembled almost entirely from components from the Maelstrom's Edge terrain sprue, with a little plasticard to fill in around the sides. The balcony floor is cut from a garage door, with the windows filled in with the gratings from the support struts cut into a trapezoid shape. The railing is made from a ladder, with one side trimmed off. The trimmed off side served for the sides of the staircase, with the stairs themselves made from lengths of support strut glued in detail-side down.
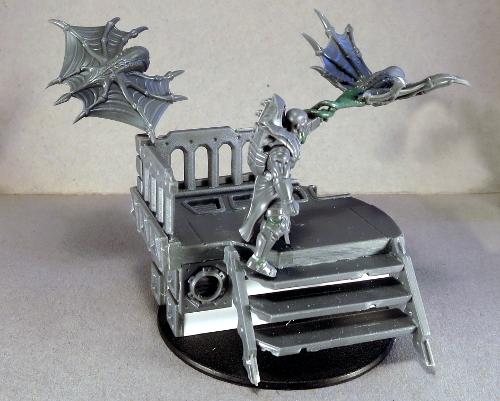
The Kaddar Nova is largely stock, although there was some small alteration of the legs (narrowing the groin area to bring his legs closer together and bending out the right foot so that his toe-tip would touch the lower stair).
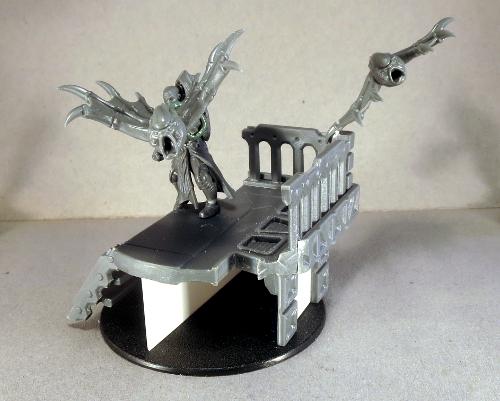
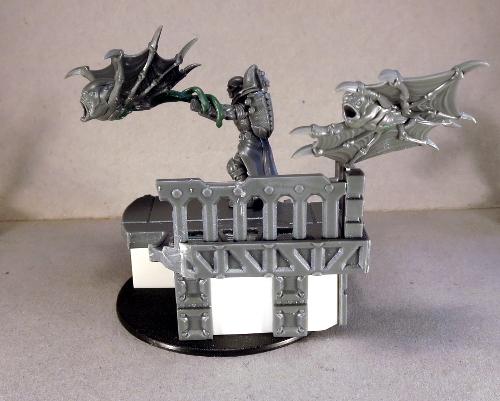
Likewise, the Minnows are assembled as normal, with the one launching off the Nova's hand losing his original tail and a new one made with a length of wire and some green stuff. The wire is glued into a small hole drilled in the Nova's forearm, which is covered up by the putty.
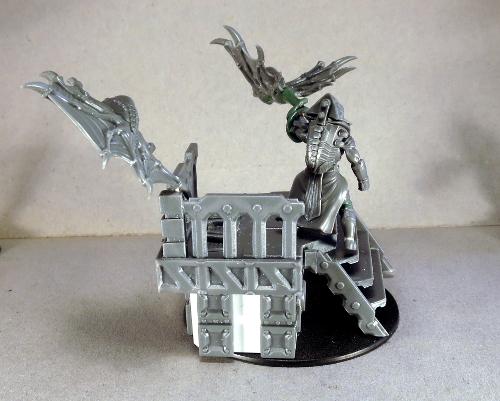
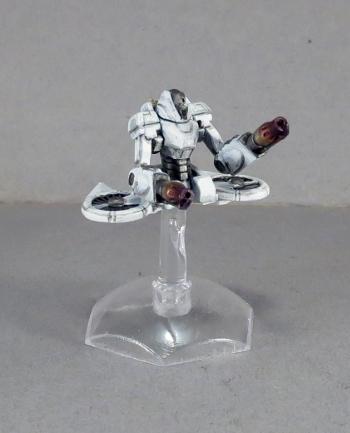
When painting something unusual, I like to try pushing my boundaries a little as a change from the repetitiveness of painting gaming forces. For this piece, I decided to go for a nice, bright, white armour, as I generally tend towards darker colour schemes. The trick with white, oddly enough, is to not make it white. Most white things aren't actually white to look at. Shadows add layers of grey, and reflections add other shades to the mix. (This goes for black, as well!) I wasn't about to try painting reflective armour this time around, but I did use Vallejo Light Grey blended into the white to shade the armour. The end result is possibly a little more grey than white, but I'm still pretty happy with how it turned out.
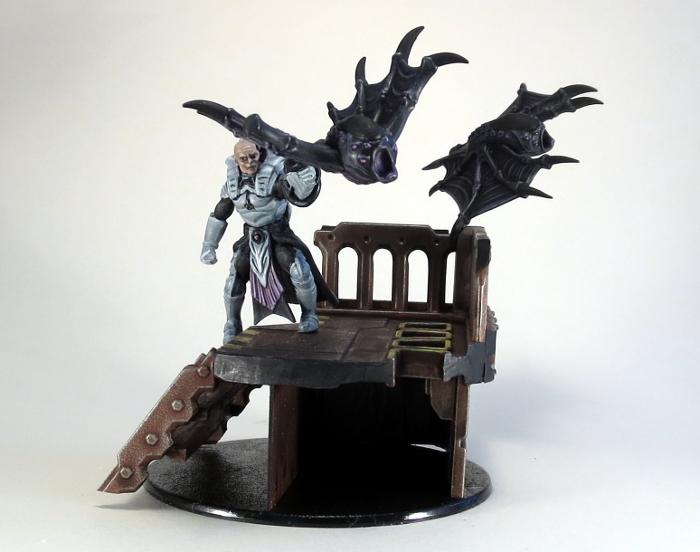
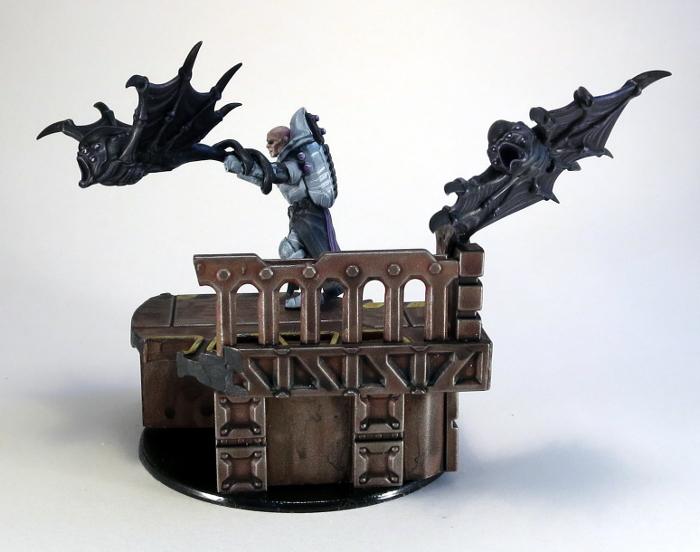
The Minnows were painted using a slight variation of the scheme I used for my winged Mature Angel a couple of weeks back. They were undercoated black, and then drybrushed with dark grey (Vallejo Heavy Charcoal, in this case) and then with purple (some old Citadel Warlock Purple and Tentacle Pink mixed together). This was then washed with some Army Painter Dark Tone to smooth out the drybrushing.
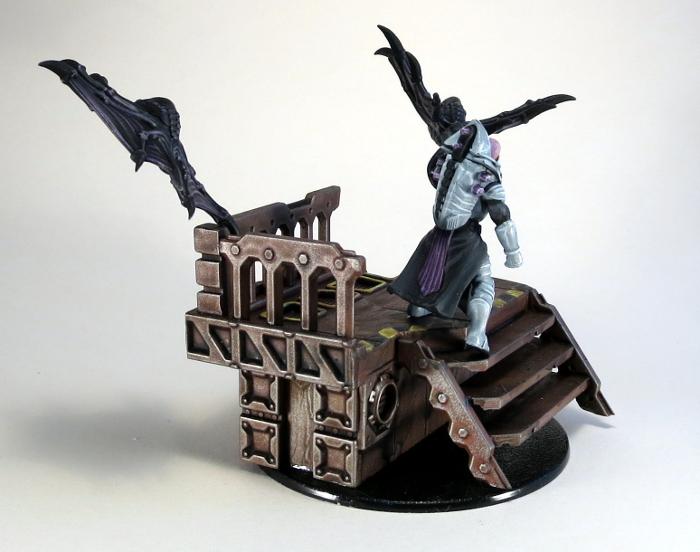
The balcony was painted using the weathered metal recipe shown in the article here, with the addition of some scratches, hazard stripes and yellow detail around the window/vents to break up the expanse of rusty metal a little.
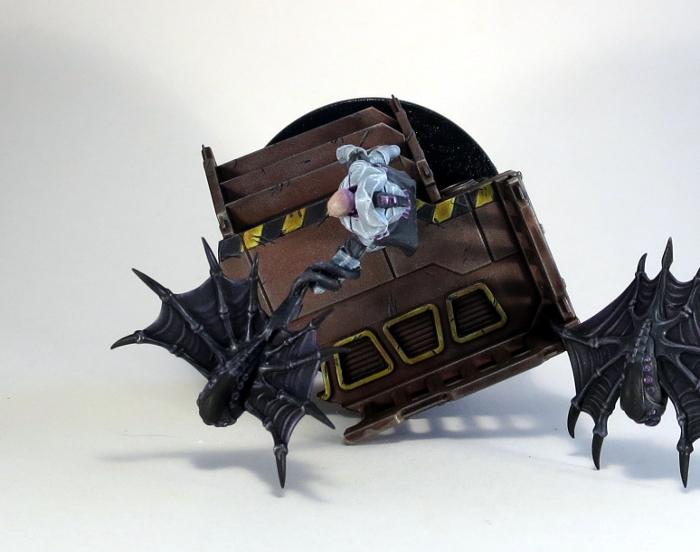
The end result is a simple little scene that I think is nicely evocative of the Maelstrom's Edge setting. If you want to try something similar, you can pick up the components used here from the Maelstrom's Edge webstore. As always, feel free to share your creations on the Comm Guild Facebook page!
For other Maelstrom's Edge modeling articles, including tutorials and walkthroughs of a wide range of different building and miniature projects, check out the article roundup here.
Tags: conversion diorama kaddar karist modeling nova painting
Tutorial and Spotlight Article Roundup
Posted on Monday Apr 17, 2017 at 05:00pm in Tutorials
The full list of articles is getting a little unwieldy for a single page, so rather than keep updating an increasingly confusing list here, you can find the full collection of articles broken down by sections in the Hobby area of the Maelstrom's Edge website here!
If you've seen anything here that has lit that modeling flame, you can pick up the various plastic kits currently available in the Maelstrom's Edge range from the webstore here.
Maelstrom's Edge also has a Facebook group, known as 'the Comm Guild', where you can post any questions you have about the rules, the models, or upcoming releases, or share your modeling projects. The group can be found here. We love to see what people are working on, so whether you're a modeling veteran or a complete newcomer to the world of miniature wargaming, feel free to join in.
And in the meantime, stay tuned for the plethora of modeling content that we have still coming down the pipeline!
Tags: buildings conversion models painting terrainsprue tutorial
Painting Tutorial: Weathered Metal
Posted on Monday Feb 27, 2017 at 05:00pm in Tutorials
 - by Iain Wilson
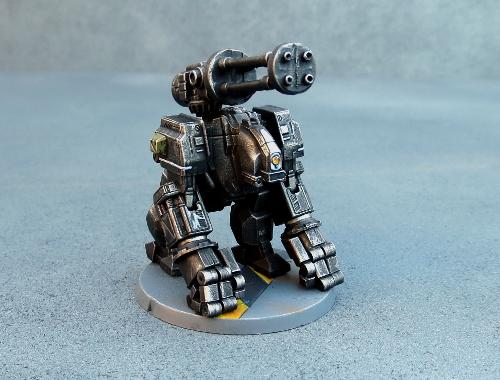
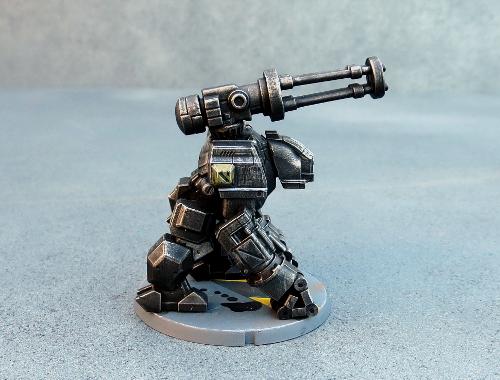
Terraforming planets is hard work, particularly on those worlds where conditions are less than favourable to begin with. Equipment has to contend with a huge range of different environments and, particularly once the Maelstrom come close, maintenance schedules can be somewhat less rigorously clung to than they might be on more 'civilised' worlds. This gives a bit of scope for painting terrain and models with a less polished finish, so this week, I thought I'd share an easy little method that I use to paint weathered metal. My guinea pig here is an Epirian Hunter Warmech.
This all starts with a red undercoat - Here I've used Army Painter Pure Red. Just a light coat, as it doesn't have to be super-bright. Going straight over the grey plastic dulls the red down a little as well.
Over the red, paint a coat of a medium brown colour. I've used Vallejo Beasty Brown. This doesn't need to be perfectly even - If a bit of the red tint shows through, all the better. It will look a little odd to begin with, but it all pulls together at the end.
Next, paint a light coat of a medium metal tone. I've used P3 Pig Iron, which is roughly equivalent to the old Boltgun Metal/Leadbelcher. Again, you don't want to completely cover the brown. For a more rusted, dirty look, just lightly drybrush the metal on. For a more lightly weathered look, use a heavier coat of metal while leaving the brown in the creases. And as with the red, if a little brown tint shows through the coat of metal, that's excellent for our purposes here.

Now the magic step: Give the model a liberal coat of brown ink. The below is done with Army Painter Strong Tone, which is more or less identical to the old Citadel Devlan Mud. (Agrax Nightshade replaced this in the Citadel range. It's probably close enough for these purposes, but I haven't tried it.)
Once the ink is dry, it's time for final detailing. You can highlight with a little silver to pick out raised edges, just to brighten things up a little bit. I also like to go over weapons and working parts with a coat or two of black ink, to make them stand out a little more. You can also paint over the top with a patchy layer of colour to show worn paint with the metal showing through.
Here's the same technique on a different model, this time a slightly converted Epirian Scarecrow.
This is also a great way to pick out metal detail on buildings or ruins. Below is an example with a more dirty effect, achieved by just lightly drybrushing the metal over the brown before washing, as described above.
You can also add extra weathering by drybrushing brown or rusty red over the top, wherever looks like an appropriate place for rust or dirt to gather, or experiment with different coloured washes to create different metal effects.
You can pick up the models shown in this article from the Maelstrom's Edge webstore here. As always, we'd love to see what you're working on, so feel free to swing by the Comm Guild Facebook page!
All Your Base, Tutorial Part 2
Posted on Wednesday Dec 07, 2016 at 05:00pm in Tutorials
- by Iain Wilson
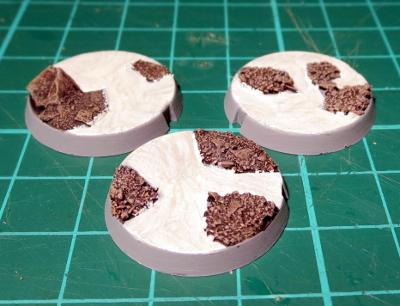
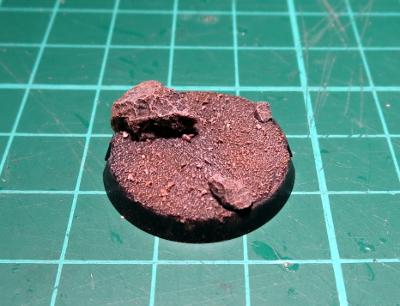
Last week, we looked at a few different ways to pretty up your bases, with industrial, rocky and snowy themes. This time around, I want to share a couple of my favourites - metal decking and ferns.
Ferns
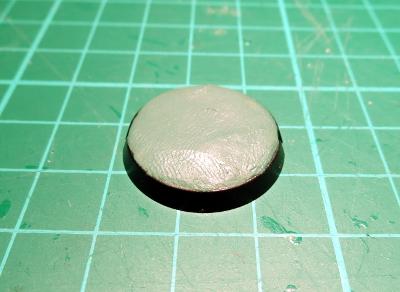
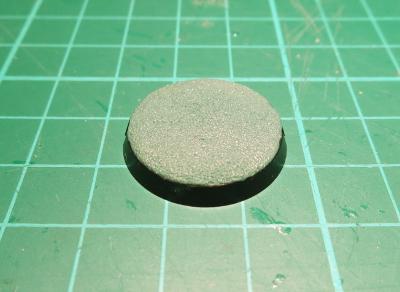
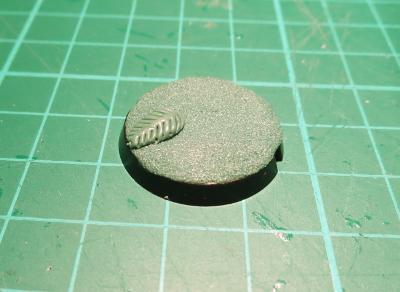
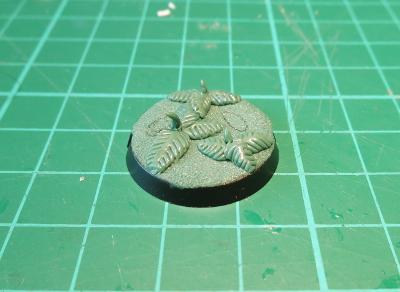
I start these off by building up some texture on the base, partly to look pretty and partly because the putty ferns that you're about to make will stick better to the layer of green stuff than to the plastic base.
Mix up some green stuff*, and press a 1-2mm thick layer all across the top of the base. Don't worry about fingerprints at this stage - they'll go away at the next step.
*For the uninitiated, 'green stuff' is the common name for a product called 'Kneadatite', which is a 2-part epoxy putty used for sculpting. I'll be putting together some basic green stuff tutorials in the near future.
Next up, take an old toothbrush and press the bristles into the green stuff to create a rough, pebbly texture all over the putty.
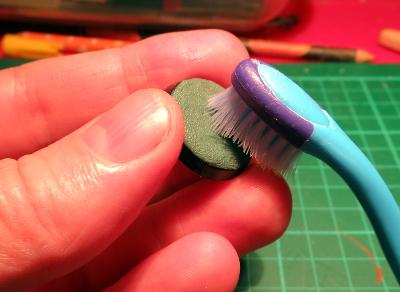
When you're done, it should look something like this:
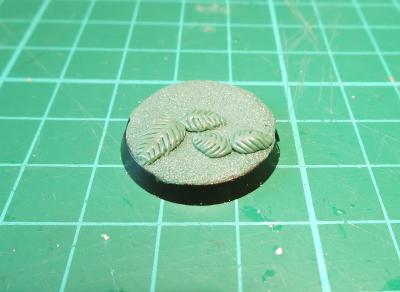
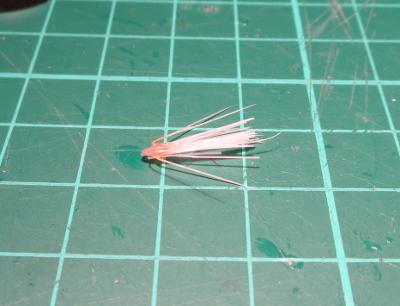
Once the putty is set, mix up a small amount and break off a 2-3mm ball. Roll this between your fingers into a teardrop shape, and press it onto the base just enough for it to stick there.
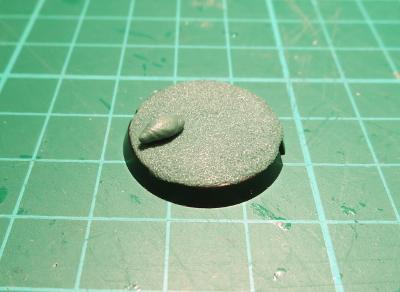
Using a round clay shaper, the back end of a hobby knife, or some other smooth, round tool, roll the teardrop out until it is mostly flat. For best effect, it should be flatter and thinner at each end than in the middle - this helps give the leaf some shape and make it look less like it's just laying flat on the ground.
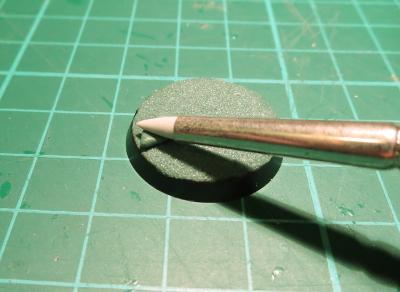
Now take a hobby knife and score a series of parallel lines down each side of the leaf, running from about half a millimetre out from the centre line and angling slightly forwards out to the edges of the leaf.
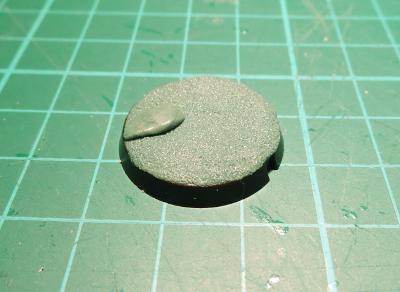
Repeat for a second leaf, butting the back end of the leaf up against the first and running it off in a different direction. Create other plants around the base using the same technique, remembering to leave room for the model's feet.
Note: If you're a little unsure about getting the placement right to fit a model on there, one easy way to give yourself a guide is to press the model's feet into the ground layer of putty before it sets.
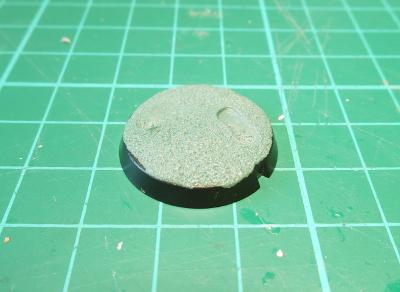
Alternatively, you can draw around the model's feet with a micro pen, or dot with paint wherever the model's feet will go.
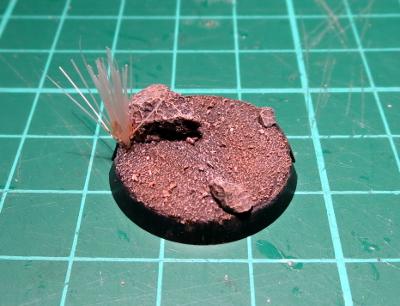
Once your first layer of leaves have set, you can build up your plants by adding extra layers on top, leaving each layer to set before moving on to the next.
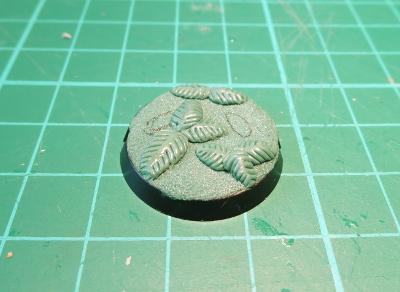
When you're happy with the buld-up of your ferns, roll out some small spikes of green stuff and press them in upright in the middle of each plant to represent a new, furled, leaf growth.
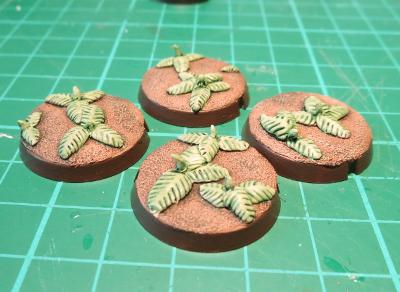
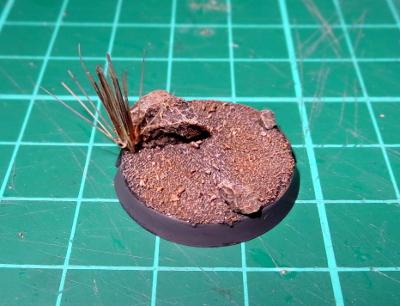
Leave to set, and then paint in appropriate colours. For the below, I've used Citadel Tallarn Flesh with a layer of Army Painter Strong Tone for the dirt, and Coat D'Arms Putrid Green with a wash of Army Painter Green Tone for the plants.
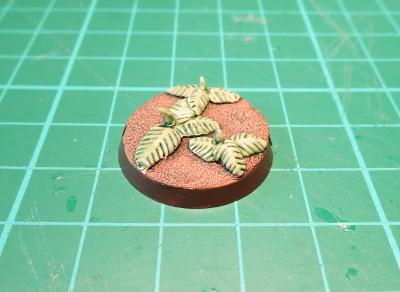
If you want a little more realism in the plants, add some tinges of brown to the lower leaves, as these are older leaves that will be starting to die off, and scatter some brown, discarded leaves around the base.
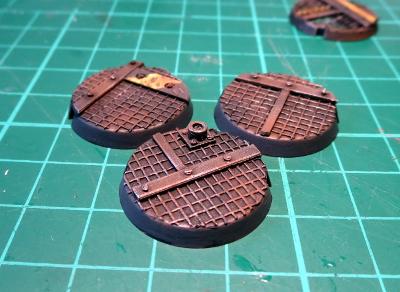
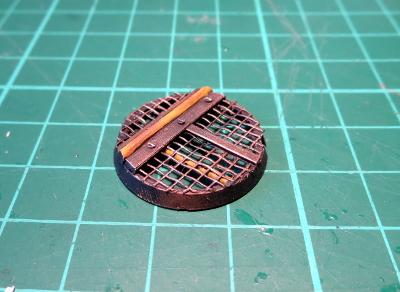
Metal Decking
There are all sorts of options out there for buying textured plastic sheeting which can be cut to size and glued to your bases, but this can get expensive. For a cheaper option that still looks effective, I use plastic flyscreen.
Start by applying a thin coat of superglue all over the top of the base, and then glue down a small square of flyscreen.
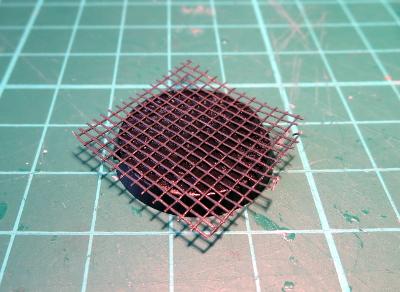
Once the glue has set, cut around the edge of the base with a sharp knife.
Now we can add some detail. Glue on small strips of plastic sheet or thin card to create panel reinforcing.
You can add rivets by drilling holes in the stripping with a 1mm drill bit (I recommend using a pin vice rather than a motorised tool for this, as it's really easy to gouge the holes out sideways with a motorised drill) and gluing in pieces of 1mm plastic rod, as below - I've shown the undercoated pic here, as it shows the detail better.
You can add whatever other detail seems appropriate. In the above pic, you can see a small pipe fitting or connection port made with a small square of plastic with a short length of tubing glued to it, with rivets added on the corners to hold it down.
Once you're happy with the level of detail on the base (and you generally don't need much) it's time to paint. For the below, I've just used a black spray undercoat, followed by a heavy drybrush of Citadel Boltgun Metal followed by a wash of Army Painter Strong Tone. Once the wash is dry, I finished up with a light drybrush of Coat D'Arms Hairy Brown to dirty things up here and there, and a light highlight of Citadel Mithril Silver on the edges.
You can also add sections of hazard striping, coloured lines or deck numbers for some more colour.
As an alternative, if you're feeling brave, you can go for more of a mesh catwalk look by cutting the top off the base before applying the flyscreen and other detailing.
All of the ideas presented here and in the previous article are, of course, just starting points. You can add to or combine these different effects to create your own style, or look to real-world or movie set inspiration for something completely different.
Feeling inspired? Want to share how you have based your models? Jump into the Comm Guild Facebook page and show us what you have come up with!
All Your Base, Tutorial Part 1
Posted on Tuesday Nov 29, 2016 at 05:00pm in Tutorials
- by Iain Wilson
Once upon a time, there was an more-or-less universally accepted standard that gaming miniatures' bases would be either covered in flock (shudder) or covered in sand and painted light green. We've come a long way since then, with the common standard now to have sand painted brown with a couple of tufts of static grass to brighten things up a little.
If that's leaving you less than inspired, then this article might be for you! Over a couple of weeks, I'm going to run through a few different ways to pretty up your bases, ranging from easy to 'might need a little practice' in complexity.
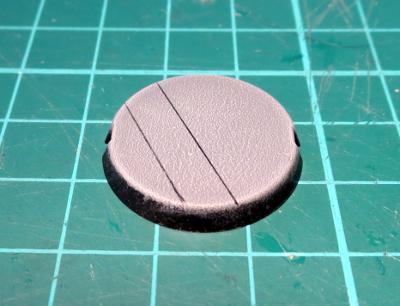
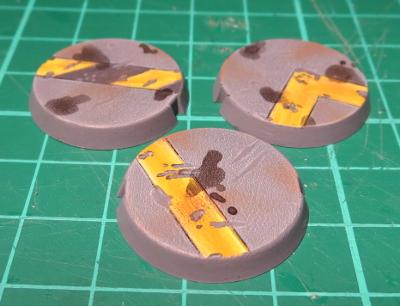
First off the blocks: Industrial Grey
This style is intended to represent industrial or urban cement-paved areas, and can be as simple or as complex as you want it to be (or as your painting skills will allow!)
Start with a medium grey - I've used Vallejo Basalt Grey.
Then drybrush with a lighter grey - in this case, Vallejo Light Grey.
You could leave it there, but where's the fun in that?
You can use a ruler or a cast off piece of sprue to mark out lines on the cement, to represent part of the sorts of markings you might find on cement floors - hazard lines, lane markings, etc.
Paint in between the lines with an appropriate colour. Yellow is a great contrast against the grey, or white is good for a more subdued look.
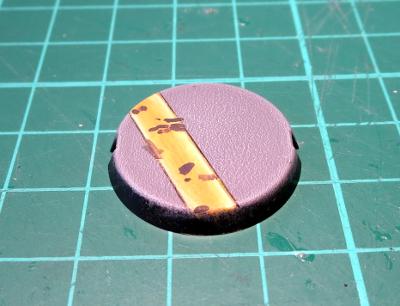
Then you can add weathering, dirt and stains to your heart's content. For the chips, paint small splotches of your original medium grey and highlight around the edges with the light grey. Dirty things up by drybrushing with a little brown, and add drops of ink for oil or chemical stains.
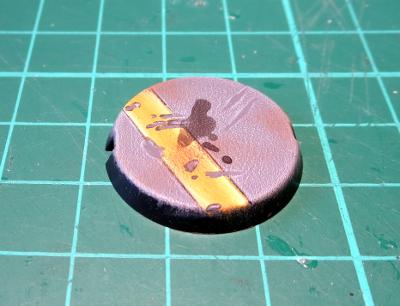
Finally, paint around your base edges.
There are several schools of thought on base edges. Some painters like to go with a colour that complements whatever is on top of the base. Some prefer a contrasting colour, or different colours to denote different units, or even just good old black. There's no right or wrong - just go with whatever you think looks best.
Next: Let it snow!
There are various hobby 'snow' products on the market for creating wintery bases or terrain, but to me they never look quite right, as they're too grainy. Instead, I like to go with something like this:
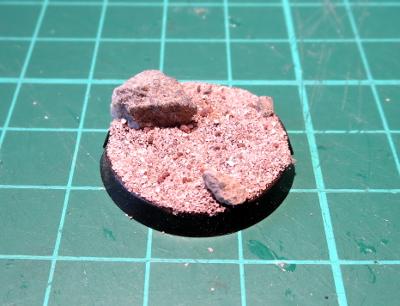
Start by gluing a few small lumps of sand or fine gravel to your bases for a little texture. If you're doing this with the bases separate to the models, make sure you leave space in between the rocky clumps for the model's feet.
Once your glue has set, paint the rocks up. I've opted for a black wash to start out. This is followed by a heavy drybrush of brown (I used Citadel Tallarn Flesh here) and then a light drybrush of light grey (the Vallejo again). That's not a hard and fast formula - rocks come in all sorts of colours and textures, so use whatever colours will make for the nicest contrast with your miniatures.
Once that's done, the flat space in between becomes snow. If you want to (and I would recommend it on larger bases), you can break up the flatness by adding smooth bumps with Green Stuff or Milliput, or just leave them flat. Paint with white.
The last step is a little hard to photograph, so you'll have to take my word for it that it looks better in person. To get a nice, shiny snow look, I use a pearlescent paint. You can find a few variations on a similar theme in most craft shops - either a pearl white paint, a pearly gloss sealer, or a pearl medium which you add to your paint. Whichever you wind up with, paint a coat or two over your white, and then finish by painting the base edges.
Moving on: Rocky Wasteland
OK, so this one isn't actually too far removed from the standard sand-and-static-grass option, but without the static grass. Start by gluing some fine gravel mix - Mine is a mix of silver sand, regular sand and some crushed up slate. I like to add some bigger pieces of stone scattered around these bases as well to create a little bit of a feature.
Paint: start with a black or brown wash to get into all the crevices.
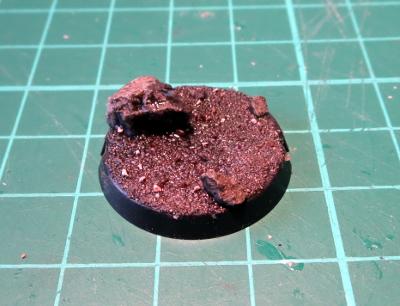
The drybrush with browns and/or greys (or whatever other colours you want your wasteland to be). I've used light grey and Coat D'Arms Hairy Brown here.
That's the boring part. Now to add some zing! Find yourself an old toothbrush, and pull out one of the clumps of bristles - use pointy pliers if they're reluctant to come out. There will sometimes be a small piece of metal in the fold at the bottom of the bristle that helps hold them in the toothbrush. If there is, discard that.
Before you let go, add a little superglue into the folded bottom of the bristle clump to hold it all together.
Then apply a small dollop of clear craft glue or superglue to the bottom of the bristles and press them into place on your base.
If you have a nice hollow to glue the bristles into, superglue will work fine. If they're sitting more on top of the gravel, the craft glue is better as it is thicker and will pool around the base of the bristles to give them a little stability.
Once your glue is set, paint by washing with brown ink, and then drybrush a little bone or light green over the top to pick out the individual bristles again. Then paint your base edge.
As a final note on this one - If you're making up your base separately to the model, it's a good idea to either leave a couple of spots with no gravel for the model's feet to glue into, or pin the model to the base, as model feet don't tend to glue well to sand or gravel due to the lack of flat surface to grab onto.
In part two, we try to make your bases more riveting, and wander off in search of a shrubbery. Stay tuned!
Feeling inspired? Want to share how you have based your models? Jump into the Comm Guild Facebook page (https://www.facebook.com/groups/MaelstromsEdge)!
Painting Tutorial: Lens Painting
Posted on Tuesday Nov 22, 2016 at 05:00pm in Tutorials
- by Iain Wilson
Time for another painting tutorial! This time around, I'm having a look at lenses.
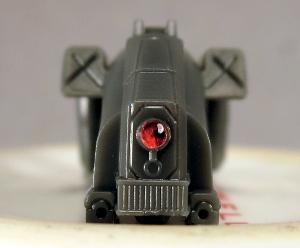
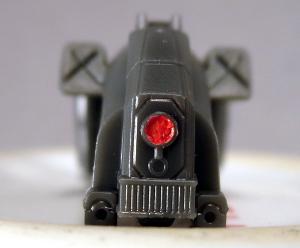
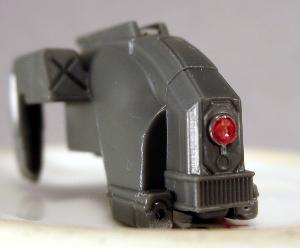
Epirian bots have a single eye lens which creates a great focal point on the model's 'face' if it's painted in a nicely contrasting colour. Below, we'll go through three different, easy techniques for painting these lenses without losing too much hair in the process.
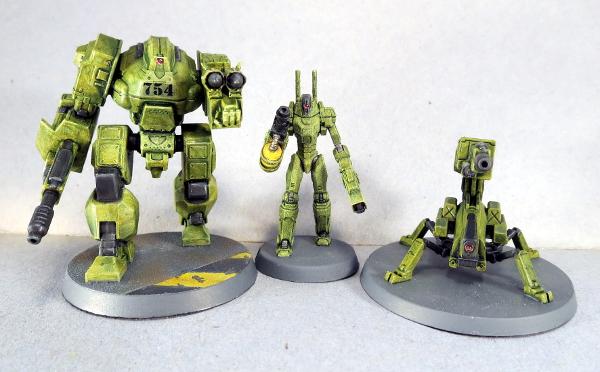
The Wash Method
This method tends to not look quite as effective as some others, but has the benefit of being quick and easy to do. Start by painting the lens silver.

Then add a wash of the colour you want the lens - in this case, I've used Army Painter Red Tone. This will give you a sightly shimmery, coloured lens. If the lens is convex (as with the drone lenses) you'll also get a lighter point of colour in the middle. For flat lenses, like on the Hunter bot, you can replicate this by adding a small dot of white or pale grey after the ink has dried.
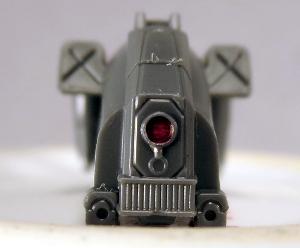
The Specular Method
This is a variation on the common blending method used for lenses and gemstones and the like. Start with the main colour you want the lens to be - the below is Vallejo Bloody Red.

Using a fine brush, apply a small amount of black ink to the top right of the lens. You want enough that it pools against the side, but not so much that it runs over the whole lens. If this gives you a particularly stark transition from the red to the inked area, you can blend the two in a little once the ink has dried by adding a small dot of red back into the middle of the lens, overlapping onto the edge of the inked area.
Finally, using some thinned white paint, apply a tiny dot in the middle of the dark inked area, and highlight the bottom left edge of the lens.
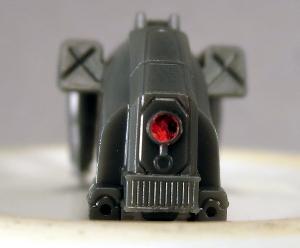
The Glue Method
Start with your chosen base colour - I've gone with red again, because I like red lenses...
Now squeeze out a small amount of superglue onto a pallet or other flat surface. Pick up a tiny drop of glue on the tip of a pin, and apply it to the lens. It may take a little experimenting to get the right amount (You might want to practice on something that doesn't matter first, as it's next to impossible to clean excess glue off again if you use to much). You need enough that it forms a small bubble of glue covering the lens with the surface tension of the glue holding it in place, but not so much that it runs out past the edges of the lens. Leave the model sitting with the lens horizontal to dry.
As the glue dries, it will most likely shrink a little, and will leave a nice, shiny, glass-like coating over the lens.
You can also us this technique with clear craft glue, although as that sort of glue tends to be thicker and tackier than superglue it can be tricky to get a small enough amount in the right place. You could probably also use gloss sealer, although depending on the size of the lens and the amount of sealer you apply, it may take longer to set properly.
And there you have it: Three different ways to paint your robots' optic lenses. Go forth and assemble your robot legions, and as always feel free to share your creations on the Comm Guild Facebook page (https://www.facebook.com/groups/MaelstromsEdge)!
Quick and Easy Painting with Washes
Posted on Monday Oct 17, 2016 at 05:00pm in General
- by Iain Wilson
Not everyone has the time to spend paintstakingly blending, shading and detailing their models. Sometimes, you just want to get them on the table quickly, so I thought it might be useful to explore some options for fast and painless army painting.
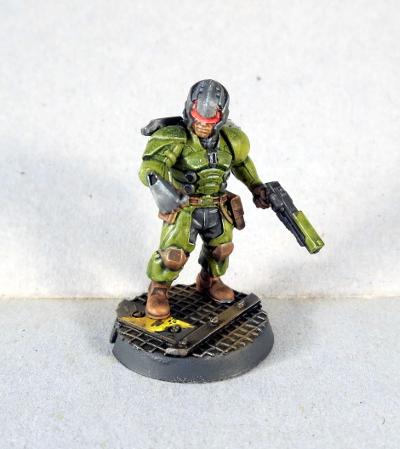
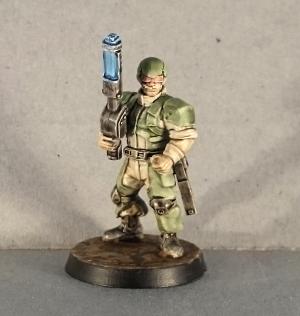
I'm going to start with some Epirian guinea pigs, painted exclusively with washes! This is a really easy technique to get to grips with, and while it won't get you an award-winning work of art, it does give you perfectly serviceable-looking models that look great on the table.
For those unfamiliar with them, washes are thin paints designed to sink into the model's crevices whilst leaving less colour on the raised detail (Also sometimes called 'inks' - Not to be confused with 'glazes' which are translucent paints that tint the surface they're painted onto evenly). So while it's a little less precise than blended highlighting or 'juicing' (applying super-thin coats of increasingly dark colour to build up shadow or colour transition), we can use washes over a pale base colour to highlight and shade a model all in one fell swoop.
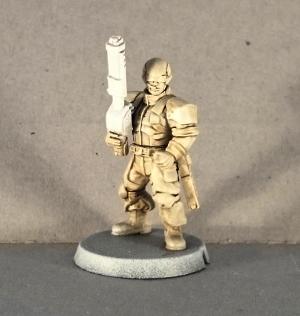
I start by giving the model a base coat of white.
Now I'm going to start applying washes to build up the colours I want, leaving the model to fully dry between each. On this model, I've started with a coat of Army Painter Soft Tone over everything except for the weapons. This is pale enough that other colours will go ok over the top - if you're using darker tones, it's best to try to keep them strictly on the areas where you want them, otherwise you'll need to touch up your basecoat to cover up the overspill before painting each part of the model. Apply a generous coat of wash and leave it to thoroughly dry before moving on to the next step.
Next, I've gone over the armour and chaps with Army Painter Green Tone, and picked out the boots, belt, kneepads and weapons with Secret Weapon Soft Body Black (this has a little more pigment in it than most other black washes I've tried, so is good for painting over pale colours without needing half a dozen coats to build up shading).
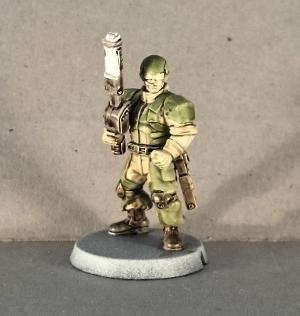
I've left the tip and front facing of the Shock Baton free of the black wash, as once that layer of wash is dry I have applied a coat of Army Painter Blue Tone to those. I've also gone over the exposed skin areas with Army Painter Flesh Tone, and painted his goggles with Army Painter Red Tone.
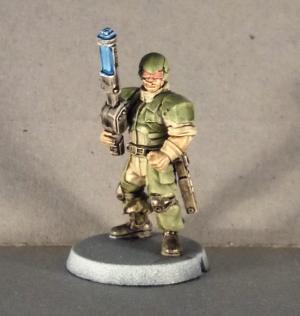
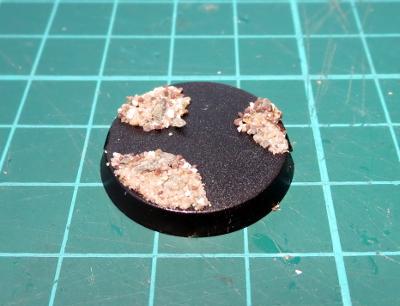
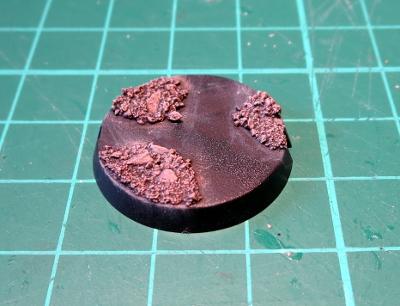
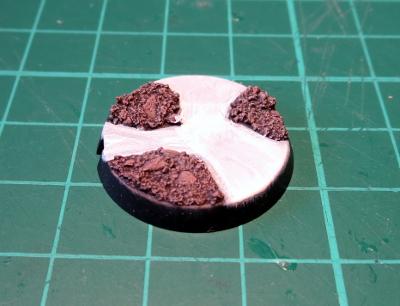
For a final step, I gave his weapons another coat of black, and detailed the base. I've gone for a cracked earth look on the base, just for something quick. There are specialist paints out there for doing this sort of thing, but this one was done with regular paint and wood glue - I'll be posting a tutorial on how to do that later on.
At this point, the model is ready for the table. You can add extra detail if you feel like it, and of course you can use different wash colours to suit your preferred colour scheme.
Go ahead and give it a try, and feel free to share your creations on the Comm Guild Facebook page (https://www.facebook.com/groups/MaelstromsEdge)!
Tags: expansionsprue painting washes