Entries tagged [spotlight]
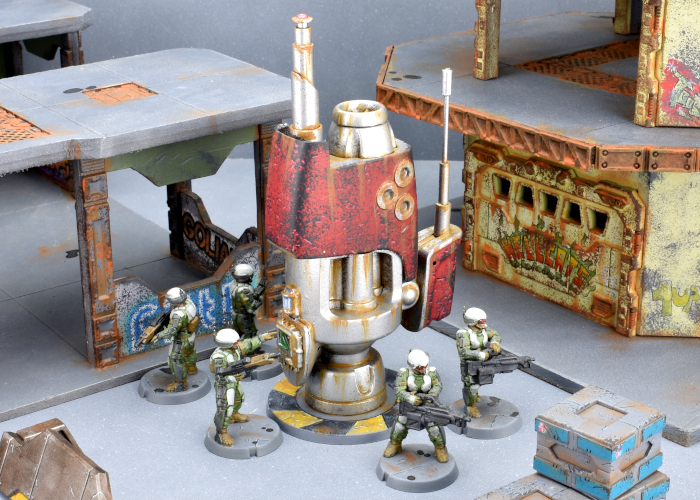
Terrain Kitbash: Communications Hub
Posted on Monday Aug 30, 2021 at 06:00pm in Tutorials
Regular readers would know by now that I have a habit of grabbing odd things from around the place that have interesting shapes and turning them into terrain. In the past, I've built terrain from various bits of building hardware, storage containers, food packaging, and Christmas tree decorations, amongst other things. This week, I ransacked Amazon's toy department to put together a communications hub!
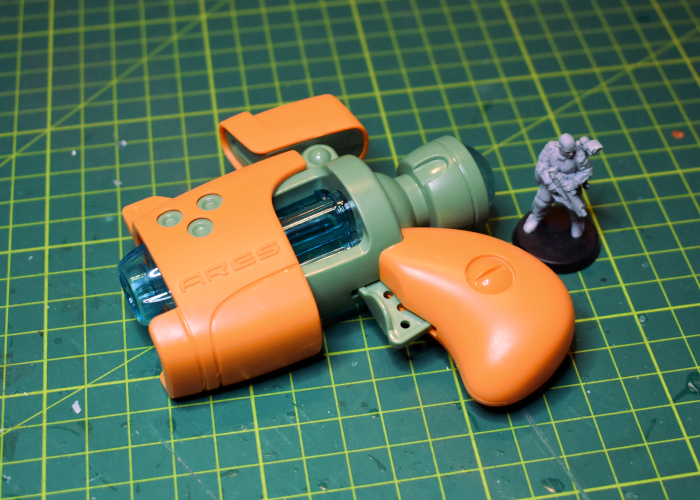
The base for this model was a small light up laser gun toy that I found while browsing Amazon. This particular toy came in a set of 4 - three of this same design in different colours, and another blockier design that I'll find a different use for later.
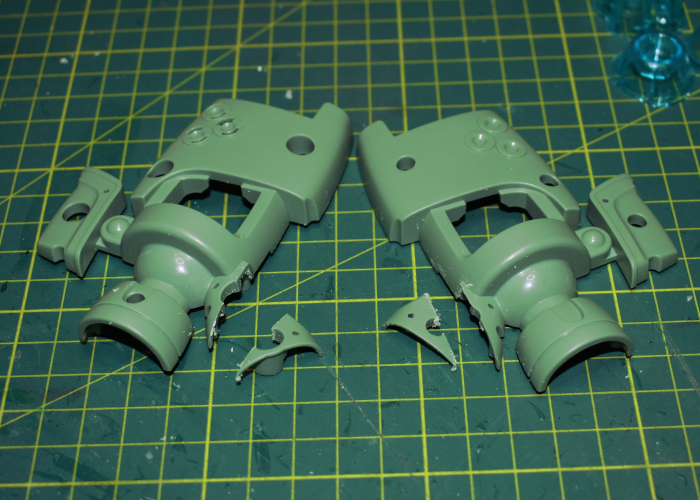
The first step was to take the gun apart so that I could remove the pistol grip and any other un-needed parts. The cowling from the front will likely wind up as a building entry at some point in the future, and I saved the light and speaker just on the off-chance that I want something to light up and make pew-pew noises.

The main part of the gun was almost perfect as is, although I trimmed down the protrusion that the pistol grip originally clipped onto with a razor saw.
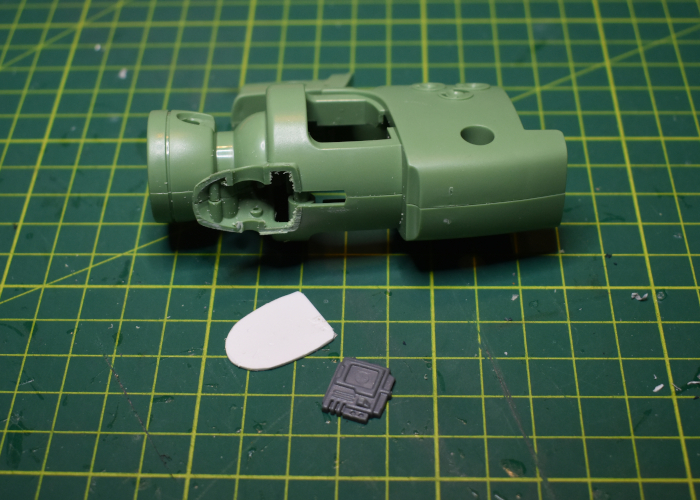
I then cut a piece of plasticard to fit neatly over the opening, and grabbed a computer panel from the first Maelstrom's Edge terrain sprue to add to this plate.
I reassembled the body of the gun, and added a couple of aerials made from plastic tubing, aluminium rod and a post piece from the second Maelstrom's Edge terrain sprue.
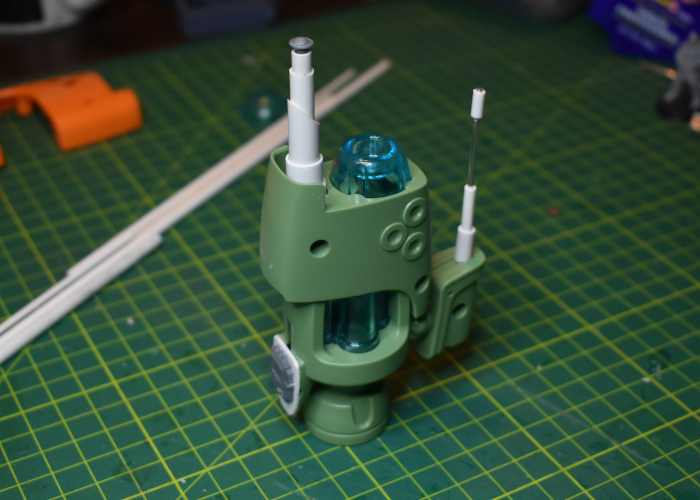
Finally, I added a base to make it a bit more stable, glued an exhaust fan from the second terrain sprue over the muzzle piece, and puttied over the screw holes.
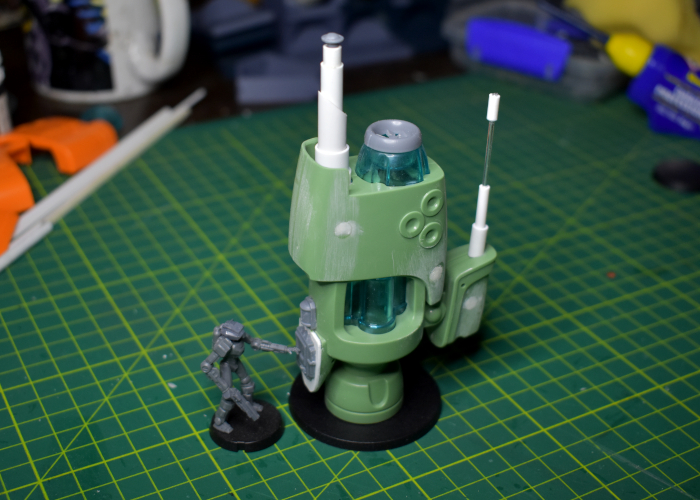
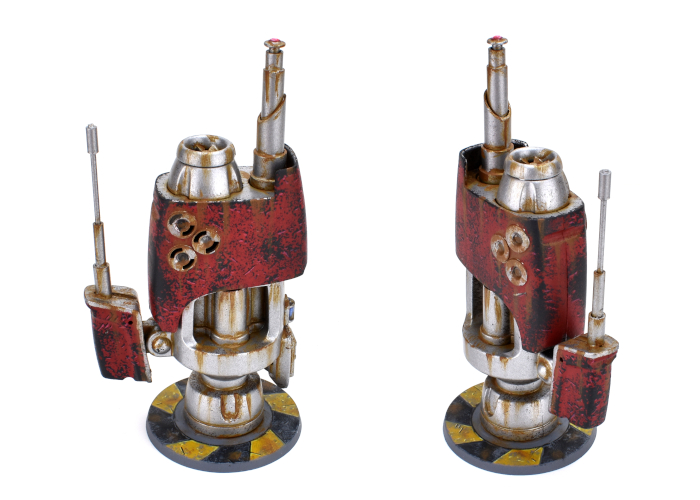
With some paint on, it wound up looking like this:
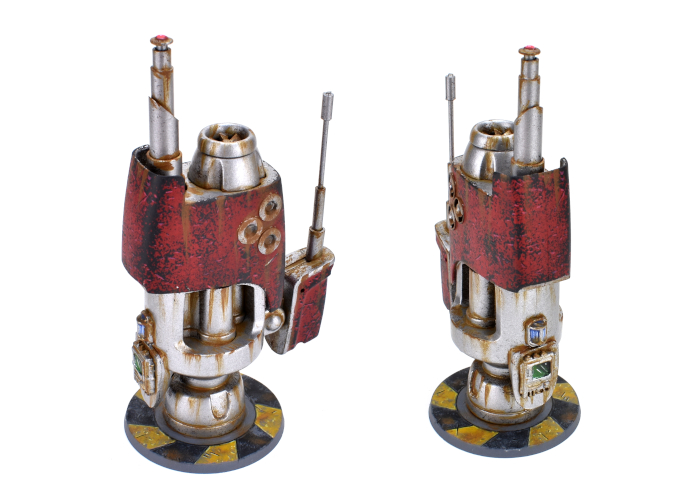
I considered leaving the blue central piece unpainted as a shiny, translucent feature, but decided against it as the three guns have different coloured pieces, so the translucent piece would be different on each comm hub... and that would offend me on a deeply spiritual level when I build the other two.
To build your own hub of communicative doom, you can pick up the Maelstrom's Edge terrain sprues along with the rest of the Maelstrom's Edge range from the webstore here.
What are you working on? We would love to see your models and terrain in the Comm Guild Facebook group!
For other building ideas, modeling tutorials, army spotlights and conversion walkthroughs, check out the Hobby section of the Maelstrom's Edge website here.
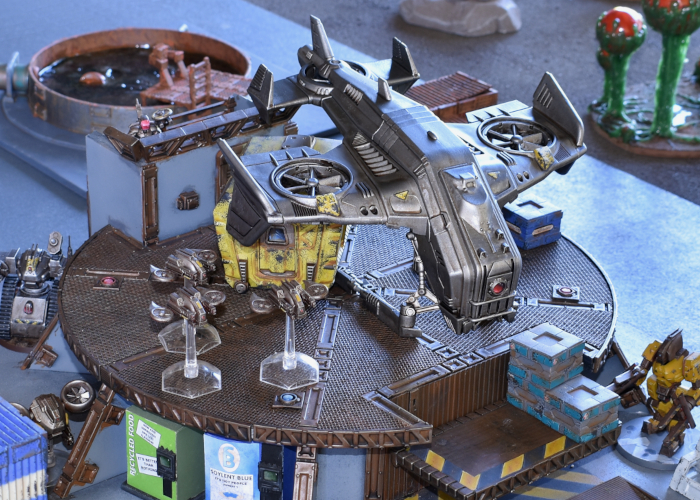
Modeling Spotlight: Kitbashed Pegasus Heavy Cargo Drone
Posted on Tuesday Jul 20, 2021 at 06:00pm in Tutorials
Time to hack something up, just because we can! I've had my eye on the Hornet dropship from Mantic's Warpath game for some time, as its general shape feels similar to the Epirian Firefly drone, just scaled up. So, I decided to take one and turn it into a heavy cargo drone to support Epirian forces behind the lines! Read on to see how it was built.
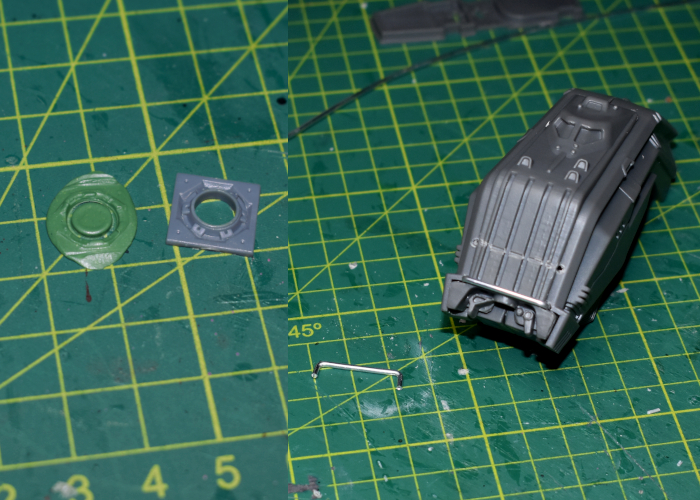
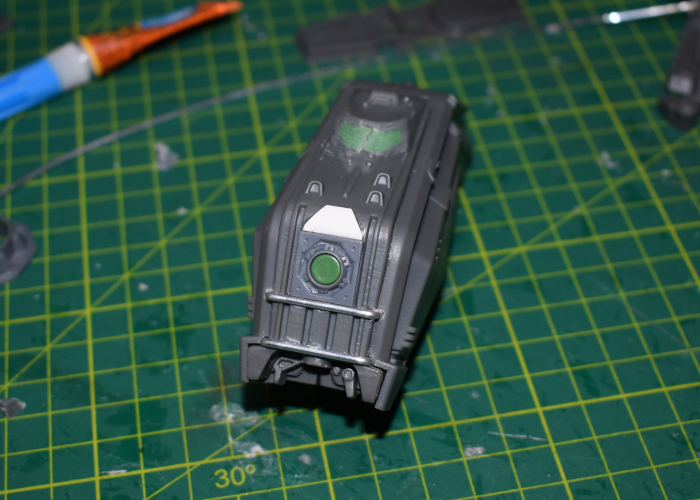
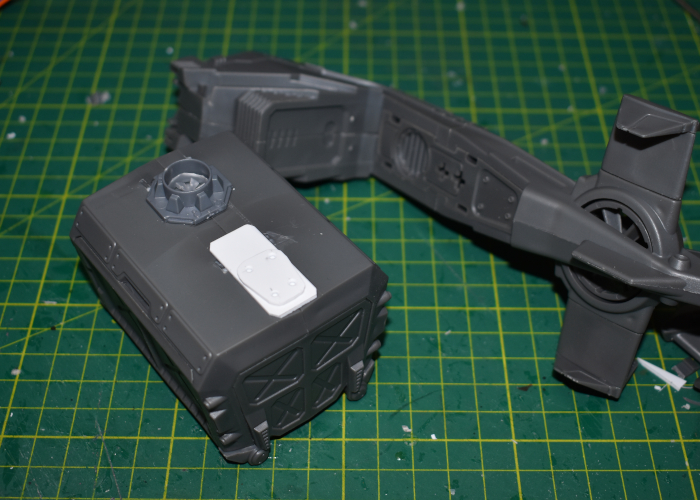
With its design already including wing-mounted turbines, the main alteration required was to make the front of the Hornet look like a standard Epirian drone. I used a small pipe fitting from the first Maelstrom's Edge terrain sprue for a sensor lens housing. For the lens itself, I rolled out some 'Green Stuff' putty into a thin sheet and used the pipe fitting as a stamp to cut out a circle. I also took a couple of pieces of aluminium rod and bent them to fit across the front section on the Hornet, to form the rectangular grill that Firefly and Spider drones have under their sensor lens.
Once the Green Stuff was fully cured, I trimmed away the excess, and glued everything into place on the front of the Hornet. The Hornet's protruded above the lens housing, so I covered over it with a thin piece of plasticard. I had originally intended to cut off the cockpit bulge and seal over it with plasticard, but decided it would be easier to use some putty to fill in the windscreen recesses.
As this drone was intended as a scenery piece rather than for gaming, I decided to keep the cargo container as a separate piece. There is a doorway on one end with no door, as this normally sits up against the door on the back of the Hornet cockpit section. I took a door from the terrain sprue and trimmed it down to fit into the opening, adding a piece of plasticard to fill in the window. I also wanted to add some detail to the top of the container. Taking a fan from terrain sprue #2, I trimmed it down to fit inside the large pipe fitting from terrain sprue #1.
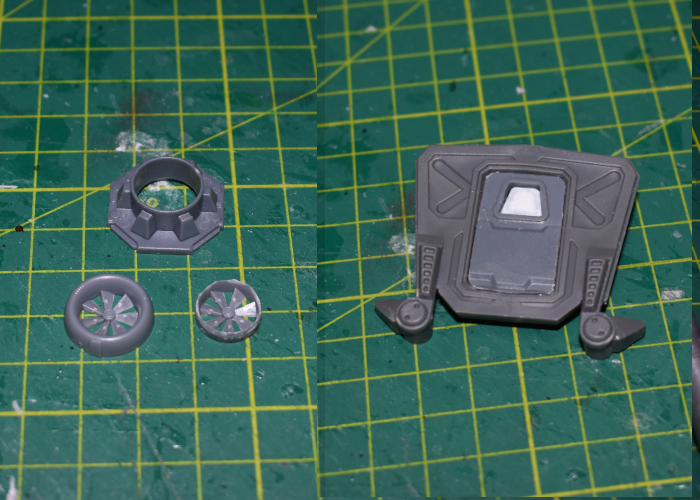
I glued the fan assembly onto the top of the container to line up with the circular vent on the underside of the Hornet's fuselage, and added some plasticard shaped to match the fuselage's trapezoid hatch.
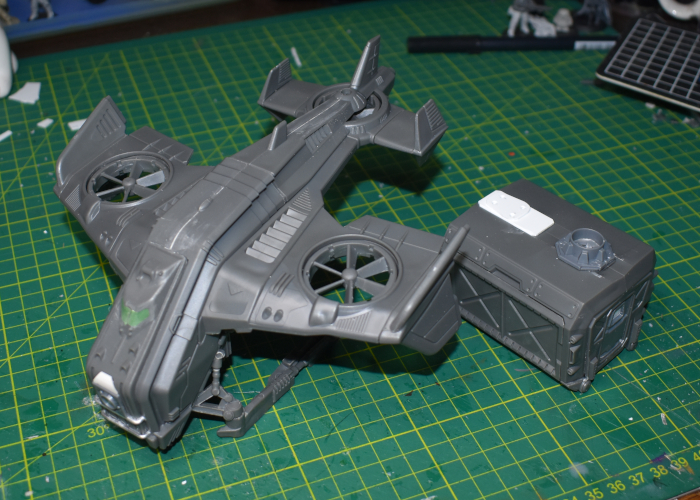
With everything else just assembled as normal, the new drone was ready for paint!
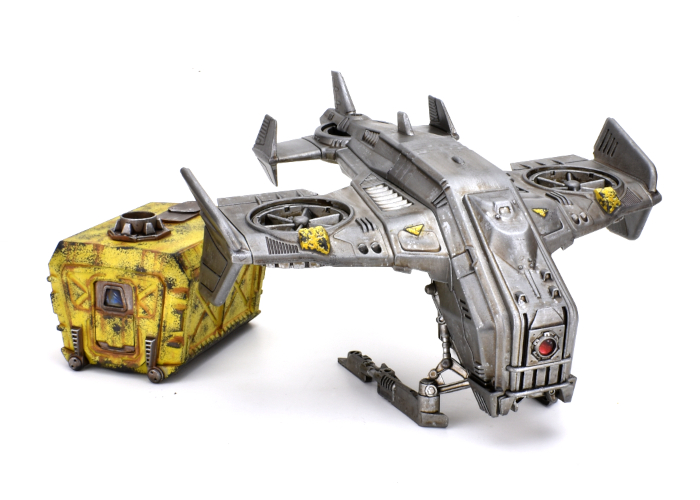
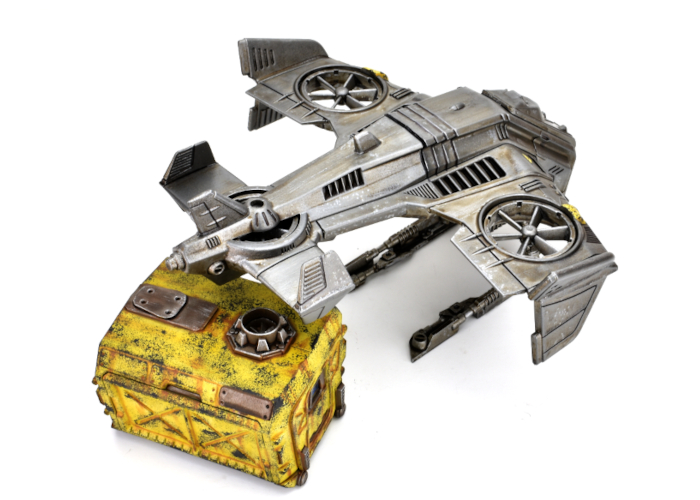
And the finished Pegasus Heavy Cargo Drone, ready to haul some heavy cargo:
To turn your own Hornet into a heavy drone of logistical doom, you can pick up the Maelstrom's Edge terrain sprues along with the rest of the Maelstrom's Edge range from the webstore here.
What are you working on? We would love to see your models and terrain in the Comm Guild Facebook group!
For other building ideas, modeling tutorials, army spotlights and conversion walkthroughs, check out the Hobby section of the Maelstrom's Edge website here.
Tags: conversion drone kitbash modeling spotlight
Model Spotlight: Revolutionary Captain!
Posted on Tuesday Jun 15, 2021 at 11:41pm in Tutorials
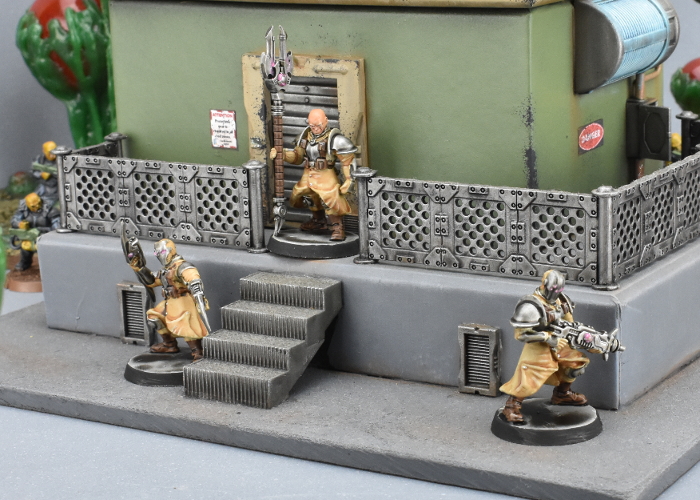
With the release of the Revolutionary Captain ushering the SARA subfaction into Maelstrom's Edge games, a range of new tactical options opens up for the Broken. I'll be sharing my fledgling SARA force in an upcoming army, but to kick things off I thought it would be fun to have a look at some modeling options for the fantastic Revolutionary Captain model!
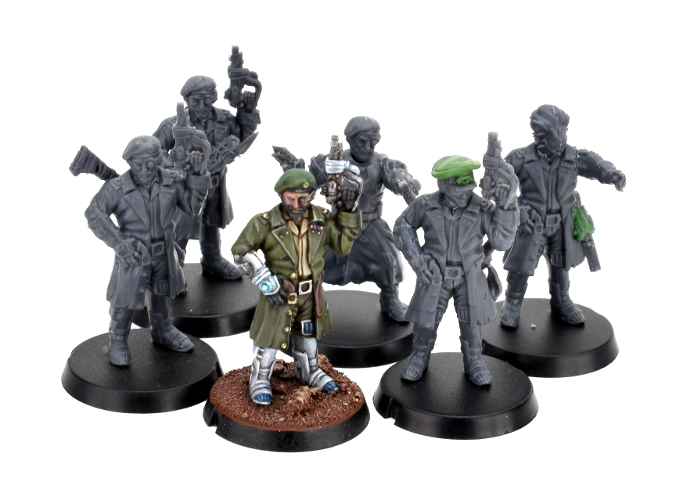
The Revolutionary Captain is a multipart, plastic model. He's not as modular as most of the Maelstrom's Edge model range, as the sculpt was in this case aiming for a specific character look. Being plastic, however, it's still relatively easy to give the model a more customised look if you feel so inclined, and I'll explore some different ideas for that below.
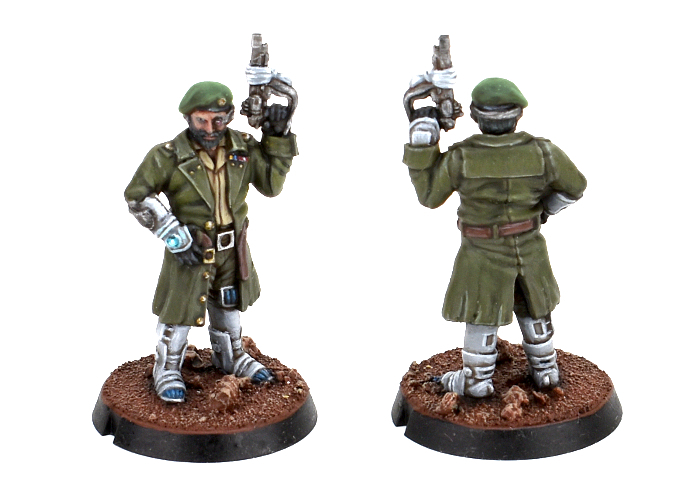
The studio model, painted by Winterdyne.
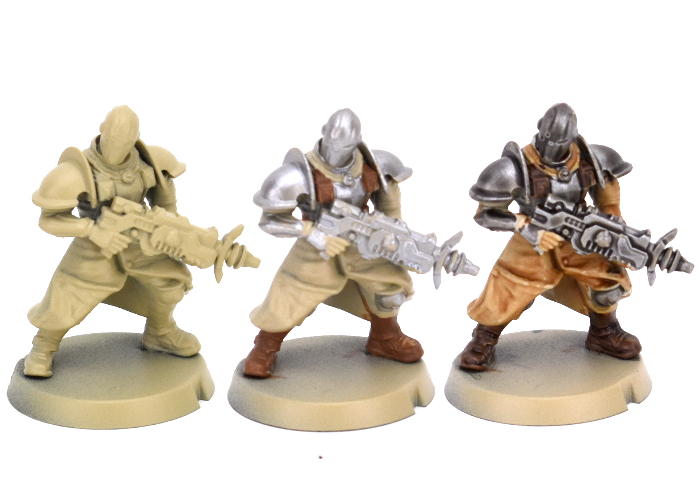
Built straight off the sprue, the Revolutionary Captain is equipped with his SARA Officer's Pistol. His rules card, which can be found here, gives him the option to take one of a number of different secondary weapons, which can mostly be sourced from the Broken Rabble kit. To equip a Beam Blastgun or Slug Rifle, the easy option is to just stick the weapon on his back. You could model a rifle strap from modeling putty, or just assume the weapon is held in place with a magnetic lock built into the back of his coat.
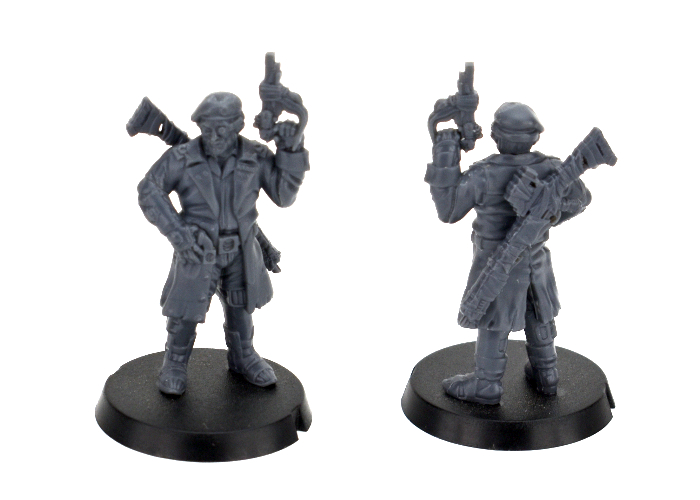
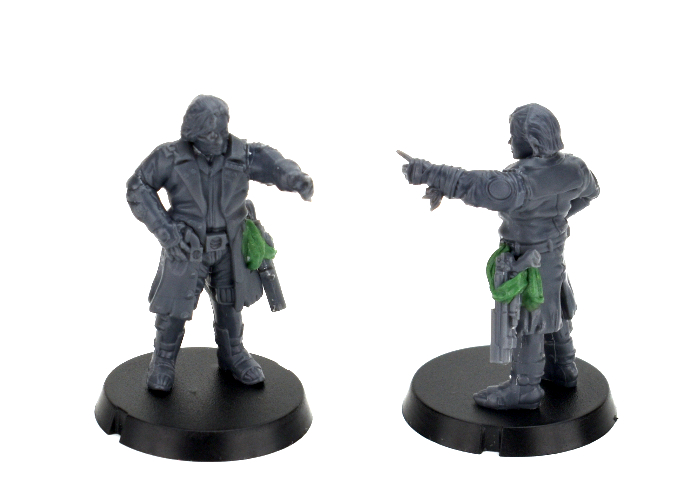
To take a more hands-on approach, for this version I sliced off his right hand, and used a forearm snipped from a Rabble sprue arm to hold the blastgun. As it still sits against his waist, there's no need to try to resculpt the coat belt where the hand was removed, as you can't see it anyway.
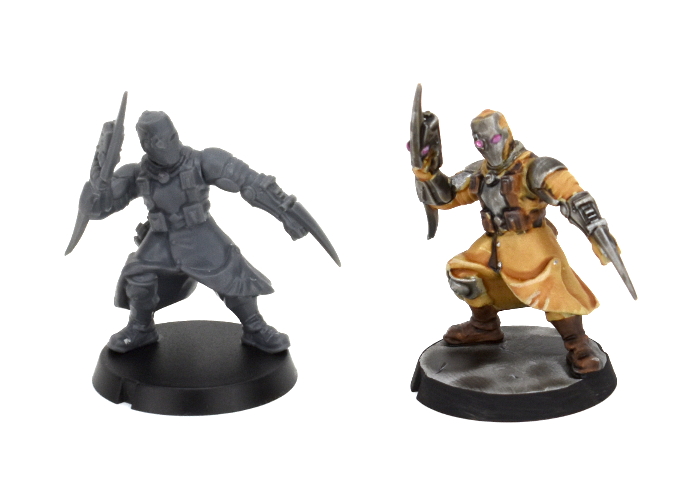
Of course, everyone knows that battlefield commanders spend a good amount of their time pointing at things. If your commander isn't either pointing at something, or standing with one foot on something, people might not even recognise them! By slicing off the Revolutionary Captain's left arm at the coat's shoulder seam, I was able to glue a pointing arm from the Rabble sprue in its place. I also replaced the head with a regular Rabble head by drilling out the neck a little with a 2mm drill bit, and glued a maglock pistol from the Epirian Contractor kit onto her hip with some strapping made from 'Green Stuff' putty to replace the officer's pistol. The putty isn't strictly necessary - you could easily just glue any of the Captain's pistol options to the belt, but the addition of the putty strap does make it look a little nicer on the model.
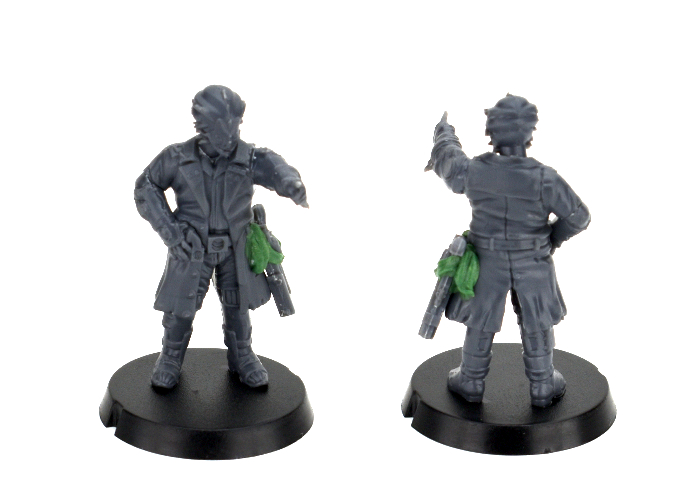
Of course, there's no reason for only humans to be revolting! With the neck drilled out as above, you can use any of the alien heads from the weapons sprue in the Rabble kit to create a xeno force commander.
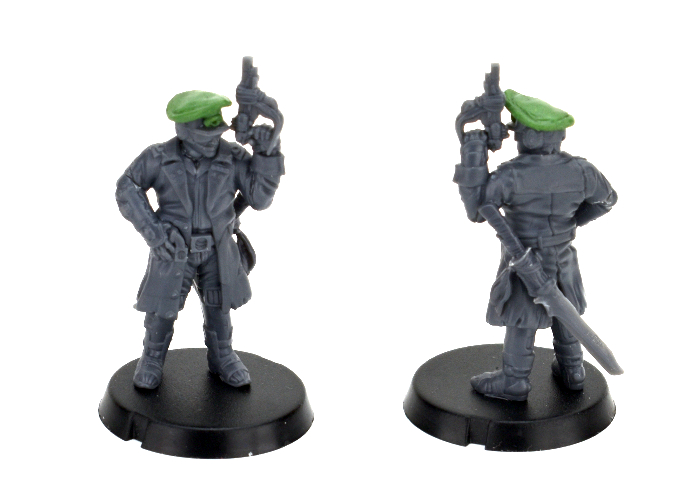
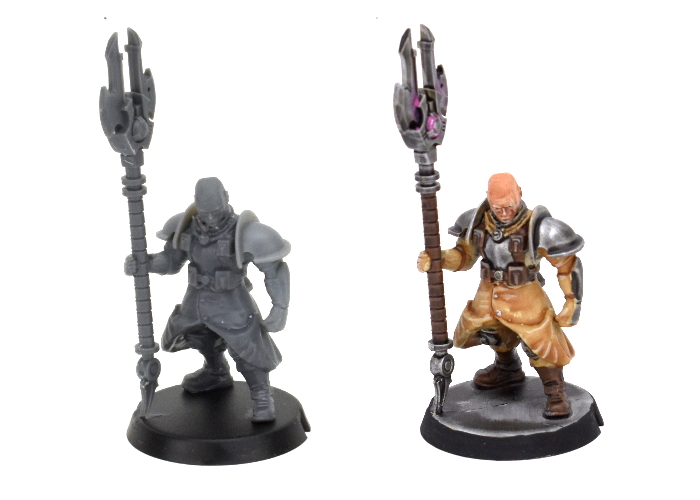
While we're replacing heads, some Captains like a nice, sensible cap in place of a beret, so for this one I used an Epirian Contractor head (mostly for the sunglasses!) and built the cap up into an officer's hat using Green Stuff. I also added a melee weapon on his belt using part of a Karist sword from the Faction Expansion Sprue and bits from a couple of weapons on the Rabble sprue. This could easily represent either the Poisoned Blade or Trophy Melee Weapon. For a slightly easier option, you could just use the Karist sword or knife from the Faction Expansion sprue. The resin Forsaken Chieftain also comes with both of these melee options, so if you have that model you could use whichever one you didn't use on her for the Revolutionary Captain.
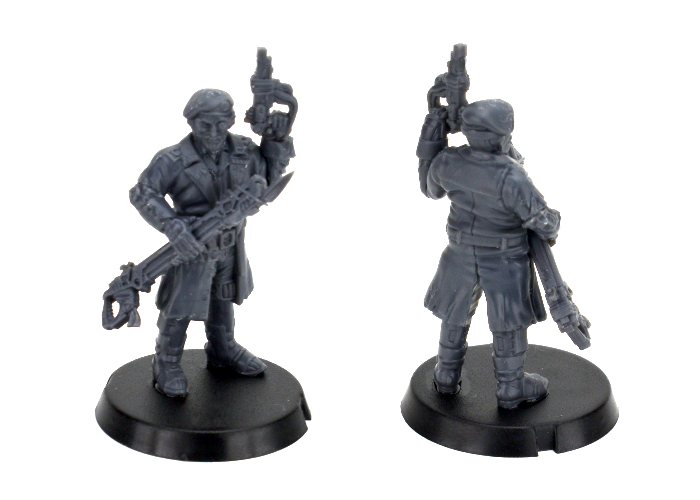
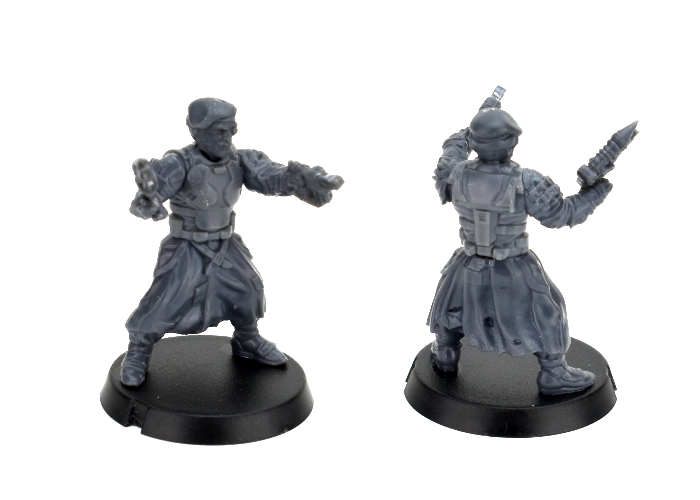
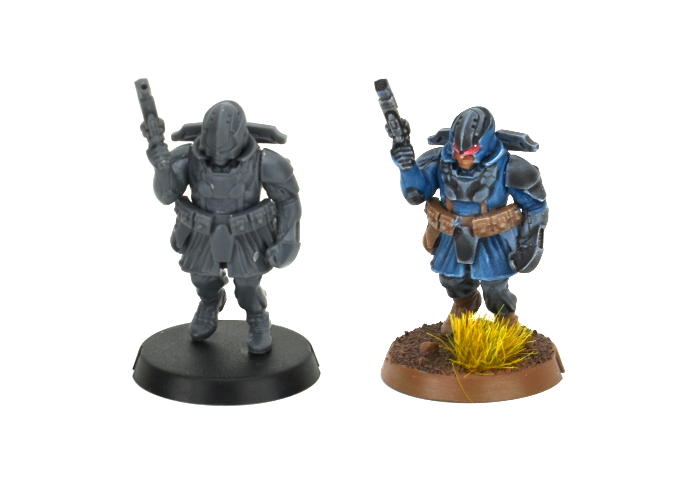
Of course, if you're hacking up your Revolutionary Captain model to replace heads and weapons, this leaves you with some useful parts to build another Captain to lead a second Detachment! For the below model, I used some parts from the Rabble kit (legs, arms and beam pistol), the left hand and head from the Revolutionary Captain, and a torso from the Epirian SecDef kit just to help him to stand out a little more from the Broken horde.
To build your own army of revolutionary doom, you can pick up the Revolutionary Captain along with the rest of the Maelstrom's Edge range from the webstore here.
What are you working on? We would love to see your models and terrain in the Comm Guild Facebook group!
For other building ideas, modeling tutorials, army spotlights and conversion walkthroughs, check out the Hobby section of the Maelstrom's Edge website here.
Tags: broken conversion model modeling sara spotlight tutorials
Model Spotlight: Remnant Nimbus Battlesuit.
Posted on Monday May 24, 2021 at 06:00pm in Models
You can find this fantastic resin miniature in the Maelstrom's Edge webstore here.
Model Spotlight: SecDef Lieutenant
Posted on Monday May 10, 2021 at 05:00pm in Models
You can find this fantastic resin miniature in the Maelstrom's Edge webstore here.
Conversion Spotlight: Automated Uplink Relay, MkII
Posted on Monday Mar 08, 2021 at 05:00pm in Tutorials
When pursuing conflicts outside of its zone of control, the Epirian Foundation makes use of portable uplink drones that link to orbital satelites and airborne recon to provide battlefield intelligence and allow Bot Handlers to remotely interface with Epirian assets on the ground. The Battle for Zycanthus box includes a cardboard marker for the Automated Uplink Relay, but for those wanting a more 'solid' version, I shared a kitbash idea some time ago using parts from various Epirian plastic kits and metal tracks from a Bombshell Miniatures model. The arrival of the PDC Gun Carriage gave me an idea for an alternative, all-plastic version!
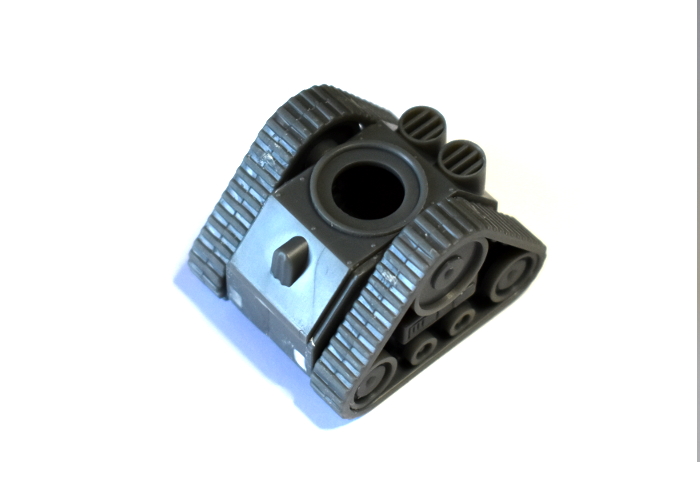
I made a few changes to the drone design this time around, with the most obvious one being the tracks. I built the track unit from the gun carriage as normal, although I trimmed off the lugs on the front that hold the dozer blade.
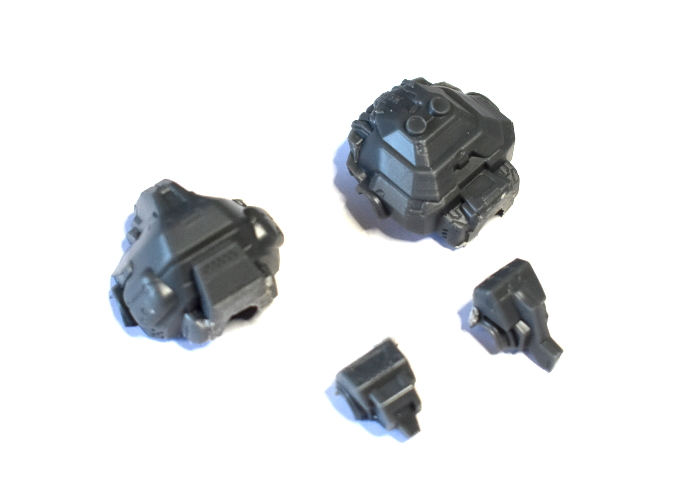
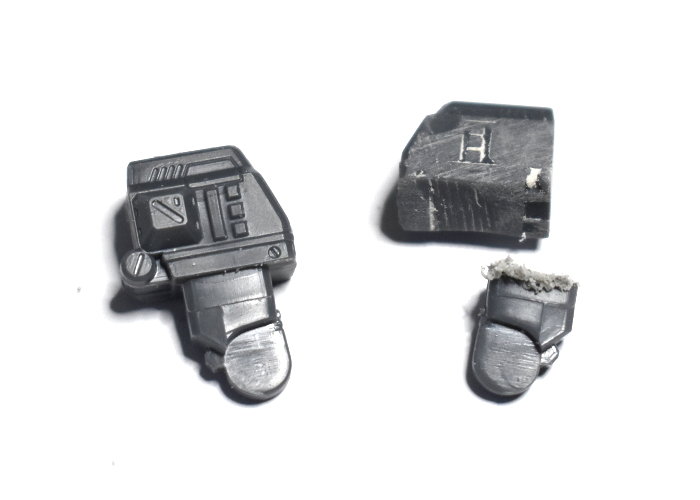
As with the original version, I used the body of an Epirian Hunter war mech, cutting apart at the waist with a razor saw.
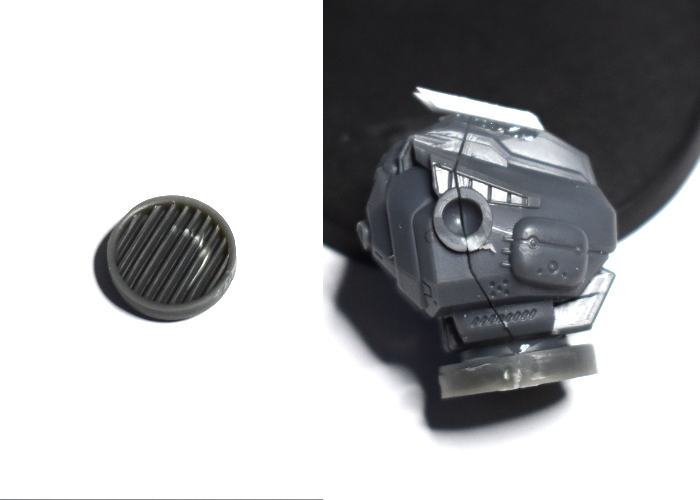
I gave the waist a rotating cuff by gluing on the round grill piece from the gun carriage, and added vanes on the head trimmed from a piece of thin plasticard.
For the arms, I used the shoulders from the Hunter, with the upper arms trimmed off. I needed to glue a new piece for the weapon assembly onto the outer surface of the shoulder, so I sanded this down flat.
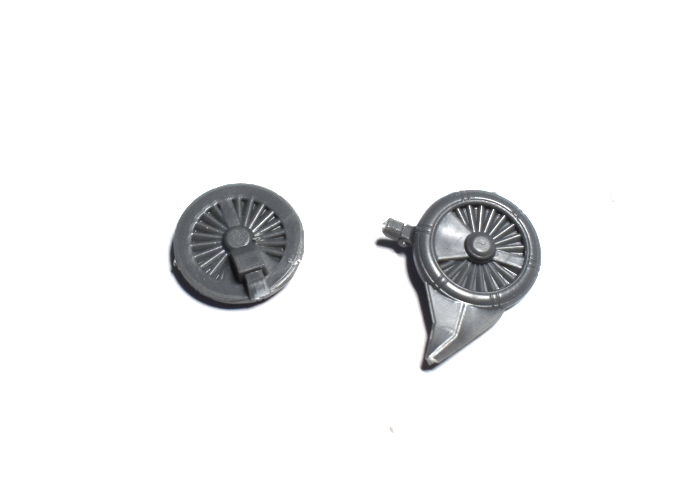
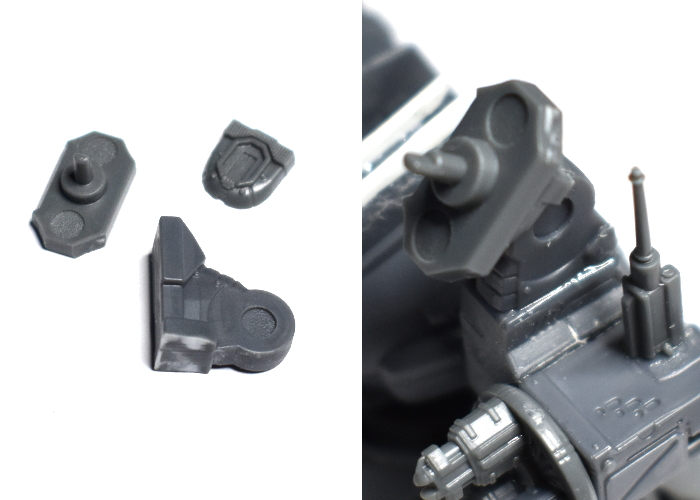
To make rotating cylinders for the tri-barreled Flakk Defense Battery, I used a couple of turbines leftover from the Epirian Spider/Firefly Drone kit. Because the kit makes either drone variant, if you have built any spiders, you'll have some of these laying around. I trimmed off the attachment peg and the wing.
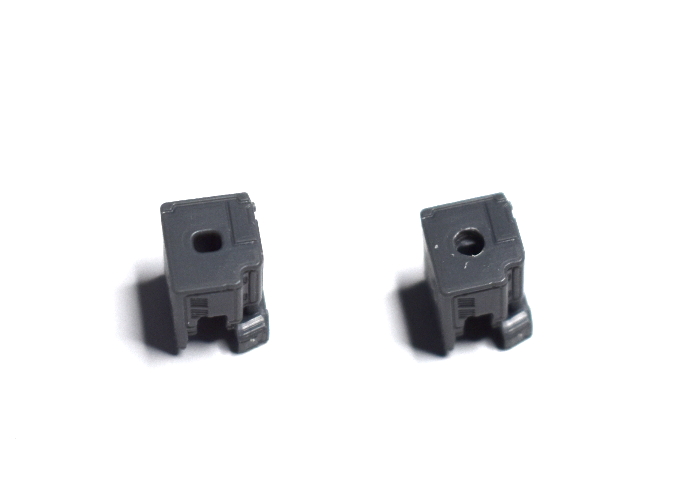
I used the Hunter's weapon casing forearms for the bulk of the flakk weapon casing, drilling out the attachment hole a little larger to accommodate the central hub on the drone turbine.
From there, I glued the weapon casings onto the outside of the shoulders, and the turbines onto the front of the casings. The barrells of the flakk weapon came from the drone kit, with the rear surface trimmed down flat and glued to the front of the turbine.
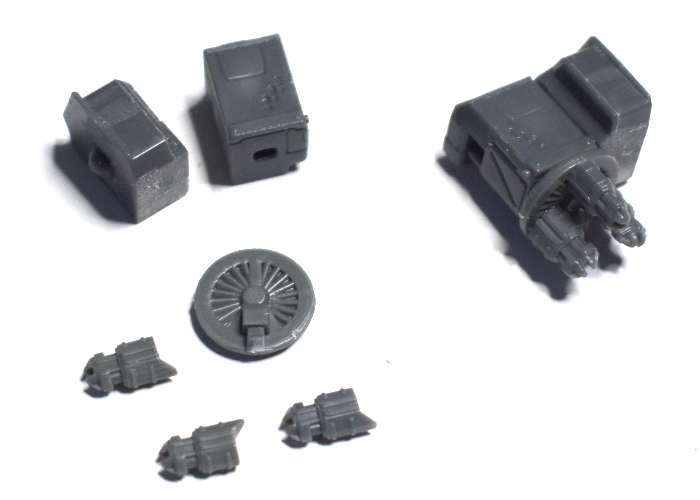
The last thing the Uplink Relay needed was the communications array. I used the 'spare' piece from the drone kit as a fixed arial, glued onto the top of the weapon casing on the left arm. I also assembled a signal dish using a trimmed Hunter foot and the back chassis piece from the drone kit. For the dish itself, I used the leg piece from the drone kit, with the legs themselves removed at the 'hip' pivot.
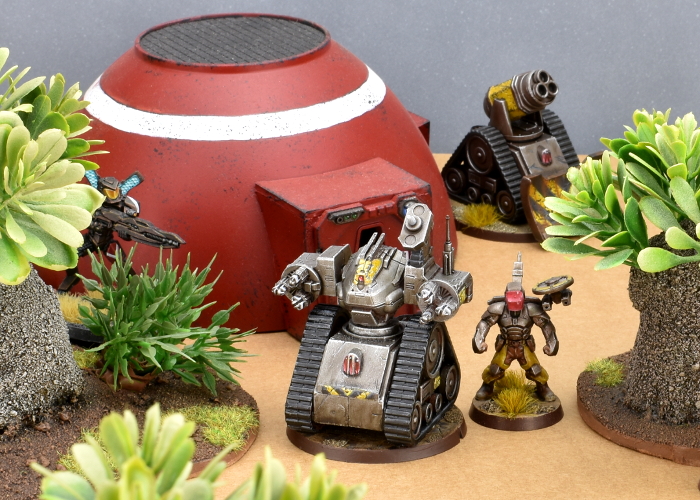
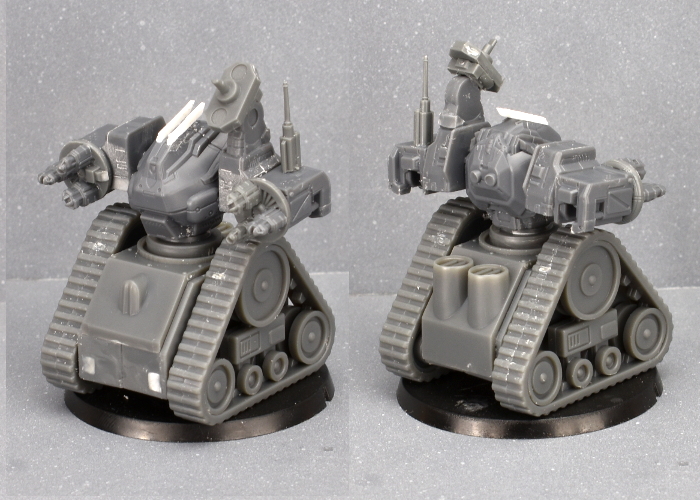
The assembled Automated Uplink Relay, ready for paint:
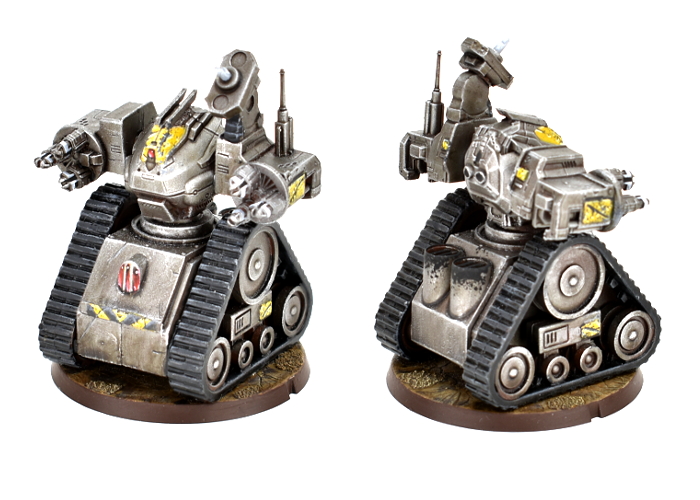
And the finished Relay, ready for the table:
Put together your own Automated Relay of Uplinky doom by picking up the plastic Hunter, Drone and Gun Carriage kits, along with the rest of the Maelstrom's Edge range from the webstore here.
Then pop on over to the Comm Guild Facebook group to show us what you're working on!
For a host of building ideas, modeling tutorials, army spotlights and conversion walkthroughs, check out the Hobby section of the Maelstrom's Edge website here.
Tags: conversion epirian kitbash modeling spotlight tutorial
Kitbash Spotlight: Greatcoat Contractors
Posted on Monday Dec 14, 2020 at 05:00pm in Tutorials
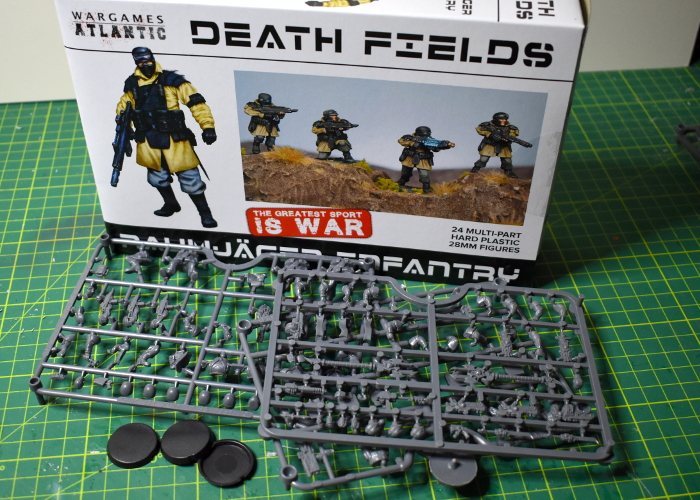
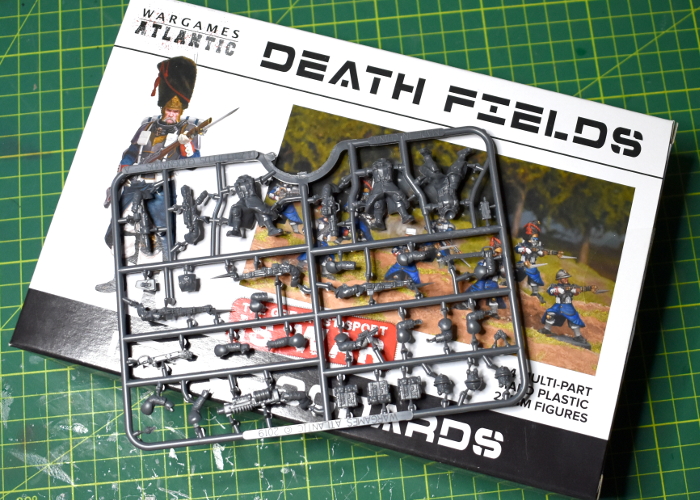
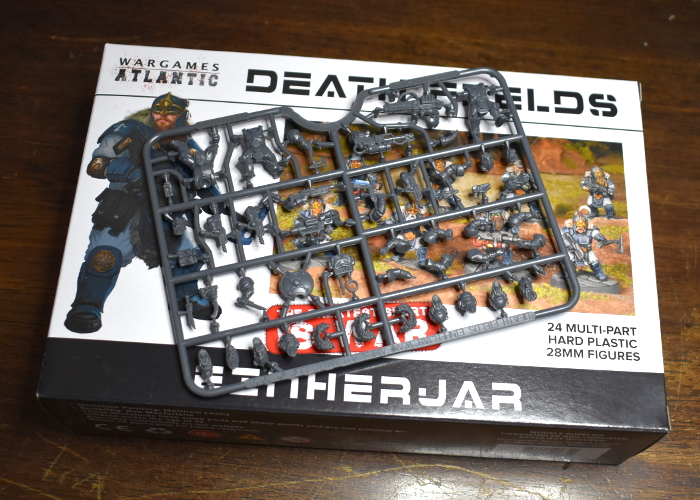
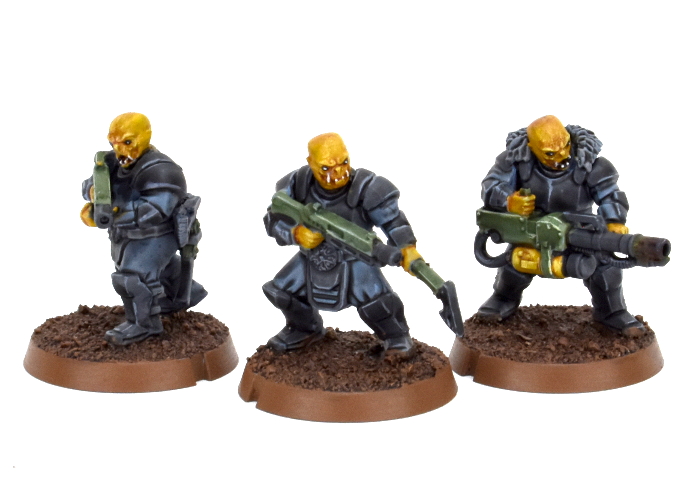
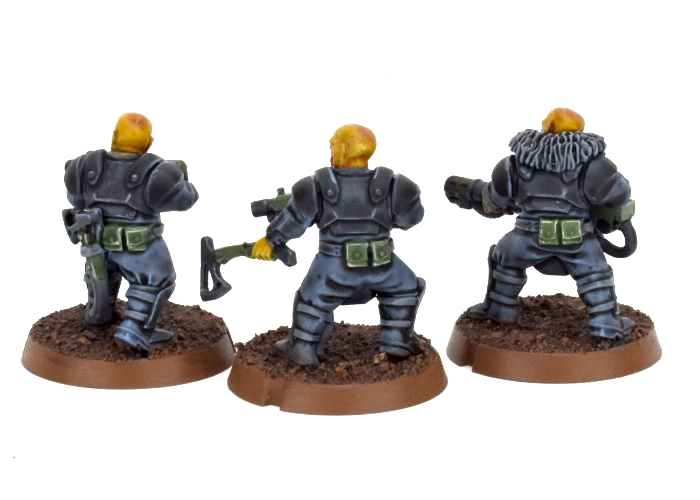
I'm continuing my stroll through the Wargames Atlantic model range. So far, I've made some short, alien scouts using Einherjar and heads from the Broken infantry sprue, and greatcoat-wearing Karist Troopers by combining Les Grognards and Karist parts. This week, I gave some Epirian Contractors the cold weather treatment, using the Raumjager Infantry box.
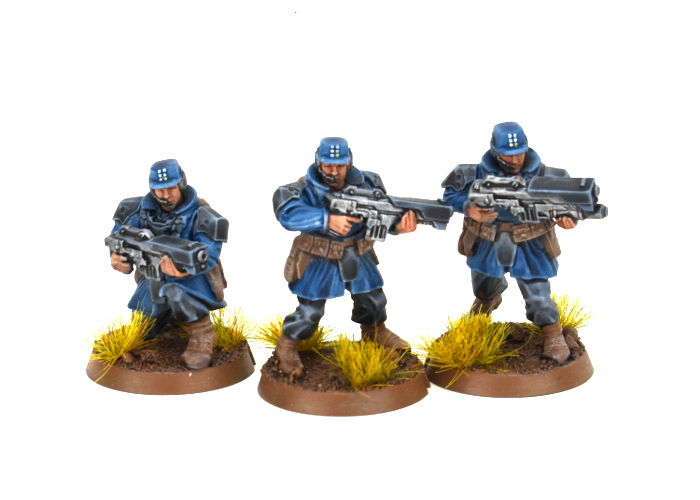
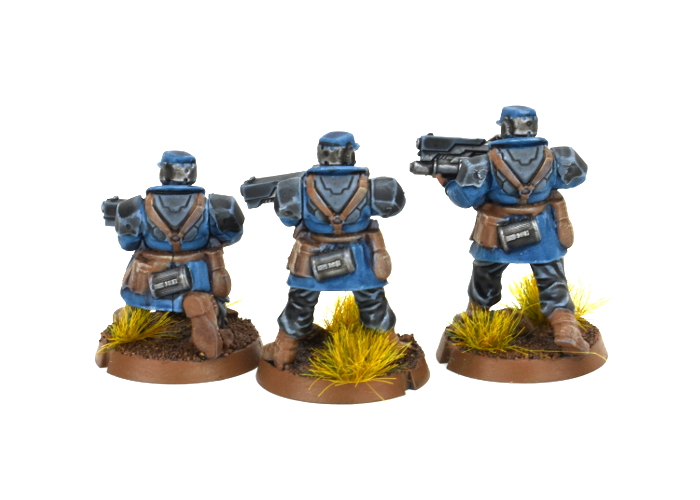
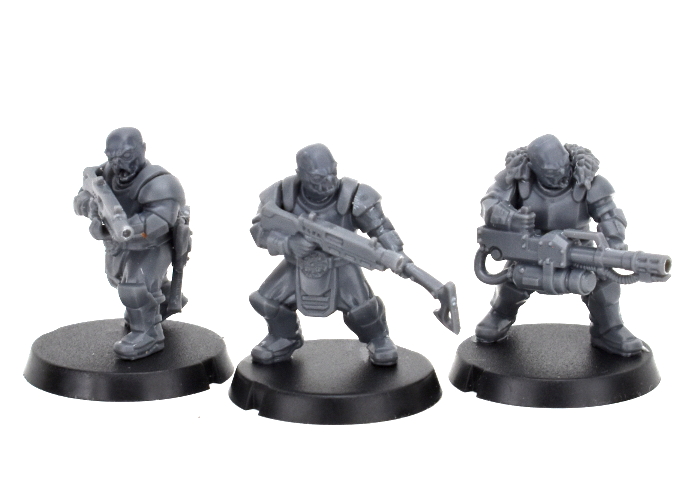
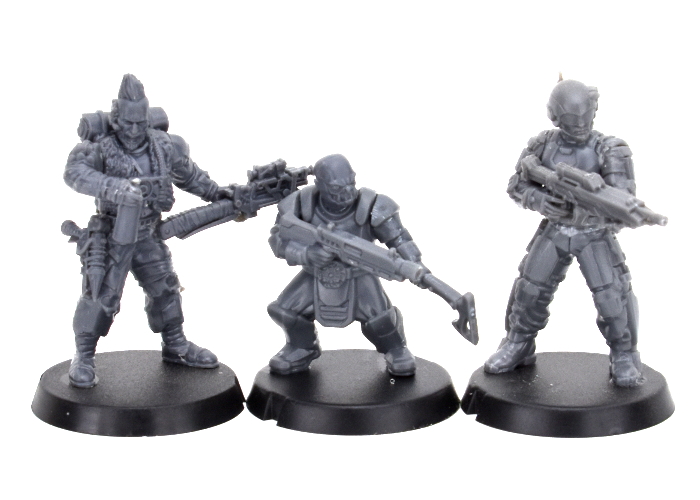
As with all of Wargames Atlantics' kits, the Raumjager are multipart, plastic models. To build my greatcoat Contractors, I used Raumjager bodies, and heads and weapons from the Epirian Contractor kit. The Contractors have rolled up sleeves, which didn't seem ideal with long coats, so I used the sleeved versions from the Faction Expansion Sprue instead.
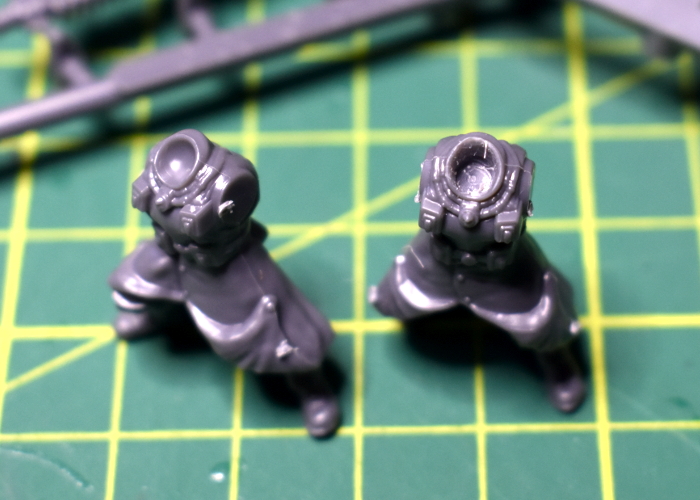
As with the previous kitbashes, the one difficulty is with the Wargames Atlantic models having shorter neck attachments than the Maelstrom's Edge models. This is easily fixed by drilling out the neck slightly with a 2mm drill bit.
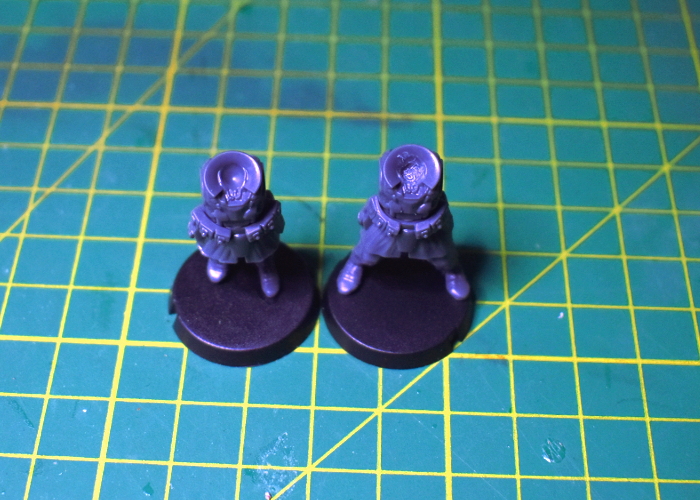
The Raumjager torsos are slightly wider than the Epirians but are close enough that everything still fits in place once arms and weapons are glued on.
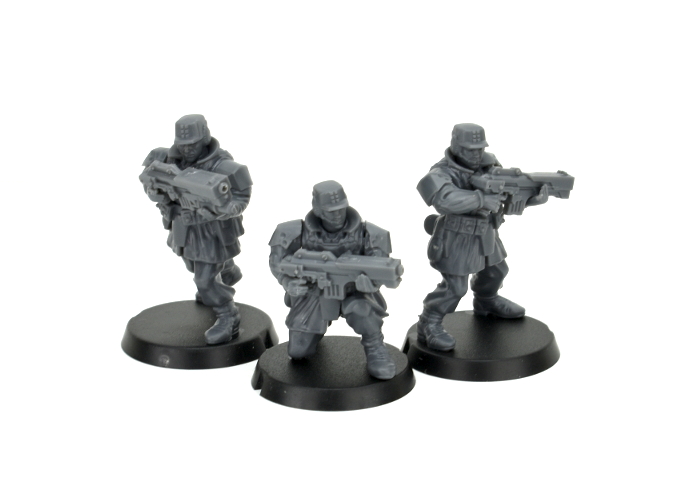
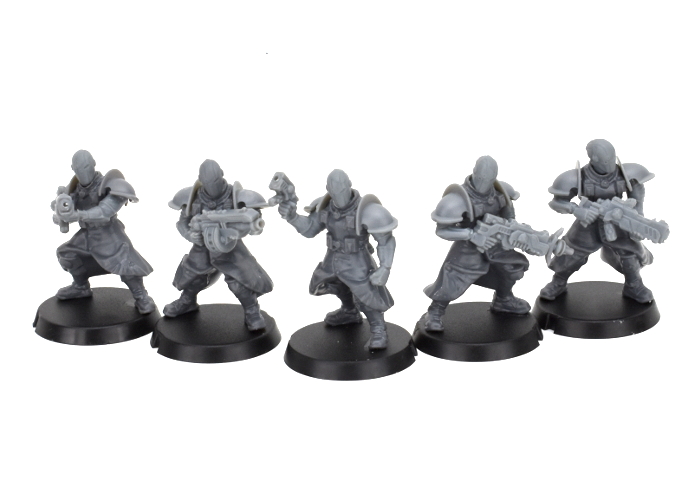
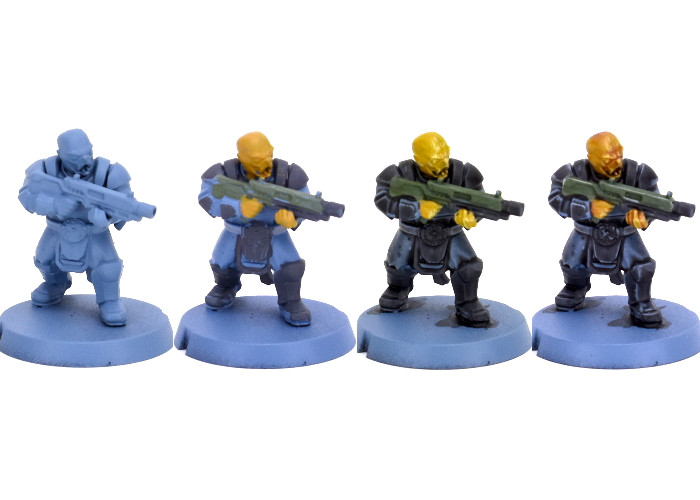
I painted these using Army Painter paints, starting out with a base coat of Wolf Gray spray. I picked out the face and hands with Barbarian Flesh and metal parts with Plate Mail Metal. I added a layer of Dark Tone over the weapons, pants and armour, and Blue Tone over the coats and hats. I also went over the skin and leather parts with Mid Brown but, while this worked ok over the skin, didn't tint the leather parts as well as I wanted. So after this dried, I went back over it with Leather Brown. Finally, I highlighted the leather and skin with Skeleton Bone, and picked out the Epirian badge on the hats with white and yellow.
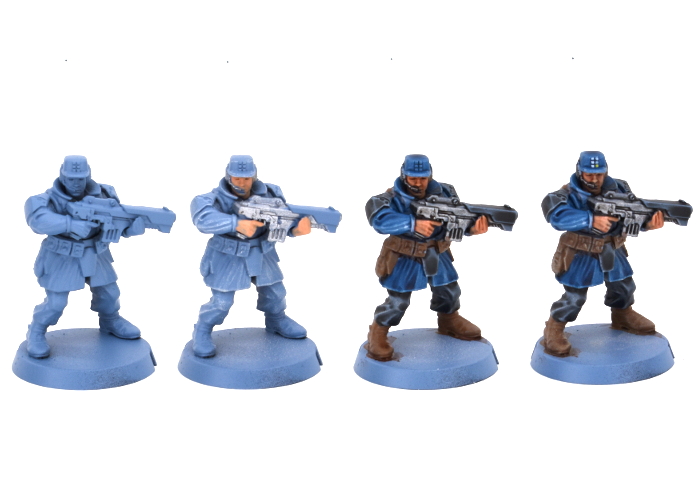
With basing done, the unit was ready for the table.
To lead them into battle, I also threw together a Bot Handler, using another Raumjager body and arms, head and uplink bar from the Epirian Handler kit.
Put together your own Epirian force of fashionably warm doom by picking up the plastic Contractor kit, along with the rest of the Maelstrom's Edge range from the webstore here.
Then pop on over to the Comm Guild Facebook group to show us what you're working on!
For other building ideas, modeling tutorials, army spotlights and conversion walkthroughs, check out the Hobby section of the Maelstrom's Edge website here.
Tags: contractors conversion epirian kitbash modeling spotlight
Terrain Spotlight: Converted Renedra Desert Buildings
Posted on Monday Dec 07, 2020 at 05:00pm in Tutorials
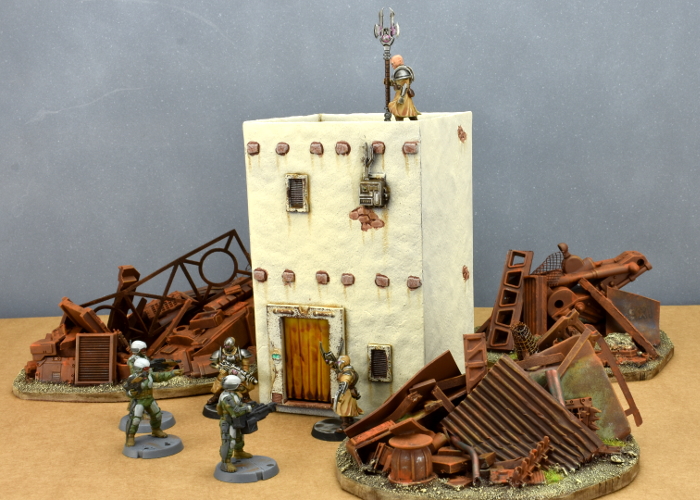
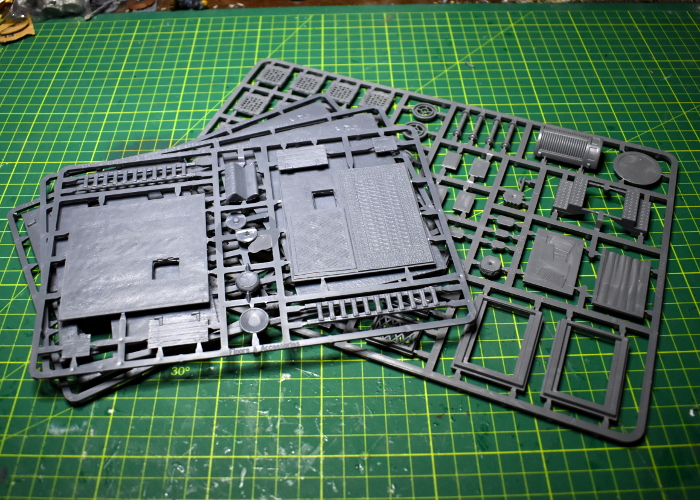
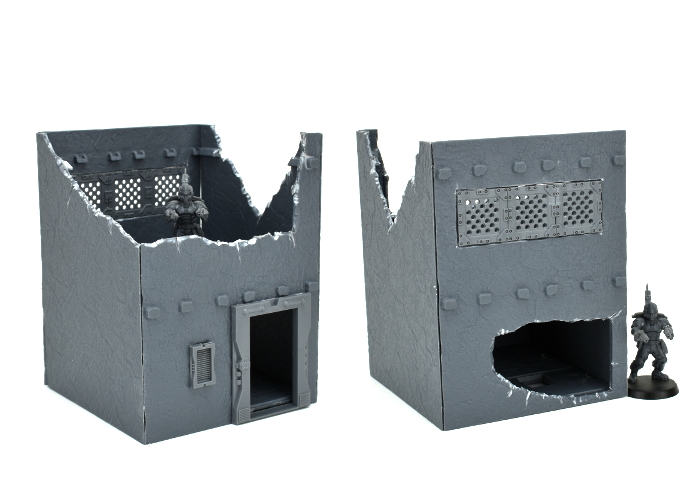
Browsing around online a few weeks back, my eye was caught by a neat looking new release from Renedra. They have a slowly-growing range of plastic historical building kits, and had just added to it with some two-story desert houses. While these are intended for historical settings, I thought it would be fun to see how they prettied up with the addition of some Maelstrom's Edge terrain sprue parts for a rustic sci-fi look. After a short and impatient wait for the post, I came up with this:
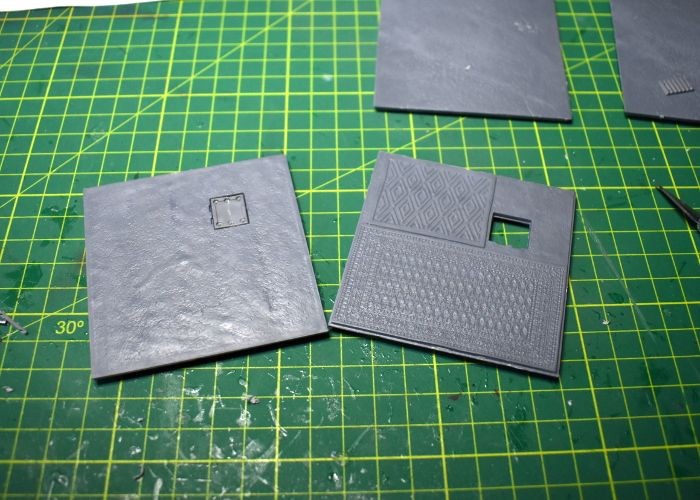
The pack I ordered includes parts for three houses. They all utilise the same floor and roof sprue, so are all the same width, just having different configurations of windows and doors, and differing overall heights. There are three sprues per building - the floor/roof sprue, and two identical wall sprues. To these, I added a Maelstrom's Edge terrain sprue.
The doorways on the buildings are quite small, and have timber doors that fit into them. That wasn't going to do here, though, so I took a doorway from the Maelstrom's Edge sprue and laid it over the existing doorway, using it as a guide to trace around with my hobby knife. Then, tracing gradually deeper cuts into that guideline, I carefully cut out the hole for the new doorway.
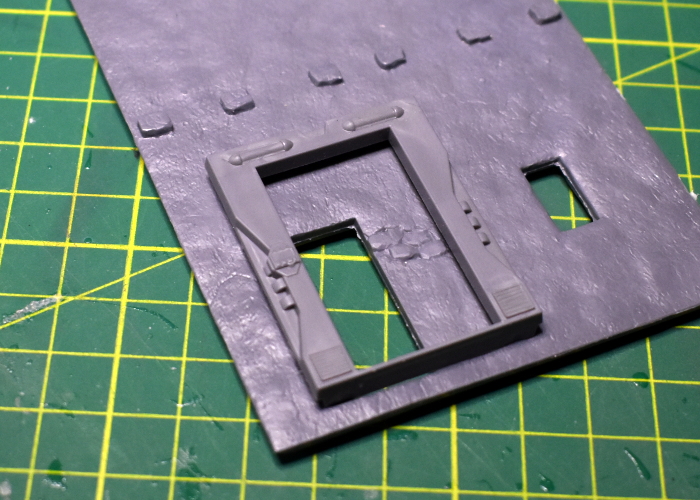
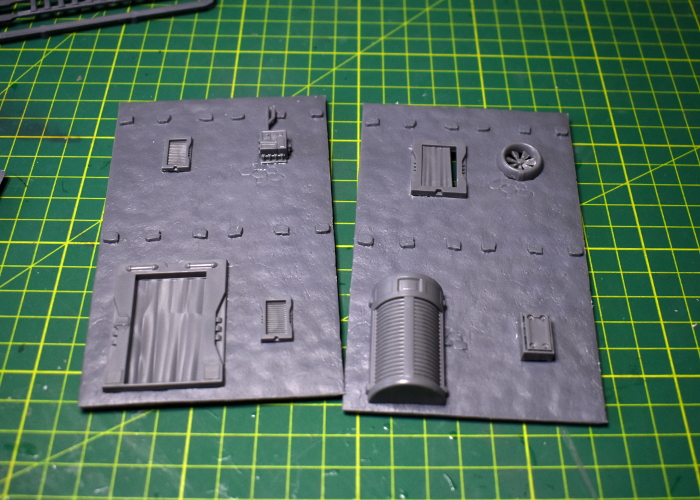
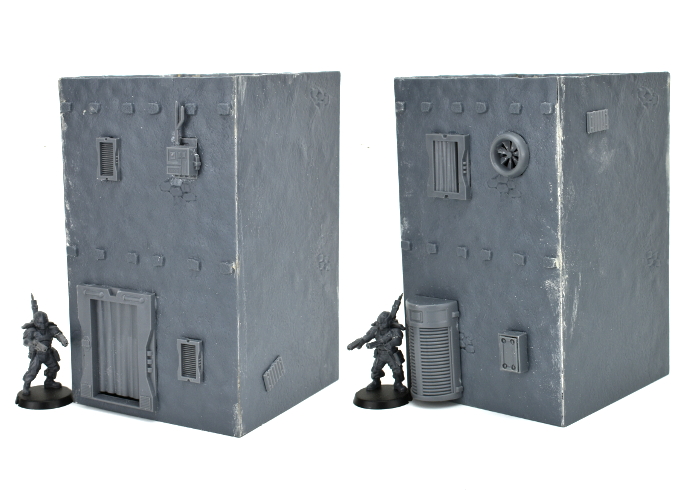
With the new door glued in place, I covered over the window cavities and the second doorway with various bits from the terrain sprue. As with the doorway, I used the curtained window as a guide to trace around in order to enlarge the original window hole.
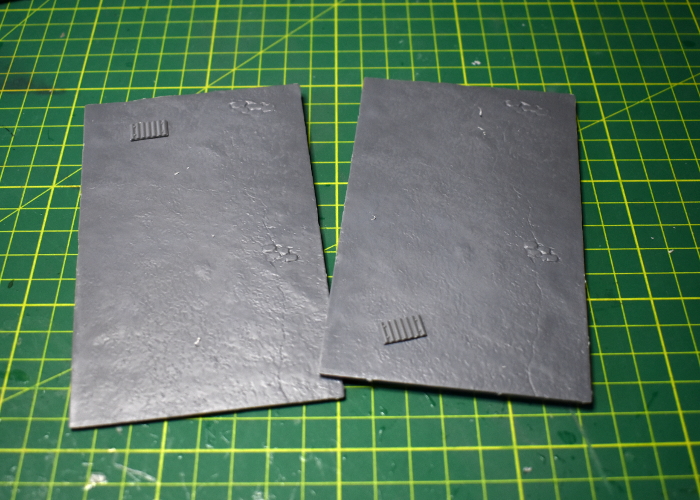
I left the side walls largely as is, adding just a couple of corrugated patches so they weren't identical.
The floor/roof pieces were also left alone, although I replaced the wooden trapdoor in the roof with a metal one made from two strut panels trimmed to fit.
From there, I just had to glue everthing together. I also added a little filling putty along the corner seams and around the edge of the roof to neaten everything up a little.
With a quick coat of paint, it wound up looking like this:
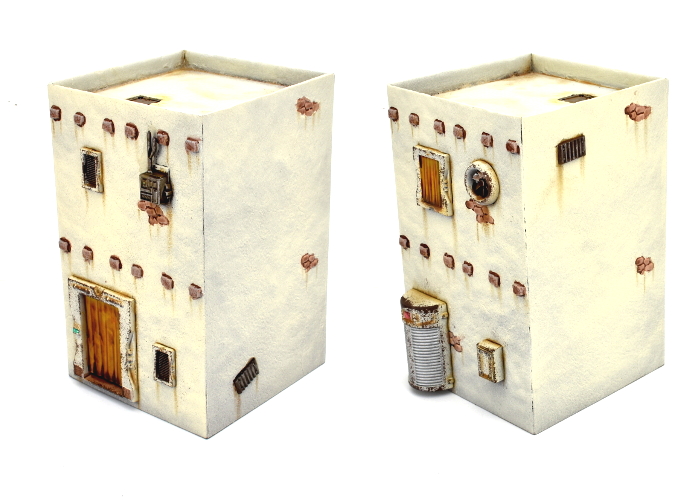
Now to get the other two finished off!
Why not give it a go? You can find the Maelstrom's Edge terrain sprues for your own terrain re-imaginings, along with the rest of the Maelstrom's Edge range from the webstore here.
What are you working on? We would love to see your models and terrain in the Comm Guild Facebook group!
For other building ideas, modeling tutorials, army spotlights and conversion walkthroughs, check out the Hobby section of the Maelstrom's Edge website here.
Tags: buildings conversion modeling spotlight terrain walkthrough
Kitbash Spotlight: Greatcoat Karists!
Posted on Monday Nov 09, 2020 at 05:00pm in Tutorials
A couple of weeks ago, I shared a kitbash of some Trogyl Scouts - alien hunters based on the Wargames Atlantic 'Einherjar' (space dwarves) kit with alien heads from the Maelstrom's Edge Broken plastics. Well, this week I threw together another unholy fusion of Wargames Atlantic and MEdge kits, to create some Karist troopers in greatcoats!
When I bought the Einherjar kit, I couldn't resist also picking up a box of 'Les Grognards'. This is a plastic kit that comes with a slew of different heads to allow you to create a number of different, laser-gun-toting, sci-fi soldier regiments. It also includes the aforementioned laser guns, and a range of heavy weapons, but I wasn't really interested in those here.
As with the Trogyl, assembly was fairly straightforward, using bodies from Les Grognards, and heads and arms from the Maelstrom's Edge Karist Trooper kit. The heads for the Grognards only have short, stubby neck attachments, so I used a drill to enlarge the neck cavities to accommodate the Karist heads.
From there, it was just a matter of gluing everything in place. The torsos match Karist Trooper bodies in width, so the arms went on with no argument.
Regular readers of my articles will no doubt have noticed that I tend to use whatever paints I have on hand, but just for something different I thought I'd try sticking to a single brand, and painted these up using Army Painter paints exclusively. I started with a basecoat of Skeleton Bone spray, and then went over the armour plates and weapons with Plate Mail Metal, and the boots, belts and webbing with Leather Brown. Over that, I applied a wash of Light Tone to the bone areas, and Dark Tone everywhere else.
To finish up, I added some highlights to the coat and leather using some more Skeleton Bone, and picked out eye lenses and weapon energy blisters using Warlock Purple and white. The bases were painted with Ash Grey, and then given a generous wash of Dark Tone before I painted the edges with black.

Not content with basic troopers, I also had a tinker with the Faction Expansion sprue to make a greatcoat-clad Praetorian, and also plundered a Shadow Walker sprue to add in some teleporty, assassiny backup!
Now I'll have to see about expanding this little starter force into something table-ready!
Put together your own Karist force of zealoty doom by picking up the plastic Trooper kit, along with the rest of the Maelstrom's Edge range from the webstore here.
Then pop on over to the Comm Guild Facebook group to show us what you're working on!
For other building ideas, modeling tutorials, army spotlights and conversion walkthroughs, check out the Hobby section of the Maelstrom's Edge website here.
Tags: conversion karists kitbash modeling painting spotlight walkthrough
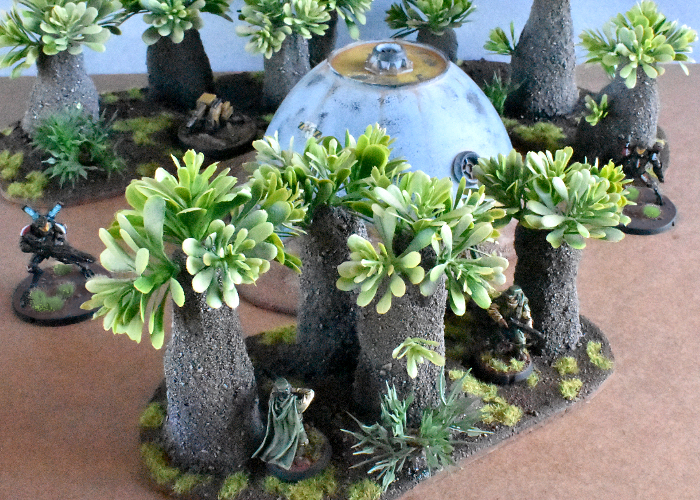
Terrain Spotlight: Hot Glue & Christmas Bauble Alien Trees!
Posted on Monday Nov 02, 2020 at 05:00pm in Tutorials
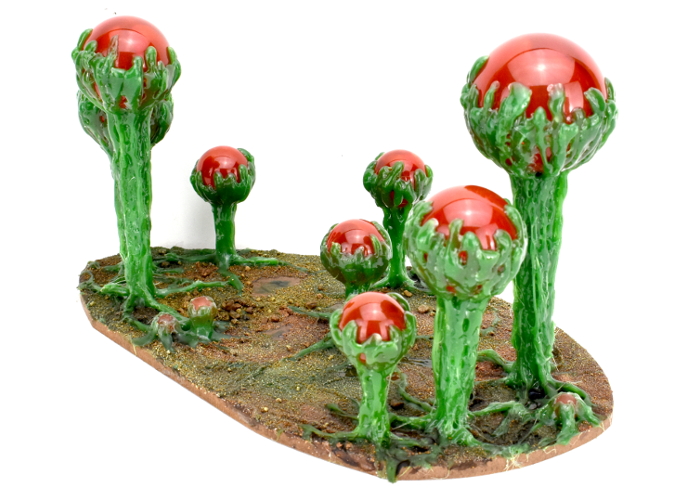
I've been having a lot of fun lately coming up with different ways to make trees that look like they belong on alien worlds. You might have seen my previous articles with silicon aquarium plant trees, or my boab-inspired expanding foam trees. This week, I drew some inspiration from the Titan AE animated movie, working up some forest bases made from Christmas baubles and coloured hot glue!
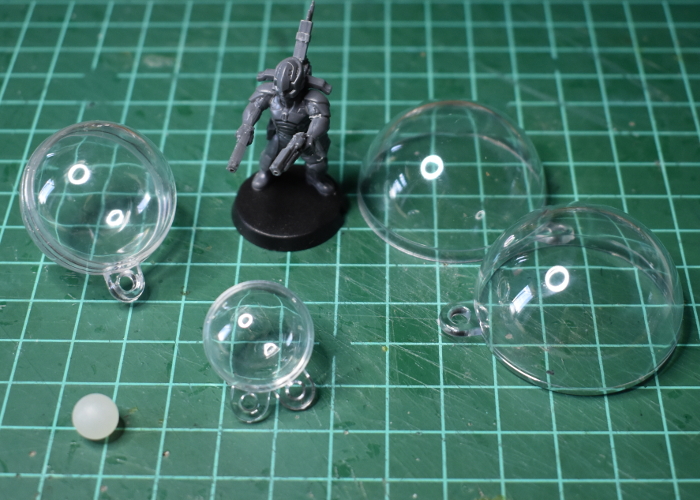
The basic idea with these is a plant that has a ball-shaped sac, filled with lighter-than-air gas of some kind (the cartoon plants they're based on are highly explosive!). To make these, I sourced a bunch of clear, plastic Christmas bauble shells in a range of sizes from Ali Express. These didn't go down as small as I wanted, so for the smallest size I wound up with some 8mm solid plastic balls.
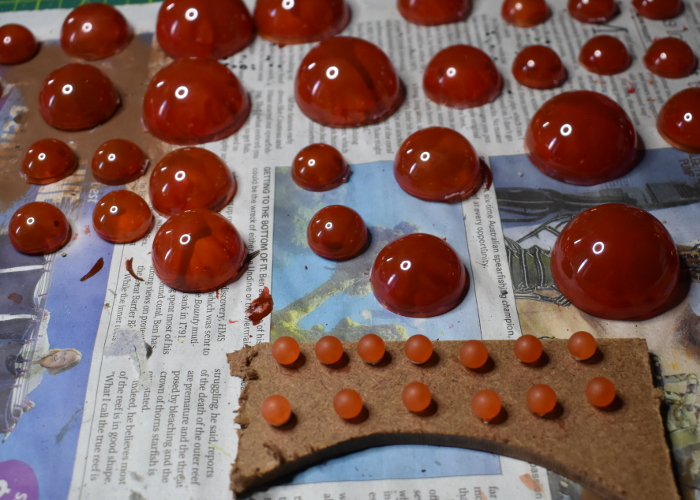
To create the gaseous effect, I wanted the sacs to be mostly opaque, with swirling colour and just a hint of translucency. So, after trimming off the hanging tabs, I painted the insides of the baubles with Citadel Gryph-Hound Orange Contrast, and then dabbed in some blobs of Mig Blood Red, letting this run wherever it liked through the orange. For the solid balls, I just painted on a coat of the orange Contrast.
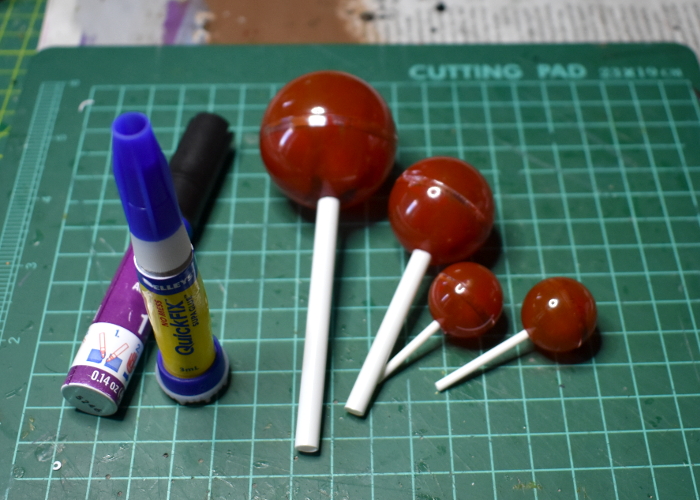
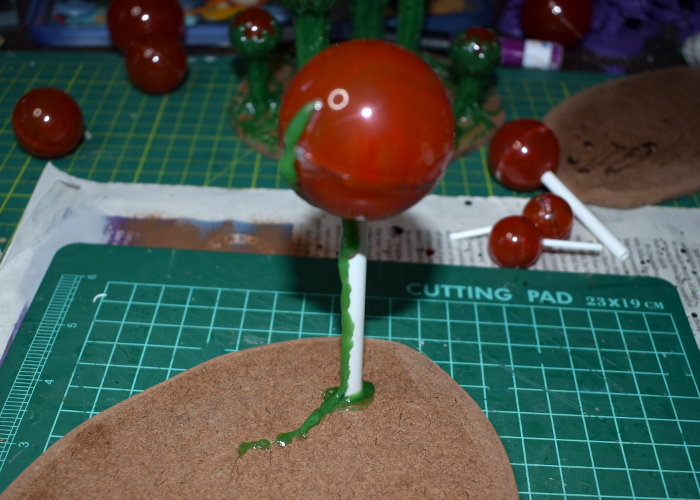
Once the baubles were dry, I fitted the halves together, and then used some superglue to stock different length stems onto them, making sure the joint lines on the baubles were running more or less horizontally. For the most part, the larger the bauble, the longer the stem it got, although I did mix this up a little here and there to keep things a little chaotic and organic.
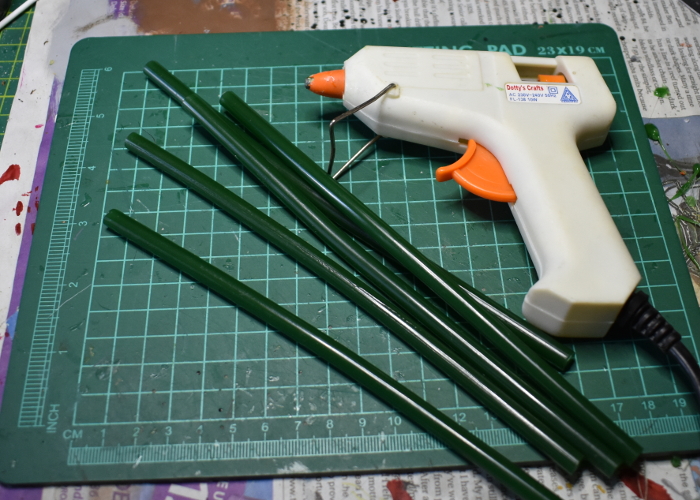
For adding the trunks, I used some green hot glue, also from Ali Express, although as with the baubles you might be able to find this in local craft stores, depending on where you are in the world.
A note on safety: If you plan on having a go at this, I feel compelled to point out the obvious: Hot glue is hot! Be careful to keep fingers away from the melty end of the glue gun, and avoid getting drips of glue onto your skin, as it can burn. Also, use in a well-ventilated area!
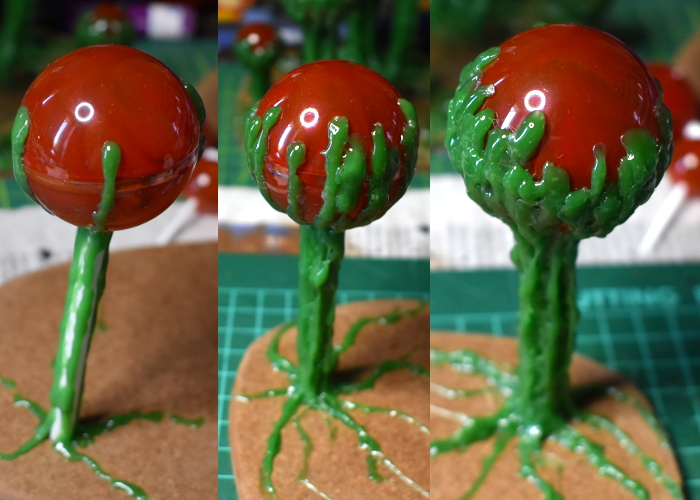
After gluing the stem to a hardwood base, I ran a line of glue from about two-thirds of the way up the bauble, all the way down, and then outwards to form a root shape along the top of the base.
From there, I added successive strips down the length of the tree, keeping some space between each new strip and the immediately preceding one, to give them time to cool and set. The aim was to coat all of the outside of the stem, and most of the lower two-thirds of the bauble. Some parts of the lower half of the bauble show through the glue for effect, and to help light shine through the finished tree top, but the glue completely covers the joint line to hide it.
Here's a video of the gluing in process!
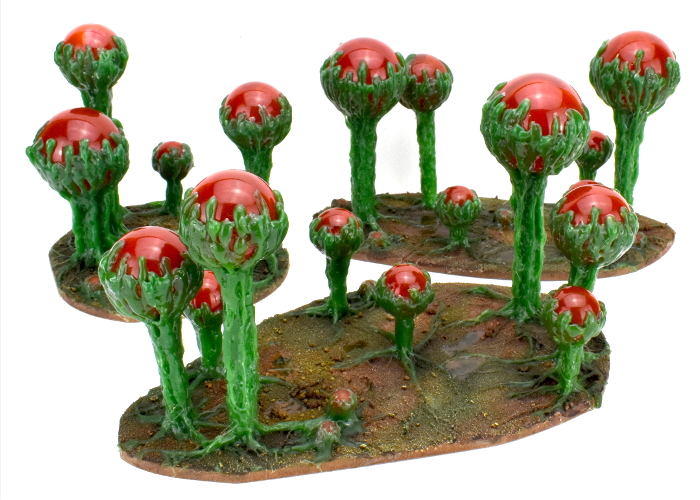
With the first tree done, I glued the next stem to the base, and repeated the process, continuing until I had a good number of trees on the base. There's a balance between having enough on there to be convincing as a 'forest' base, while still leaving enough room to position models. When in doubt, always err on the side of playability, as this is supposed to be gaming terrain, after all!
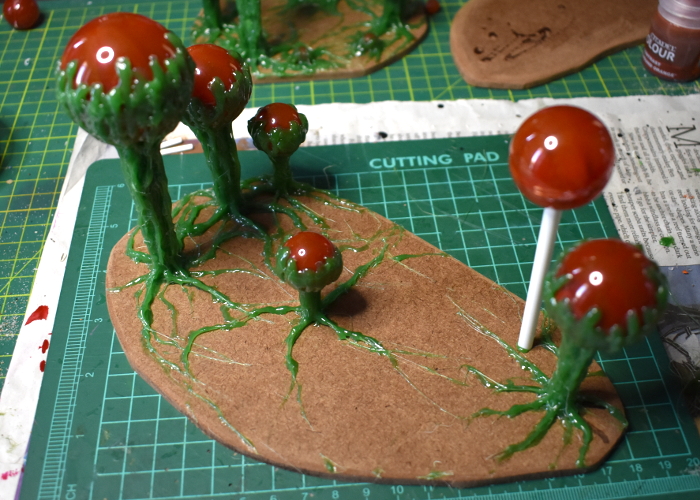
The small balls were used to create new growth without much height to it. For these, I glued the ball directly to the base, and then added blobs of glue around the circumference.

I decided on a boggy base to go with these trees, so started out by gluing some fine sand on with PVA glue, leaving the tree roots exposed. I also left some patches of the hardwood exposed, to make a few open puddles.

With the PVA dry, I painted over the sand with a mix of Army Painter Mid Brown and Green Tone Quickshades. You could paint the tree trunks to cover over the glue if you want, but I decided I liked the shiny green on them, so left them as is.
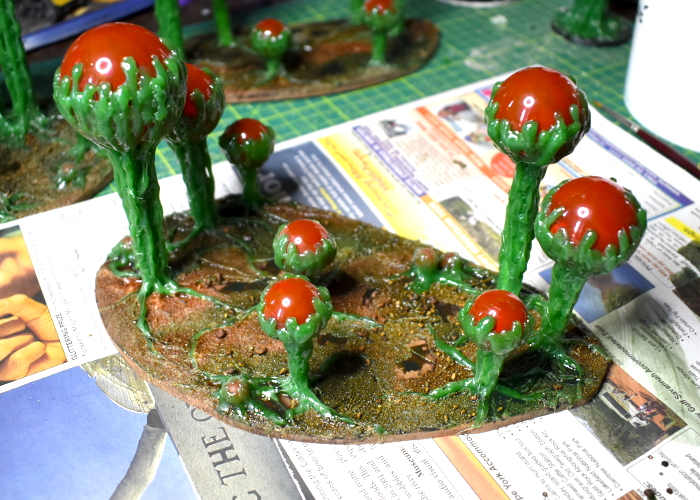
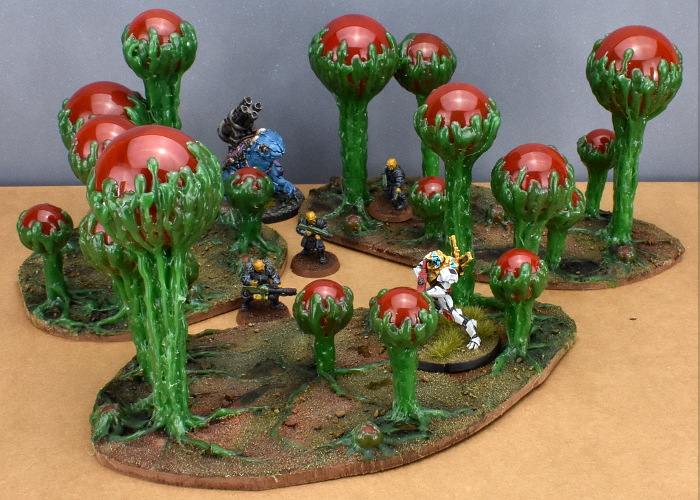
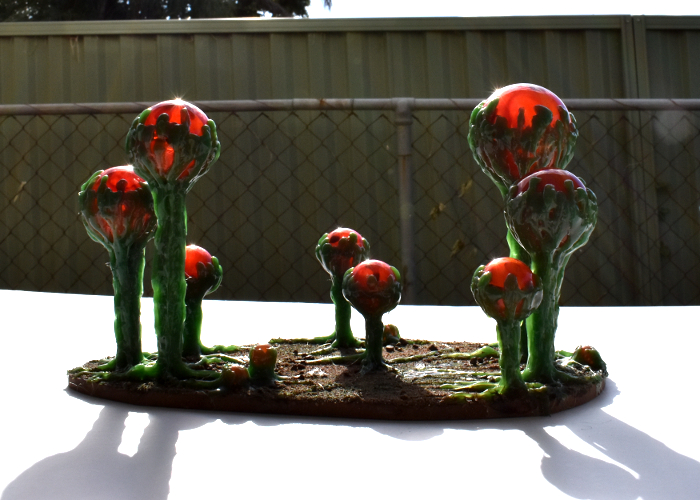
Finally, I added a light drybrush of Coat D'Arms Putrid Green over the sand, and painted some gloss varnish onto the 'puddle' areas. The end result looked something like this:

And a shot out in the sun, to show the light shining through the gas sacs!
Feel like giving some alien trees a go? Be sure to share what you come up with on the Comm Guild Facebook group!
Pop on over to the Maelstrom's Edge webstore here to find our plastic and resin model range, including the ever-popular Maelstrom's Edge terrain sprues.
And for other building ideas, modeling tutorials, army spotlights and conversion walkthroughs, check out the Hobby section of the Maelstrom's Edge website here!
Tags: scratchbuilding spotlight terrain trees tutorial walkthrough
Kitbash Spotlight: Trogyl Scouts!
Posted on Monday Oct 26, 2020 at 05:00pm in Tutorials
Wargames Atlantic have been releasing a steady stream of assorted plastic miniature kits over the last little while, and amongst their recent releases was a box of 'Einherjar' - space dwarves! I couldn't resist picking up a box to have a tinker with, and while most of them will probably be built as intended just because they're great models, I thought it would be fun to build something from them that fit in a little better on the Edge, and so came up with these: Trogyl Scouts!
As mentioned above, the base for this conversion was the Einherjar kit. The kit comes with several weapon options, and different (suitably Dwarfy) head designs, but I wanted something alien, instead. Turning to the Maelstrom's Edge Broken kit, I chose the fanged head, which has an open and closed mouth variant, so they don't all wind up identical.
I didn't bother documenting the assembly, as it was pretty straightforward: Everything except the head was assembled as normal. The necks on the Broken models have a longer ball joint and a deeper socket on the torso for it, so I had the choice of either trimming down the necks on the alien heads, or drilling out the necks on the Einherjar torsos. I went with the latter, using a 2mm drill bit to make a deep enough hole for the alien heads to slot in neatly.
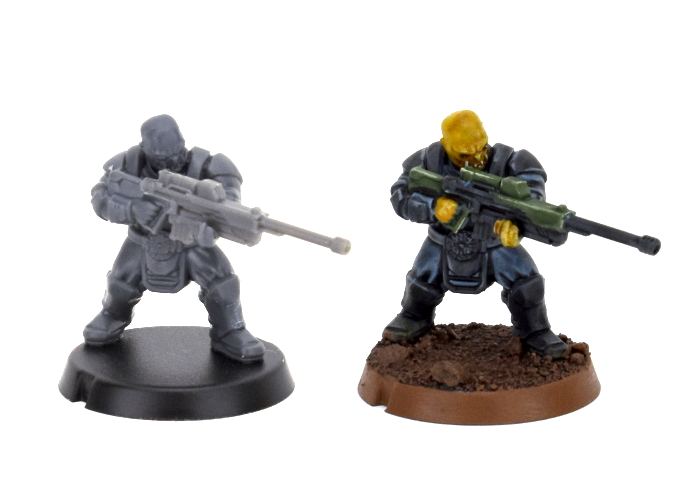
For comparison, here's a scale shot with Drinky McStagger of the Broken, and Trooper Anonymicus of the Epirian SecDef:
I envisaged this unit as being fairly stealthy, so wanted their uniforms to be nondescript. I started out with a basecoat of Army Painter Wolf Grey, then went over the exposed skin with Citadel Iyanden Darksun, weapon casings and pouches with Army Painter Army Green and armour plates and other metal areas with Vallejo Basalt Grey. The green was then washed with Army Painter Military Shader, and the grey areas with Army Painter Dark Tone. Over the yellow, I added a coat of P3 Cygnus Yellow, and then added a light drybrush of the yellow mixed with some white over the face and knuckles, before adding a layer of Army Painter Flesh Wash. The armour plates then received a light highlight with Vallejo Light Grey on upper edges, and the green areas a similar treatment with Coat D'Arms Putrid Green.
The final steps were to add in eyes with black and a tiny dot of white, and teeth with some more white, and then detail the base. I glued on a layer of sand, painted with Army Painter Leather Brown, washed with Army Painter Strong Tone, and then gave it a final drybrush with some more Leather Brown.
Since they're intended to be a scout unit, I couldn't resist adding in a sniper option as well, either to replace the flamethrower or as a unit-wide upgrade (I haven't decided yet!). I used a rifle from the Epirian SecDef kit, trimming off the shoulder stock and gluing it onto one of the Einherjar rifle arms with the weapon trimmed off just in front of the stock.
The next step will be to work up some (unofficial, obviously!) rules for these chaps. I'm thinking of a Mercenary-type faction, that can be 'hired' by any of the other factions, possibly using up two non-Core slots for the privilege. More on this once I can get something written up and tested on the table a little!
What are you working on? We would love to see your models and terrain in the Comm Guild Facebook group!
If you're running short on plastic fodder, you can pick up the full Maelstrom's Edge range from the webstore here.
For other building ideas, modeling tutorials, army spotlights and conversion walkthroughs, check out the Hobby section of the Maelstrom's Edge website here.
Terrain Spotlight: Junkyard!
Posted on Monday Oct 19, 2020 at 05:00pm in Tutorials
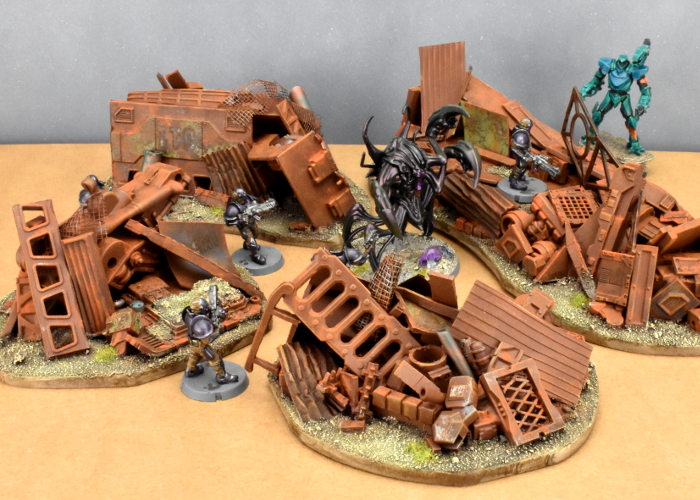
When you do a lot of conversion work on models or terrain, you tend to accumulate an ever-growing collection of discarded remnants - model or terrain components that have been cut up to use specific parts or them, leftover parts from different kits, random off-cuts of plasticard or cardboard, and other odd bits and pieces collected because they were interesting. Unless you have bottomless storage, it's handy to clean these out from time to time. Since I hate throwing anything away, however, I wanted a way to make use of these parts that I otherwise might not have an immediate project for. And so, I decided to make some junkyard terrain!
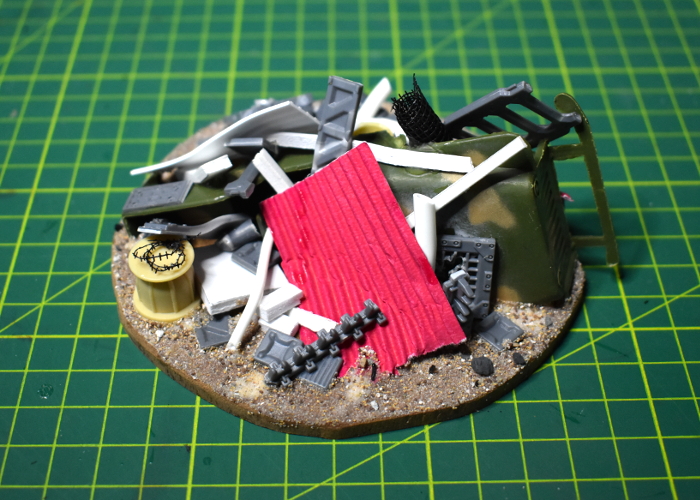
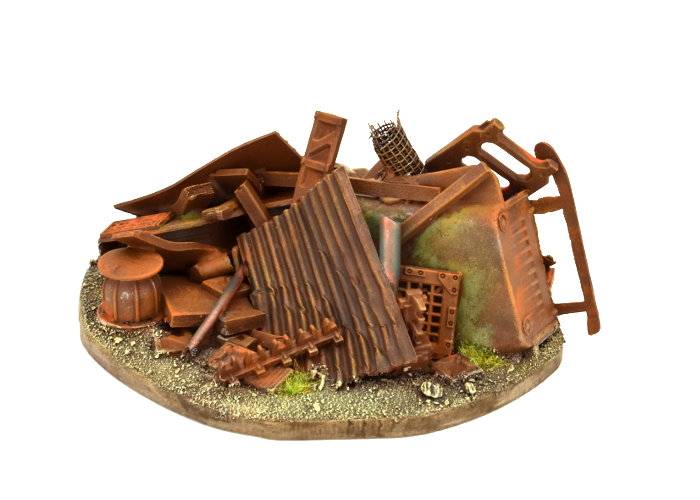
I wanted junk piles that would, at least in part, completely obscure human-sized models, so needed a bit of bulk to get started. For this purpose, I used some military vehicles from my daughters' toy soldier collection that had broken parts that couldn't be easily fixed. Cutting these more or less in half diagonally provided some interesting shapes to build on, and also doubled the number of terrain pieces I could potentially make from them!
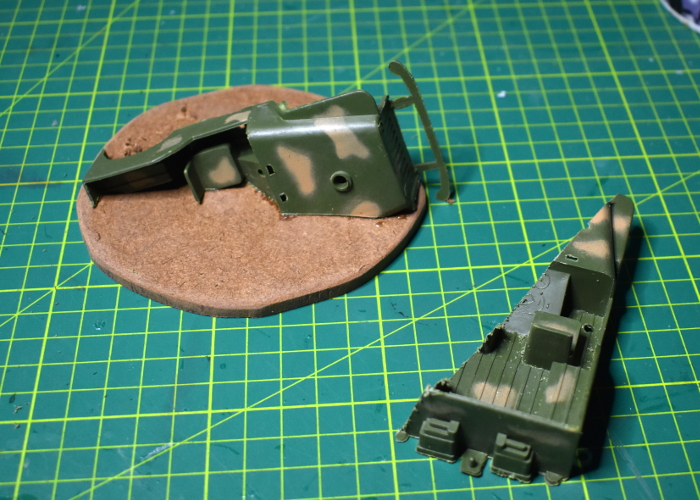
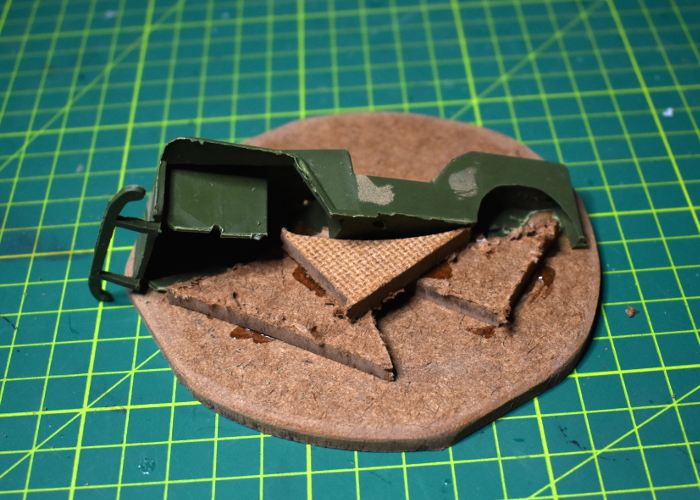
The vehicle parts were glued down onto some irregular pieces of hardboard, using Power Grip (a 'glue anything to anything else' sort of glue). I used some small hardboard off-cuts to add a little more bulk as well.
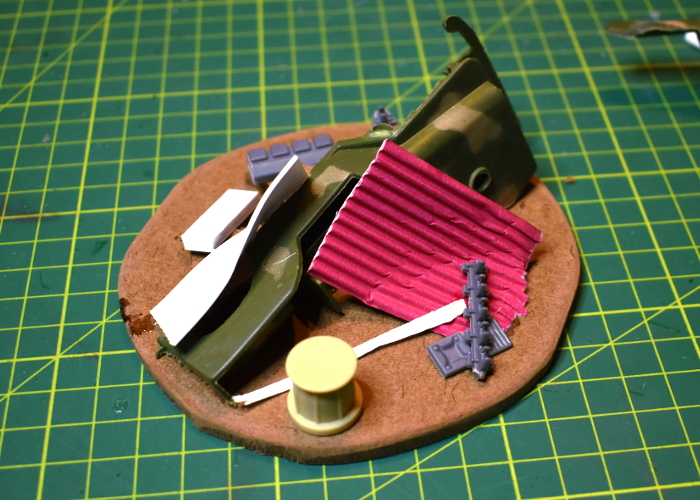
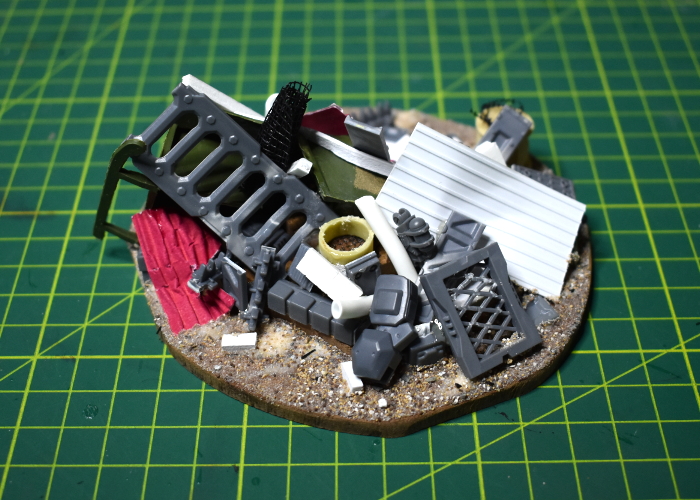
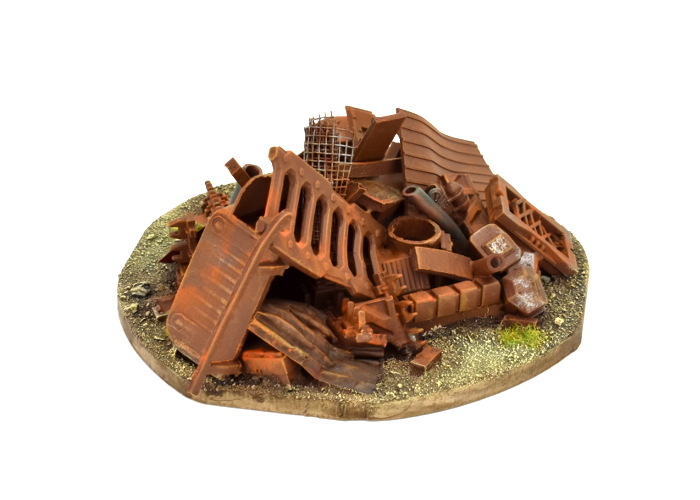
From there, it was simply a matter of grabbing interesting bits of this and that and gluing them on wherever seemed appropriate. As mentioned above, this included model and terrain parts, in some case chopped up a bit, bent, or otherwise cut or dented up in places to make them look more junk-worthy, and also whatever other scraps of building materials I had to hand, including plasticard, foamed PVC, plastic tubing, corrugated cardboard, flyscreen, and a few other odds and ends.
I kept piling up bits until I was happy with the amount of detail and cover on the base.
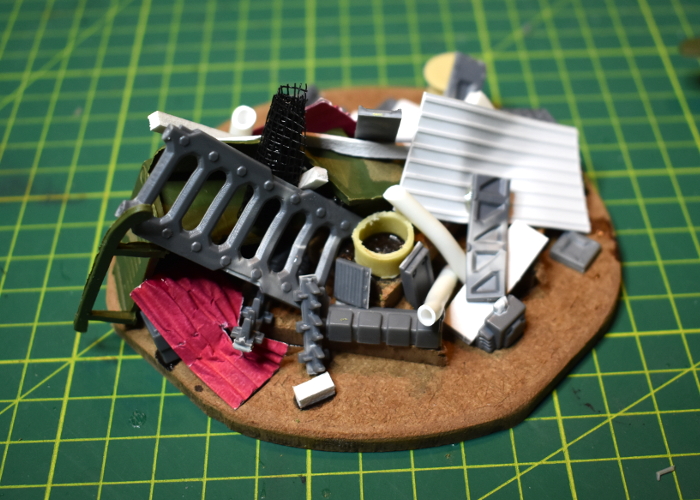

To finish up, I glued on some light gravel and sand mix anywhere on the hardboard where there was empty space.
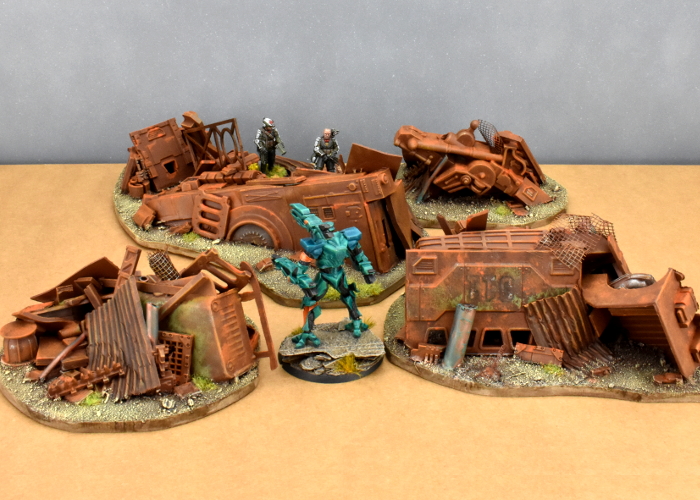
That just left painting. There were a few different potential ways to go here: painting everything up as heavily rusted and old, making it a newer junkyard with lots of shinier metal and painted parts, or something in between. To help disguise the mix of different building materials used, I decided on the first option.
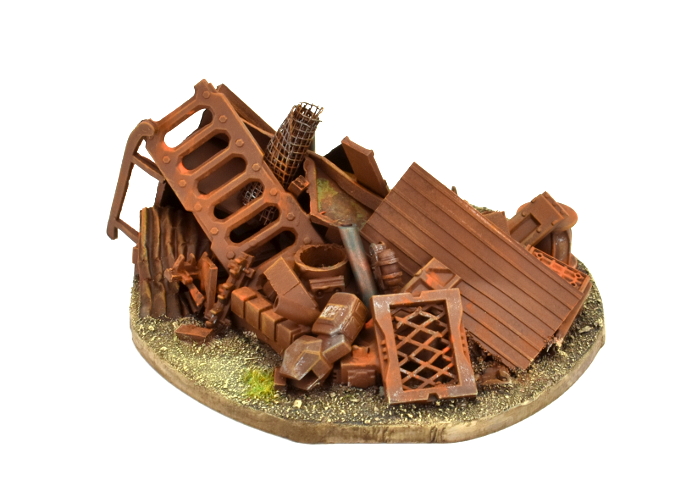
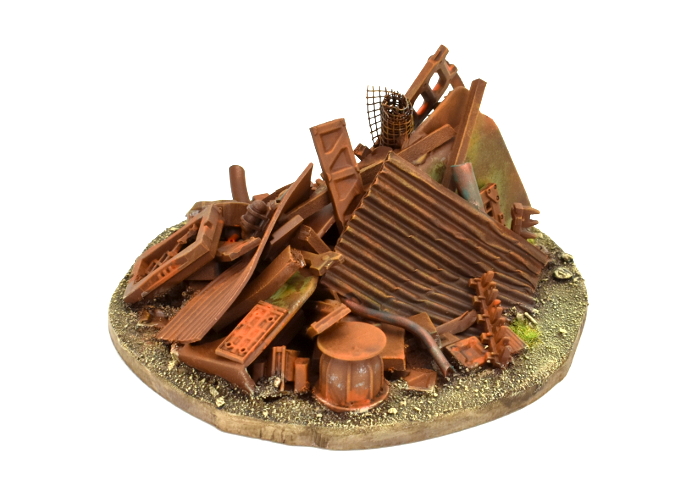
For the most part, I used the same rusted metal technique as for my shanty buildings and elsewhere. Some panels have some weathered paintwork still showing, and I couldn't resist adding in some aged copper pipes for a little extra colour, using the same method as in my copper tutorial. The gravel around the junk was painted in the same style as I used for my crystal outcrops, to provide some contrast to the rusty metal.
To get in some terrain action of your own, you can pick up the Maelstrom's Edge terrain sprues along with the rest of the model range from the webstore here.
For other building ideas, modeling tutorials, army spotlights and conversion walkthroughs, check out the Hobby section of the Maelstrom's Edge website here.
What are you working on? We would love to see your models and terrain in the Comm Guild Facebook group!
Tags: conversion modeling painting spotlight terrain terrainsprue tutorial walkthrough
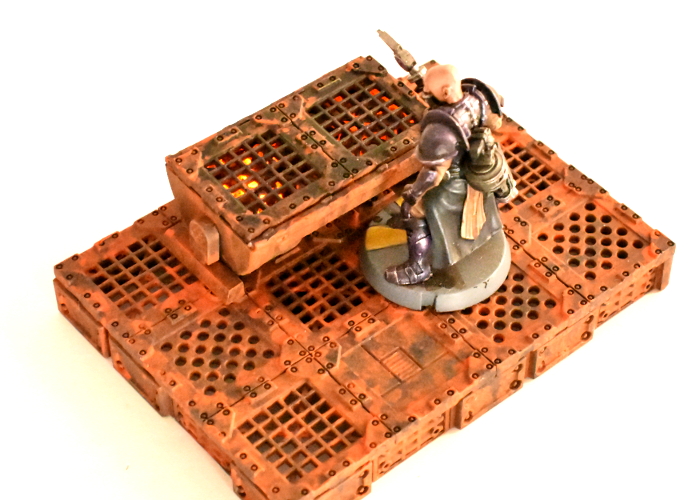
Terrain Spotlight: Light-up Grill
Posted on Monday Sept 28, 2020 at 05:00pm in Tutorials
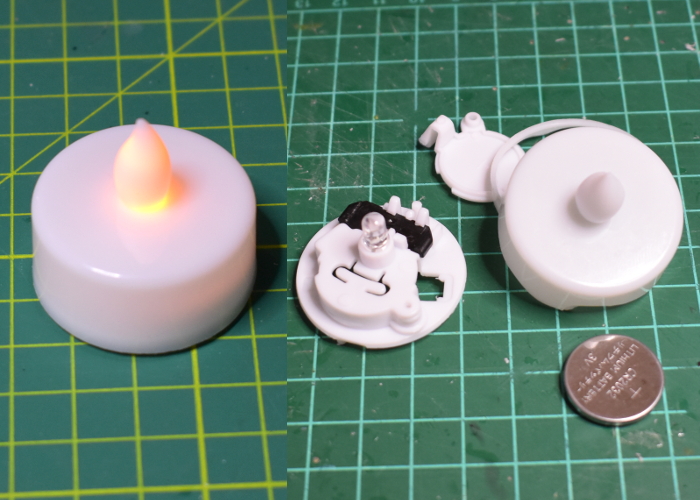
I've had a bunch of battery-powered 'tealights' sitting in my 'cut this up for something interesting' pile for some time now. They're cheap and dodgy, and would be absolutely useless as an actual light source, but I thought they might be useful for making some illuminated explosion markers, or something similarly unnecessary but pretty. Being Australian, the thought of standing outside, cremating anything within reach on a hot barbeque is always present in my mind, and so it occurred to me that a lit up grill would be a fun modeling project.
The tealights in question are a plastic shell with an extremely convincing and lifelike 'flame' on top, containing an orange LED hooked up to a large button cell and a basic switch that just moves a wire on and off the side of the battery. The first step was to extract the useful parts from the outer shell.
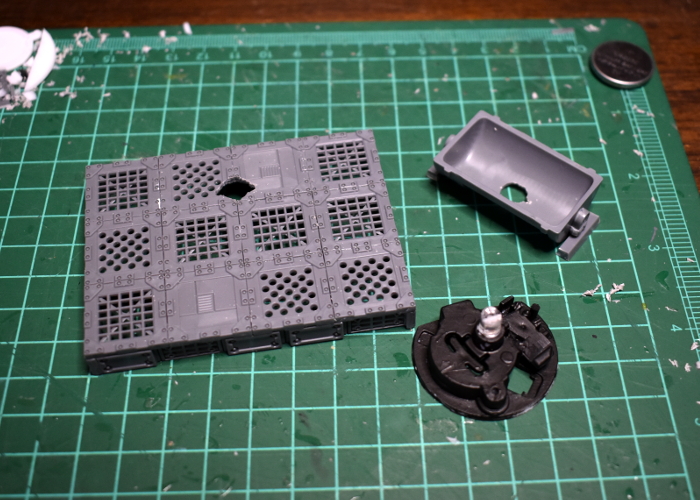
Rather than pulling all of the parts out and rewiring everything, I decided to leave the interior of the candle mostly intact, just trimming away as much as possible of the protruding parts to slim it down. Then I build a platform using parts from the Maelstrom's Edge Terrain Sprue #2 to make a platform, under which the battery compartment would be concealed.
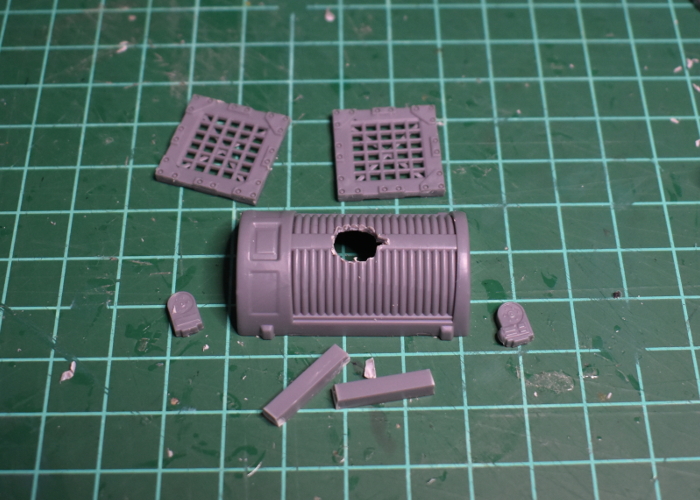
For the grill, I used an assortment of parts taken from the terrain sprue. A generator piece with a hole cut in the middle for the LED to poke through formed the main section of the grill. This left the LED a fraction too tall, so I used a razor saw to trim the top off the clear outer casing, being careful to leave the working parts of the LED intact.
I cut a matching hole in the platform's floor, and painted the candle parts black, so that they would hide more-or-less invisibly underneath the platform.
The LED isn't particularly bright, so to give it a helping hand I lined the inside of the generator with some aluminium foil to serve as a reflector. My hope was that with another small piece of foil glued on top of the LED, this would bounce the light around enough to spread the glow down the length of the grill interior. To go over the top, I took a piece of clear plastic, painted it with transparent red paint, and glued some gravel sprinkled across one side.
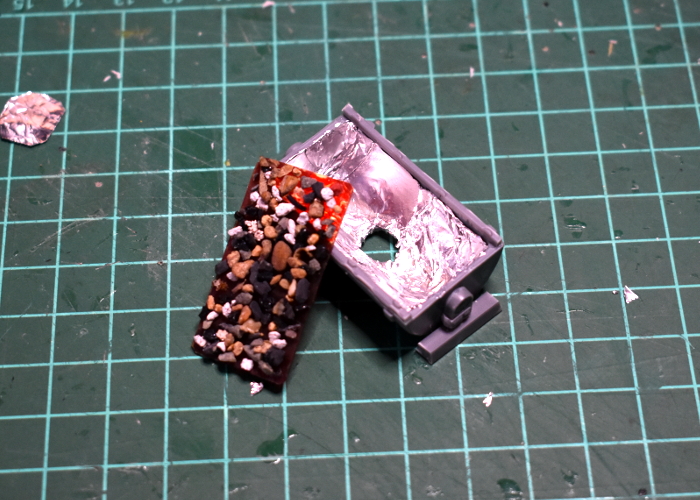
With some more transparent red on the outside of the LED, it was time to get some colour on the parts before gluing everything together. I also added a little putty around the LED, to close up any gaps where the light could shine back down where it doesn't belong.

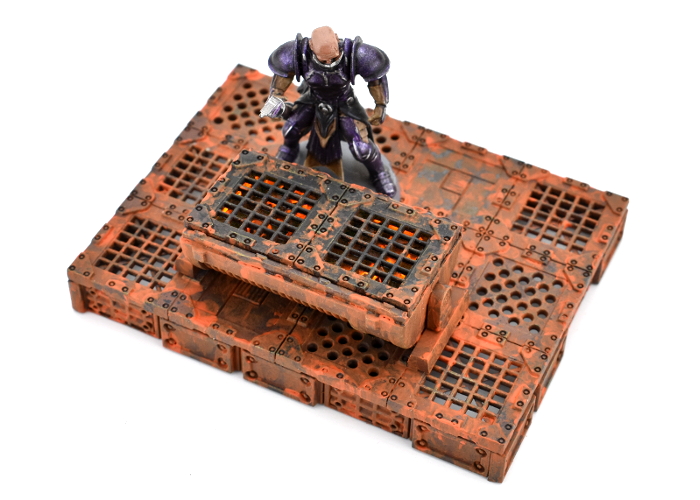
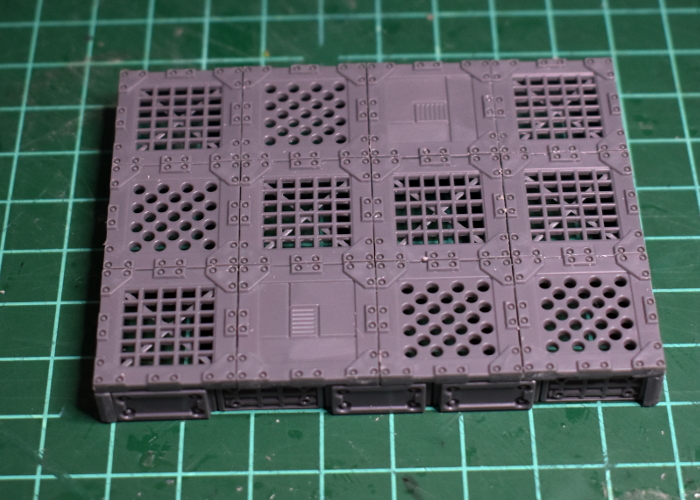
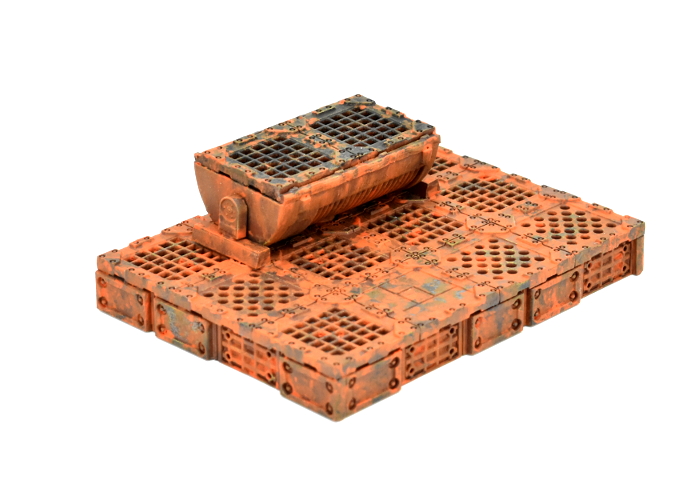
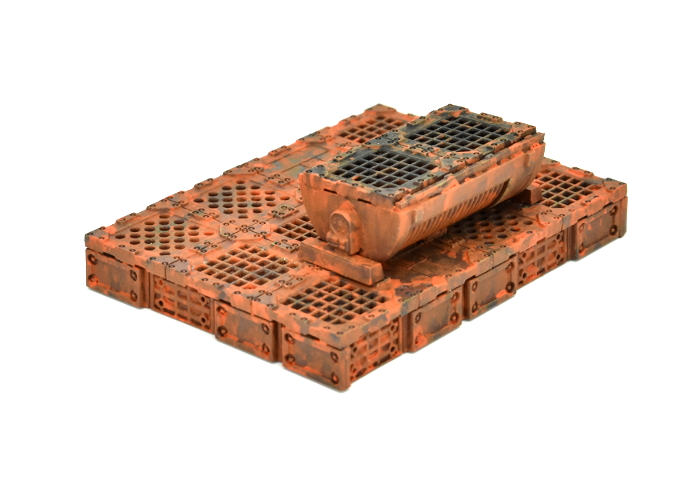
With the top glued on, and the final rust effect layer in place, the platform wound up looking like this:
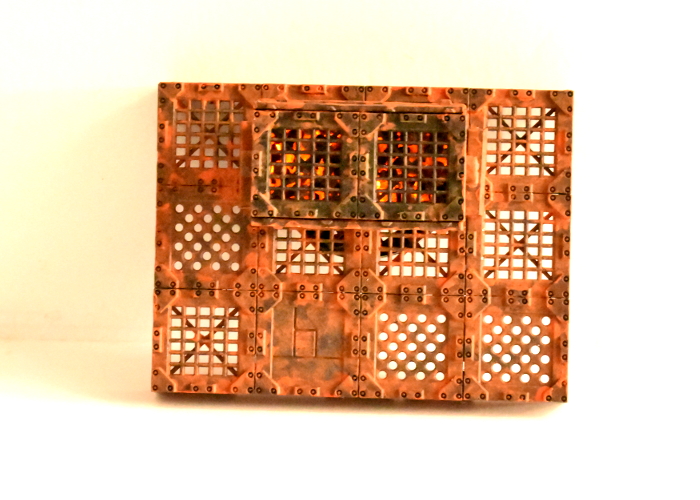
The glow doesn't show up particularly well under the photographic lights, but less bright, ambient light, it looks something like this:
The next step will be to see what else I can add to the platform to bring it to life a little. Stay tuned!
To build your own cookplate of charcoaled doom, you can pick up the terrain sprue along with the rest of the Maelstrom's Edge model range from the webstore here.
For other building ideas, modeling tutorials, army spotlights and conversion walkthroughs, check out the Hobby section of the Maelstrom's Edge website here.
What are you working on? We would love to see your models and terrain in the Comm Guild Facebook group!
Tags: modeling spotlight terrain terrainsprue tutorial walkthrough
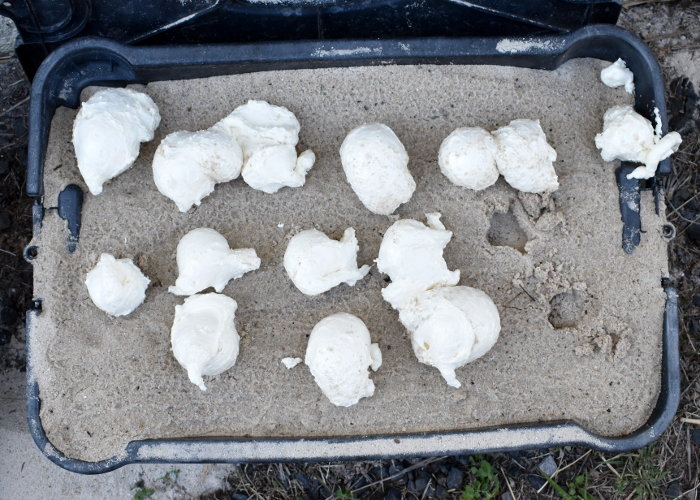
Terrain Spotlight: Expanding Foam Trees!
Posted on Friday Aug 28, 2020 at 05:00pm in Tutorials
Most of my terrain building focuses on buildings and other urban-styled features, because tinkering with plastic terrain sprues is just too much fun. Sometimes, though, I like to venture outside the urban sprawl and into the forest. Previously, I've dabbled with old-school, polystyrene ball cacti and alien forest bases made from silicon aquarium plants. This week, I'm working on some boab-inspired trees made from expanding foam!
There are various tutorials floating around for expanding foam trees, but all of those that I found were using twigs or plastic tree trunks with the foam used for filling in foliage. I wanted to turn that idea upside down, using plastic plants for foliage, and the foam used for the trunk. (For the uninitiated, expanding foam is sold in hardware stores for filling holes in walls and the like. It comes in an aerosol can, and when you spray it out it expands to around 300% of its original volume, setting into a lightweight, hard-shelled foam)
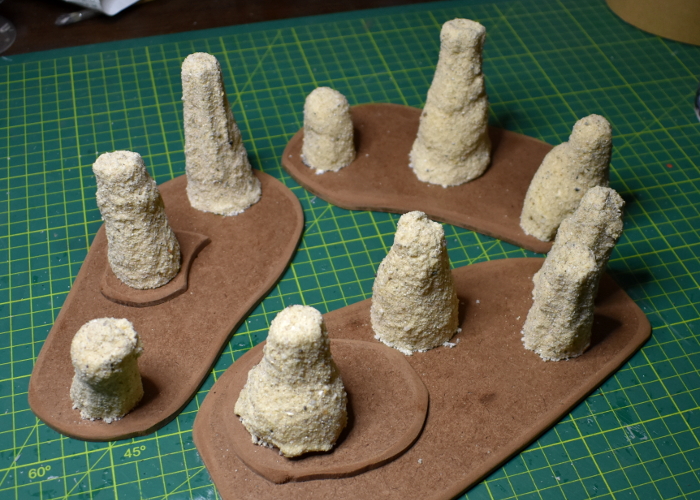
My first attempt used large bases with a piece of sprue stuck vertically on them as a support, with the foam sprayed around it, but this wasn't overly successful - they just settled into giant blobs of foam. So instead, I hit on the idea of using a mould for them. I took a screwdriver and used its handle to make a number of vaguely-conical holes in some damp playsand, and then sprayed the foam into these holes, leaving it to set.
Once the foam was set, I pulled the pieces out of the holes, brushing off any loose sand. Because the foam is quite sticky when it is setting, they wound up with a layer of sand quite firmly glued to the outside, which made a nice texture on the trunks.
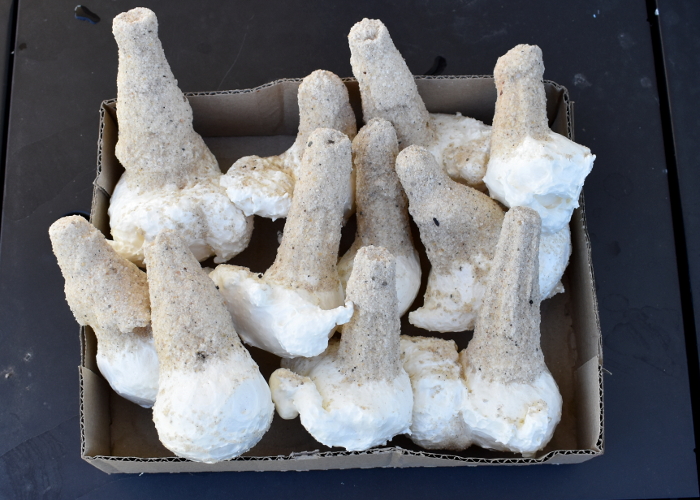
I used a mitre saw to cut the blobby excess bits off the bottom of the trunks, and then glued them down to some hardboard. A knife probably would have done this job, as the foam is quite easy to cut, but the deep-bladed saw made it easy to get a nice, flat cut.
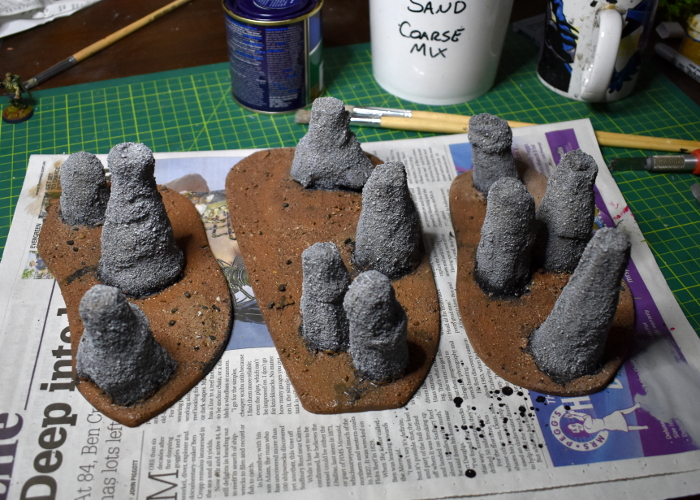
After texturing the bases with some light gravel and sand mix, I tried painting the trunks with a coat of the same charcoal wood stain that I used for last week's wood stain painting tutorial. While it worked great on the models, here it just tinted the sand but left the lighter, yellowy foam peeking through, so I painted over the top with a coat of Army Painter Ash Grey, and also basecoated the base with some Army Painter Leather Brown.
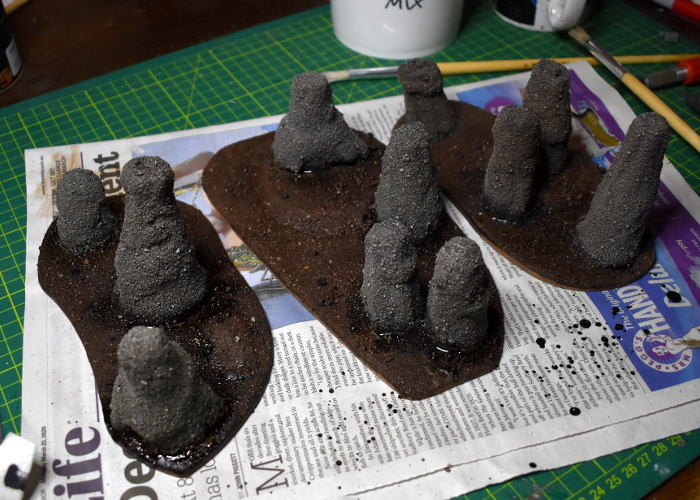
I then went over the whole lot with a generous coat of Army Painter Strong Tone.
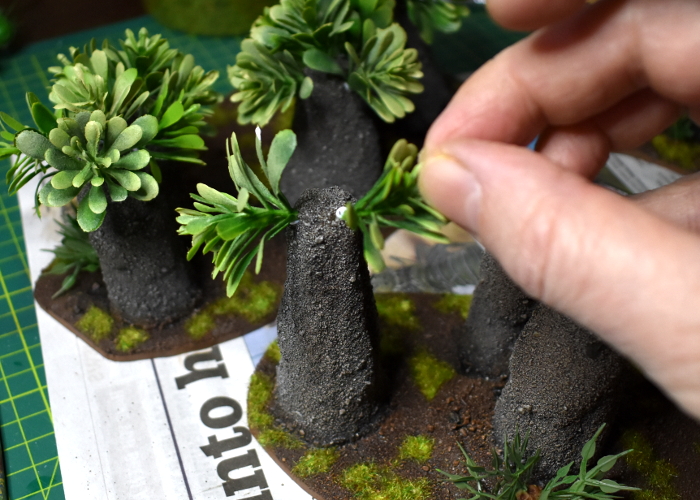
To finish up the painting, I gave the bases a light drybrush with some more Leather Brown, also painting the edges with the same colour. Then I glued on some patches of static grass, and a few bushes made from plastic indoor decorating plants - these come from large sheets of plants that are sold for making artificial garden walls.
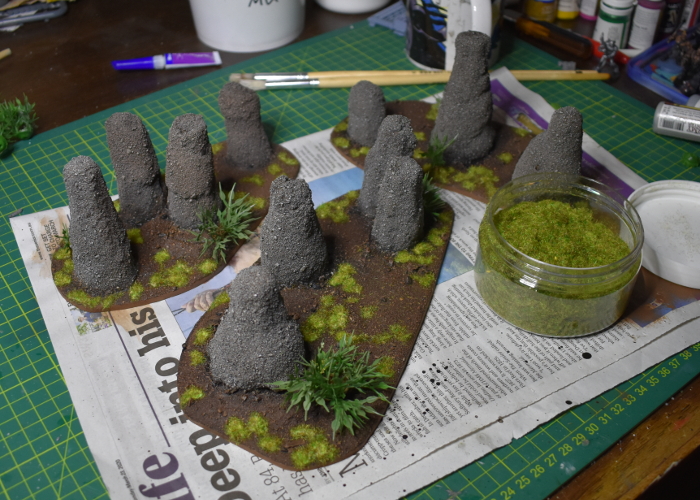
At this point, these terrain pieces could easily pass for rocky outcrops or some sort of giant insect mounds, but I decided to go the final step and foliage them up. Using some more decorative plastic sheet plants, I pierced around the top of the trunks with a spike, and then glued clumps of plants on to form a canopy.
The end result:
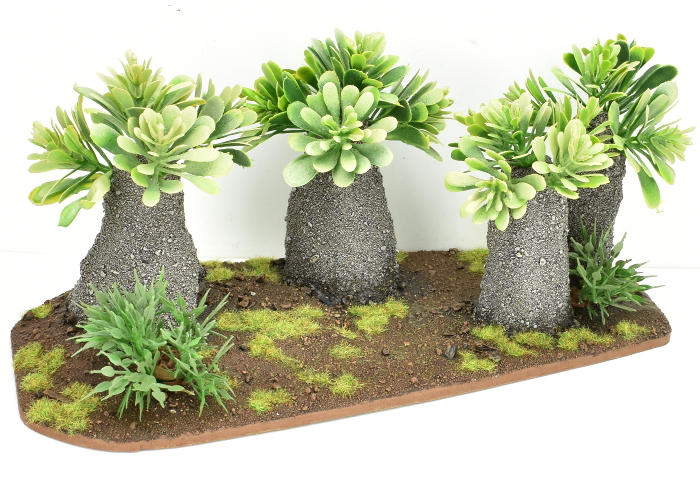
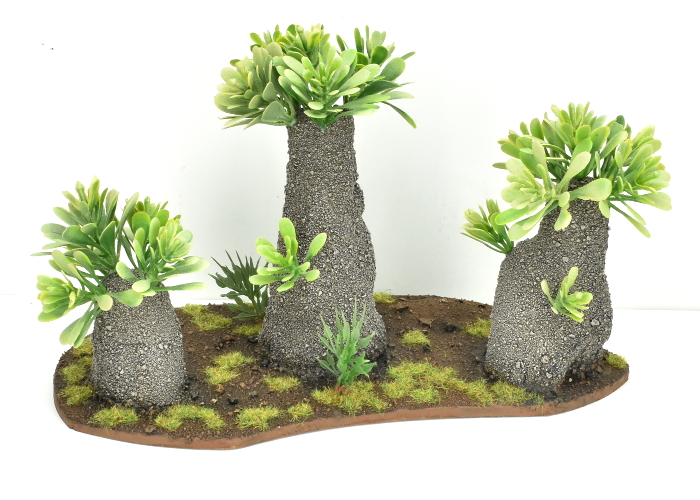
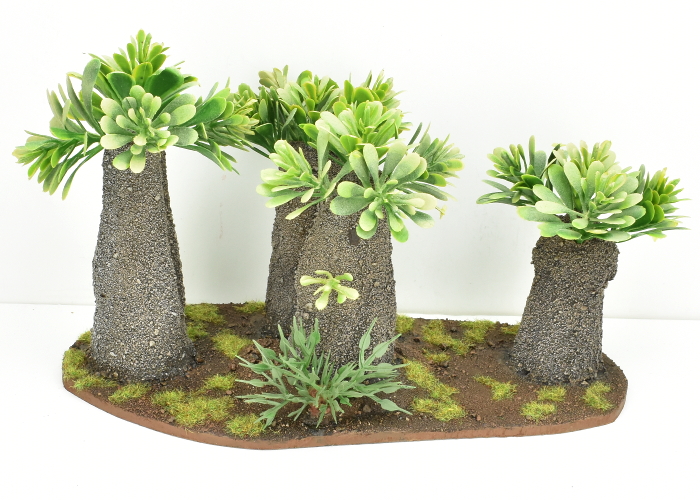
And the forest cluster, all together:
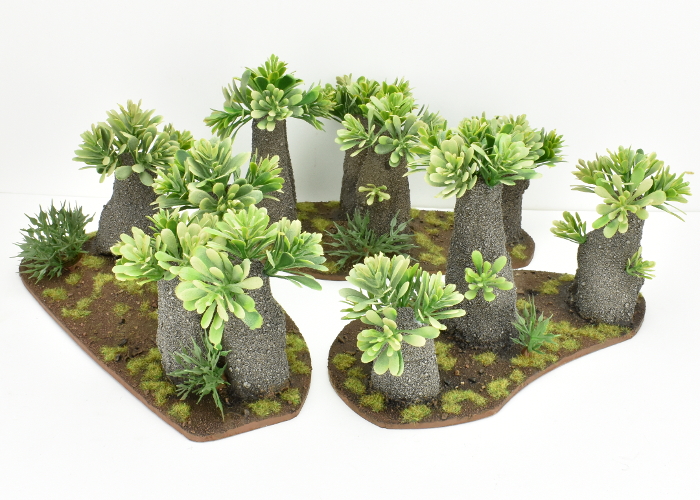
The texture on the trunks winds up a little unusual for bark, but given that they're intended for a sci-fi table it could easily be something other than wood as we know it - maybe some sort of calcium deposit, or a silicon-based extrusion on which the plants grow. It might also give an interesting bark effect to paint over the sand with some crackling, desert-earth texture paint.
If you feel like building your own alien forest of water-retaining doom, be sure to show your results in the Comm Guild Facebook group!
Meanwhile, don't forget that you can pick up the entire Maelstrom's Edge model range from the webstore here.
For other building ideas, modeling tutorials, army spotlights and conversion walkthroughs, check out the Hobby section of the Maelstrom's Edge website here.
Terrain Spotlight: Derelict Water Tank
Posted on Thursday Jul 30, 2020 at 05:00pm in Tutorials
I've bought a couple of different materials for making water terrain features over the years, but other than using a tiny bit of Woodland Scenics' 'Realistic Water' in the watering trough in my Sci Fi Stockyard some time ago, I've never really done anything with it. So this week, I decided it was time to get my toes wet.
The main part of this water tank was originally the lid of a cylindrical gift box.
I flipped the lid upside down and used it as a template to cut a circle out of a sheet of foamed PVC for the lid to fit neatly into. A plastic plate served as a template for a larger circle around the tank. (Note: if you're using plates for circle templates, plastic is best. China or ceramic plates are often not perfectly circular!)
After gluing the tank and surround down to a square of hardboard, I started detailing. A thread spool that I had tucked away in my 'to be turned into terrain' pile looked like a perfect base for an overflow pipe, with additional detailing added from some more foamed PVC and a porthole and exhaust fan from the 2nd Maelstrom's Edge terrain sprue.
I also took a bunch of floor grates and pillars from Terrain Sprue #2, and half of a ladder from the Terrain Sprue #1 to make a platform. Onto this, I glued a control panel made from an antennae array from sprue #2 and a couple of trimmed down trapezoid windows from sprue #1, with a piece of plastic tube to finish it off. I made sure this would fit where I wanted it, but held off on gluing it in place until it was painted.
To add some detail around the outside of the tank, I took some loose strut panels from sprue #2 and curved them slightly over a marker pen before supergluing them in place at intervals around the tank.
Some small pipe fittings, a little plastic tubing and a piece of sprue cut from Terrain Sprue #1 served to make a smaller fill pipe. And finally, because it's against the law to make a water feature for a sci fi table and not have a barrel floating in it, I dug one out of the bits collection. After cutting through it at an angle with a razor saw, this gave me two barrels to glue in place inside the tank.
Painting consisted of spraying the whole thing with a brown 'Rust Basecoat', adding a coat of Army Painter Gun Metal around the outside, and then going to town with browns, oranges and Army Painter Dry Rust. On the inside of the tank I also added some swirls of green, before gluing the platform in place and filling the tank with several layers of Woodland EZ Water and Realistic Water, adding drops of Army Painter inks in between to provide some swirly patches of colour. This wasn't entirely successful, as the inks reacted with the Realistic Water and made it dry a bit lumpy - the key would seem to be to make sure that the inks are fully dry before adding the 'water'... or using Woodlands own pigments that are actually intended for this job!
To build your own water tank of icky, muddy doom, you can pick up the terrain sprues along with the rest of the Maelstrom's Edge model range from the webstore here.
For other building ideas, modeling tutorials, army spotlights and conversion walkthroughs, check out the Hobby section of the Maelstrom's Edge website here.
What are you working on? We would love to see your models and terrain in the Comm Guild Facebook group!