Entries tagged [spotlight]
Force Spotlight: Quick Painted Epirians!
Posted on Tuesday Apr 12, 2022 at 05:00pm in The Epirian Foundation
 - by Iain Wilson
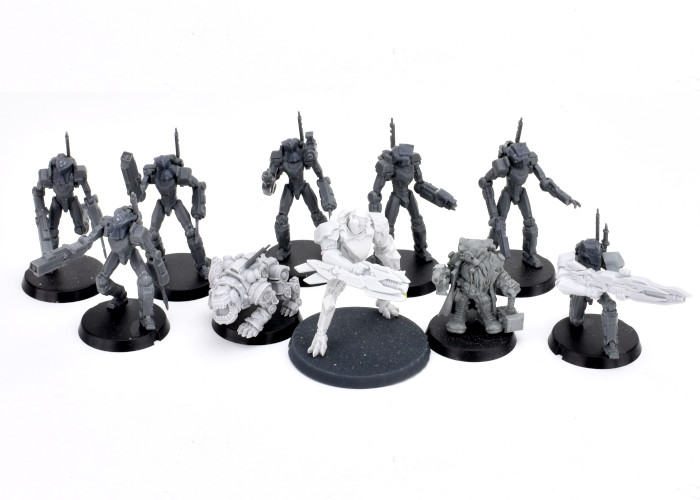
A few weeks back, we published some sample force lists for the V2 Maelstrom's Edge rules. These got me a little inspired to put together a new force for myself, and so I dove into the unbuilt model pile and put together 120 points based on the Epirian sample list.
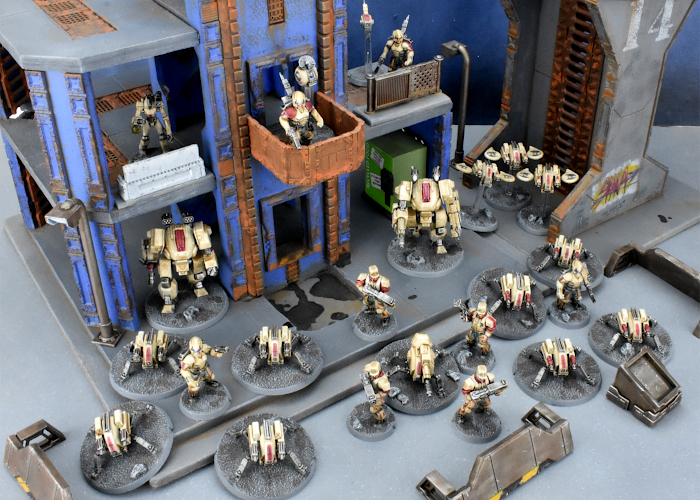
The force roster is almost identical to the sample list. I found myself short by one Firefly drone, so I dropped those to a unit of three, and gave the Contractor Defenders a Chaingun drone and one of the Journeymen a second Dominator pistol to make up the difference.
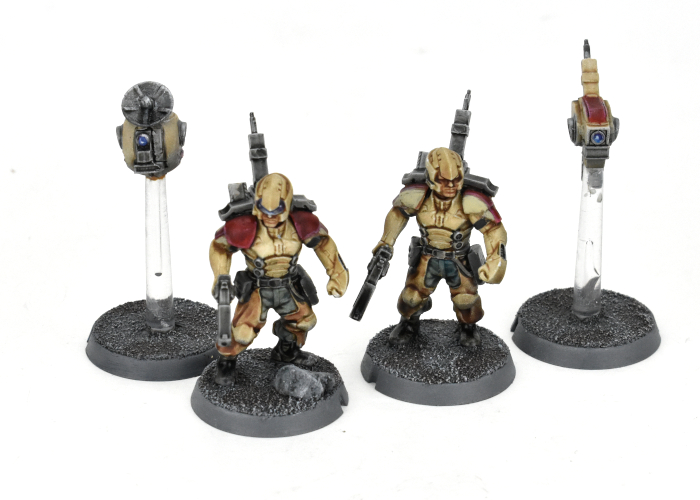
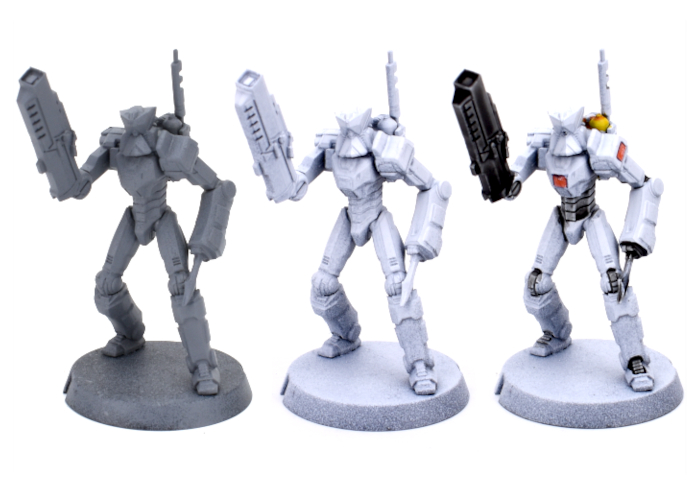
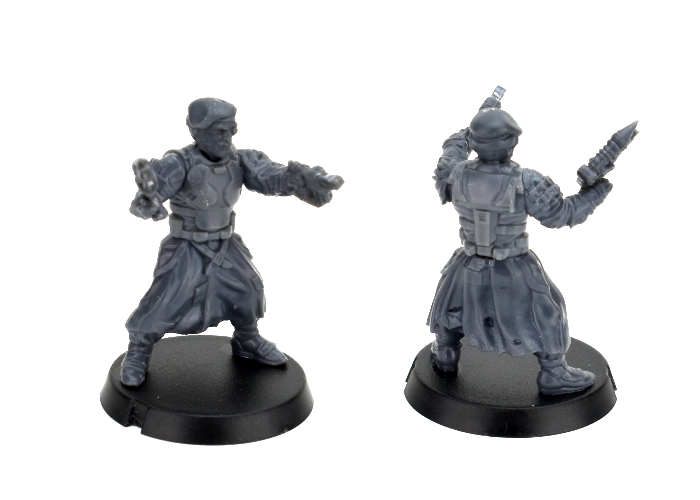
Journeyman Bot Handlers with micro drones (the drones are 3D printed test models - the finished models will be coming in plastic soon!)
I wanted a colour scheme that was quick and easy to paint, and also visually distinct from my existing forces. Starting out with a basecoat of Army Painter Uniform Grey spray, I then added a 'zenithal' highlight by spraying down from above the models with white spray. Over that, I applied a wash of Army Painter Soft Tone. Metal parts were picked out with AK Gunmetal and then washed with Army Painter Dark Tone - two coats for the weapons.
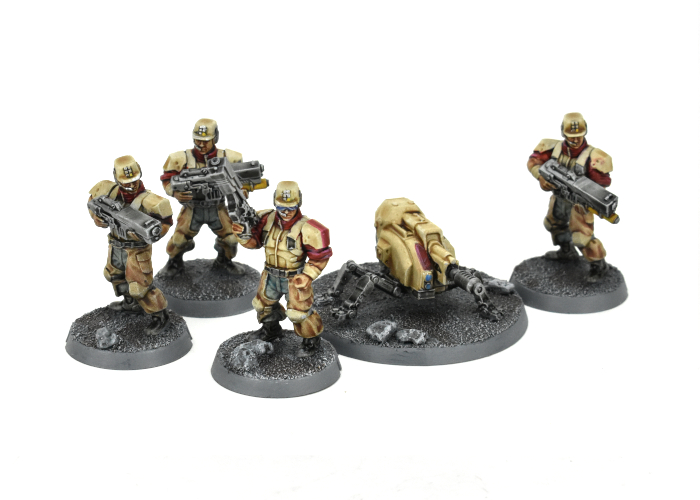
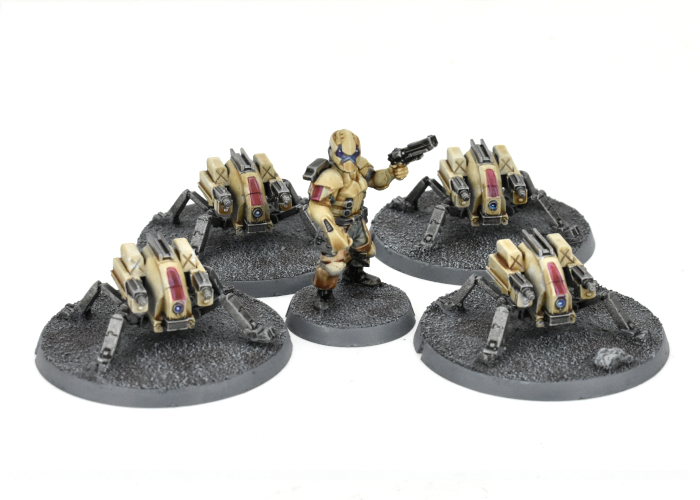
Contractor Defenders.
The pants on the Contractors were painted with a layer of Army Painter Blue Tone to give them a denim look, while the chaps were given a coat of Army Painter Mid Brown wash. I painted the skin with a coat of Army Painter Flesh Wash, and then as it still looked a bit pale added a layer of Mid Brown as well.
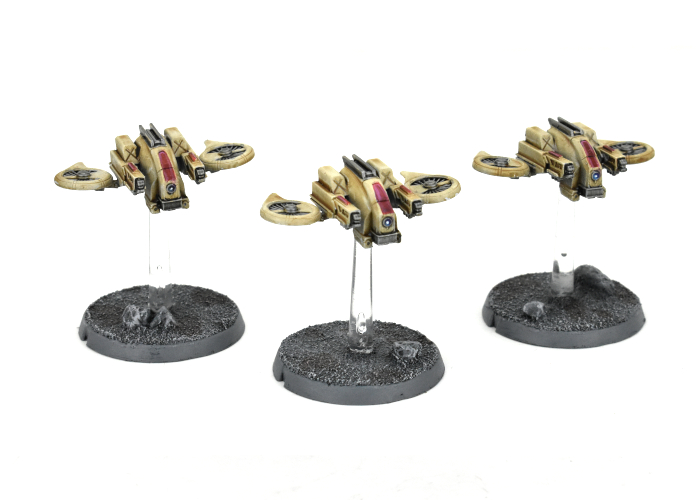
Firefly Drones.
For the red details, I painted on a coat of Citadel Blood Angels Red Contrast. This didn't look quite the right tone with the sandy coloured armour, so I added a layer of Army Painter Purple Tone over the top, before highlighting with Army Painter Pixie Pink.
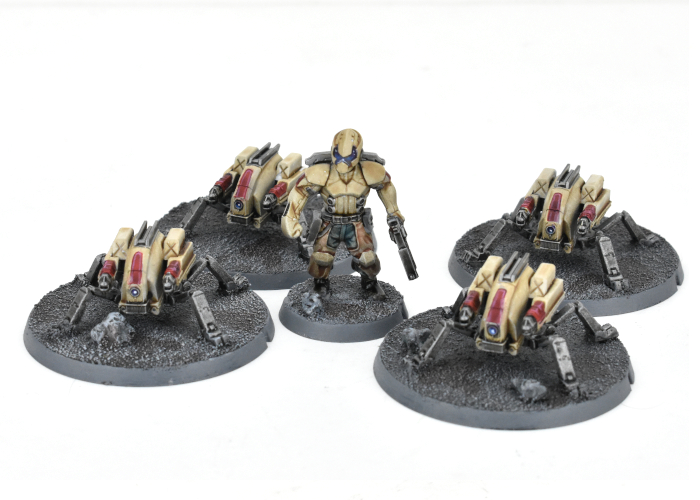
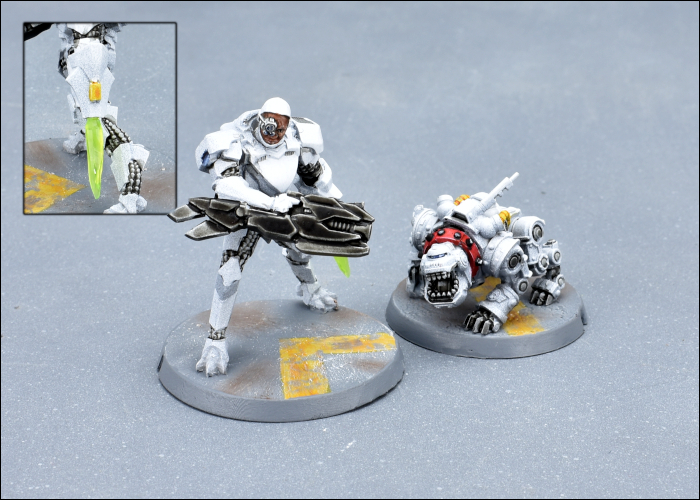
Spider Drones with flakk guns.
I had found with my previous Epirian Bot Force that the weapons on Spider Drones can be a little hard to differentiate from across the table, so I made sure I painted them differently, leaving the machine guns bare metal and adding a red casing on the flakk guns.
Spider Drones with machine guns.
I used Army Painter Ultramarine Blue for lenses and sensors, shading with Purple Tone and highlighting with Army Painter Gorgon Hide.
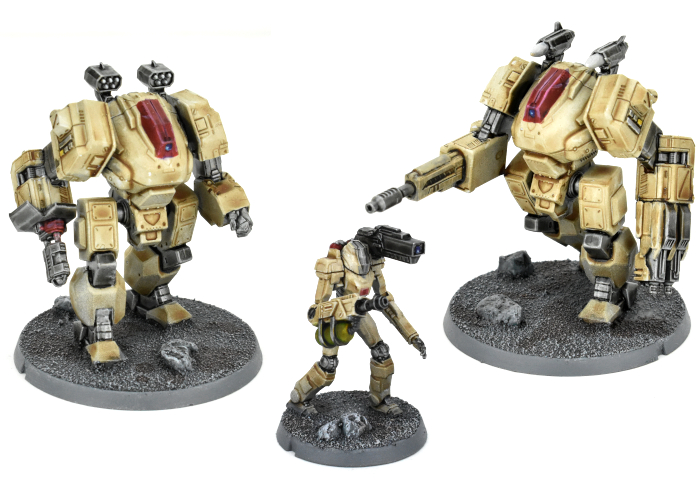
Hunter mechs and Scarecrow bot.
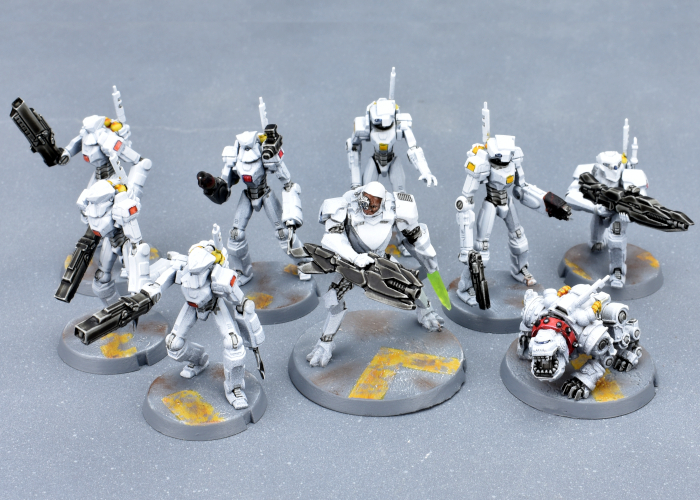
To finish up, after gluing on some fine sand and a few pebbles for detail, I painted the bases with Uniform Grey, washed over the top with Army Painter Dark Tone, and then drybrushed with Vallejo Light Grey and White before adding some splotches of Mid Brown here and there to break up all of that grey.
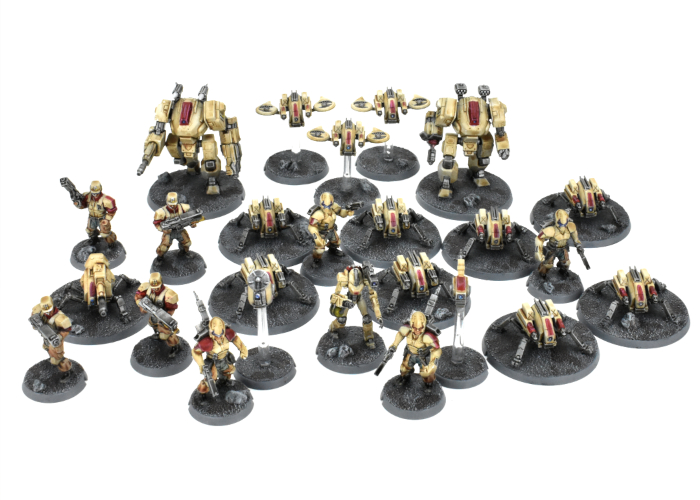
The full force deployed.
Get started on your own V2 force by heading over to the Maelstrom's Edge webstore!
While you're there, you can download the V2 rules from the Trial Rules section of the Maelstrom's Edge website here. The Beta rules documents contain all of the rules for playing V2 games, but keep in mind that these are just 'preview' documents - some rules may be revised based on feedback, and the final layout including background material for the factions and the Maelstrom's Edge universe, artwork and other 'flavor' material is missing.
If you have any thoughts on the new rules, pop on over to the Comm Guild Facebook group, or start up a thread in the Maelstrom's Edge section on the Dakka Dakka forums. We welcome any feedback, and would love to hear how everyone's forces stack up in the new rules!
Terrain Spotlight: Candy Jar Desert Building
Posted on Tuesday Jan 11, 2022 at 06:00pm in Tutorials
- by Iain Wilson
As a wise man once said, "With great Christmas comes a great big bunch of junk food!"
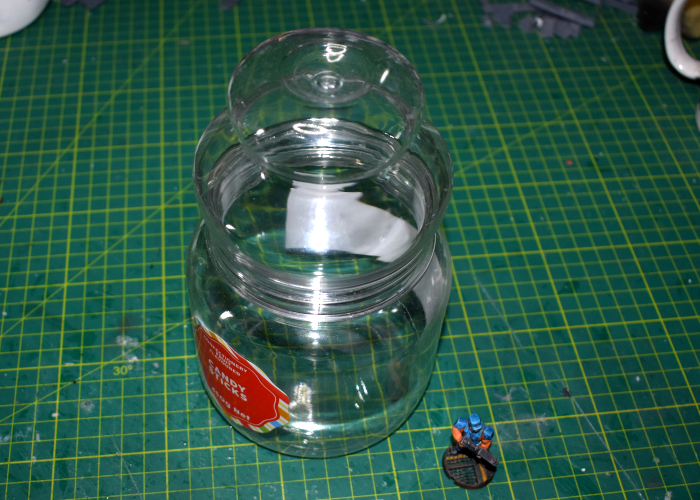
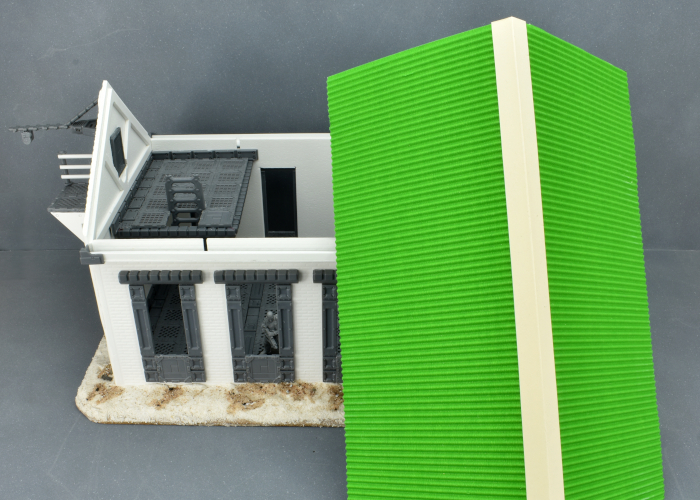
Amongst my family's collection of sugary delights this year was a plastic jar full of candy sticks, bought for my daughters to stuff into Christmas cards. Once empty, though, the jar itself was just too interesting a shape to toss it away. So, there was nothing else for it but to build something!
The jar in question, blissfully unaware that it was about to enter a whole different plane of existence.
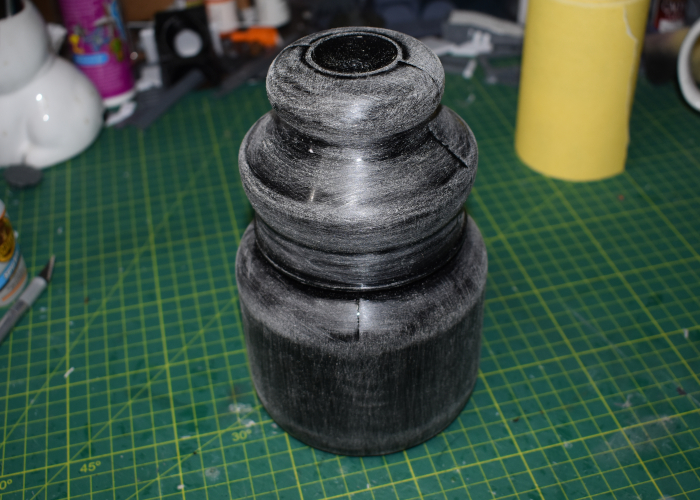
After removing the labels and cleaning off the glue residue with some isopropyl alcohol, I sprayed the inside of the jar with some matt black spray. I do this whenever I'm using something clear as a terrain base, as it prevents stray light bleeding through the paint, and also stops things looking weird if the paint on the outside gets scratched.
I also gave the outside a scrub with some sandpaper to break up the glossy surface. This gives a better surface for the glue and paint to adhere to.
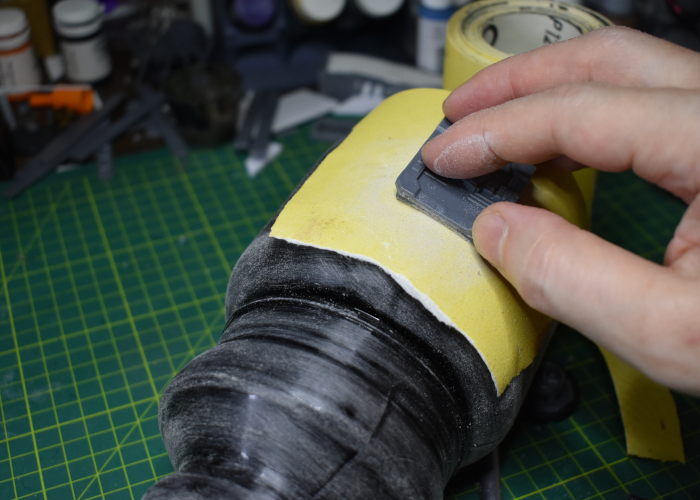
To fit doors and windows from the terrain sprue to the curved surface of the jar, rather than building a framework to square things up I decided to fit them to the curve. I laid a piece of sandpaper over the jar and used this as a curved sanding block to shape the back of the parts.
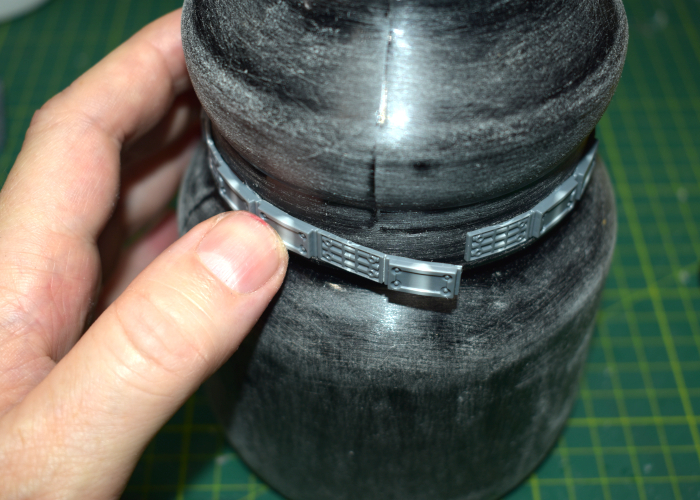
Adding the support struts around the rim of the lid was a little easier - I just bent them around the curve and glued them in place with superglue and a plastic primer.
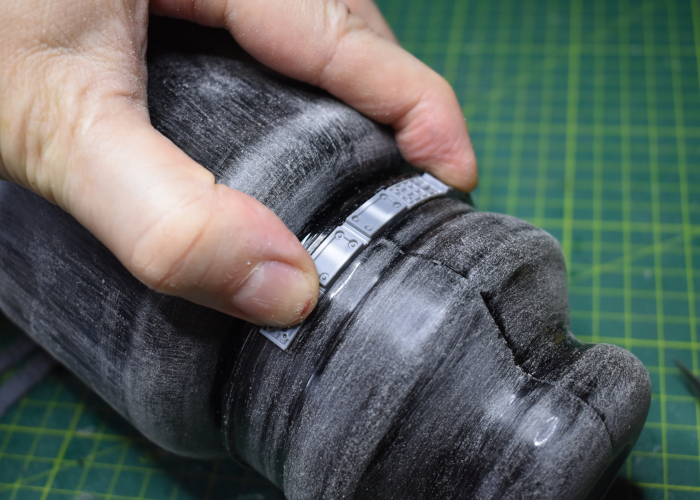
In a happy coincidence, the spacing worked out almost perfect. I used three full struts, and cut the last one down to three sections, needing to trim only a fraction off the end to make it fit perfectly.
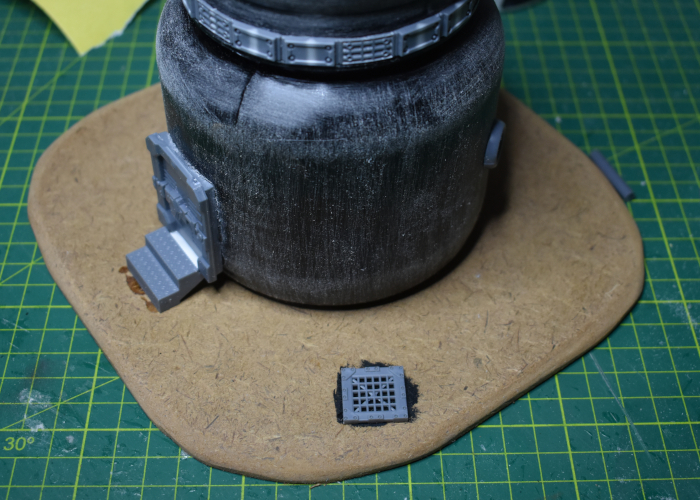
I glued the door and windows into place, adding some steps and gluing the jar down to a piece of hardboard. I also added a grating piece onto a bare patch of the board just for some extra visual interest, painting underneath it with some black as this was easier than doing it later.
To dress up the top of the building, I grabbed a few assorted pieces from the terrain sprues, whipping together an aerial array, a control box and a chimney using a piece of the sprue and some plastic tube.
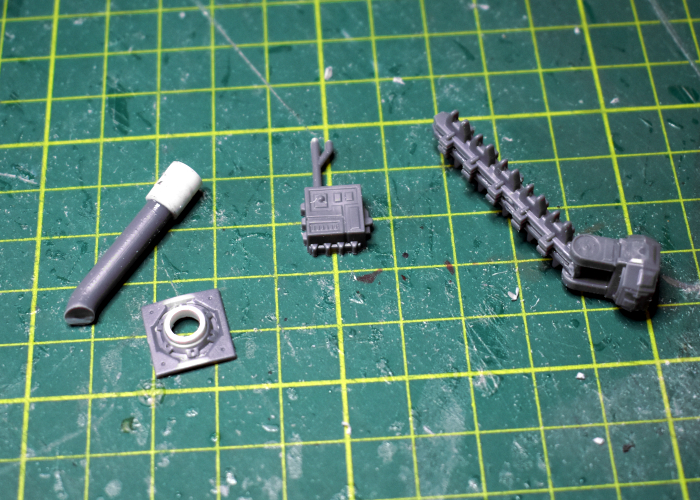
With these parts glued in place, I finished off the roof with a fan and large pipe fitting glued onto a base that fit just perfectly over the cavity in the top of the jar lid.

The jar needed some texture, so I added a coat of textured paint and while that was drying I built up the base with some filling plaster.
Finally, I added a layer of sand and gravel mix over the filling plaster, fixing it in place with some PVA glue.
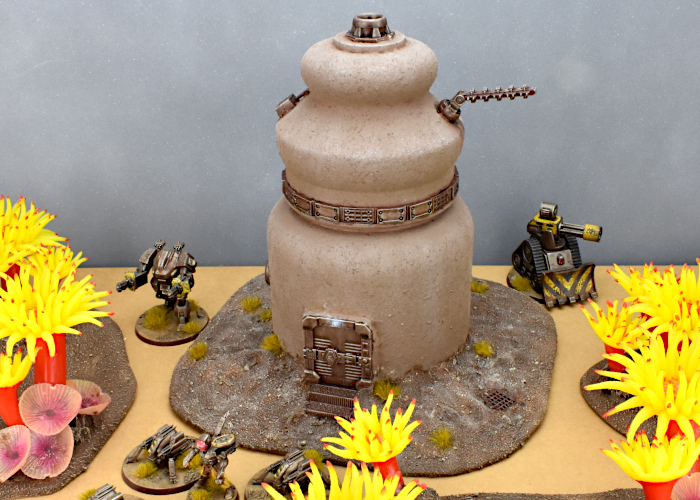
After a quick bit of paint work, the new building was looking totally sweet and ready for the table!
To build your own desert habitat of sugary doom, you can pick up the terrain sprues along with the rest of the Maelstrom's Edge range from the webstore here.
What are you working on? We would love to see your models and terrain in the Comm Guild Facebook group!
For other building ideas, modeling tutorials, army spotlights and conversion walkthroughs, check out the Hobby section of the Maelstrom's Edge website here.
Tags: buildings scratchbuild spotlight terrain terrainsprue tutorial
Terrain Spotlight: Fruit Jar Air Purifier!
Posted on Wednesday Dec 08, 2021 at 01:03am in Tutorials
- by Iain Wilson
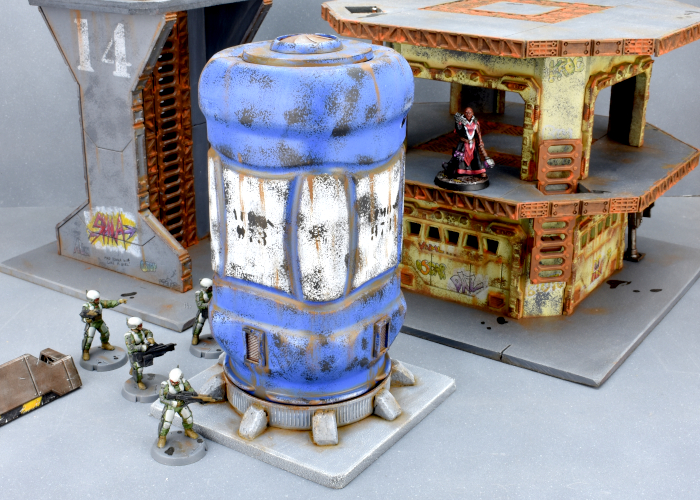
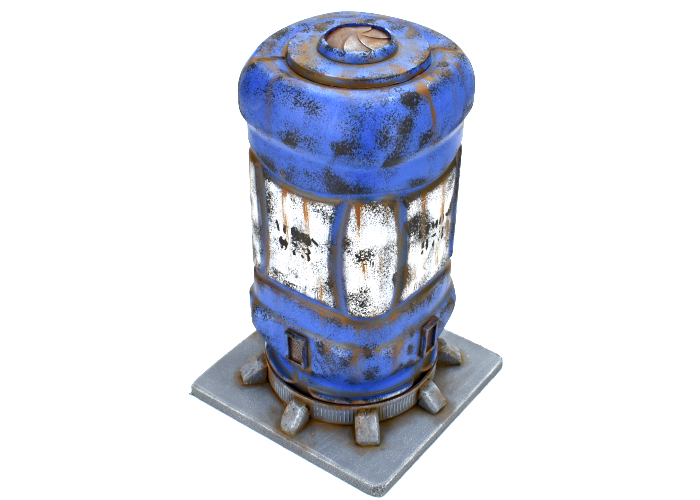
Time for a super-quick terrain build! In the grand tradition of painting things instead of throwing them into the recycling bin, this week I built an air purifier station out of a plastic fruit jar, with some help from the Maelstrom's Edge terrain sprue!
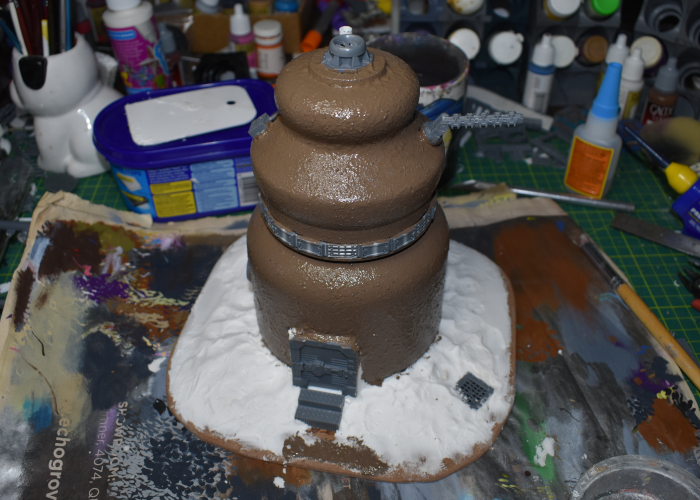
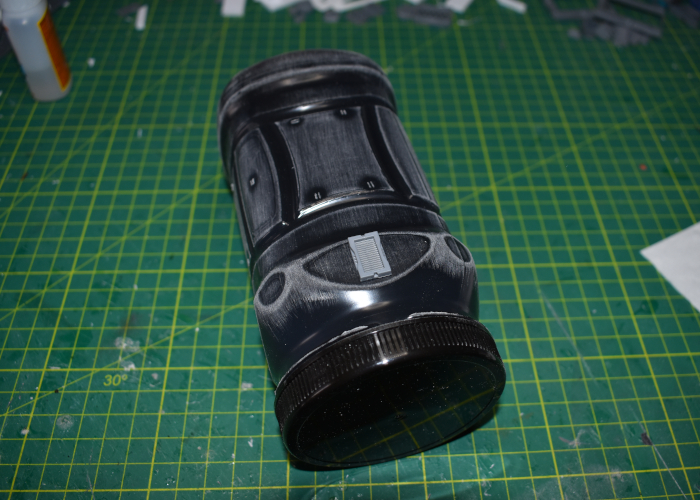
The bulk of this terrain piece uses the aforementioned plastic jar, which I think originally had plums in it. The plums weren't much good for modeling, but the jar itself was an interesting shape, so I figured it was worth hanging onto it.
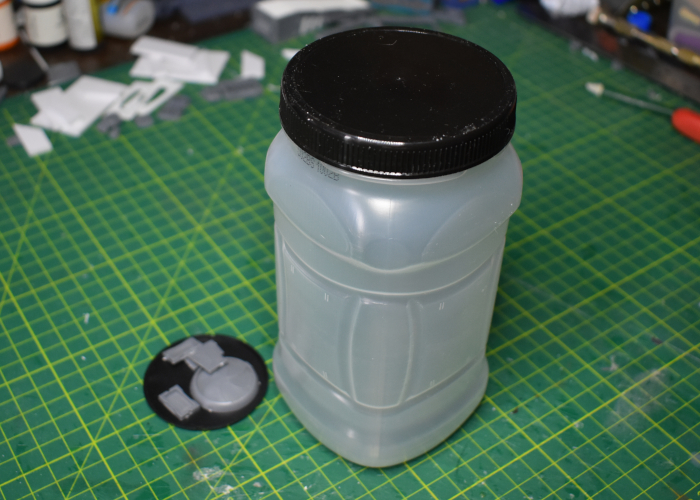
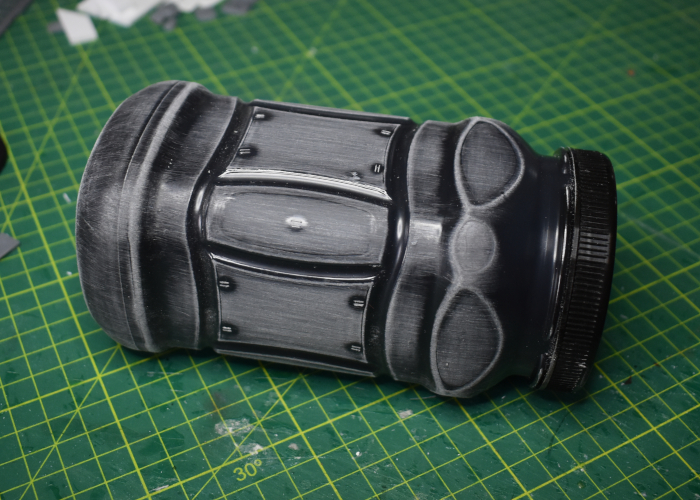
I started out by spraying the inside of the jar with some black paint. This helps to avoid things looking weird if the outer layer of paint gets scratched with use, and also blocks light from showing through if the outer paint layer is thin in places. I also gave the outside a light sand to help the glue and paint to stick better.
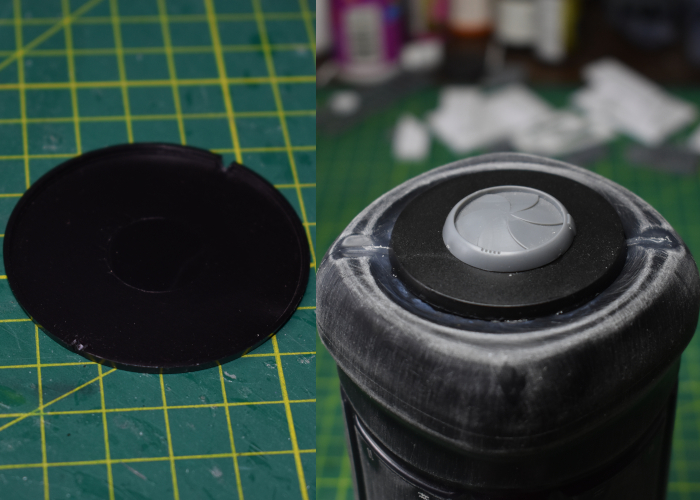
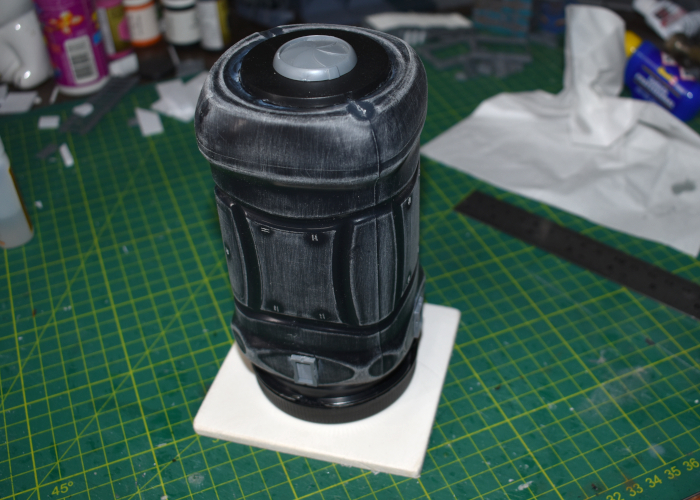
To cover over the embossed logos on the bottom of the jar, I took a large base and cut some indents into the bottom to sit over the mould line on the jar. I glued this in place using some all-plastic glue (a superglue with a primer pen that helps give a secure bond on different types of plastics). In the middle of the base I added an iris portal from the second Maelstrom's Edge terrain sprue.
I went light on additional details as I thought the shape of the jar was interesting enough by itself, but I added a vent on each side - the iris on top would be opened to suck in contaminated or otherwise unsuitable air, and the cleaned/chemically altered/now fit for breathing air would be pumped out through the vents, with all of the 'working gubbins' sealed away inside the unit.
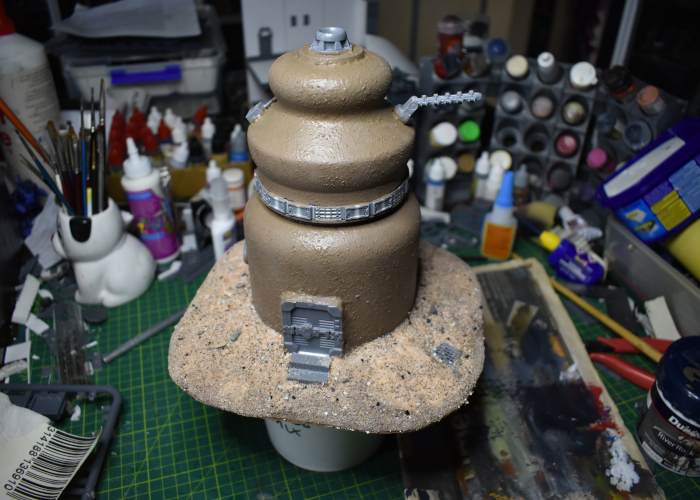
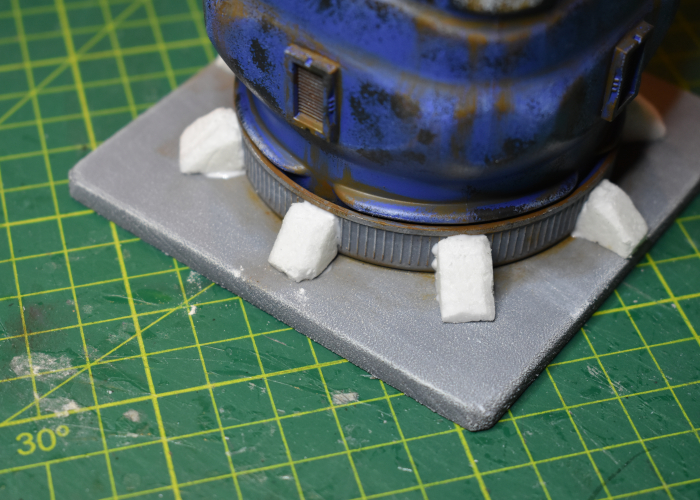
Finally (or so I thought) I added a small base cut from a piece of 5mm foamed PVC.
While I was painting the purifier unit, I decided that it still looked a little too much like a jar turned upside down, largely because the lid is such a recognisable shape. So I broke it up a bit by adding some buttresses around it cut from a piece of polystyrene foam.
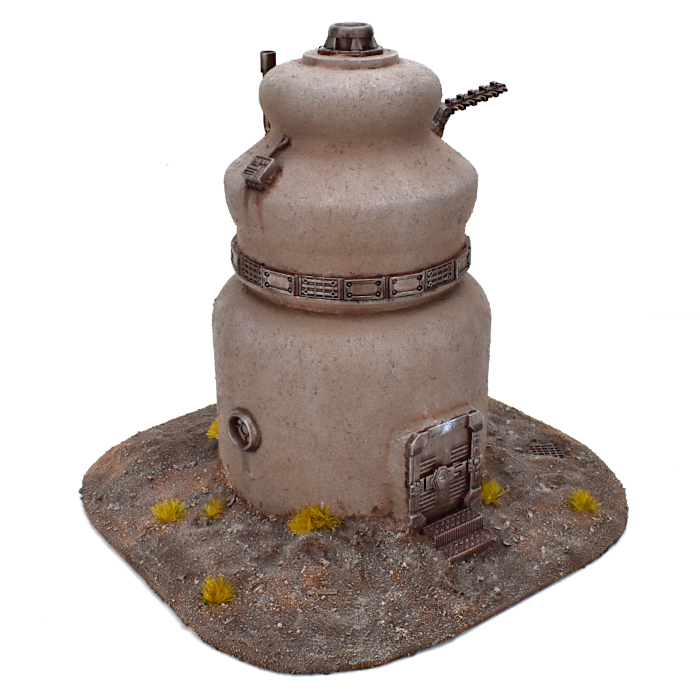
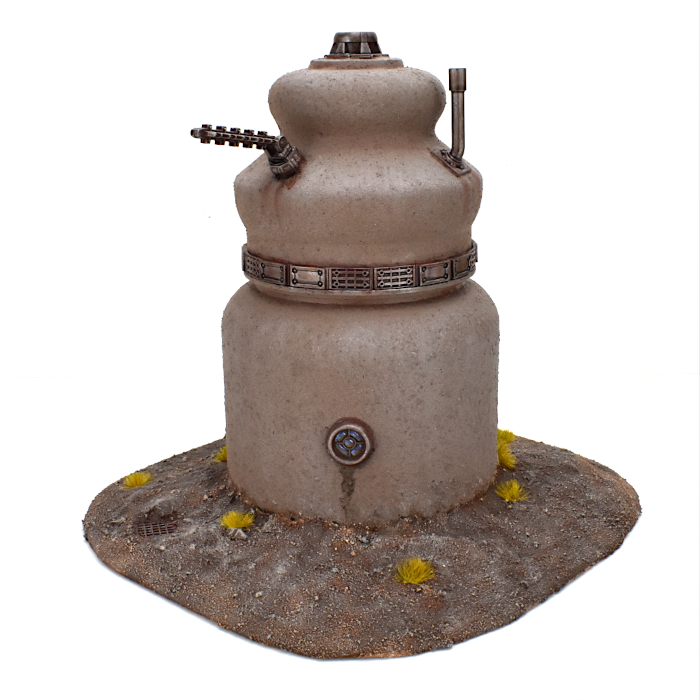
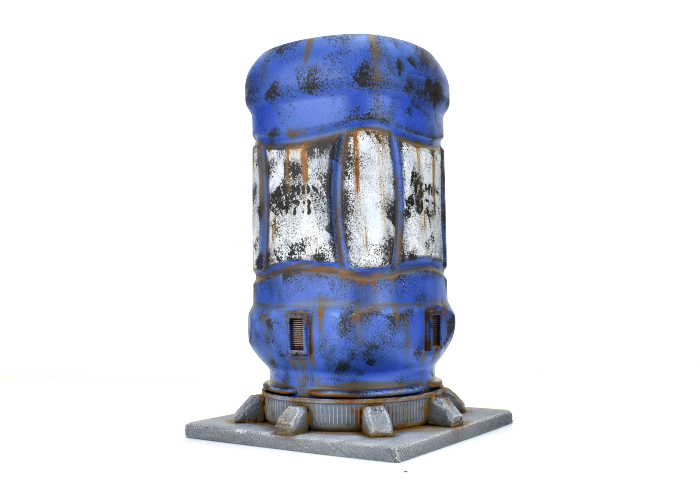
With some paint on, the air purifier wound up looking like this:
Build your own air purifier of respiratory doom by picking up the Maelstrom's Edge terrain sprues along with the rest of the Maelstrom's Edge range from the webstore here.
What are you working on? We would love to see your models and terrain in the Comm Guild Facebook group!
For other building ideas, modeling tutorials, army spotlights and conversion walkthroughs, check out the Hobby section of the Maelstrom's Edge website here.
Tags: spotlight terrain terrainsprue tutorial
Terrain Kitbash: Sector 16
Posted on Tuesday Nov 16, 2021 at 05:00pm in Tutorials
- by Iain Wilson
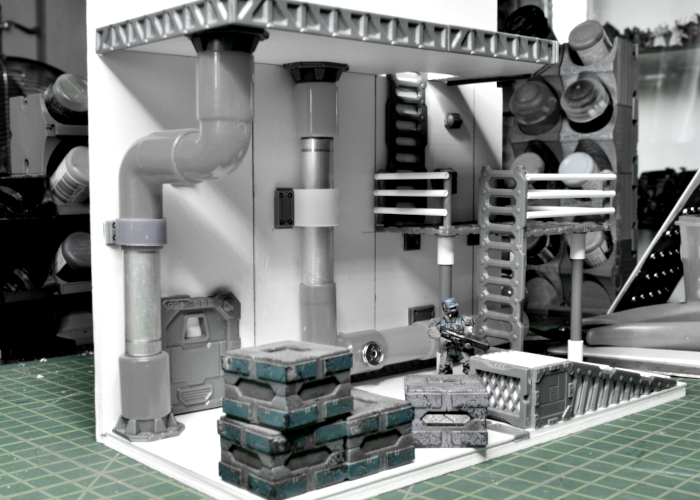
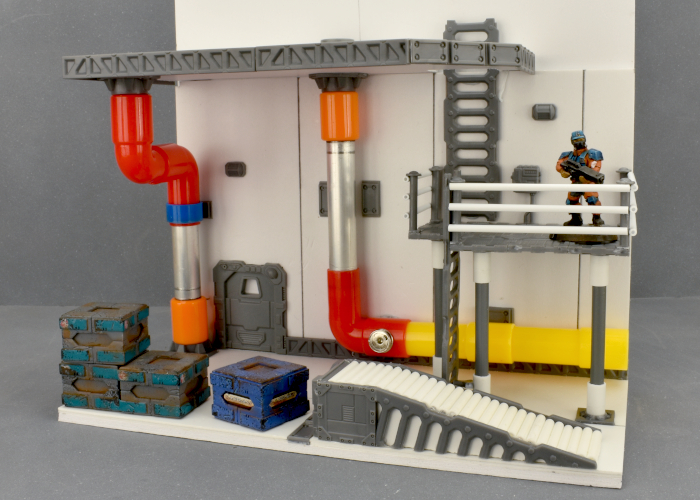
Sometimes I like to take a break from building things for the tabletop, and put something together just for the fun of it. That's what I had in mind this week, when I started work on a display backdrop piece that I'm calling 'Sector 16'
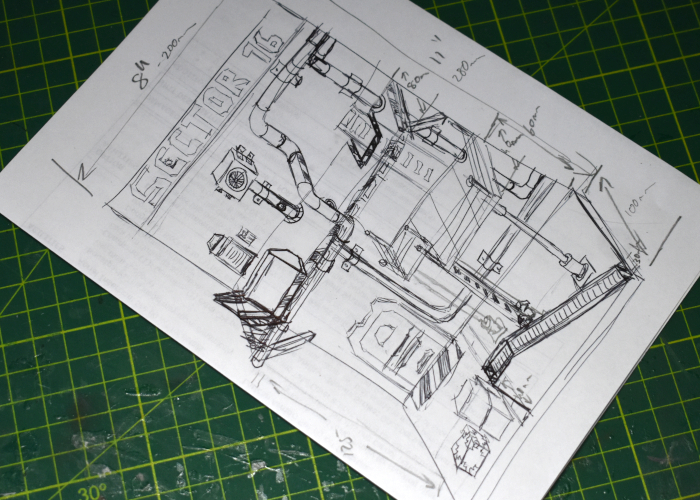
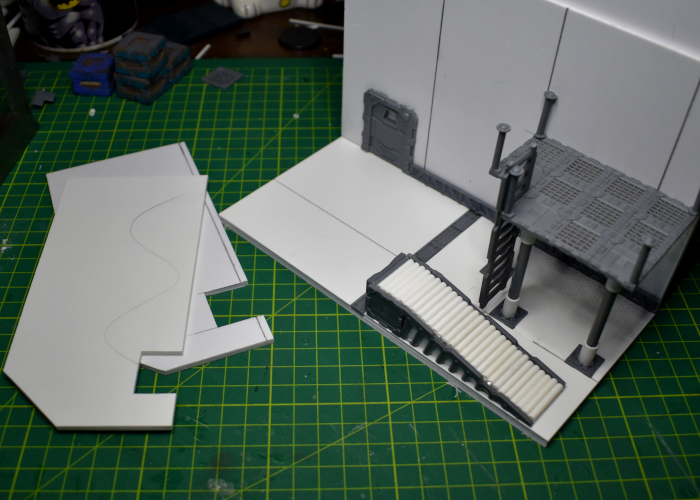
Most of the time, I get a rough idea of what I'm building in my head, and I just wing it from there. Some builds though require a little more planning to make sure everything will fit together correctly. My plan for Sector 16 wasn't particularly complicated, but with pipes running in multiple directions and platforms on several levels, I decided that a rough sketch would be a good idea. This still just serves as a starting point, and things tend to change along the way, but it helps to avoid those inadvertant 'oops' moments when something doesn't fit where it is supposed to.
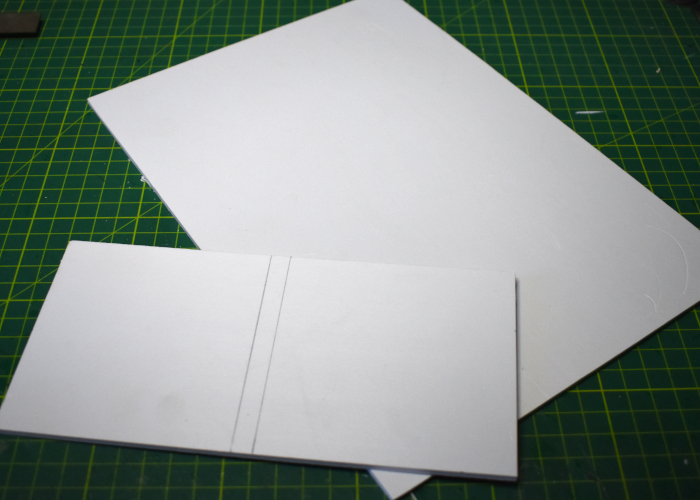
The bulk of the structure was made from foamed PVC sheet, cutting a base and back piece that would go together in an 'L' shape, with detail layered over the top.
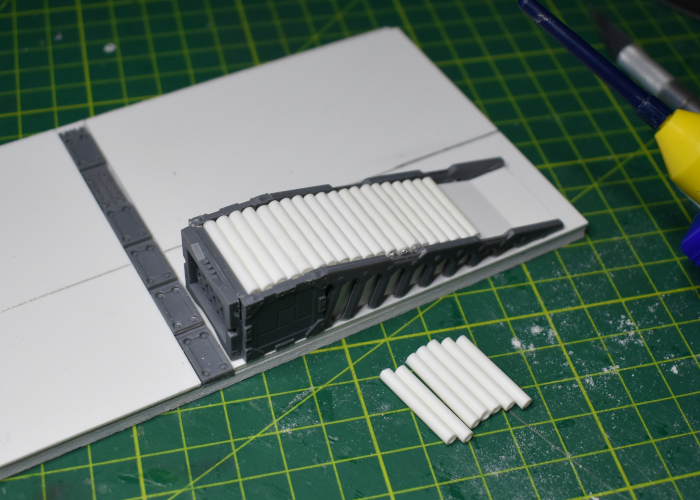
I thought that adding some detail along the front of the base would help to add depth, and when using it as a photo backdrop would be useful for disguising its relatively shallow depth. To this end, I constructed a conveyor assembly using parts from the Maelstrom's Edge terrain sprues, some 1mm foamed PVC and plastic tubing.
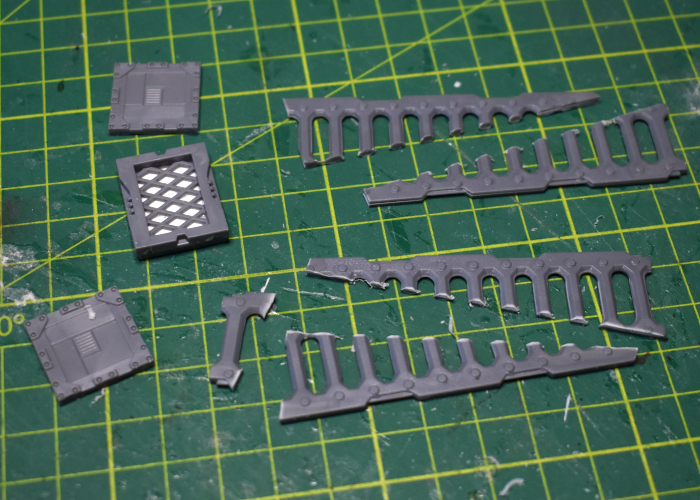
In the interests of mixing things up visually, I wanted the multiple level platforms to be constructed differently. The upper level was to be concrete, but for the lower level I used floor grating pieces from the second Maelstrom's Edge terrain sprue, with support poles cut from the sprue itself of the original terrain sprue.

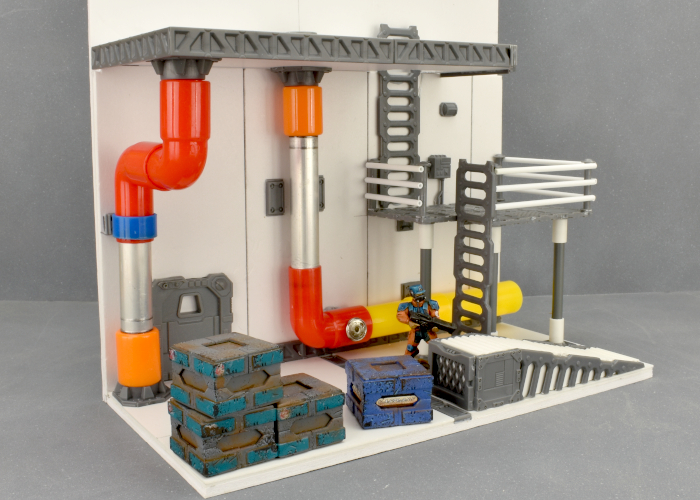
To finish up the lower section, I put together some pipes made using pieces from a kid's toy pipe construction set (which looks a little technicolour right now, but should be a little less cartoony when they have some paint on!) and some 12mm aluminium tubing, and added some additional details like lights, edging and pipe support straps using more pieces from the terrain sprues.
Tune in next time, as I get to work on the upper level!
To build your own sector of unspecified doom, you can pick up the terrain sprues along with the rest of the Maelstrom's Edge range from the webstore here.
What are you working on? We would love to see your models and terrain in the Comm Guild Facebook group!
For other building ideas, modeling tutorials, army spotlights and conversion walkthroughs, check out the Hobby section of the Maelstrom's Edge website here.
Terrain Kitbash: Sci-Fi Barn pt3
Posted on Monday Oct 25, 2021 at 06:00pm in Tutorials
- by Iain Wilson
Sci Fi Barn, episode 3: Now in Epirocolor!
In this latest installment, I finally get some paint on this barn build. If you're wandering in here wondering what it's all about, this was a kitbash of a Plast Craft Games warehouse with parts from the Maelstrom's Edge terrain sprues to build the a sci fi barn (you can find the first part here).
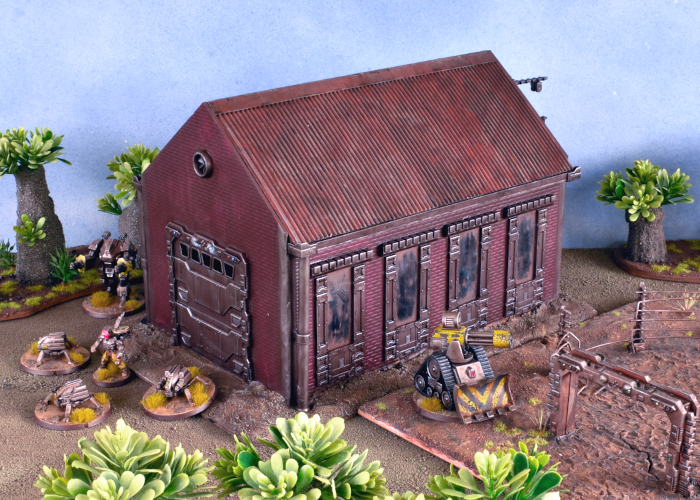
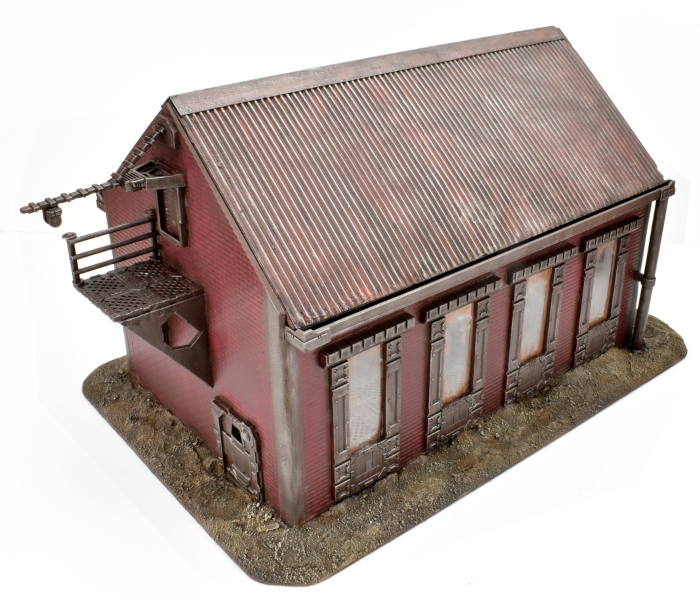
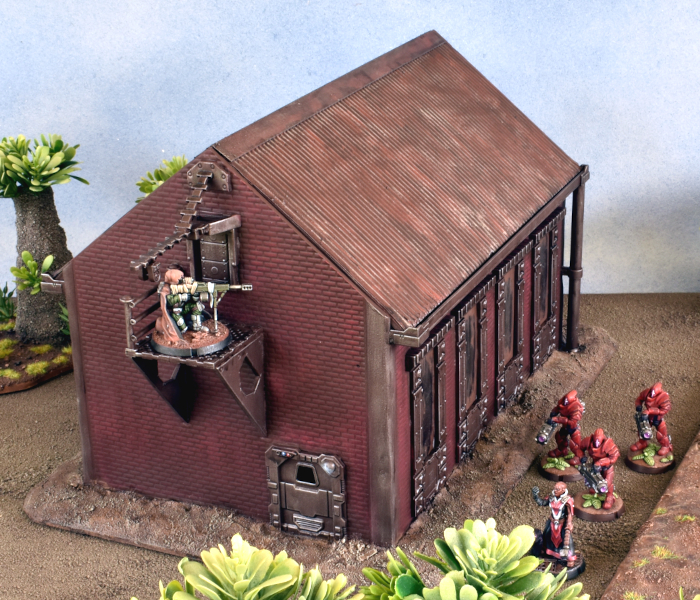
With assembly completed, I kicked off the painting by spraying the whole thing with a coat of a mediumish-dark brown satin spray paint that I had sitting on the shelf. Or, I would have, but it ran out on me. So I wound up spraying the top of the roof with some old Rustoleum flat red that I sometimes use as a base for rusty metal.

I went back over the red roof with some Vallejo Charred Brown before drybrushing over all of the metal parts with some Citadel Boltgun metal (Leadbelcher, for the newcomers). The non-metal parts of the interior walls were drybrushed with some Army Painter Skeleton Bone to pick up the texture on the foamed PVC, and the exterior bricks were given a heavy drybrush of Scalecolor Baal Crimson. Then before putting the drybrushes away, I gave the dirt on the base a layer of Vallejo Heavy Brown.
I was aiming for a weathered but not overly rusty metal look for this piece, as it's intended for a fairly arid 'western' themed table set. So over all of the metal parts and the base I added a generous coat of Army Painter Strong Tone and set it aside to dry.
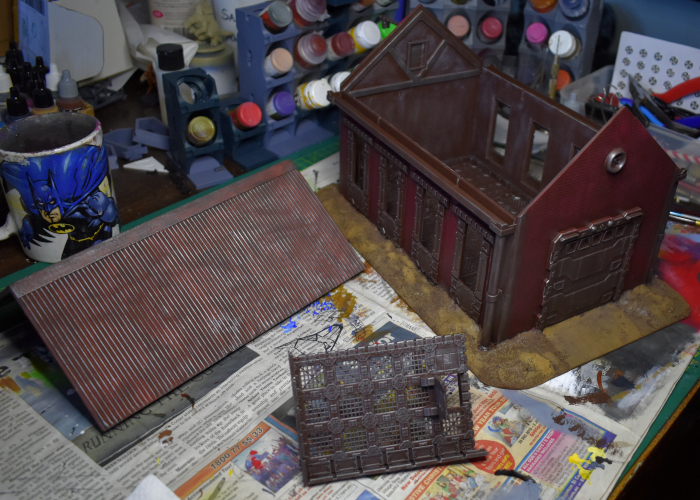
At this point it was time to fit the window panes. The warehouse set came with painted clear plastic pieces that looked fine in the original warehouse, but turned out to not look right here. So instead, I used them as a template to cut some clear plastic sheet to size as a replacement.
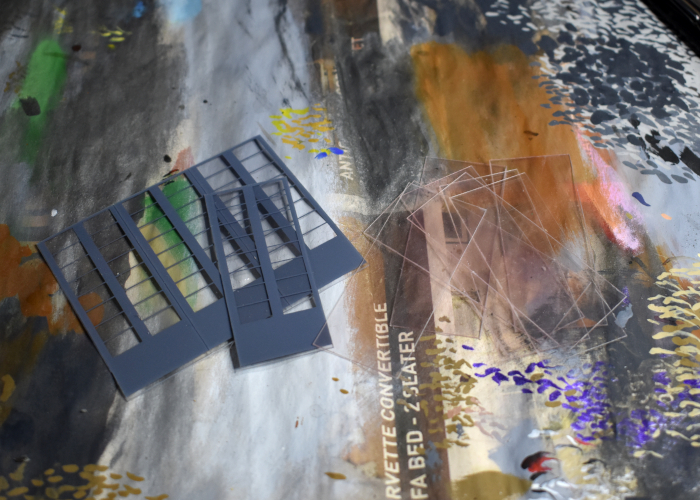
I hadn't originally planned to add internal window frames, but with the panes in place the glue around the edges was very obvious , so I added some thin frames using some thin PVC.
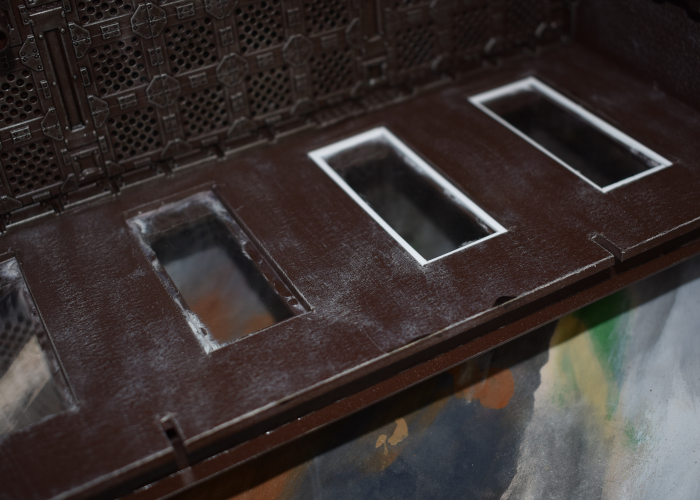
After painting these new internal frames brown, all that was left was to add final detailing. I drybrushed the base dirt with some Army Painter Skeleton Bone and all of the metal parts with a light layer of Army Painter Shining Silver. Lights and sensors on the door frames were painted in with red and blue.
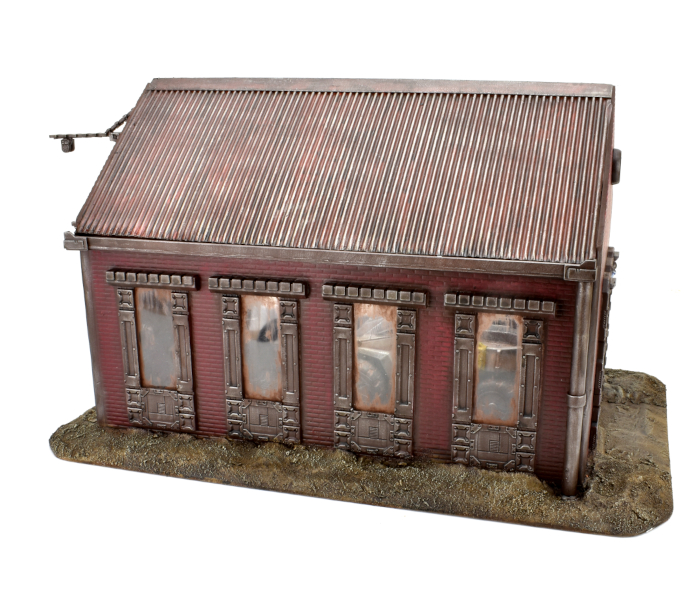
With the metal parts being quite dark, I didn't add a lot of dirt weathering, other than over the tops of the doorframes where it served to conceal a few messy over-brushes of red from the bricks. I did add some brown dirt smearing around the edges of the window panes, partly to give them a more weathered appearance, and partly to conceal any fogging from the glue.
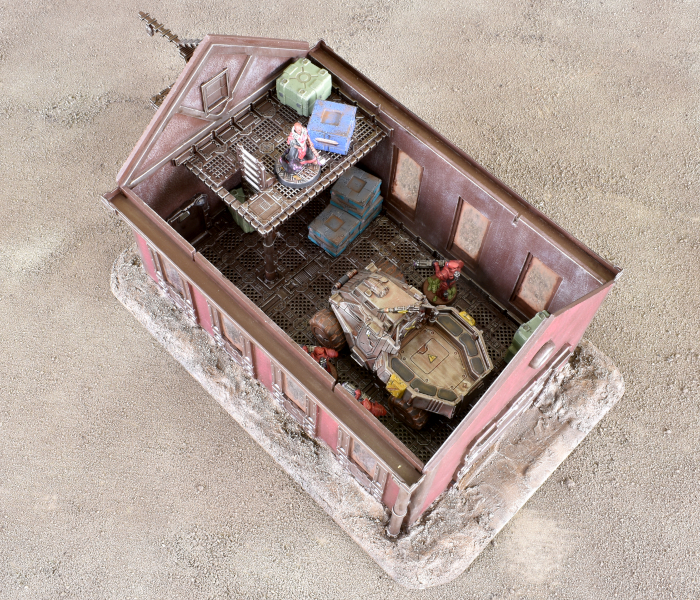
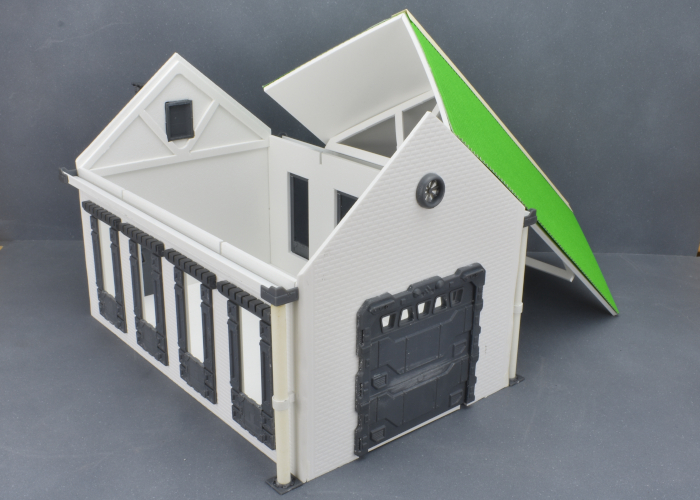
With some crates and an old vehicle thrown in for colour, when the roof is lifted off the interior winds up looking like this:
To build your own outbuilding of rural doom, you can pick up the terrain sprues along with the rest of the Maelstrom's Edge range from the webstore here.
What are you working on? We would love to see your models and terrain in the Comm Guild Facebook group!
For other building ideas, modeling tutorials, army spotlights and conversion walkthroughs, check out the Hobby section of the Maelstrom's Edge website here.
Tags: buildings conversion kitbash painting spotlight terrain terrainsprue tutorial
Terrain Kitbash: Sci-Fi Barn pt2
Posted on Monday Oct 11, 2021 at 06:00pm in Tutorials
- by Iain Wilson
Back in the barn!
I recently shared the first part of this build, combining a Plast Craft Games warehouse with parts from the Maelstrom's Edge terrain sprues to build the shell of a sci fi barn (part one is here). This week, I broke out some more terrain sprues and set to work on the interior!
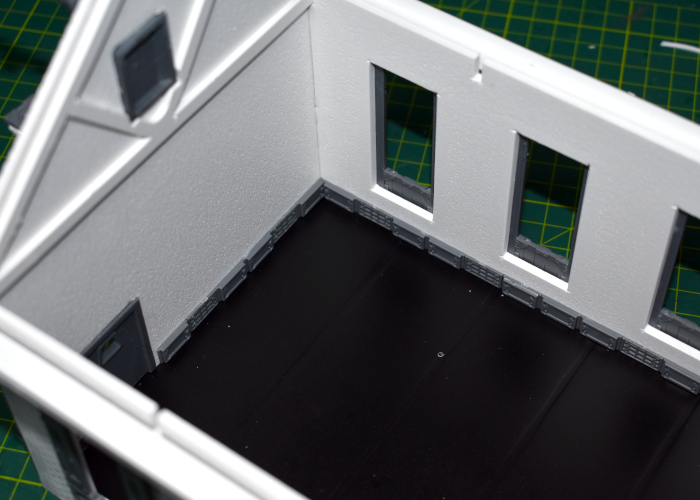
When I built the outside, I left the floor unglued, to get easier access for fitting parts. So I started by taking the floor piece back out and spraying it matte black, so that it wouldn't show underneath the grating pieces I was planning to use for a new floor layer on top. After measuring out the width of the floor against the floor grate pieces from the terrain sprue, I found there was going to be a slight gap around the edges, so I added some skirting using the reinforcing struts from terrain sprue #2.
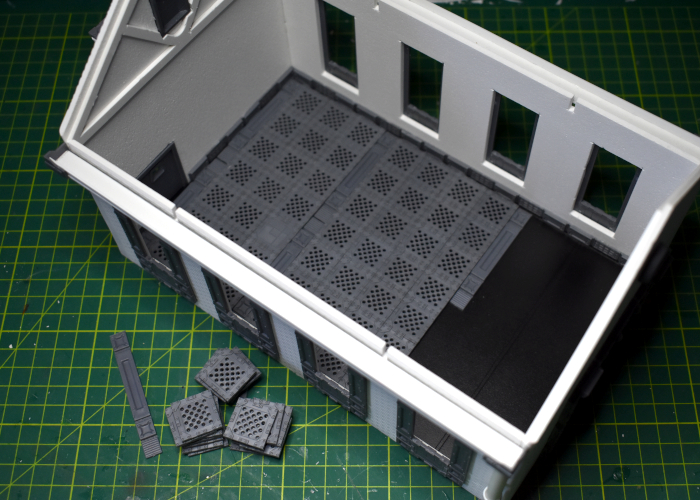
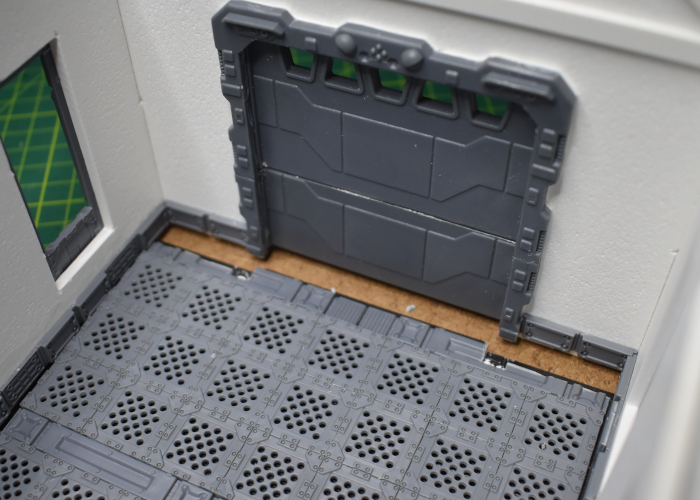
Then I tiled the floor with one of the floor grates from terrain sprue #2, spacing them out with struts from terrain sprue #1 to cover the full length of the barn.
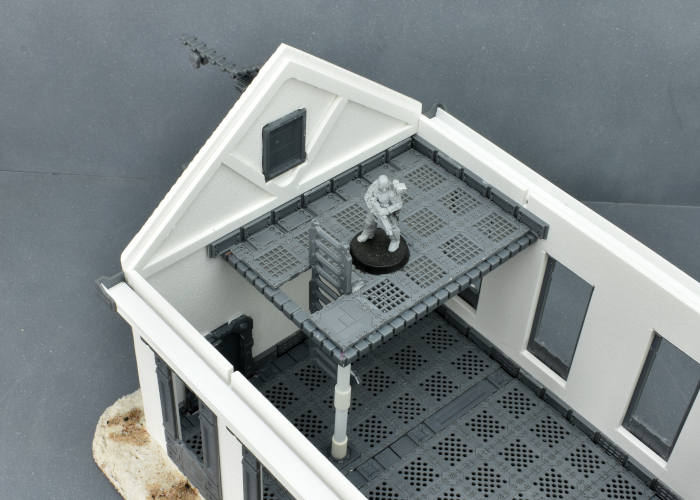
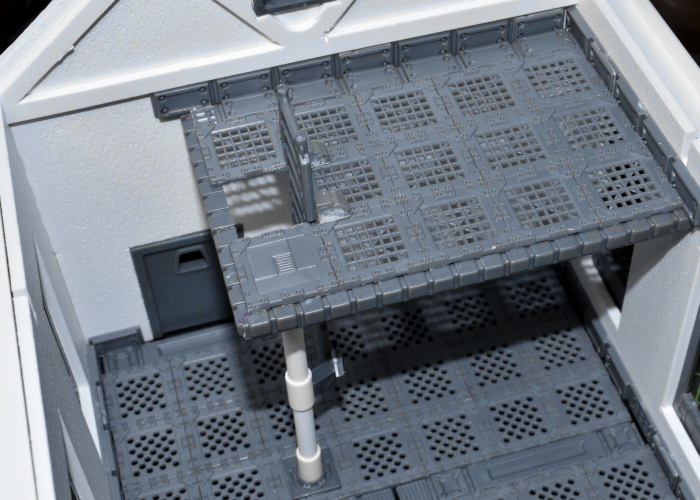
I wanted a small balcony on the end with the smaller door, which would provide access to the platform and crane on the outside of the wall. I used another of the floor grate pieces with some more reinforcing struts and lintel pieces top build the balcony, and some plastic tube with two of the small pipe fittings from terrain sprue #1 to hold it up on the protruding corner. Finally, a ladder from terrain sprue #1 provides access up to the balcony.
To add some detail to the inside of the doors, I grabbed some extra doors and cut the frames off the outside using a razor saw and scalpel.

The rectangular inside frame of the existing doors protrudes through the wall about a millimetre, so I cut some 1mm plasticard to form a spacer behind the new interior frames, trimming it up to match the contours of the outside of the frames and then gluing it all into place. I also added the outside ring from a porthole from terrain sprue #2 to finish off the hole for the exhaust fan on the outside wall.
I considered adding some interior detail around the windows, but this would complicate painting as I needed to get the clear plastic panes in at the end. I also thought about building some animal enclosures, but decided to keep the floor space open so that, in the event the building is being used with the interior accessible, I can just drop in a vehicle or some crates and other obstacles to suit the situation.
So that just left putting the barn onto a base. I cut a piece of 5mm hardboard to size, sanding down the edges to bevel them off and then glued the floor piece of the barn into the middle of it. When I went to glue the rest of the barn over the top, it immediately became apparent that I hadn't accounted for the raised floor tiles when I added the interior door frames, so I had to cut out some inserts for them to slot into.
Finally, I mixed up a batch of filling plaster with some PVA glue and fine sand for texture, and slathered it around the outside of the building to cover up the hardboard. This mixture didn't immediately stick particularly well to the hardboard, although it would once the glue dries, so this process involved poking it into place with fingers and an old paintbrush, and a certain amount of cursing. In the end, though, I got the plaster laid down all around the exterior, with a smoother ramp of pure filling plaster leading up to the larger door. Then I finished up by adding some small patches of sand and gravel mix here and there, glued into place with some more PVA glue.
Next up: Getting some paint on. Click here!
To build your own outbuilding of rural doom, you can pick up the terrain sprues along with the rest of the Maelstrom's Edge range from the webstore here.
What are you working on? We would love to see your models and terrain in the Comm Guild Facebook group!
For other building ideas, modeling tutorials, army spotlights and conversion walkthroughs, check out the Hobby section of the Maelstrom's Edge website here.
Tags: buildings conversion kitbash spotlight terrain terrainsprue tutorial
Model Spotlight: The Broken Gnolti
Posted on Tuesday Oct 05, 2021 at 06:00pm in Models
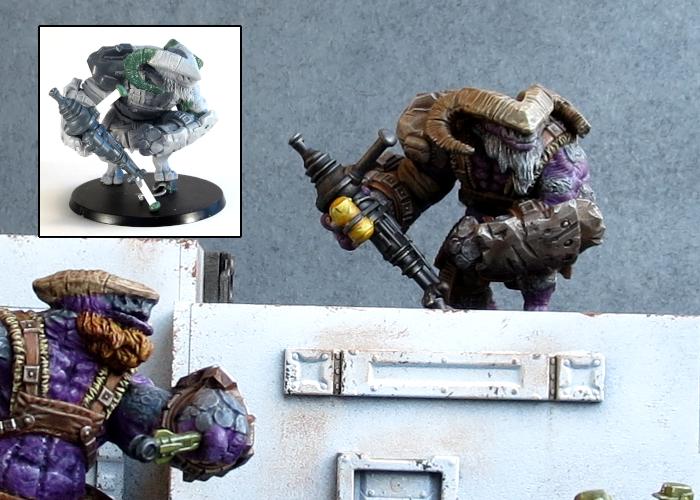
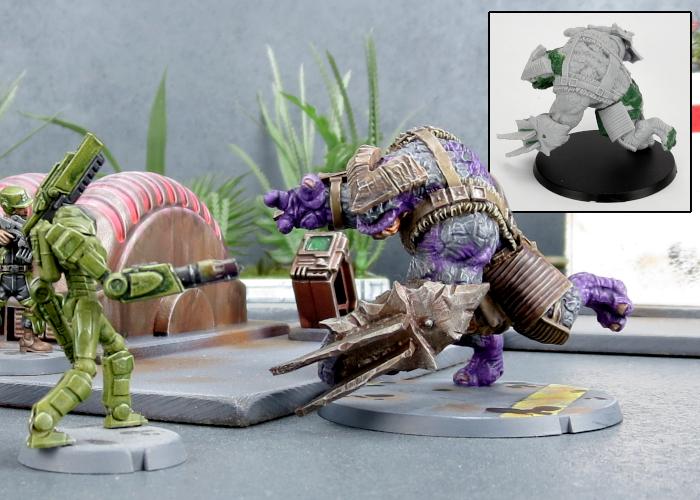
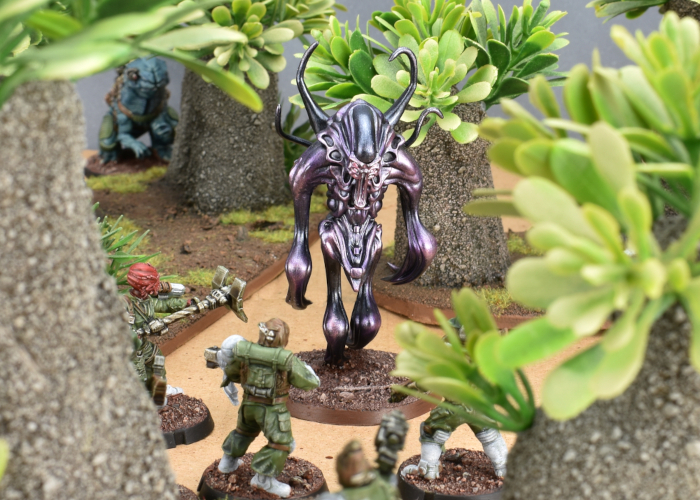
With its horned visage towering over the rest of its force, the Gnolti cuts an imposing presence on the battlefield. The resin Gnolti kit is one of our most popular, and makes for a fantastic centerpiece for any Broken force. Let's take a look at it!

Originally hired and transported to systems requiring extreme manual labour or exposure to elements lethal to humans, their normally calm, thoughtful temperament made Gnolti easy to integrate into human society. Gnolti are extremely loyal to those who treat them well, gladly risking themselves to protect their friends. Despite being incredibly useful, Gnolti are often denied berths on planetary evacuation ships due to their extreme size. Gnoltis have few opportunities to escape the Maelstrom, and stranded Gnolti are a common recruit into the ragtag warbands of the Broken, where their physical power can be a huge asset.
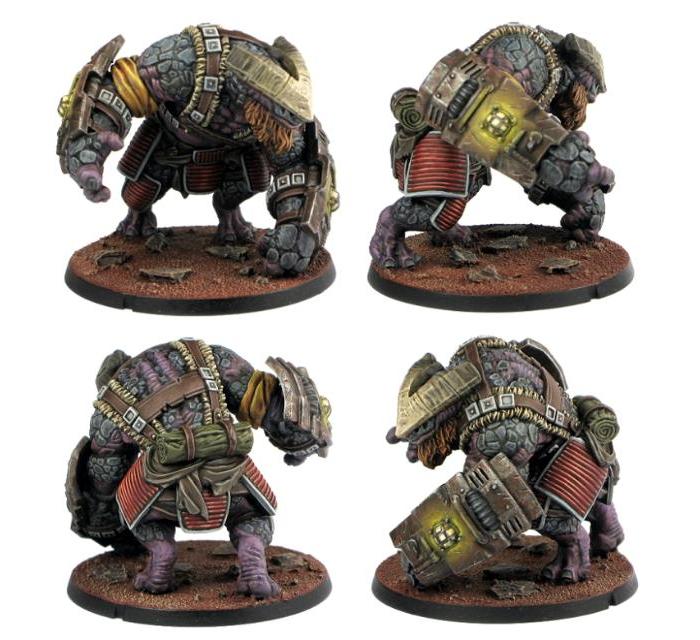
The studio Gnolti model, painted by Winterdyne Commission Modelling
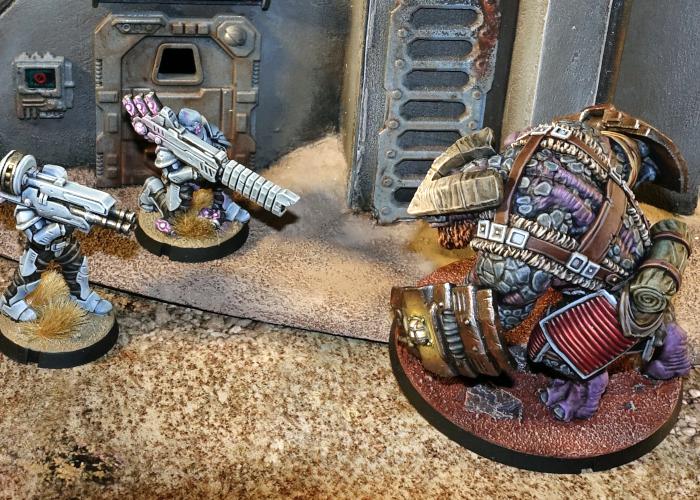
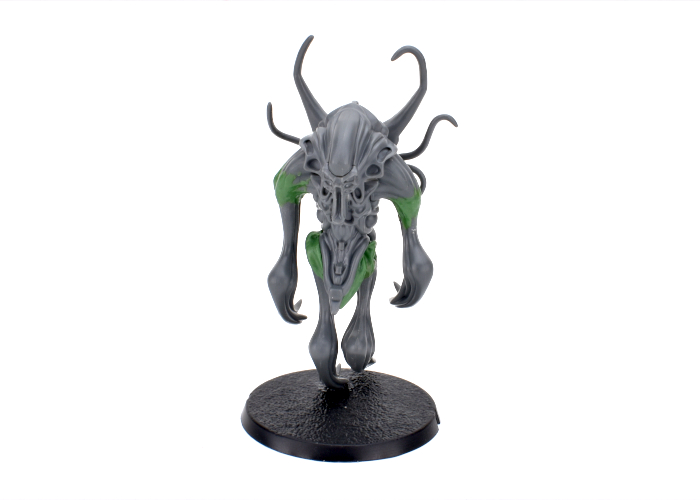
The Gnolti's impressive physique is clad in makeshift harness and armour, its forearms covered by jury-rigged protective shields that it uses to protect nearby Broken units. The multi-part kit was sculpted for us by the resin techno-wizards at Anvil Industry, and cast in high quality resin.
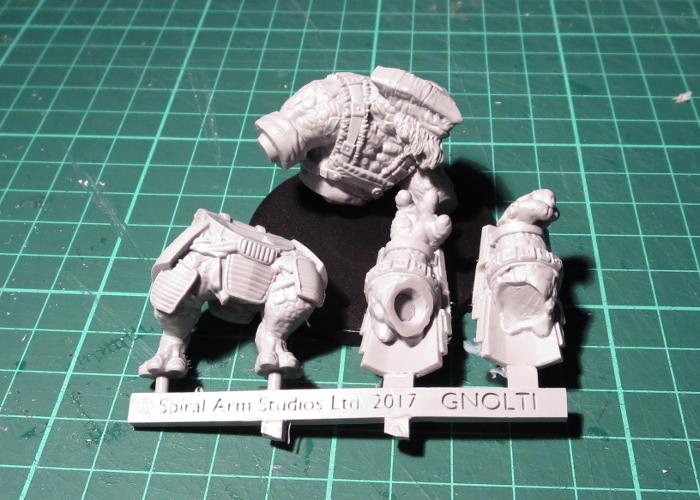
While the Gnolti kit is easy to assemble and impressive on the table, the resin is also easy to convert, which led to a few conversions that we've featured in previous articles:
Raging Gnolti
Gnolti Longhorn
Gnolti Berserker
Pick up your own towering behemoth of muscly doom along with the rest of the Maelstrom's Edge range from the webstore here.
What are you working on? We would love to see your models and terrain in the Comm Guild Facebook group!
For other building ideas, modeling tutorials, army spotlights and conversion walkthroughs, check out the Hobby section of the Maelstrom's Edge website here.
Terrain Kitbash: Sci-Fi Barn
Posted on Monday Sep 20, 2021 at 06:00pm in Tutorials
Time to get some terrain on!
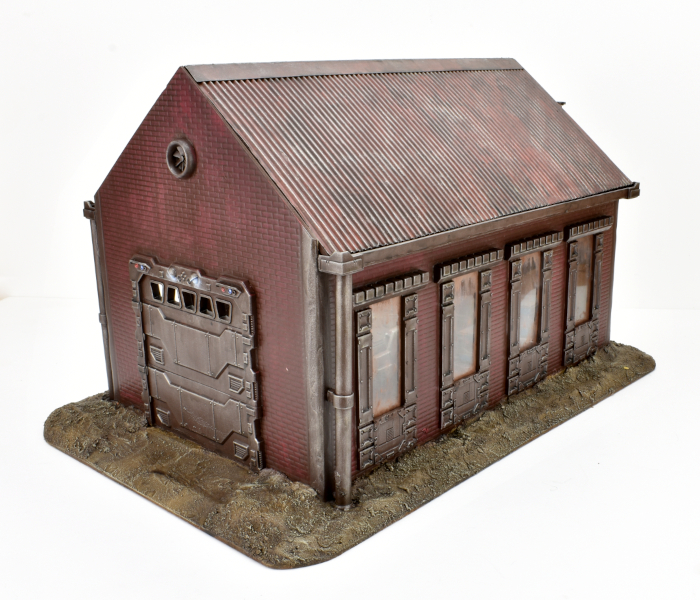
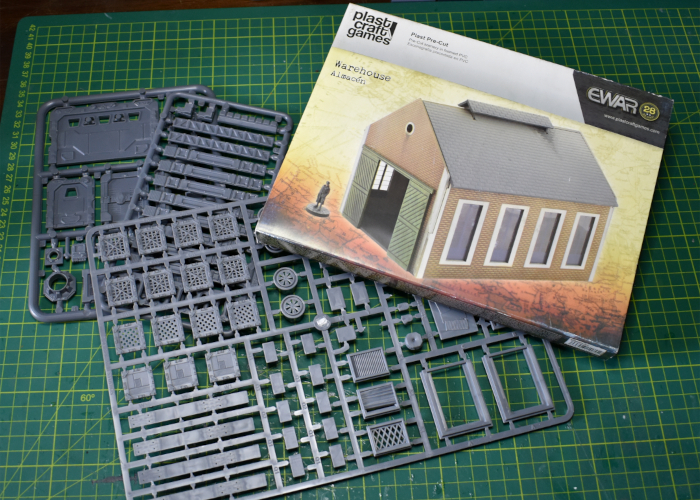
Back in 2017, I put together a sci-fi 'western' gunshop, using the Maelstrom's Edge terrain sprue and a foamed PVC western shop kit from Plast Craft Games. Plast Craft sadly appear to have gone out of business, but I picked up a few building kits on clearance from a local retailer to start fleshing out a themed table. The first (and probably largest) off the rank is an appopriately upgraded barn!
Along with the Maelstrom's Edge terrain sprues, the kit I used for this build is an urban warehouse. If you want to build something similar yourself, while you may not be able to still track down this specific kit, there are other similar buildings available in MDF from other manufacturers, or you could use foamed PVC or foamcore to build your own from scratch.
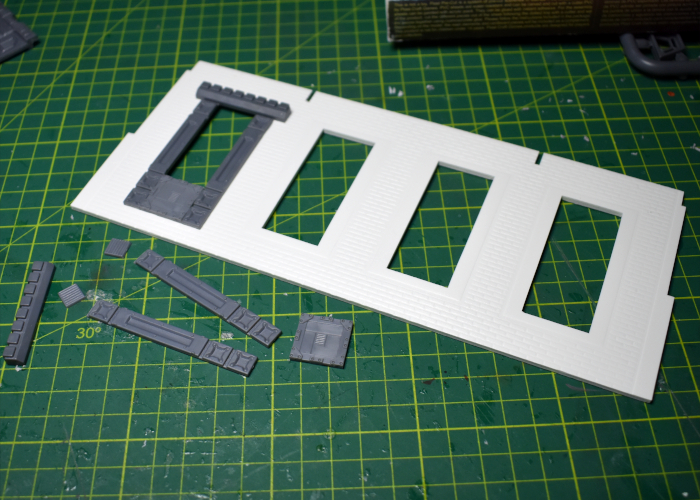
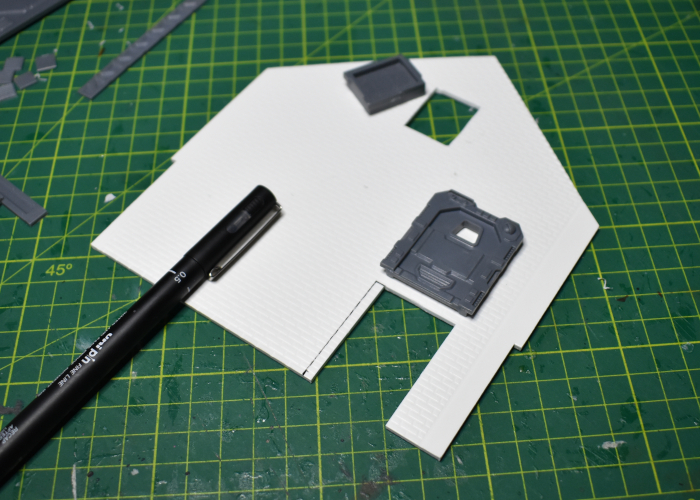
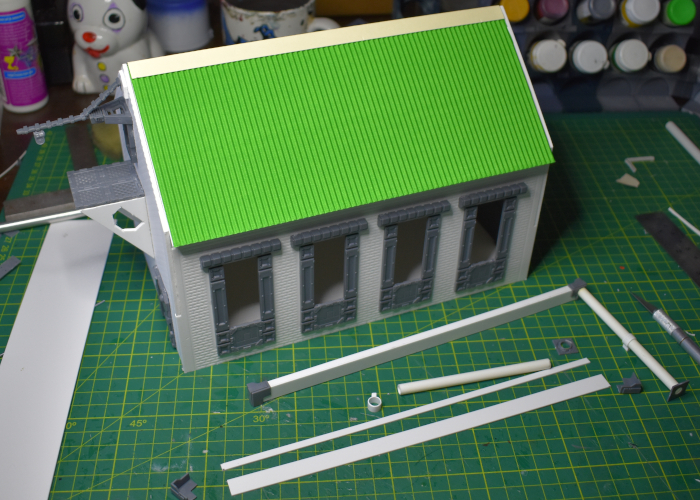
I started out by adding some tech details to the windows, bulking out the frames using support struts and lintel pieces from terrain sprue #1, and floor panels from terrain sprue #2.
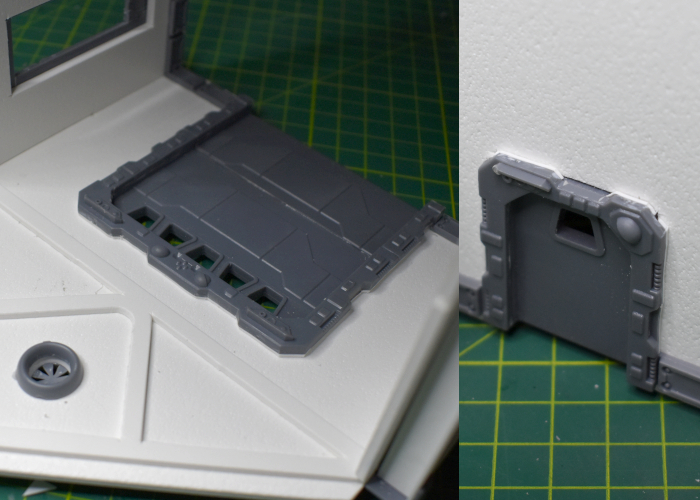
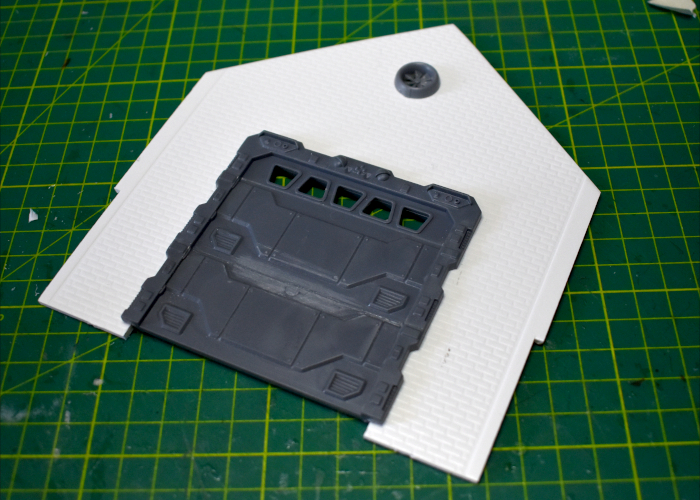
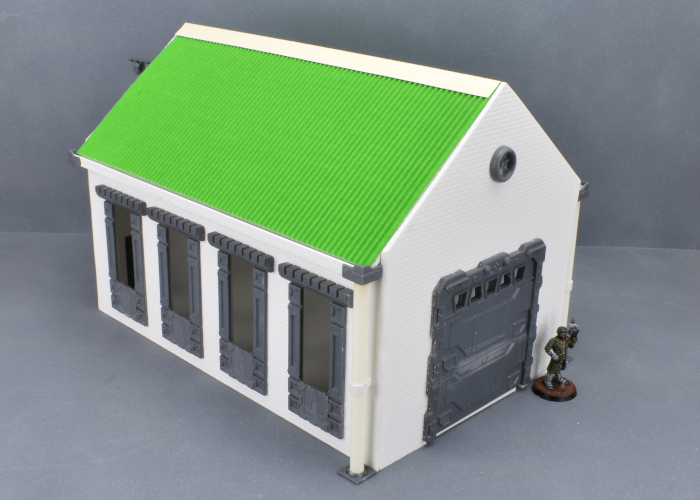
On the front of the building, I replaced the sliding wooden doors with a garage door from terrain sprue #1. To make up the extra height, I cut off the top of a second garage door with a razor saw and glued the two together.
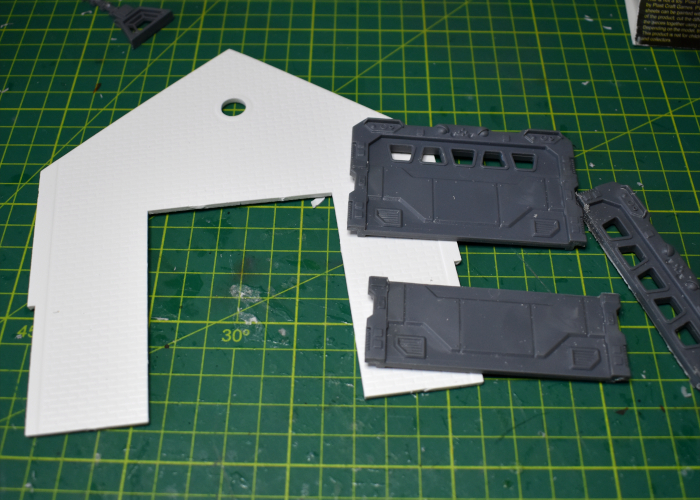
The resultant door was the right height, but too wide, so I also widened the door cavity in the wall with an exacto knife before gluing the door in place. The round window at the top of the wall turned out to be exactly the right size for the exhaust fan from sprue #2..
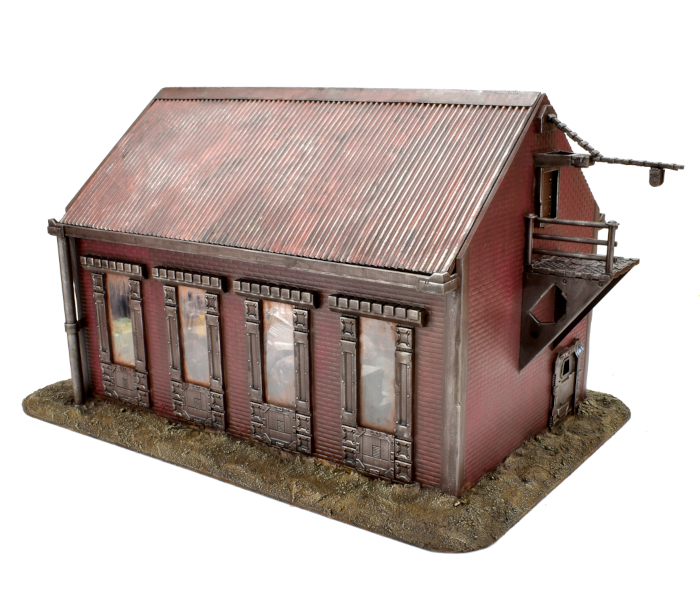
The other end of the building has a smaller door and a rectangular window up high. I enlarged the cavities slightly and glued in a shutter window and door from sprue #1.
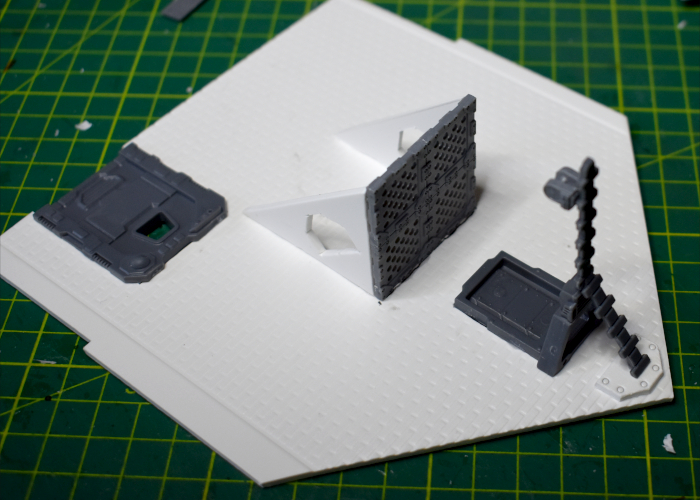
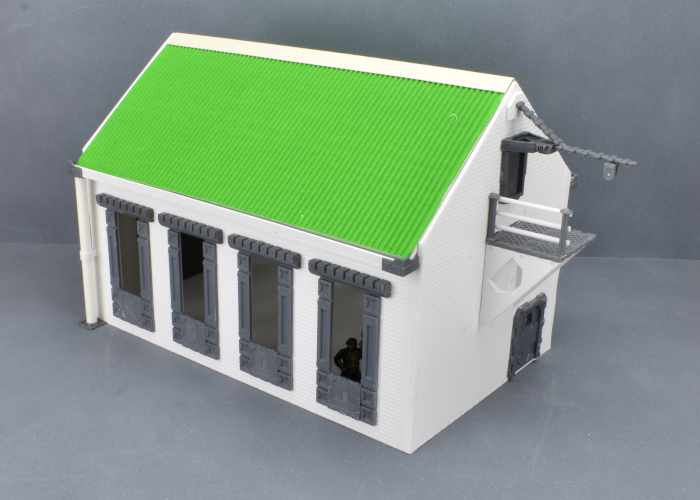
To avoid the building from just winding up looking like a plain box, I built a small platform and crane onto the wall, turning the small window into an access point for small freight. The platform was constructed from sprue #2 floor grates and some scrap pieces from the warehouse kit's roof trusses. The crane used a trapezoid window and a couple of energy fence pieces from sprue #1, the upright supports from the gun unit on sprue #2 and another scrap piece of PVC. I'll need to find some string or fine chain for it to finish up.
At that point, it was time to start slotting everything together.
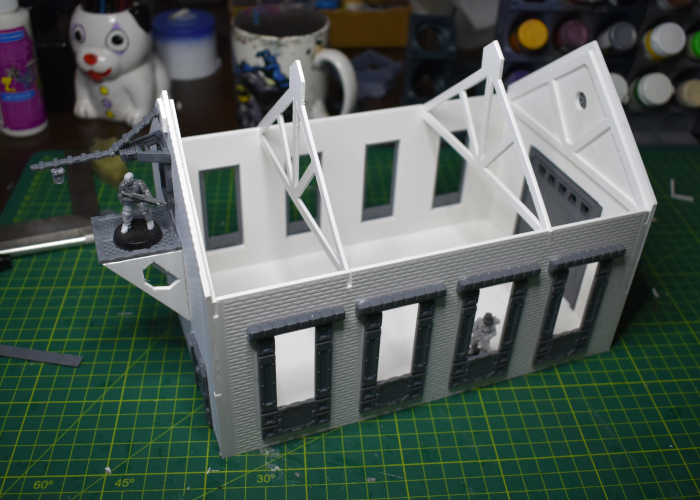
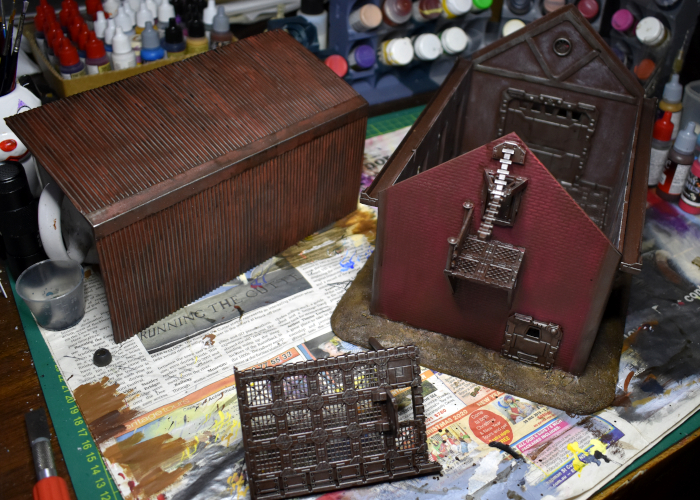
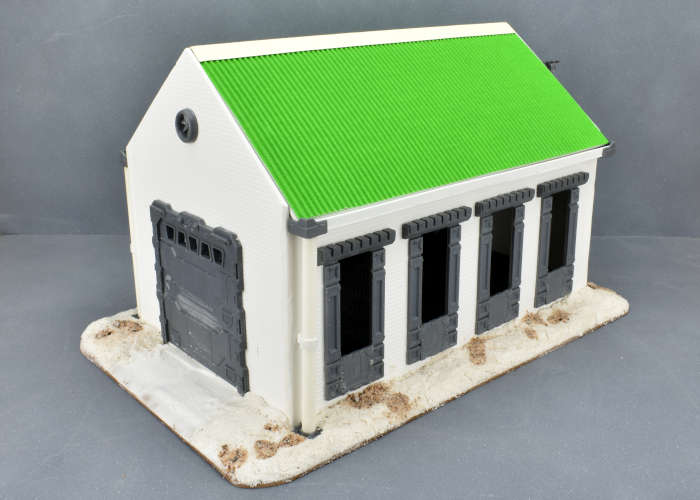
The warehouse kit has a tiled roof, but I wanted to go with corrugated iron instead, for a better contrast from the brick walls. With the top ventilation struts trimmed off, the assembled roof provides a solid base for the iron roof. I've left the middle two roof trusses and the roof itself unglued, so that the roof can be removed and the building interior used during a game.
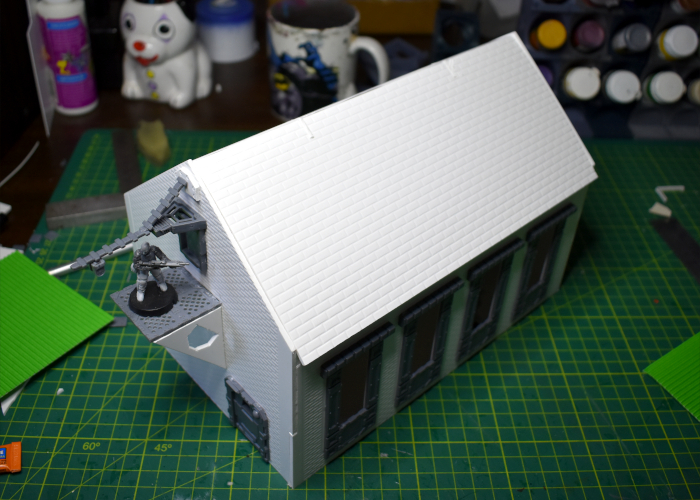
Over the original roof, I glued two sheets of corrugated cardboard, adding a strip of thin, folded card for the ridge capping. That didn't look quite right as-is, so I decided to also add some rain guttering, using some plasticard and a few more components from terrain sprue #1.
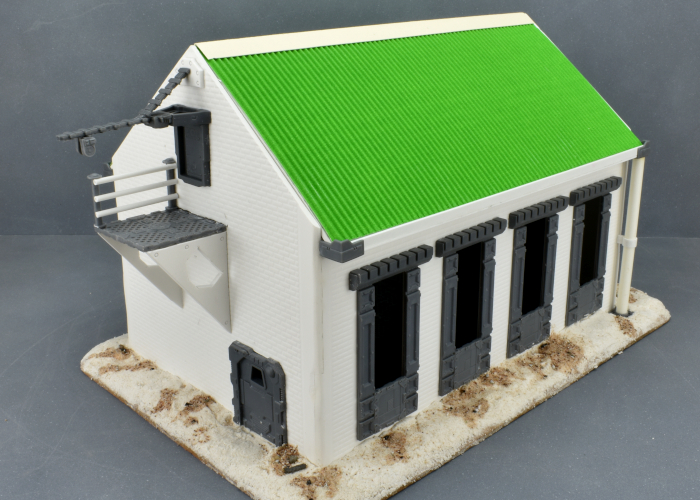
The windows are still missing their 'glass' - some thin, translucent plastic that comes with the warehouse kit. This will be glued in place after I've painted the barn. Otherwise, the finished exterior:
As a final touch, I decided the small platform needed a hand rail, so I whipped one up using a pair of posts from terrain sprue #2 and some thin plastic rod.
Coming up in part 2: I'll add some detail to the interior of the building before painting. Find it here!
To build your own outbuilding of rural doom, you can pick up the terrain sprues along with the rest of the Maelstrom's Edge range from the webstore here.

What are you working on? We would love to see your models and terrain in the Comm Guild Facebook group!
For other building ideas, modeling tutorials, army spotlights and conversion walkthroughs, check out the Hobby section of the Maelstrom's Edge website here.
Tags: buildings conversion kitbash spotlight terrain terrainsprue tutorial
Converting a Robot Stargrave Crew
Posted on Monday Sep 13, 2021 at 09:52pm in Tutorials
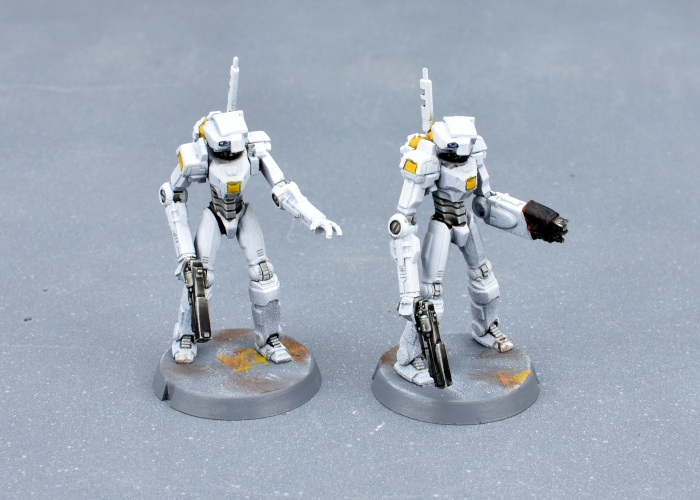
When Stargrave arrived on the gaming scene, bringing the popular Frostgrave rules into a sci-fi setting, it sparked all sorts of interesting ideas amongst gamers for building crews. While there is an official model range for the game, it also encourages players to use whatever miniatures they like, which is a perfect excuse to break out some models and get creative! I was particularly interested in the rule allowing any crew members to be robots, and set to work building up a crew using (mostly) the Maelstrom's Edge Epirian Scarecrow plastic kit!
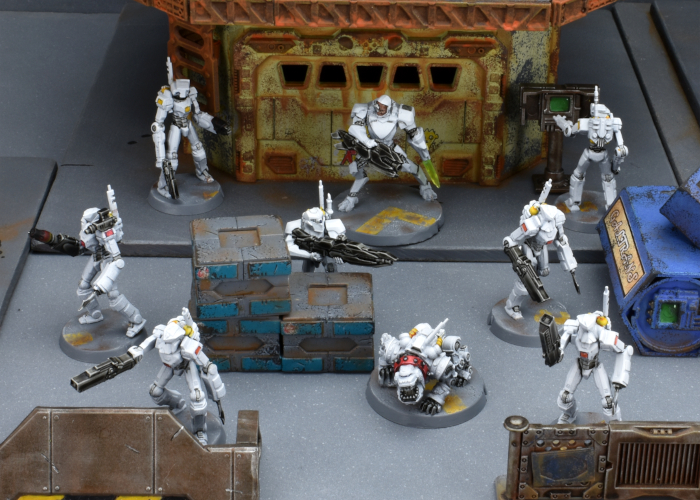
The bulk of the crew was made up of very slightly converted Scarecrows with different heads taken from the Remnant Militus battlesuit kit to denote different 'classes' of robot. Thanks to how wonderfully poseable the Scarecrow kit is, it's really easy to get a range of different looking models out of it! I also used a resin robo-dog from Artel W for a guard dog, added a (still to be painted) space dwarf from Victoria Miniatures as a first mate, and a converted Remnant Nimbus battlesuit for the Captain.
I wanted an easy paint scheme that I could get done quickly, and used Army Painter paints for the bulk of it. I started with a base coat of Uniform Grey spray, followed by a top-down (or 'zenithal') spray of white, so that the grey would stay visible in the creases and underneath surfaces to provide some shading. I then went over the joints and other exposed metal parts with a coat of Dark Tone, and gave the weapons three generous coats of the same. The final details were done with Citadel Contrast - Iyanden Yellow for the tanks on the robot's backs and Leviadon Blue highlighted with Army Painter Ice Storm and white for the eye lenses. The different classes of robot also received some shaded panels to tell them apart - yellow for techs, orange for soldiers and red for specialists.
I'm still deciding how to paint up the first mate, and how closely he will mimic the colour scheme, but here's the rest of the the crew all assembled:
Captain and Guard Dog:
The Captain was built from a Nimbus battlesuit with the head taken from the Karist Heavy Weapons kit. The energy blade is part of a trimmed down lightsaber from a Star Wars figure, left over from an old project. He represents a cyborg in combat armour.
Tech crew - Hacker and Chiseler:
Chiselers are normally equipped with lockpicks. I decided to go a more direct route and gave him a cutting torch using part of a weapon from the Broken Rabble kit.
Troopers

I gave the troopers bulkier left arms to house their combat knives using spare Scarecrow shin pieces. The knives are taken from the Faction Expansion Sprue.
Specialists - Burner and Sniper:
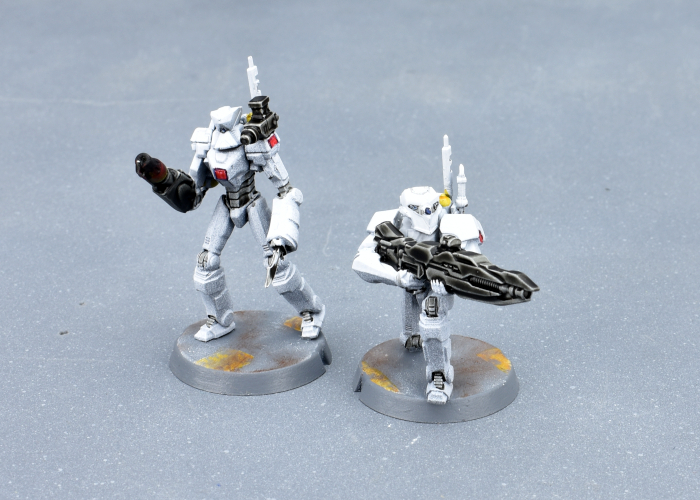
The Burner has a pistol and knife as well as the flamethrower, so I gave him the same knife arm as the regular troopers and mounted a mini grenade launcher taken from the Epirian Handler kit to his shoulder to represent the pistol. The sniper has a different head to the regular troopers, and his sniper rifle was a handy way to make use of the second set of arms that come with the Captain's Nimbus suit.
Time to get that mate painted up and send these bots out on into the black!
To build your own robot crew of clanking doom, you can pick up the Scarecrow kit along with the rest of the Maelstrom's Edge range from the webstore here.
What are you working on? We would love to see your models and terrain in the Comm Guild Facebook group!
For other building ideas, modeling tutorials, army spotlights and conversion walkthroughs, check out the Hobby section of the Maelstrom's Edge website here.
Tags: conversion epirian robot scarecrow spotlight stargrave
Painting Spotlight: Metallic Angel
Posted on Monday Sep 06, 2021 at 06:00pm in Tutorials
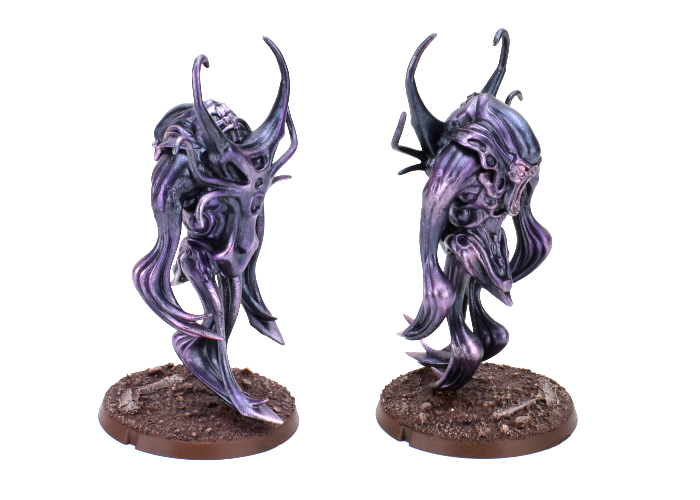
A while ago, I picked up a set of the Army Painter coloured metallic paints, and decided this week it was time to take them for a spin. The paint set includes some lovely purples that were just screaming out for a friendly little angel to bring to life. And so that's what I did.
The model I chose to use for this was a conversion that I put together some time ago while playing around with the Mature Angel kit. The end result is a slightly sinister-looking, floaty juvenile angel.
Metallic paint generally goes best over a dark basecoat, so I started out by spraying the model with some Army Painter black.
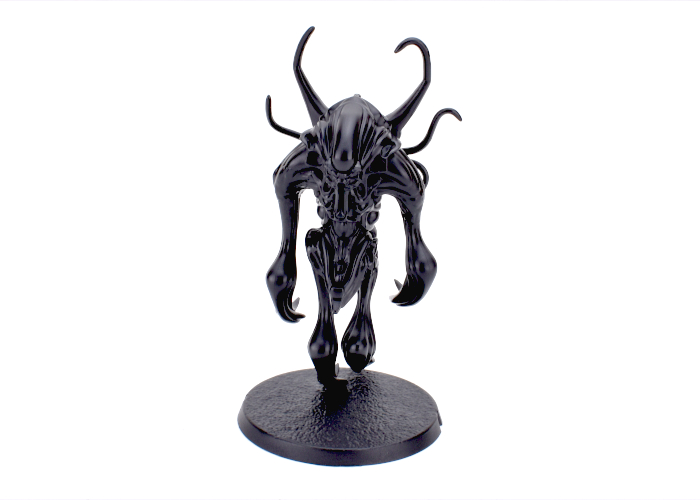
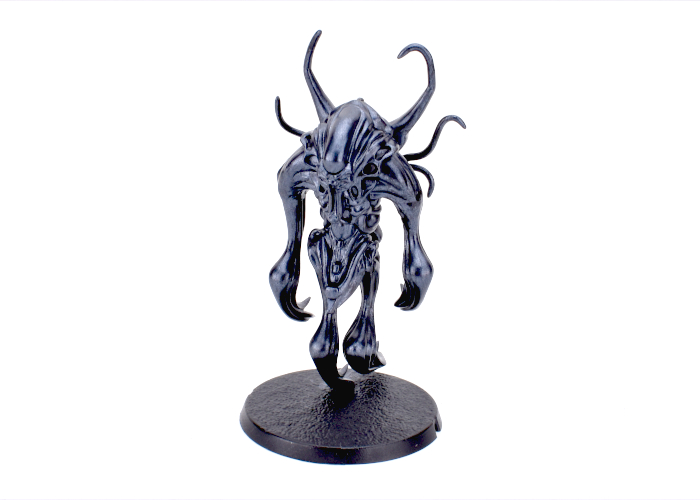
I then gave the whole model a coat of Night Scales, a metallic black from the Army Painter set. This has a slight bluey-purple tint to it that is just perfect for the angel. I was tempted to just leave it like this and call the job a good'un.
Deciding to go for a little more 'wow', though, I grabbed the bottle of Royal Purple, a midrange purple metal colour, and drybrushed the angel with it, building up more colour on raised areas and tentacle tips.
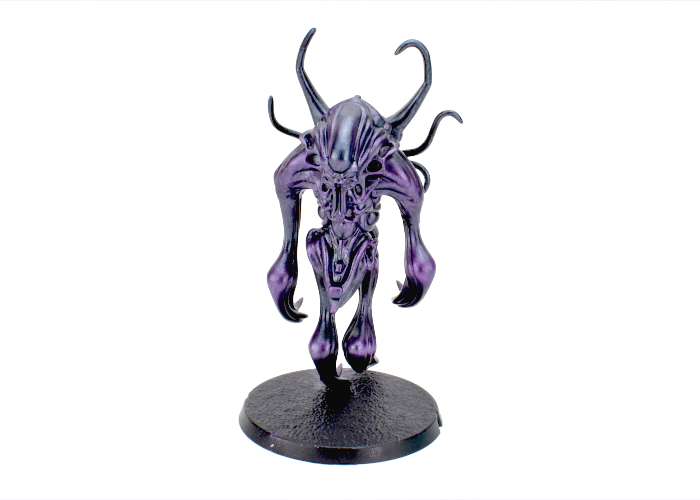
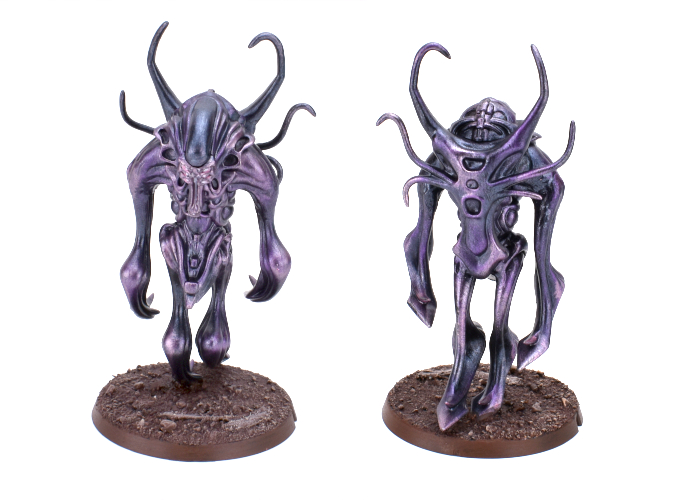
I used a light drybrush of Zephyr Pink to add some extra highlights wherever it seemed appropriate. I also went back over the top of the head with some more Night Scales, and picked out the eye sockets with Zephyr Pink before adding some white over on the eyeballs and inside the mouth. Finally, I added some coarse sand mix to the base with PVA glue, and then painted with Army Painter Dirt Spatter, then a wash of Mid Brown ink, and finally a drybrush with Kobold Skin, also picking out the base edge with more Dirt Spatter.
To build your own angel of floaty, screamy doom, you can pick up the Mature Angel kit along with the rest of the Maelstrom's Edge range from the webstore here.
What are you working on? We would love to see your models and terrain in the Comm Guild Facebook group!
For other building ideas, modeling tutorials, army spotlights and conversion walkthroughs, check out the Hobby section of the Maelstrom's Edge website here.
Terrain Kitbash: Communications Hub
Posted on Monday Aug 30, 2021 at 06:00pm in Tutorials
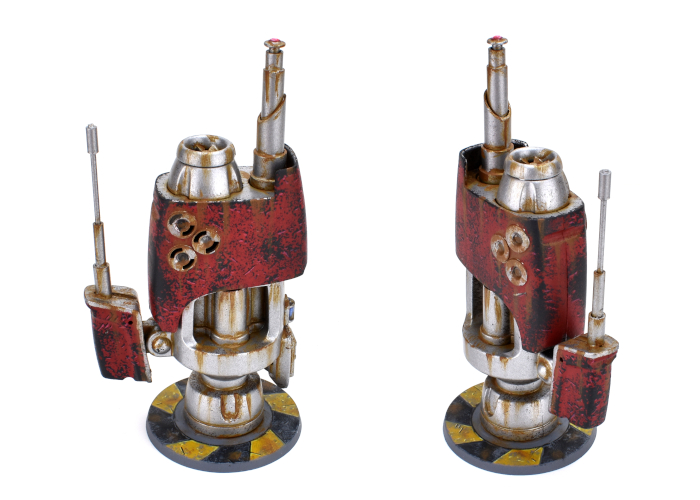
Regular readers would know by now that I have a habit of grabbing odd things from around the place that have interesting shapes and turning them into terrain. In the past, I've built terrain from various bits of building hardware, storage containers, food packaging, and Christmas tree decorations, amongst other things. This week, I ransacked Amazon's toy department to put together a communications hub!
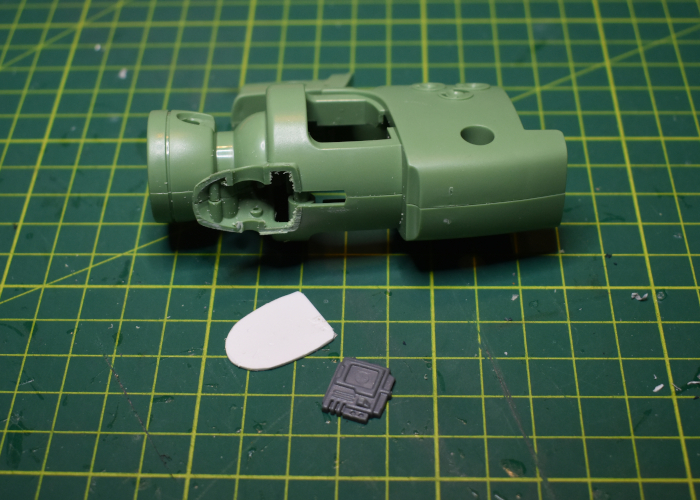
The base for this model was a small light up laser gun toy that I found while browsing Amazon. This particular toy came in a set of 4 - three of this same design in different colours, and another blockier design that I'll find a different use for later.
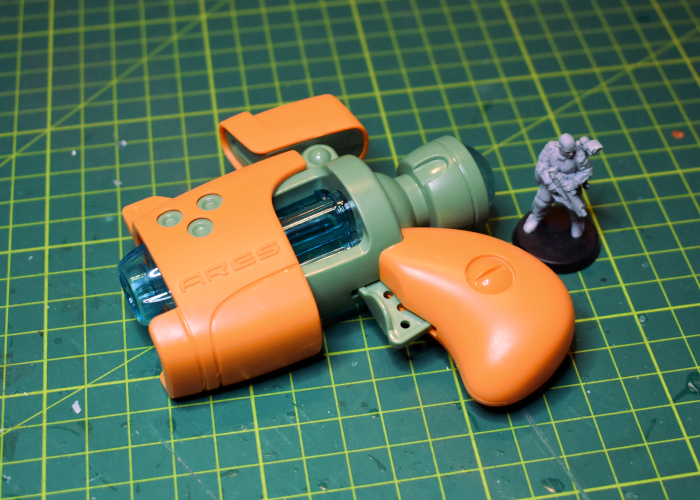
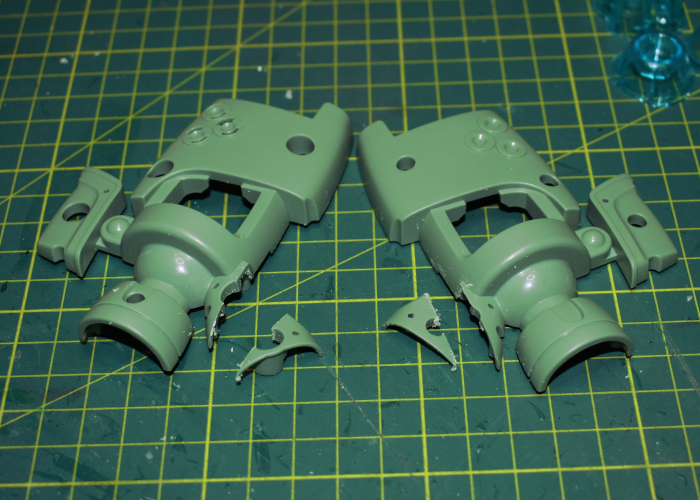
The first step was to take the gun apart so that I could remove the pistol grip and any other un-needed parts. The cowling from the front will likely wind up as a building entry at some point in the future, and I saved the light and speaker just on the off-chance that I want something to light up and make pew-pew noises.

The main part of the gun was almost perfect as is, although I trimmed down the protrusion that the pistol grip originally clipped onto with a razor saw.
I then cut a piece of plasticard to fit neatly over the opening, and grabbed a computer panel from the first Maelstrom's Edge terrain sprue to add to this plate.
I reassembled the body of the gun, and added a couple of aerials made from plastic tubing, aluminium rod and a post piece from the second Maelstrom's Edge terrain sprue.
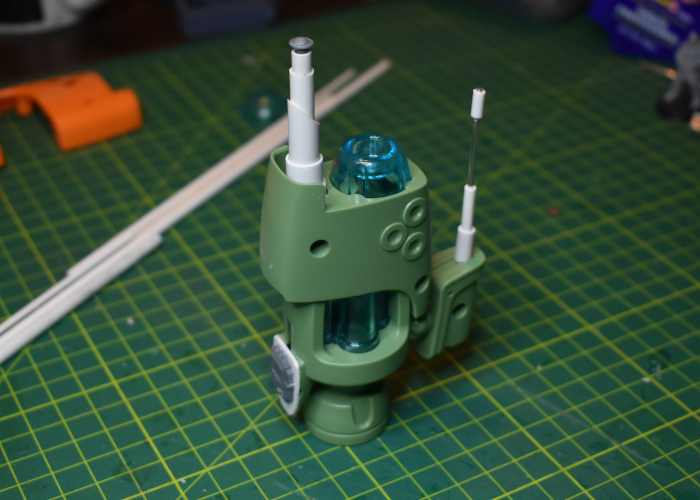
Finally, I added a base to make it a bit more stable, glued an exhaust fan from the second terrain sprue over the muzzle piece, and puttied over the screw holes.
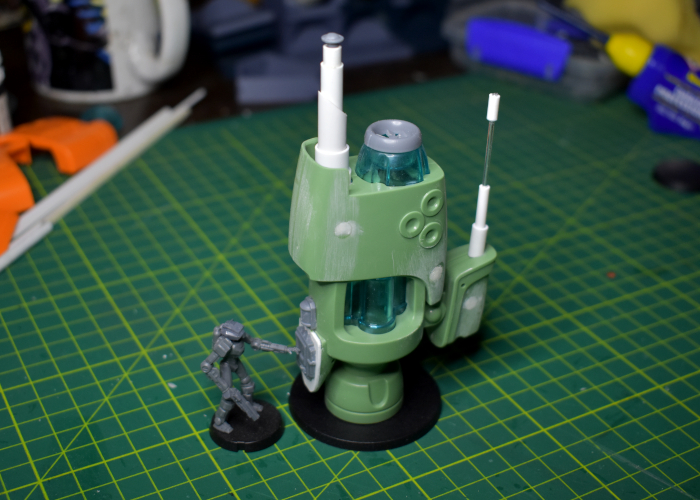
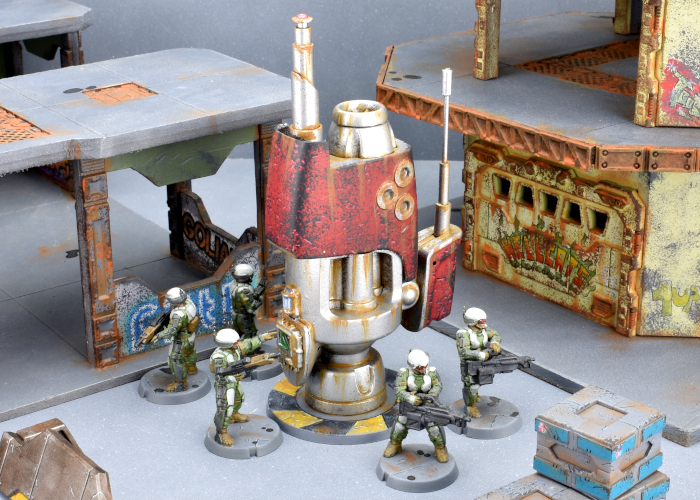
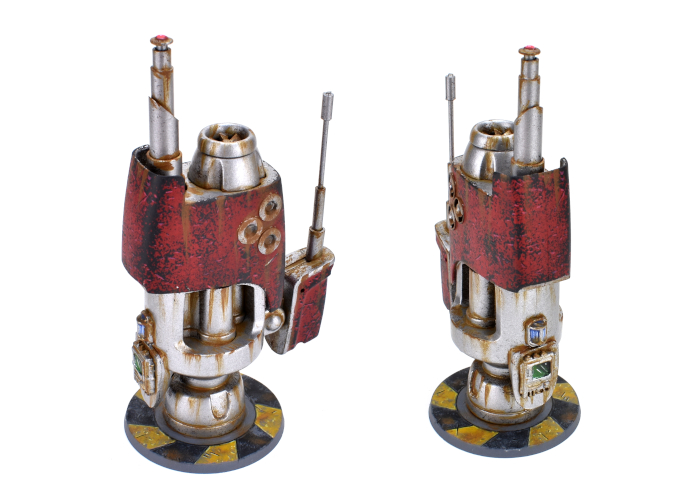
With some paint on, it wound up looking like this:
I considered leaving the blue central piece unpainted as a shiny, translucent feature, but decided against it as the three guns have different coloured pieces, so the translucent piece would be different on each comm hub... and that would offend me on a deeply spiritual level when I build the other two.
To build your own hub of communicative doom, you can pick up the Maelstrom's Edge terrain sprues along with the rest of the Maelstrom's Edge range from the webstore here.
What are you working on? We would love to see your models and terrain in the Comm Guild Facebook group!
For other building ideas, modeling tutorials, army spotlights and conversion walkthroughs, check out the Hobby section of the Maelstrom's Edge website here.
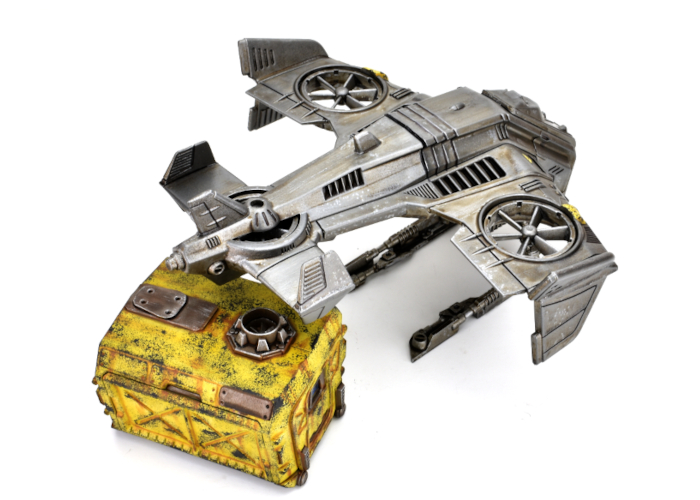
Modeling Spotlight: Kitbashed Pegasus Heavy Cargo Drone
Posted on Tuesday Jul 20, 2021 at 06:00pm in Tutorials
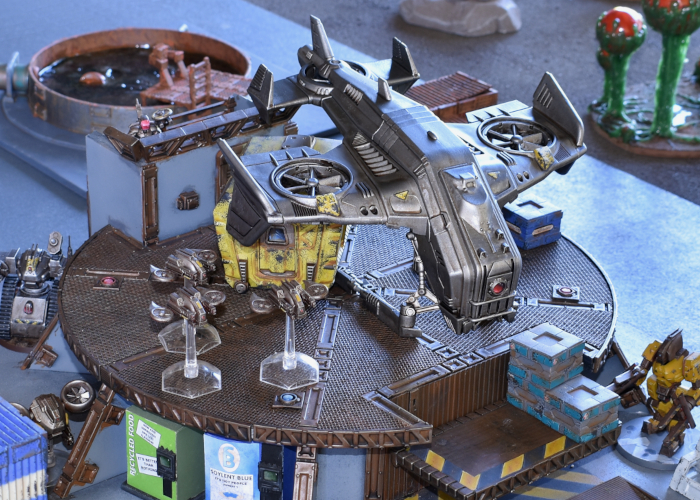
Time to hack something up, just because we can! I've had my eye on the Hornet dropship from Mantic's Warpath game for some time, as its general shape feels similar to the Epirian Firefly drone, just scaled up. So, I decided to take one and turn it into a heavy cargo drone to support Epirian forces behind the lines! Read on to see how it was built.
With its design already including wing-mounted turbines, the main alteration required was to make the front of the Hornet look like a standard Epirian drone. I used a small pipe fitting from the first Maelstrom's Edge terrain sprue for a sensor lens housing. For the lens itself, I rolled out some 'Green Stuff' putty into a thin sheet and used the pipe fitting as a stamp to cut out a circle. I also took a couple of pieces of aluminium rod and bent them to fit across the front section on the Hornet, to form the rectangular grill that Firefly and Spider drones have under their sensor lens.
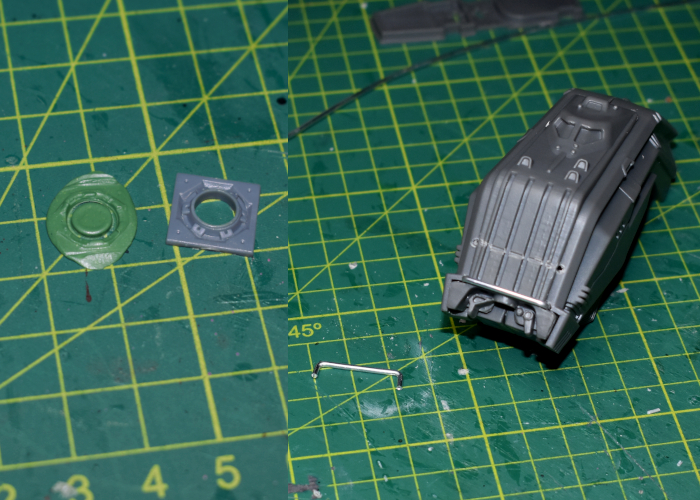
Once the Green Stuff was fully cured, I trimmed away the excess, and glued everything into place on the front of the Hornet. The Hornet's protruded above the lens housing, so I covered over it with a thin piece of plasticard. I had originally intended to cut off the cockpit bulge and seal over it with plasticard, but decided it would be easier to use some putty to fill in the windscreen recesses.
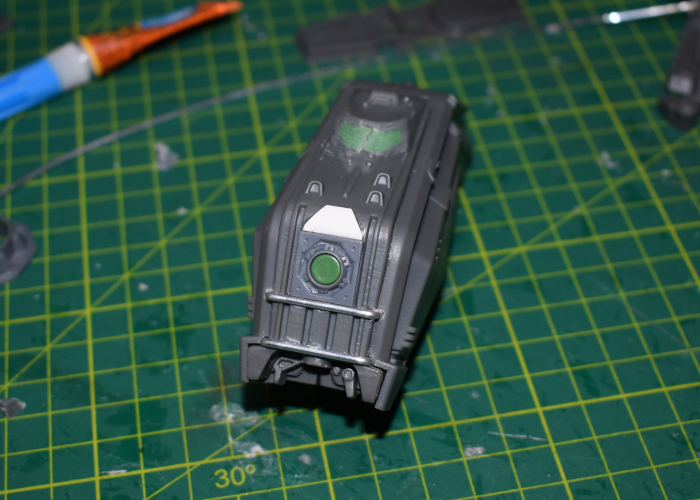
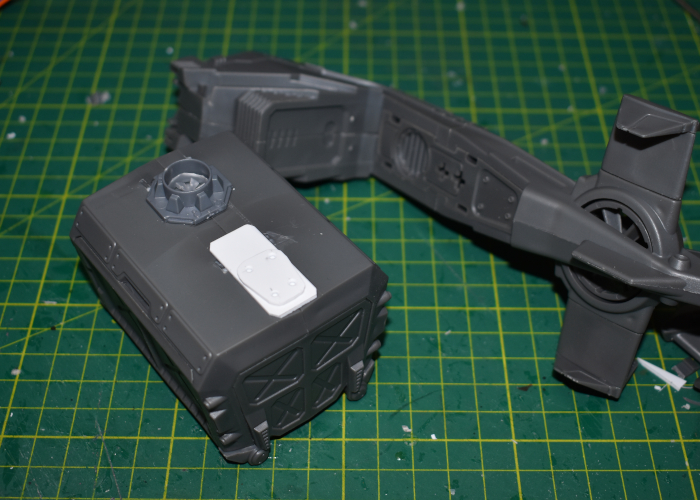
As this drone was intended as a scenery piece rather than for gaming, I decided to keep the cargo container as a separate piece. There is a doorway on one end with no door, as this normally sits up against the door on the back of the Hornet cockpit section. I took a door from the terrain sprue and trimmed it down to fit into the opening, adding a piece of plasticard to fill in the window. I also wanted to add some detail to the top of the container. Taking a fan from terrain sprue #2, I trimmed it down to fit inside the large pipe fitting from terrain sprue #1.
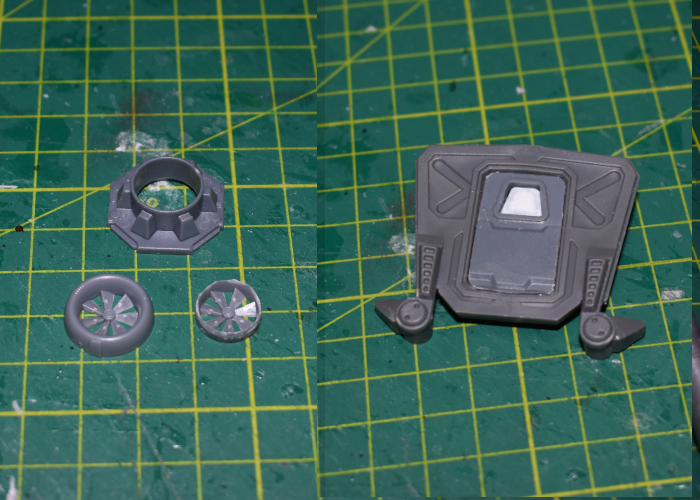
I glued the fan assembly onto the top of the container to line up with the circular vent on the underside of the Hornet's fuselage, and added some plasticard shaped to match the fuselage's trapezoid hatch.
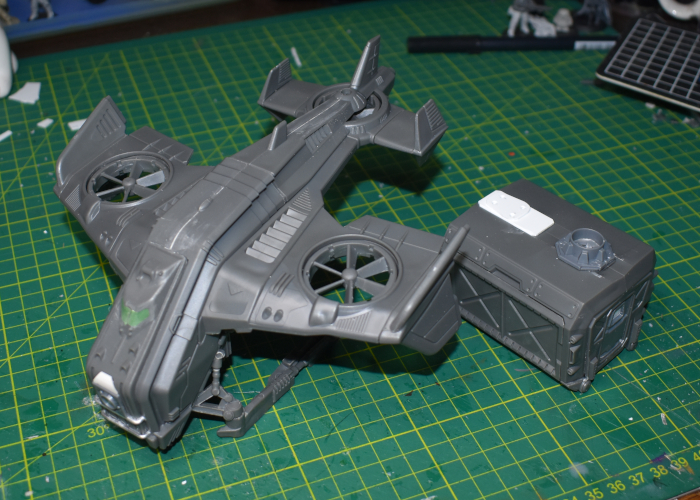
With everything else just assembled as normal, the new drone was ready for paint!
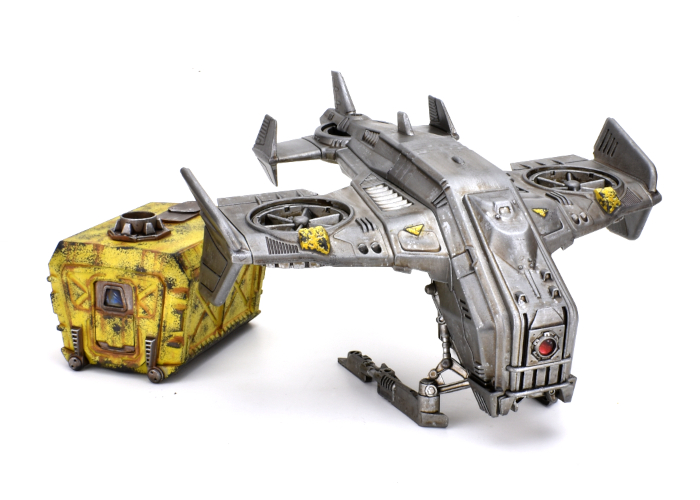
And the finished Pegasus Heavy Cargo Drone, ready to haul some heavy cargo:
To turn your own Hornet into a heavy drone of logistical doom, you can pick up the Maelstrom's Edge terrain sprues along with the rest of the Maelstrom's Edge range from the webstore here.
What are you working on? We would love to see your models and terrain in the Comm Guild Facebook group!
For other building ideas, modeling tutorials, army spotlights and conversion walkthroughs, check out the Hobby section of the Maelstrom's Edge website here.
Tags: conversion drone kitbash modeling spotlight
Model Spotlight: Revolutionary Captain!
Posted on Tuesday Jun 15, 2021 at 11:41pm in Tutorials
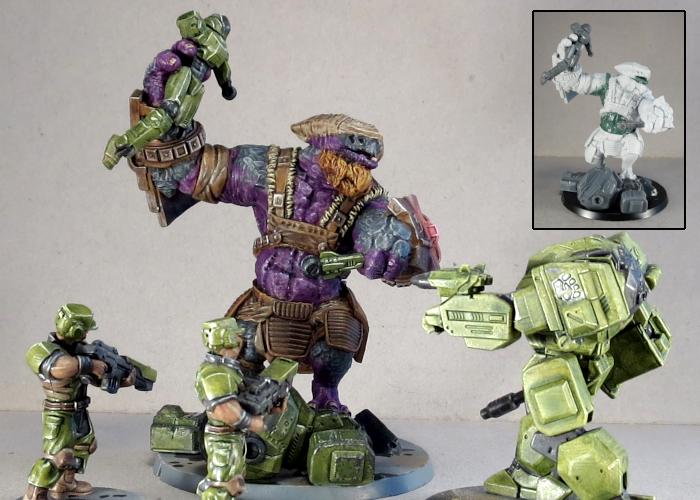
With the release of the Revolutionary Captain ushering the SARA subfaction into Maelstrom's Edge games, a range of new tactical options opens up for the Broken. I'll be sharing my fledgling SARA force in an upcoming army, but to kick things off I thought it would be fun to have a look at some modeling options for the fantastic Revolutionary Captain model!
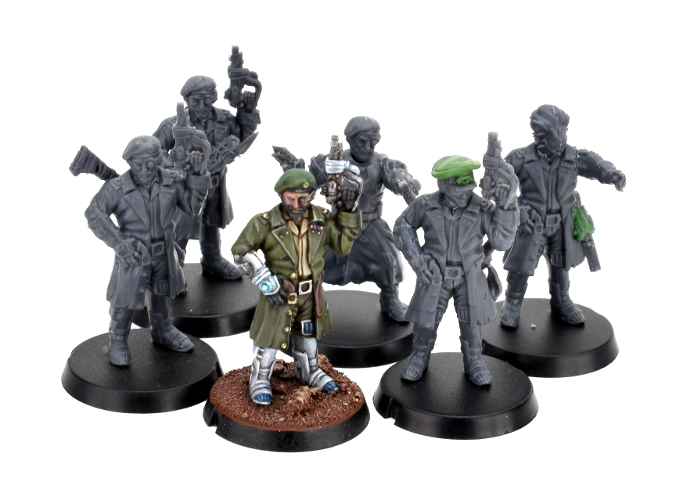
The Revolutionary Captain is a multipart, plastic model. He's not as modular as most of the Maelstrom's Edge model range, as the sculpt was in this case aiming for a specific character look. Being plastic, however, it's still relatively easy to give the model a more customised look if you feel so inclined, and I'll explore some different ideas for that below.
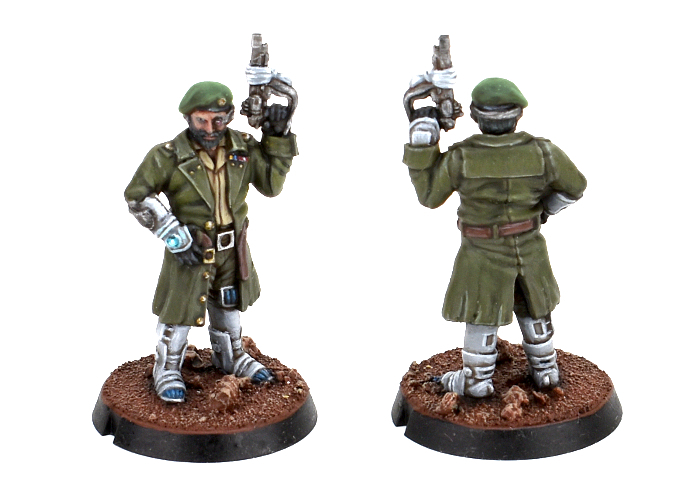
The studio model, painted by Winterdyne.
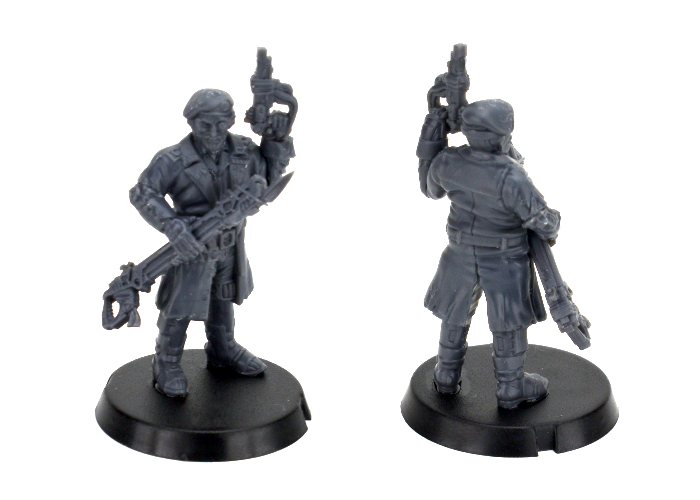
Built straight off the sprue, the Revolutionary Captain is equipped with his SARA Officer's Pistol. His rules card, which can be found here, gives him the option to take one of a number of different secondary weapons, which can mostly be sourced from the Broken Rabble kit. To equip a Beam Blastgun or Slug Rifle, the easy option is to just stick the weapon on his back. You could model a rifle strap from modeling putty, or just assume the weapon is held in place with a magnetic lock built into the back of his coat.
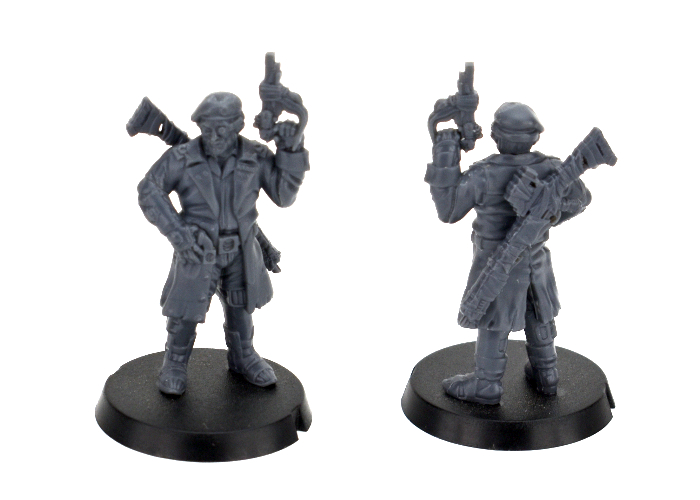
To take a more hands-on approach, for this version I sliced off his right hand, and used a forearm snipped from a Rabble sprue arm to hold the blastgun. As it still sits against his waist, there's no need to try to resculpt the coat belt where the hand was removed, as you can't see it anyway.
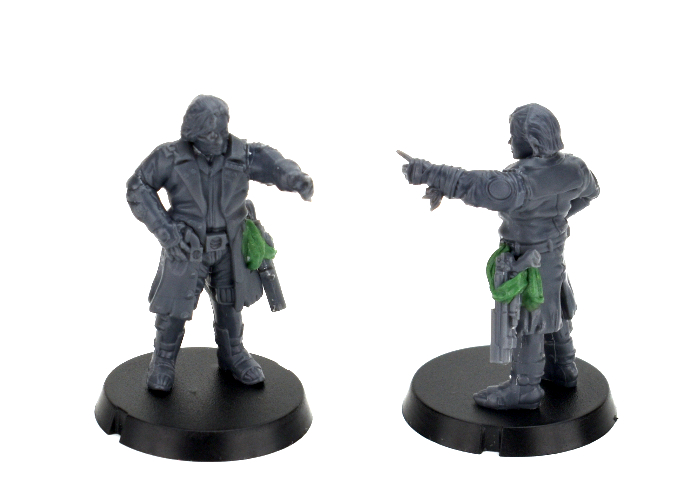
Of course, everyone knows that battlefield commanders spend a good amount of their time pointing at things. If your commander isn't either pointing at something, or standing with one foot on something, people might not even recognise them! By slicing off the Revolutionary Captain's left arm at the coat's shoulder seam, I was able to glue a pointing arm from the Rabble sprue in its place. I also replaced the head with a regular Rabble head by drilling out the neck a little with a 2mm drill bit, and glued a maglock pistol from the Epirian Contractor kit onto her hip with some strapping made from 'Green Stuff' putty to replace the officer's pistol. The putty isn't strictly necessary - you could easily just glue any of the Captain's pistol options to the belt, but the addition of the putty strap does make it look a little nicer on the model.
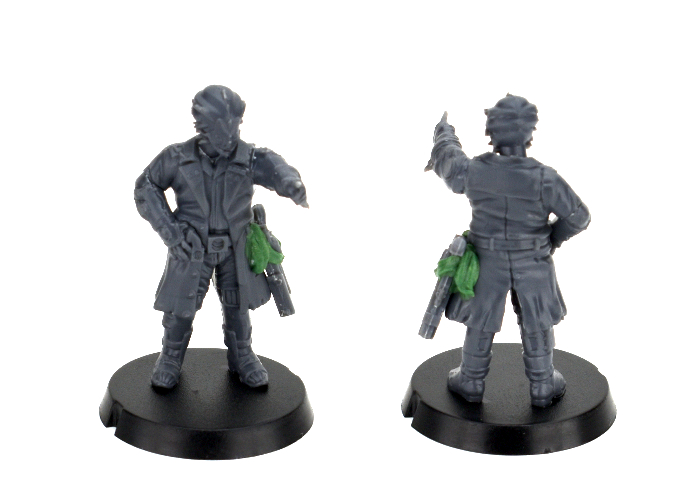
Of course, there's no reason for only humans to be revolting! With the neck drilled out as above, you can use any of the alien heads from the weapons sprue in the Rabble kit to create a xeno force commander.
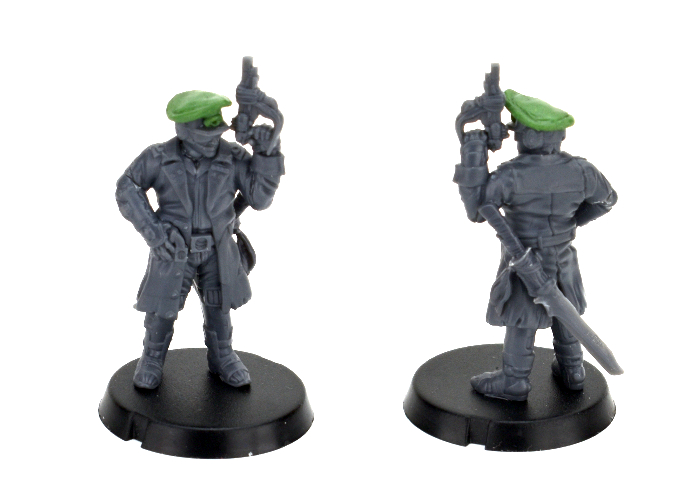
While we're replacing heads, some Captains like a nice, sensible cap in place of a beret, so for this one I used an Epirian Contractor head (mostly for the sunglasses!) and built the cap up into an officer's hat using Green Stuff. I also added a melee weapon on his belt using part of a Karist sword from the Faction Expansion Sprue and bits from a couple of weapons on the Rabble sprue. This could easily represent either the Poisoned Blade or Trophy Melee Weapon. For a slightly easier option, you could just use the Karist sword or knife from the Faction Expansion sprue. The resin Forsaken Chieftain also comes with both of these melee options, so if you have that model you could use whichever one you didn't use on her for the Revolutionary Captain.
Of course, if you're hacking up your Revolutionary Captain model to replace heads and weapons, this leaves you with some useful parts to build another Captain to lead a second Detachment! For the below model, I used some parts from the Rabble kit (legs, arms and beam pistol), the left hand and head from the Revolutionary Captain, and a torso from the Epirian SecDef kit just to help him to stand out a little more from the Broken horde.
To build your own army of revolutionary doom, you can pick up the Revolutionary Captain along with the rest of the Maelstrom's Edge range from the webstore here.
What are you working on? We would love to see your models and terrain in the Comm Guild Facebook group!
For other building ideas, modeling tutorials, army spotlights and conversion walkthroughs, check out the Hobby section of the Maelstrom's Edge website here.
Tags: broken conversion model modeling sara spotlight tutorials
Model Spotlight: Remnant Nimbus Battlesuit.
Posted on Monday May 24, 2021 at 06:00pm in Models
You can find this fantastic resin miniature in the Maelstrom's Edge webstore here.
Model Spotlight: SecDef Lieutenant
Posted on Monday May 10, 2021 at 05:00pm in Models
You can find this fantastic resin miniature in the Maelstrom's Edge webstore here.