Entries tagged [modeling]
Terrain Walkthrough: Plantation Dome
Posted on Monday Mar 06, 2017 at 05:00pm in Models
 - by Iain Wilson
On many frontier worlds, terraforming is still underway when colonists move in and start trying to install some sort of civilisation on everything. Where conditions are less favourable, this can require mean that non-native vegetation can need a little help getting established.
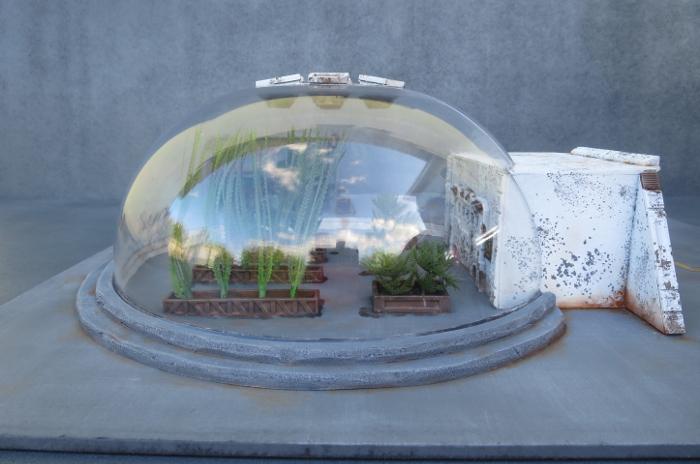
One of my very early ideas when the Maelstrom's Edge Terrain Sprue was first released into my eager little hands was for a small bio-dome-style structure where food or other useful plants would be grown during the process of making the planet fully habitable. It's taken a while to get back to it, but this is what I eventually came up with:

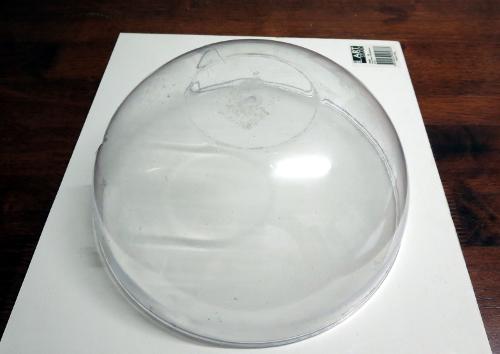
The foundation for this building was a plastic salad bowl, found at a local discount store.
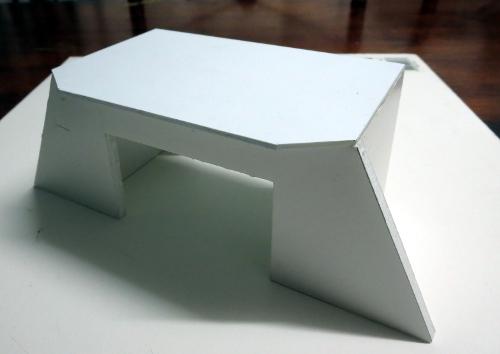
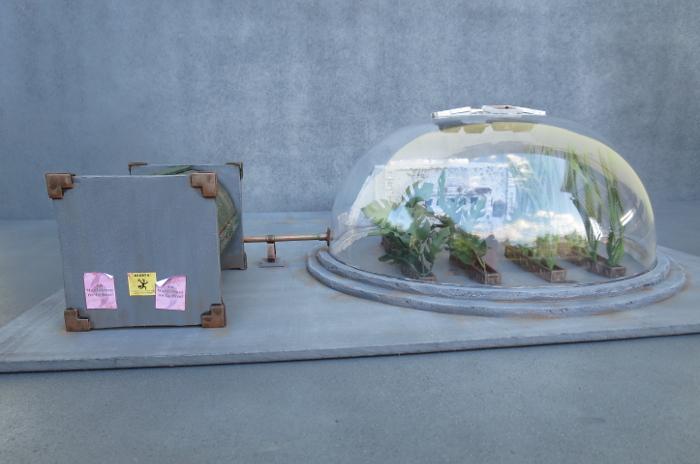
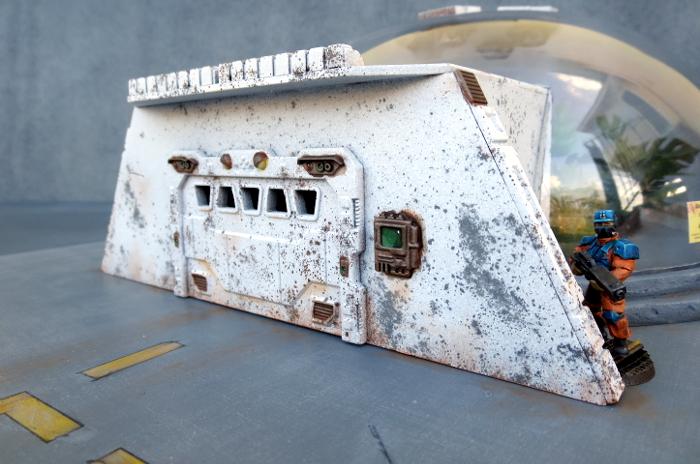
I built a 'gateway' building, to be installed into the side of the dome. This would form a sort of airlock, to allow for environment control inside the dome, and also function as a storeroom for whatever tools or drones were used to maintain the plantlife inside.
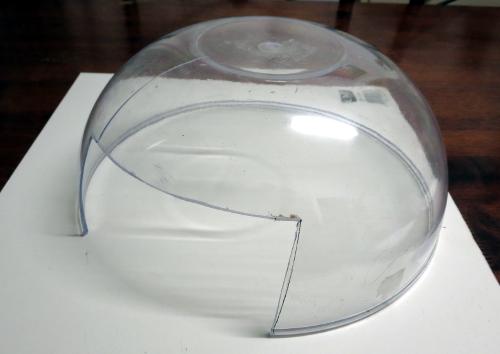
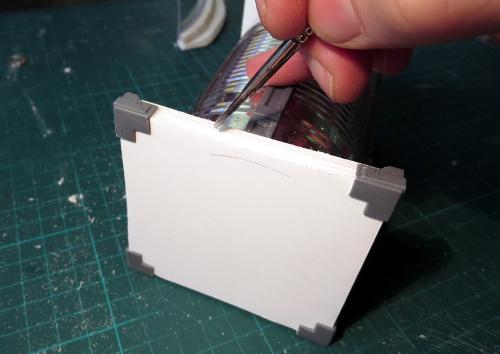
To install the airlock, I carefully cut a square hole into the side of the bowl. Apparently I wasn't quite careful enough, as the fairly brittle plastic cracked just as I was almost finished cutting. (Note for next time - use a razor saw rather than trying to get clever with an exacto knife!) I decided to go with it anyway, as a little damage on battlefield terrain obviously isn't the end of the world.
The gateway building was prettied up with doors, control panels and some reinforcing from the terrain sprue.
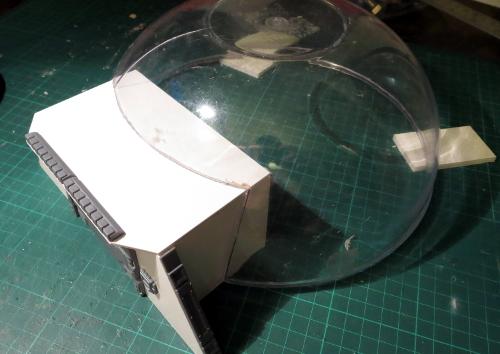
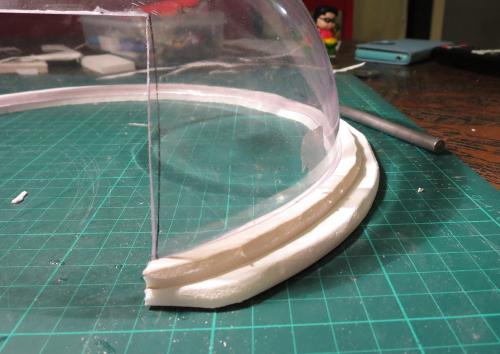
The hole in the side of the bowl is 5mm too short for the gateway. That allows me to add a foamcore rim around the base of the dome, with another ring of foamcore running on top, sealing in the edge of the bowl.
I wanted some detail for the top of the dome, to disguise the bowl's flat bottom. So I took some shutter windows and used a razor saw to cut the backs of the frames so that the windows sit on an angle.
These were then glued to a circle of plasticard cut slightly smaller than the base of the bowl. A square hatch in the middle forms a hub, where I imagine the machinery that controls the shutters would be located.
On the inside of the bowl, I added some large pipe fittings, positioned to sit directly underneath each of the shutter windows. This forms a venting system, to allow the atmosphere inside the dome to be vented in an emergency, or to allow controlled amounts of the outside air into the dome.

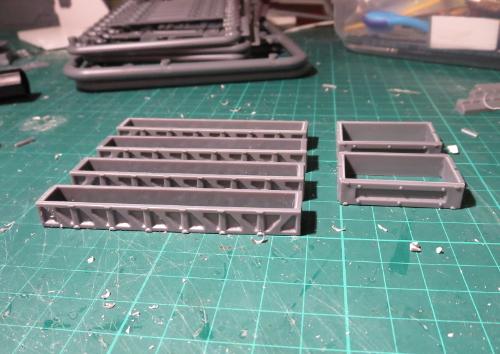
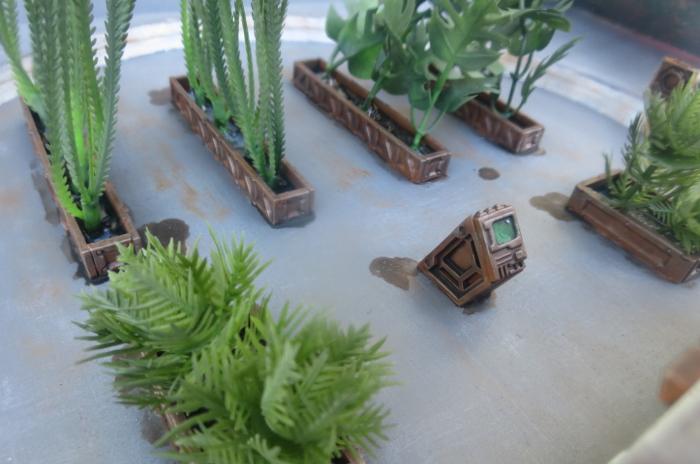
A bunch of reinforcing strips from the terrain sprue were hacked up and glued into planter boxes to go inside the dome.
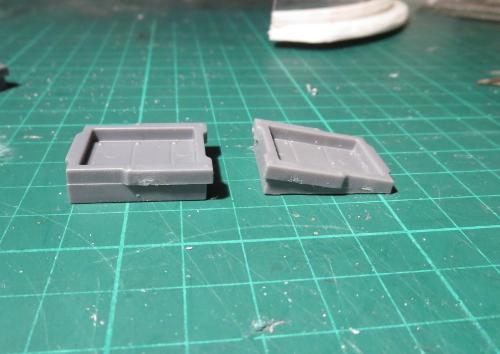
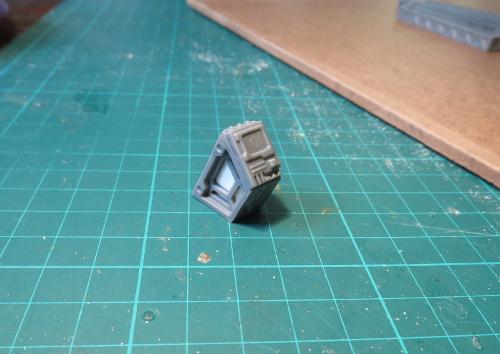
To these, I added a control unit using a control panel and two trapezoid windows glued together with a small piece of foamcore sandwiched between them. This would control the environment inside the dome, administer fertilisers or other chemicals to the plants, or activate the dome's resident drones.
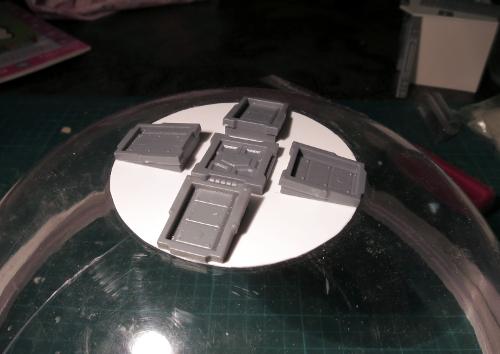
After marking out the inside circumference of the dome on a sheet of masonite, the planters and control unit were glued in place.

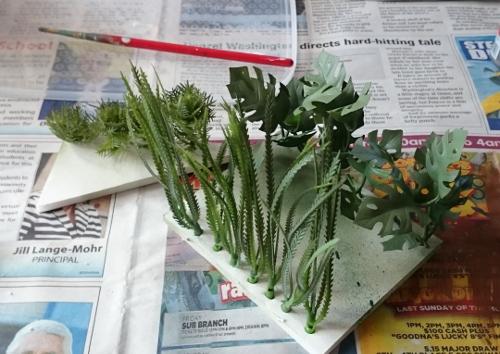
For the plants themselves, I cut appropriately-sized pieces from a few different aquarium plants. These were lightly sprayed with a matt green paint to dull them down a little and make them look slightly less plastic. These would be glued into the planter boxes and the boxes then half-filled with clear craft glue (water effects would be better, but I was in a hurry and craft glue was what I had to hand).
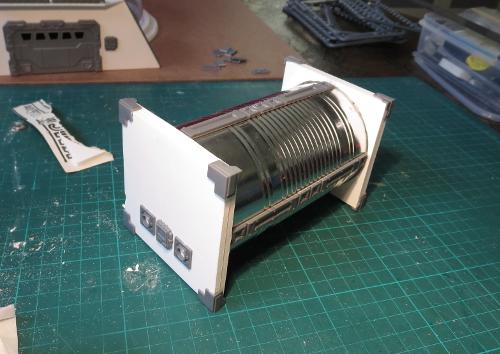
To add a little extra detail to the overall terrain piece, I built a water tank from some foamcore and a beverage mix tin. The ends of the tin are nested into circles cut into the inner sheets of foamcore, for extra strength.
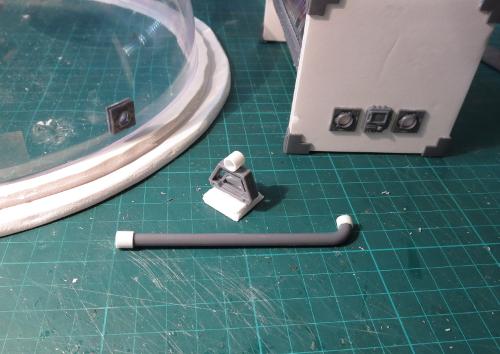
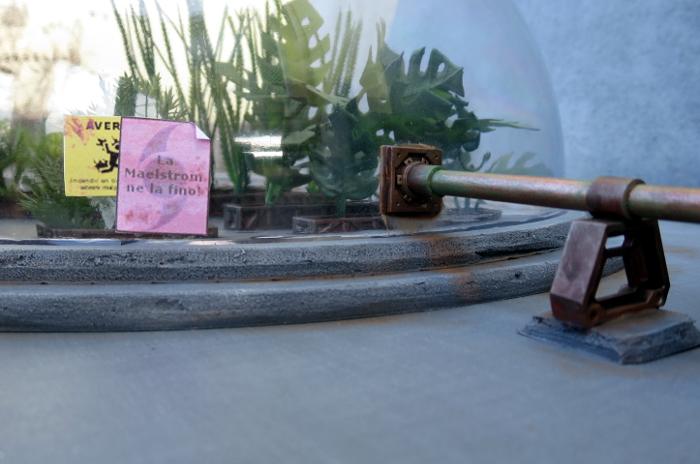
A pipe made from a piece of sprue cut from the terrain sprue and some plastic tube joins the water tank to the dome. I built a support for the pipe from a trapezoid window and another piece of tube, and added small pipe fittings from the terrain sprue to the inside and outside of the dome. The drone tasked with watering the plants would connect to the interior fitting and syphon off as much water as required.
The last thing to do then before painting and assembling everything was to paint any exposed edges of the foamcore with some PVA glue, to protect it from the spraypaint.
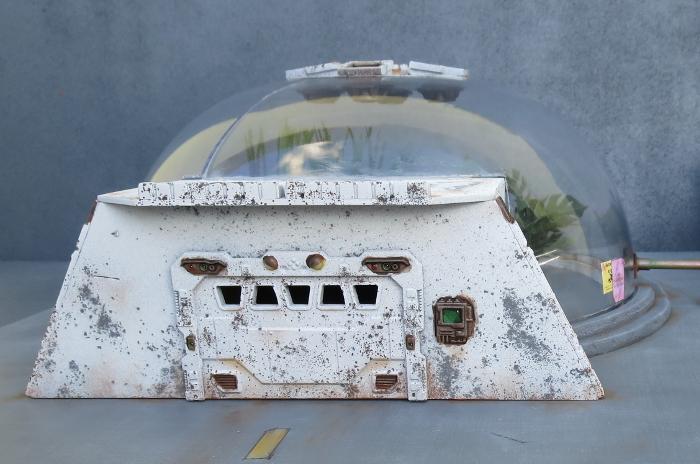
My original batch of buildings for Maelstrom's Edge were painted white with green detailing, and since the gateway building for this one was constructed in a similar style, I went with a matching colour scheme.
The gateway was sprayed with a grey undercoat, and then a spray of matt white, with salt weathering to give it a nicely aged appearance.
The water tank was painted brown, drybrushed with Citadel Boltgun Metal and washed with Army Painter Strong Tone before being sprayed with a coat of green.
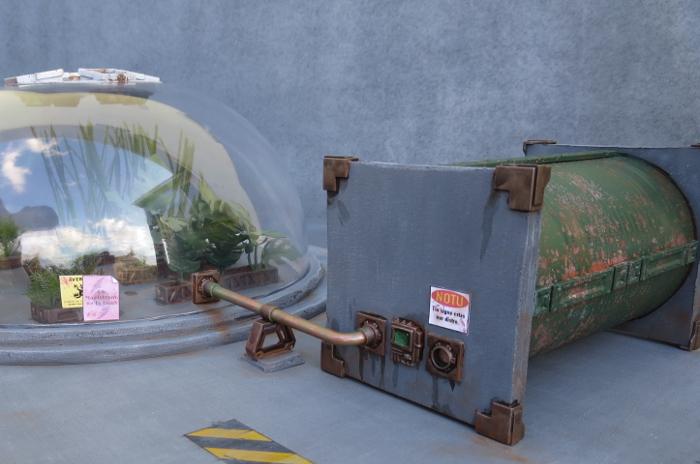
Again, salt weathering adds some age and experience. The end pieces, along with the base board and the dome rim, were painted with Vallejo Basalt Grey and then drybrushed with Vallejo Light Grey.
A few touches of Vallejo Beasty Brown add some dirt around the place, and some signs created in Gimp, printed out and glued in place add some character touches.
The interior needed to be all painted and the plants glued in place before the dome could be glued down.
I considered leaving the gateway unglued, so that it could be pulled out to put models inside the dome, but figured that as cool as that might look, there was little actual point in being able to do so in-game, so for a gaming terrain piece that was an unnecessary bit of fiddliness.
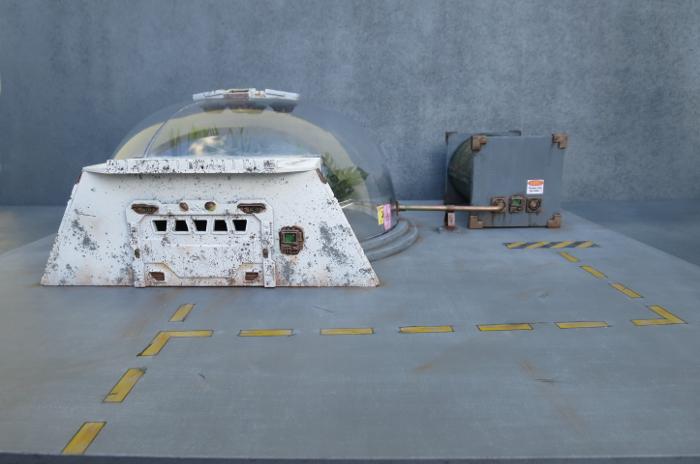
A yellow guideline adds a little extra detail to the broad expance of base. The base was deliberately large - the dome and water tank make for a fairly hefty line of sight blocker, so I wanted to leave plenty of free space around it. Where a little more cover is required, scatter terrain (barriers, crates, industrial bins, and the like) can easily be added to the open front corner.
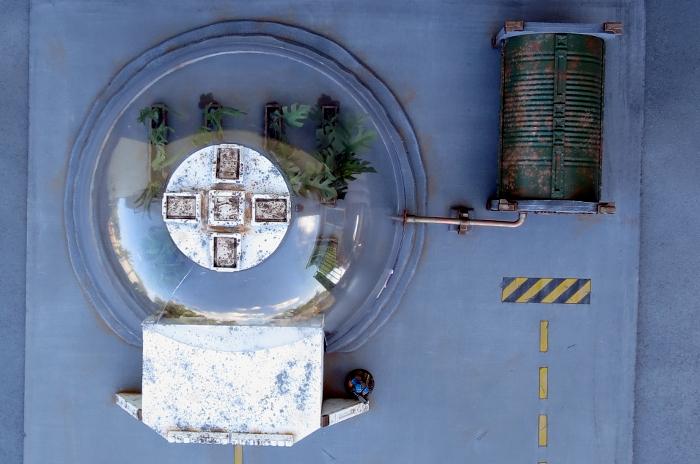
And that's it - another terrain piece just waiting for a battle to spring up around it.
To build your own plantation dome, or a transport hub, or whatever other round thing strikes your fancy, you can pick up the Maelstrom's Edge terrain sprue from the online store (in a handy 2-pack!) here.
As always, please feel free to share your creations on the Comm Guild Facebook page!
Tags: buildings modeling terrain walkthrough
Terrain Tutorial: Shipping Container
Posted on Monday Jan 09, 2017 at 05:00pm in Tutorials
- by Iain Wilson
A while back, we showed off a shipping container made from components from the Maelstrom's Edge Terrain Sprue. This week, I'll be showing how to build it for yourself.

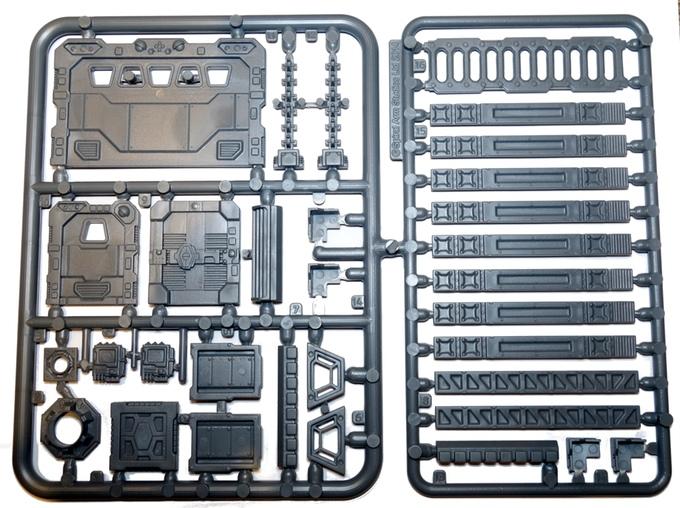
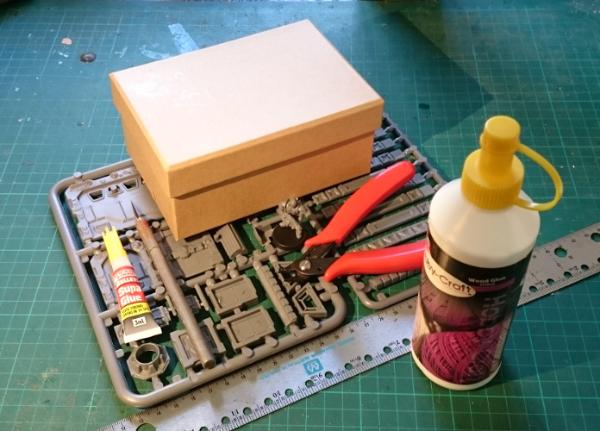
The terrain sprue is a fantastic source of interesting bits and pieces to spruce up your homemade terrain and, for the uninitiated, looks like this:
What you need:
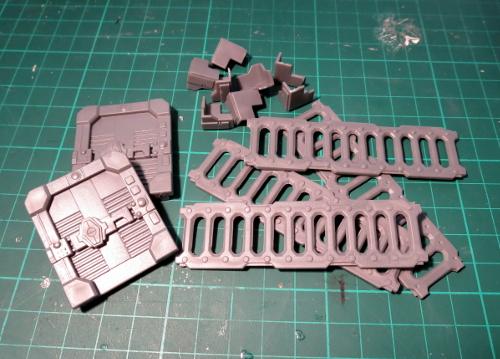
You'll need four terrain sprues for this build, from which you will need:
- 4 x ladders
- 8 x corners
- 2 x heavy doors
 (I will be going through some ideas for using the other sprue components in the coming weeks.)
You will also need:
- 3mm foamcore
- A sharp hobby knife
- A steel ruler
- A pencil
- Superglue
- PVA glue or Foam glue (more or less the same as PVA, but slightly faster setting and formulated specifically for gluing foam)
What you do:
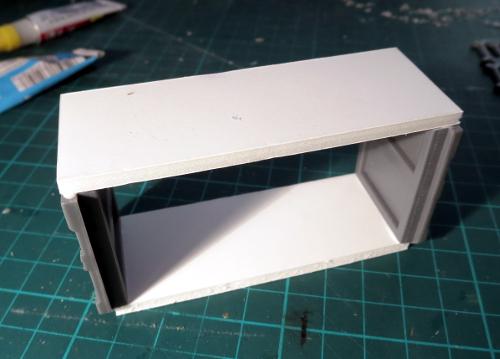
Clean the mould lines off the components. Then from your sheet of foamcore, measure out and cut a strip that is 31mm wide.
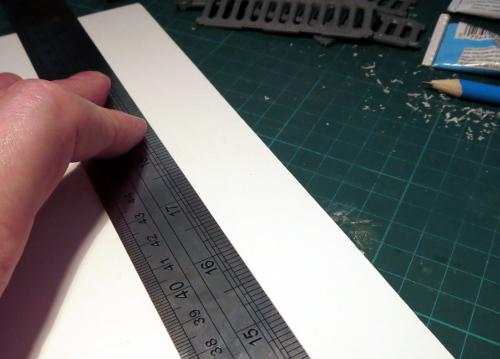
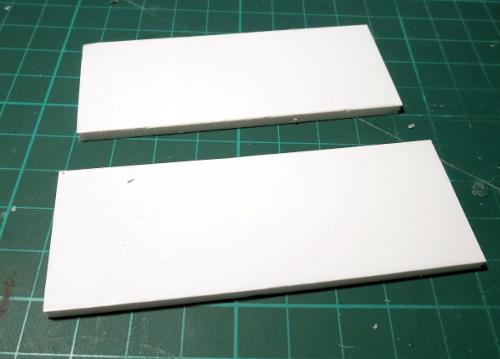
From this strip, cut one piece that is 81mm long, and another 87mm long.
Using your PVA/foam glue, glue the 81mm strip bridging the tops of the two doors and sitting on top of the inset support that runs around the back of the door. The PVA is better than superglue for this initial assembly partly to avoid melting the edges of the foamcore (superglue melts expanded polystyrene) and partly to give some time to manipulate the structure as you build it, to ensure that it winds up square.
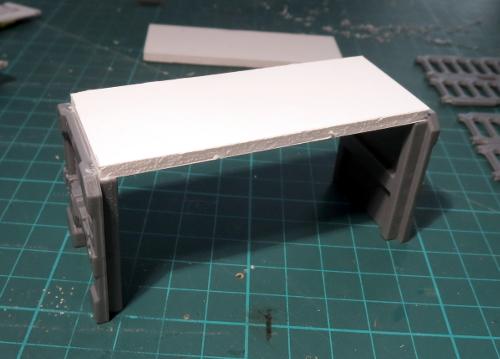
Once the glue has grabbed sufficiently to stop everything from falling apart when you move it, flip the structure over and glue the longer strip bridging the bottoms of the doors. The ends of the foamcore strip should be flush with the widest part of the bottom of the doors.
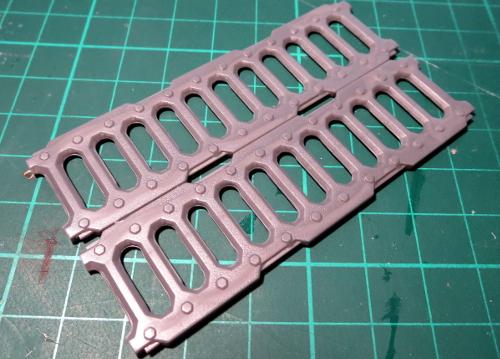
Using the superglue (or plastic glue if you prefer) glue two of the ladders together along their long edges. You can use the edge of the steel ruler to make sure that the ends are square. The do the same with the other two ladders.
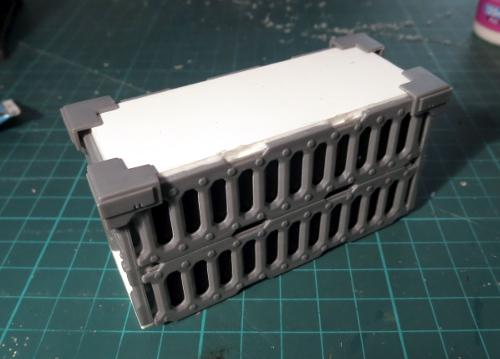
Then, using the PVA/Foam glue again, glue the first pair of ladders into place along the side of the structure, with the raised-detail side outwards. You can lay the container on its side on a gridded cutting mat or use a set-square to make sure that the structure is all squared up at this point, and nudge it into shape off it doesn't all quite line up.
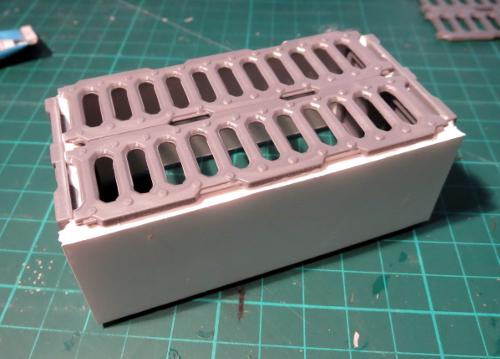
If you're building an open cage-style container like the one pictured at the start of the article, this is a good time to stop and let the glue set, and then paint the inside of the container - otherwise, it's going to be considerably harder to do once both sides are glued on.
Alternatively, you can cut a couple of pieces of foamcore or thin cardboard to glue to the inside of the ladder-walls to create an enclosed container.
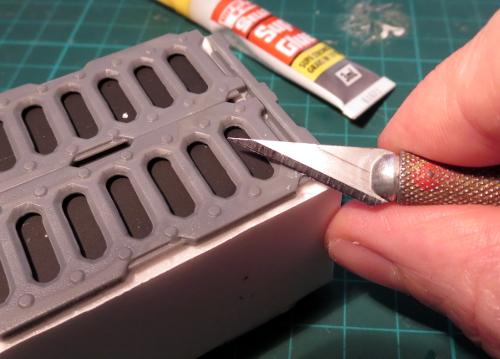
Once you have painted the interior, or glued the interior panels in place, glue the second set of ladders on the other side. Then, using the hobby knife, trim off the bolts closest to the corners of the walls.
Take four of the corners, and glue them over the top corners of the container. Use superglue for this step, to give the structure some extra strength.
The other four corners will be going on the bottom. They need a little trimming so that they don't protrude over the bottom of the door - just bevel on corner off as below, and then opposing corner on the matching edge.
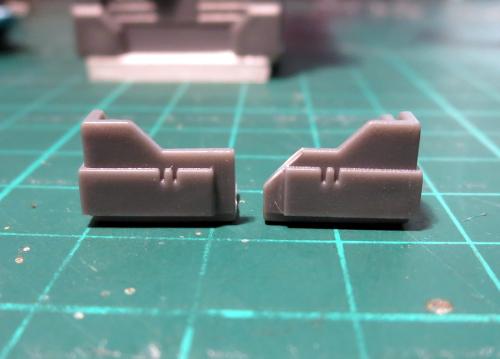
These can then be superglued in place around the bottom of the container. For this step, make sure you only get the superglue on the card side of the foamcore and on the plastic components where they touch - avoid getting glue on the foam edge of the base piece.
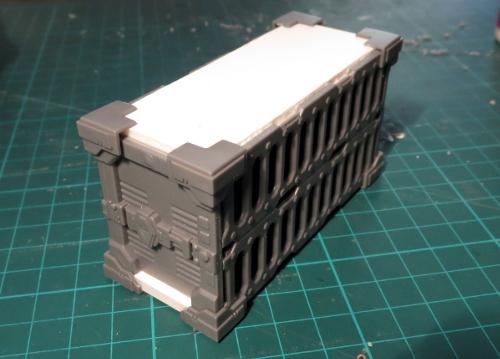
Once all your glue has set, the container is ready to paint! If you are intending to use spray paint, you will need to paint a thin layer of PVA or Foam glue over any remaining exposed edges of the foamcore first as, like superglue, most sprays will at least partially melt the polystyrene.
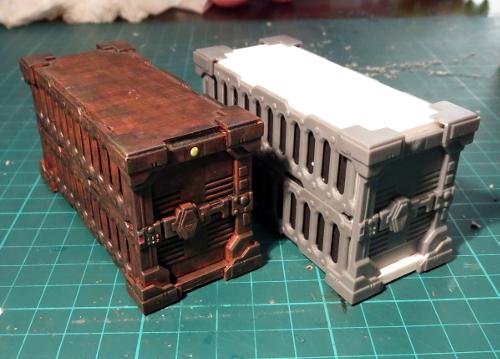
If you want to have a try at building your own containers, you can pick up the terrain sprue from the Maelstrom's Edge Online Store here. And as always, be sure to share your creations on the Comm Guild Facebook page (https://www.facebook.com/groups/MaelstromsEdge)!
Modeling Tutorial: Epirian Contractor Gas Masks
Posted on Monday Jan 02, 2017 at 05:00pm in Models
- by Iain Wilson
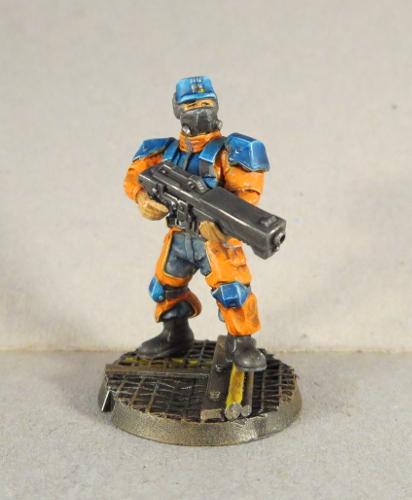
In my continuing quest to find all of the fun and cool ways to customise the range of Maelstrom's Edge plastic models, this week I'm having a look at enhancing the humble Epirian Contractor, through the addition of a gas mask or rebreather to help him to stay upright and functional in some of those less human-friendly environments that they might come across on frontier worlds.
What You Need:
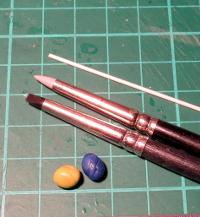
Aside from your contractors, you'll need a little green stuff, some sculpting tools (something flat, and something rounded - I like silicon clay shapers (also sometimes sold as 'color shapers' for painting), as they don't stick to the putty the way metal tools do), a little 1mm plastic rod and you may also find a hobby knife and some superglue useful.
You're best off working with the heads before they have been glued on the model, as you have a little more room to maneouvre that way. I find just working with the head on the sprue works well for this.
Note: For those new to putty work, 'green stuff' is the common name for a product called 'Kneadatite', which is a two-part epoxy putty. You have a blue component and a yellow component that you mix together until they go green, at which point they are pliable for sculpting for an hour or two, after which they set to a slightly-rubbery-plastic consistency.
What You Do:
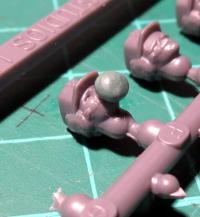
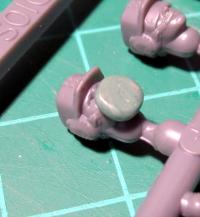
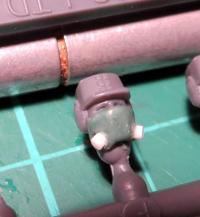
Roll a small ball of green stuff, and press it lightly onto the Contractor's lower face.
Tip: If you're trying to make a number of identical masks, roll out a long, thin sausage of green stuff, and cut off segments for each mask. This makes it much easier to get the same amount of putty for each mask.
Using a flat sculpting tool, press the front of the ball down flat, angling down towards the chin.
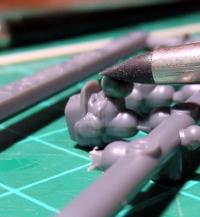
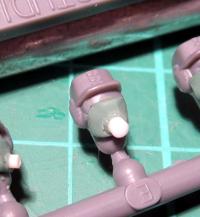
Using a rounded or conical tool, roll the sides of the ball down to meet up with the Contractor's earpieces on either side.
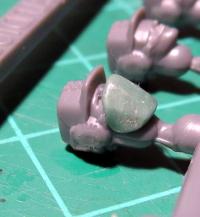
If necessary, use a sharp knife to cut the mask off just a fraction below the chin. If it juts down too far, you'll have problems getting the head to sit right without cutting off the front of the collar.
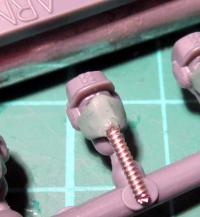
Then, cut yourself two 1-2mm lengths of plastic rod.
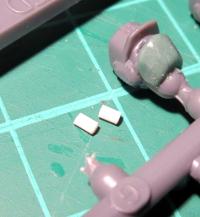
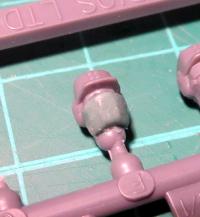
Press these into the 'cheeks' of the mask so that they protrude out diagonally downwards. It can help to add a small touch of superglue to the end of the rod that goes into the putty, to help it stick in place. Otherwise, they can work loose once the putty has set.
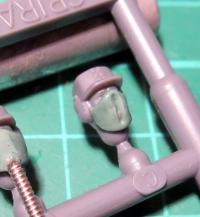
Leave for a couple of hours to let the putty set, and you're ready to glue the head in place and paint.
You can easily vary the design by modifying where you place the rebreather canister...
...using some guitar string instead if plastic rod, and running it down to a canister on the belt or armour harness...
...or leaving the canister off entirely and having an inset rebreather grill. This style also works well for converting a Karist Angel Keeper.
Working away at your own Contractor Squad? We'd love to see your work! Wander on over to the Comm Guild Facebook page to share your creations!
Community Spotlight: Epirians on Guard
Posted on Wednesday Nov 02, 2016 at 05:00pm in The Epirian Foundation
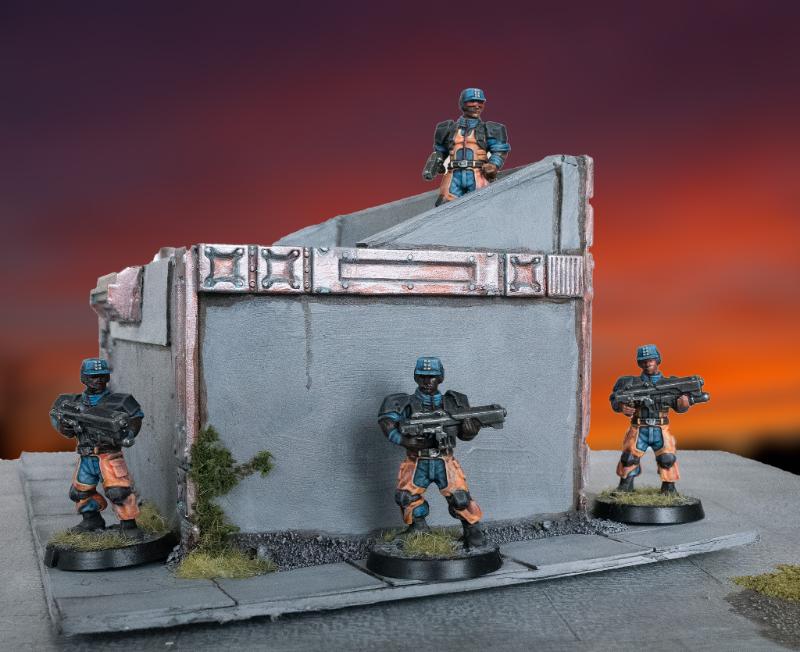
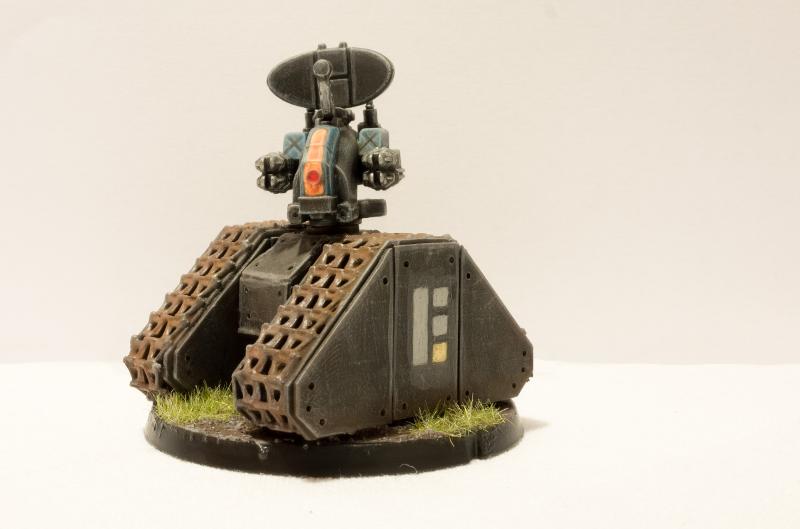
Sgt Oddball's Epirians make an appearance once again, this time around a small structure he has built. The striking use of bright colour really helps the Epirians to stand out against the cool greys and metallics of the building.
The Comm Guild's community spotlight focuses on sharing something from the Maelstrom's Edge community each week, if you have anything you'd like to get in to the queue, please get in touch with us via the Maelstrom's Edge website
Tags: contractor epirian modeling painted terrain
Community Spotlight: Panic's Doom Marines
Posted on Wednesday Oct 26, 2016 at 05:00pm in The Epirian Foundation
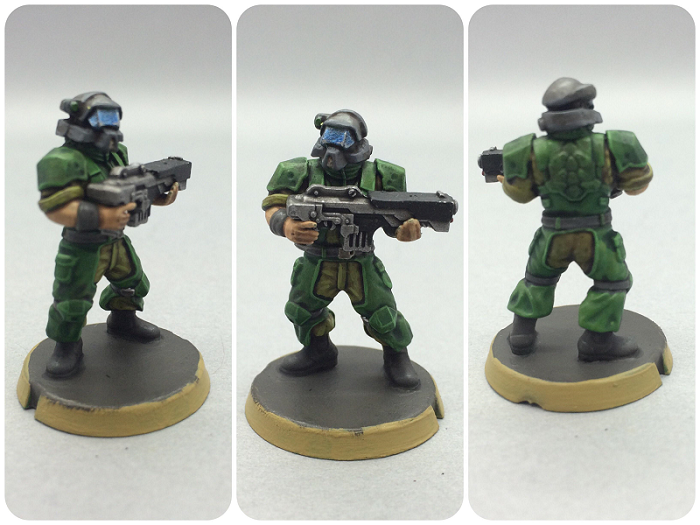
The flexibility of having a plastic model range is really shown with the ease of head-swaps that can be done. This excellent example by Panic is part of his Doom force, which is a valid Epirian army, themed around the classic first person shooter videogame 'Doom'. The right colourscheme and a simple head swap really changes the feel of the model. We'll be sharing a lot more of Panic's amazing work in the future!
The Comm Guild's community spotlight focuses on sharing something from the Maelstrom's Edge community each week, if you have anything you'd like to get in to the queue, please get in touch with us via the Maelstrom's Edge website
Tags: conversion doom epirian modeling painted
Community Spotlight: TP^DC Deputy Manager's Angel Minnow
Posted on Wednesday Oct 19, 2016 at 05:00pm in The Karist Enclave
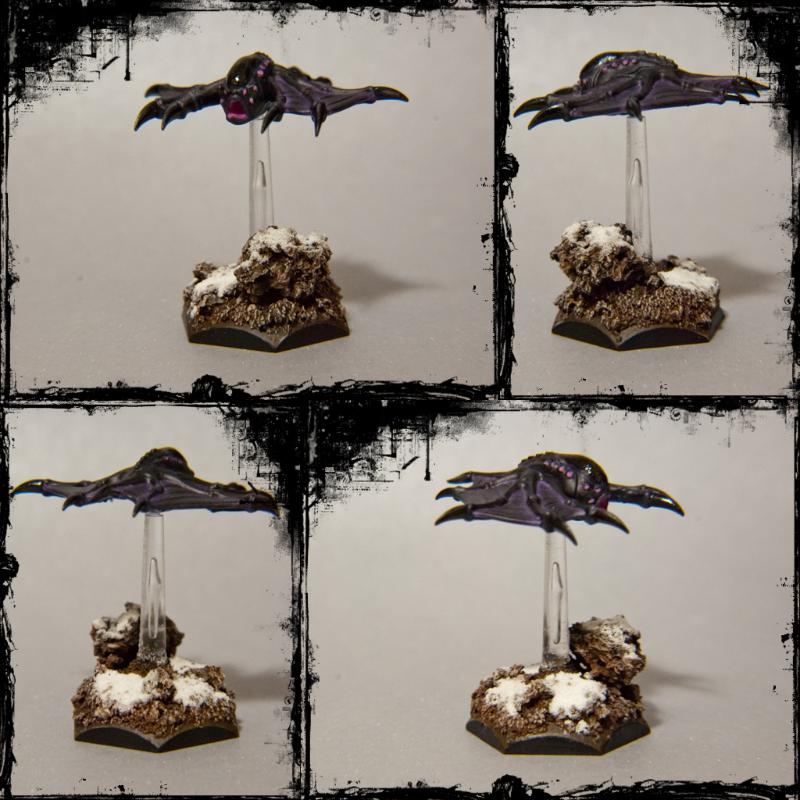
We've previously covered TP^DC Deputy Manager's excellent mature Angel, and this minnow complements it very well, with a similar basing scheme and colourscheme. The monochromatic base really helps draw the eye to the purple and pink in the minnow.
The Comm Guild's community spotlight focuses on sharing something from the Maelstrom's Edge community each week, if you have anything you'd like to get in to the queue, please get in touch with us via the Maelstrom's Edge website
Terrain Thursday: Electric Box Buildings
Posted on Thursday Oct 13, 2016 at 05:00pm in General

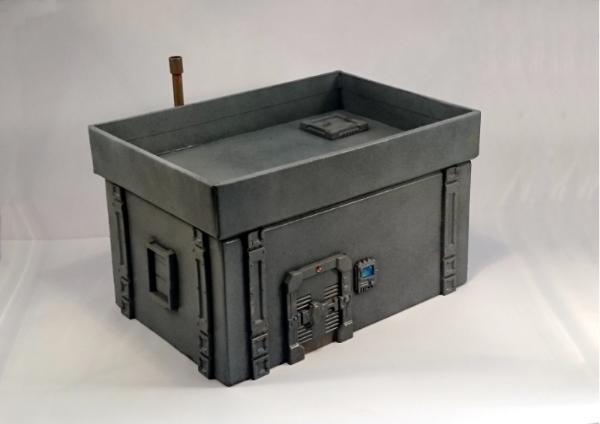
Dakka user and friend of Maelstrom's Edge, Panic, has been an amazing early adopter of the terrain kits. He came up with the great idea of taking an electrical box from a hardware store, slicing some holes into it, and adding Maelstrom's Edge terrain components. The above image shows the finished piece all nicely painted up.


Any basic box that has texture on it already serves as an excellent base for terrain sprue components. One word of warning with electrical boxes though - they are a total pain to cut, so patience is definitely needed!
Community Spotlight: Zambro's Desert Epirians
Posted on Wednesday Oct 12, 2016 at 05:00pm in The Epirian Foundation

What is it about Ochre that looks so good on models? This Epirian Hunter by Zambro at Dakka has a great finish and a nice use of contrasting colours that really make the model pop.
The Comm Guild's community spotlight focuses on sharing something from the Maelstrom's Edge community each week, if you have anything you'd like to get in to the queue, please get in touch with us via the Maelstrom's Edge website
Gift Box Building with the Maelstrom's Edge Terrain Sprue
Posted on Thursday Oct 06, 2016 at 05:00pm in Models
- by Iain Wilson
The Maelstrom's Edge terrain sprue is a fantastic resource for enhancing your games. Packed as it is with different bits and pieces for crafting buildings and scifi accessories, it serves as a handy base to combine with foamcore, cardboard, plastic containers, the cat*, foam packaging inserts, plumbing supplies, or anything else you can think of to create distinctive and personalised battlefield terrain.
*Don't glue things to the cat. Seriously.
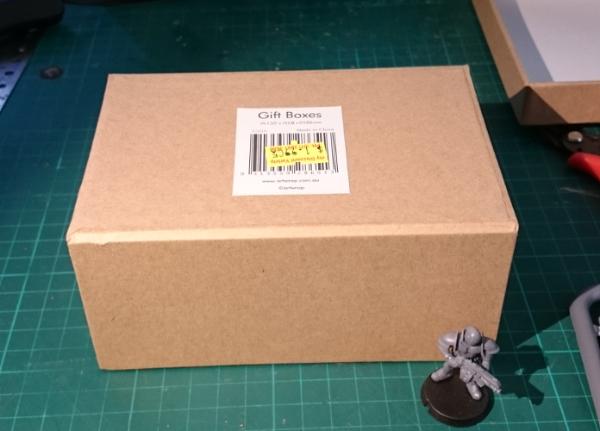
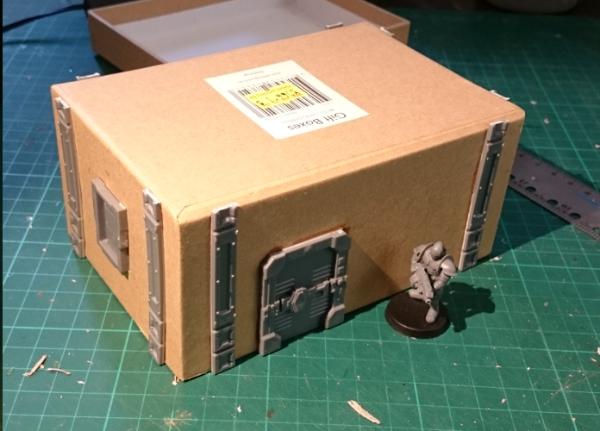
For now, I'd like to focus on one particular way to use the sprue, by crafting a basic building using a cardboard gift box.
These are fairly readily available all over the place, are generally made of a fairly sturdy cardboard, and are (best of all) cheap. You can also get them with all sorts of pretty patterns on them, but you'll probably want to paint them, so that’s less important, really.
Here’s a quick video showing the build process:
You will need: a giftbox, the terrain sprue, some glue (superglue for gluing the plastic parts on, PVA/wood glue for gluing the box lid on) clippers, a pencil, a sharp knife, and a ruler can be useful for marking out parts.
I want a building with a walled roof, as that gives some nice line of sight-blocking terrain while giving troops somewhere elevated to stand. So the box will be turned upside down, and the lid will eventually be glued on top, also upside down.
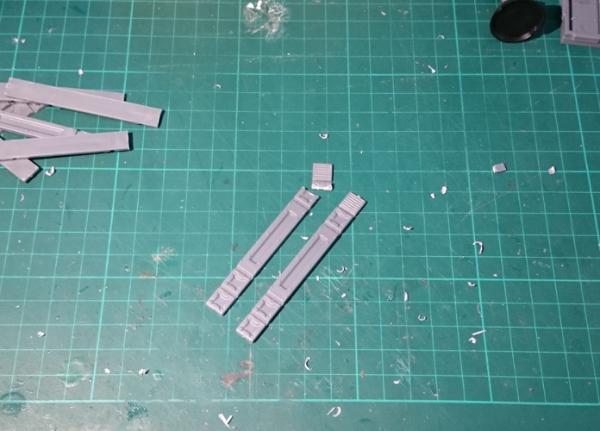
First step is to cut the parts you want to use off the sprue and clean up any mould lines.
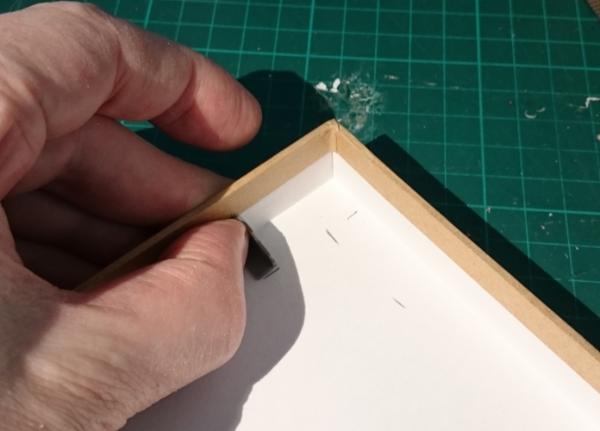
I'm using the long support pieces vertically on the walls of the building, so they need to be trimmed down to the height of the box. That's simply a case of taking the lid off, holding one of the supports against the box to mark where to cut it, and then cutting them all off at that point.
Put the leftover pieces aside - they'll come in handy for other projects.
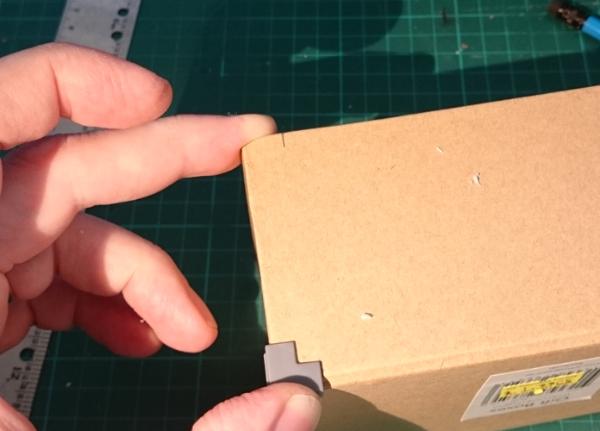
Next, measure out where the supports will go on the building. I tend to use them slightly in from the corners of my buildings, rather than as corner bracing - this looks neater, as they don't meet in a flush corner if you butt them up against each other right on the edge.
You can put them wherever you like, so long as it's consistently spaced around the building. Here, I've used a corner brace to mark out the spacing, by placing it up against the corner and marking against the side of it. Repeat top and bottom on both sides of each wall.
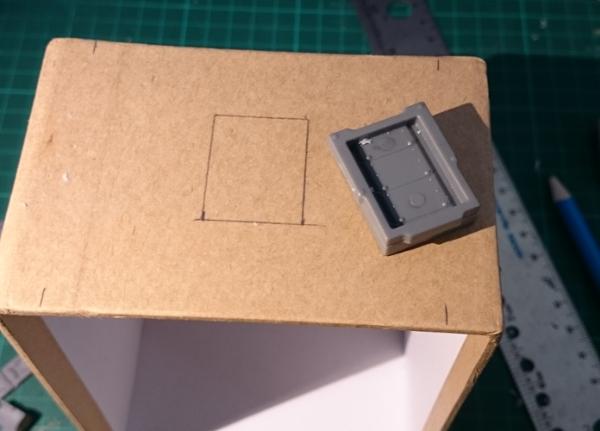
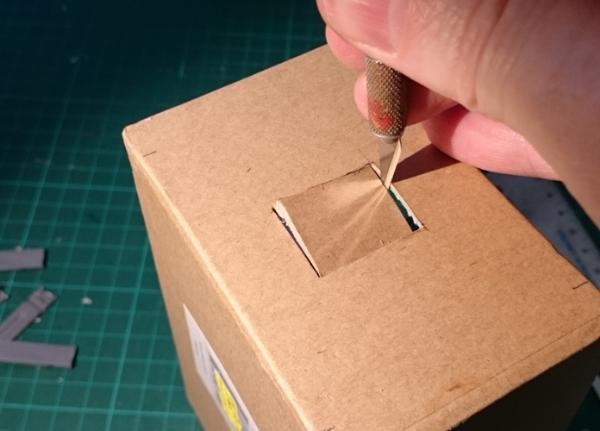
Next, work out where you want to put your door. Hold it in place against the building wall and draw around the back of the door frame with a pencil.
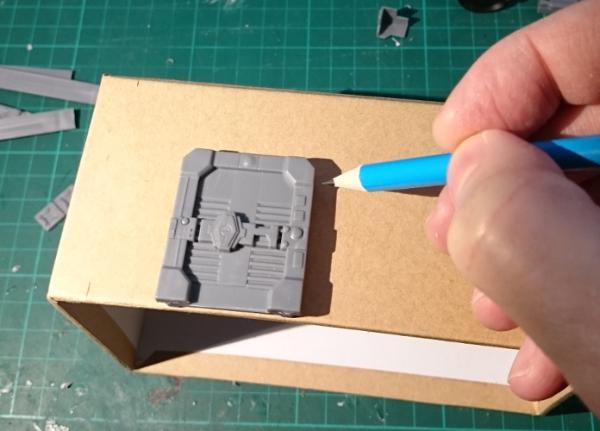
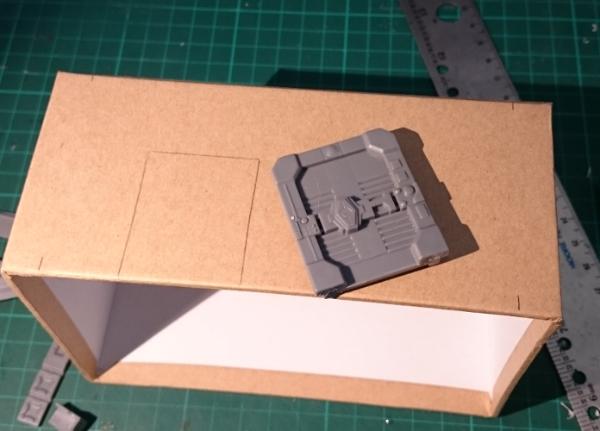
Do the same for the windows - I've gone for one on each end of the building.
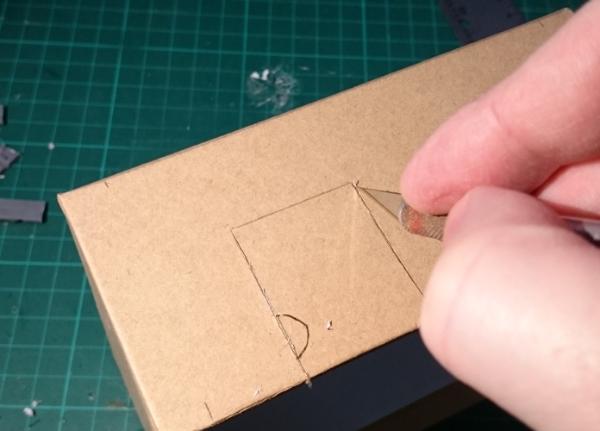
Then take your knife and carefully cut out the door and window holes. Note that the windows don't actually have to be inset into the walls - the box frame design means that they actually look pretty good just glued on the outside. So you can save yourself some cutting if you're in a hurry. I do prefer to inset them, though, as it looks a little more polished.
Once the holes are cut out, check that the parts fit in securely - trim up if necessary.
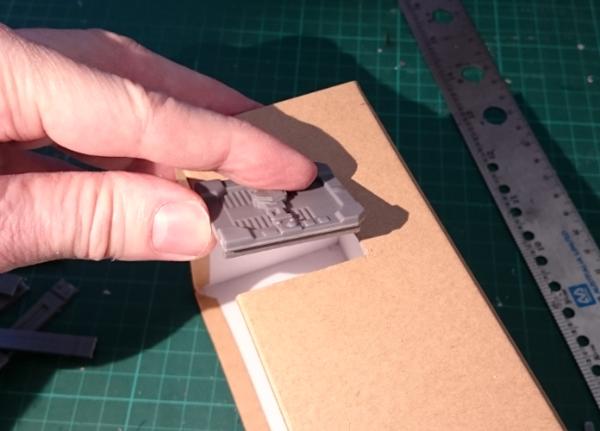
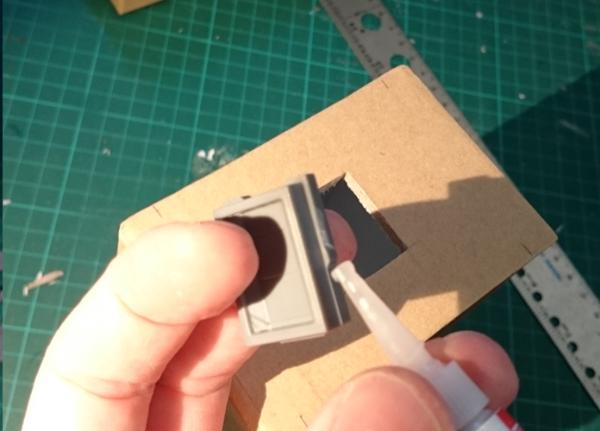
Then it's time to glue everything in place. Apply a small amount of glue around the door and window frames and push them into place. You can 'hide' the glue behind the protruding frame on the sides and bottom of the windows, so that you get less overflow onto the cardboard.
Run a line of glue down the back of the supports, and press them into place against your pencil marks on each wall.
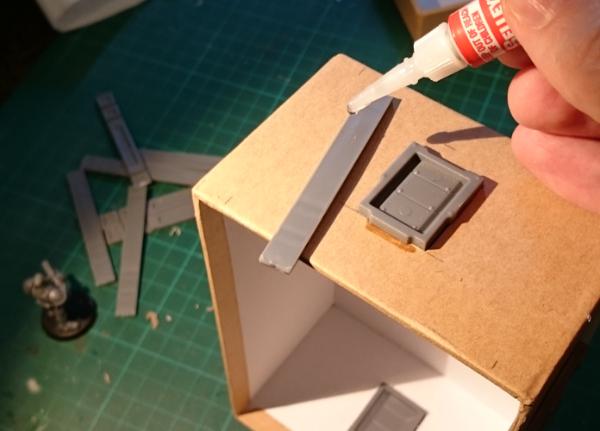
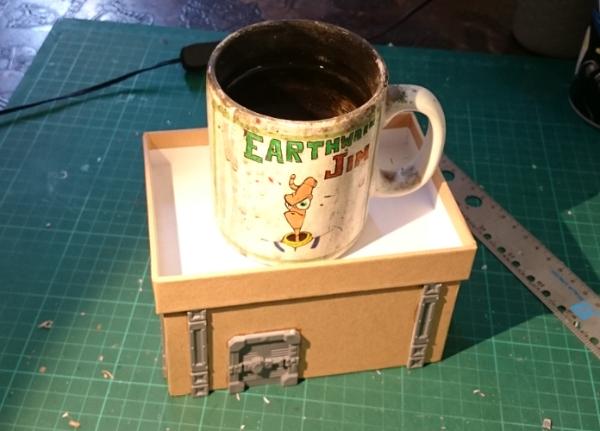
Next, grab your box lid, and on the inside mark out where you want the roof hatch to go. Once again I've used the corner brace to mark out an even distance from the sides of the box lid. Then glue the hatch in place.
Now we can glue the roof on. Spread some PVA glue liberally over the top side of the building, press the lid on upside down, and sit something heavy on top to hold it snugly in place while the glue sets.

You could use superglue for this if you don't have any PVA or if you're in a hurry, but the PVA glue gives a better bond if there are irregularities in the cardboard that stop the two pieces from meeting perfectly flush.
While the roof is setting, we can hack the sprue a little to add some extra detail to the back of the building. Cut a corner piece off the narrower side of the sprue, as below. This will become the pipe for a small chimney or air vent.
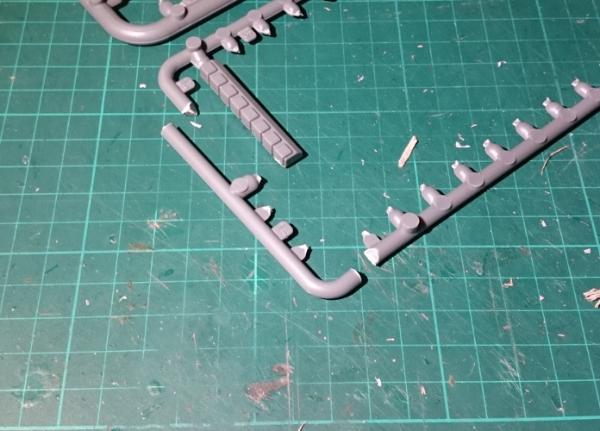
Clean off the extra tabs and the mould line, and grab the small pipe fitting off the sprue.
A handy feature of this part of the sprue is that it fits perfectly into a 1/4"(7mm) plasticard tube, which in turn fits snugly into the small pipe fitting. So cut yourself two short segments of tubing - one for each end of the 'pipe'. If you don't have any plasticard, you can also use a strip of thin cardboard (cereal packet or the like) wrapped around the sprue instead.
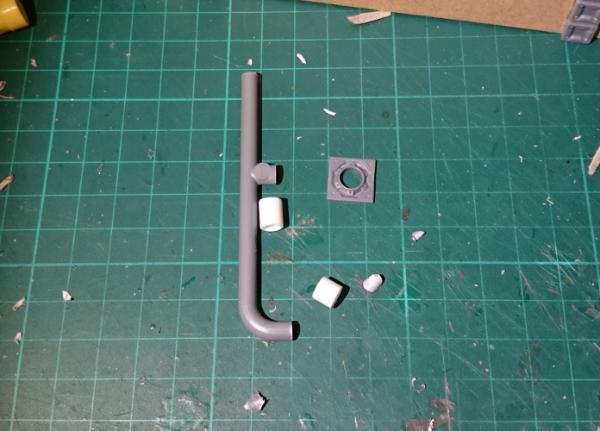
Glue the tubing (or cardboard strips) onto the 'pipe', glue the curved end into the pipe fitting, and check the fit against the back wall of the building. You can trim up the protruding sprue support as necessary to make sure the chimney sits vertically and the pipe fitting is flush against the wall. Then glue in place.
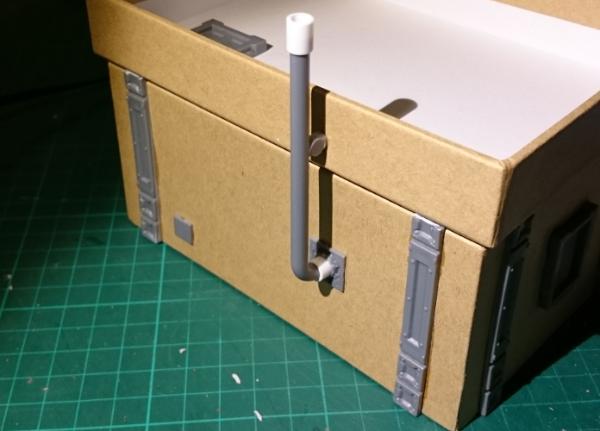
I have also added one of the small vent pieces that was trimmed off the wall supports right at the start, just for a little extra detail, and glued a comm panel onto the front wall beside the door.
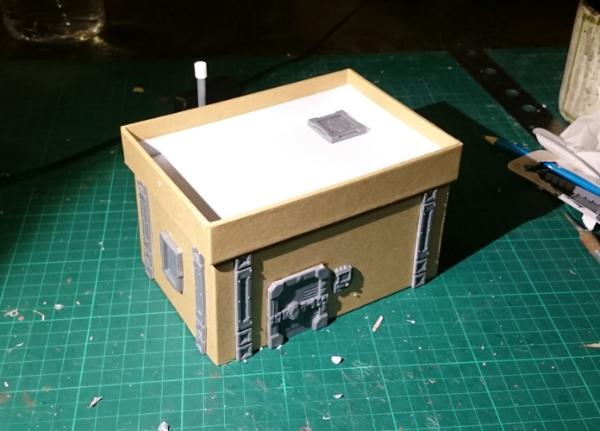
So the finished building looks something like this:
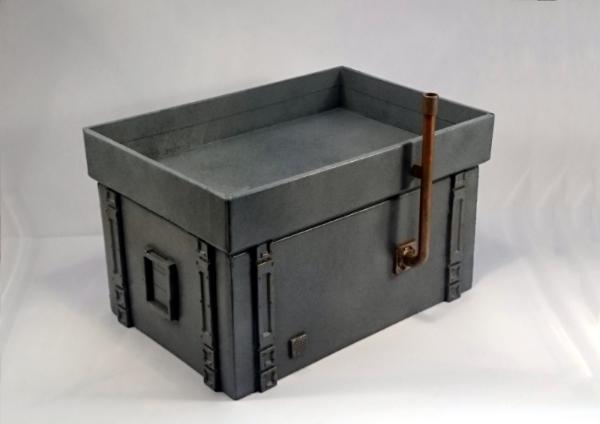
This can then be decorated however you like. I would recommend a good spray paint for the basecoat, particularly if the boxes you are using have a glossy finish. The building below was basecoated with black spray, and then given a spray coat of a medium grey, and a final highlight with a light grey spray from above, to leave the darker colour in the recesses and undercuts.
The 'chimney' pipe was painted in copper with a light drybrush of green to dirty it up, and some details like the comm panel screen and the light above the door picked out for a little extra colour. You could also add on building numbers, posters, warning signs, or anything else that you might find on a real building - we'll be covering some different ways to pretty up your battlefield terrain in a later article.
Pick up the terrain sprue from the Maelstrom's Edge online store here and give it a go! You can share your creations on the Comm Guild Facebook page here: https://www.facebook.com/groups/MaelstromsEdge
Community Spotlight: Epirian Objective
Posted on Wednesday Oct 05, 2016 at 05:00pm in The Epirian Foundation
The Maelstrom's Edge box set comes with two cardboard objectives for the Karist and Epirian forces. The above shows a lovely physical model based on the Epirian Objective by Sgt Oddball over at Dakka.
The Comm Guild's community spotlight focuses on sharing something from the Maelstrom's Edge community each week, if you have anything you'd like to get in to the queue, please get in touch with us via the Maelstrom's Edge website
Terrain Thursday: Strategic Outpost
Posted on Thursday Sept 29, 2016 at 05:00pm in Models
We have quite a few pieces of terrain in our studio collection now. One of our absolute favourites is the strategic outpost.
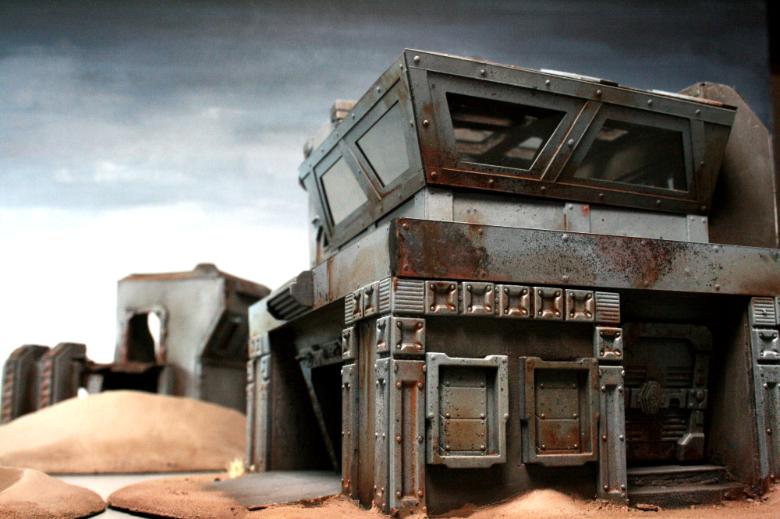
The upper floor's windows are transparent plastic, and not visible in the photos is a cool staircase leading to the upper floor.
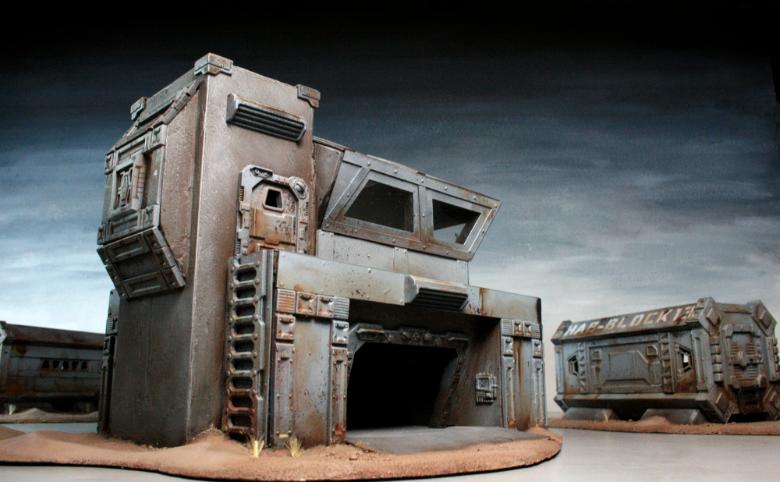
This building was primarily made out of foamcore, thin plasticard and normal card, and the Maelstrom's Edge terrain sprue.
Community Spotlight: Chris' Dig Site Objectives
Posted on Wednesday Sept 28, 2016 at 05:00pm in Models
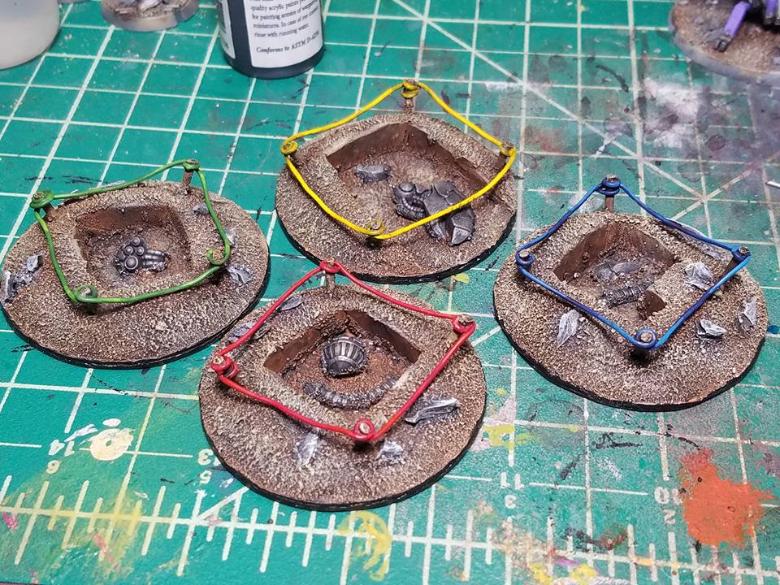
This morning on the Maelstrom's Edge: Comm Guild facebook community group, Christopher Wailes posted these fantastic dig site objectives. We wanted to share them widely, immediately as they are really good!
Tags: digsite modeling objectives painted
Spotlight: Karist Praetorians
Posted on Monday Sept 26, 2016 at 05:00pm in The Karist Enclave
- by Iain Wilson
The new Faction Expansion Sprue saw the addition of new units to the game for both the Karist and Epirian factions, with extra components to add to the original plastic kits. This seemed like a great chance to expore the versatility of these kits, by looking at different ways to build the new units.
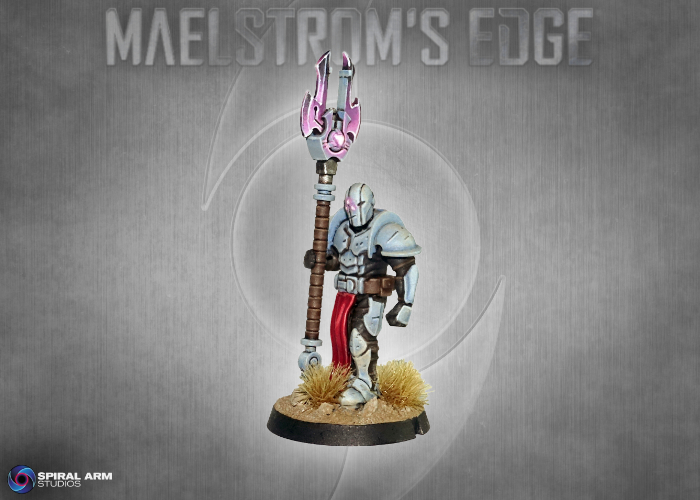
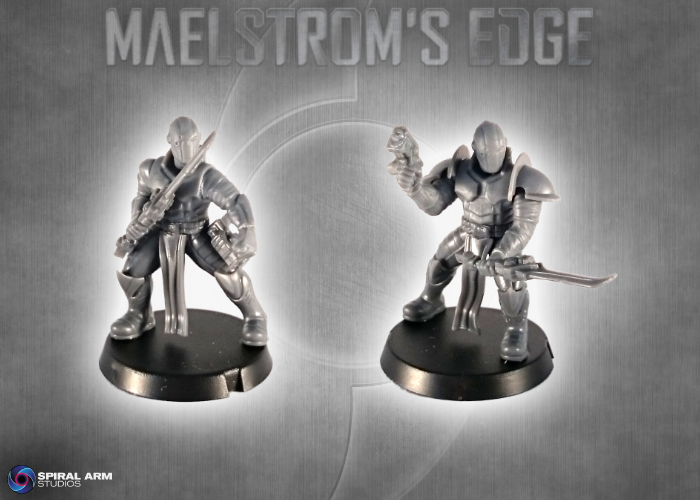
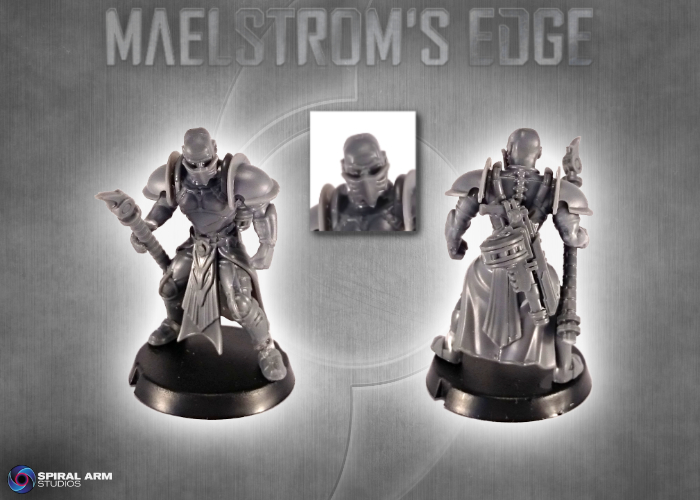
We've already had a look at the Epirian Suppression Team, so this time around I'm having a play with the Karist Praetorians. These veteran warriors are immediately recognisable with their massive Cybel Glaives, or the smaller but deadly Cybel Blade.
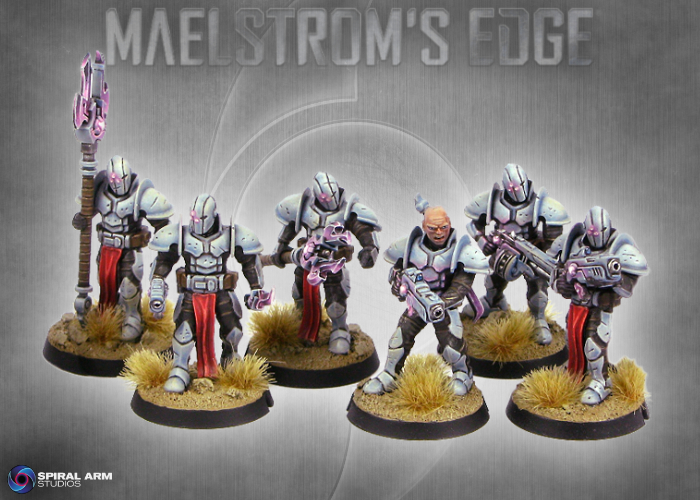
The sprue comes with an open hand for holding the Cybel Glaive in a single-handed grip. For the other arm, you can use the arm with clenched fist from the Karist trooper sprue, or the pointing arm from the Expansion sprue, as in the studio images above and below.
With a little cutting and gluing, though, you can use the rifle support hand from the Epirian Contractor sprue on one of the Karist left arms to create a two-handed grip like this:
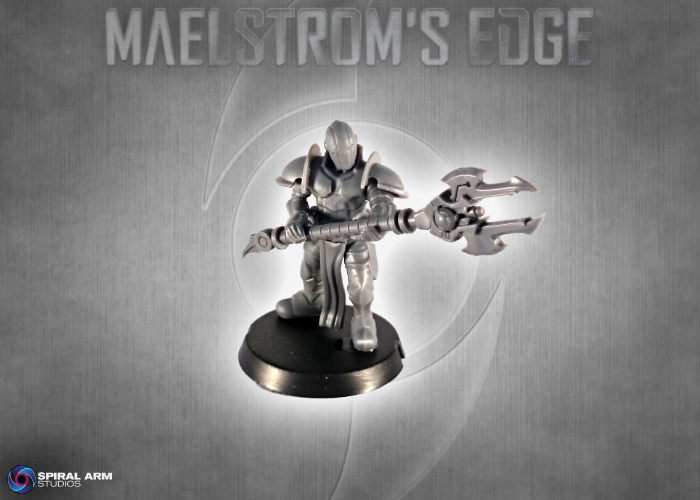
The left hand will look slightly different to the right, as the Karists have a flat plate on the backs of their gloves which the Epirian hand will lack, but painted up like the other glove it won't be particularly noticable.
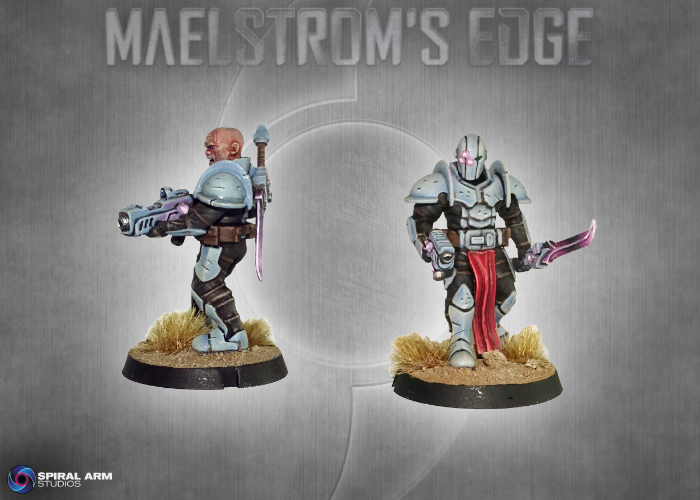
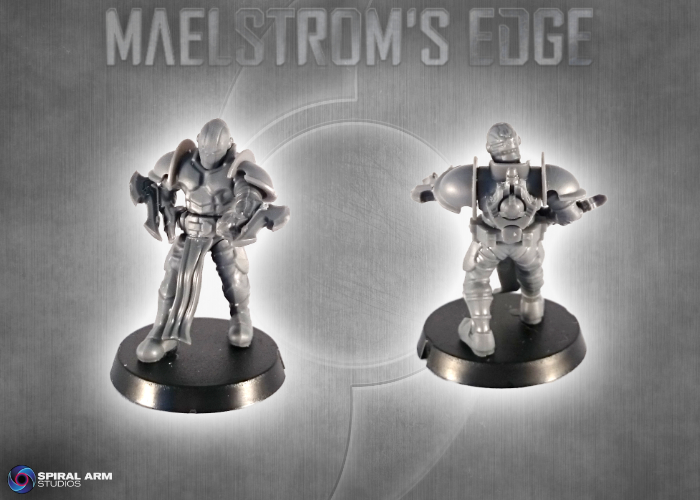
Both the Cybel Glaive and the Cyble Blade can be glued to the models' backs, to leave hands free for ranged weapons. For Cybel Blade-equipped models, you can instead use the clenched fists which can be found on the Karist Trooper sprue or the Expansion Sprue to hold the sword, by cutting the hand grip off the sword and gluing to the top of the fist, and gluing the bottom of the hand grip to the bottom of the fist. You need to trim off a little of the grip to correspond to the part that would be in the model's hand, otherwise you wind up with a very long handle. You may find it sits better if you sand or file down the top of the fist a little to make sure you have a flat surface to glue the sword onto.
You can achieve some slightly more dynamic posing and make your Praetorians stand out a little more from regular Troopers by using Shadow Walker legs, as below:
It's possible to equip a Praetorian with both a rifle (including a Ripper Grenade Launcher or Radwave Emitter) and a Cybel Blade. If you would like to avoid having to sling one of the weapons on the model's back, you can always combine them both into a single pole-arm:
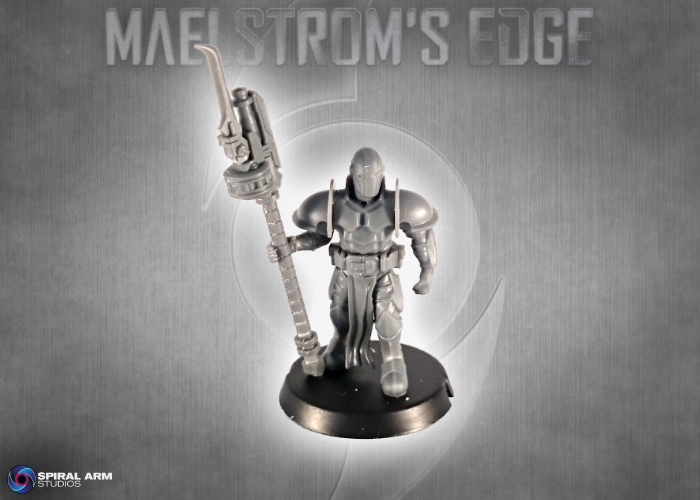
This was made by cutting away part of the fore-grip on the grenade launcher, trimming the handle off a Cybel Blade and gluing it in place. I then sliced off the back of the grenade launcher directly behind the drum magazine, and attached the shaft of a Cybel Glaive.
For an alternate take on the iconic Cybel Glaive, I tried going the other way and removing the shaft. The blades were attached to the model's forearms, and the power unit glued onto the model's back:
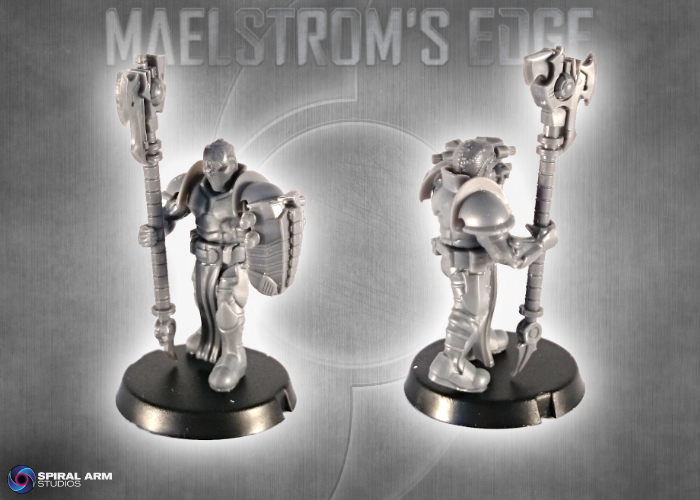
There are plenty of other possibilities for personalising your units from this sprue, or for creating new unit options for your own home-brew rules, like this model armed with a Cybel Halberd, made by flipping the Glaive's blade upside down, and Energy Shield taken from a Kaddar Nova's backpack:
...or this Angel Keeper, built from Kaddar Nova legs, a Shadow Walker torso, Karist Trooper arms and the shaft of a Cybel Glaive, with a mask made by trimming down a Kaddar Nova's crown.
(We'll be looking at Angel Keepers in a little more depth, and sharing a tutorial for building your own, in an upcoming article very soon...)
And finally, if overkill is your thing, here's a Kaddar Nova who clearly favours getting in close and personal with his enemies:

Why not have a try and see what you can come up with yourself? You can pick up the Faction Expansion Sprue in a handy 3-pack in the Maelstrom's Edge Online Store here.
You'll also need the Karist Trooper Sprue (here) for the standard Praetorian builds, or the Shadow Walker (here) or Kaddar Nova (here) sprues for the more adventurous conversions.
Feel free to share your creations on the Comm Guild Facebook page (https://www.facebook.com/groups/MaelstromsEdge) - We would love to see what you do with your Praetorian units!
Terrain: A couple of nice hab units
Posted on Thursday Sept 22, 2016 at 05:00pm in General
Today we share some nice buildings made by Alex and his son over at Lead Balloony


These nice, simple buildings make great use of the computer terminals and small doors, along with some additional decorative elements on the other faces of the buildings. All affixed to some olive pots of all things!

Spotlight: Epirian Suppression Team
Posted on Monday Sept 19, 2016 at 05:00pm in Models
- by Iain Wilson
The new Faction Expansion Sprue saw the addition of new units to the game for both the Karist and Epirian factions, with additional components to add to the original plastic kits. This seemed like a great opportunity to expore the versatility of these kits, by looking at different ways to build the new units.
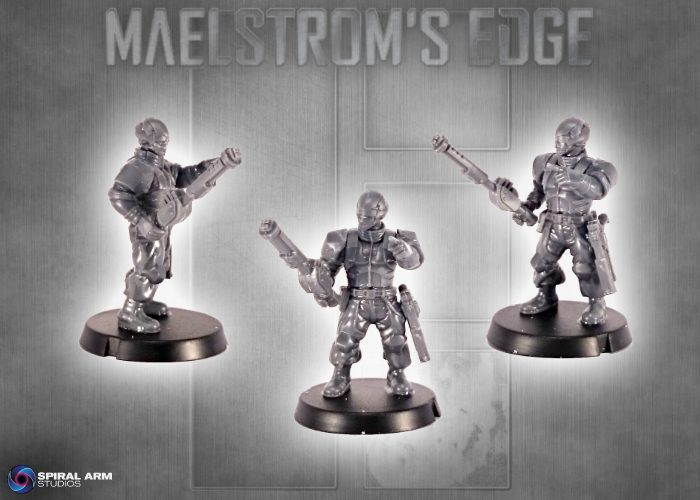
So to kick things off, we'll be looking at the Epirian Suppression Team. These doughty warriors take the field armed with the standard Epirian Maglock weapons, but also have the option to replace either pistol or rifle with a Shock Baton or Shock Maul.
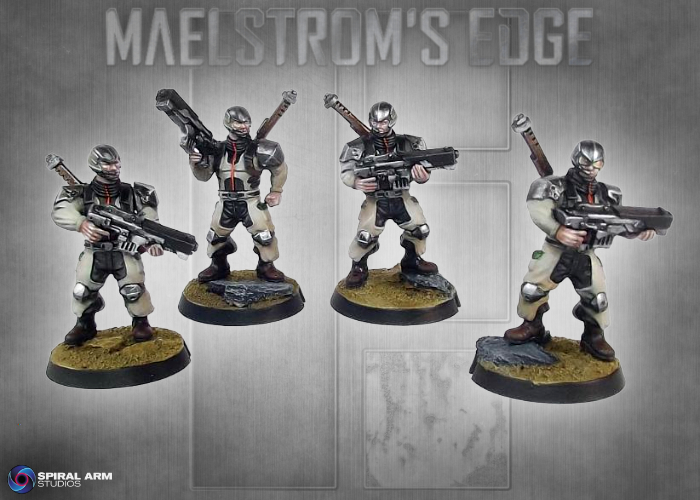
The studio models shown above were assembled with the Shock weapons slung on the models' backs, which is the easiest and quickest way to assemble them, particularly if you want to arm them with their rifles. This is simply a matter of gluing the Baton or Maul straight to the Contractors' back plates. We would assume that they're held there with a magnetic latch system, or some similar thing.
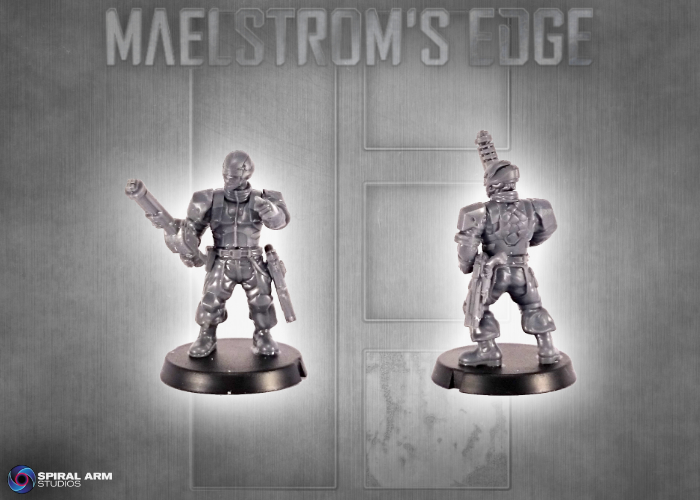
An easy alternative is to use one of the Contractor rifle arms to hold the Shock weapon. Several of the rifle arms have the trigger finger fairly close to the other fingers, and so they don't look too out of place holding the Shock weapon handle. You can also gently bend the trigger finger in to reduce the gap even further (The Shock Baton does have a chunkier grip than the Maul, so if you're having trouble getting it to fit, you can shave down the sides of the grip a little).
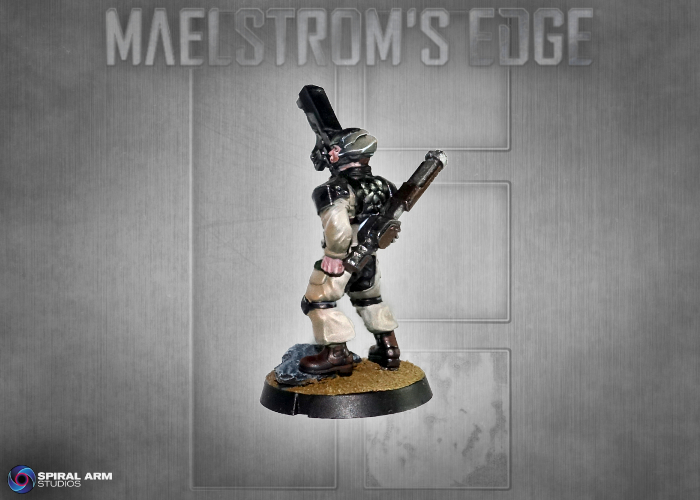
You can slice the arms at the wrist and/or just under the rolled sleeves on the upper arm and reposition to give some more interesting poses. On the Maul-equipped model below, the right arm has been swivelled just under the rolled sleeve to move the hand outwards from the body, and on the other model one of the rifle support arms has been used with the hand rolled at the wrist to give him an 'at-rest' pose with the baton resting on the ground.

You can also use the open Karist hand on the Expansion sprue to replace one of the rifle hands. On the model below, I've used that hand for the Shock Baton, and swapped the pointing hand off the Karist arm on the sprue onto one of the Epirian rifle arms. The end result is a model wearing Karist gloves, but with the Epirian arms they still look quite distinct from the Karist models.
The team members' ranged weapons can be dealt with several different ways. For models equipped with pistols, you can use the pistols and weapon arms from the Contractor sprue, of course. However, if you've used the right arm for the Shock weapon, an easy alternative is to glue the pistol onto the model's belt, or to use the legs from the Bot Handler sprue and hang the pistol off the strapped pouch on the thigh. For either of these, it's a good idea to cut off the revolver drum on the side of the pistol that will attach to the model, to allow it to sit more flush against the leg.
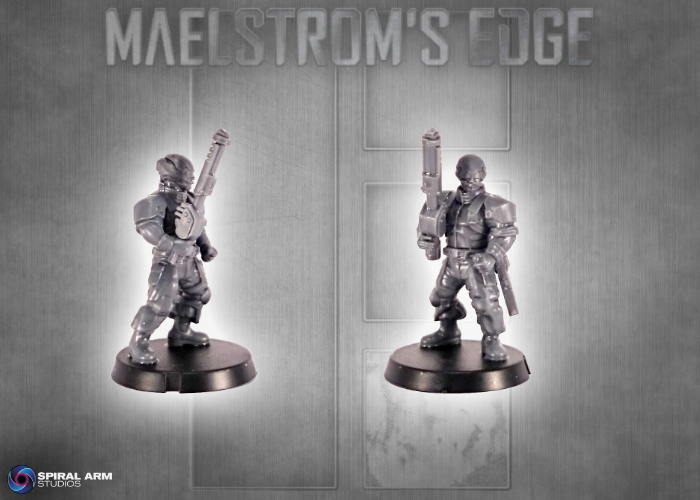
For rifle-equipped models, you can reverse the idea from the studio models, and mag-lock the rifle to the model's back. Or you can use the rifle support arms to balance the rifle against the model's hip, as below.
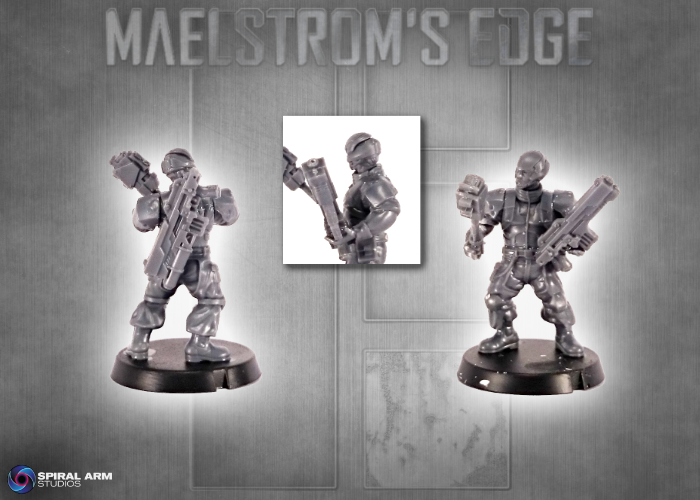
With the rifle safely stowed on the model's back, you can use the rifle arms to create a two-handed grip on the Shock weapons, as below. Depending on the specific arm pairing you go for, a little wrist-repositioning can be necessary to get these sitting just right.
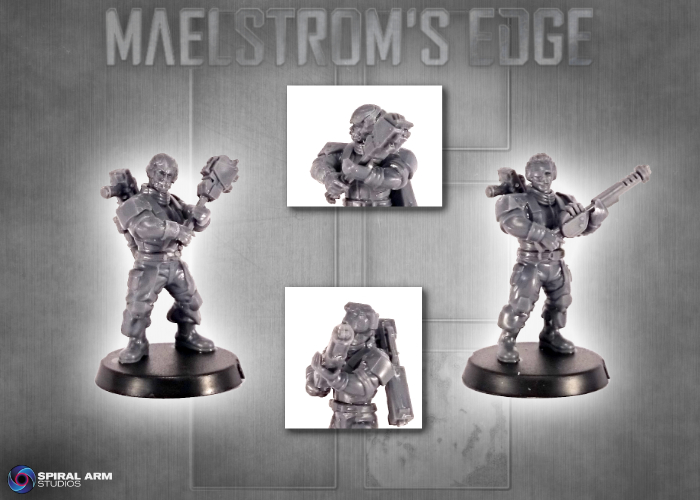
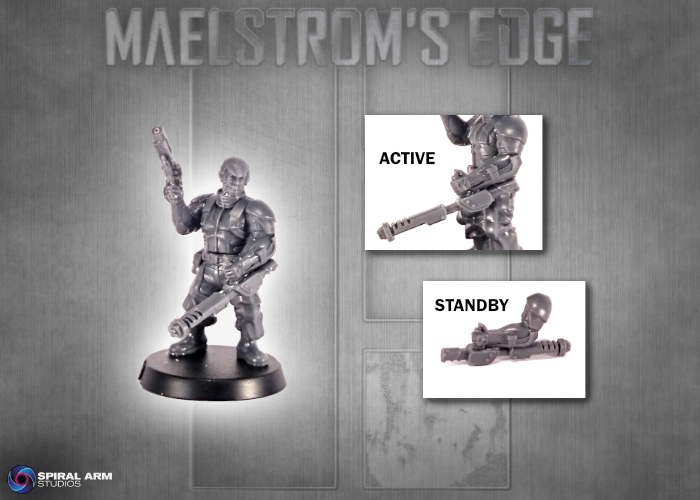
For a slightly more out-of-the-box alternative, the below model was assembled using the arms from the Bot Handler sprue, instead of Contractor arms. For the Shock Baton, I cut off the Handler's underslung grenade launcher, chopped the heatsink part off the back of the Baton, and glued it in place running along the forearm. This can be positioned pointing forwards for an 'Active' pose, or reversed for a 'Standby' or 'At-Rest' pose.
You can pick up the Faction Expansion Sprue in the Maelstrom's Edge Online Store here.
You'll also need the Epirian Contractor Sprue (here) or for the arm-mounted conversion, the Bot Handler Sprue (here)
As you can see, there are a lot of possibilities with these models, thanks to the ease of assembly and conversion with the plastic models. I've only just scratched the surface with the builds shown here. Feel free to share what you come up with on the Comm Guild Facebook page (https://www.facebook.com/groups/MaelstromsEdge) - it's always great to see how others put their own spin on the model range!
Next up, I'll be taking a look at the Cybel Glaive-equipped Karist Praetorians. Stay tuned!
Tags: epirian modeling suppressionteam