Entries tagged [epirian]
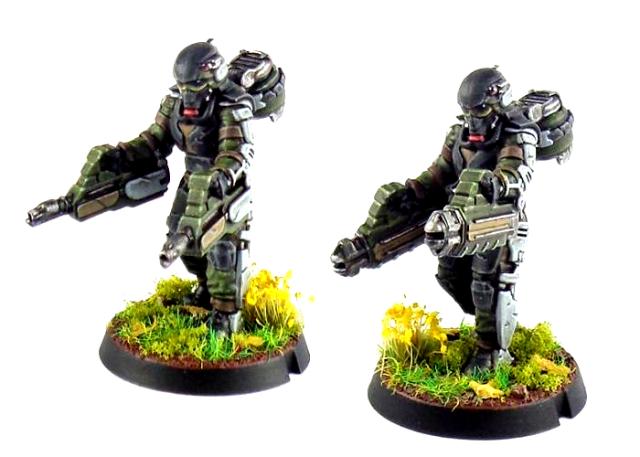
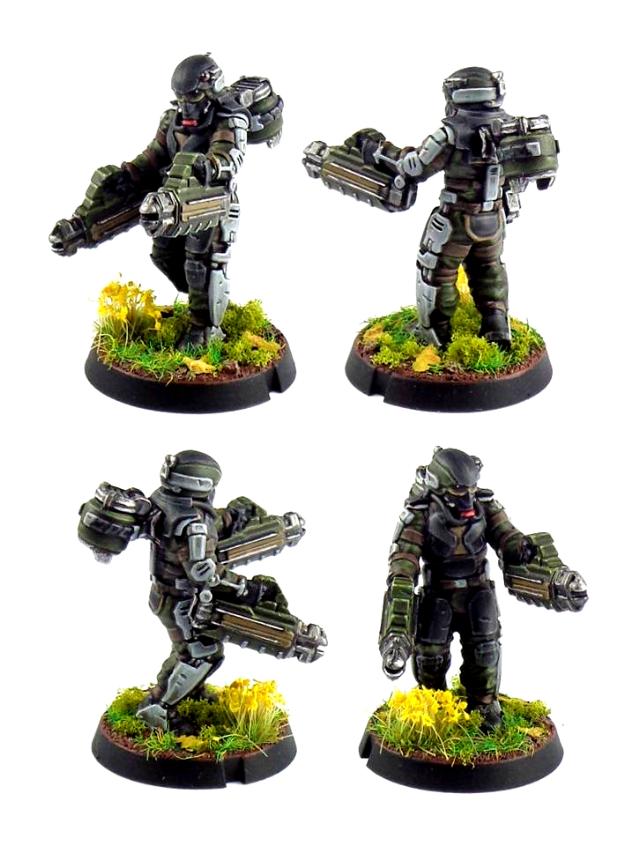
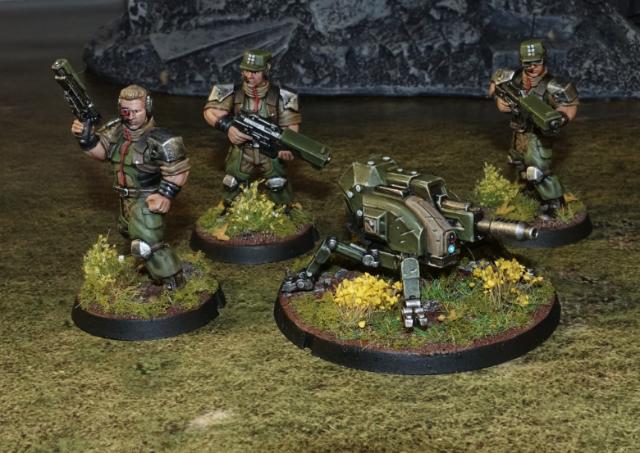
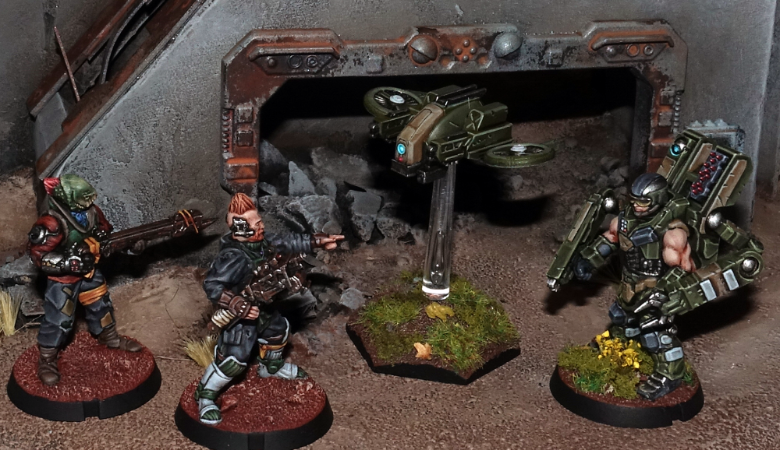
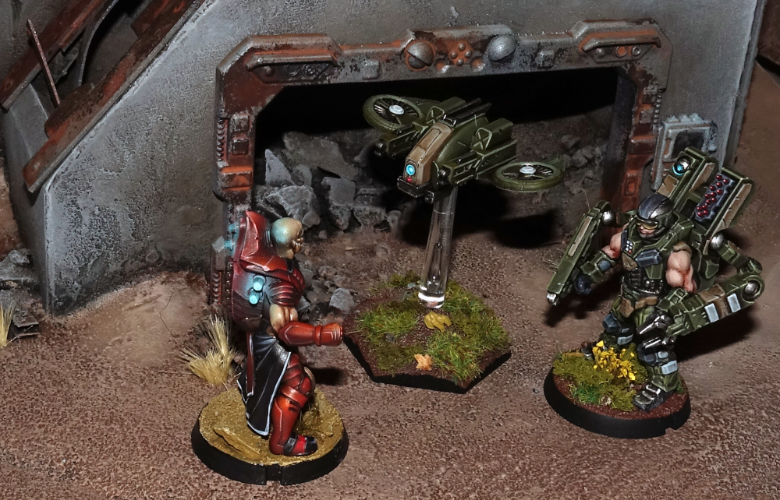
New resin release: Epirian SecDef Boostpack Specialists!
Posted on Wednesday Mar 06, 2019 at 05:00pm in The Epirian Foundation
This week sees the addition of some heavier firepower to SecDef Rapid Intervention Teams, with the release of SecDef Boostpack Specialists!
-Click here for the full rules card-
Modeling Spotlight: Kitbashed Epirian Contractor Truck
Posted on Monday Feb 18, 2019 at 05:00pm in Tutorials
- by Iain Wilson
Running around is all well and good, but sometimes it's preferable to travel in style. So with that in mind this week I decided to add some extra mobility to my Epirian force in the form of a contractor truck, built from a somewhat neatened-up Games Workshop Ork Squigbuggy.
The basic truck chassis was perfect for the look that I wanted, with the main challenge being to remove anything overtly 'orky'. The ramshackle look is great, but not really in keeping with the Epirian aesthetic. And obviously, the ork crew themselves had to go. The only problem there was that the driver's feet are moulded to the pedals. So job number one was to remove those feet with a chisel-blade hobby knife.
Removing the metal 'teeth' on the front grill was more problematic, so I replaced the grill piece entirely with a new one cut from textured plasticard.
Likewise, there was just too much detail on the rear tray to be easily removed, so I built a new tray out of layered 1mm plasticard, with a centre detail piece cut from plastic mesh.
I considered trimming up the doors, but was on a roll with the plasticard by this point, so quickly knocked up two new door panels and added some Epirian badges using tile-texture plasticard.
The extra plating on the sides of the front cowling was considerably easier. I cut away anything that didn't belong, and gave the trimmed surfaces a light sand to make sure they were smooth.
Humans being somewhat smaller than orks, the driver needed a seat added to fit in properly, so I assembled one out of 1mm plasticard and some more of the tile. For the driver himself, I used an Epirian contractor with the legs cut and repositioned.
The proportions had worked out all wrong to use the original pedals, so the driver's feet both wound up resting on the middle pedal. I added some pieces of plasticard over the other two to cover up the holes left from cutting off the original driver's feet.
I've been making it a feature of my Epirian conversions to include a drone head, and the intake on the hood seemed like an obvious spot to put one, with a little trimming to make it sit as flush as possible.
Rather than trying to wedge a second seat into the asymmetrical cabin, I decided to make it a single-seater and add a drone-controlled weapon in the (ahem) shotgun spot. I built this using a few pieces pilfered from the Master Bot Handler and Scarecrow kits, with a base from a Spider Drone leg piece with the actual legs removed.
To give the weapon a clear fire arc, I cut apart the roll cage and shortened the crossbar so that it would only extend over the driver's seat.
At this point, it was time to putty up any gaps, notably around the base of the drone and the driver's repositioned legs. The roll cage was left unglued for now, and there would be a little more putty filling required once I was ready to put it in place, but this couldn't happen until after I had painted the driver and cabin. (In hindsight, I also should have left the driver separate, as it proved rather difficult to paint him in place!)
The final step was to add some arms for the driver - I needed some outstretched arms, so wound up using Master Handler arms with Contractor shoulder pads added, and the hands replaced with open contractor hands to grip the steering wheel. And with that, the truck was all set for painting.
Painting used the same scheme as I have used on my previous green Epirians - Vallejo Yellow Green washed with Army Painter Green Tone, although in this case I spent a little more time layering the ink to create neater shading and highlights.
I added damage to the paintwork by sponging with Vallejo Heavy Charcoal and then highlighting the lower edges of the paint chips with yellow green.
The metal parts were painted with Vallejo Basalt Grey, washed with a coat of Secret Weapon Soft Body Black, and then drybrushed with Vallejo Light Grey. I followed this up with a final wash of Army Painter Dark Tone.
The next step will be to work up a rules card for this thing, probably with some homebrew rules for transporting units to make use of that trayback!
What have you done to personalise your forces? As always feel free to pop along and share your work, or ask any Maelstrom's Edge- or hobby-related questions on the Comm Guild Facebook page!
You can pick them up the Epirian models used here, along with the rest of the Maelstrom's Edge model range from the webstore here.
For other Maelstrom's Edge modeling articles, including tutorials and walkthroughs of a wide range of different building and miniature projects, check out the Hobby section of the Maelstrom's Edge website here.
Tags: contractor conversion epirian modeling spotlight walkthrough
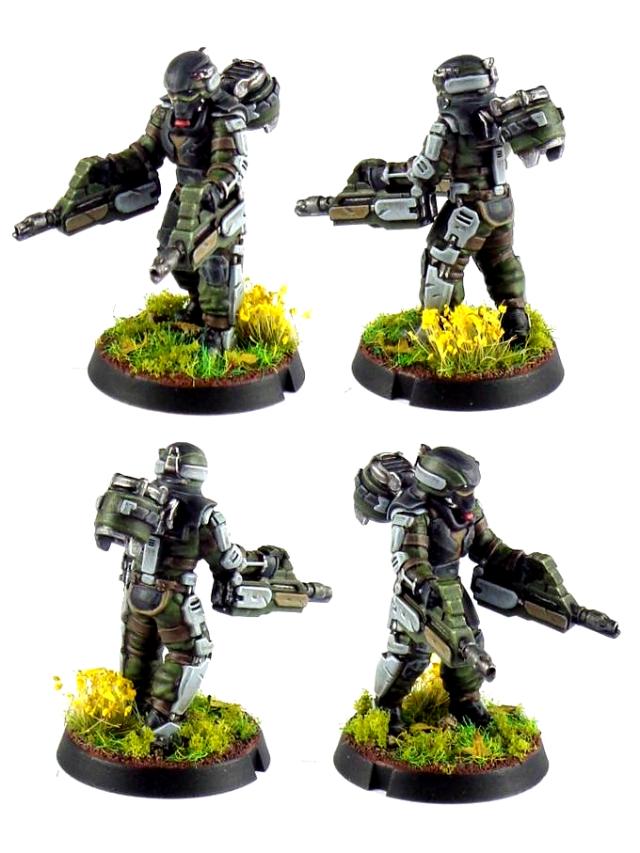
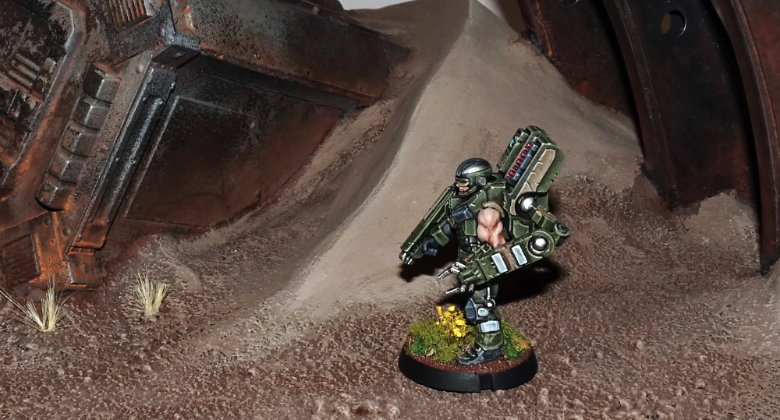
Modeling Spotlight: Epirian Boostpack Infantry
Posted on Monday Jan 14, 2019 at 05:00pm in Models
- by Iain Wilson
Following on from my improbably-mobile Pa'ku conversion, I'm continuing the jetpack theme this week with a bit of a closer look at the Epirian SecDef Boostpack Infantry models released last month.
Released in a pack of three models, Boostpack Infantry take to the table as a SecDef Rapid Intervention Team, where their boostpacks and twin carbines allow them to get in close to the enemy and lay down a withering hail of fire.
The high quality resin kit comes with the body and head as a single piece, with separate weapon arms, boostpacks and grenades. The unit's rules card also gives them access to a couple of special weapon options - these will be coming in a separate release very soon!
Assembly is really straightforward - the boostpack goes on the back, with a handy locator pin slotting into the model's backplate, and the arms go where you would expect, and are fully interchangeable between the three models.
There is no specific mounting point for the clingfire grenades - you can glue them to the belt, chestplate, thighs, or wherever else seems appropriate.
While the armour is the same as the regular plastic SecDef models (aside from the head!), the shoulders are slightly different to allow for the boostpack mounting plate extending up over them. You can sub in arms from the plastic sprue though by removing the small shoulder pad piece shown below in red.
With a little more work, you can create gasmask-equipped SecDef Tactical Teams, by using the plastic arms and filling in the boostpack mounting point with a little green stuff putty.
For a little more leg variety, you can use a sharp hobby knife or razor saw to cut through the bodies just below the belt. This allows you to glue on legs from the plastic SecDef to mix up your boostpack models, or use the resin legs on your regular SecDef teams to add some running models.
SecDef Sergeants have, from time to time, been known to requisition the best gear for themselves. This sergeant has given himself a bit of a boost with a twin-turbine boostpack, made by trimming off the locator pin on the pack and gluing two boostpacks side by side to the model's back.
Finally, why should SecDef have all of the fun? While boostpacks are notoriously unreliable and difficult to keep operational, it seems likely that some Broken chieftains or techs with the right technical knowledge would be unable to resist the lure of the extra speed afforded by a scavenged unit!
To add a Rapid Intervention Team to your Epirian force, you can pick them up along with the rest of the Maelstrom's Edge model range from the webstore here.
As always, feel free to pop along and share your work, or ask any Maelstrom's Edge- or hobby-related questions on the Comm Guild Facebook page!
For other Maelstrom's Edge modeling articles, including tutorials and walkthroughs of a wide range of different building and miniature projects, check out the article roundup here.
Tags: conversion epirian modeling secdef spotlight
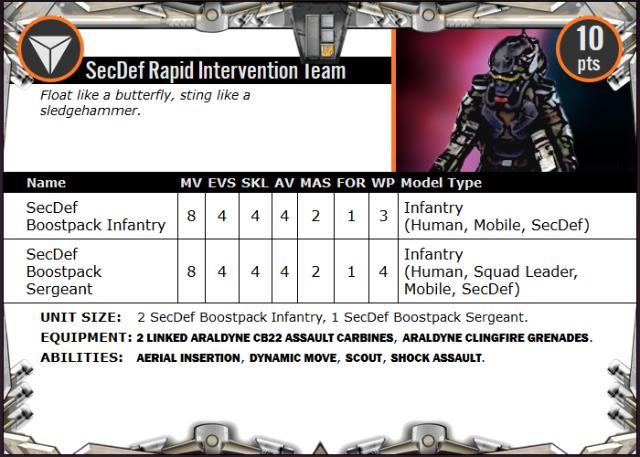
New resin Epirian unit: SecDef Rapid Intervention Team
Posted on Thursday Dec 13, 2018 at 06:00pm in The Epirian Foundation
This week sees the release of some new, fast-moving reinforcements for the Epirian SecDef - the Rapid Intervention Team!
-Click here for the full rules card-
Modeling Spotlight: Epirian Contractor Drones
Posted on Monday Dec 10, 2018 at 06:00pm in Models
- by Iain Wilson
The addition of the Contractor Drone to Epirian Contractor units gave them some new tactical options, with heavy weapon options for the re-titled Contractor Defender units, and supply drone options for the new Contractor Scout unit. This week I'm looking at some modeling options for the multi-part, resin Contractor Drone model.
Building one of four different options, the Contractor Drone kit comes with three different weapon options - a maglock chaingun, twin cluster missile pods and twin flakk guns. It also includes the Resupply Package for the Contractor Scout unit.
While sharing a superficially similar configuration, the Contractor Drone is a distinctly different model from the Spider Drone, with a chassis that is bulkier and taller. It also has weapon mounts situated beside its off-centre sensor unit as opposed to the Spider's side-mounted set-up.
The drone's legs all fit into any of the four shoulder sockets, with a barrel pivot allowing them to be positioned through a wide range of movement.
The equipment options slot in with a large locator tab. If you want to keep your options open, you can use a small piece of blu tac or similar re-usable adhesive to temporarily fix them in place and swap them out as you want.
Since I have problems assembling things the way they're supposed to be, I couldn't resist taking a knife to the kit to see what I could do with it. For a taller profile, I repositioned the feet on the below drone by soaking the legs in hot water and then bending them. I also cut through the legs right beside the shoulder assembly and glued them back on at a shallower angle.
One of the weapon options - Strike Missile Pods - didn't make it into the kit for the initial release. There are a couple of fairly easy ways to get around this problem if you want Strike Missile-equipped drones. For this one, I took a pair of Strike Missile pods from the Hunter Warmech kit, trimmed them up a little to fit onto the Contractor Drone front and glued them together.
If you don't have a Hunter kit to hand, you can also take the Cluster Missile pods, trim the missiles flush with the front of the pods, glue a 1.5mm hole into the front of each pod and glue in two pieces of 1.5mm plastic rod trimmed to points.
For a closed version of the Resupply drone, I cut through the supply cache directly behind the front panel using a razor saw, and then glued the panel directly to the front of the drone.
Legs are all well and good, but sometimes a more stable platform is called for. On the below drone, I replaced the legs with a skirt made from sections cut from a lintel piece found on the Maelstrom's Edge terrain sprue. Under that, I added some tracks purloined from an old Mechwarrior tank model.
The Contractor Drone chassis also makes a nice, solid foundation for a remote turret assembly, to be installed on fortification walls or vehicle hulls. In place of the legs, I added a mounting column cut from a length of plastic tube, and inserted that into the small pipe fitting from the Maelstrom's Edge terrain sprue.
You can pick up the Contractor Drone along with the rest of the Maelstrom's Edge model range from the webstore here.
As always, feel free to pop along and share your work, or ask any Maelstrom's Edge- or hobby-related questions on the Comm Guild Facebook page!
For other Maelstrom's Edge modeling articles, including tutorials and walkthroughs of a wide range of different building and miniature projects, check out the article roundup here.
Background Fiction - The Prowler APV
Posted on Wednesday Oct 17, 2018 at 06:00pm in Fiction
Prowler APV
Prowler is the group term used to refer to the armoured personnel vehicles used by Epirian Contractors and security forces. Six or eight wheeled, the prowler is sturdy enough to clamber over rough terrain or suffer small arms fire, and its sealed compartments are large enough to house five to ten men. Prowlers are utilised for different functions, with some having an empty rear for transport of goods or men, whilst others have banks of computer interfaces to control drones or even act as a mobile command vehicle in battle. Prowlers are fitted with a drone rack allowing for rapid launch of airborne drones, and military vehicles sport a roof-mounted turret with a surface to air rocket battery or machine gun.
Tags: background epirian fiction
Modeling Spotlight: Epirian SecDef Heavy Weapons Team conversion & rules!
Posted on Monday Sept 17, 2018 at 06:00pm in Tutorials
- by Iain Wilson
The addition of the SecDef to the Epirian lineup adds a much more 'military' feel to the faction, and I've been having a lot of fun exploring that with the models. I previously added my own homebrew SecDef Lieutenant and Scout Walker unit cards to the force builder (and if you missed the article, you can see how they were built here), and this week, I'm fleshing them out a little more with the addition of a dedicated heavy weapons team, based on the Master Bot Handler exo-suit.
My idea was for a slower-moving, but more heavily-armed team variant, for those situations that call for a little more firepower. With that goal in mind, I grabbed some parts from the SecDef and Master Handler sprues, and went to work!
From the Master Handler sprue, I took a torso and backpack, the weapon support arms and two weapons (I used the flakk guns, but it doesn't really matter which you use as you only want the mounting ring on the back of them). From the SecDef sprue, I took a head, two arms, two legs and a pair of machine guns.
I didn't want these guys to be quite as heavily armed as the Master Handler, so the first step was to remove the missile racks from the top of the backpack. I sliced them off using a razor saw, and cleaned up with a hobby knife to get rid of any rough cut marks.
As the SecDef arms have small shoulder pads on them, I removed the ridges that sit directly over the Master Handler's shoulders on each side of the torso. Otherwise, the arms would wind up sitting too low.
For the weapons, I cut the mounting ring from the back of the Master Handler's guns, and the grip and trigger assembly from the top of the SecDef gun, and then glued the mounting ring to the back of the machine gun's butt.
From there, the body was assembled pretty much as you would expect...
And finally, the weapons were glued onto the outside of the forearms - I didn't bother adding any specific mounting for them, as I figure they would magnetically lock to the SecDef exoskeleton's wristbands. Then I glued the support arms in place, and the model was ready for painting!
The same process works with the chainguns on the SecDef sprue, although in that case I also removed the weapon butt before attaching the mounting rings, to avoid the weapon looking too long against the model's arms.
For the team sergeant, I used a pointing arm, and for something different I put the gun for that arm in a 'standby' position. When he needs it, the support arm would drop it down and it would maglock to his wrist, ready for action.
Of course, pretty models are only half of the story! I have also generated an unofficial rules card for the heavy weapons team, which you can find in the Force Builder section of the Maelstrom's Edge website here.
To build your own heavy weapons team, you can pick up the Master Handler and SecDef sprues along with the rest of the Maelstrom's Edge model range from the webstore here.
As always, feel free to pop along and share your work, or ask any Maelstrom's Edge- or hobby-related questions on the Comm Guild Facebook page!
For other Maelstrom's Edge modeling articles, including tutorials and walkthroughs of a wide range of different building and miniature projects, check out the article roundup here.
New Epirian Resin Release: Contractor Drones!
Posted on Sunday Sept 02, 2018 at 11:19am in The Epirian Foundation
A reinforcement for the Epirian Foundation crawls into the online store this month, with the release of the Epirian Contractor Drone. Providing a more stable and reliable platform than human troops, Contractor Drones are used in Epirian forces to add heavy firepower or specialised tactical options to Contractor units.
The Contractor Drone changes the way Contractor units are structured. Instead of having a single Contractor Unit, we're introducing 4 different types of Contractor squads which are differentiated by the type of drone that accompanies them. This current Drone has parts to use it with the new Contractor Defender unit and Contractor Scout unit, with more drone variants and associated Contractor unit types to follow later on.
This resin kit is comprised of a Contractor Drone chassis, and optional parts to equip it with a Maglock Chaingun, linked Cluster Missile Pods or linked Flakk Guns, for inclusion in a Contractor Defender unit, or a Resupply Package to supplement a Contractor Scout unit. You can find it in the Maelstrom's Edge webstore here!
The rules cards for these units will be online very soon, but in the meantime, here's a look at the rules for the new units:
CONTRACTOR DEFENDERS
FACTION:Epirian Foundation
UNIT TYPE:Core Unit
POINTS:6 pts
Full Unit Profile:
Contractor:MV 7, EVS 4, SKL 3, AV 3, MAS 2, FOR 1, WP 2, Type: Infantry (Human)
Contractor Team Leader:MV 7, EVS 4, SKL 3, AV 3, MAS 2, FOR 1, WP 3, Type: Infantry (Human, Squad Leader)
Contractor Drone:MV 7, EVS 4, SKL 3, AV 3, MAS 2, FOR 1, WP 1, Type: Infantry (Robot, Slaved)
UNIT SIZE: 1 Contractor Team Leader & 2 Contractors.
EQUIPMENT: Maglock Assault Rifle & Maglock Guardian Pistol.
Contractor Drone: 2 linked Flakk Guns.
ABILITIES: None.
OPTIONS:
• May add up to 2 more Contractors: +2 pts each.
• May replace up to 2 Contractors with Contractor Drone: +2 pts each.
• Up to 2 models may replace Maglock Assault Rifle with Maglock Assault Rifle & Aux Grenade Launcher (Choke & Emp Rounds): +2 pts each.
• Contractor Team Leader may replace Maglock Assault Rifle with:
- Shock Baton: +0 pts.
- Shock Maul: + 1 pt.
• Contractor Drone may replace 2 linked Flakk Guns:
- 2 linked Cluster Missile Pods: +1 pt.
- 2 linked Strike Missile Pods: +1 pt.
- Maglock Chaingun: +1 pt.
Heavy Defenders: A Contractor Defender unit with 2 Contractor Drones is an [Anvil] selection.
Unique Abilities:
None.
Unique Equipment:
None.
CONTRACTOR SCOUTS
FACTION:Epirian Foundation
UNIT TYPE:Vanguard Unit
POINTS:7 pts
Full Unit Profile:
Contractor:MV 7, EVS 4, SKL 3, AV 3, MAS 2, FOR 1, WP 2, Type: Infantry (Human)
Contractor Team Leader:MV 7, EVS 4, SKL 3, AV 3, MAS 2, FOR 1, WP 3, Type: Infantry (Human, Squad Leader)
Contractor Drone:MV 7, EVS 4, SKL 3, AV 3, MAS 2, FOR 1, WP 1, Type: Infantry (Robot, Slaved)
UNIT SIZE: 1 Contractor Team Leader, 1 Contractor & 1 Contractor Drone.
EQUIPMENT: Maglock Assault Rifle & Maglock Guardian Pistol.
Contractor Drone: None.
ABILITIES: Scout.
Contractor Drone: Resupply Package, Scout.
OPTIONS: • May add up to 2 more Contractors: +2 pts each.
• Up to 2 models may replace Maglock Assault Rifle with Maglock Assault Rifle & Aux Grenade Launcher (Choke & Emp Rounds): +2 pts each.
• Contractor Team Leader may replace Maglock Assault Rifle with:
- Shock Baton: +0 pts.
- Shock Maul: + 1 pt.
• Contractor Drone may replace Resupply Package with Recon Package: +0 pts.
Unique Abilities:
Resupply Package: (squad ability) Friendly units within 6" of this unit (including itself) may re-roll one failed roll to hit during a round of shooting.
Recon Package: (squad ability) All of this unit's attacks have the [b]Paint (4+)[/b] ability, not including CQ attacks.
Unique Equipment:
None.
As you can see, the Contractor Defender unit basically replaces the existing Contractor unit type, with the optional addition of one or two heavy weapon drones. Note that this includes the option to equip the drones with Strike missiles, which aren't included in this release - there will be a conversion article for this option coming very soon!
The Scouts are the first new unit type, adding another Vanguard option to the Epirian line-up. With the new and planned units, you will soon have the ability to field an entire force of Contractors, although you can obviously still mix these new units with the existing bot units as well!
The new Contractor Drone is available now - You can find it in the Maelstrom's Edge webstore here!
Painting Spotlight: 120-point Epirian SecDef Force
Posted on Tuesday Jul 24, 2018 at 12:49pm in Models
- by Iain Wilson
Last week, I built a 120-point force using the fantastic new Epirian SecDef models. If you missed it, you can find the article here: http://www.thecommguild.com/roller/thecommguild/entry/modeling-spotlight-120-point-epirian.
This week, my aim was to get this force painted up to a basic tabletop standard. This can be helpful for getting past the 'sea of grey' stage and allowing you to field a painted army faster than might happen if you're painting each unit up to a fully detailed level, or if you just want a quick and easy paintjob on your army and aren't interested in getting bogged down in detail work. The end result isn't going to win any painting awards, but looks fine on the table and can be updated later.
So, the painted force:
For painting up armies quickly I tend to rely heavily on ink washes, as they are so handy for adding shading quickly (if sometimes a little messier than doing it by a more manual and time-consuming method would allow for). This force was no exception to that. I started with a basecoat of Army Painter Army Green spray, and when that was dry added a wash of Army Painter Military Shader.
When the wash was dry, I went over the armour plates with Army Painter Ash Grey, the exo-skeleton sections in Vallejo Basalt Grey and the weapons on Vallejo Heavy Charcoal, before adding a layer of Army Painter Dark Tone over these areas with a detail brush. Any slight spillover onto the green is fairly unnoticeable, but excess wash was quickly removed with a wet brush where necessary.
On the Ash Grey armour plates, rather than covering them completely with the wash, I just painted a thin coat of the wash onto the lower surfaces of the plates, or on the innermost half of the thigh plates.
I then painted the face and neck with Citadel Tallarn Flesh, chosen by virtue of being the first flesh tone I came across in my paint box. I also painted the flesh tone over the goggles, to provide a nice base layer for the red that would come later. The pouches, straps, rifle stocks and boots were painted with Vallejo Heavy Brown and then the flesh and brown parts were washed with Army Painter Strong Tone.
Finally (for now) I painted the base with Vallejo Neutral Grey and the goggle lenses with Army Painter Pure Red. The helmet chinstrap had originally been painted in the Heavy Brown, but after the wash I found that the tone was too similar to the flesh colour, so I went over the brown with black, and also used a black fineliner pen to darken the lower frame of the goggles, around the bottom of the lenses and up the nose. I also used the Neutral Grey to add a quick drybrush over the black on the weapons to pick out the detail - I wanted them dark, but to still be recogniseable on the table.
At this point, all of the main colours are in place and they're ready for the table. To finish them off later, I can add a highlight to the green with some light green, some light brown or bone on the brown parts, and add some shading and a reflective spot on the goggle lenses, which gets something that looks more like this:
I will also need to go through and drybrush the bases and add some detail so that they match my other urban bases.
So, the 'finished' units:
Lieutenant
Tactical Teams
Snipers
Annihilator Teams
Recon Walker
The gang all together:
To start assembling your own SecDef force, you can pick up the Secdef sprue, or any of the rest of the Maelstrom's Edge model range, from the webstore here.
As always, feel free to pop along and share your work, or ask any Maelstrom's Edge- or hobby-related questions on the Comm Guild Facebook page!
For other Maelstrom's Edge modeling articles, including tutorials and walkthroughs of a wide range of different building and miniature projects, check out the article roundup here.
Modeling Spotlight: 120-point Epirian SecDef Force
Posted on Monday Jul 16, 2018 at 05:00pm in Models
- by Iain Wilson
With this week's article, I'm continuing the SecDef love because, well, they're awesome!
As nice as it is to include some elite supertroops in amongst the Epirian bots and contractors, I thought it would be fun to build an entire SecDef force. Obviously, with only a single Hammer option currently in the official rules, this required a bit of creativity, but two mocked-up new unit cards and a bunch of sprues later, my first 120 points were assembled and ready for painting.
To build even a bare-bones force within the army selection rules for Maelstrom's Edge, a Command unit is required. While there will no-doubt be a SecDef officer option released down the track, I'm far too impatient to wait for that, so I ran up an unofficial unit card for a lower-level officer, a Lieutenant, to command smaller SecDef strike forces. The aim was to create a commander on about the same level as the Journeyman Bot Handler, and one that could be built from existing parts with minimal conversion required. So I took a bare bones SecDef trooper built from the sprue, on the assumption that SecDef field officers would likely look little different to their troops, and just swapped his rifle for a pair of pistols taken from the Contractor sprue.
To allow for a viable force, the Lieutenant has the 'SecDef Commander' rule, which allows him to take up to two SecDef Tactical Teams as Core choices instead of in their usual Hammer slots. In the interests of fielding as many big guns as possible (because the SecDef heavy weapons look cool) I choose to give each of the Core teams two LM14 Machine Guns, and added two extra warm bodies to each to bring them up to full strength.
The models throughout the force are assembled largely straight off the sprue with minimal conversion. I switched around some of the leg pairs (as explained in last week's Modeling Spotlight) and changed around the left hands on the unit Sergeants to add some variety to their poses without having them all holding their rifles twp-handed like their troops, to help them stand out a little.
With the two available Core options filled, I decided to include a sniper unit in the Hammer slot (because why wouldn't you?). To keep them extra sneaky and to stay within my chosen 120 points, I went with the base unit of three, and gave the two troopers each a sniper rifle.
There was clearly not enough firepower on the table here yet, which called for some Chainguns! Rather than fill up my last remaining Hammer slot for the detachment, I made use of the Tactical Team rule that causes teams equipped with two CG100 Chainguns to become Anvil selections, and built up two five-man units accordingly.
To round out the detachment, I liked the idea of a SecDef force having access to a light vehicle that would serve as an advance scout, and potentially as a beacon to guide in teams arriving by Aerial Insertion. After some searching online, I found the Heron Light Battlewalker, a resin kit from Hexy-Shop. This is a small walker with an enclosed cockpit but a detailed interior, which allowed me to cut away the roof and part of the sides to create an open cockpit.
I replaced the Heron's original weapons with a pair of CG100 Chainguns glued together side-by-side, and added a driver by cutting up a pair of SecDef legs, re-assembling them in place in the seat and then filling in the resulting gaps with 'green stuff' putty.
There were no controls in the Heron's cockpit other than a screen down between the driver's feet, so I added a control loom made from a leftover resin piece and the pistol grip from a SecDef assault rifle. I also added some roll bars on the sides of the cockpit (these pieces normally go on the platform on the rear of the Heron), but these are only sticky-tacked in place so I can take them off for painting - this should make it easier to get into the nooks and crannies in the cockpit.
The final touch was to shorten the legs slightly, as the Heron turned out to be a bit taller than I had expected and wanted it to be. This was done by cutting out the lowest section of the legs and reattaching the legs to the ankle ball-joint.
All up, with an 11-point Lieutenant and 12-point walker, the above force comes in at 119 points - perfect for getting started, and ready to be taken as a detachment in a larger Epirian force or fleshed out later if and when more SecDef units are added to the roster. If you would like to build something similar, you can find the unit cards for the Lieutenant and the walker in the Force Builder section of the Maelstrom's Edge website here.
Next week - Painting!
To start assembling your own SecDef force, you can pick up the Secdef sprue, or any of the rest of the Maelstrom's Edge model range, from the webstore here.
As always, feel free to pop along and share your work, or ask any Maelstrom's Edge- or hobby-related questions on the Comm Guild Facebook page!
For other Maelstrom's Edge modeling articles, including tutorials and walkthroughs of a wide range of different building and miniature projects, check out the article roundup here.
Modeling Spotlight: Epirian Secdef
Posted on Monday Jul 09, 2018 at 05:00pm in Tutorials
- by Iain Wilson
Last week saw the release of the awesome new plastic Secdef to bolster the Epirian battleline with some elite military muscle. If you missed it, you can see the release article here: https://www.facebook.com/maelstromsedge/posts/2244261785589396, and you can also find an assembly guide here: http://www.thecommguild.com/roller/thecommguild/entry/assembly-guide-epirian-secdef.
This week, I'd like to go through some quick and easy modeling ideas to tweak your models. Novice modelers, fear not - nothing here requires extensive conversion experience or special tools!
To (ahem) kick things off, you may have noticed in the assembly guide that the sprue comes with 3 sets of legs - one in a walking pose, and two slightly different standing poses.
The left and right legs from each pair have matching locator pins to help them go together neatly, and these are different sizes for each pair to help you keep them sorted during assembly. You can easily mix-and-match the pairs to create some variation in the posing, though - the smaller pins will fit into the larger locator slots, and for pairings where the locator pins don't fit in you can just cut them off with a sharp hobby knife and glue the hips together without them.
One of the ongoing design goals for the Maelstrom's Edge range has been for the various kits to be compatible wherever possible to enable parts swaps. This is particularly useful for increasing the pool of available heads for any unit, and the open-hand design that has been adopted for weapon arms likewise adds extra options for switching gear around. On the below models, some slightly more hi-tech than usual Contractors have been made by using Contractor heads and weapons on the Secdef bodies.
You can also use heads from the Broken Infantry sprue to add unhelmeted human heads or aliens to your Secdef's ranks.
For an enclosed helmet option, you can use a spare head from the Epirian Bot Handler sprue.
The left arm on the above model has also been modified, removing the pointing hand at the wrist and replacing it with one of the open-palm left hands that normally hold the Secdef heavy guns. The heavy weapon arms are also useful for putting on Sergeants to show tactical hand signals.
Secdef troopers are equipped with a G20 pistol along with their assault rifles, although this isn't included on the sprue. As with other pistol and grenade options that come as standard on various units, there's no specific need, rules-wise, to show these. If you do want to show the pistol, though, the G20 is a variant of the standard Epirian Guardian pistol, so you can use the pistols included on the Contractor sprue to represent them, as has been done on the 'Lieutenant' model below.
(Lieutenants aren't an official unit option currently, although a HQ unit for the Secdef is in the pipeline. I'll be working up an unofficial rules card for this guy to go in the Online Force Builder for those who might want to try out an all-Secdef force.)
Finally for this week - While the designs are slightly different, the strength-boosting exoskeleton makes Secdef legs similar enough to the legs of the Master Bot Handler that you can make a walking Master Handler by simply swapping in the Secdef legs for the normal Master Handler legs, as below. I couldn't resist also taking the opportunity to replace this Master Handler's usual weapons with a modified pair of CG100 Chainguns taken from the Secdef sprue.
What have you done with your Secdef troopers? We would love to see your creations on the Comm Guild Facebook page!
To pick up the Secdef sprue, or any of the rest of the Maelstrom's Edge model range, visit the webstore here.
For other Maelstrom's Edge modeling articles, including tutorials and walkthroughs of a wide range of different building and miniature projects, check out the article roundup here.
Tags: conversion epirian modeling secdef spotlight
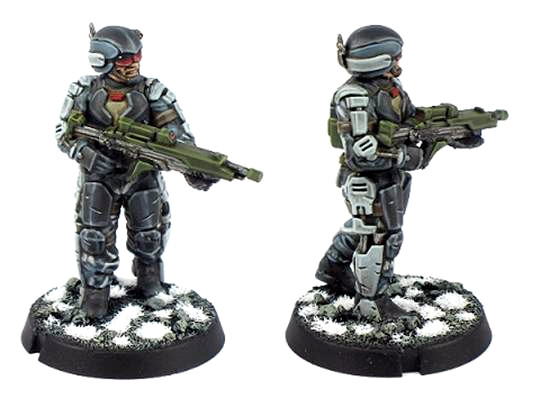
Assembly Guide - Epirian Secdef
Posted on Wednesday Jul 04, 2018 at 05:00pm in Tutorials
We are very proud to announce the immediate availability of our latest plastics - the Epirian SecDef. These guys have exo-augmented armour, allowing them to be a much more powerful and effective fighting force than their contractor allies.
Available now at https://www.maelstromsedge.com/store/41/3x%20Epirian%20Secdef%20Infantry, along with details of their history and background.
Below, you can find instructions for assembling these great new models!
Assembling Epirian Secdef
General Notes
Polystyrene cement - only use superglue if you want to go insane! All of our models are designed to be assembled with polystyrene cement as it gives some time to re-pose while gluing, fuses the models together and prevents brittle joins like other glues do. Make sure you have polystyrene cement in your toolkit before you begin!
We want you to experiment! We've broken our models up into lots of parts and given a fair few spare parts so that you can push yourself out of your comfort zone, learn new skills and create some really unique models. We've tried to price things so that it won't break the bank if you make a mistake, so please cut stuff up and have some fun. Start simple with a slice here and a re-pose there, and watch your confidence and skills increase until you are a master modeler!
Basing - Always make sure you glue your model to its base with an eye on the arc markers on the sides of the base. The arc marker indents should be at the halfway point between the front and back of the model to show the front and back halves of the model when gaming. See the Maelstrom's Edge rulebook for more detailed notes on this.
Dry fit before gluing! - There are lots of pose options possible, but that means there is also the freedom to screw up and make some bad poses! Sticking the parts together and seeing how things look will usually lead to a model that is fairly static and repetitive. You should consider knee, hip, torso, and arm positions when gluing and ensure that you have a pose in mind before you start gluing things together. If in doubt or insecure about your talents in the posing area, we recommend you try to copy the poses from some of our studio models found here in the gallery.
Epirian Secdef Assembly Notes
Three Secdef models can be made from one sprue. The sprue includes the following weapons: 2 x AR60 Assault Rifle, 1 x SR40 Sniper Rifle, 1 x CG100 Chaingun and 1 x LM14 Machine Gun.
Legs have three different poses and are paired, left and right, with differently-sized locator pins to keep them straight. Leg 5 goes with leg 7, 8 with 4 and 6 with 9.
The three torsos have two different designs (two with chest pouches and a backpack, one without), but the chestplate is identical for each, and any of the three torsos fit with any of the legs.
There are five 'sets' of arms, including two that have right hands with fingers together, and three with the fingers more splayed and the trigger finger separate. The closed-finger version works best for the Machine Gun or Chaingun, while the more open fingers work best for the Assault Rifles or Sniper Rifle. These are more-or-less matched with the extended left arms for the rifles and the left arms with more bent elbows for the heavier weapons. The pointing left arm obviously works with whichever right arm you choose, although there is one rifle arm that has the weapon held out to the side rather than across the body.
There are two small parts labelled as part 24 on the sprue. These are optional, and can be glued in between the belt and the heavier weapons as a support strut.
Finally, the three heads all fit with either of the two torso variants.
For some more ideas for building your Secdef models or to share your own creations, head on over to the Comm Guild Facebook page.
You can pick up the Secdef sprue, and the rest of the Maelstrom's Edge miniature range, from the webstore here.
For other Maelstrom's Edge modeling articles, including tutorials and walkthroughs of a wide range of different building and miniature projects, check out the article roundup here.
Painting Tutorial - Konstantin Moor, Veteran Bot Handler
Posted on Monday May 21, 2018 at 05:00pm in Tutorials
- by Iain Wilson
Last week, I ran through a conversion tutorial for a veteran Master Bot Handler who I'm calling Konstantin Moor, a nasty, multi-weaponed individual built, along with his faithful drone companions, from the new Epirian Master Bot Handler kit (If you missed last week's article, you can find it here).
Well, now it's time to get some paint on him!
Before I start, a quick note on paints: I tend to use paints from a few different ranges, as I collect whichever paints I like rather than sticking to a single brand. If you're looking to match any of the paints I use, you might find this Paint Compatibility Chart somewhat handy!
I'm painting Konstantin for gaming rather than display, so this is a fairly quick and easy paintjob, with nothing too complicated or fancy going on. I started out by basecoating all three models with Army Painter Army Green spray.
Next, I painted armour sections and the drone chassis with Vallejo Yellow Green, and metal sections with Vallejo Heavy Charcoal. I also gave Konstantin some Vallejo Neutral Grey pants, and a base layer of skin using Citadel Scorched Brown.
Once that was done, I went over the yellow green with a light wash of Army Painter Green Tone, and the metal, grey and skin with Army Painter Dark Tone.
When the washes had dried, I went back over the green sections with a fine brush and a little more green wash, applying very thin layers onto downward-facing surfaces to give them a little more shading. Then I applied a light highlight to raised edges using Coat D'Arms Putrid Green. The metal areas were given a similar highlight with P3 Pig Iron, and I used Vallejo Light Grey on Konstantin's pants. For his skin, I highlighted by lightly drybrushing with Citadel Tallarn Flesh.
Finally, the models were all transplanted to fresh bases, painted up in my urban scheme. I added some light grey onto Konstantin's eyebrows, and painted the lenses on his Neural Nodes with Army Painter Pure Red before giving them a spot of white in the centre. For the laser tips and the shield generator on the firefly drone (Cassio), I painted on a layer of Citadel Ultramarine Blue before drybrushing with Citadel Ice Blue and finishing with white. A few other details, like the red eye lenses on the drones (Pure Red, shaded with the red mixed with a little black and then a highlight spot of white), the Epirian badge on Konstantin's chest (Pig Iron, with a spot of P3 Cygnus Yellow), and picking out the missile tips on the spider drone (Iago), and the trio were ready for the table!
Group shot:
Stay tuned for an unofficial rules card to use Konstantin in your own games, coming later this week to the Force Listing section of the Maelstrom's Edge website!
What have you done with your Master Bot Handlers? We would love to see your creations on the Comm Guild Facebook page!
To pick up this or any of the rest of the Maelstrom's Edge model range, visit the webstore here.
For other Maelstrom's Edge modeling articles, including tutorials and walkthroughs of a wide range of different building and miniature projects, check out the article roundup here.
Modeling Tutorial - Konstantin Moor, Veteran Bot Handler
Posted on Monday May 14, 2018 at 05:00pm in Tutorials
- by Iain Wilson
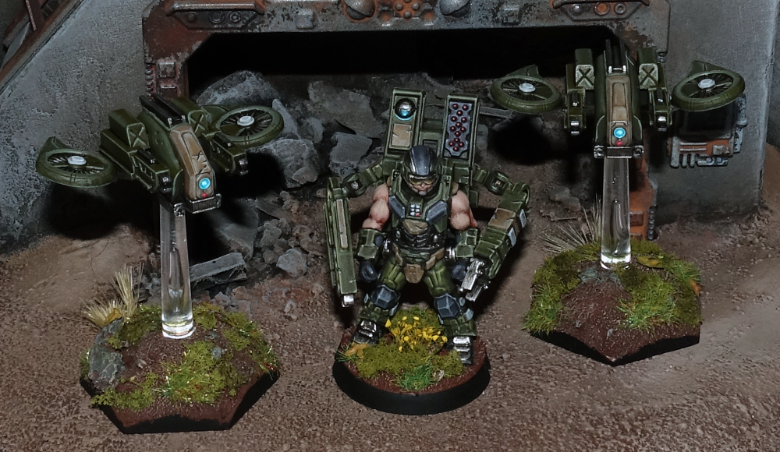
I've been having an awful lot of fun playing with the new Epirian Master Bot Handler kit (as evidenced in the Modeling Spotlight article from last week. Amongst all of the other conversion ideas that popped up when I started looking at the sprue, I had one that I thought warranted a conversion article all of its own. And so, let me present Konstantin Moor, Veteran Bot Handler, along with his companion drones: Iago and Cassio!
The main things that set Konstantin apart from his brethren are the additional pair of weapon arms, and the independent movement of the weapon arms, as opposed to the normal direct control rig that links to the forearm. To replicate this build, you will need two Epirian Master Bot Handler sprues and the Faction Expansion Sprue. You will also need a Drone sprue to build Iago and Cassio.
I built the body as normal, using the bent legs and the matching torso. In place of the normal helmeted head, I used the bare head from the Faction Expansion Sprue, although there would be nothing stopping you from just using the normal head if you prefer the armoured look. Note that the head from the expansion sprue is designed to go with the Karist Trooper torso, and so has a slightly thicker neck than the various Epirian and Broken heads. As a result, the neck needed a little shaving down with a hobby knife before being glued in place.
The arms were largely left alone, with the only modification required being to chop off the mounting peg for the weapons.
Now for the fun part. I took the backpack, and underneath the existing weapon arm socket, I smoothed down the corner of the pack and drilled a small guide hole with the tip of my hobby knife. Then I found a drill bit that matched the diameter of the arm socket (11/64", although a 4mm bit would do the job for the metric-inclined) and drilled out a new arm socket. I did this with the drill bit held in my fingers and twirling it - you could use a dremel or similar rotary tool, but plastic is soft so there's not really any need when the drill bit is large enough to grip it securely with your fingers, and this helps to reduce the risk of accidentally over-drilling the hole by drilling too fast.
Next up I assembled the two sets of weapon arms and glued them with a bit more than a 90 degree bend in the elbow.
These were glued in place on the backpack, and the backpack and arms glued onto the body. I also glued the Neural Nodes in place on the backpack weapon ports.
Time for some weapons!
Konstantin is armed with two linked sets of Drone Class Laser Systems. Without these being joined to the forearms, I wanted to change how they mounted onto the weapon arms a little, to give them a more open range of movement. Using a hobby knife, I cut through the rear half of the mounting ring off the back of the weapons. The cutoff piece was also cut in half.
The weapons were then glued onto the ends of the weapon arms, pointing directly forwards with the remaining half of the mounting ring socketing over the ball joint. I attached one half of the cutoff ring section on the outside, to reinforce the joint a little.
After one final tweak (repositioning the right arm to be extended forwards instead of down) Konstantin was assembled and ready for paint!
Moving on - Iago!
Iago was assembled as a concept for the Master Handler modeling spotlight article, and I liked the idea too much to not get him onto the table. To put him together, I used a Spider Drone and a Master Handler backpack with Cluster Missile pods.
The bottom protrusions were sliced off the backpack with a razor saw, and the back of the drone chassis was similarly cut down flat.
I then glued the backpack onto the back of the drone chassis. The chassis sidepods needs shortening a little - I cut them down so that they butted up flush against the backpack.
With the addition of a set of Spider Drone legs, Iago was all set.
And finally: Cassio!
Cassio is based on a Firefly Drone, with the normal laser system replaced with an energy field projector. To create the projector, I used a flakk gun from the drone sprue, cut as below, and the muzzle of a radwave emitter and a cybel mine from the Faction Expansion sprue.
I assembled the drone as normal (sans weapons) and then glued the projector in place underneath, using the cut-down flakk gun as the mount, gluing the cybel mine to the front of the gun, and then the reversed radwave emitter muzzle to the front of the mine.
With turbines glued on and a flight base added, Cassio was ready for action.
The unit all assembled:
Next: painting and rules card - Click here!
What have you done with your Master Bot Handlers? We would love to see your creations on the Comm Guild Facebook page!
To pick up this or any of the rest of the Maelstrom's Edge model range, visit the webstore here.
For other Maelstrom's Edge modeling articles, including tutorials and walkthroughs of a wide range of different building and miniature projects, check out the article roundup here.
Tactics: Equipping the Epirian Master Bot Handler
Posted on Saturday May 12, 2018 at 09:30pm in Gaming
EQUIPPING A MASTER BOT HANDLER
A Master Bot Handler is one of the most powerful figures in the Foundation, able to command legions of robotic minions and carry a vast array of weaponry that common soldiers can only dream of. However, this dizzying amount of options can also make deciding exactly how to equip your own Master Handler a bit daunting. Have no fear though! Once you finish with this article, you’ll have all the insider information of what Master Handlers are capable of and know how you’ll want to equip yours.
TACTICAL ROLES OF A MASTER HANDLER
There are three main roles you can equip your Master Handler to fulfill:
- Bot Commander.
- Gun Heavy.
- Support/Melee.
BOT COMMANDER
No matter how you choose to equip your Master Handler, you’ll want to be aware that, above all else, they are a force multiplier for Foundation robotic units. So if you’re looking to field a force that has a preponderance of Contractor or SecDef (coming soon!) units, then you might want to instead just stick with taking regular Journeyman Bot Handlers as the Command Model for your detachments.
With a Master Handler, while you pay a premium in points to take them, you get a heck of a lot of value by way of improving all the robotic units in your force. With his Neural Interface, a Master Handler effectively has the Command (3) ability, which means he’s able to issue orders to up to 3 friendly units within 18” per turn. Anytime a Bot Handler (of any level) issues an order to a Bot unit, that unit gets to enable its Bot Protocols for the turn, which makes them perform much better: Hunter Warmechs get to move and shoot more effectively, Scarecrows get to fire more shots, Firefly Drones dodge incoming fire better and Spider Drones make better use of cover they’re hiding in. If you’re looking to make the absolute most out of this ability to buff nearby robotic units in this way, then there are a few options for the Master Handler that are pretty much mandatory:
Neural Nodes - Master Handlers are able to take up to 2 Neural Nodes. Each one allows them to issue an order to 1 more unit then they normally would be able to. A Master Handler has a WP of 5, which means, especially later in the game when you have a lot of Command Points available, you can put 5 Command Points onto the Master Handler and with the help of a couple Neural Nodes, be able to issue orders to 5 nearby robotic units (thereby enabling Bot Protocols on all of them).
Command Booster Micro Drone - Being able to issue orders to 5 nearby bot units is great, but with a command range of only 18”, you’ll have to keep all those units pretty well clustered around your Master Handler, which is less than ideal. However, Master Handlers are able to take a Command Booster Micro Drone, which increases their command range up to 24”. If you’re looking to make your Master Handler into a true bot commander, then taking a Command Booster allows you to keep your Master Handler back out of harms way while still issuing orders to your bot units that need them.
Firefly Defender Drones - In order to get the most out of your Master Handler as a bot commander you’ll want to keep them roughly in the center of your force, within command range of as many of your bot units as possible. Unfortunately, a Master Handler's prickly superior attitude prevents them from joining friendly units, so to keep your Master Handler safe, a great tactic can be to keep him hidden behind a big obstacle or piece of area terrain so that the enemy can't even spot him. However, a canny opponent might try to counter this by outflanking that terrain in order to get some wide open shots on your Handler. While the Master Handler’s impressive MAS 3 can protect him from a small amount of enemy fire, if the opponent does get a decent-sized unit with open shots on your Master Handler, you're probably going to lose the linchpin of your entire force, and along with it, the game. Therefore taking 1-2 Firefly Defender Drones can be a solid idea to help protect your Handler. As long as you enable their Bot Protocols, Firefly Defender Drones grant their unit (including the Master Handler) the Dodge ability equal to the number of Defender Drones in the unit (so 2 Defender Drones means the unit gets the Dodge (2) ability).
Cheap Weapons - As your goal will be to keep your bot commander Master Handler hidden from the enemy behind terrain, it doesn't make sense to spend extra points on weapons that will probably never be used. As such, sticking with the 0 point weapons (like a Flakk Gun and/or Repair Claw) is the smart choice for a Master Handler acting as a bot commander.
Master of Machines faction objective - Finally, if you want to get the absolute most out of your Master Handler as a bot commander, then taking the Master of Machines as your faction objective is pretty much a must, as it potentially allows you to enable Bot Protocols on a 6th friendly bot unit, and better yet, one that’s beyond your Master Handler’s command range:
MASTER OF MACHINES This objective may only be utilized if your force contains a Master Bot Handler. If utilized, a Master Bot Handler is automatically your force commander for any objective type that requires one. This objective type can generate a maximum of 3 VPs per game, after which you may no longer utilize the Bot Mastery ability. ----- Partial: (each end phase) If at least one of your Master Bot Handlers is on the table and the Bot Mastery ability was not utilized that turn, gain 1 VP. Full: (end of game) If at least one of your Master Bot Handlers is still on the table, gain all of this objective’s remaining VPs. Bot Mastery: Once per turn, you may automatically enable one of your unit’s bot protocols when that unit is activated (regardless of whether its activation discipline check is successfully passed). You must have at least one Master Bot Handler on the table to utilize this ability.
SAMPLE ‘BOT COMMANDER’ MASTER HANDLER
- Master Bot Handler - 16 pts.
- 1 Firefly Defender Drone - 3 pts.
- 2 Neural Nodes - 2 pts.
- 2 Flakk Guns - 0 pts.
- Command Booster Micro Drone - 3 pts.
- TOTAL - 24 pts.
GUN HEAVY
The next major role a Master Handler can fill is one of straight-up shooty death to the enemy. The Master Handler’s powerful exo-skeleton allows them to carry more and heavier guns than any other Foundation infantry model released to date. That means when equipped properly, a Master Handler’s unit can be one the most devastating shooting units in your arsenal. But be warned, this is also the most expensive configuration for a Master Handler.
Fire Assist - One very important limitation to be aware of is that, while Master Handlers have the Fire Assist (+1) ability, this only allows them to fire a maximum of 2 weapons during each round of shooting. That means the only reason you’d want to equip your Master Handler with more than 2 weapons is to give you the tactical flexibility to choose the best 2 weapons to fire in any given situation.
Cluster Missile Pods - If you’re looking to get maximum firepower out of your Master Handler, then taking 2 linked Cluster Missile Pods is definitely the way to go. Linked weapons add +1 to the number of shots the weapon normally is able to fire (and also only count as a single weapon being fired). So if you can manage to find a target where you're able to cover 3 models with the Cluster Missile Pod's AoE template, then you’re looking at getting to fire 5 shots, plus any 6’s you manage to roll count as 2 hits instead of 1!
Arm-mounted Weapons- For a gun heavy Master Handler, you really can’t go wrong with any of the arm-mounted ranged weapon options. However, you do want to pick weapons whose range and weapon profile are a good match to be fired alongside the linked Cluster Missile Pods. The Cutter Light Machine Gun is the obvious choice. A Flakk Gun can be a great choice for your second arm-mounted weapon because it is 0 points and is useful to fire instead of the Cutter when your Master Handler happens to find themselves in an up close and personal situation with the enemy. The Drone Class Laser System (DCLS) is a fine choice to take instead of a Cutter if you desire, providing your Handler with the absolute maximum number of shots possible (albeit with a PEN of only 1), that pair nicely with the shooting of the Firefly Defender Drones that are part of the unit.
Firefly Defender Drones - While Defender Drones are great at keeping the Master Handler protected from enemy fire, they are also all equipped with a DCLS as well, which means when you take a full squad of 4 of them and combine their firepower with that of the Master Handler, you can obliterate almost any enemy light infantry unit right off the table, regardless of whether they’re in cover or not!
Aerial Drone Strike - One thing that should never be forgotten is that the Master Handler also has an Aerial Drone Strike: a one-time use, incredibly powerful area effect weapon. Best of all, using an Aerial Drone Strike just counts as firing a single weapon, which means the Master Handler can fire the Aerial Drone Strike and also fire another weapon at the same time (including his linked Cluster Missile Pods, for example), and all of this gets combined with the shooting of his Defender Drones as well!
Aerial Uplink & Targeting Micro Drones - There are two great Micro Drone options for your gun heavy Master Handler. The Aerial Uplink Drone allows the Master Handler to fire his Aerial Drone Strike two times during the game, instead of just once, which is great for obvious reasons. An even better fit is the Targeting Drone. This gives the Master Handler and all of his Defender Drones +3 SKL when shooting (except during close quarters fighting), which unsurprisingly ups the deadliness of their combined firepower to near obscene levels.
SAMPLE ‘GUN HEAVY’ MASTER HANDLER
- Master Bot Handler - 16 pts.
- 4 Firefly Defender Drones - 12 pts.
- 2 linked Cluster Missile Pods - 4 pts.
- 1 Cutter Light Machine Gun & 1 Flakk Gun - 1 pt.
- Targeting Micro Drone - 2 pts.
- TOTAL - 35 pts.
SUPPORT/MELEE
While the bot commander and gun heavy roles for the Master Handler are fairly straightforward and easy to define, you can also mix and match different aspects of these roles a bit to create something unique for your Master Handler. In addition, the inclusion of a Repair Claw allows a Master Handler to perform yet another role: that of helping to remove suppression from nearby bot units.
Repair Claw - Giving your Master Handler a Repair Claw can be a great choice, not only because it is 0 points, but also because it gives the Handler the Bot Repairs (2D3) ability. This means that whenever the Handler finishes an Advance & Fire or Dash action within 6” of another friendly bot unit, he can remove 2D3 suppression tokens (STs) from them, turning him into an excellent support unit (Note that you cannot use this ability on the Bot Handler’s own unit though). Considering that you'll be keeping your Handler near your bot units to help enable their Bot Protocols, you will often find him within range to perform these types of repairs. You can also consider giving your Handler 2 Repair Claws. While this doesn’t allow him to remove any additional STs from friendly units, it does turn him into quite the close quarters (CQ) powerhouse. Since the Handler is able to fire 2 weapons per round of shooting (which includes CQ fighting), this allows him to use both of his Repair Claws to their full effect. That’s a total of 8, PEN 4 shots during CQ fighting (on top of any shots generated by his Defender Drones) which ain’t too shabby! Be warned that the Master Handler is a pretty slow mover so it can be a bit tough to get him into CQ fighting, but once there, he’ll certainly be able to cause some significant damage.
Firefly Defender Drones - Whether you’re running your Master Handler next to your bot units to remove STs from them, or trying to charge into CQ fighting, either way you’ll definitely need to protect your Handler with at least 2, it not the max of 4 Defender Drones to dissuade the enemy from picking him off and to soak up the inevitable defensive fire he takes from the enemy.
Flakk Gun - If you’re taking 1 repair claw on your support Handler, then the obvious weapon to pair with that is the Flakk Gun, which excels at short range shooting. Since a support/melee Handler will often find himself near the enemy (when removing STs from your bot units and/or running around trying to get into CQ fighting) having a powerful short ranged weapon is a great choice.
Aerial Uplink & Defense Micro Drones - While there isn’t one Micro Drone choice that really excels for a Master Handler in a support role, the Aerial Uplink Drone is a solid pick. Because you likely won’t have the great firepower of a gun heavy build, being able to unleash an Aerial Drone Strike twice during the game can be quite useful. On the other hand, the Defense Drone is perfect for the Handler that is trying to get into CQ fighting. Sure it's a one-use item, but it’s 0 points, and for the turn it's used the Handler gets the Field (2) ability (great for when his Defender Drones have been destroyed) and makes him an absolute melee monster. Plus, because the Handler can fire 2 weapons, he’s able to use the Defender Drones melee profile as well as one Repair Claw in CQ fighting!
SAMPLE ‘SUPPORT’ MASTER HANDLER
- Master Bot Handler - 16 pts.
- 2 Firefly Defender Drones - 6 pts.
- 1 Cluster Missile Pod & 1 Neural Node - 4 pts.
- 1 Flakk Gun & 1 Repair Claw - 0 pts.
- Aerial Uplink Micro Drone - 2 pts.
- TOTAL - 28 pts.
SAMPLE ‘MELEE’ MASTER HANDLER
- Master Bot Handler - 16 pts.
- 4 Firefly Defender Drones - 12 pts.
- 2 Neural Nodes - 2 pts.
- 2 Repair Claws - 0 pts.
- Defense Micro Drone - 0 pts.
- TOTAL - 30 pts.
How will you use your Master Handlers? To share your tactics or modeling ideas, or to discuss the loadouts described above or any other aspect of the Maelstrom's Edge game, visit the Comm Guild Facebook page.
You can find the Epirian Master Bot Handler, along with the rest of the Maelstrom's Edge model range, in the webstore here!