Entries tagged [buildings]
Painting Tutorial: Hazard Stripes
Posted on Monday Sept 25, 2017 at 05:00pm in Tutorials
- by Iain Wilson
Battlefields are a dangerous place, but that's no reason not to follow reasonable occupational health and safety protocols. So here's a quick and easy tutorial for painting hazard stripes on your terrain, to make sure that your settlement's managing body doesn't find themselves with unexpected compensation claims on top of their post-battle repair bills!
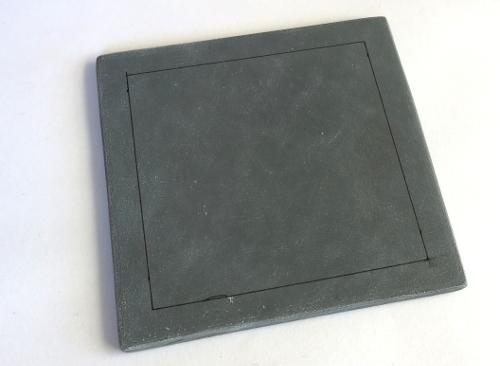
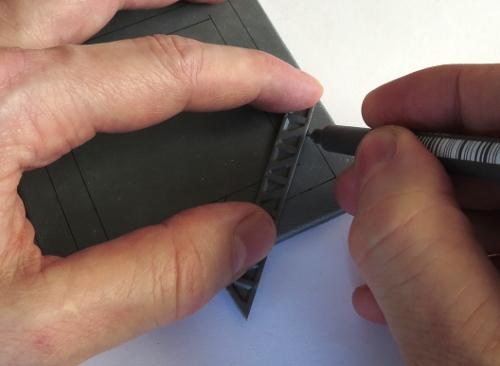
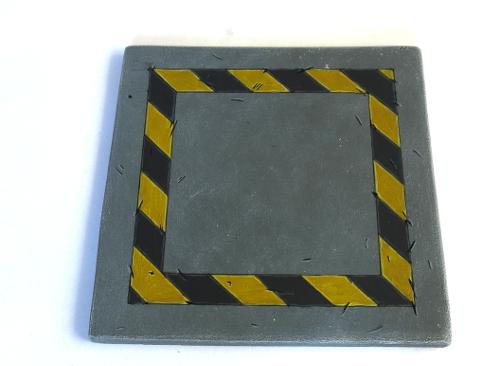
Start by marking out the area that you want to draw attention to with a ruler and a fine line black pen - I'm using a Staedtler 0.05 'Pigment Liner' here.
You can use a ruler to mark out the width that you want for the striped area, but I find it quicker and easier to just grab an appropriately-sized strip of plasticard or (as shown here) a spare support strut from the Maelstrom's Edge terrain sprue and use it as a guide.
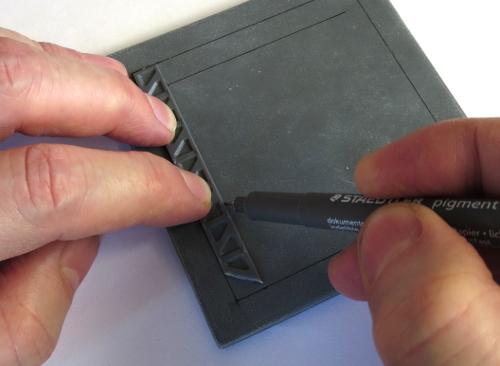
Once you have marked out the area to be striped, it's time to start adding in the lines for the striping itself. I generally use something around about a 45-degree angle, but the precise angle doesn't really matter. Place your guide strip where you want the first stripe (I started at the corner here, because it seemed like the obvious place) and draw a line either side of the strip. If you're working to the right, move the strip to line up the left hand edge with the right hand stripe, and draw a new line along the right of the strip. Repeat all the way along.
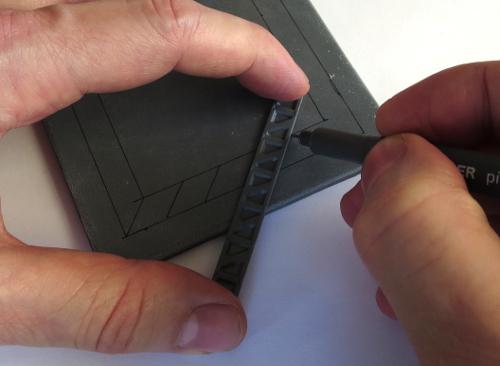
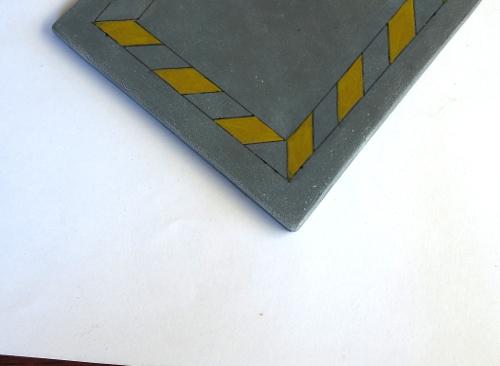
If your hazardous area has corners, there are a couple of ways to approach them. The easiest way is to just run your stripes past the corner, so that the angle of the stripes reverses around the corner.
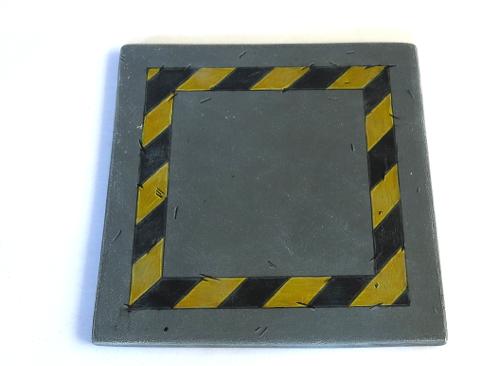
Once you're all marked out, it's a good idea to either set the piece aside for a couple of hours to let the pigment from the pen set properly, or hit it with a coat of fixative spray (which you should be able to get in the sealer section of any decent craft store) to avoid it smudging. Then it's time to fill in every second stripe with yellow. Here, I've used a basecoat of Iyanden Darksun followed by a coat of P3 Cygnus Yellow. It doesn't matter if it's a little patchy, unless you're going for a new and pristine look to your terrain.

The above shows how the stripes 'flip' when they go around the corner. Alternatively, you can run the stripes to the corner, and then start another run of stripes in the new direction. This can be fiddly for odd angles, but works fairly well for 90-degree corners.
It's also worth mentioning that if you are worried about painting neatly in the lines, you can minimise the need to do so a little by painting the whole area yellow before marking the stripes in. That way, you only have to be neat with the black, which is a little more forgiving since messy bits that run over the lines can just be turned into weathering anyway.

Extra tip - If your striped area runs up to a wall, cutting the end of your template strip at an angle lets you get it
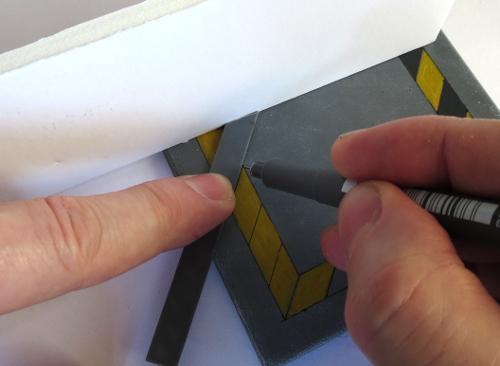
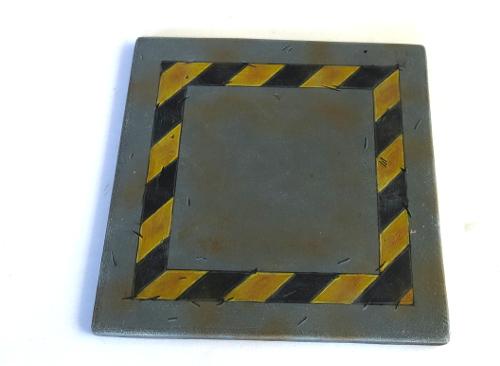
Next, fill in the 'black' areas. I prefer to use a dark grey rather than a black, as it looks a little more natural. Here, I'm using Vallejo Heavy Charcoal, from their Game Colour 'Extra Opaque' range.
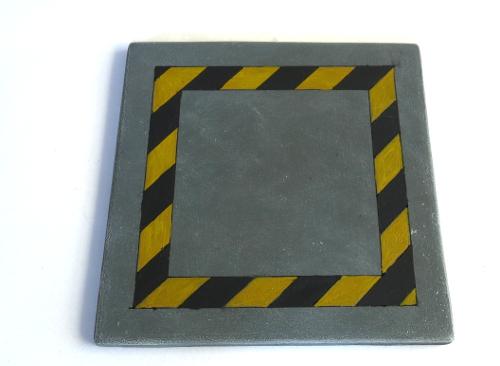
If you're in a hurry, you can leave it there and it will look quite presentable. Or carry on for a little more detail...
Add some chips and scratches with your pen, wherever seems appropriate. This is a great way to conceal any spots where your paint wasn't completely inside the lines, and also adds some extra detail to the finished piece.

Then highlight the edges of the hazard stripes and the scratches with lighter yellow and grey - I just mix a little white into whichever yellow I used for the stripes, and some Vallejo Basalt Grey for the 'black' sections. I have also used some Vallejo Light Grey to highlight the scratches on the surrounding cement area.
You can 'fade' the stripes, to give them a more worn appearance, by drybrushing with a little of the same colour as the area around them. My cement on this piece is Vallejo Basalt Grey drybrushed with Light Grey, so I've drybrushed over the stripes with some more light grey. The heavier you go with the drybrush, the more faded the end result.
Finally, a bit of brown drybrushed into the middle of the yellow stripes gives them some more depth, with some more brown (Vallejo Beasty Brown here) drybrushed around to dirty things up.
And that's about it. Go forth and hazard up your terrain wherever seems appropriate.
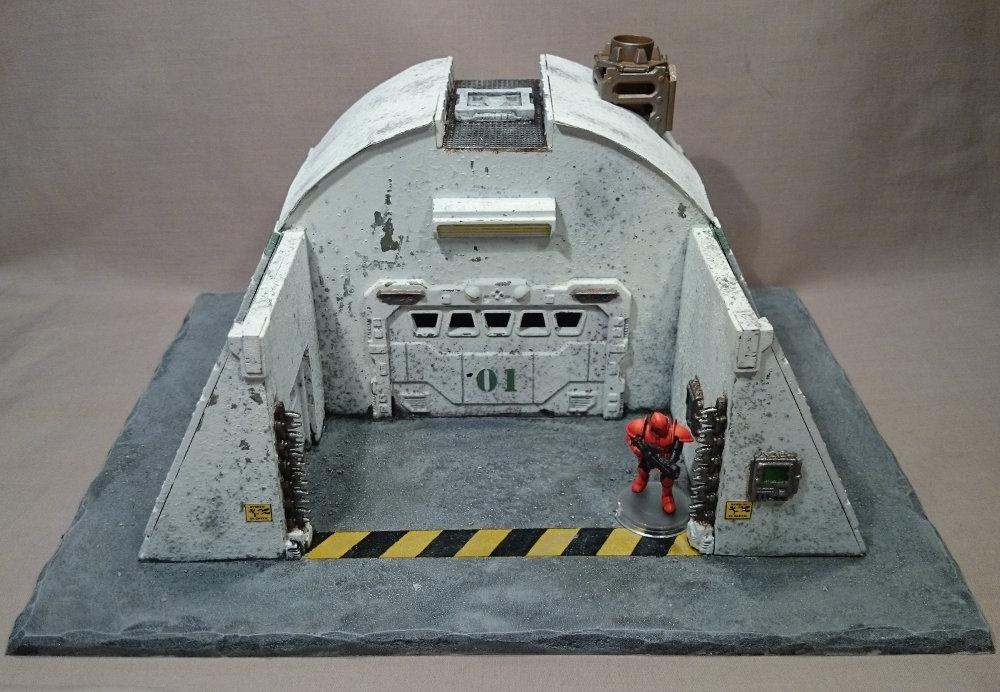
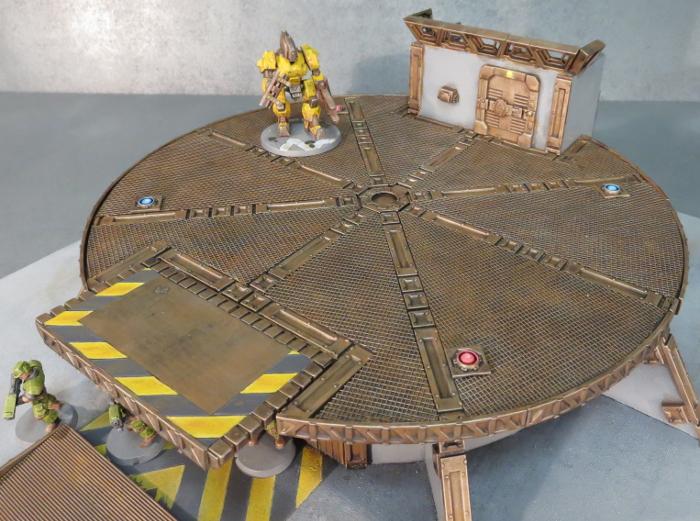
Gateways, energy fences, holes, hatchways, heat vents, and anything else that could conceivably crush, spindle or make your day unpleasant is a good candidate for some serious warning stripes.
To build your own hazardous terrain, you can pick up the Maelstrom's Edge terrain sprue from the webstore here. As always, feel free to share your creations on the Comm Guild Facebook page!
For other Maelstrom's Edge modeling articles, including tutorials and walkthroughs of a wide range of different building and miniature projects, check out the article roundup here.
Terrain Tutorial: Streetlights
Posted on Monday Sept 11, 2017 at 05:00pm in Tutorials
- by Iain Wilson
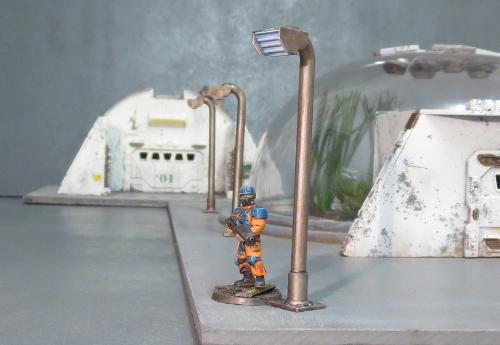
When you're putting together an urban table, little 'real' details can help immensely to bring it all to life. With that in mind, we shared a tutorial a little while back for creating simple hedges made from kitchen scourers and flock. This week we're adding to the urban chaos, and using up some of that leftover sprue, with some quick and easy streetlights.
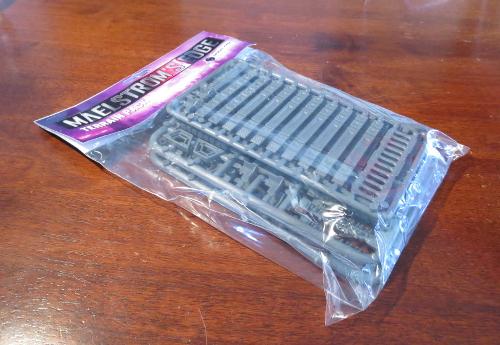
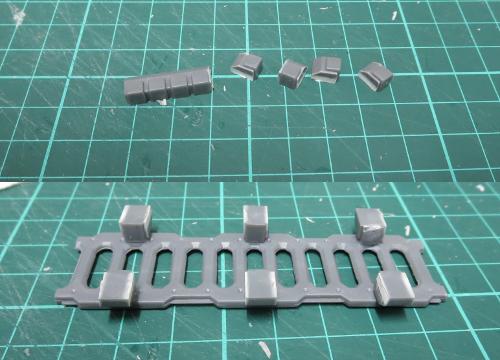
The Maelstrom's Edge terrain sprue has a whole slew of useful components on it, but it also has a nice, rounded frame that is itself rather handy for making pipes, railings or, in this case, streetlight poles. I'm using three emptied sprues (the smaller side of the two frames that make up the terrain sprue), three small pipe fittings, a striplight, some 6mm plastic tubing and some .75mm plasticard.

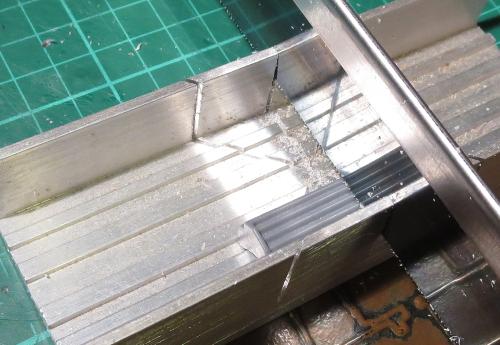
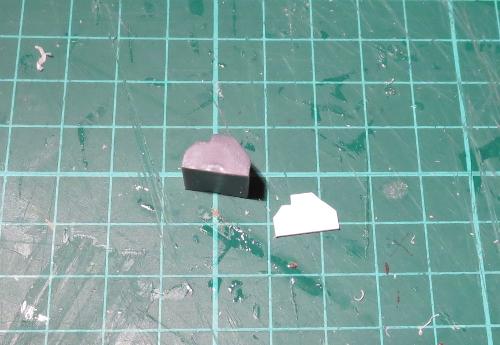
The first step is to take the striplight and cut it into 3 sections. You can do this with a sharp hobby knife if you're patient and not too attached to your thumbs, but a razor saw and hobby mitre box makes the job a lot easier.
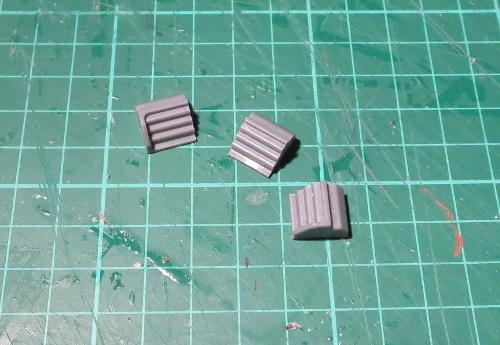
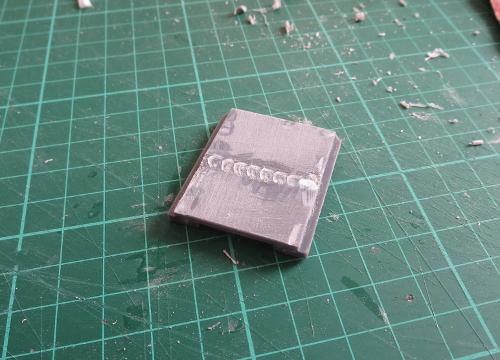
Trace around one of the end sections of the cut striplight to transfer the shape of the light's side panel to the plasticard, and then cut out four panels - 1 each for the light sections from either end, and two for the middle section.
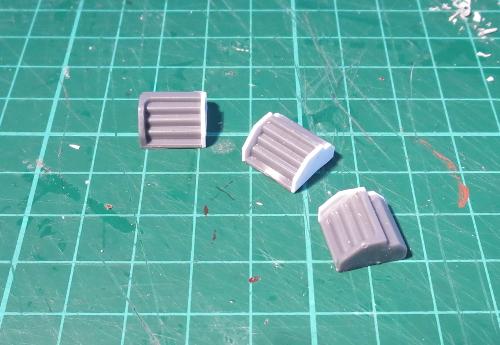
Glue these panels in place. Once the glue is dry, you can shave or file the edges of the panels down so that they are flush with the shape of the light.
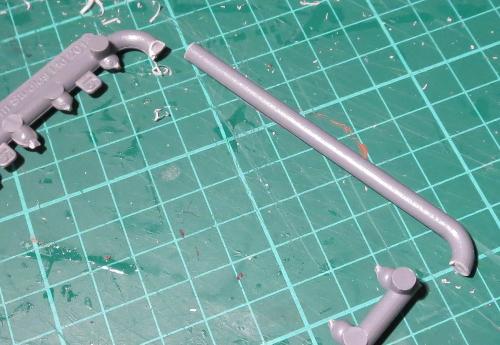
The sprue frame has one end that has no connection tabs on it. This end will form the pole for the light. Cut three of them as below:
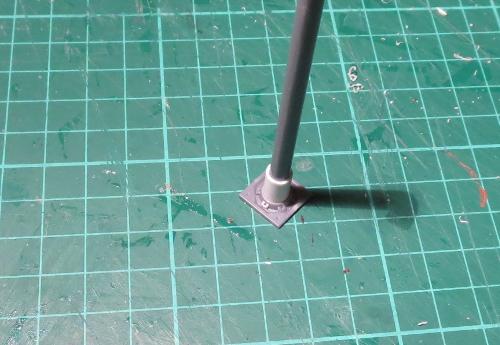
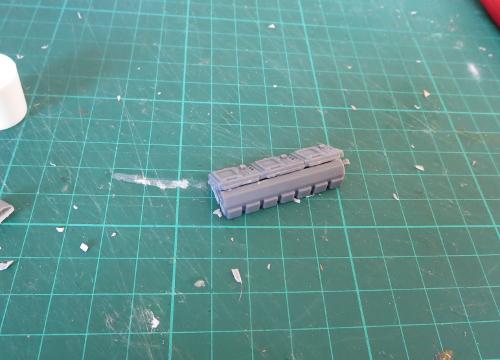
On the straight end of each of the poles, add a short piece of the plastic tube - I've used a 10mm section, but the exact length isn't important so long as it's consistent on all of your lights.
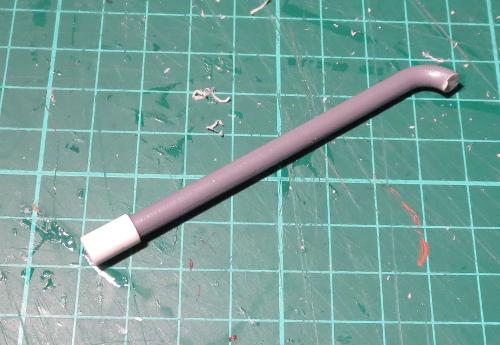
The tube then goes into the pipe fitting.
From the leftover sprue, cut three identical connection tabs.
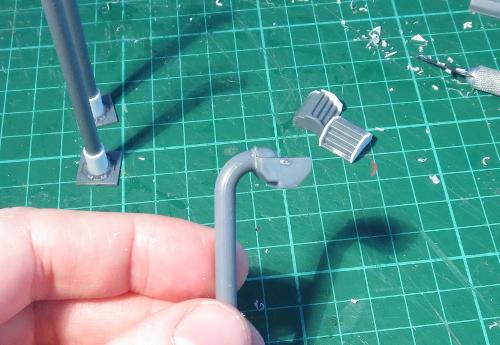
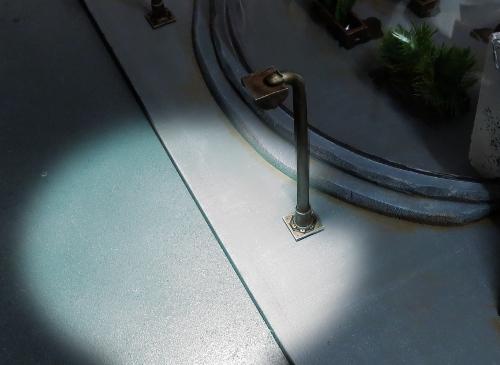
The light is glued in place on the bent end of the pole, and the connection tab is glued on top to add a little detail and bulk up the joint to match the end of the pole.
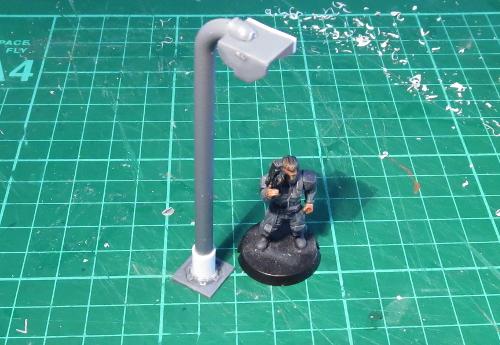
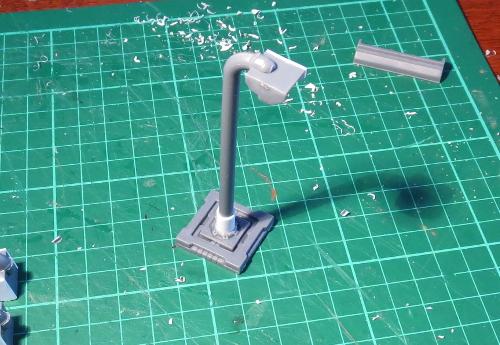
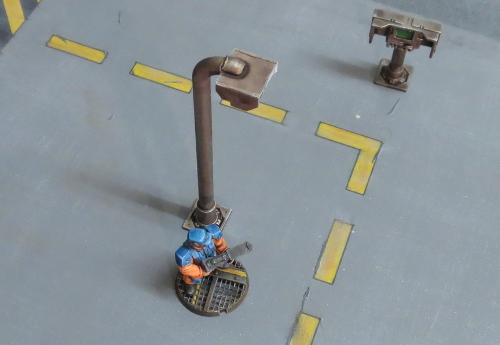
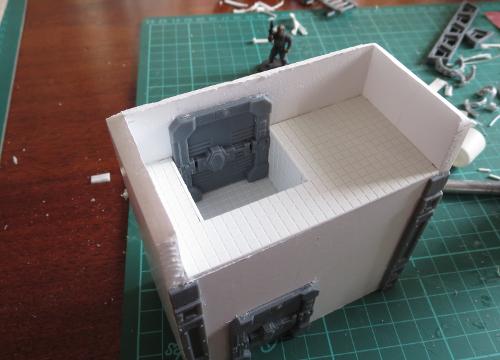
If you're intending to glue the lights onto your terrain, then you're done (aside from painting, obviously). If you want to be able to use the streetlights as scatter terrain, then you might want to glue them to a slightly larger base to make them more stable. You could use a small circle of MDF or plasticard, a spare miniature base, or alternatively the square hatch from the terrain sprue serves for a more high-tech solution.
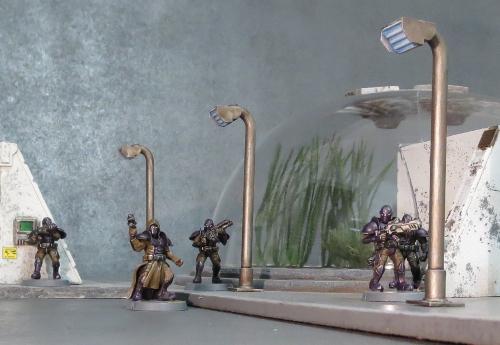
From there, it's all down to painting. The lights shown here have been painting using the weathered metal formula that features in so many of my articles - You can find the tutorial here.
And that brings us to a close once more. Time to pop the chairs up on the tables, grab our umbrellas and saunter off into the gathering dusk...
To put together your own scifi urban utopia, you can pick up the Maelstrom's Edge terrain sprue in a handy two-pack from the webstore here.
As always, feel free to share your creations on the Comm Guild Facebook page!
For other Maelstrom's Edge modeling articles, including tutorials and walkthroughs of a wide range of different building and miniature projects, check out the article roundup here.
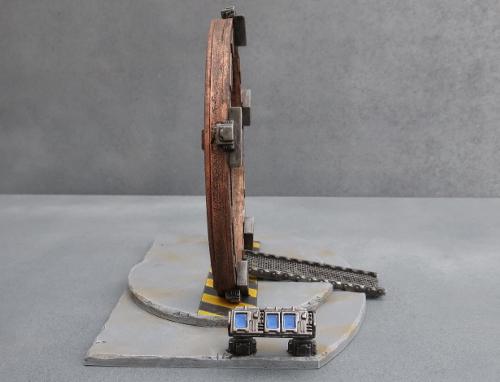
Terrain Spotlight: The Galactic Wanderer
Posted on Monday Aug 21, 2017 at 05:00pm in Models
- by Iain Wilson
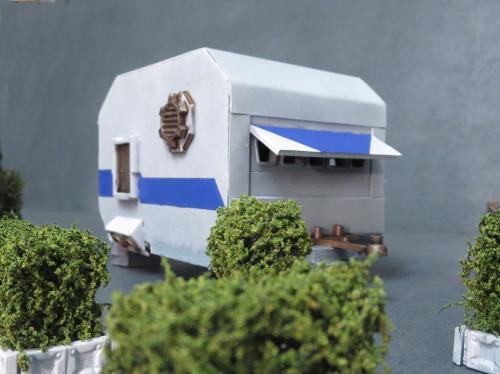
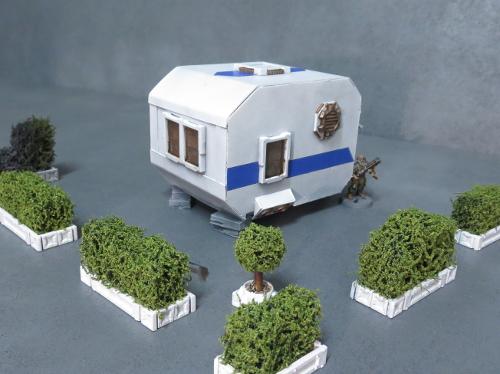
When I shared my Hedge Tutorial a few weeks ago, there was a comment made that they looked like they would be right at home in some sort of scifi trailer park. Well, I'm not one to let a challenge like that go unanswered, and so... the Galactic Wanderer was born.
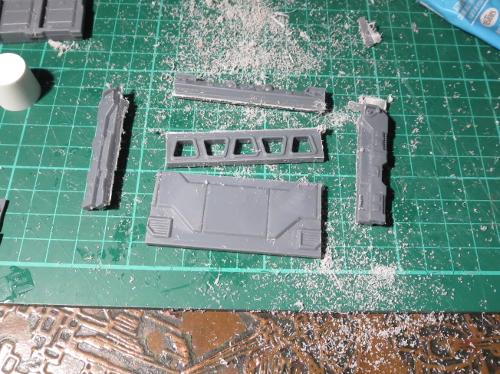
Like many of my terrain builds, this all started with some foam core and a bunch of parts from the Maelstrom's Edge terrain sprue.
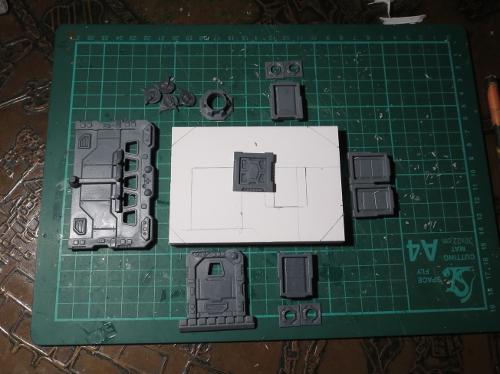
I cut a fairly basic, old-school caravan shape from the foamcore, and cut holes for a door and some windows.
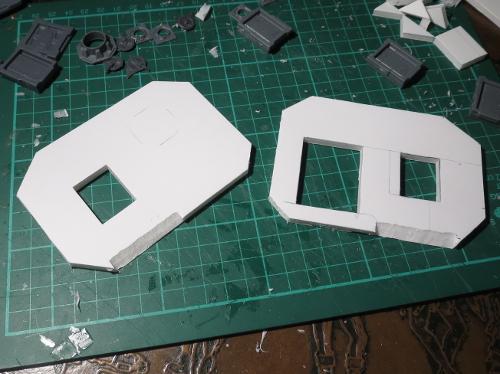
The body of the caravan was glued together with foam glue (a white glue that I picked up a while back. It may well just be overpriced PVA glue, but it does a good job of gluing foam and grabs a little faster than a lot of PVA glues that I have tried) and the door and windows glued in place.
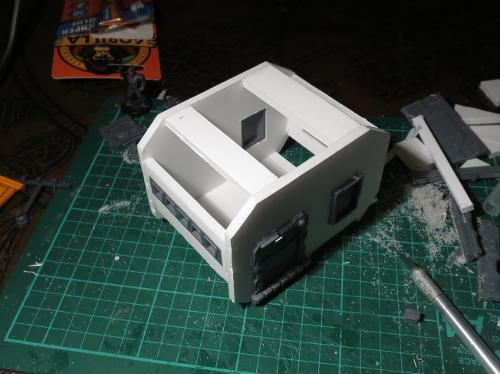
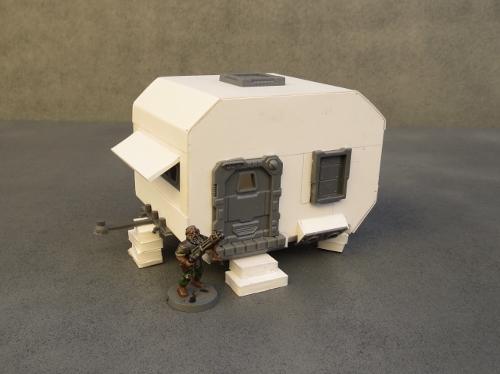
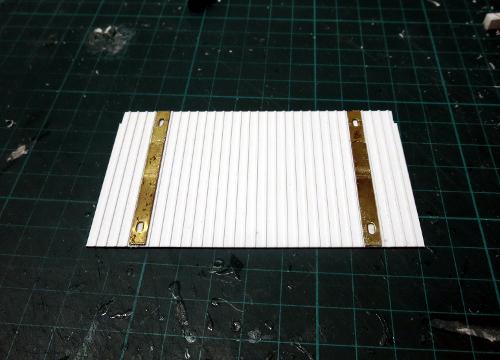
A strip of windows cut from a garage door fit quite nicely along the front wall.
An awning cut from a piece of 2mm plasticard provides a nice break in the regular shape of the caravan, and is totally there for aesthetic reasons and not at all to help conceal the fact that the strip of windows actually wound up just a little bit wonky. I also added a towbar made from a section of old sprue, a hatch in the roof, and rested the construction on some 'bricks' cut from discarded pieces of foamcore.
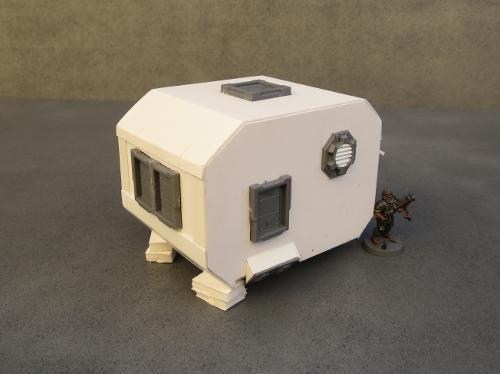
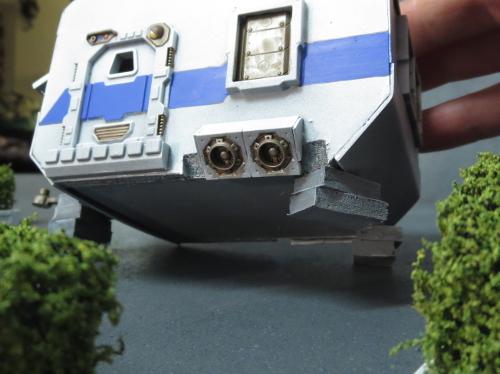
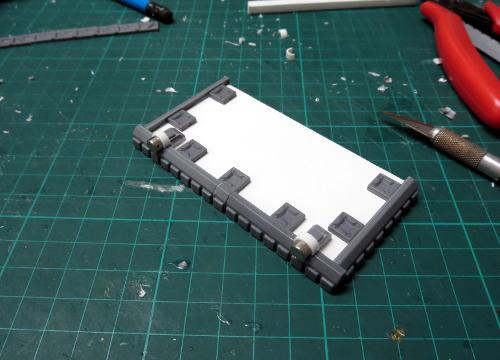
To help with the scifi vibe, unstead of wheels this caravan has some turbines made from the small pipe fitting from the terrain sprue with some turbines from the Epirian Drone sprue behind them. And finally, a large pipe fitting, trimmed off with a razor saw and with some strips of plasticard glued inside provides some ventilation.
A quick spray and some striping later, and the compact, budget-conscious home of the future is ready for housing stellar refugees or indulging the wanderlust of the more well-to-do.
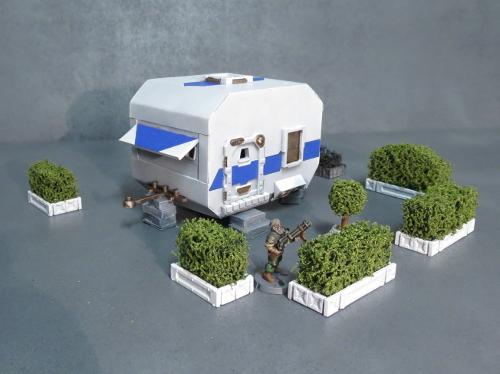
A better look at the caravan's 'wheels':
To build your own holiday villa or mobile refugee camp of the future, you can pick up the Maelstrom's Edge terrain sprue from the webstore here. As always, feel free to share your creations on the Comm Guild Facebook page!
For other Maelstrom's Edge modeling articles, including tutorials and walkthroughs of a wide range of different building and miniature projects, check out the article roundup here.
Tags: buildings modeling spotlight terrain terrainsprue walkthrough
Terrain Spotlight: Experimental Cybel Gate
Posted on Monday Jul 10, 2017 at 05:00pm in Models
- by Iain Wilson
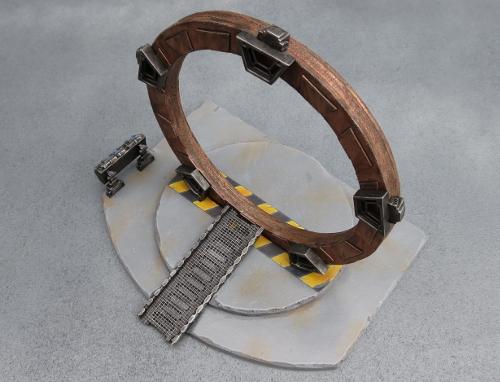
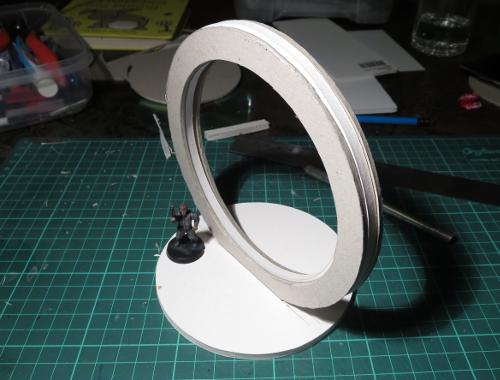
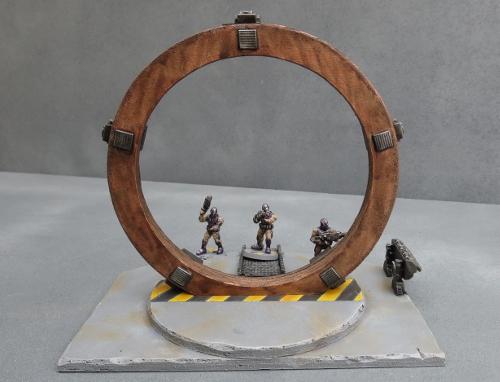
As the Maelstrom's apocalyptic conflagration closed in on the planet Devlin IV, rumours began to circulate amongst those still desperately trying to find passage off-world that scientists in a secret Epirian Foundation facility had been working on a new kind of Cybel gate that might prove to be their salvation. Whilst most Cybel gates are massive, space-borne affairs, this gate would supposedly operate from the planet's surface! While the rumour would ultimately lead to disappointment, as the project had been a dismal failure, it nevertheless gave temporary hope to many who had given up on escaping the Maelstrom's wrath and fueled a frantic search for this device.
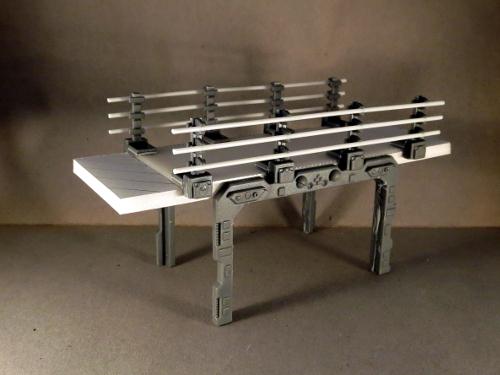
I had an idea a while back for a table themed around a Cybel gate research facility, where the experimental gate would form a centrepiece that would double as both a cool focal point and a potential objective for scenario-driven games. Capturing a resource such as this would, of course, be a worthy goal for any of the various forces encountered in Maelstrom's Edge, and there is all sorts of additional potential for thematic events when the gate is activated. Below is what I came up with, built from foamcore, cardboard, and components from the Maelstrom's Edge terrain sprue.
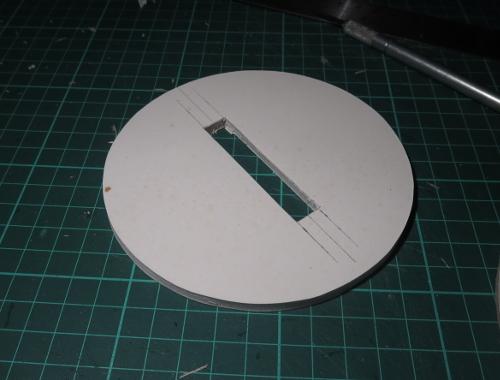
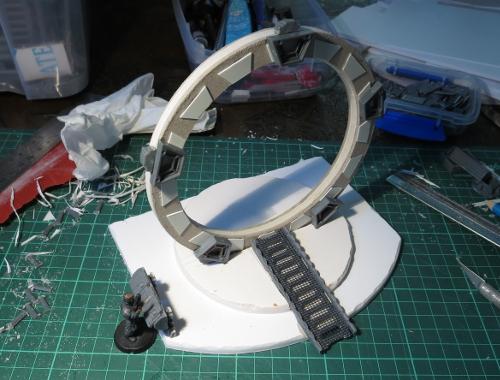
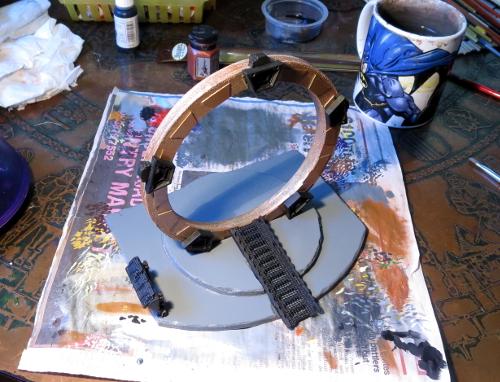
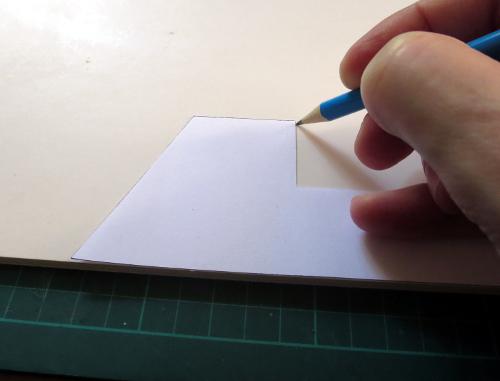
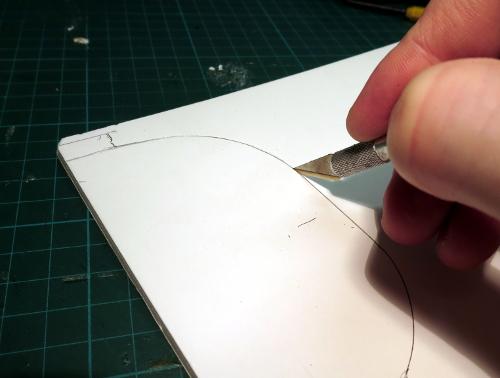
I started out creating the basic shape for the gate by tracing two concentric circles onto a sheet of 5mm foamcore and cutting the resultant ring out with a hobby knife.

I then used the foamcore ring as a template to make two more rings from thick card.

The circle cut from the inside of the foamcore ring was the perfect size to act as a base, with a channel cut down the middle for the ring to sit in.
The three rings were glued together, and set in place to check the fit.
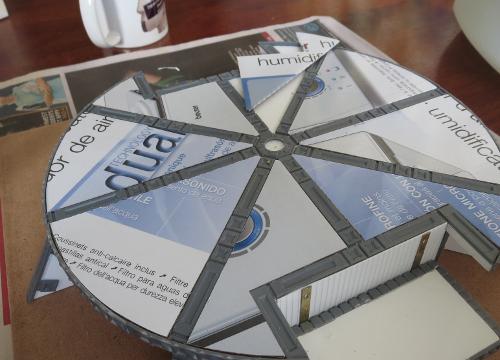
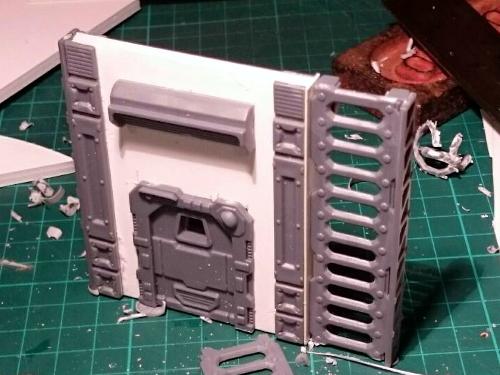
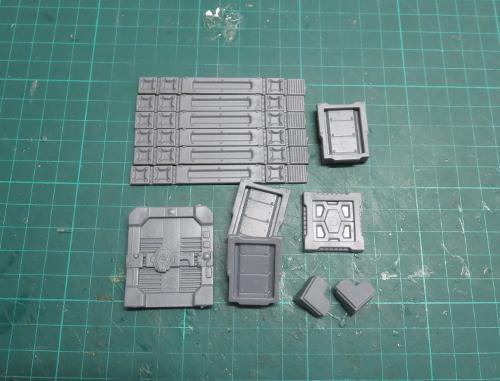
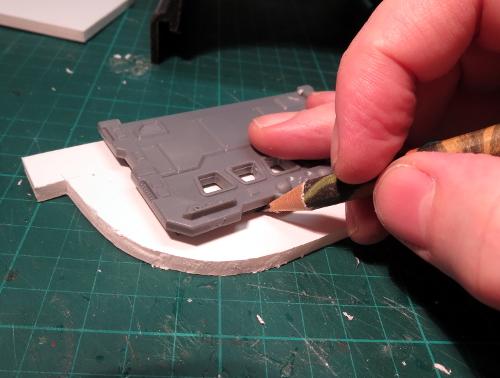
Next, I cut a bunch of trapezoid shapes from plasticard, sized to fit neatly inside the trapezoid window from the Maelstrom's Edge terrain sprue.
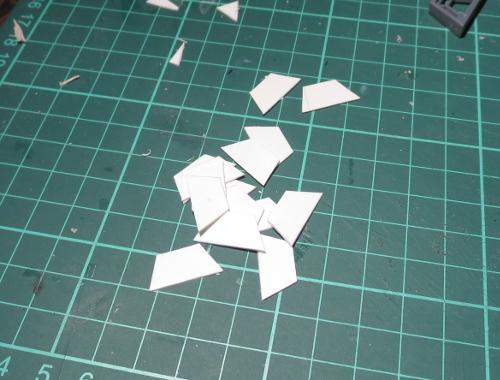
These were glued at intervals around one side of the ring.
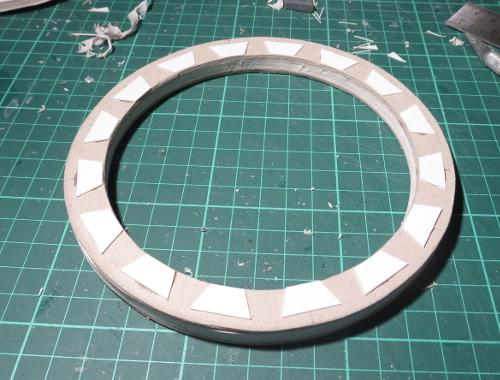
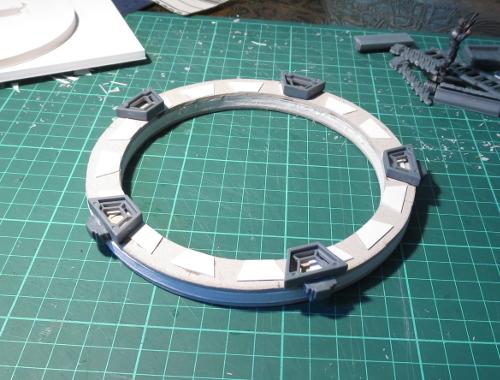
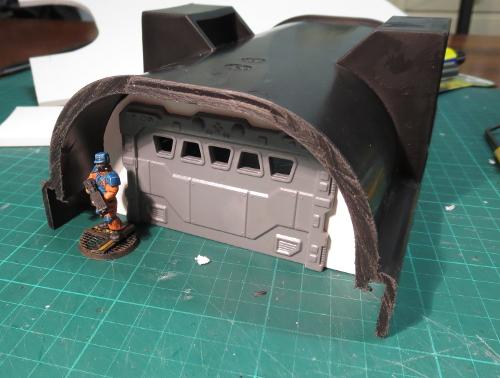
Over these, I glued 5 trapezoid windows, with power units cut from the bottom of the energy-fence posts glued around the outside of the ring.
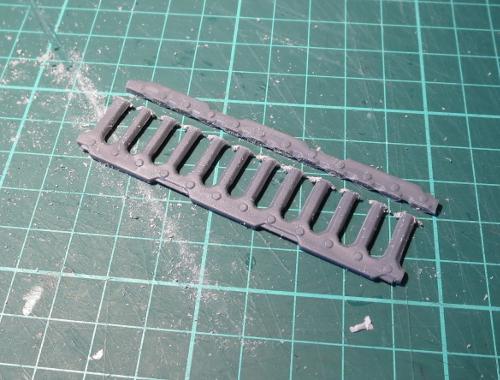
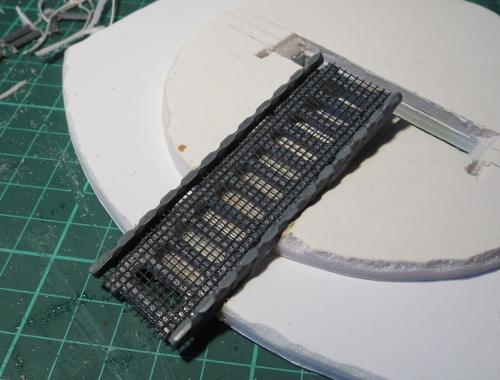
I took a ladder and cut the outside edges off with a razor saw.
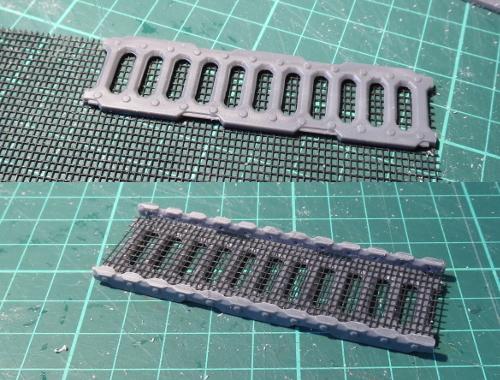
A second ladder was glued to a sheet of flyscreen, and then the flyscreen trimmed around the edges of the ladder and the cut pieces from the first ladder glued onto either side.
The base was bulked up a little with another layer of foamcore.
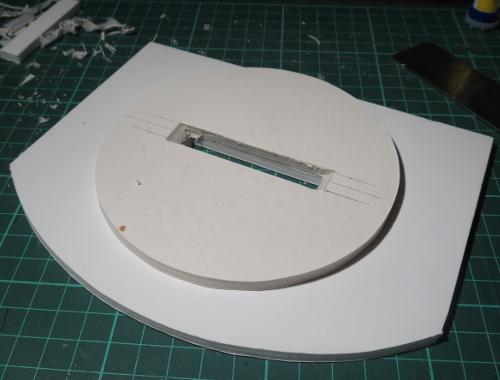
I then used a file to carve out an angled ramp down the front of the base.
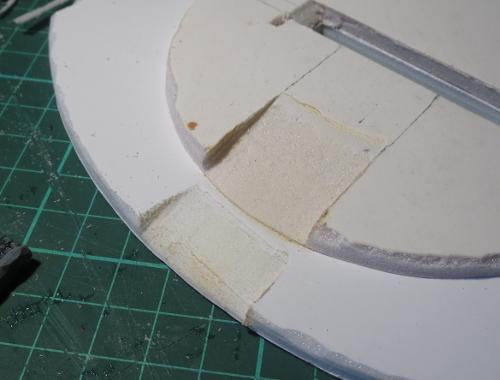
The ladder assembly slots neatly into the ramp recess.
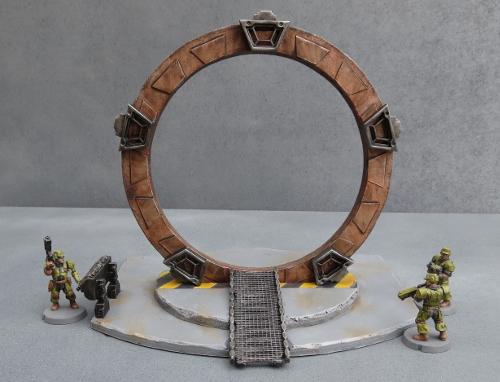
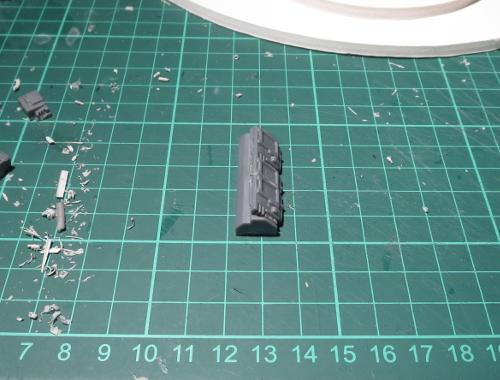
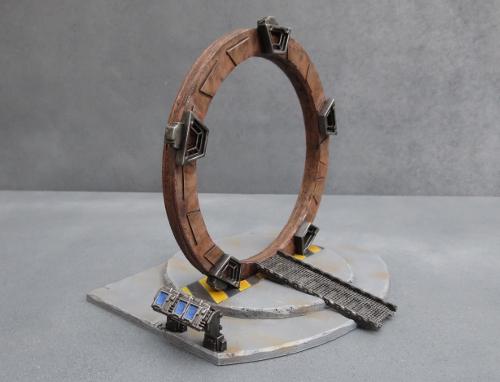
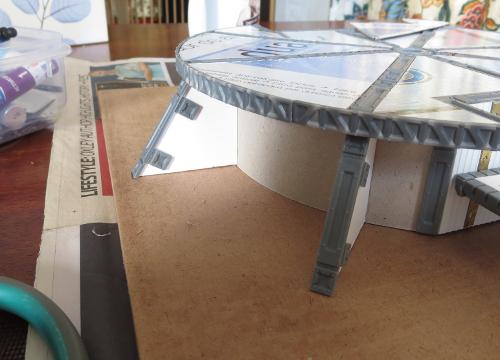
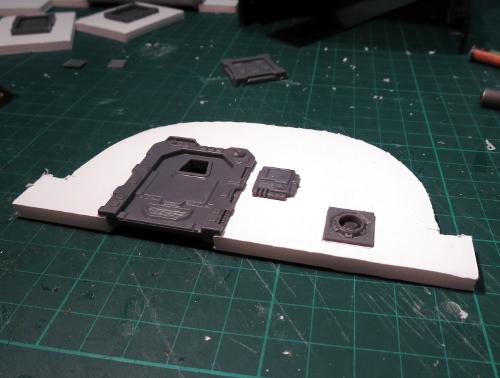
Finally, I put together a control panel using a light fixture and three trimmed computer panels.
With the addition of some legs made from trimmed down energy-fence posts, the control panel was glued in place, and the gate was ready for painting.
I wanted a bit of contrast in the gate assembly, so decided to go with a coppery ring and darkened steel details. To get started, I sprayed the ring with Army Painter Army Green, partly to give a nice base layer for the copper and partly because I didn't have a lot of time for painting this week, and the Army Painter sprays dry nice and quickly...

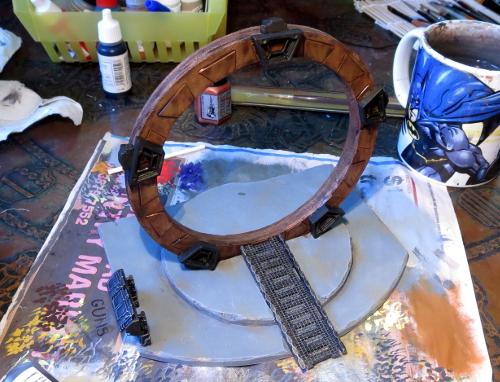
Over the green, I did a couple of coats of some old Citadel copper that I had laying around.

The base was sprayed with a medium grey colour.
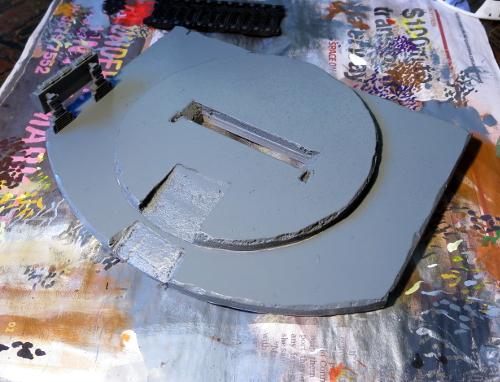
I then picked out the steel parts with black. It's a little hard to see in this lighting, but I also drybrushed the base with a light grey and added some dirt scuffing with some lightly drybrushed brown.
The ring was given a couple of coats of Army Painter Strong Tone, and the steel parts drybrushed with P3 Pig Iron and then washed with Army Painter Dark Tone.
Finally, the control panel screens and some hazard lines were added, and the ring was given a light drybrush with silver to lift the edges a little.
If you would like to build your own experimental Cybel gate, you can pick up the Maelstrom's Edge terrain sprue from the webstore here. As always, feel free to share your creations on the Comm Guild Facebook page!
For other Maelstrom's Edge modeling articles, including tutorials and walkthroughs of a wide range of different building and miniature projects, check out the article roundup here.
Terrain Spotlight: Giftbox Garage
Posted on Monday Jul 03, 2017 at 05:00pm in Models
- by Iain Wilson
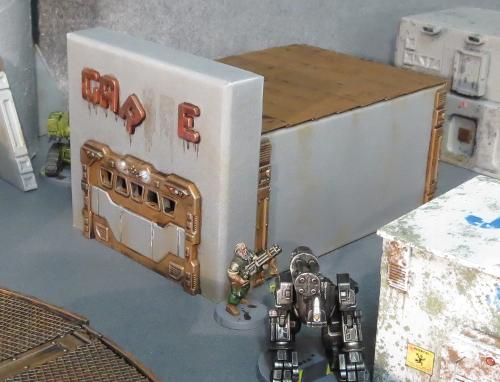
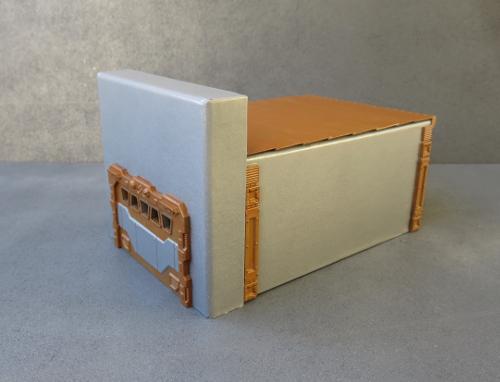
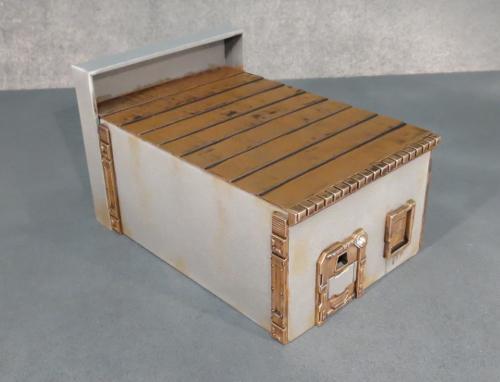
A while back, I shared a scifi western-themed building constructed from a Plast Craft Games plastic kit and the Maelstrom's Edge terrain sprue. This week, I wanted to have another try at that vaguely-western, raise-facade, scifi styling, but with more of a mass-produced, cheap colony building sort of vibe. Something a little more urban, but with a nod back to the frontier. This is what I came up with:
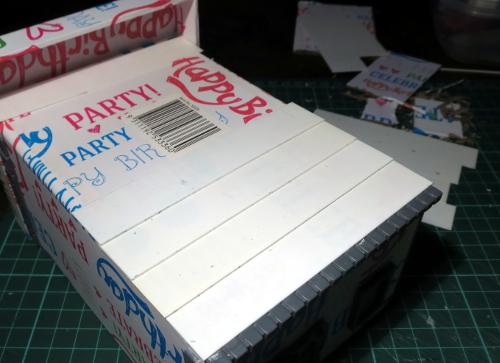
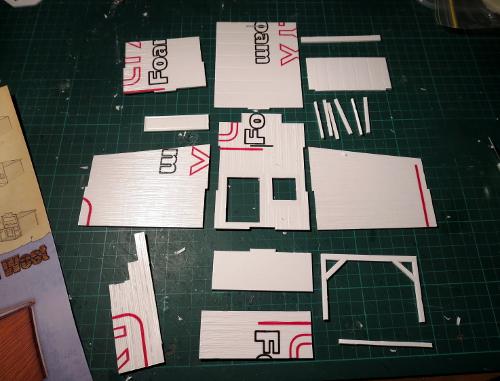
This is built from one of my favourite bases - the good old cardboard giftbox.
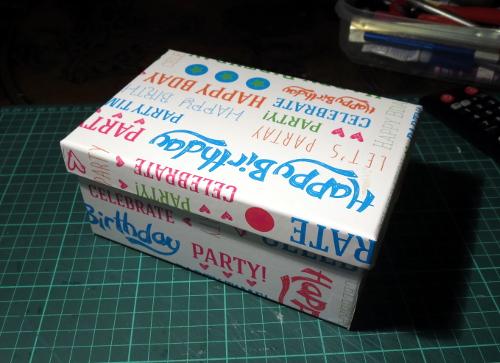
You can pick these up from just about anywhere that sells giftwares or from many craft shops, and they're generally fairly inexpensive. Craft shops will also often have raw cardboard versions without the printing on the outside, which does have the bonus of looking slightly less hideous while you're putting it together, but can have a rougher surface texture.
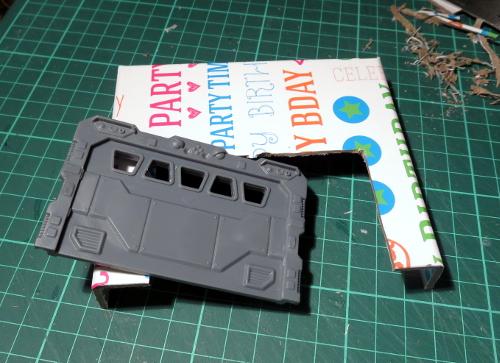
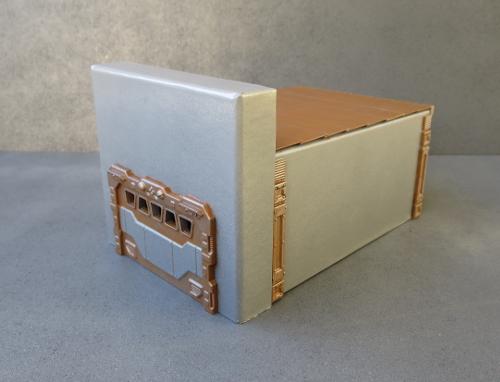
For my previous giftbox buildings, I used the lid upside down on top to form a walled-in roof area. This time, I used the lid for the facade. So the first step was to cut the lid to the height that I wanted the front of the building. I also cut away the end wall of the box, so that the hole for the front door only needed to go through the facade - The door inset is deeper than the width of the card, so would I otherwise have needed to cut a second door hole in the end of the box and hope that they lined up properly.
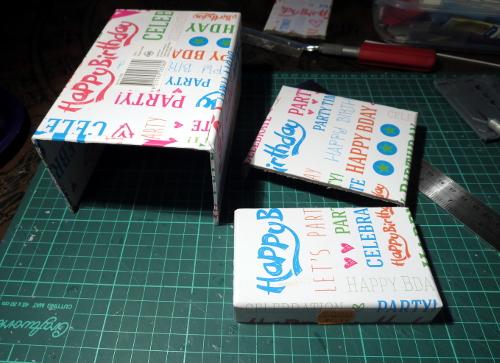
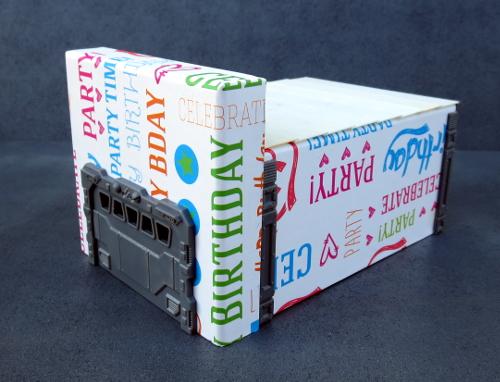
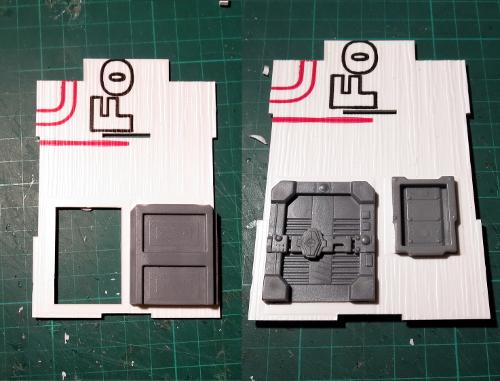
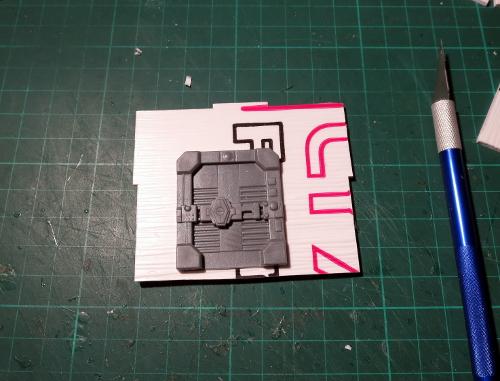
Speaking of a door hole: I took the garage door from the terrain sprue, sat it in place against the facade, and traced around the back of it before cutting out the resultant rectangle. The garage door was then glued in place.
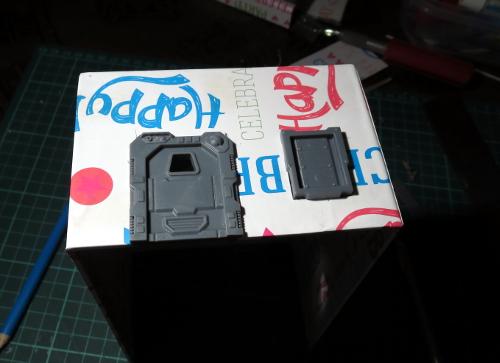
The same process was used on the intact end of the box to add a small door and shutter window from the terrain sprue.
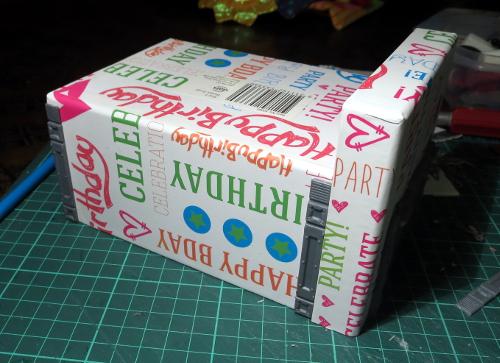
The facade was then glued in place.

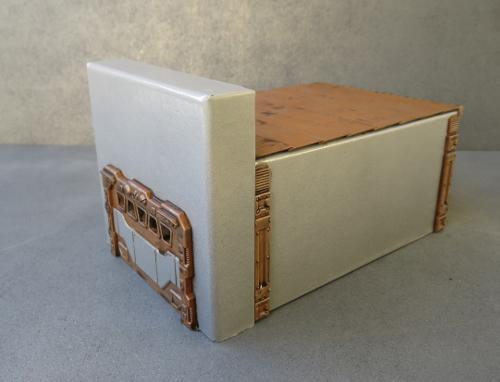
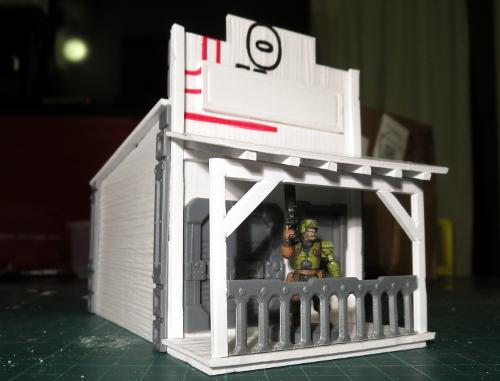
I glued a couple of support struts onto either side of the building, for a little texture.
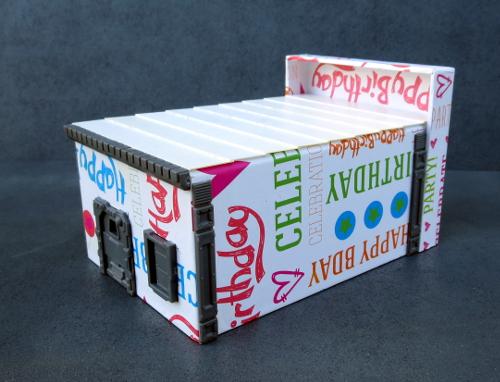
A row of lintel pieces from the terrain sprue were glued onto the top edge of the back wall.
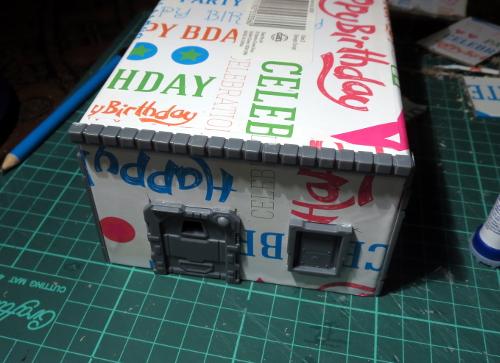
I then layered strips of plasticard along the roof, working up towards the front of the building.
The final building, ready for painting:
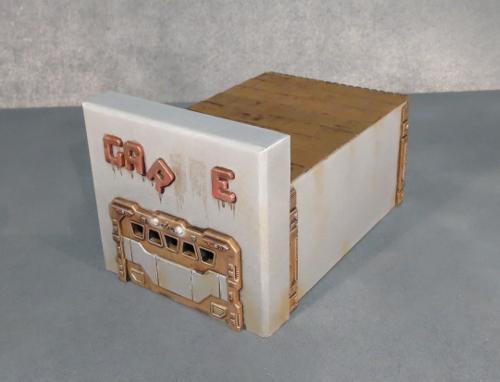
Quick and easy paintjob, that will be quite familiar for anyone who has been following these articles. I started with a black spray undercoat, to give a solid layer to cover over the printing.
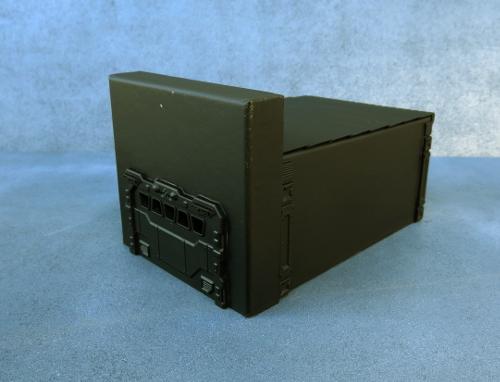
This was followed by a spray of flat grey, and while this was still wet I oversprayed this from above with a lighter grey to add a little bit of a natural highlight.

The metal parts were then picked out with Vallejo Beasty Brown.
Then a drybrush of P3 Pig Iron.
Then a wash of the most useful paint on the planet: Army Painter Strong Tone.
A final drybrush of silver over the metal bits and some detail work, and the newest addition to the table is ready to go.
This design can be very easily tailored to different buildings through using different sized boxes and choosing different sprue components. If you would like to build your own, you can pick up the Maelstrom's Edge terrain sprue from the webstore here. As always, feel free to share your creations on the Comm Guild Facebook page!
For other Maelstrom's Edge modeling articles, including tutorials and walkthroughs of a wide range of different building and miniature projects, check out the article roundup here.
Tags: buildings conversion modeling spotlight terrain terrainsprue tutorial walkthrough
Terrain Spotlight: Landing Pad
Posted on Monday Jun 19, 2017 at 05:00pm in Models
- by Iain Wilson
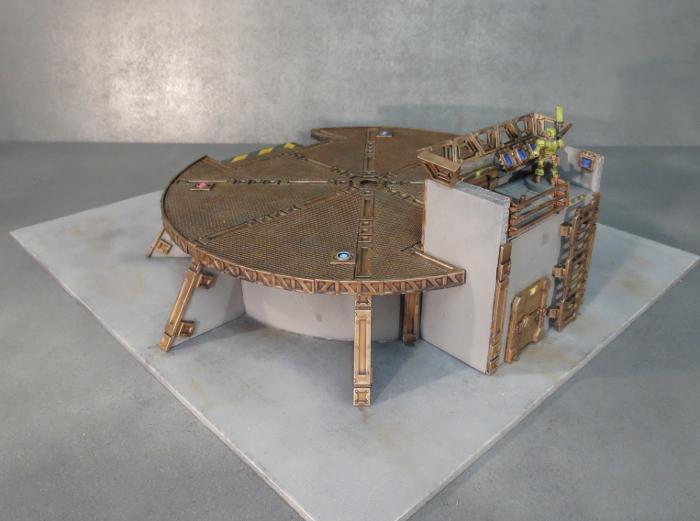
Terrain is a bit of a passion of mine. It can make such a difference to your games having a table full of nice-looking terrain pieces, and this is helped along with the addition of a shiny, impressive centre piece to dominate the battlefield.
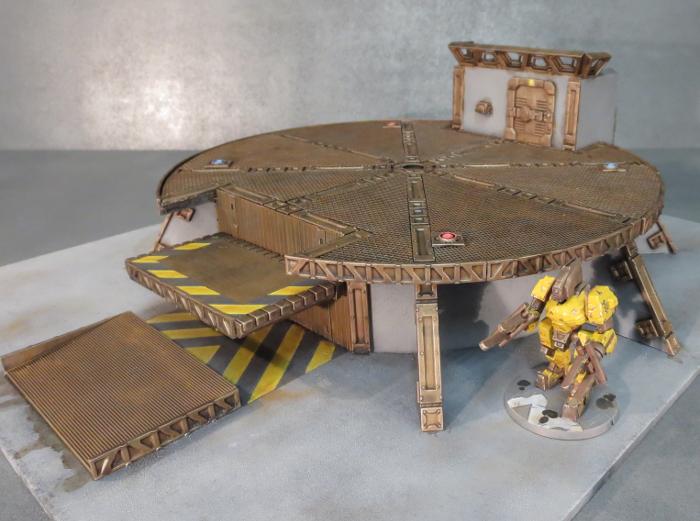
With that in mind, I set to work this week to build a landing pad for my table. Landing pads look great visually, can be easily tailored from game to game with the addition of some crates, landing craft or other small terrain features on top and make for nice line of sight blockers in the middle of the table.
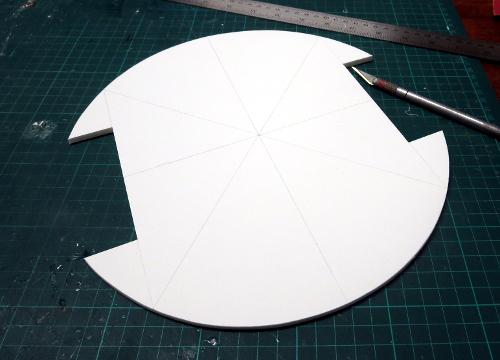
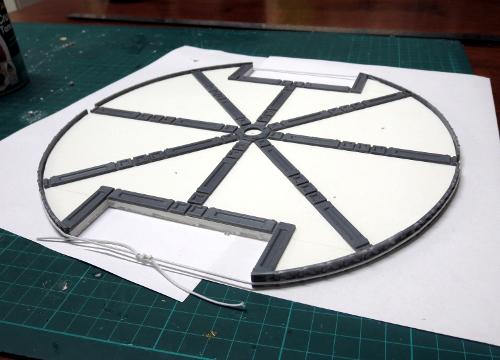
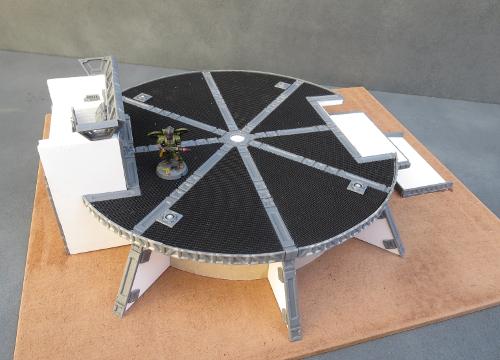
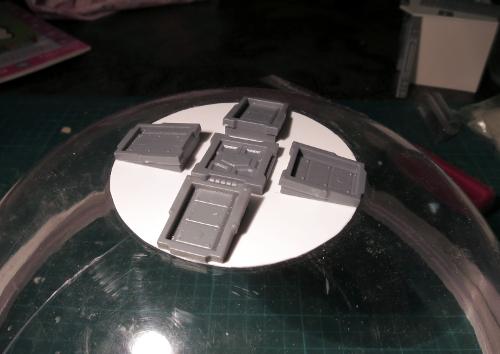
I started out, as so many of my projects do, with a few Maelstrom's Edge terrain sprues and a sheet of 5mm foamcore. A dinner plate served as a handy template for the pad itself.
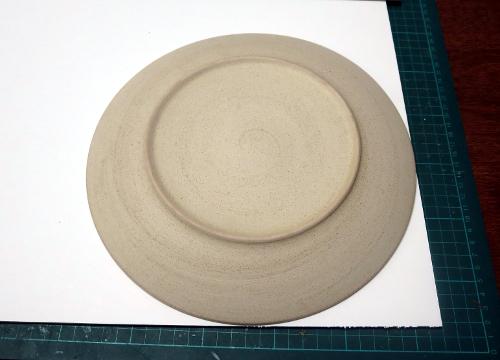
After tracing around the plate, I drew in an inset rectangle on opposing sides, to break up the circular shape a little in order to make the pad a little more visually interesting. The the shape was cut out with a hobby knife, and some guide lines drawn on for some detailing.
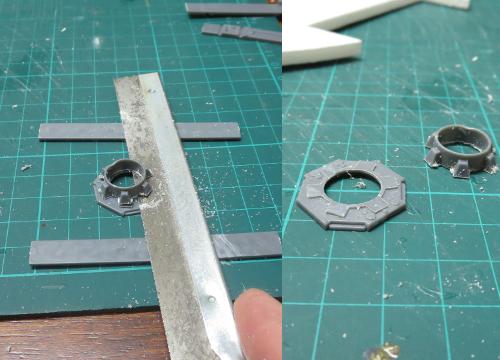
A round detail in the centre of the pad was created from the large pipe fitting, cut down to match the thickness of the support struts. I used a couple of spare struts as height gauges for a razor saw to cut through the pipe fitting sideways.
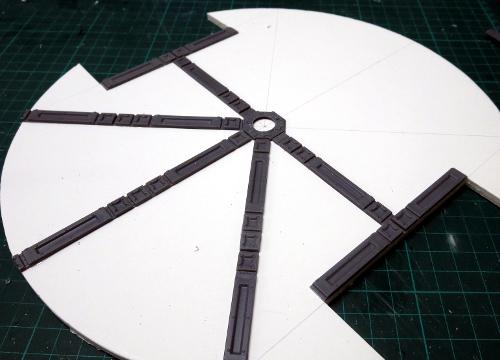
I then laid support struts out along the guide lines, cutting them to length so that they extended to the edges of the pad.
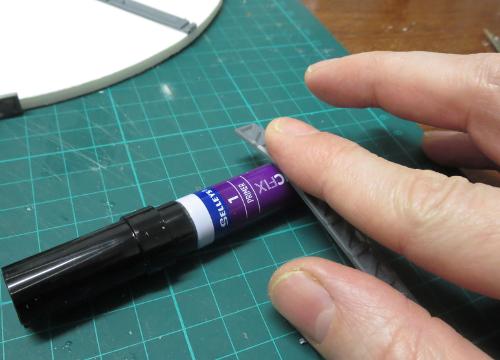
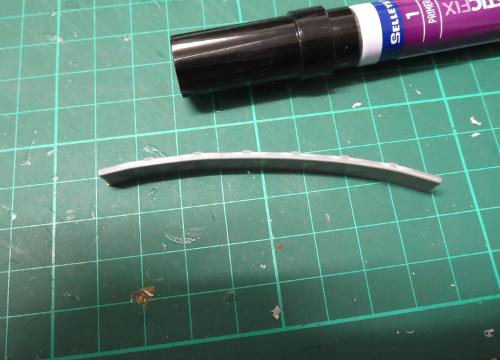
For some detail around the edge of the pad, I took some more support struts and rolled them carefully over a glue primer tube to give them a curve.
These were then glued around the edges of the pad, and held in place with some hat elastic until the glue set.
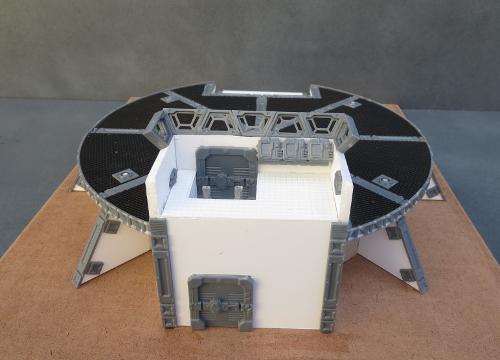
A landing pad on the ground is functional enough, but not much good for blocking line of sight, and certainly won't impress the neighbours. So I made a formwork from some more foamcore to go under the pad. In between each of the formwork supports, I spaced some off-cuts of foamcore to serve as guides for the outer wall.

The outer wall was made from thick card, which was bent around the outside of a coffee mug.
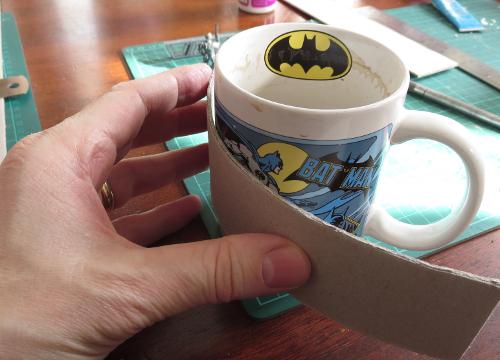
This was then glued in place around the outside of the support formwork, with the help of a few cardboard tabs to reinforce the joints.

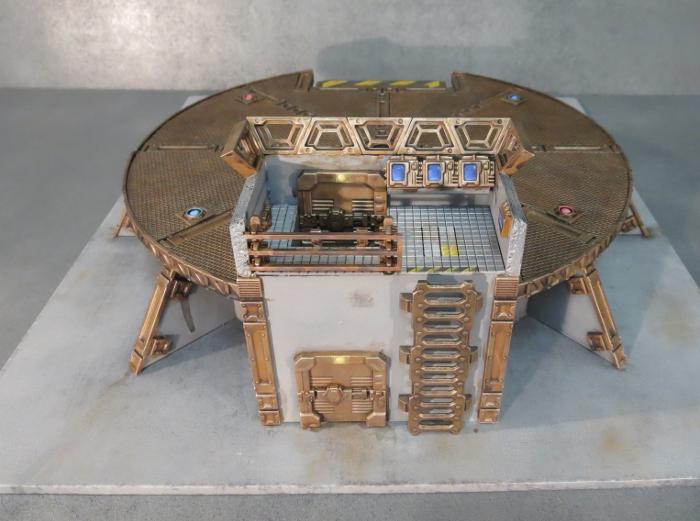
A little more foamcore and some doors from the terrain sprue created the bare bones of a control tower.
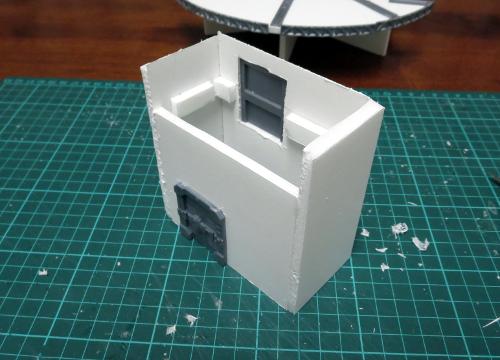
This will have multiple access points, through the lower door, a second door off the pad surface, and a ladder from the ground to the control platform. The ladder can be just glued directly to the wall, but this never looks quite right to me, as it would make climbing it a little problematic unless you cut recesses in behind it. In this case, I decided to space it out from the wall instead, using some off-cuts from the terrain sprue lintel piece.
Because the inside of the upper door can be seen from the control platform, I used a second door on the inside wall. Two doors back to back are a little thick for 5mm foamcore walls, so I trimmed the inner door's back down flush so it would fit in neatly.
The floor of the platform was made from some tile-pattern plasticard, with a recess created for the inner door - this would have a short ladder up to the main platform.
I also made some computer terminals using some computer panels and lintels.
Opposite the control tower will be a lift. I wanted this to be functional, just for a little fun. So I made a wall section from some textured plasticard and glued on a couple of picture hooks that I had flattened out with some pliers and a hammer.
The lift platform was made from a rectangle of foamcore with detailing around the edges provided by some lintels and a support strut. On the bottom of one of the long sides I affixed some nice, strong, rare earth magnets. These allow the lift platform to be attached anywhere along the flattened picture hooks, and are strong enough to hold it up even with models standing on it.
The base of the platform still needed some more detail, so I made some buttresses to going around the perimeter. These are just a wedge of foamcore and some pieces cut from support struts. Normally I layer a piece of 5mm and a piece of 3mm foamcore to match the width of the support strut, but this time I decided to go for something a little more visually striking and just used a piece of 5mm foamcore with extra reinforcing pieces added on either side.

These buttresses were then glued around the base of the platform, lining up with the support struts on the platform top.
The top of the platform needed some more detail, and so I cut some wedges of card to slot in between the support struts.
These were sprayed black, and then painted with a coat of PVA glue and pressed onto some plastic flyscreen. I used a sharp hobby knife to cut around the edges.
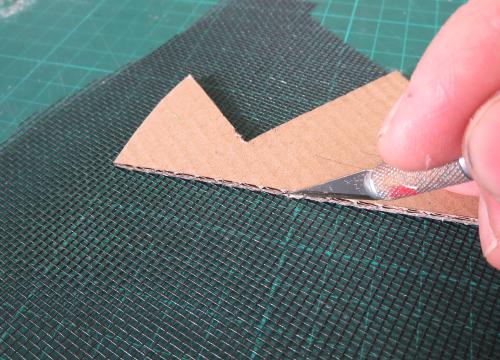
(Spraying them black before gluing the flyscreen on makes painting a little easier, as it can be tricky to cover all of the tiny little nooks and crannies in the flyscreen)
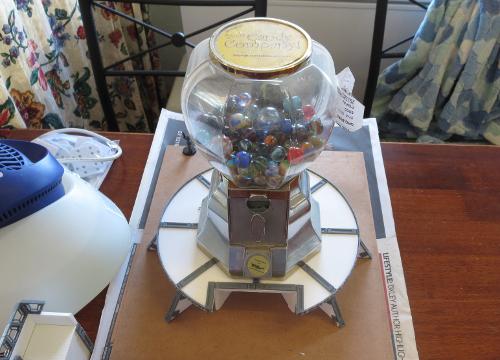
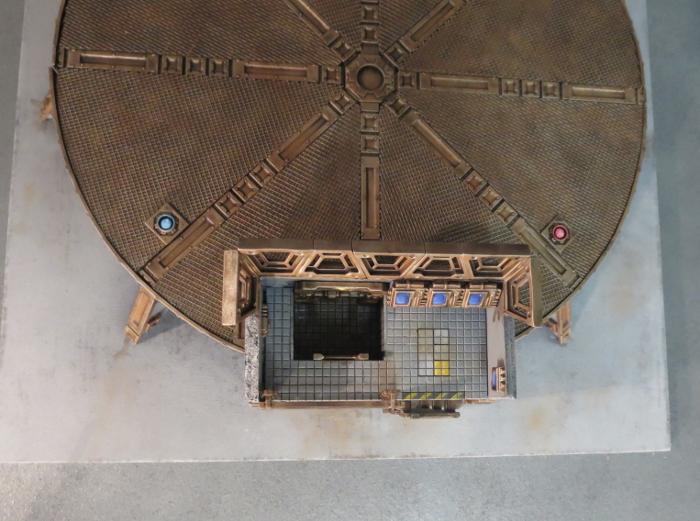
While the glue was setting on the flyscreen, I took the time to glue the landing pad down onto a base board of masonite. A handy, nearby gumball dispenser filled with marbles served as a weight to help the glue bond everything nice and tight.
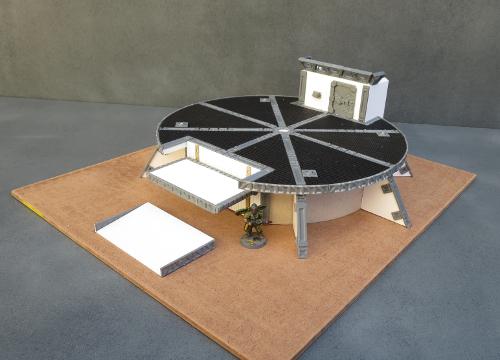
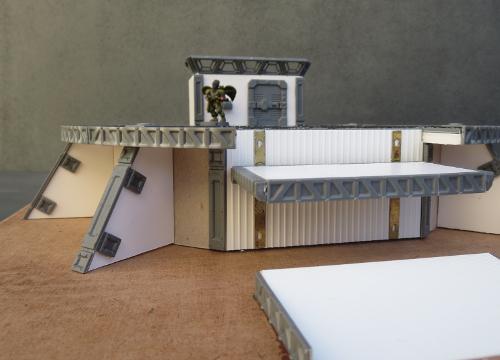
When everything was set, I glued the flyscreened wedges into place on the platform, and added some landing lights made from small pipe fittings and offcuts of sprue.

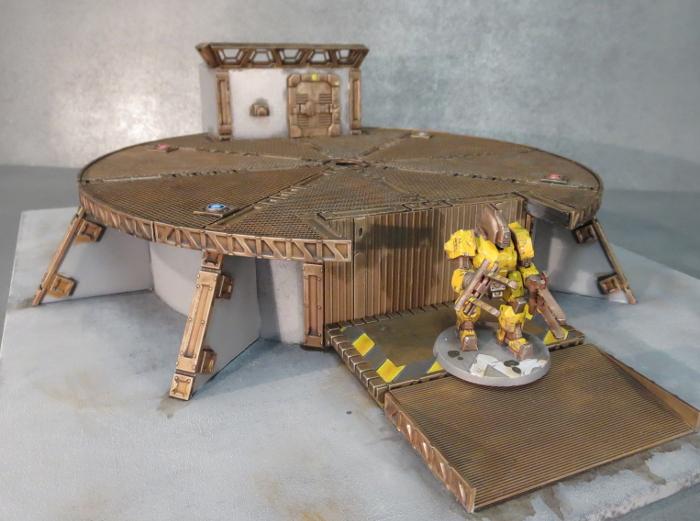
With the control tower then glued in place and a row of trapezoid windows added for controller protection, a ramp up to the lift built on the other side of the pad, and a few other little details here and there, construction was complete.
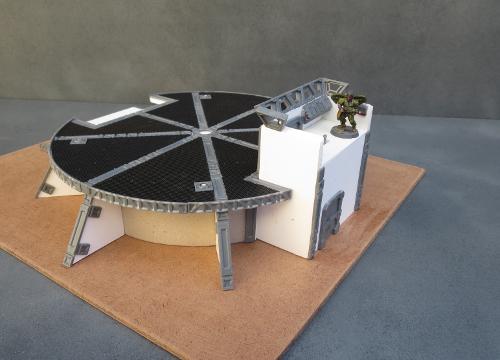
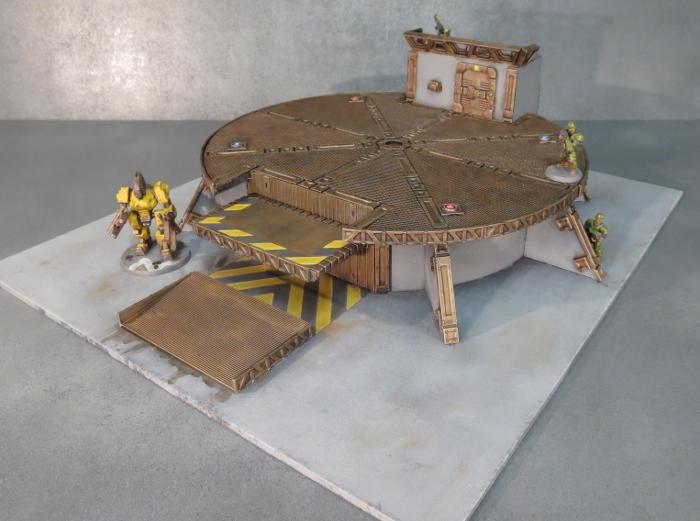
Painting was kept fairly simple: I basecoated with black spray, and then added a coat of grey for the base and walls. The metal parts were then painted using my weathered metal method shown here. Add in the details (including the obligatory hazard striping) and the job's done!
For other Maelstrom's Edge modeling articles, including tutorials and walkthroughs of a wide range of different building and miniature projects, check out the article roundup here.
Terrain Spotlight: Comm Tower
Posted on Monday Jun 05, 2017 at 05:00pm in Models
- by Iain Wilson
One of the things I really enjoy about working with the Maelstrom's Edge terrain sprue is that with a little imagination and a sharp knife, there are so many potential uses for most of the parts. I think I've used the ladders, energy fences and pipe fittings far more as other things than I have for their original purposes.
This week's build is no exception, as I had a bit of a brain-flash as I was looking at the energy fence posts and decided to build a communications array!
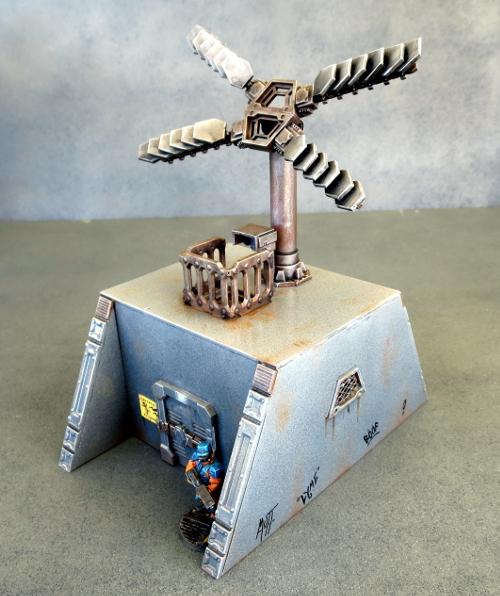
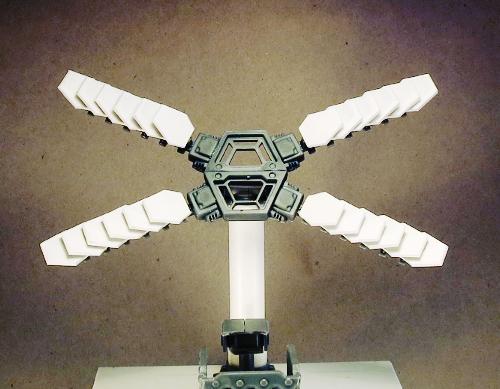
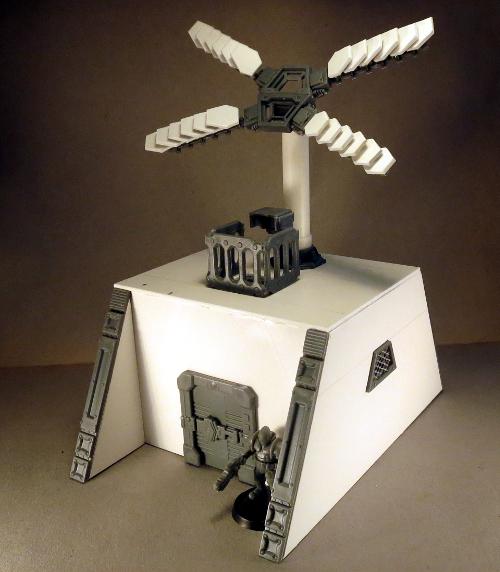
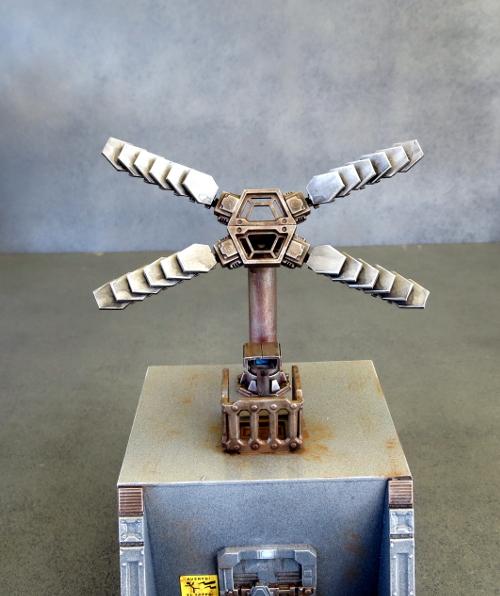
The main focus of this terrain piece is, of course, the cross-shaped array on the roof. The transceiver panels on this array are each built from a fence post and a series of hexagonal shapes cut from a sheet of plasticard. I cut a few test panels from cardboard to get the size and shape right, and then used one of those cardboard testers as a template to mark out the plasticard.
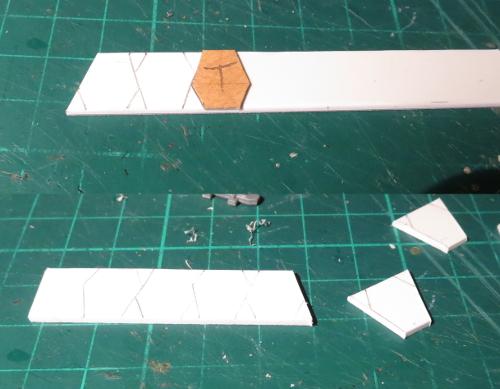
Once cut and cleaned up, the panels had a small length of plastic rod glued to the back, and then glued in place onto the fence post.
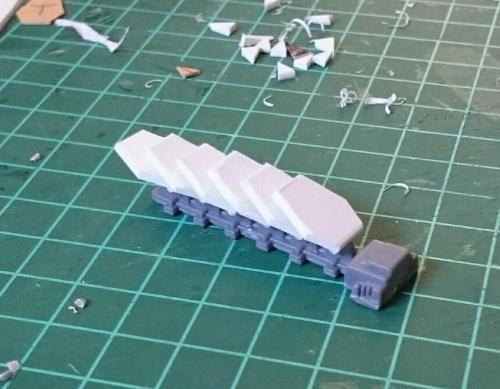
The four resultant transceiver arms were glued onto a pair of trapezoid windows to form the array. I sat this on a post made from plastic tubing and some pipe fittings, with a control panel mounted on the front for servicing and fine-tuning - because as any sci-fi buff would tell you, intergalactic regulations require any piece of important equipment to have a control interface positioned somewhere accessible from outside, but exposed to enemy shooting.
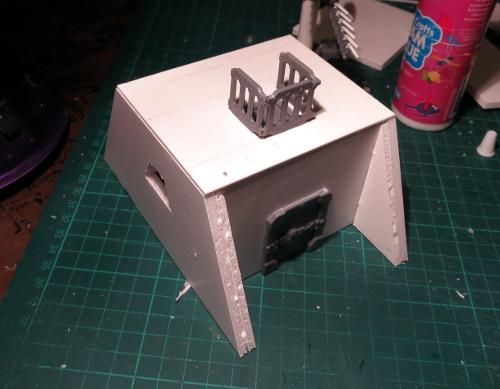
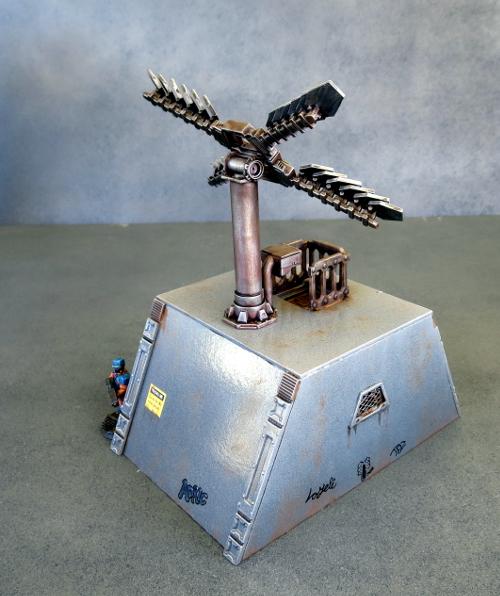
The array obviously needed something to stand on, so I made a basic building frame out of foamcore.
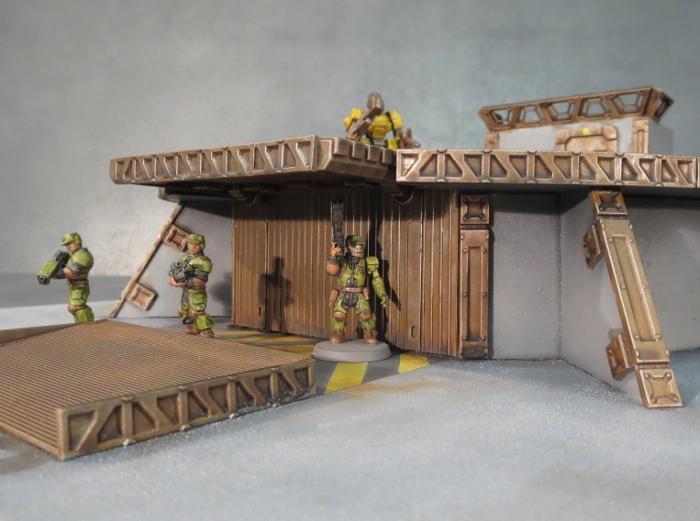
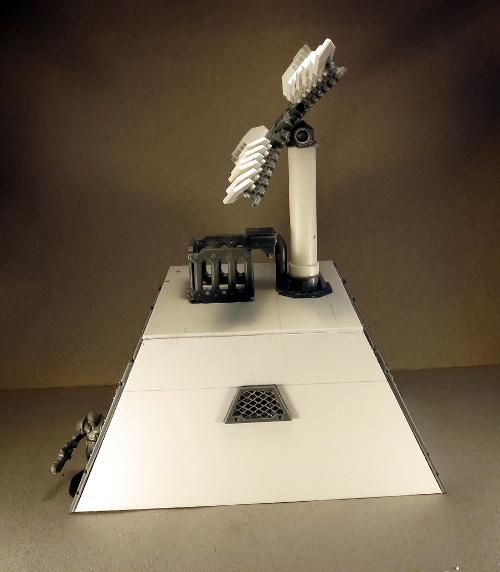
I set a hatch into the roof, and surrounded this with a railing made from a cut-up ladder - because while the control panel needs to be exposed, the Epirian Foundation still (on paper, at least) follows strict OH&S standards.
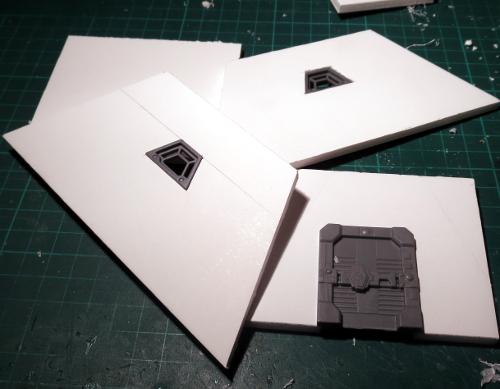
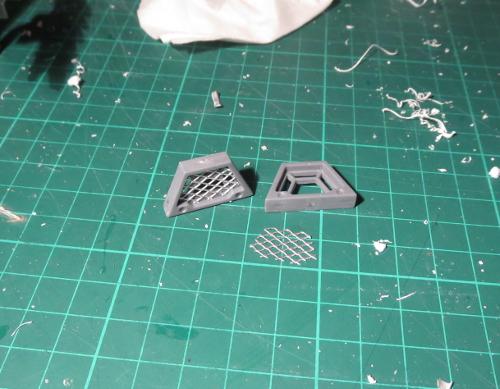
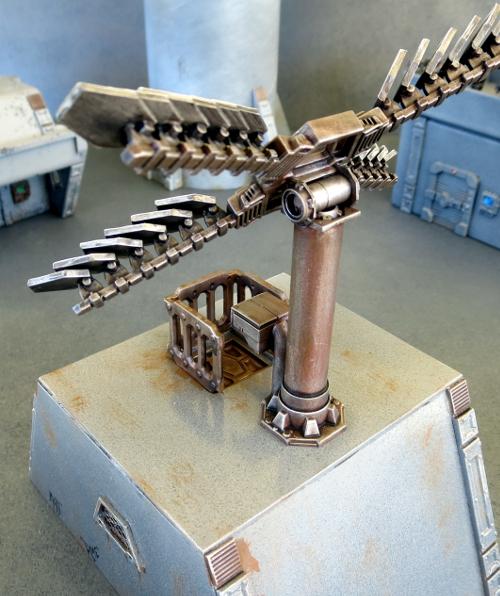
I wanted to use trapezoid windows in the sides of the building, to tie back to the shapes in the array, but they needed to look different to the array centre to reduce the number of people looking at the building and asking why it had windows on its aerial. So I cut some pieces of aluminium mesh to fit snugly inside the window frames.
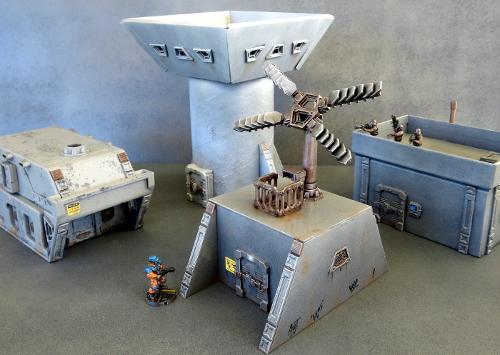
With everything glued in place, the comm building looks like this:

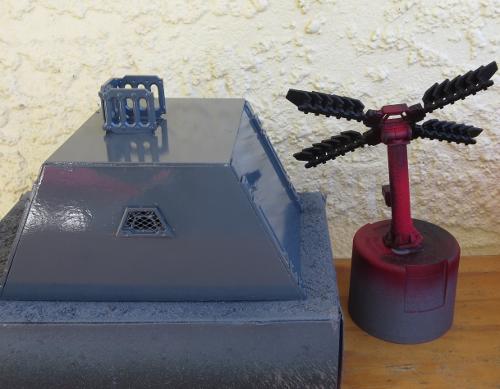
I kept the painting on this one a fairly simple grey, to match some other terrain from previous articles. The building section was sprayed with a medium grey undercoat, and the array sprayed red on the less important parts and black on the transceiver plates and 'moving' parts.
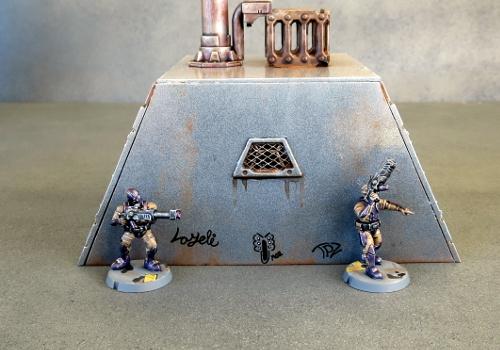
The building then had a light spray with a lighter grey, pitched from above so that the darker grey would stay in the indentations and form some natural shadows. The array and the metal parts on the building were painted using the weathered metal recipe from the article here. Then I finished up with weathering added with drybrushed brown, the door light and control panel screen painted in blue, and then added a couple of printed signs and some fineliner graffiti on the side and back walls.
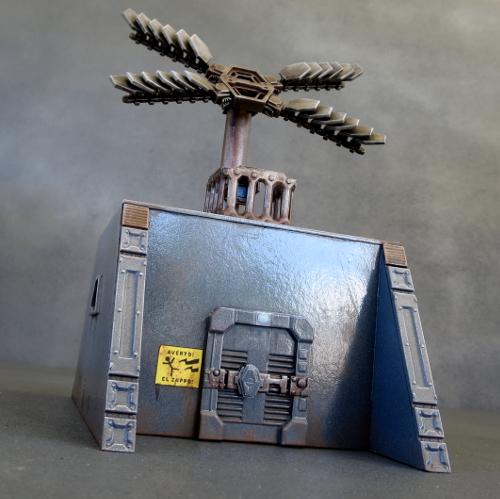
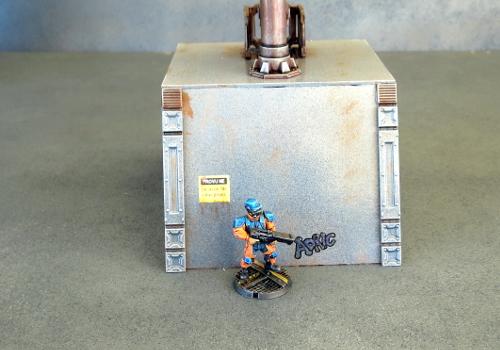
A cheery, grey city in progress...
If you would like to build your own communications array, you can pick up the Maelstrom's Edge terrain sprue from the webstore here. As always, feel free to share your creations on the Comm Guild Facebook page!
For other Maelstrom's Edge modeling articles, including tutorials and walkthroughs of a wide range of different building and miniature projects, check out the article roundup here.
Tags: buildings modeling models spotlight terrain terrainsprue walkthrough
Terrain Spotlight: Catwalks
Posted on Monday May 22, 2017 at 05:00pm in Models
 - by Iain Wilson
As the Maelstrom creeps inexorably across the galaxy bringing Armageddon to world after world, many wars are fought in the shadow of once great cities. Where once were towering beacons of hope, the shining pinnacle of human endeavour, now lies ruin - seething hives of scum and villainy where only the strong survive.
For those inclined to less flowery prose: I thought it might be fun to explore what could be done to create multi-level terrain using the Maelstrom's Edge terrain sprue, for games set within the gloomy nether regions of gigantic cities on those worlds where everything has just gone a little bit wrong. Within these cities would be various tall structures linked by ladders and catwalks - essential if you want to get around without having to leap onto the roof of a passing taxi!
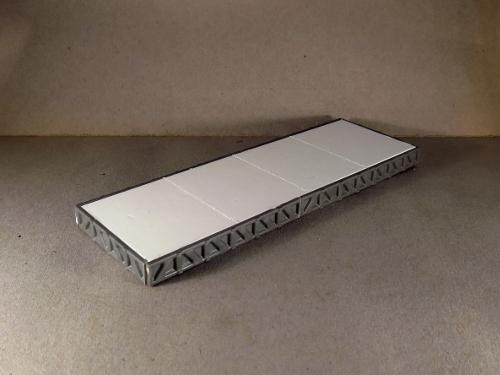
So this week, I'll be presenting a few ideas for different ways to construct catwalks to link your buildings together. Starting with the bare bones, Evil-Overlord-thinks-minions-don't-deserve-handrails version:
This is simply a strip of 5mm foamcore cut to an appropriate length, with some panel lines scored across at intervals with a razor saw (you could do the same with a hobby knife, but the saw helps to keep a consistent width and depth). The edges are covered up with reinforcing struts from the Maelstrom's Edge terrain sprue.
For the slightly more OH&S-conscious city builder, here's example 2:
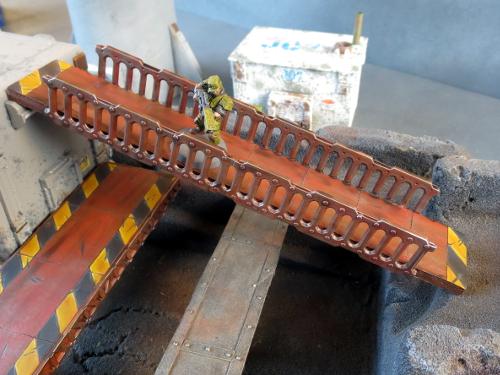
This is another strip of 5mm foamcore, but this time I've used ladders from the terrain sprue glued sideways along the edges to create handrails.
This catwalk is also a little narrower than the first. Varying the width of your catwalks allows for some visual variety, and also mixes up how the catwalk will function in-game, by changing what can fit on it, and whether or not troops will be able to easily block off enemy advances along it.
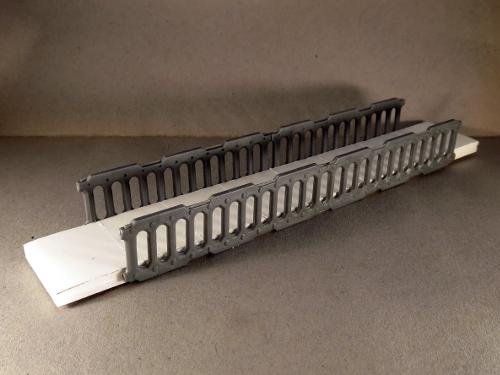
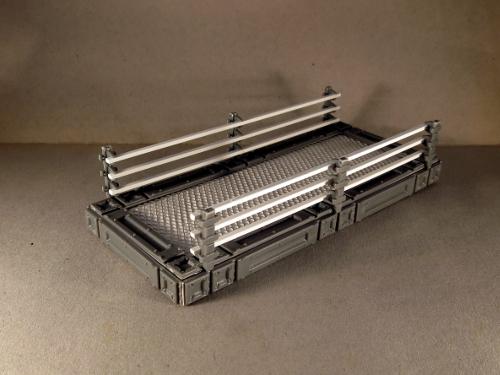
For something with a little more texture, example 3:
This one starts with another strip of foamcore, but this time I have glued a sheet of aluminium mesh to the top. Support struts from the terrain sprue are cut to size and glued around the perimeter of the top to hold the mesh down and cover the cut edges, and more support struts run around the outside edge of the foamcore to pretty things up.
The handrails are made using the top halves of half a dozen energy fence poles, with the railings cut from lengths of 1.5mm x 2mm plastic rod.
For a break from foamcore, the base of the catwalk can be made from plasticard or sturdy cardboard:
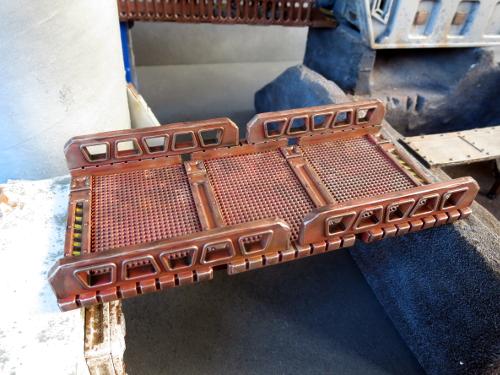
This catwalk uses 1.2mm plasticard, with some embroidery mesh cut to size and glued on top to add some texture, interspersed with support struts from the terrain sprue. The handrails are made from lintel pieces from the terrain sprue topped with leftover window strips cut from doors I used a few weeks back for barriers in my scatter terrain article.
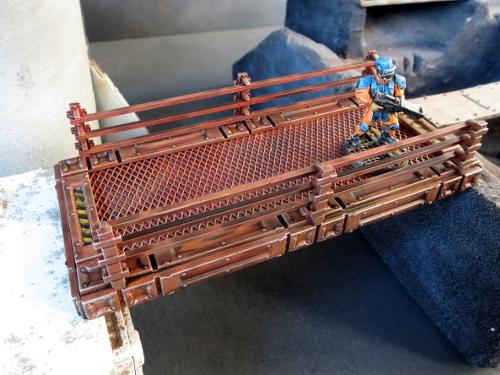
And finally, the freestanding version:
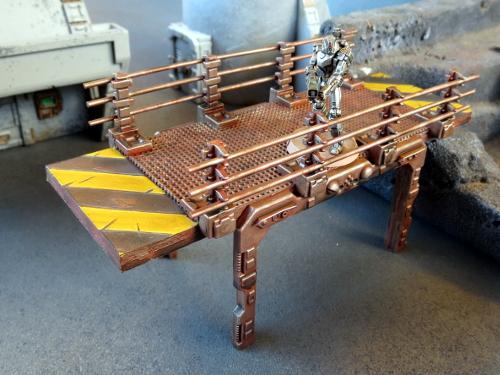
Back to the foamcore for this one, with the embroidery mesh once again providing some detail on the top. The handrails use the bottom halves of the fence posts used for the 3rd catwalk, with railings made from 1.6mm round plastic rod. The legs are door frames that were also left over from the scatter terrain article.
These are obviously just scratching the surface. You can easily mix up these designs by changing the dimensions or detailing. Replacing the foamcore with sturdy mesh gives you a more open, industrial style. You could even build some junction pieces and lay out catwalks on the table for a space corridor bug-fight!
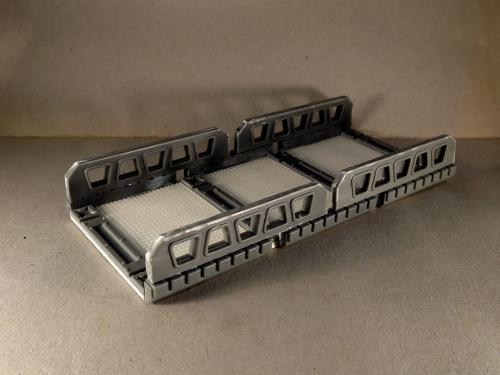
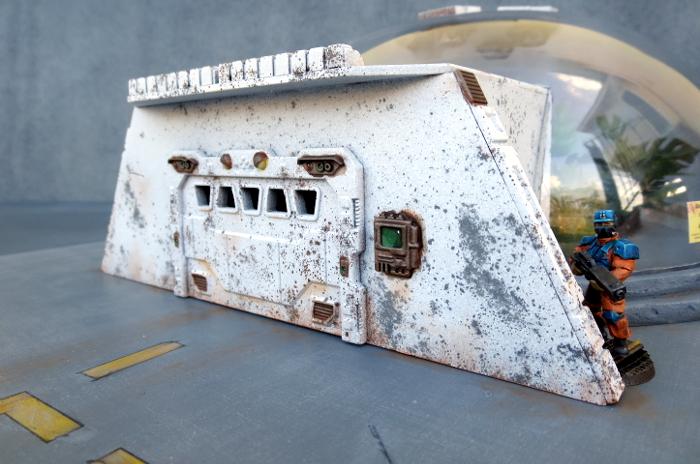
Where to from here? One of my next projects will be to create some matching buildings to hang these off, based around modular bulkheads like this:
If you're feeling inspired and need more catwalks in your life, you can pick up the Maelstrom's Edge terrain sprue from the webstore here. As always, feel free to share your creations on the Comm Guild Facebook page!
For other Maelstrom's Edge modeling articles, including tutorials and walkthroughs of a wide range of different building and miniature projects, check out the article roundup here.
Tags: buildings conversion modeling spotlight terrain terrainsprue walkthrough
Terrain Template and Tutorial - Bunker
Posted on Monday May 08, 2017 at 05:00pm in Tutorials
- by Iain Wilson
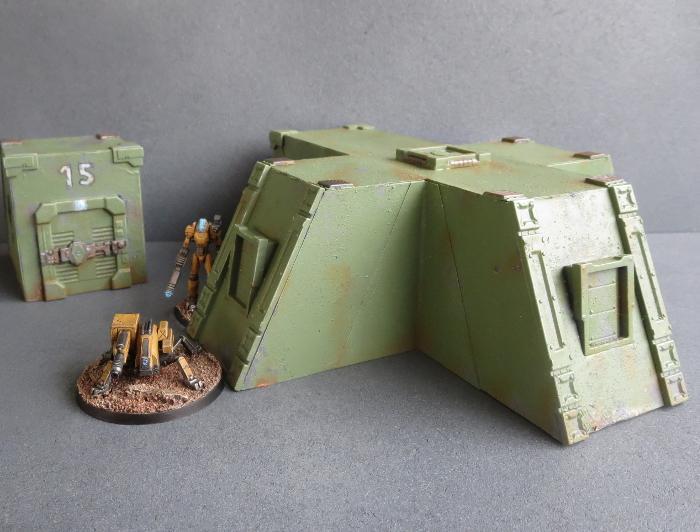
A couple of weeks ago, I shared a template for building a small minehead structure from foamcore, cardboard and the Maelstrom's Edge terrain sprue. For something a little larger and more impressive-looking, I have put together a new template for a bunker. This builds on the basic design of the minehead to keep some design consistency on the table.

 You will need some 5mm or 6mm foamcore (either will work, although the roof piece will overhang the sides slightly with the thinner foamcore), some thin cardboard - around .5mm thick, PVA glue, and the Maelstrom's Edge terrain sprue. A sharp pencil, a steel ruler and a sharp craft knife will get you by for tools.
You will also need the building template, which can be downloaded from here: Bunker.pdf
From the terrain sprue, the following components are used: one of the small doors (either will do), three shutter windows*, two corner braces, the square hatch, and six of the long support struts.
*There are only two shutter windows on a sprue, so you'll need to grab one of the windows from a second sprue. Alternatively, you can build the bunker without the rear window in order to stick to just a single sprue.
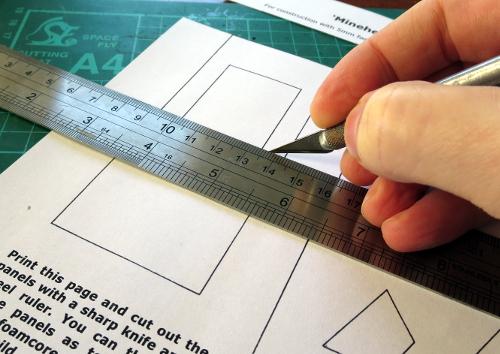
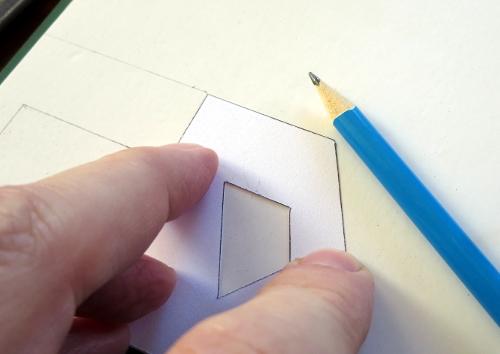
Print out the building template, and cut out the panels using steel ruler and knife.

You can then lay the panels on top of the foamcore and card (the parts are labelled for which material they need) and draw around them with the pencil to transfer the outlines. The solid lines on the parts show where you need to cut.
You need multiples of some parts - the quantity required of each is listed on the part. Some parts also say '(flip)' after the quantity. For these, trace the panel once and then flip it over to trace the second. When cutting foamcore with a knife, the back of the piece can wind up a little rougher than the front, so flipping the template makes sure that you have two 'clean' surfaces for the outside of the building.
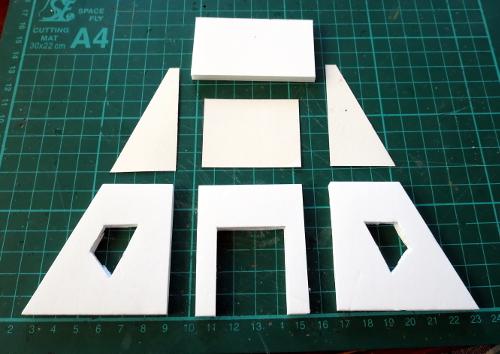
Once you have traced all of the parts onto the appropriate material, use the ruler and knife to cut them all out. If you have never cut foamcore before, don't try to cut through in one go. Lay the ruler along the line you want to cut, and then make several passes with the knife, working deeper as you go and being careful to keep the knife blade vertical so you don't wind up with a bevelled edge. If you're building the single-sprue version mentioned above, don't cut the rectangle out of the middle of one of the end wall pieces.
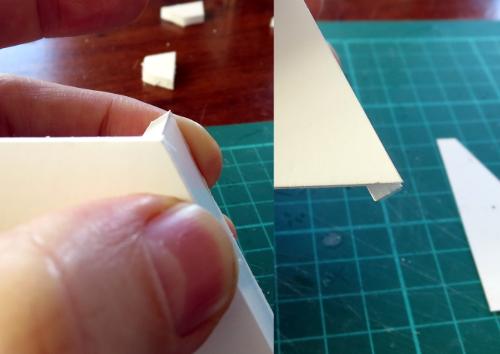
The end wall pieces lean inwards, so need to be bevelled at the bottom. Use a knife to cut an angled strip out of the back of the bottom of each of the wall parts.

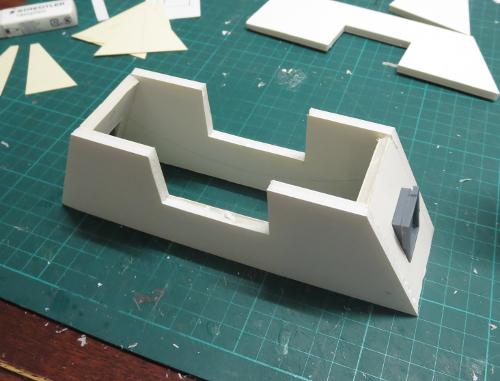
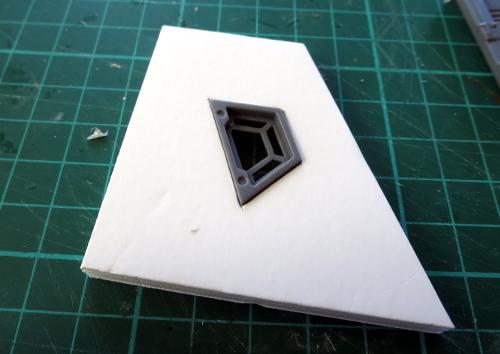
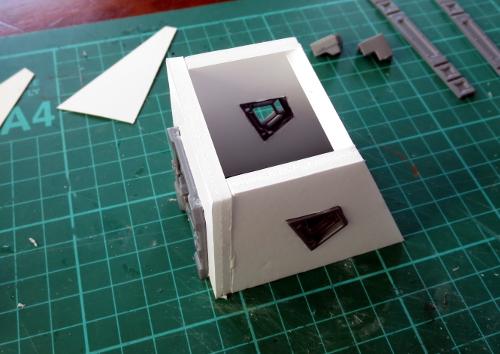
There is a protrusion on the bottom of the shutter window that needs to be removed. Trim off with a knife or file it down on each of the windows so that the bottoms of the windows are flat. You can then glue the windows into the end walls. They sit angled out at the top, as below. The outer edge of the window frame sits flush with the wall at the bottom, while the back edge of the window should sit against the outside edge of the hole at the top.

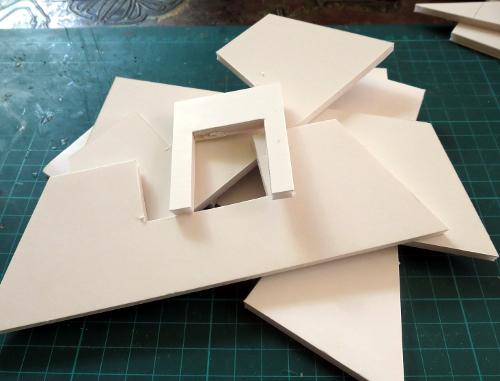
Take the two side wall pieces and two of the end walls and glue then together. The end walls sit inside the side walls, as shown below:
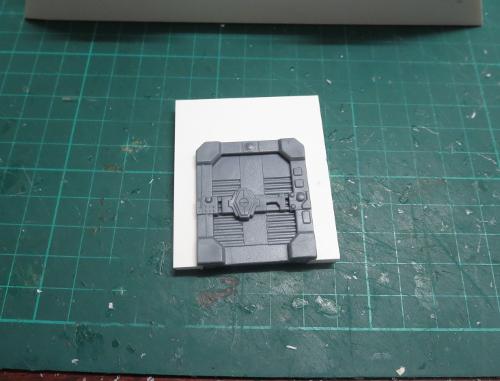
Glue the door into the door section.
Then take the door section, the third end wall and the two main walls and glue them together. The end wall sits inside the main wall sections, while the door goes across the other end, outside the main wall as below:
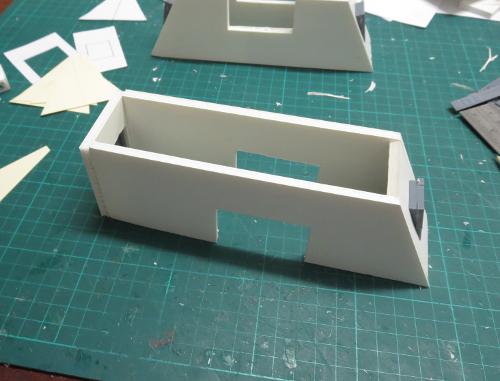
The two sections then slot together, and can be glued in place to form a t-shape.

Glue on the side panels. These sit flush with the front of the door panel, to cover over the cut edge of the foamcore and to reinforce the joint.
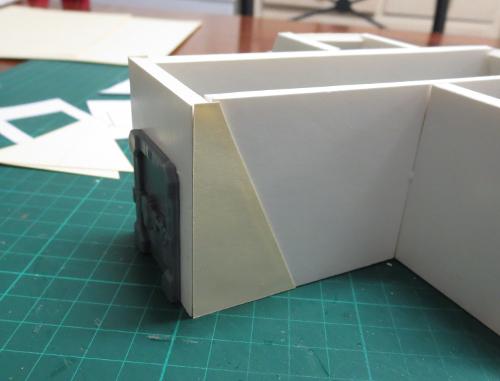
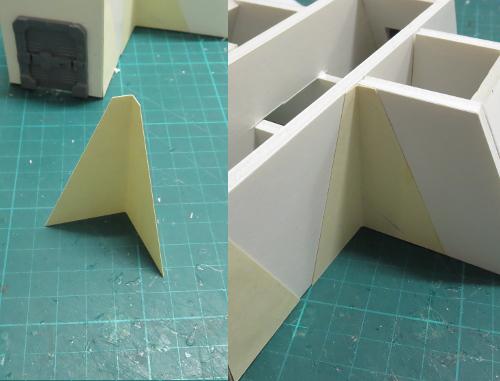
Fold the corner panels along the middle fold line, so that they form a 90-degree angle. These can then be glued in place into each of the inner corners of the 't'. You can use superglue for this step to speed things up a little, as there is no exposed foam to worry about. This helps to give the structure some rigidity while the PVA glue sets, and also covers over any messiness or gaps where the walls join.
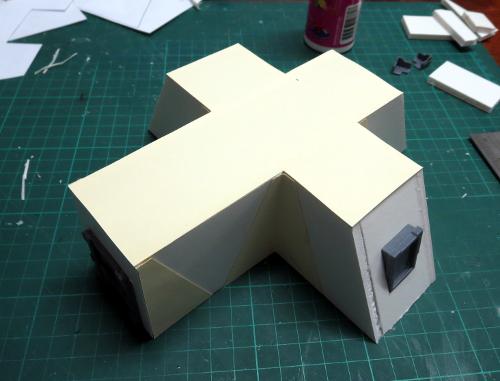
The roof can now be glued in place.
Glue the two corner braces in place on the roof corners above the door.

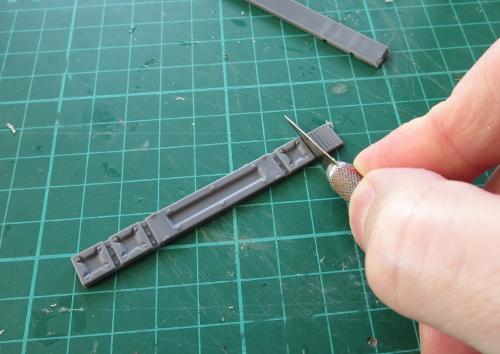
Take the support struts and cut off the vent and rivet strip from the end with a knife.
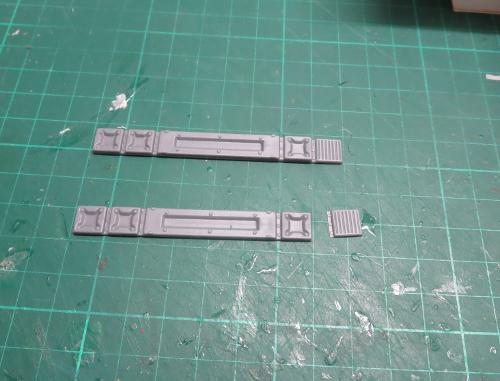
These are then glued onto the end walls, covering over the cut ends of the foamcore. The vent piece goes on the roof, with the rivet strip butting up against the top of the support strut.

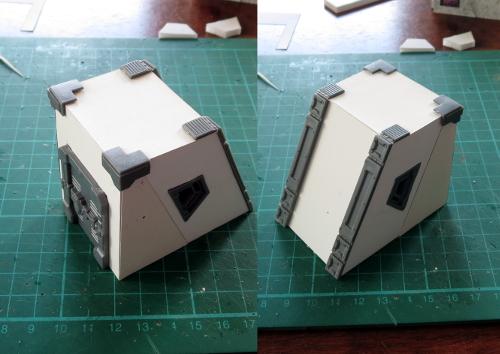
Finally, glue the square hatch onto the roof, in the middle of the 't', and your bunker is complete.

Let the glue set, and it's ready for painting.

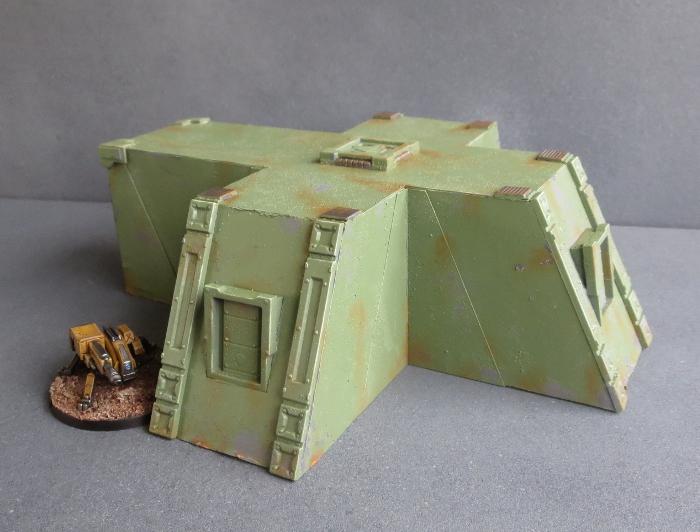
For variation, you could replace the door section with another angled end wall, leaving access through the roof or underground, for more of a fortified pillbox. Or you could stack the small minehead building on top, making a balcony above the door section for troops to stand on.
If you want to try it for yourself, you can grab the template from here and the Maelstrom's Edge terrain sprue from the webstore here. I'd love to see what others can come up with to do with the design, so as always please feel free to share your creations on the Comm Guild Facebook page!
For other Maelstrom's Edge modeling articles, including tutorials and walkthroughs of a wide range of different building and miniature projects, check out the article roundup here.
Terrain Template & Tutorial - Minehead
Posted on Monday Apr 24, 2017 at 05:00pm in Tutorials
- by Iain Wilson
This week, we're sharing an easy building tutorial that would be perfect for those looking to dip a toe into the terrain scratch-building pool for the first time. The project is a small outbuilding, which I think of as an access to some sort of underground facility, although it could also double as a small utility or detention building.
You will need some 5mm or 6mm foamcore (either will work, although the roof piece will overhang the sides slightly with the thinner foamcore), some thin cardboard - around .5mm thick, PVA glue, and the Maelstrom's Edge terrain sprue. A sharp pencil, a steel ruler and a sharp craft knife will get you by for tools.
You will also need the building template, which can be downloaded from here: Minehead.pdf
From the terrain sprue, the following components are used: one of the small doors (either will do), two trapezoid windows, two corner braces and two of the long support struts.

Print out the building template, and cut out the panels using steel ruler and knife.
You can then lay the panels on top of the foamcore and card (the parts are labelled for which material they need) and draw around them with the pencil to transfer the outlines.
Once you have traced all of the parts onto the appropriate material, use the ruler and knife to cut them all out. If you have never cut foamcore before, don't try to cut through in one go. Lay the ruler along the line you want to cut, and then make several passes with the knife, working deeper as you go and being careful to keep the knife blade vertical so you don't wind up with a bevelled edge.
Check the fit on the holes for the trapezoid windows by pushing the windows into place. You can trim around the edges where necessary to make them fit nice and snug. If you have cut the window holes too large, you can pad them back out by gluing a strip of cardboard onto whichever cut edge has a gap. Once you're happy with the fit, run some glue around the edge of the window hole and then push the window into place.
Next up we need to glue the walls together. Because of the angle on the back wall, the bottom of the wall will protrude past the bottom of the building, so will need a little trimming. If you hold the back wall against the side as below, so that the top edge of the back wall sits level with the top of the side wall (left-hand image) you can see the triangular part that needs trimming off (right-hand image) - trim this off with the knife, or sand it down, so that the bottom of the back wall sits flat on the table.
From there, glue the side walls to the rear side of the front wall. The run a little glue down either side of the back wall section. Spread the side walls out slightly, hold the back wall in place, and squeeze the side walls back in against it. Give the glue 30 seconds or so to start to grab, and then sit the building down on the table. You can look down from above here and nudge the walls around as necessary to square everything up. A cutting mat with a printed grid is a big help for this step, as you can line the walls up with the grid.
The cardboard side panels can then be glued one onto the front of each of the side walls, so that they cover over the exposed polystyrene edges of the front wall. The roof panel goes (surprisingly...) on top - run a little glue around the top edges of each wall, and sit the roof on top.

Take the two support struts and slice off the grill piece as below, leaving the recessed rivet strip attached to the grill.
The grills are glued onto the back edge of the roof, one at each corner with the rivet strip to the edge. The remaining sections of the support struts are then glued running up the sides of the back wall, covering over the exposed polystyrene edges of the side walls. Check for fit first - if they protrude past the bottom of the building when lined up with the roof at the top, bevel off the bottom of the strut with your knife before gluing in place.

Finally, take the two corner pieces and glue them to the front corners of the roof. What you wind up with should look something like this:
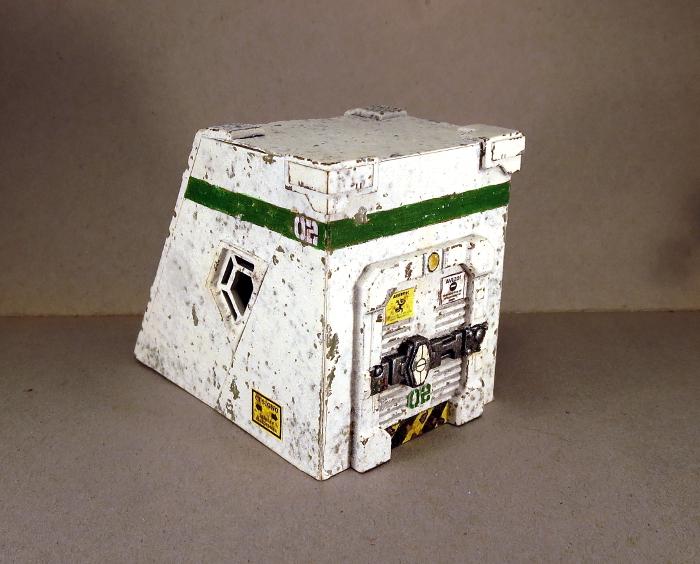
All that remains is painting, once the glue has set. Paint the building up in whatever colours suit your table or preferences. I like to weather my buildings, but it's not necessary - a simple spray with grey, white or a muted (not pastel, but not too bright) primary colour with the details picked out where appropriate works quite well with these as well.
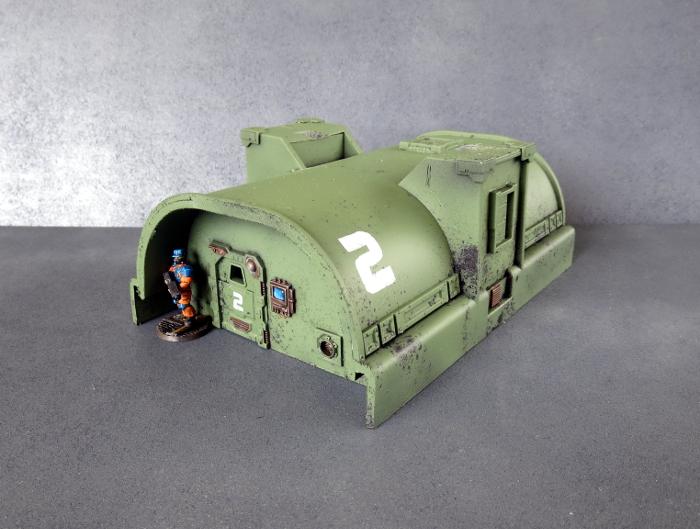
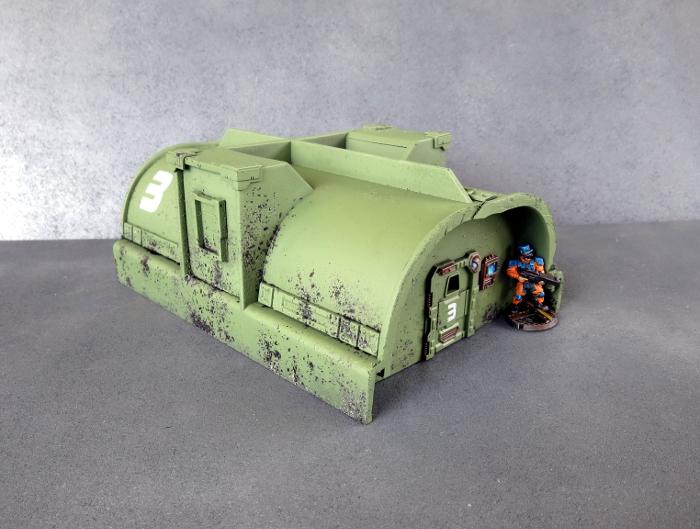
Here's my prototype version painted up, with some added salt weathering and some paper signs created in Gimp and printed out on paper for gluing on wherever they seem appropriate.
The graffiti on the back wall was made in an online graffiti creator (google it, you'll turn up a few different ones with different functions and fonts), printed and glued in place. You can see the edges of the paper if you look closely, but from game-playing distance it does the job. The numbers on the green strips and door were done the same way.
(Note that the windows in the painted example above are in a slightly different position to the template. This was a design change between the prototype and the template creation, as I think it looks better with the slight gap between the window and the raised side panel.)
And there you have it - one mine access/detention cell/utility closet/bike garage/whatever else you can think of to use it for.
If you want to try it for yourself, you can grab the template from here and the Maelstrom's Edge terrain sprue from the webstore here. I'd love to see what others can come up with to do with the design, so as always please feel free to share your creations on the Comm Guild Facebook page!
For other Maelstrom's Edge modeling articles, including tutorials and walkthroughs of a wide range of different building and miniature projects, check out the article roundup here.
Tutorial and Spotlight Article Roundup
Posted on Monday Apr 17, 2017 at 05:00pm in Tutorials

The full list of articles is getting a little unwieldy for a single page, so rather than keep updating an increasingly confusing list here, you can find the full collection of articles broken down by sections in the Hobby area of the Maelstrom's Edge website here!
If you've seen anything here that has lit that modeling flame, you can pick up the various plastic kits currently available in the Maelstrom's Edge range from the webstore here.
Maelstrom's Edge also has a Facebook group, known as 'the Comm Guild', where you can post any questions you have about the rules, the models, or upcoming releases, or share your modeling projects. The group can be found here. We love to see what people are working on, so whether you're a modeling veteran or a complete newcomer to the world of miniature wargaming, feel free to join in.
And in the meantime, stay tuned for the plethora of modeling content that we have still coming down the pipeline!
Tags: buildings conversion models painting terrainsprue tutorial
Terrain Spotlight: Welcome to Hamilton!
Posted on Monday Mar 27, 2017 at 05:00pm in Models
- by Iain Wilson
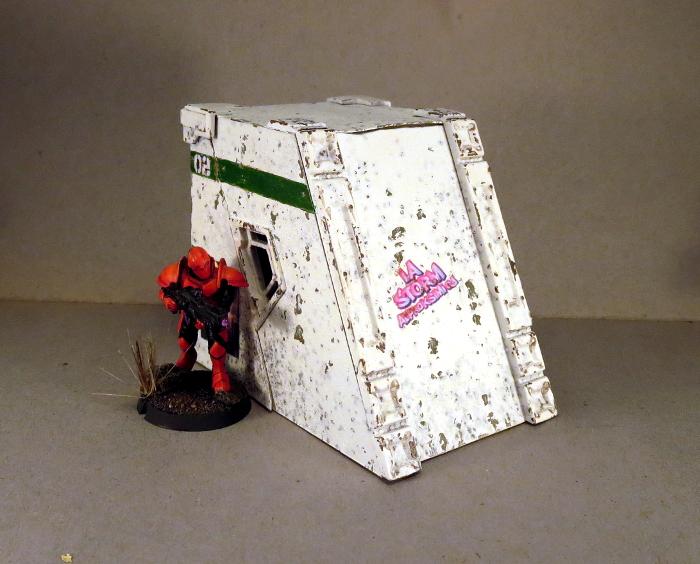
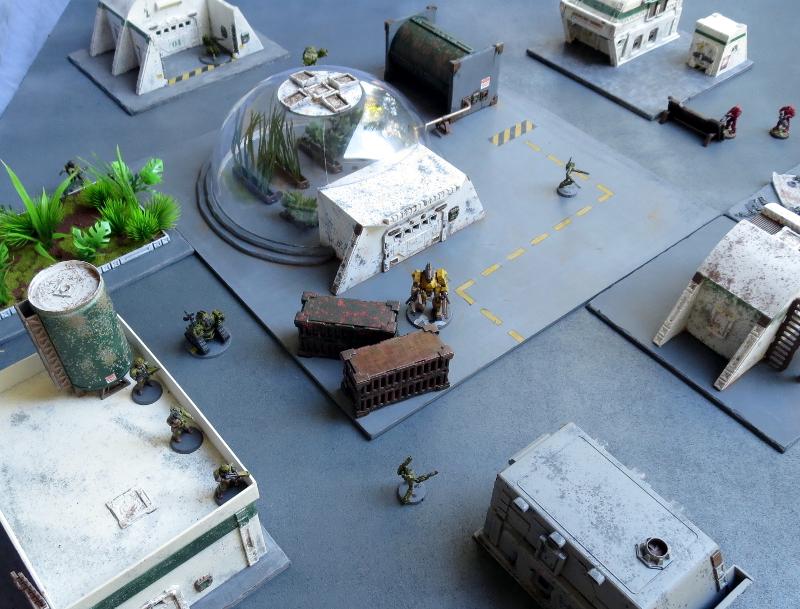
The frontier world listed in the Epirian Foundation directory as PG-4215 [designation pending] is a barely-habitable planet on the outer fringe of populated space. At the time the Maelstrom approached the system, PG-4215 possessed a single official settlement, known as 'Research & Terraforming Implementation Facility Alpha' by the Foundation and as 'Hamilton' by those unfortunate enough to have been posted there.
With PG-4215's few small, equatorial landmasses being hot, dry, and generally unpleasant, Hamilton's small population very early on had committed themselves to paving over and urbanising as much of it as possible.
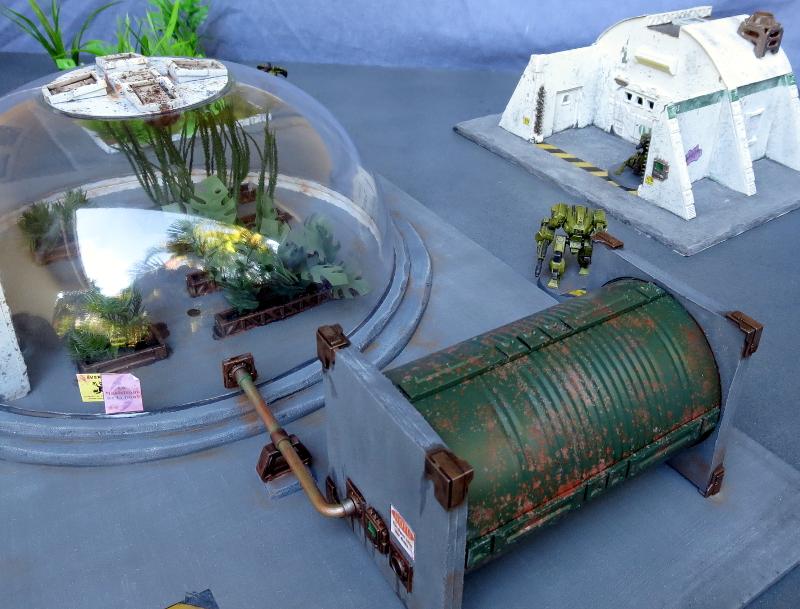
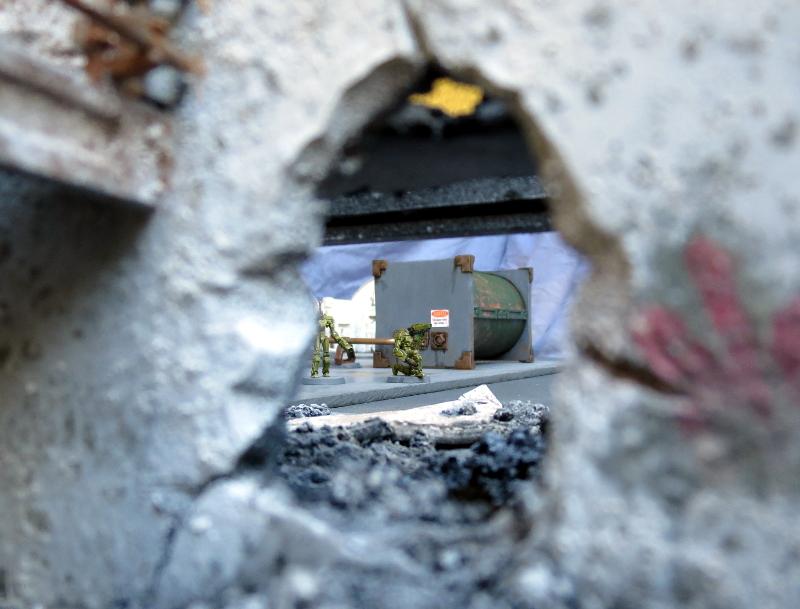
Oblivious to impending conflict, an Epirian cargo drone shunts shipping containers for unloading.
Hamilton is the first table setup that I've finished off so far for my own Maelstrom's Edge games. I've used it somewhat as a test-bed for trying out different ideas, with the end result being a bit of a hodge-podge of styles.
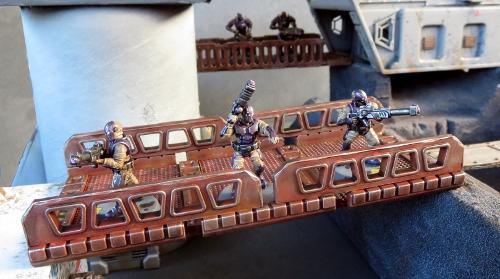
Taking up position on the roof of the refectory, the squad watches an automated uplink relay trundle down the laneway.
Buildings have been constructed from a range of different materials, with the components from the Maelstrom's Edge terrain sprue helping to tie it all together into a more-or-less coherent whole. The building above is made from a cardboard giftbox with the lid flipped upside down.
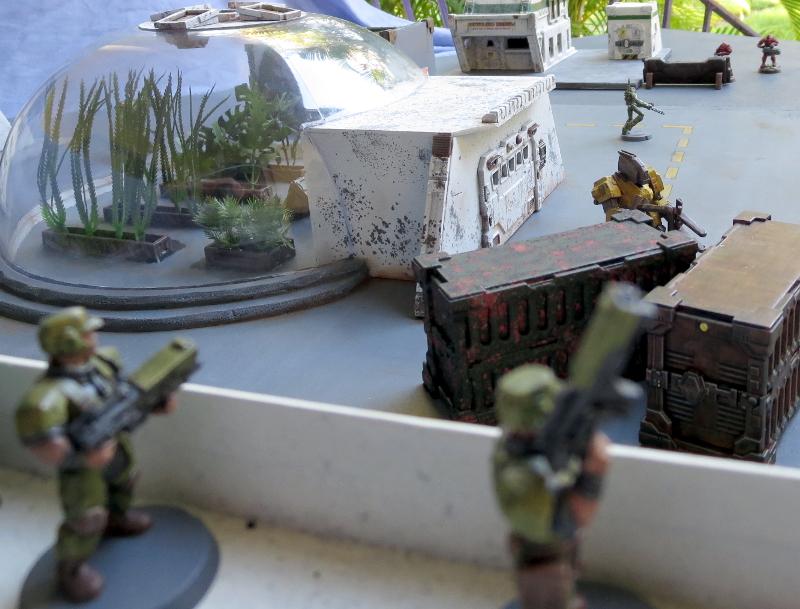
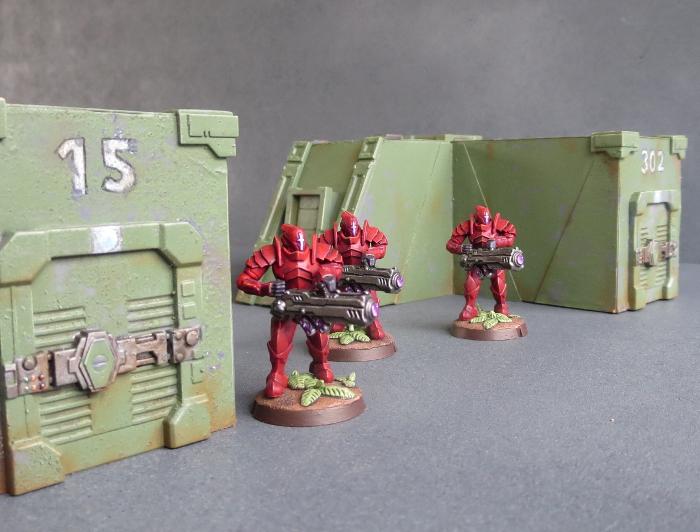
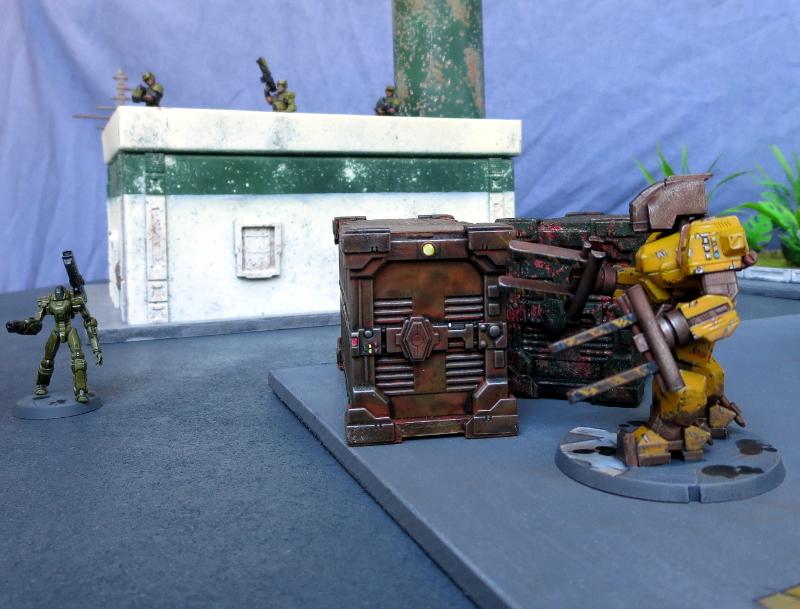
In the distance, past the plantation dome, a squad of heavy armoured Karists approaches, weapons at the ready.
The plantation dome was constructed from a plastic salad bowl, with foamcore used for the enclosed area at the front. You can see how this was put together in the walkthrough here.
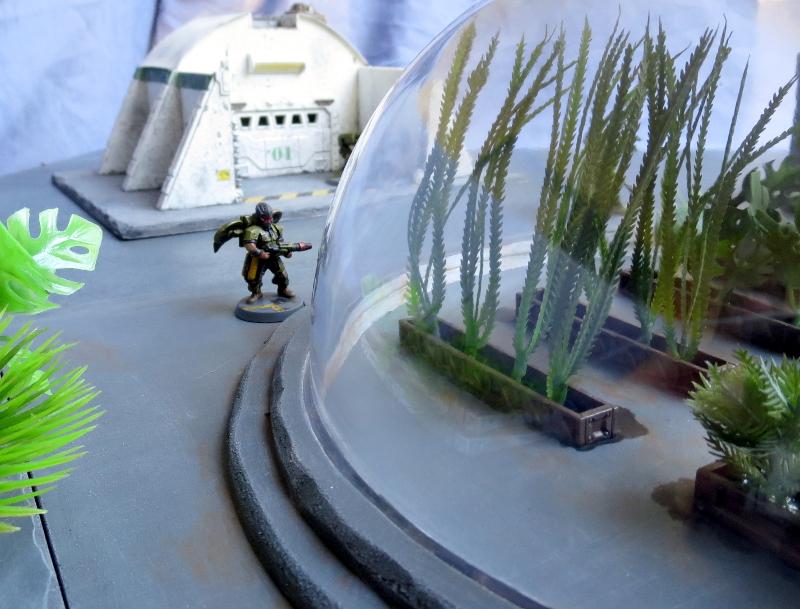
A Warden conducts a routine maintenance check on the exterior of the planation dome.
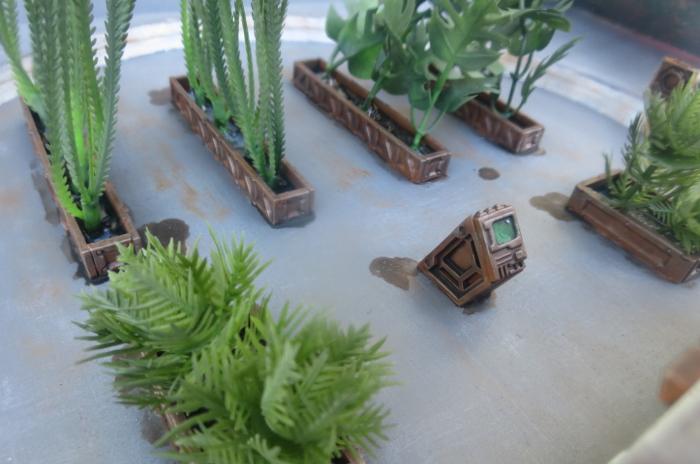
Trimmed-down and repainted aquarium plants were used for the plantation beds inside the dome. In the background is one of my first foamcore constructions.
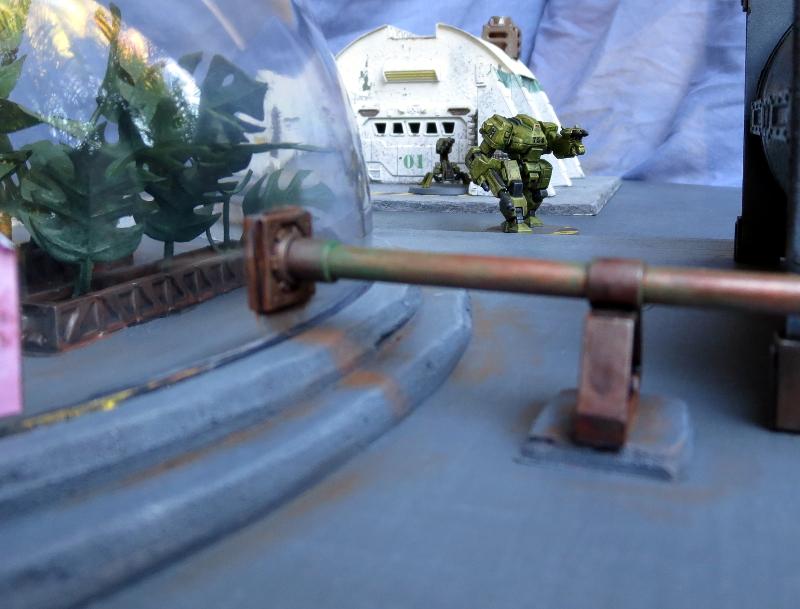
A Hunter warmech on patrol.
Cover is extremely important in Maelstrom's Edge, so wherever possible I have tried to include protruding elements for models to potentially hide behind, as can be seen in the buttressing on the building behind the Hunter.
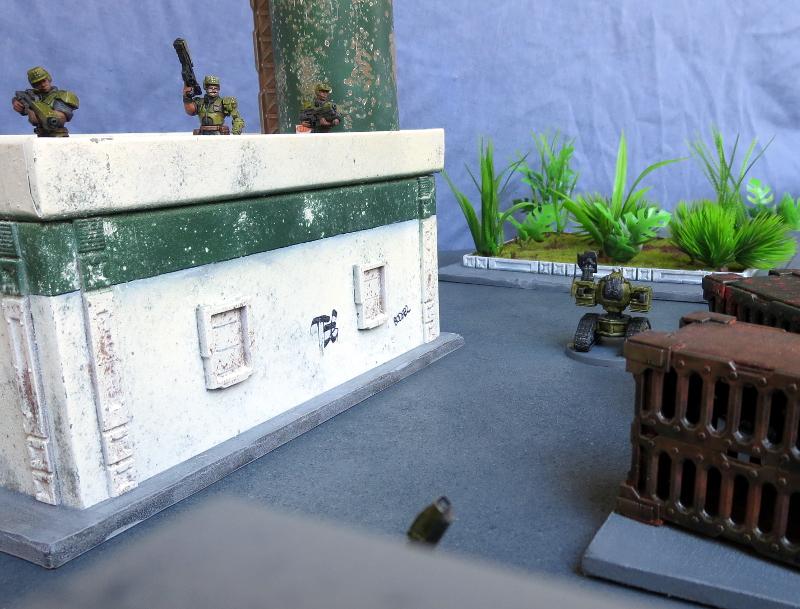
A Scorpion drone lurks in the courtyard, awaiting instructions from its Handler.
Of course, some details aren't particularly useful for cover, and are just there to look pretty.
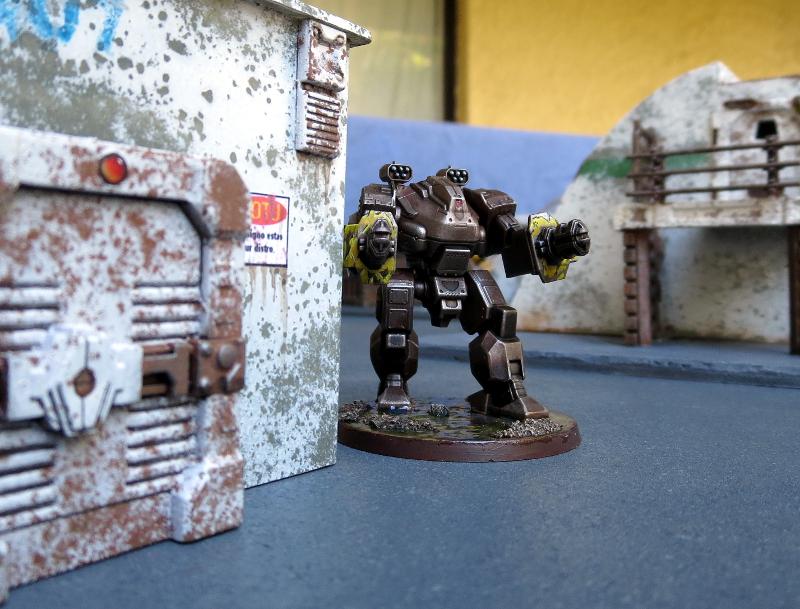
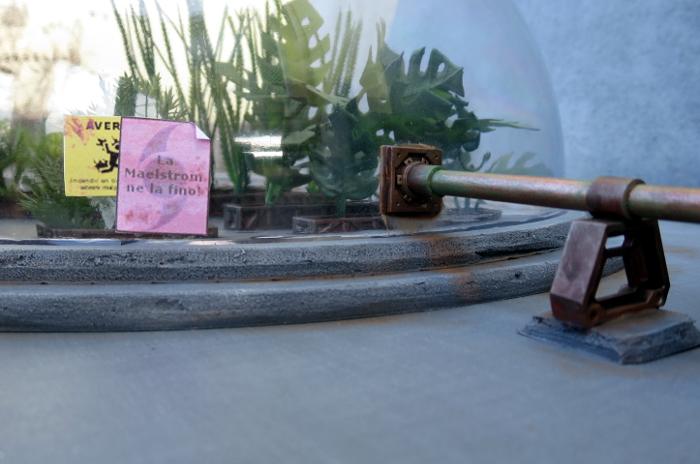
On the other side of town, a Hunter on loan from the Swamp Research Team surveys the laneway.
Painting has mostly been kept fairly simple, with the buildings all painted white with some salt weathering to make them look like they've been exposed to the elements on an unfriendly world. I wanted a unified colour scheme to help tie the disparate buildings together, so they would look like the town was cobbled together from various sources, but would still look like it was purpose built for a single organisation.
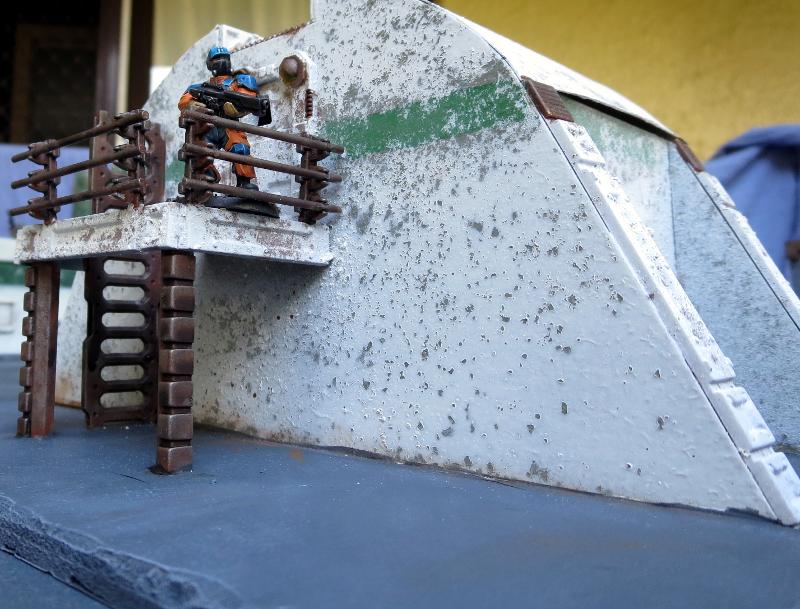
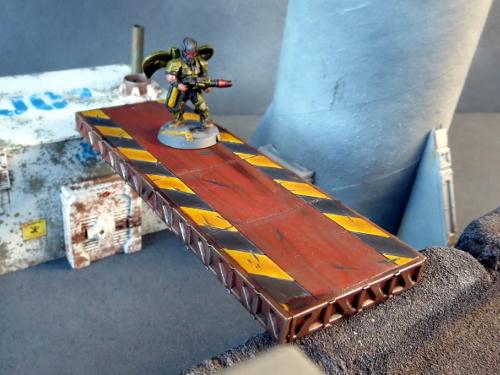
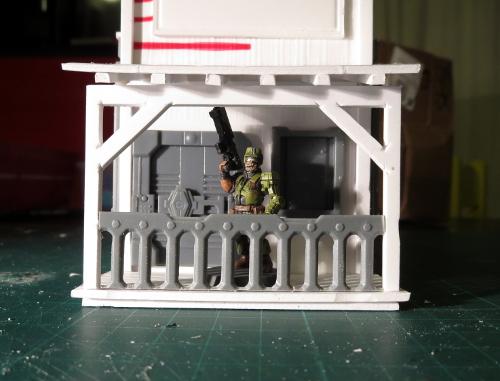
Lieutenant Bob takes up position on the balcony.
Variations on a basic design can help create a 'kit-home' look, with some different buildings that all clearly belong together. The above building was constructed using a similar template to the first foamcore structure, but with the courtyard removed and a balcony added. You can see the construction of this building in a short video here.
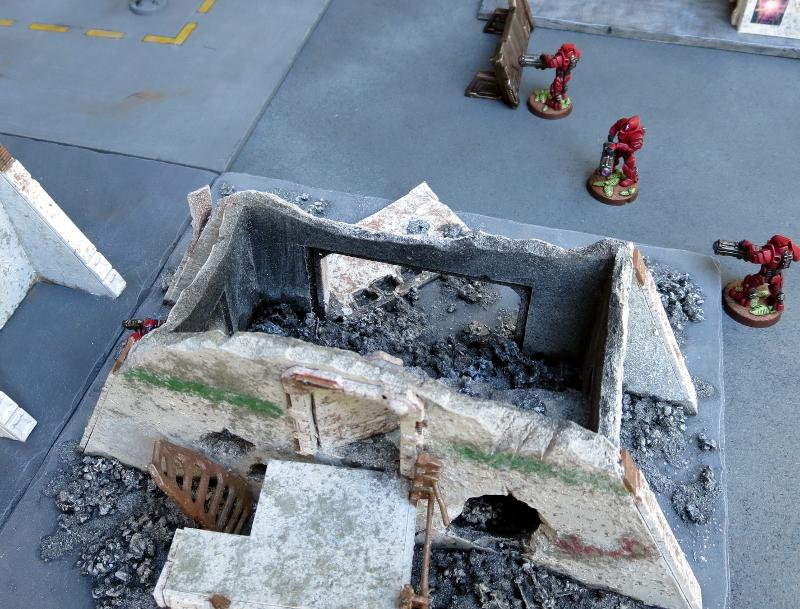
The Karists advance.
If you're aiming for an urban-themed board, it's a good idea to add in some area terrain elements rather than just having a table filled with solid buildings, as this mixes things up a bit for movement and cover. The same template used for Lieutenant Bob's balcony building was used to create a ruin, just by cutting off the roof, bashing things up a bit and adding some rubble on the base.
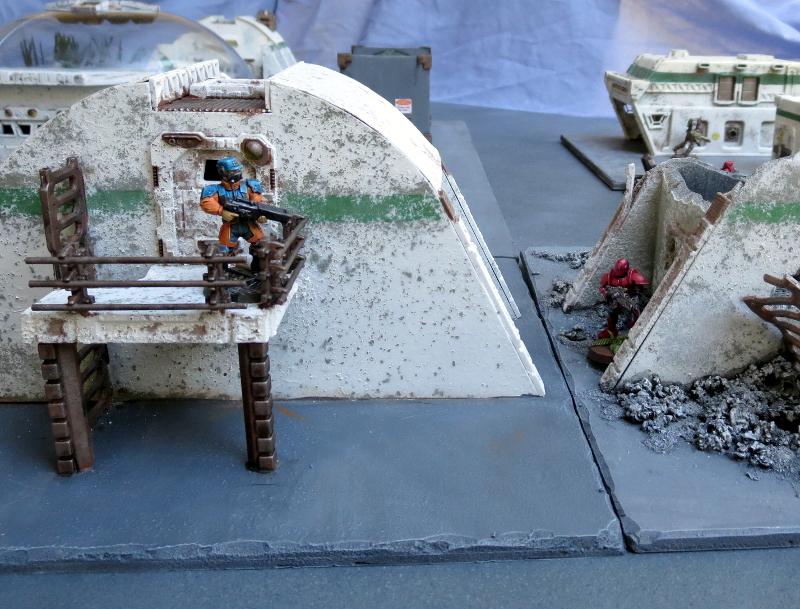
A lone Karist trooper lurks between the buildings.
In the background above you can see another building made from a plastic storage tray. Check out the build video here.
Scarecrows move to intercept the intruders.
Playing on a themed table is a great way to bring your games to life, as it helps to create the illusion of an actual battlefield, rather than just having a random assortment of different terrain.
Despite imminent conflict, Bob can't resist trying out his new camera drone...
Still to do: I have several more buildings still on the workbench for this board, including a bot storage building and some more small multi-purpose buildings. I'd also like to add some sort of water-treatment pond. This will help to expand out from 4'x4' to a more rounded 4'x6', which is better for standard games. It would also benefit from the addition of more scatter terrain to break up the firelanes a little, which will be my next terrain project:
All of the decorative elements on the buildings shown here are from the Maelstrom's Edge terrain sprue. You can find this in a handy two-pack in the Maelstrom's Edge online store here. You can share your terrain creations on the Comm Guild Facebook page!
Terrain Walkthrough: Western-themed SciFi Building
Posted on Monday Mar 13, 2017 at 05:00pm in Models
- by Iain Wilson
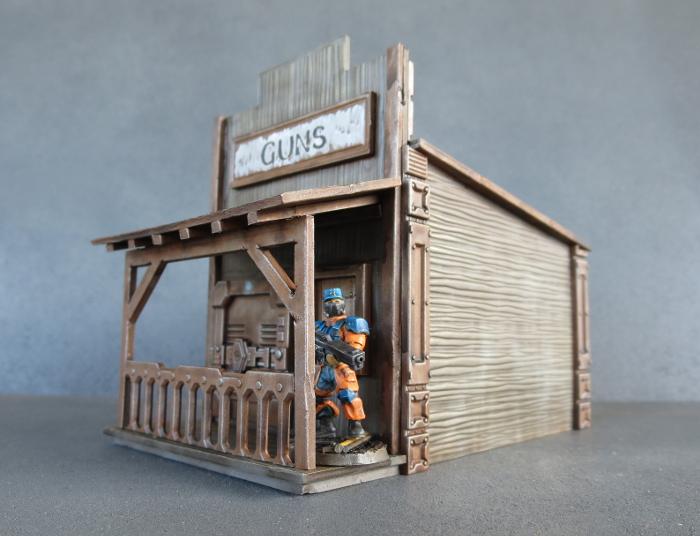
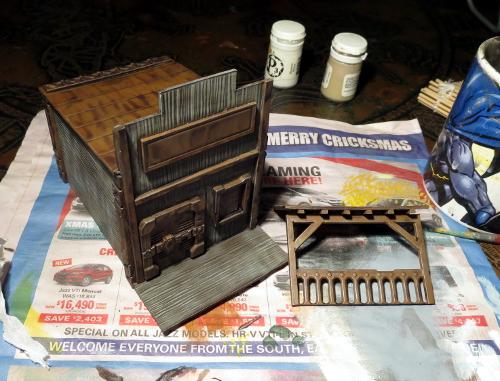
A few weeks back, I built an Epirian Stockyard, just to get an idea of how some more rustic styling would fit into the Maelstrom's Edge universe. So it was with a fairly large amount of delight that I stumbled this week upon some fantastic, inexpensive, western-styled building kits from a company called Plast Craft Games. These are made from die-cut PVC sheets, and make a perfect base for customisation - in this case, with the addition of some parts from the Maelstrom's Edge Terrain Sprue to make a scifi frontier-town building.
The original kit comes as a single PVC sheet, with the cut panels attached with a few lugs. The PVC is soft enough to cut easily, and while there was some warping of some of the panels (I'm assuming from the pressure of the cutting process) they bend back into shape readily enough. The fact that the woodgrain shown in the store pics of the kit was actually embossed onto the parts was a nice surprise - I had been assuming that was just painted detail.
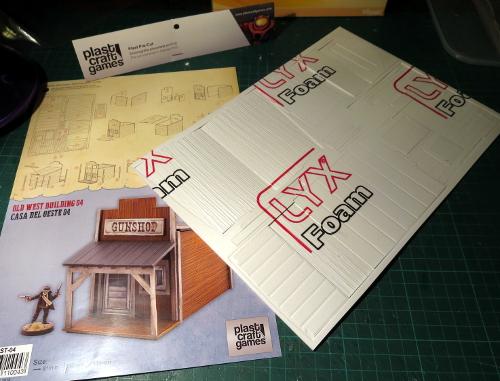
So, the first step was to remove all of the panels from the sheet and clean off the attachment lugs. I was a little surprised to find printing on the outer facings of the building pieces - as I inadvertently discovered three-quarters of the way through assembly, this is actually a sheet of protective film that peels off, once you know about it... It's not mentioned in the mostly-pictorial assembly instructions.
The opening for the door on the front wall turned out to be exactly the right height for the terrain sprue door, although I had to widen it a little. This was the work of a moment with a steel ruler and an exacto knife, and then I did the same for the window, which needed to be widened just a fraction and lengthened a bit. These parts could then be glued in with superglue.
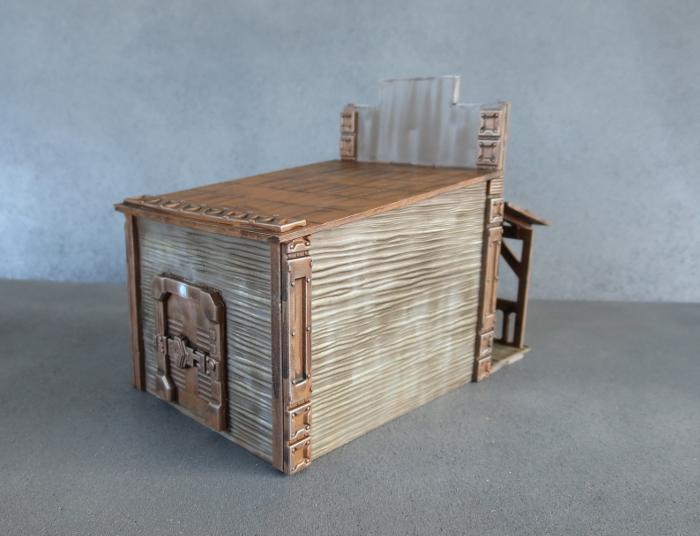
The back wall of the building doesn't have any openings, but I decided to add a second door for in-game versatility. This was done by tracing around the door frame and cutting out a hole for it with the exacto knife and ruler again.
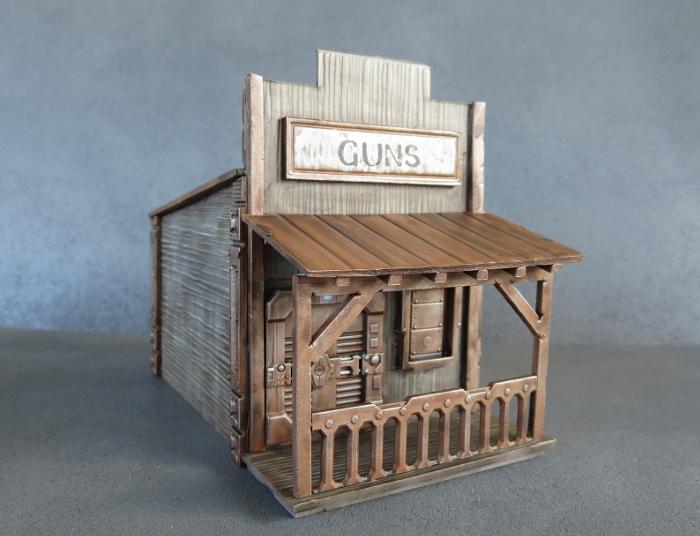
From there, the rest of the building could be assembled. There are some timber braces that run vertically up the edges of each all to disguise the panel joins. I left these on the front and back wall, but flipped them over to hide the woodgrain so that they could be painted as metal to match the terrain sprue parts. Then I added the terrain sprue reinforcing pieces on the side walls and roof, and added a railing to the front porch using a trimmed-down ladder.
(The porch roof and rails are still unglued at this point, to make painting the front of the building easier.)
Time to paint!
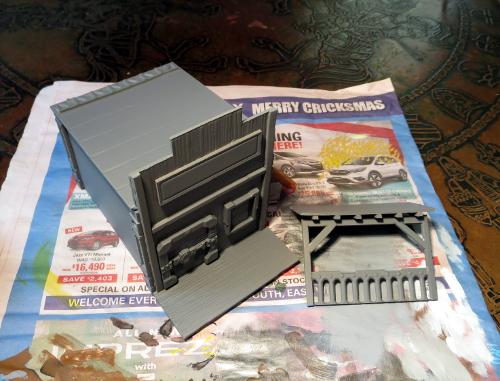
I started with a spray of grey undercoat all over.
Parts that I wanted to be metal were then given a coat of Vallejo Beasty Brown.
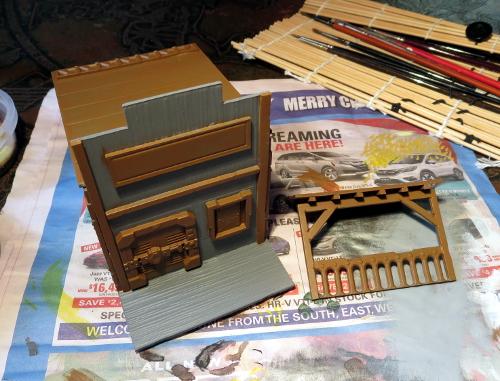
This was followed with a light drybrush of Citadel Boltgun Metal (Leadbelcher, for the newcomers)

Then the whole building was given a generous wash with Army Painter Strong Tone.
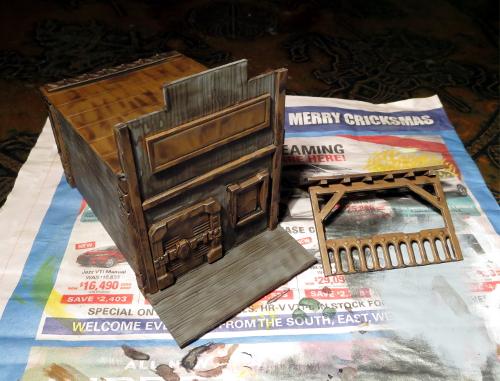
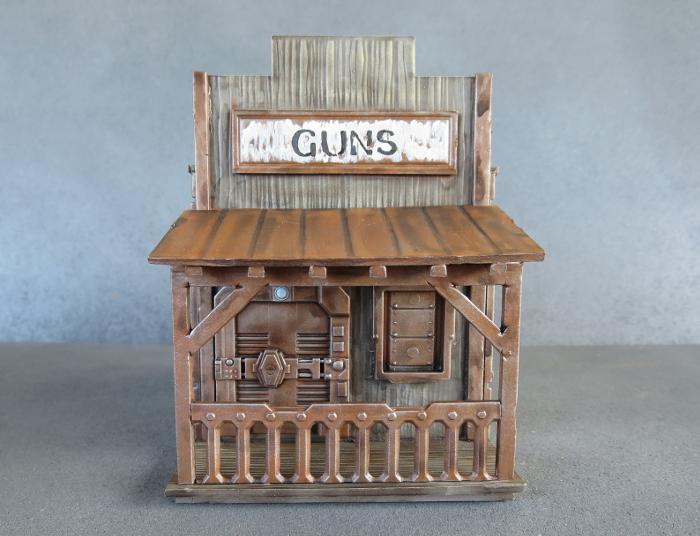
Once dry, the wash was cleaned up a little in a few places where it hadn't covered quite right, and then the wood areas were drybrushed with P3 Jack Bone, with some white mixed in for some lighter areas - this was intended to give the wood an uneven, weathered appearance. The metal parts were also given a light drybrush with the Boltgun Metal again.
At that point, all that was left was to paint up the lights on top of the doors (Citadel Ice Blue with a drybrush of white) and the green-orange-red lights on the door lock panels, give the moving parts of the door locks a coat of Boltgun Metal to make them stand out from the rest of the weathered metal parts, and to paint the sign on the front wall.

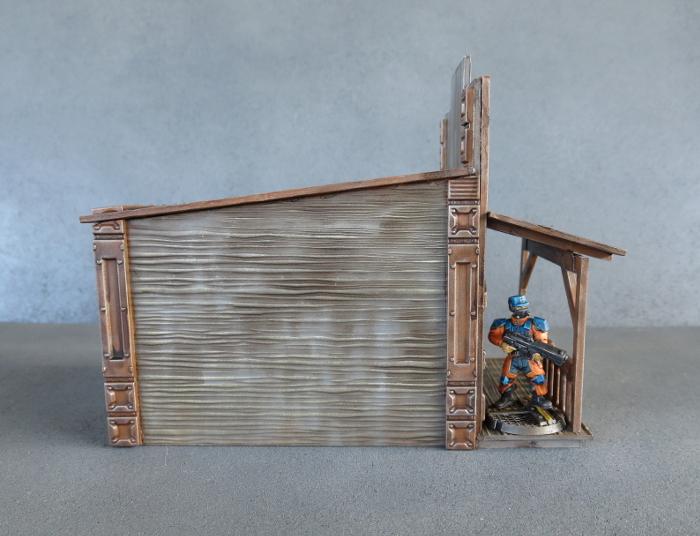
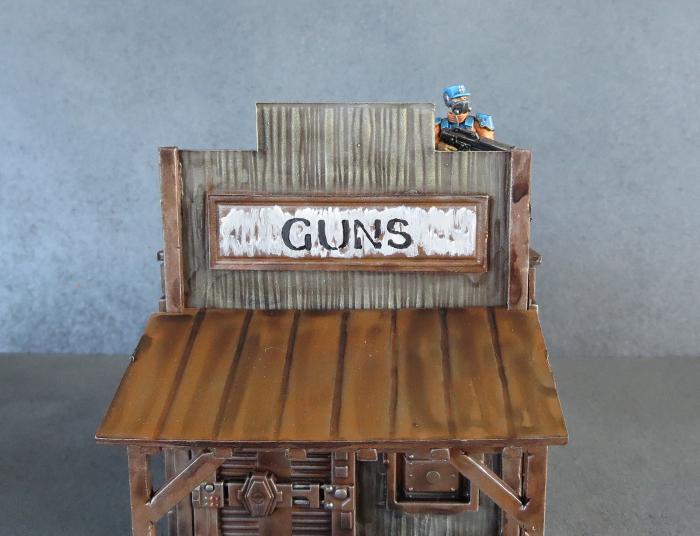
So while Lieutenant Bob there takes up his sniping position on the roof, and I go off to make up a town's-worth of these and track down some models for the Serenity crew, we mosey off into the sunset once more.
If you're feeling a similar urge to misbehave, you can find the Plast Craft Games range in various hobby stores and through their own webstore and you can pick up the Maelstrom's Edge terrain sprue 2-pack from the Maelstrom's Edge webstore here.
As always, we'd love to see what you come up with, so feel free to share your creations on the Comm Guild Facebook page!
Terrain Walkthrough: Plantation Dome
Posted on Monday Mar 06, 2017 at 05:00pm in Models
- by Iain Wilson
On many frontier worlds, terraforming is still underway when colonists move in and start trying to install some sort of civilisation on everything. Where conditions are less favourable, this can require mean that non-native vegetation can need a little help getting established.
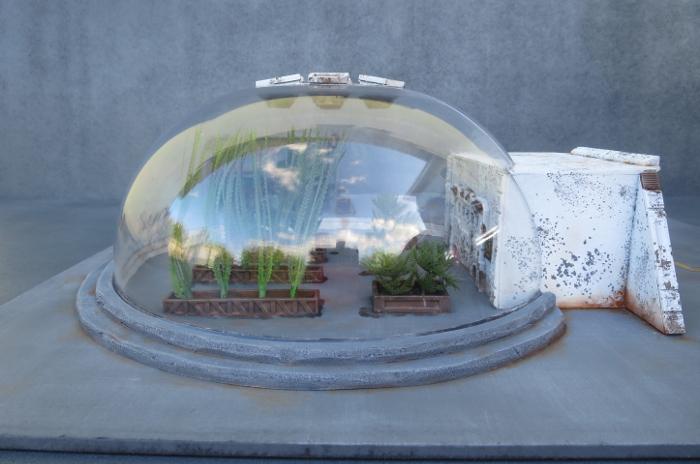
One of my very early ideas when the Maelstrom's Edge Terrain Sprue was first released into my eager little hands was for a small bio-dome-style structure where food or other useful plants would be grown during the process of making the planet fully habitable. It's taken a while to get back to it, but this is what I eventually came up with:

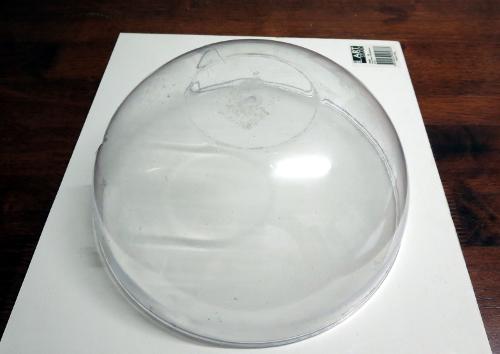
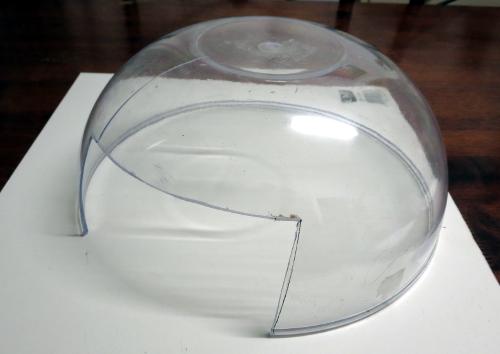
The foundation for this building was a plastic salad bowl, found at a local discount store.
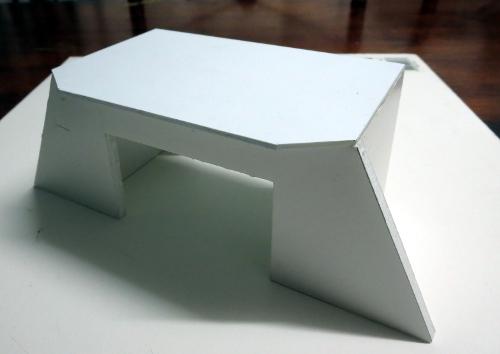
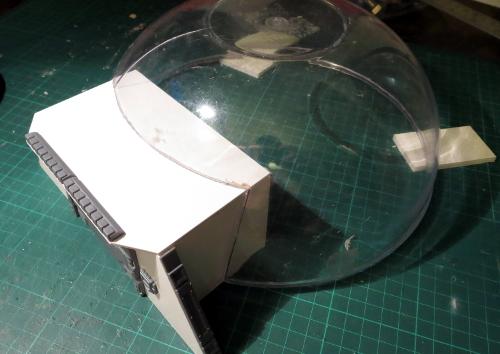
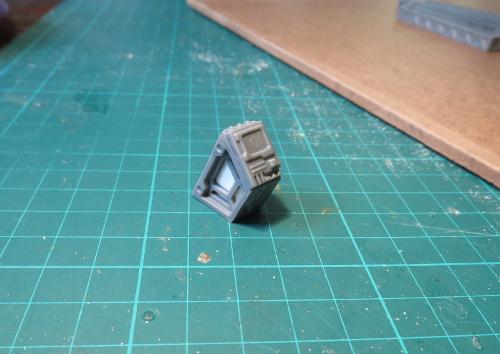
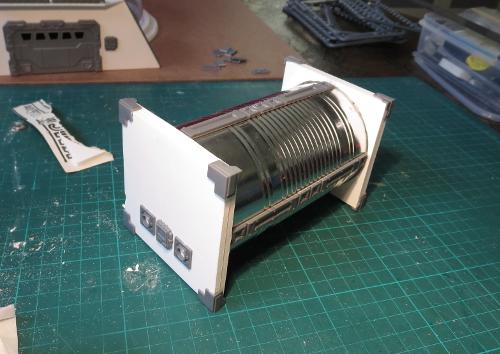
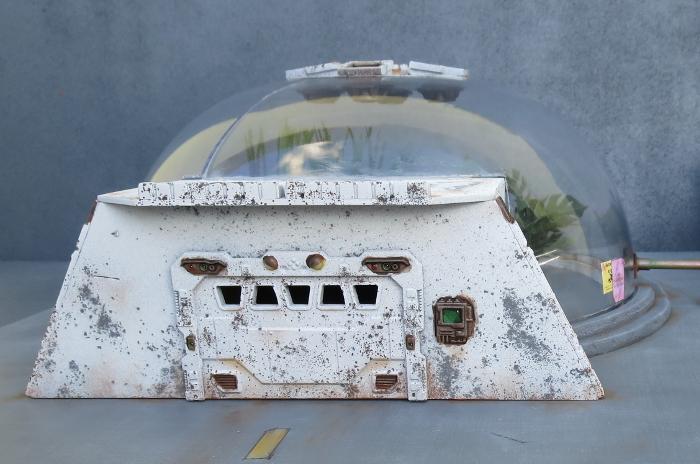
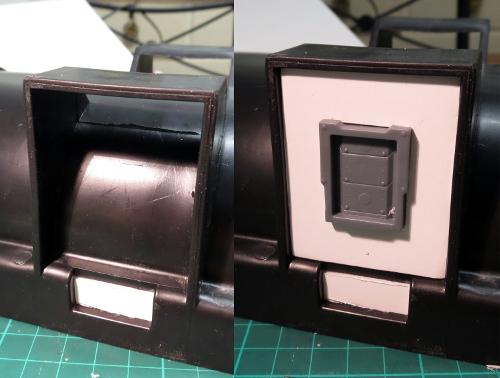
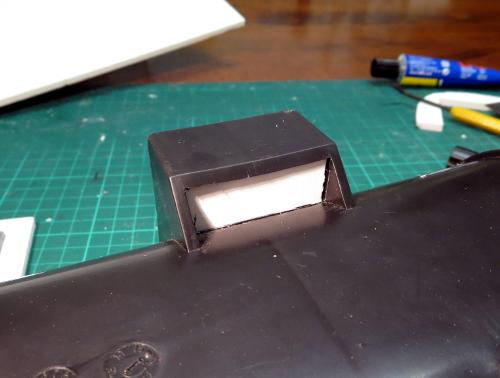
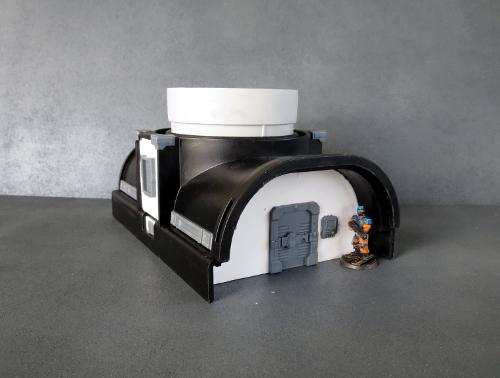
I built a 'gateway' building, to be installed into the side of the dome. This would form a sort of airlock, to allow for environment control inside the dome, and also function as a storeroom for whatever tools or drones were used to maintain the plantlife inside.
To install the airlock, I carefully cut a square hole into the side of the bowl. Apparently I wasn't quite careful enough, as the fairly brittle plastic cracked just as I was almost finished cutting. (Note for next time - use a razor saw rather than trying to get clever with an exacto knife!) I decided to go with it anyway, as a little damage on battlefield terrain obviously isn't the end of the world.
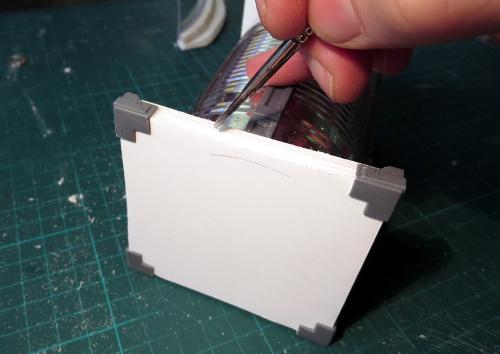
The gateway building was prettied up with doors, control panels and some reinforcing from the terrain sprue.
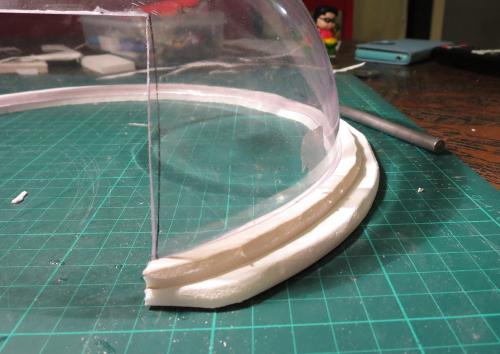
The hole in the side of the bowl is 5mm too short for the gateway. That allows me to add a foamcore rim around the base of the dome, with another ring of foamcore running on top, sealing in the edge of the bowl.
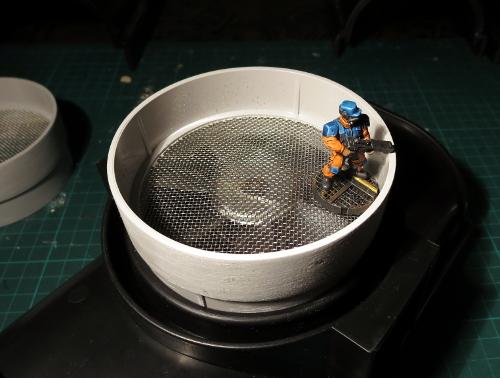
I wanted some detail for the top of the dome, to disguise the bowl's flat bottom. So I took some shutter windows and used a razor saw to cut the backs of the frames so that the windows sit on an angle.
These were then glued to a circle of plasticard cut slightly smaller than the base of the bowl. A square hatch in the middle forms a hub, where I imagine the machinery that controls the shutters would be located.
On the inside of the bowl, I added some large pipe fittings, positioned to sit directly underneath each of the shutter windows. This forms a venting system, to allow the atmosphere inside the dome to be vented in an emergency, or to allow controlled amounts of the outside air into the dome.

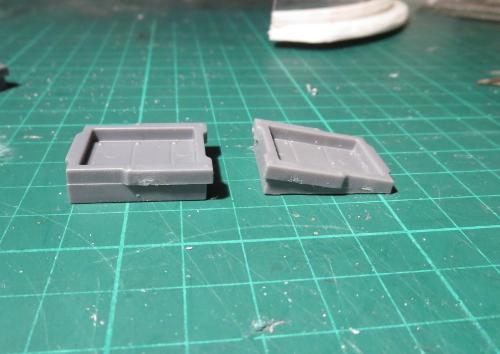
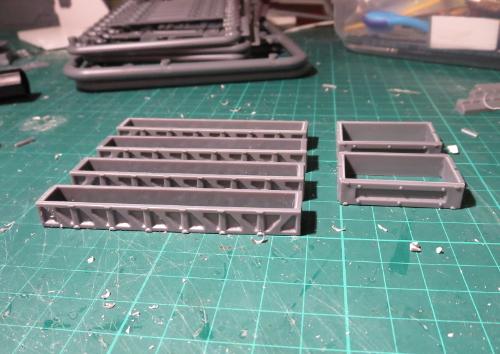
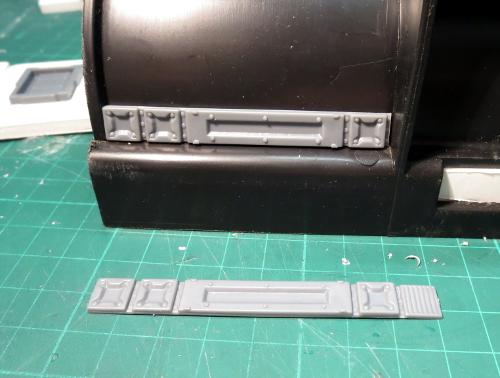
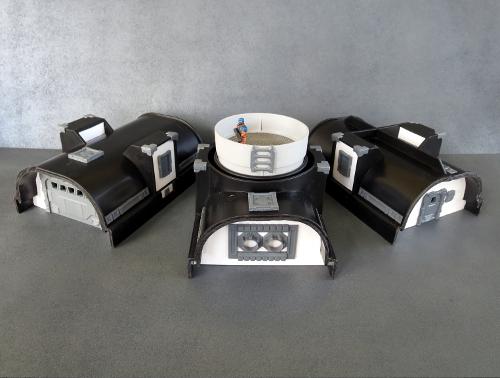
A bunch of reinforcing strips from the terrain sprue were hacked up and glued into planter boxes to go inside the dome.
To these, I added a control unit using a control panel and two trapezoid windows glued together with a small piece of foamcore sandwiched between them. This would control the environment inside the dome, administer fertilisers or other chemicals to the plants, or activate the dome's resident drones.
After marking out the inside circumference of the dome on a sheet of masonite, the planters and control unit were glued in place.

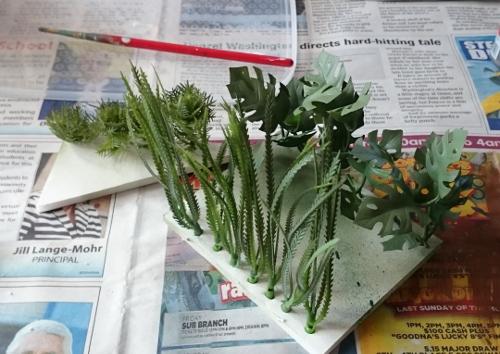
For the plants themselves, I cut appropriately-sized pieces from a few different aquarium plants. These were lightly sprayed with a matt green paint to dull them down a little and make them look slightly less plastic. These would be glued into the planter boxes and the boxes then half-filled with clear craft glue (water effects would be better, but I was in a hurry and craft glue was what I had to hand).
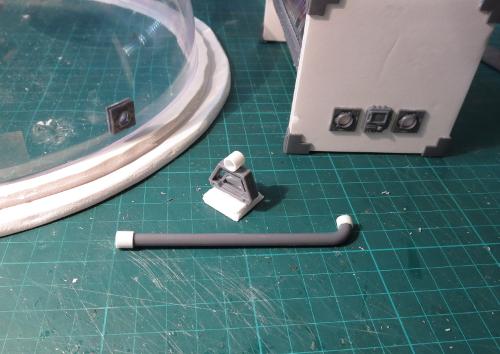
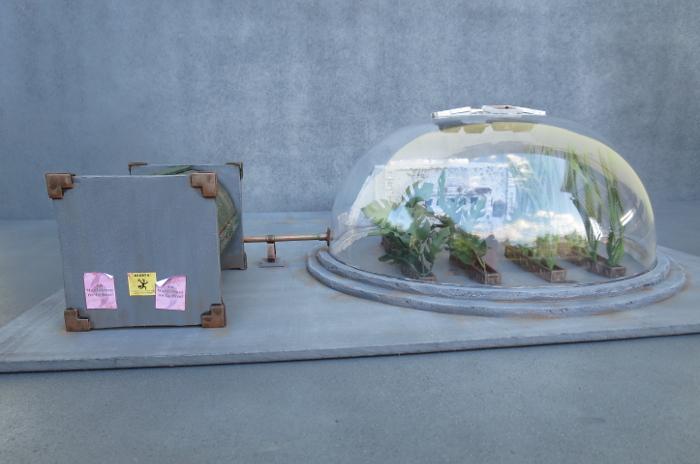
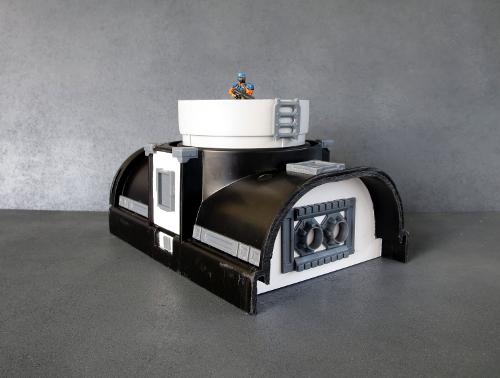
To add a little extra detail to the overall terrain piece, I built a water tank from some foamcore and a beverage mix tin. The ends of the tin are nested into circles cut into the inner sheets of foamcore, for extra strength.
A pipe made from a piece of sprue cut from the terrain sprue and some plastic tube joins the water tank to the dome. I built a support for the pipe from a trapezoid window and another piece of tube, and added small pipe fittings from the terrain sprue to the inside and outside of the dome. The drone tasked with watering the plants would connect to the interior fitting and syphon off as much water as required.
The last thing to do then before painting and assembling everything was to paint any exposed edges of the foamcore with some PVA glue, to protect it from the spraypaint.
My original batch of buildings for Maelstrom's Edge were painted white with green detailing, and since the gateway building for this one was constructed in a similar style, I went with a matching colour scheme.
The gateway was sprayed with a grey undercoat, and then a spray of matt white, with salt weathering to give it a nicely aged appearance.
The water tank was painted brown, drybrushed with Citadel Boltgun Metal and washed with Army Painter Strong Tone before being sprayed with a coat of green.
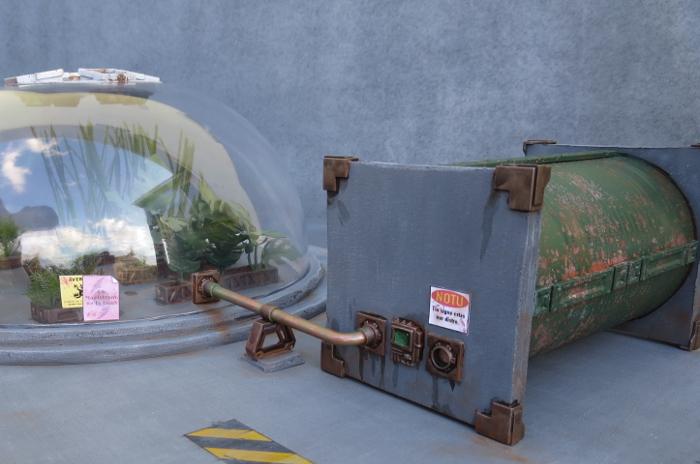
Again, salt weathering adds some age and experience. The end pieces, along with the base board and the dome rim, were painted with Vallejo Basalt Grey and then drybrushed with Vallejo Light Grey.
A few touches of Vallejo Beasty Brown add some dirt around the place, and some signs created in Gimp, printed out and glued in place add some character touches.
The interior needed to be all painted and the plants glued in place before the dome could be glued down.
I considered leaving the gateway unglued, so that it could be pulled out to put models inside the dome, but figured that as cool as that might look, there was little actual point in being able to do so in-game, so for a gaming terrain piece that was an unnecessary bit of fiddliness.
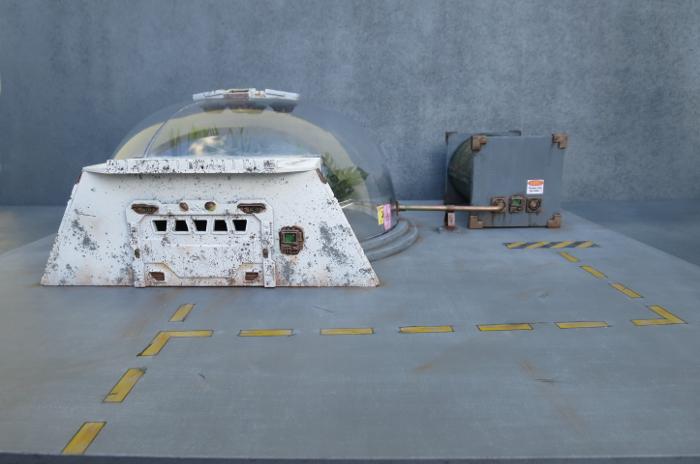
A yellow guideline adds a little extra detail to the broad expance of base. The base was deliberately large - the dome and water tank make for a fairly hefty line of sight blocker, so I wanted to leave plenty of free space around it. Where a little more cover is required, scatter terrain (barriers, crates, industrial bins, and the like) can easily be added to the open front corner.
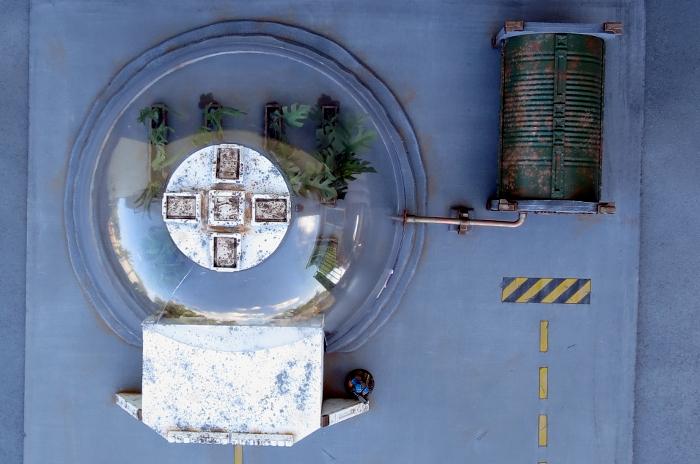
And that's it - another terrain piece just waiting for a battle to spring up around it.
To build your own plantation dome, or a transport hub, or whatever other round thing strikes your fancy, you can pick up the Maelstrom's Edge terrain sprue from the online store (in a handy 2-pack!) here.
As always, please feel free to share your creations on the Comm Guild Facebook page!
Tags: buildings modeling terrain walkthrough
Terrain Tutorial: Drainage Channel Buildings
Posted on Monday Feb 20, 2017 at 05:00pm in Tutorials
- by Iain Wilson
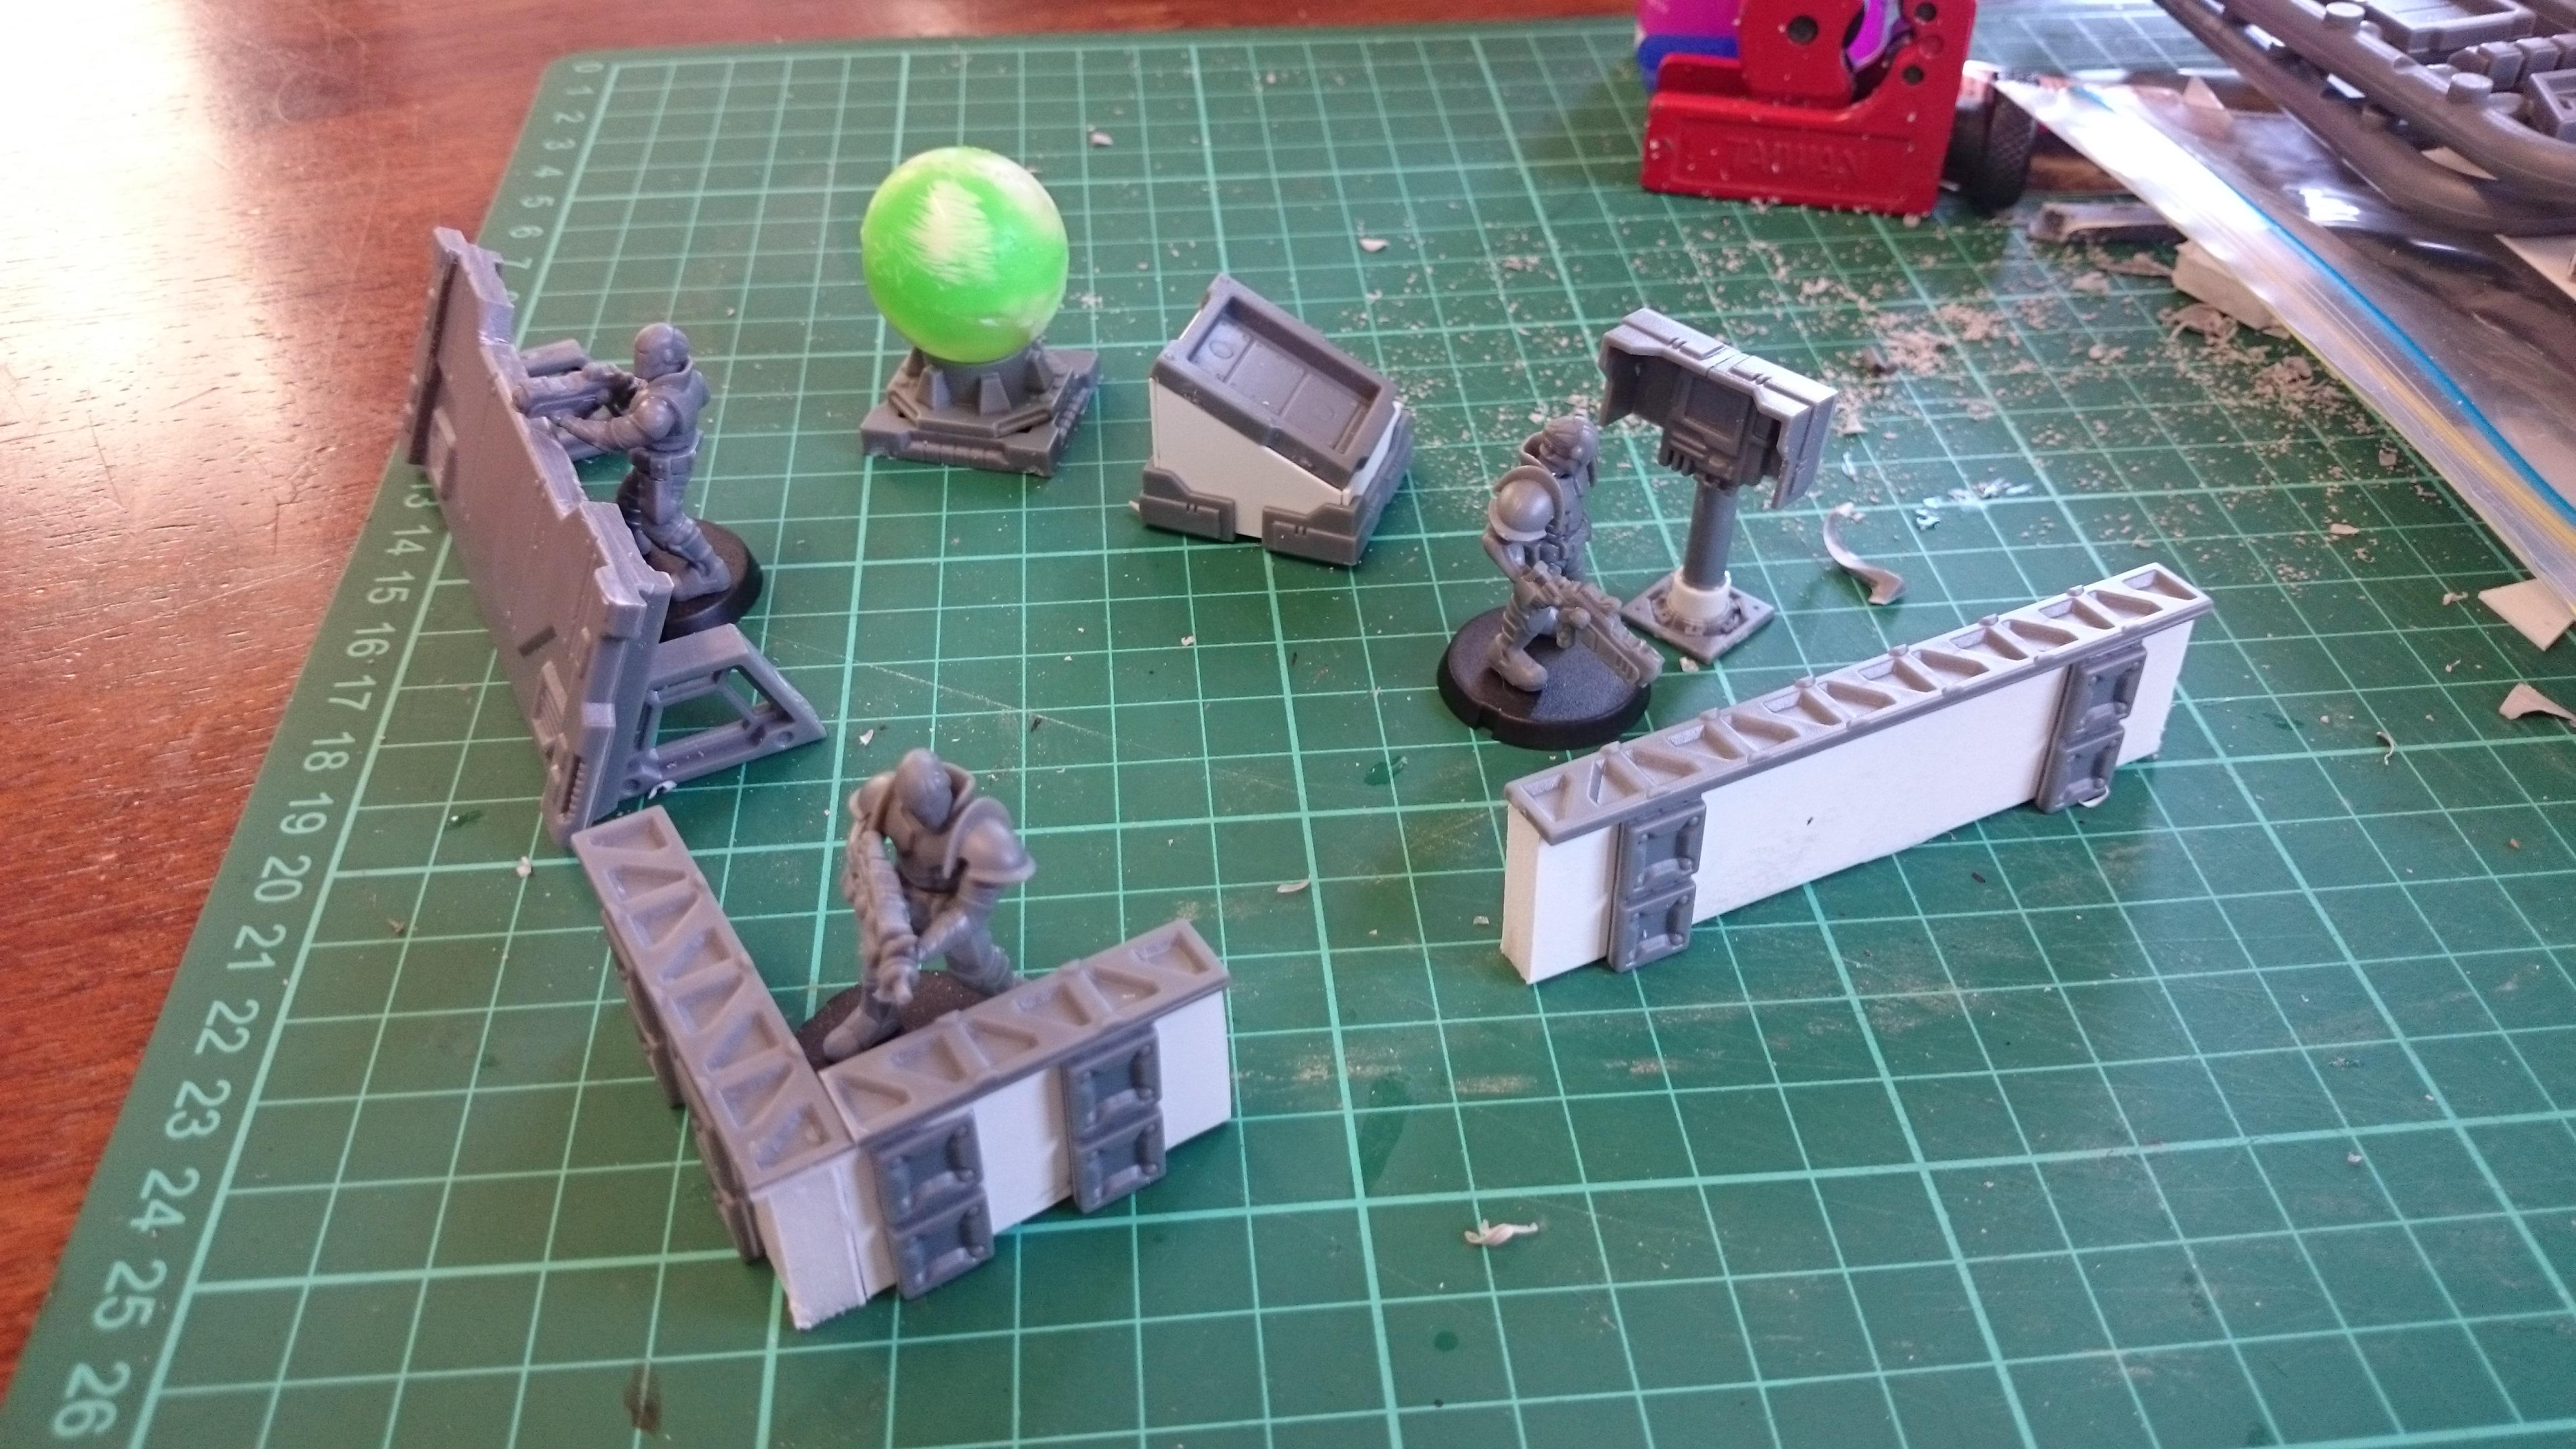
In my continuing quest to turn every interesting thing I encounter into wargaming terrain, I often find myself wandering up and down the plumbing aisle of the local hardware store. The result of the latest meanderings, once combined with some foamcore and an assortment of parts from the Maelstrom's Edge Terrain Sprue, looks like this:
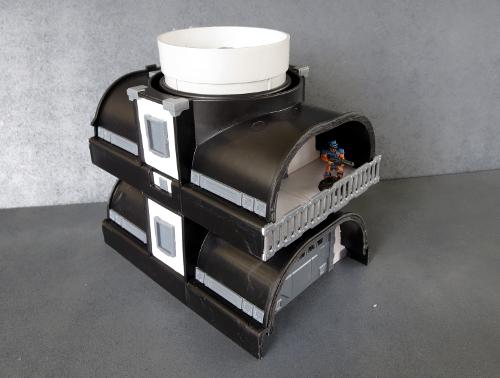
This started out life as a section of plastic drainage channel, that looks like this:
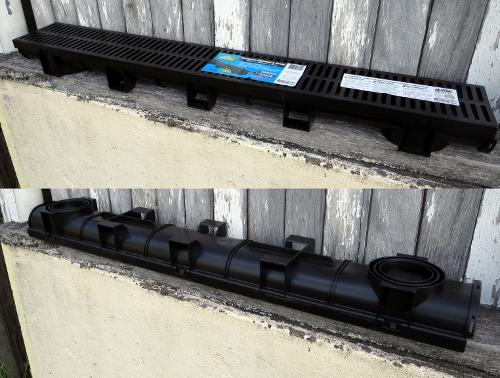
There are a whole bunch of variations on these, in different sizes and with different detailing on the undersides, which become the buildings' roofs. I chose this particular one through the arcane process of just buying the cheapest one (which was around AU$15).
Clearly having designed this product with wargamers in mind, the manufacturer has quite helpfully broken the length of channel into 5 sections.
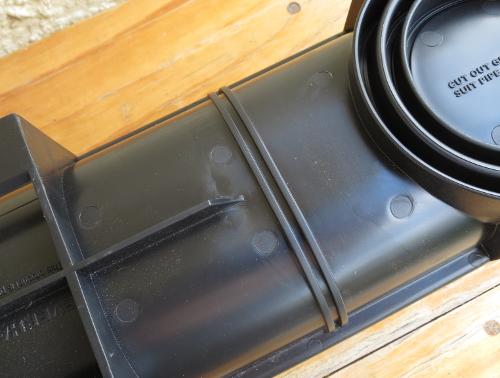
Taking to those dividing lines with a hacksaw results in 5 equal lengths, just the perfect size for a building.

Rough edges on the cut ends can be sanded or trimmed with a sharp knife.
To fill in the ends, I used foamcore. You could also use plasticard, cardboard or corrugated plastic signboard, but I like foamcore for its ease of use.
To get the shape right, sit the building shell end-wise on the foamcore, and trace around the inside with a pencil.
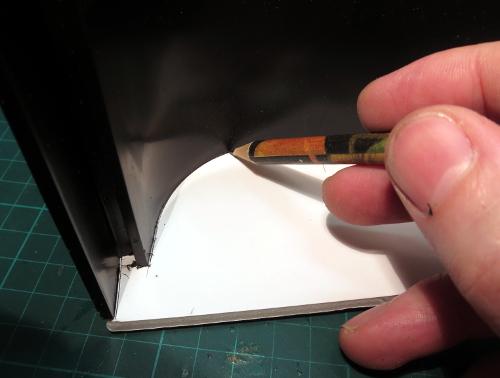
Cut out the resultant shape with a sharp knife.
Once your end piece is cut out, check the fit against the shell, and trim wherever necessary to get a neat fit. Then add details from the terrain sprue components. I'm starting with a garage door - these are designed to be inset, so cut out a hole for it by tracing around the frame and then cutting out. Check for fit, and then glue the door in place.
The end panel can then be glued in place in the end of the building shell. Recessing the wall a little, rather than having it flush with the end of the shell, will provide a nice little nook for models to take cover in.
A note on glue - Skip this part if you've read any of my previous articles on gluing things to random assorted plastic objects: Plastics used for plumbing fittings are not generally designed with gamers in mind, but you can usually get away with a good quality superglue. For gluing plastic to plastic, you can buy specialised 'all plastic' glues, some of which are a two-part system (a tube of superglue, and a 'primer' that helps the glue stick better) and some that are just really sticky glue. For foamcore, you can use superglue if you're just gluing onto the cardboard outer shell, but superglue will melt the interior foam, so for gluing to the edges of the foamcore you'll need a good PVA glue or a specialist Foam glue, which you should be able to get from any craft store.
Repeat for the other end, using whatever detail components seem appropriate.
Each section of this channel has a raised, rectangular detail midway down each side, which I believe is to help keep it in place in the ground, for those rare situations where you might feel inclined to buy these for their actual, intended purpose. These are turned into windows by adding a panel of foamcore with a shutter window inset into the middle. On this section, there is also a small hole below the window where the grating clipped in. This is also covered over with a little foamcore.
The back on some of the sections also needs filling in with a little more foamcore.
A couple of reinforcing struts from the terrain sprue add a little extra detail down the sides of the building shell.
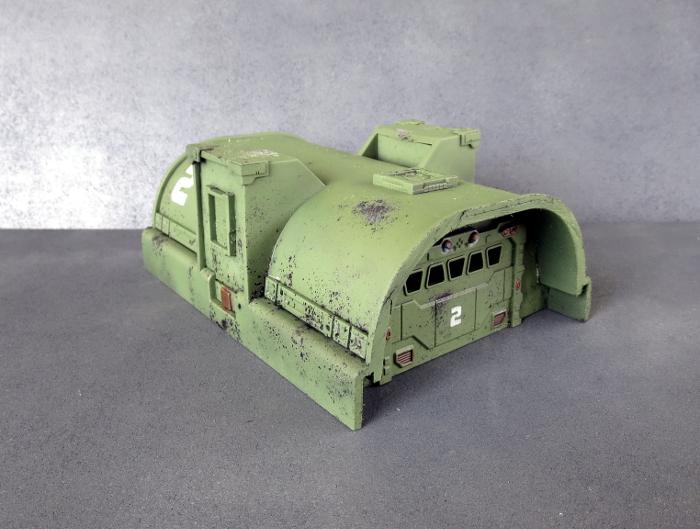
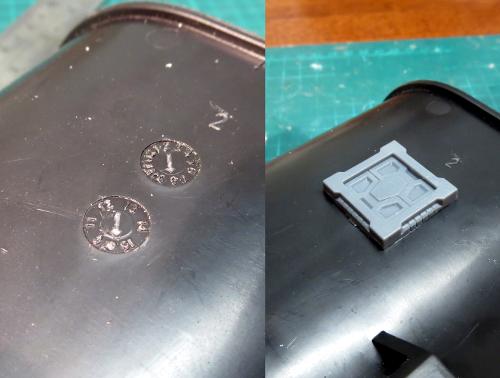
On the roof, errant text or (in this case) batch symbols can be covered over with hatches or extra reinforcing.
With detailing complete, the building winds up looking something like this:
There are some differences between the separate sections of this channel. The above was from the middle section. The next section along is almost the same, but with a raised ridge down the middle.
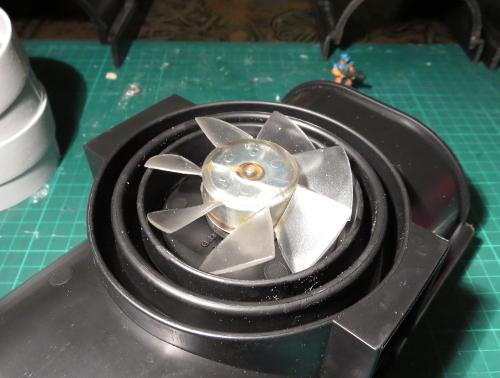
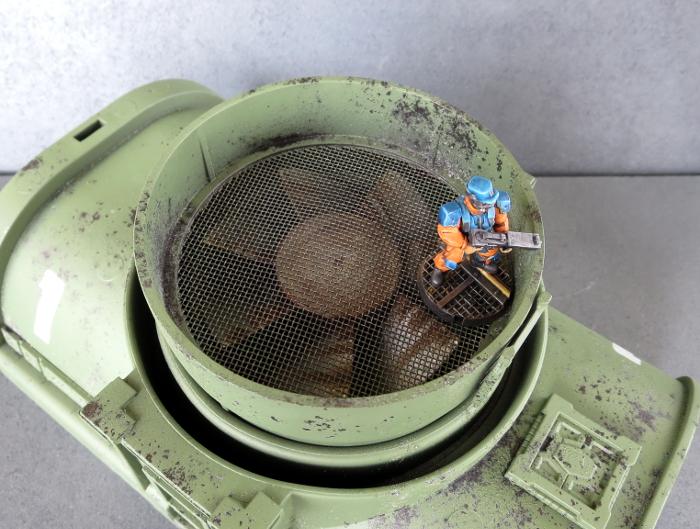
The sections on either end have a circular detail in the middle, for attaching downpipes.

This turned out to be a perfect spot to place an old PC fan.
Over this, I added a section of mosquito barrier, intended for insertion into guttering downpipes. This had some text around the outside, which I removed with a bit of sanding.
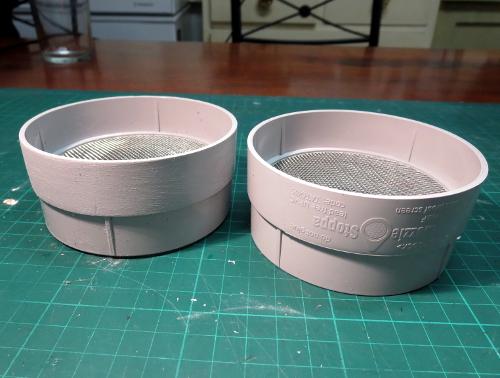
Once clipped in place over the fan and with a section of ladder glued onto the outside for access, this creates a nice visual detail, and a functional watch platform.
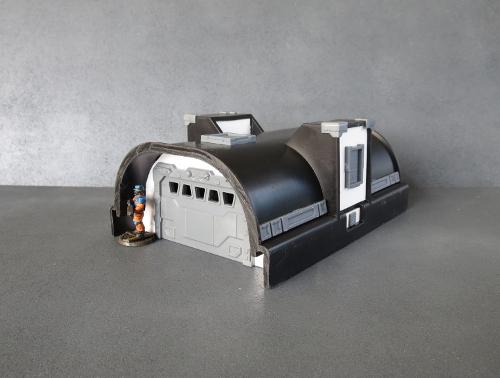
So the resultant building looks like this:
Construction complete, the end result is three different buildings that all look similar enough to represent mass-produced structures with slight variations for specific roles.
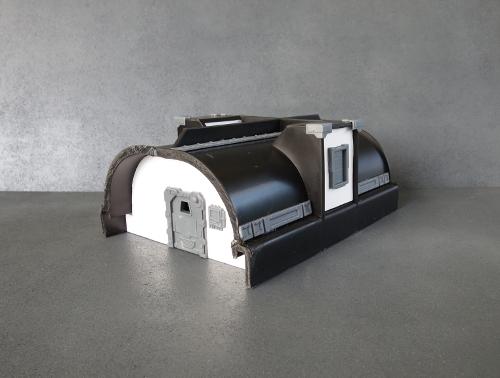
Astute readers may realise that this leaves two sections of the original channel. The only logical thing to do with them was, of course, to combine them and make a two-story version:

On the upper story, I recessed the end walls even further in and added a floor from foamcore, to create a good-sized balcony on either end of the building. The railing was made from two ladders.
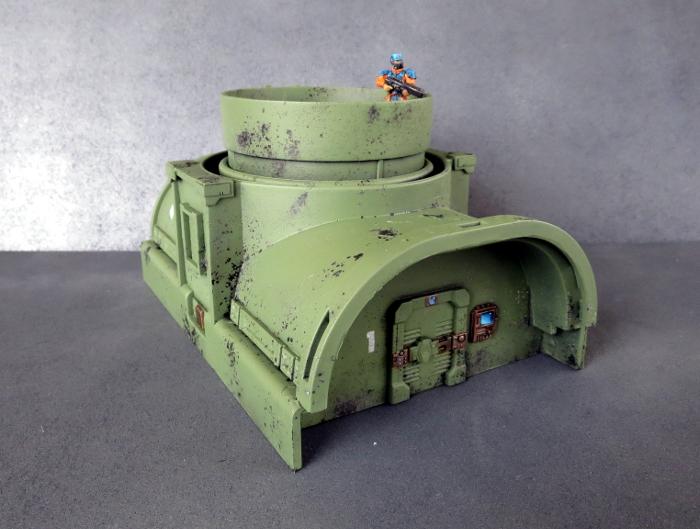
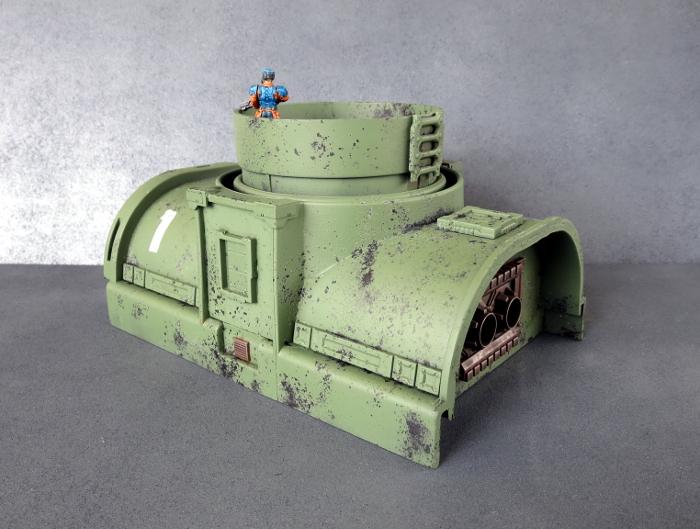
From there, all that's left is to paint them!
I used a Killrust Satin Black spray as a basecoat - a decent quality spray is a good idea, as cheaper sprays may not stick as well to the plastic used for these channels. This was followed up with a coat of Rustoleum 'Oil Rubbed Bronze', which I thought would make a nice, dark, weathered metal layer to show through for the weathering. A coat of sealer and a sprinkle of salt (there's a tutorial on salt-weathering coming in the very near future), and then a top coat with Army Painter 'Army Green', before scrubbing off the salt. Then some final detailing, and the buildings are ready for the table.
If you're feeling the urge to head on out to the hardware store to recreate these yourself, you can pick up a two-pack of the Maelstrom's Edge terrain sprues from the online store here. As always, feel free to share your creations on the Comm Guild Facebook page!