Search Results for 'terrain'
Entries found for "terrain": 216Showing 21 - 30 of total 216 search results
Terrain Tutorial: Cheap Trees from Pine Cones!
Posted on Friday Oct 14, 2022 at 05:00pm in Tutorials
 - by Iain Wilson
A good collection of trees is handy for fleshing out your battlefields, but commercially-made trees made specifically for scale modeling can be expensive. I've shared a few different ideas in the past for making your own foliage, including using aquarium plants, expanding foam, and Christmas baubles covered in hot glue.
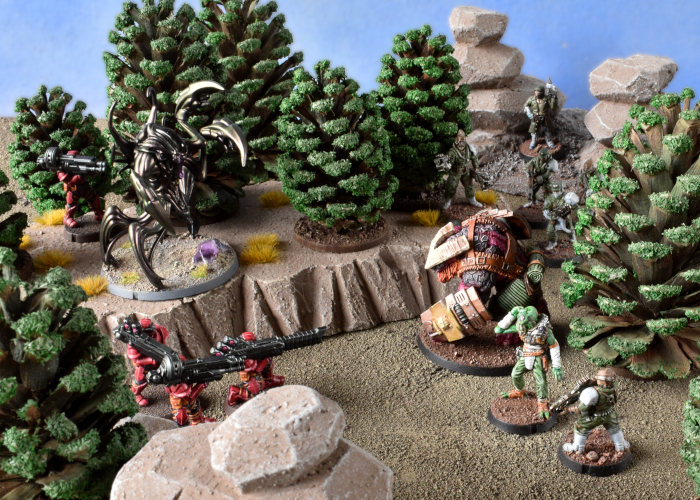
Over the years, one of the more common budget tree ideas I've come across is to use pine cones painted green. They have the advantage of being vaguely tree-shaped and inexpensive if you have pine trees nearby, but tend to wind up just looking like pine cones painted green. I thought I would see if I could come up with an easy and cheap way of improving on this idea a little, with this result:
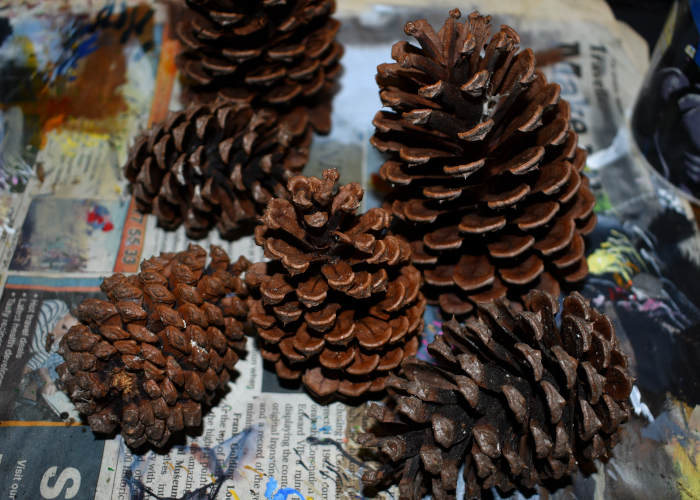
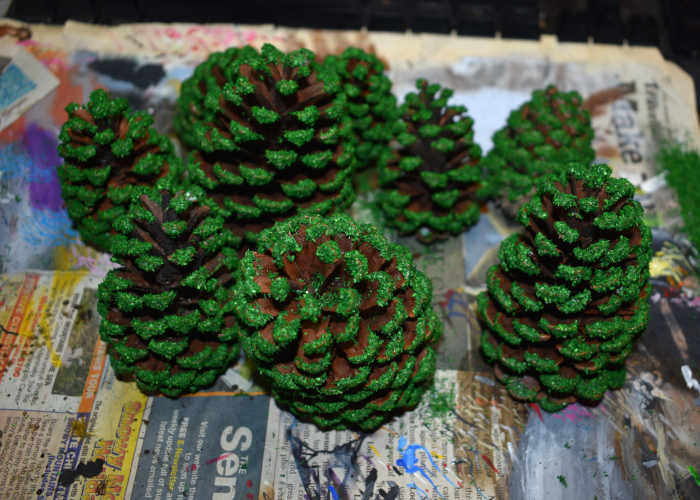
To get started, I collected a bunch of pine cones in assorted sizes, preferably as close to fully opened up as possible.
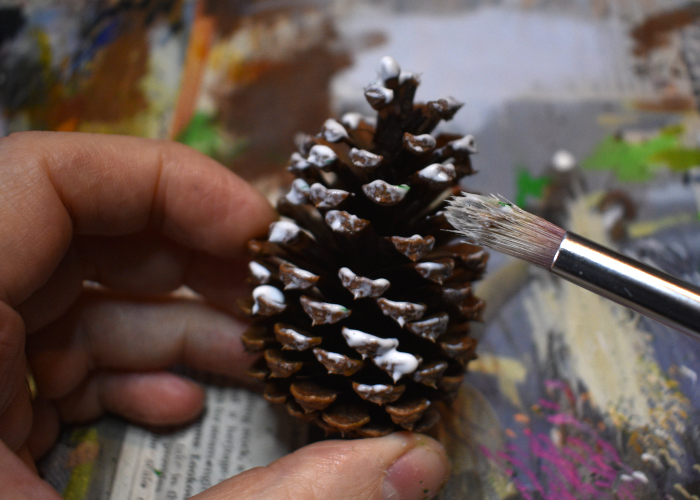
I took an old, large paintbrush and painted the outside of each pine cone with a generous layer of PVA glue.
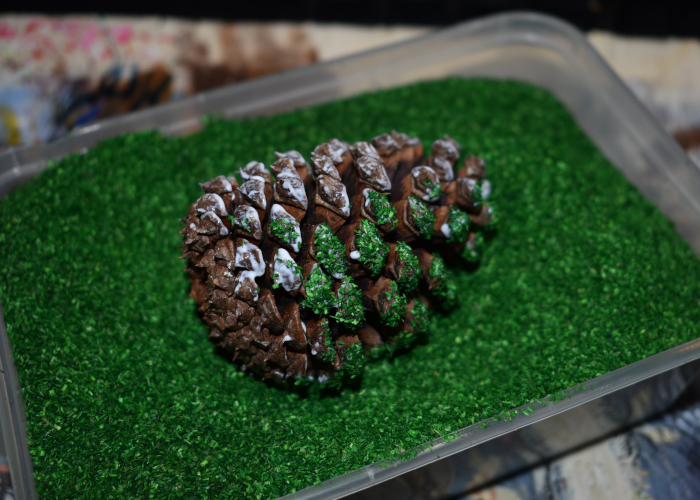
Then while the glue was still nice and wet, I dipped the cones in a tub of green flock, rolling them around to get the flock covering all of the glued areas.
I don't normally use sawdust flock for modeling, as for its primary use (for grassed areas) I don't like how it looks, although I have used a finer flock in the past for making hedges. But I had a big tub of this stuff that someone gave to me years ago, and this seemed like a good use for it.
The flocked pine cones:
To finish up, I gave the trees a light spray from above using Army Painter Army Green. This dulled down the bright green of the flock and gave it some depth. I then used hot glue to attach the trees to some circular plywood bases. At this point, they can be put on the table as single trees, placed on top of a shaped terrain piece to make a forest base, or fitted to a textured base board. For the latter, you can glue the trees directly to the base board instead of using the circles, or texture around the circles so that the trees are removable, making for easier storage or the ability to remove trees when they are in the way for model movement.
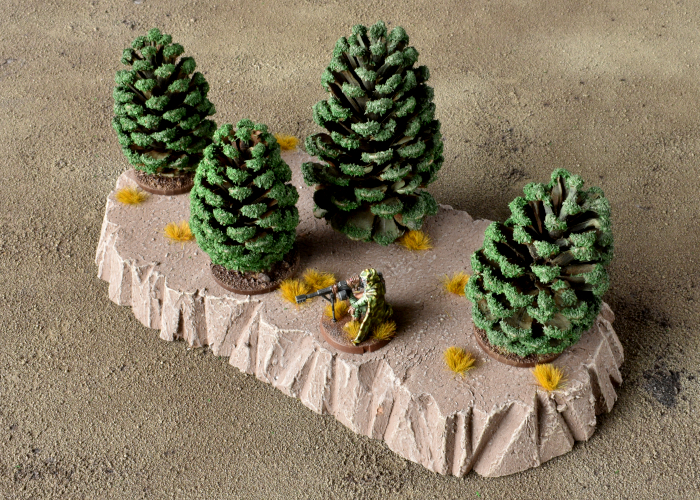
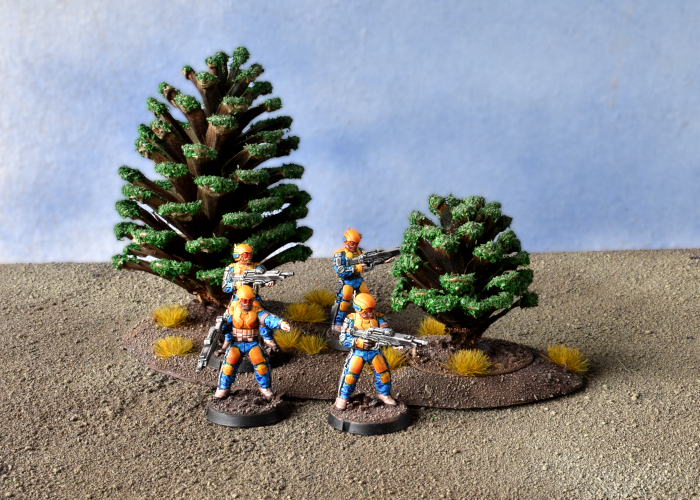
The end result, to be honest, still looks somewhat like pine cones painted green, although the illusion works a little better from above at normal playing height. For a little more work, you can also prune away the pieces from the base of the pine cone to create a trunk protruding from the bottom, like this:
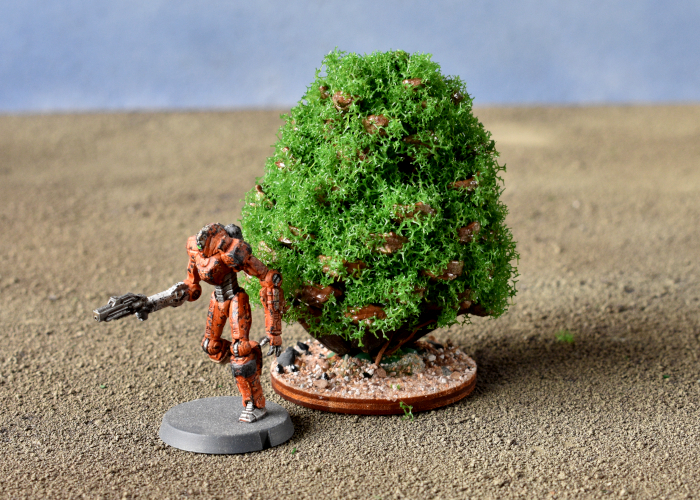
Or, to get even further away from the pine cone look, you can use a slightly more liberal coat of glue and cover the whole thing in landscaping foliage, like this:
Once you have your forest of pine-scented doom, head on over to the Maelstrom's Edge webstore here, to pick up an army to run around in it!
What are you working on? We would love to see your models and terrain in the Comm Guild Facebook group!
For other building ideas, modeling tutorials, army spotlights and conversion walkthroughs, check out the Hobby section of the Maelstrom's Edge website here. And while you're there, grab a copy of the Maelstrom's Edge V2 Beta rules!
Looking for hobby content?
Posted on Wednesday Sept 21, 2022 at 05:00pm in General
The 'Hobby Basics' section is aimed at beginners to the world of miniature modeling, and includes a series of articles covering some useful information on tools and techniques to get you started.

In the 'Tips & Techniques" section you will find articles on different modeling or painting techniques that can be applied to all sorts of different hobby projects.
The "Modeling Articles" section covers articles that take a closer look at the Maelstrom's Edge model range, or detail different modeling projects using Maelstrom's Edge models or kitbashes borrowed from other ranges of miniatures.
Iain's favourite, the "Terrain Building Articles" section contains a wide range of articles detailing different wargaming terrain projects. Many of these use the Maelstrom's Edge terrain sprues and found objects (storage containers, plumbing supplies, assorted bits of trash) or foamed PVC or foamcore sheets to create buildings and other structures for your gaming tables. There are also kitbashes of 3rd party terrain kits, scratchbuilding ideas for alien forests, and much more.
To get started building up your own little corner of the Maelstrom's Edge universe, you can pick up the entire Maelstrom's Edge range from the webstore here.
What are you working on? We would love to see your models and terrain in the Comm Guild Facebook group!
Remember to also grab a copy of the Maelstrom's Edge V2 Beta rules so you can get into the action!
Terrain Spotlight: Levitating Generator Platform!
Posted on Friday Sept 16, 2022 at 05:00pm in Tutorials
- by Iain Wilson
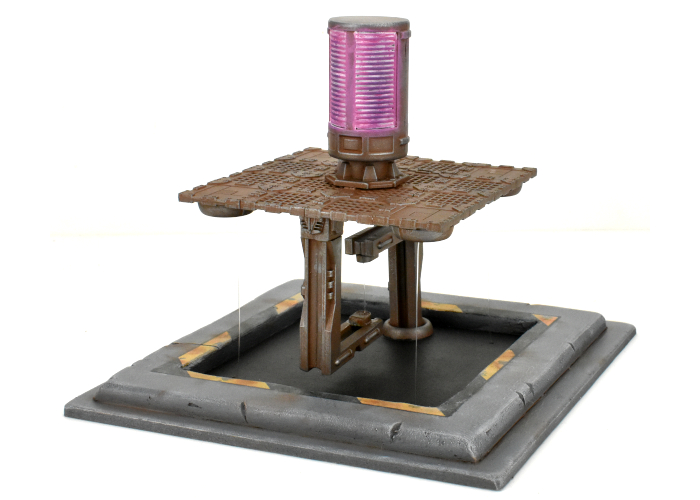
I've been fascinated for a while now by the various designs floating around for coffee tables and the like that 'float' with some clever cable design making it look like they have no actual support. In a moment of whimsy this week, I thought it might be fun to recreate this sort of design for the gaming table. And so... this happened:
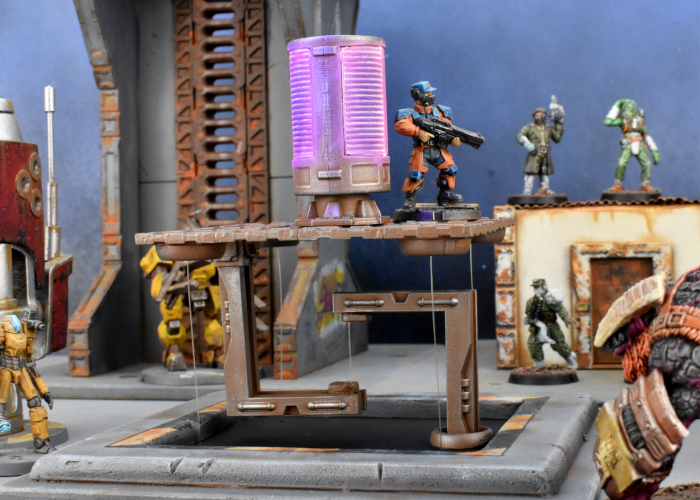
The main part of the structure is made from various bits and pieces from the Maelstrom's Edge terrain sprues. The circular windows on the bottom of the platform have a piece of thin plasticard behind them with a hole drilled through the centre. This allowed me to feed some clear fishing line through the holes and glue it onto the back of the plasticard. Once everything was painted and assembled, this would (I hoped!) securely hold the fishing line in place.
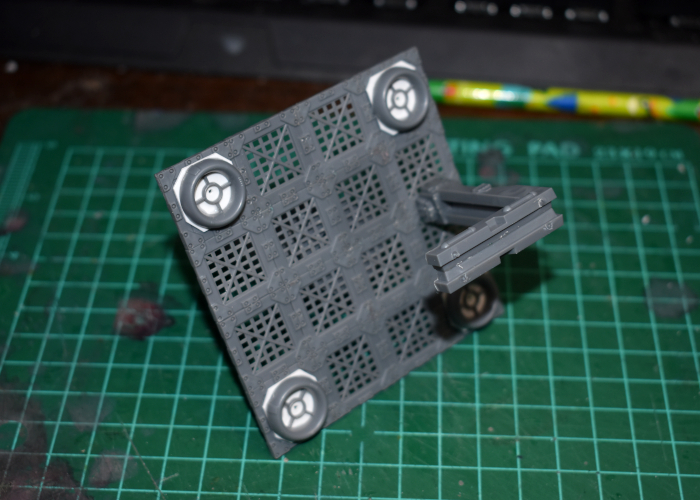
The base for the piece was made from a sheet of 2mm foamed PVC and some 6mm foamcore, with a few more bits from the terrain sprues for the support piece. I drilled holes in the base piece matching up to the holes on the platform corners, and made an indent beside each hole on the bottom of the base. This would allow the fishing line, when glued in place, to sit in the indents leaving the bottom of the base nice and flat.
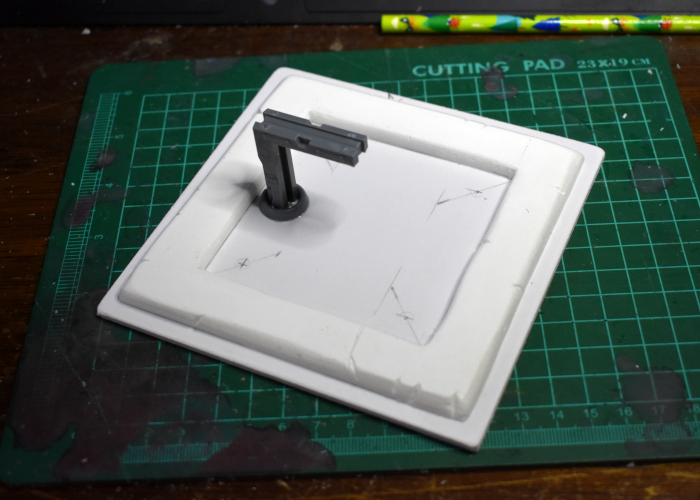
Everything needed to be painted before final assembly, to avoid getting paint on the fishing line - I wanted the line to remain as unobtrusive as possible.
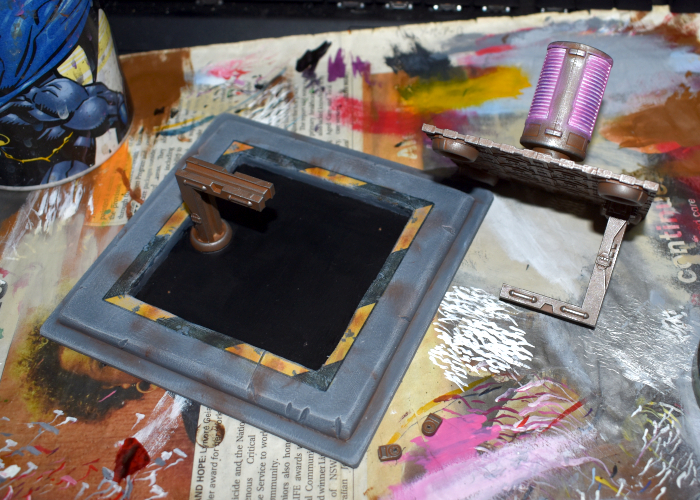
I glued the fishing line into the window ports and glued those in place on the bottom of the platform, and then glued the central support line in place. The it was just a matter of pulling the corner lines through the base holes until everything was sitting square and secure, and gluing the ends of the lines in place on the bottom of the base. There was a bit of breath-holding when I turned it over, and much rejoicing when it turned out to work as intended!
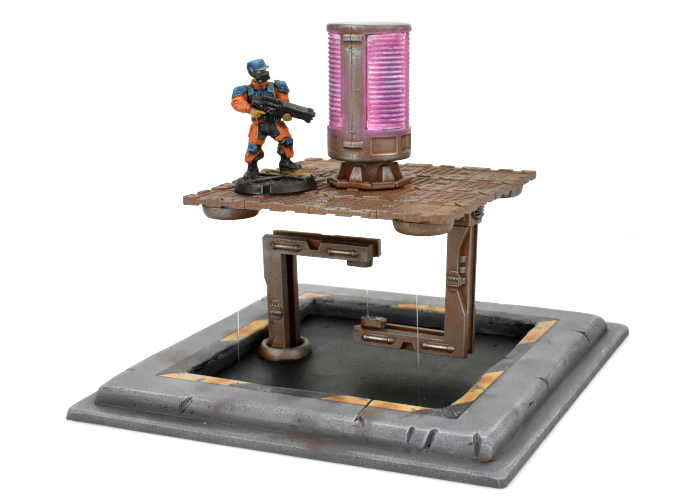

It's a bit of an odd piece for gaming terrain, but sometimes it's fun to make something just to find out if you can!
To build your own generator platform of floating doom, you can pick up the terrain sprues along with the rest of the Maelstrom's Edge range from the webstore here.
What are you working on? We would love to see your models and terrain in the Comm Guild Facebook group!
For other building ideas, modeling tutorials, army spotlights and conversion walkthroughs, check out the Hobby section of the Maelstrom's Edge website here. And while you're there, grab a copy of the Maelstrom's Edge V2 Beta rules!
Tags: modeling spotlight terrain terrainsprue
Terrain Tutorial: Quick and Easy Fences!
Posted on Friday Sept 09, 2022 at 05:00pm in Tutorials
- by Iain Wilson
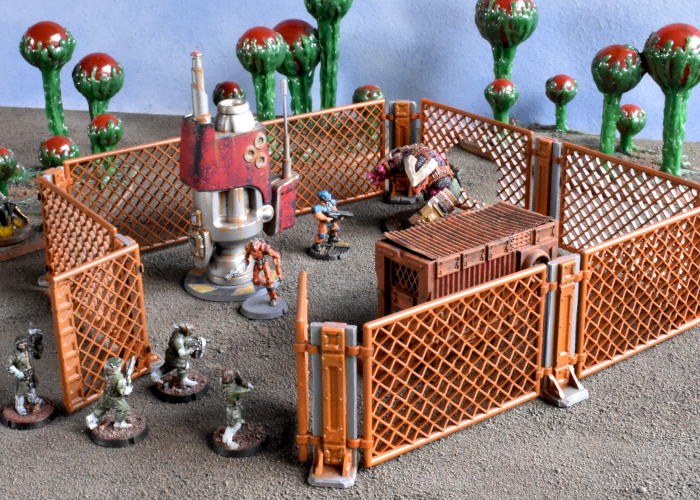
Fences can provide an interesting extra dimension to miniature battlefields, as they block movement without necessarily also blocking line of site. This can force some tactical decisions around model placement and movement around the table. In this week's article, I'm sharing a quick and easy way to make some fences for your table.
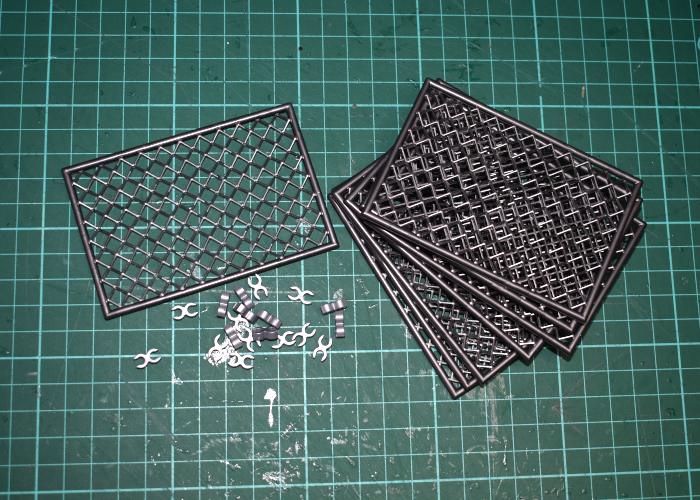
I came across these Lego-compatible fence pieces on AliExpress completely by accident, and thought they seemed ideal for gaming. They come as a pack of fence sections, and join together with separate clip pieces, and they're a nice, dark metallic grey colour. So for the really quick and easy version, you could just take these, clip a bunch of them together and plonk them on the table as-is and call the job a good-un.
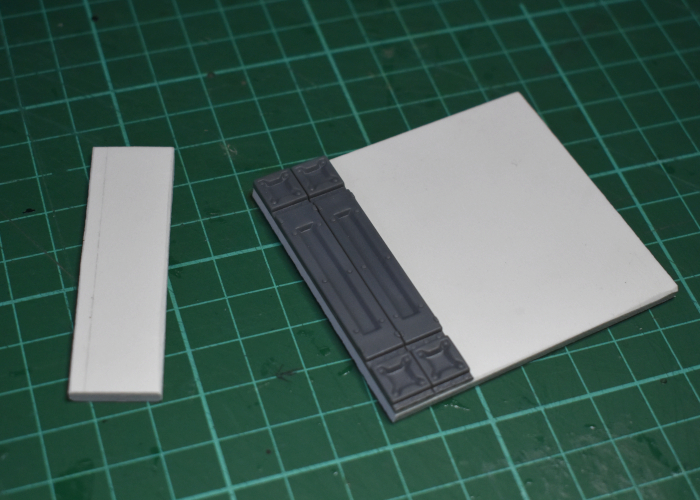
I wanted to fit them in with my existing terrain a little better, though, so I grabbed a couple of Maelstrom's Edge terrain sprues and set to work. I started by trimming up some reinforcing struts to about the same height as the fence panels by cutting off the top and bottom segments.
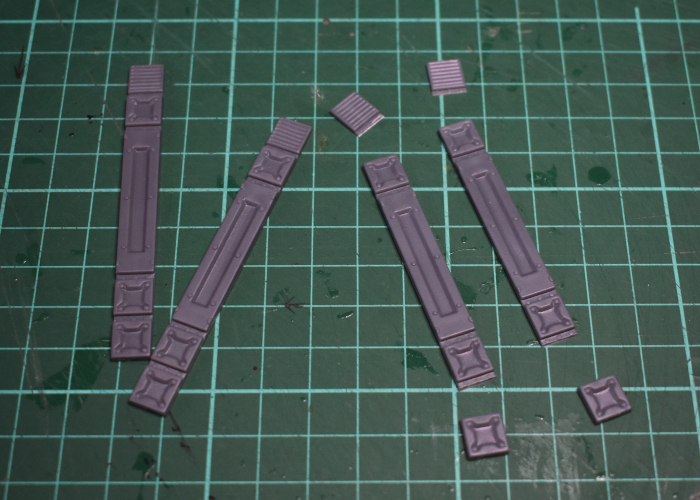
Then I took some 3mm foamed PVC and cut strips the same height as the struts, with about 4mm extra width either side - as a happy coincidence, this was the same width as two of the struts, so laying the struts side-by-side on the PVC served as a handy cutting guide.
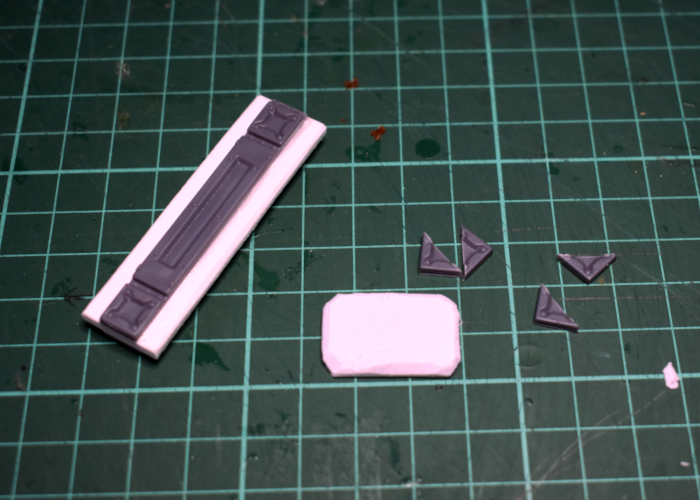
I glued the struts in place on either side of the PVC strips to form reinforced fence posts, and then cut some shorter strips to serve as bases for the posts. The bottom segment removed from the struts, cut in half diagonally, made some perfect supports to strengthen the attachment between post and base.
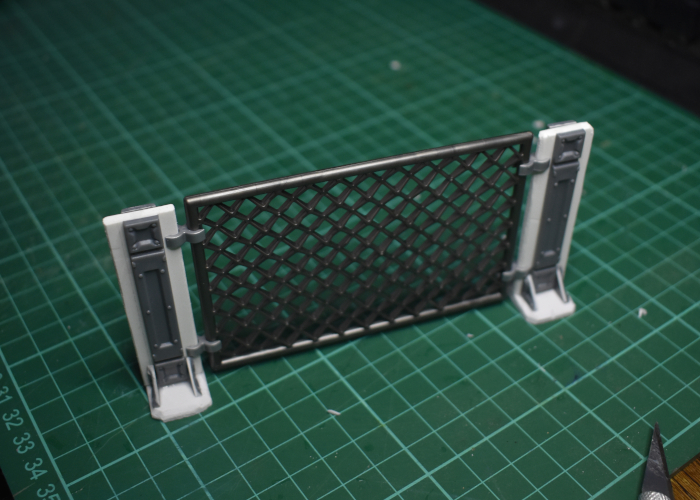
With everything glued together, the clips for the fence pieces slot snugly onto the PVC and it all stands up nicely.
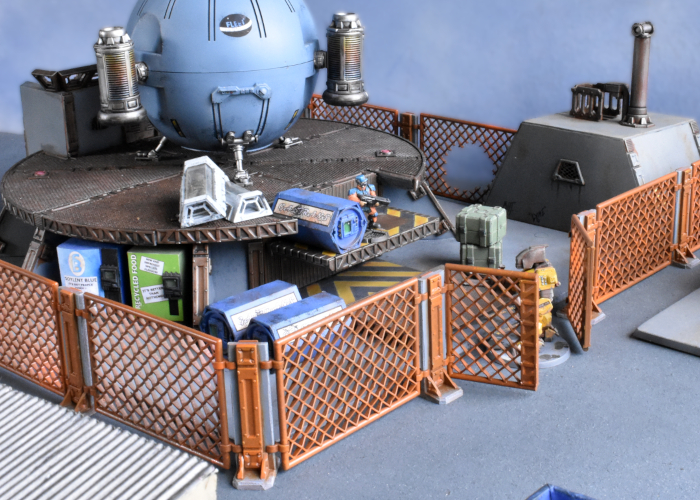
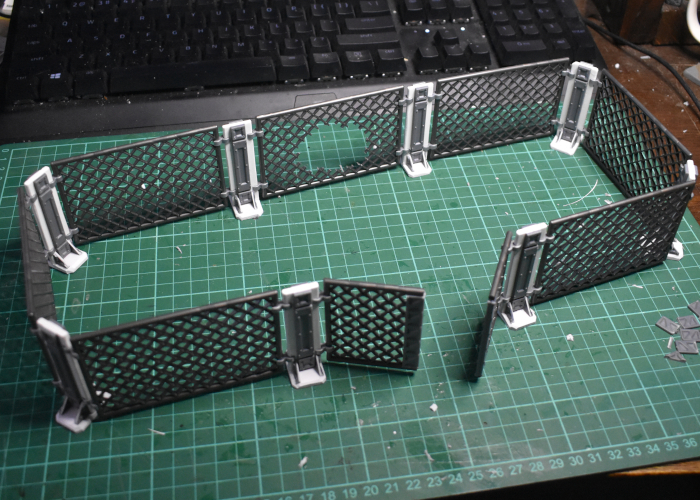
I made a bunch of posts, and for good measure cut one of the fence segments in half and attached some more reinforcing struts on the inner sections to make a two-part gate. The whole thing slots together and by twisting the holding clips can go around corners into whatever configuration is needed.
With a quick coat of rusty paint (Vallejo Beasty Brown spray with some splotchy spray of Tamiya Pure Orange and a light drybrush with Army Painter Fire Lizard) and some grey for the PVC parts (Army Painter Uniform Grey with a drybrush of white and some Vallejo Beasty Brown drybrushed into the creases) the fence is ready for the table!
To build your own fence of chainlinked doom, you can pick up the terrain sprues along with the rest of the Maelstrom's Edge range from the webstore here.
What are you working on? We would love to see your models and terrain in the Comm Guild Facebook group!
For other building ideas, modeling tutorials, army spotlights and conversion walkthroughs, check out the Hobby section of the Maelstrom's Edge website here. And while you're there, grab a copy of the Maelstrom's Edge V2 Beta rules!
Model Spotlight: The Epirian Scarecrow
Posted on Tuesday Aug 23, 2022 at 05:00pm in Models
- by Iain Wilson
This week, we're taking a look at the multi-part, poseable plastic kit for the Epirian Foundation's feared security bot.
Scarecrows are area patrol units, designed to provide security to various types of property ranging from industrial perimeters to agricultural and terraforming facilities. Equipped with an advanced suite of thermal and motion tracking sensors, the Scarecrow is designed to detect and deter any non-authorized biological or technological intrusion into its designated patrol area.
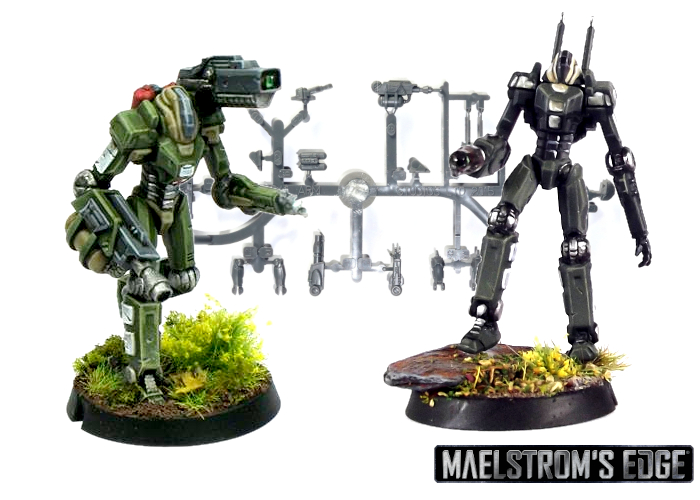
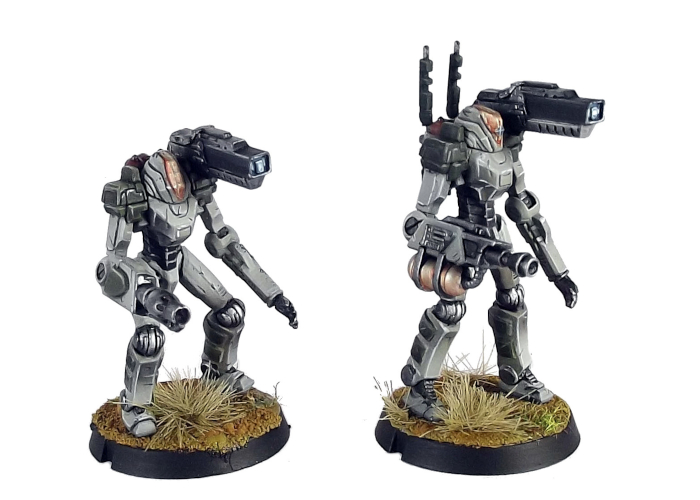
The Scarecrow kit is designed to build a couple of different variants of this farming-bot-turned-military-asset, which lets you field the regular Scarecrow Sniper in a Hammer slot, or the Command Array-equipped Command Scarecrow leading an all-bot force. These can be armed with a shoulder mounted railrifle, and either a clingfire sprayer or chemtek sprayer on one arm.
If you 'borrow' a second clingfire sprayer (leftover from building a chemtek variant, obviously!) you can also build the twin-flaming Subjugator variant that often accompanies Contractor Suppression Teams.
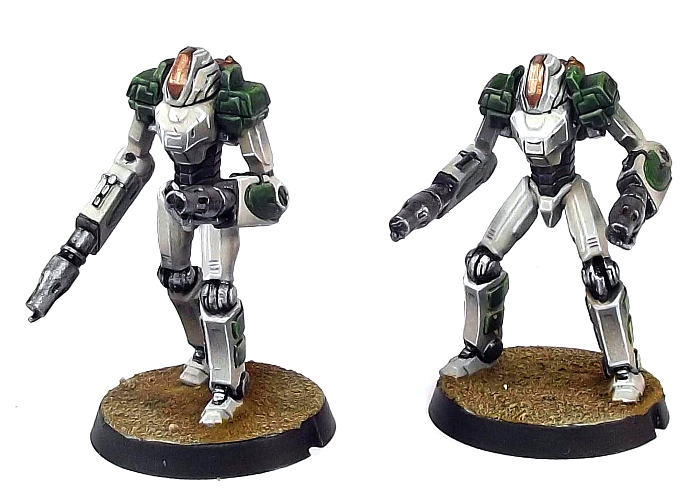
The best part of the Scarecrow kit is its extreme flexibility. With separate ankle, knee, elbow and shoulder joints, the Scarecrow is our most poseable kit, and being plastic is a fantastic base for adding alternate parts and mixing things up even further.
To build your own implacable robot of avian-frightening Doom, pick up the plastic Scarecrows in a pack of two from the Maelstrom's Edge webstore!
While you're there, you can download the Maelstrom's Edge V2 rules from the Trial Rules section of the website here. The Beta rules documents contain all of the rules for playing V2 games, but keep in mind that these are just 'preview' documents - some rules may be revised based on feedback, and the final layout including background material for the factions and the Maelstrom's Edge universe, artwork and other 'flavor' material is missing.
For other modeling ideas, tutorials, army spotlights and conversion walkthroughs, check out the Hobby section of the Maelstrom's Edge website here.
What are you working on? We would love to see your models and terrain in the Comm Guild Facebook group!
Modeling Spotlight: Speedpaint Kaddar Nova!
Posted on Wednesday Jun 22, 2022 at 05:00pm in The Karist Enclave
- by Iain Wilson
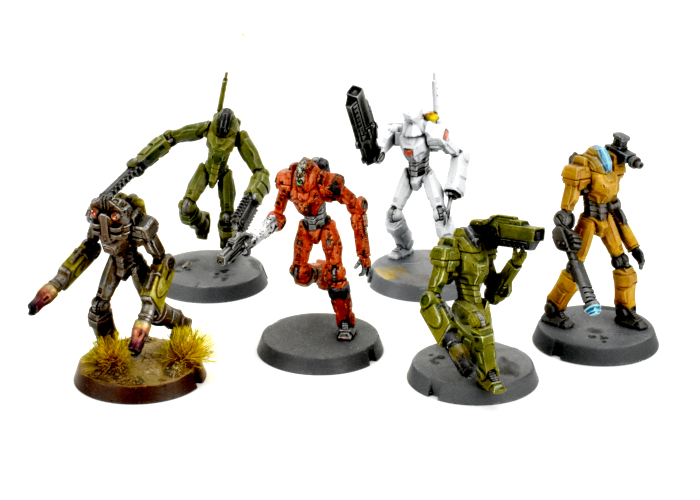
My adventures with Army Painter Speedpaints continued this week, as I'm slowly piecing together a force from various miniatures to run as an Imperial Guard army in 2nd edition Warhammmer 40000. This week's addition was a plastic (and slightly converted) Karist Kaddar Nova!
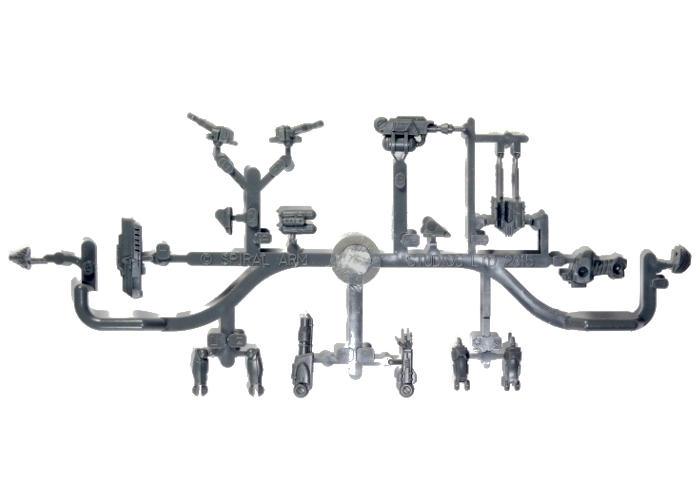
This model uses mostly the standard Kaddar Nova parts, although I added in a right hand, glaive and pistol from the Faction Expansion sprue, as this chap will be fielded as an Inquisitor Lord armed with a force rod and hand flamer.
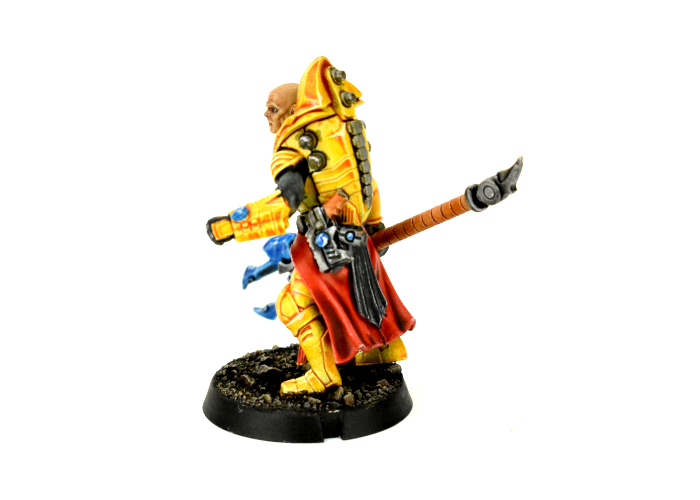
As per normal for Speedpaint work, I started with a white spray basecoat. The armour is Zealot Yellow, hung upside down to dry so that the paint would pool into upper recesses. For the skin, my initial tests with Crusader Skin straight over white were not what I wanted, so this time around I tried an experiment. Starting with a coat of Skeleton Bone, I applied a very light drybrush of Matt White and then the Crusader Skin, and was quite happy with the result. The eyes are a thin strip of white with some black dots in the middle, and then any mess around the edges cleaned up with some more Skeleton Bone and Crusader Skin.
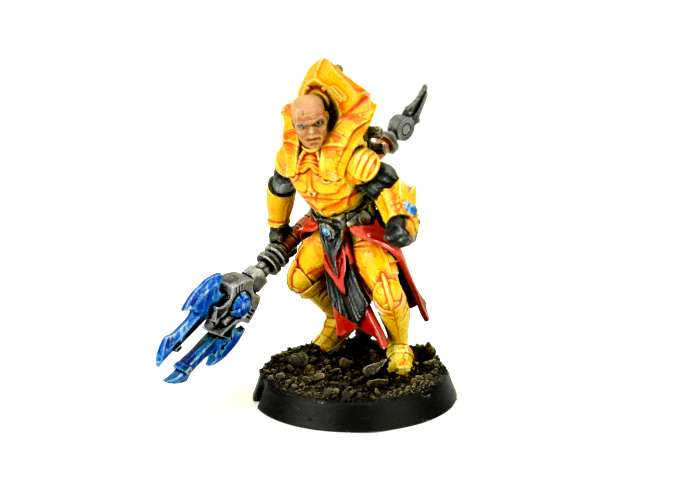
Proper curing time is still something of a mystery with Speedpaint, and in certain conditions the paint can reactivate when painted over if it is not completely cured, so I have taken to applying a light coat of Anti-Shine varnish over the first, main colour and then applying any white touchups and subsequent Speedpaint colours over that, and this seems to do the trick.
I used Grim Black for the black parts on his tabard and arms, and Gravelord Grey for exposed metal parts. The grey gives a good metal stand-in without actually being metallic, and there's enough of a contrast between the grey and black for the two to wind up looking sufficiently different.
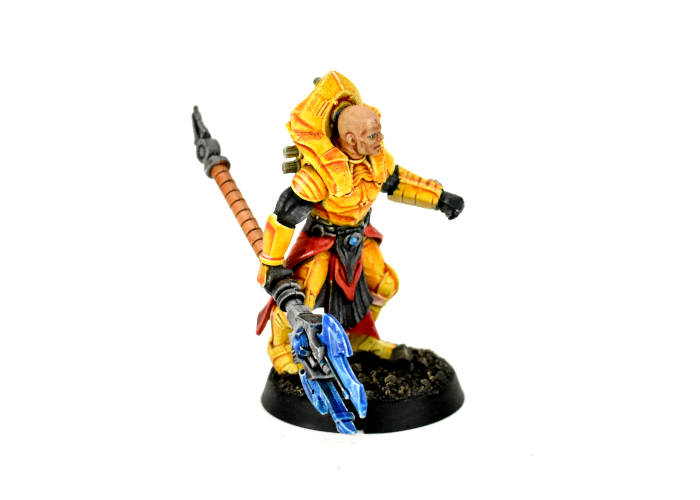
The blades on the glaive and the various glowy blue bits were painted with Highlord Blue with accents of Matt White, while the handle of the glaive is Hardened Leather.
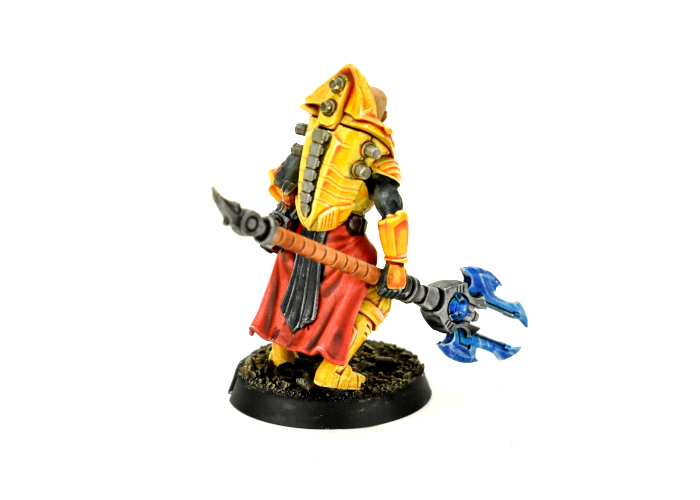
The tabard is Blood Red, applied in two layers - one for the initial colour, and then after that dried, some additional red dabbed into the deeper creases for some extra shading. Then, with all of the colours in place, I added some highlights wherever seemed appropriate on the model with a little Matt White.
Finally, I painted the base with a coat of Dark Wood, drybrushing when it was dry with a little Skeleton Bone, and then added Matt Black around the rim.
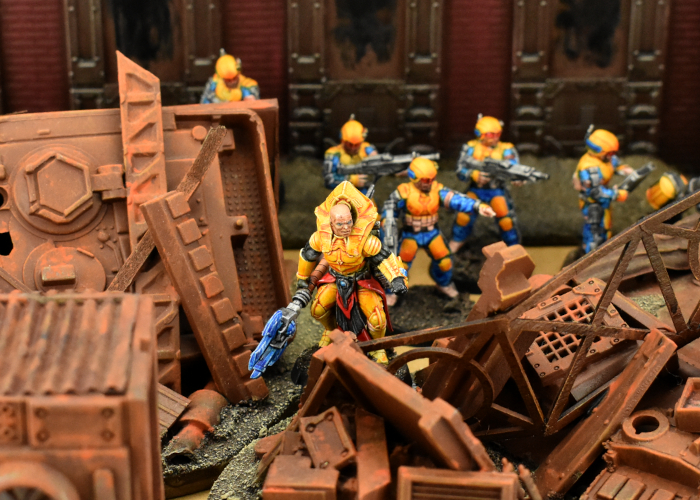
So, that's one squad and a character down, and the rest of the force in progress.

Stay tuned for more!
To build your own Psychic Lord of Proxied Doom, pick up the plastic Kaddar Nova kit from the Maelstrom's Edge webstore!
While you're there, you can download the V2 rules from the Trial Rules section of the Maelstrom's Edge website here. The Beta rules documents contain all of the rules for playing V2 games, but keep in mind that these are just 'preview' documents - some rules may be revised based on feedback, and the final layout including background material for the factions and the Maelstrom's Edge universe, artwork and other 'flavor' material is missing.
For other modeling ideas, tutorials, army spotlights and conversion walkthroughs, check out the Hobby section of the Maelstrom's Edge website here.
What are you working on? We would love to see your models and terrain in the Comm Guild Facebook group!
Tags: kaddar karist nova painting speedpaint spotlight walkthrough
Painting Tutorial: Quick & Easy Camouflage using Speedpaint!
Posted on Tuesday Jun 14, 2022 at 05:00pm in General
- by Iain Wilson
I've been having some fun experimenting with Army Painter's Speedpaints, to see what can be done with them. This week, I'd like to share this simple method that I stumbled upon for painting a camouflage pattern using just a trio of Speedpaints!
Step 1 - Basecoat the model with white spray.
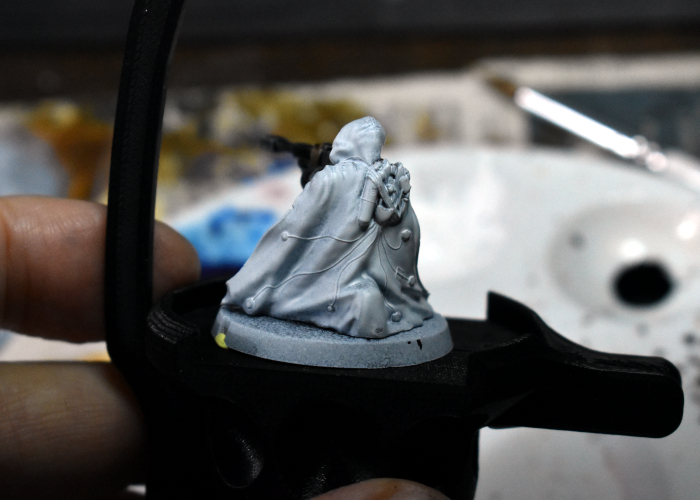
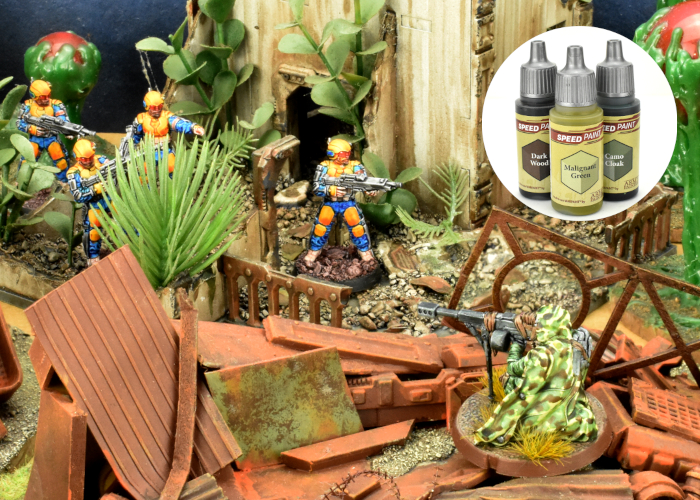
Step 2 - Go over the camouflage area with a generous coat of Malignant Green.
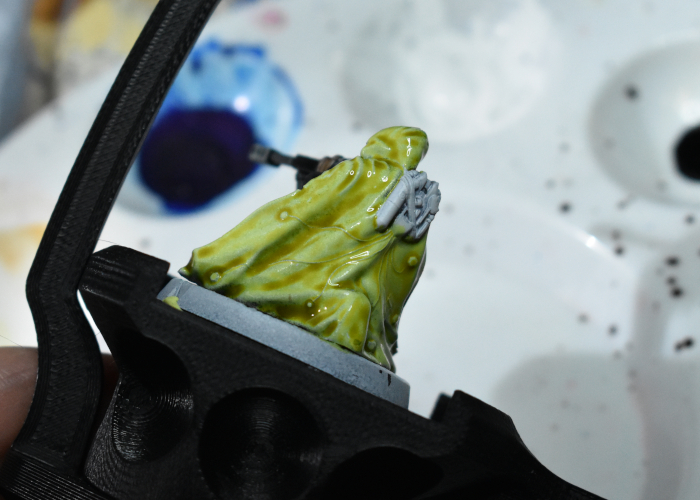
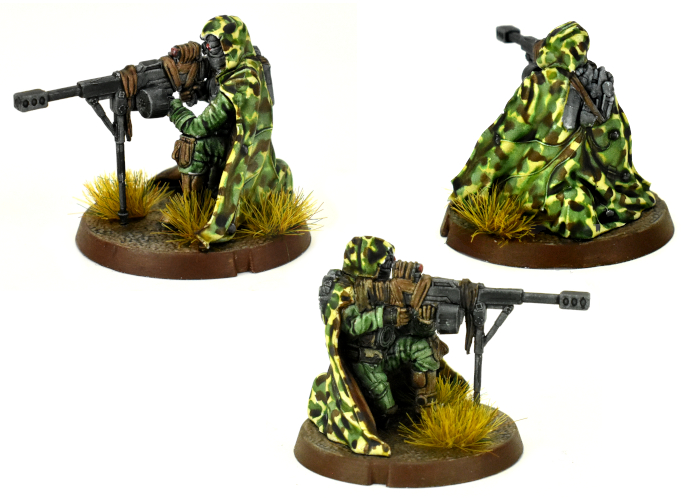
Step 3 - While the Malignant Green is still wet, dab on dots of Camo Cloak. Make these dots about half the size you want them, as they will spread out. Try to mix up the spacing of the dots as you go, so they don't wind up forming a regular pattern. Doing this while the first green is still wet allows the second colour to spread organically, creating irregular, random shapes.
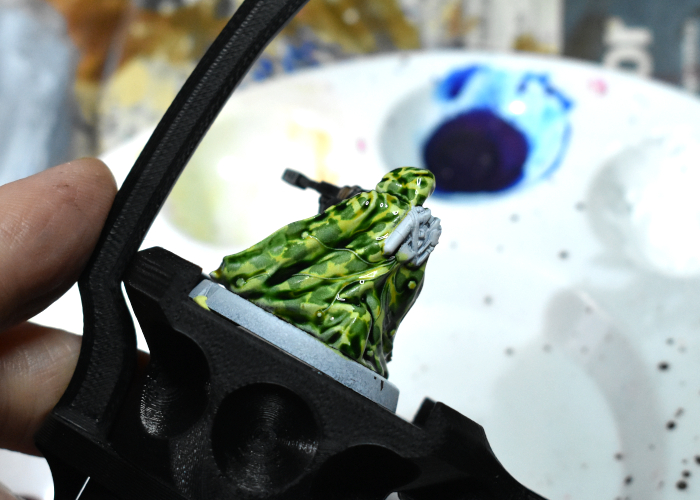
Step 4 - While those first two colours are still wet, go back over with slightly smaller dots of Dark Wood. This will spread across and through the other two colours, creating the layered camo effect.
Step 5 - Let it all dry. It can help if you can lay the camouflage surface as flat as possible, to avoid the wet colours from running downwards.
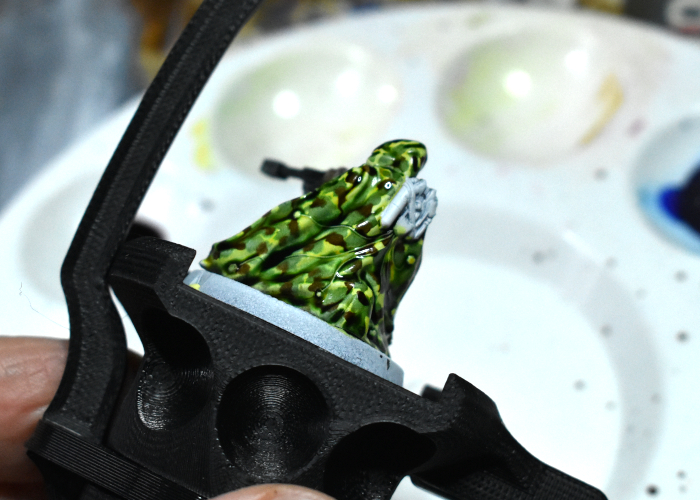
The completed model - the rest of the model was also painted with Speedpaint, mostly Camo Cloak, Dark Wood and Grim Black.
To have a go yourself, pick up the plastic Broken Sniper kit from the Maelstrom's Edge webstore!
While you're there, you can download the V2 rules from the Trial Rules section of the Maelstrom's Edge website here. The Beta rules documents contain all of the rules for playing V2 games, but keep in mind that these are just 'preview' documents - some rules may be revised based on feedback, and the final layout including background material for the factions and the Maelstrom's Edge universe, artwork and other 'flavor' material is missing.
For other modeling ideas, tutorials, army spotlights and conversion walkthroughs, check out the Hobby section of the Maelstrom's Edge website here.
What are you working on? We would love to see your models and terrain in the Comm Guild Facebook group!
Tags: broken painting tutorial walkthrough
Modeling Spotlight: Speedpaint SecDef
Posted on Wednesday May 18, 2022 at 05:00pm in Tutorials
- by Iain Wilson
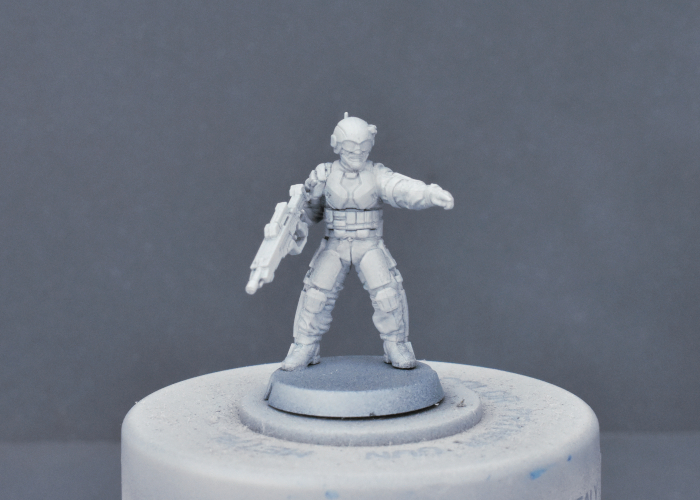
My long-awaited Army Painter Speedpaint Starter Set finally arrived last week, and I was impatient to give them a test run. I've had a bunch of plastic SecDef models assembled for a while, for a little side-project, and figured they would be perfect for the job. So I grabbed the first squad of models out of the hobby box and set to work!
I started off with a basecoat of Army Painter Matt White spray. I did experiment on a couple of initial test models with a plain white basecoat and a zenithal base using white and purple, but decided that the zenithal basecoat didn't make enough of a difference to the end result to be worth the effort.
(A zenithal basecoat is where two layers of colour are used - a darker colour in the recesses/undersides of the mode, and a lighter layer sprayed down from above. This can be handy when combined with certain painting methods, particularly using thinner 'glazing' paints to accentuate shading and highlights.)
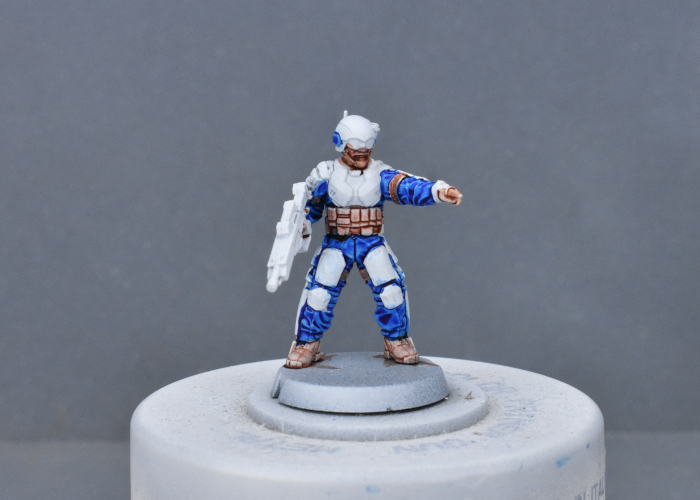
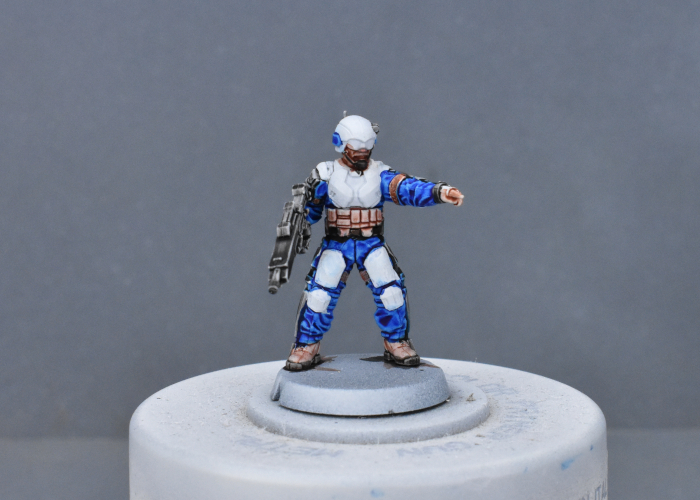
For the uniform, I went with Highlord Blue, applying to any visible cloth areas and trying to avoid too much spillover onto the armour plates. I also added the blue to the raised surround on the helmet.
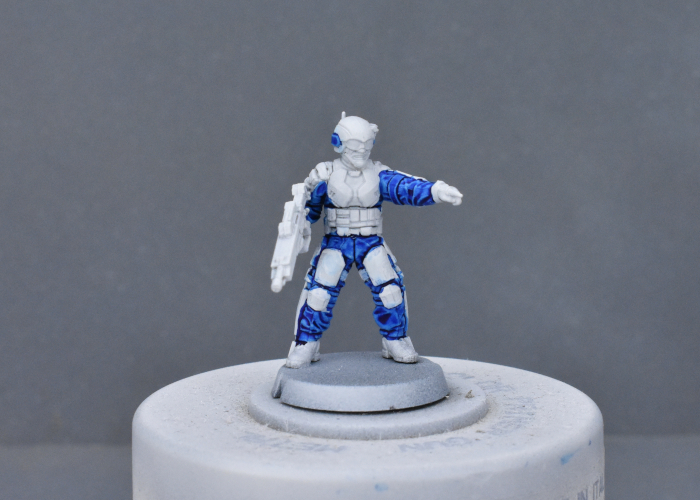
After a quick touchup where necessary with some Matt White, I painted a layer of Hardened Leather over pouches, straps, boots, gloves and face, and then went back over the face with Crusader Skin. The double layer on the skin was to give a darker skin colour - my initial test showed the Crusader Skin to be a bit more washed out than I wanted, but layering it over the Leather gave a nice, dark tone.
Next up, I painted over the weapon, belt, exoskeleton, and helmet commlink, targeter and chinstrap with Gravelord Grey.
For the armour plates and helmet, I went with a coat of Zealot Yellow. This settled nicely on the lower areas of the plates, providing a lovely contrast against the blue uniform.
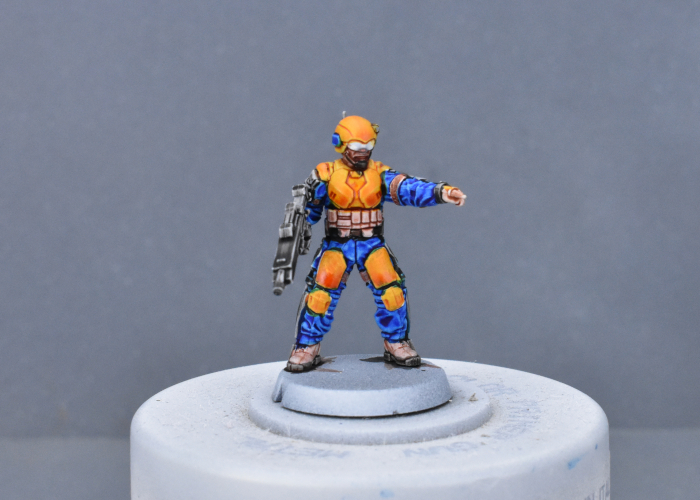
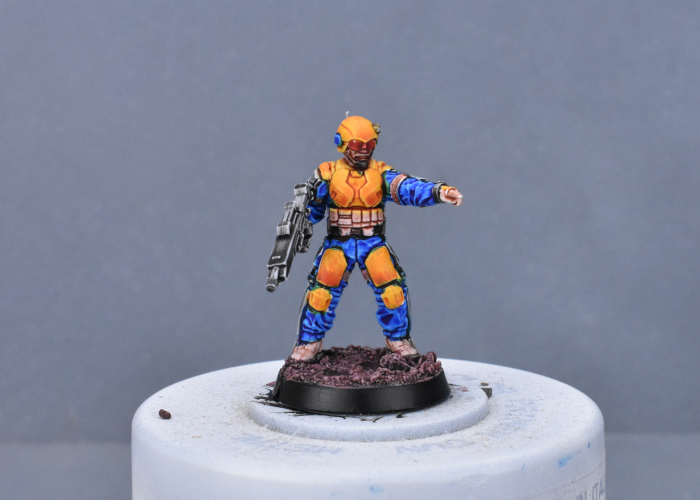
To finish up, I added some Blood Red over the goggles, and while that was drying added some gravel mix to the base. Without a dark brown in the starter set, I used a 1:1:1 mix of Hardened Leather, Blood Red and Hive Dweller Purple over the gravel, giving it a drybrush of Tanned Flesh and Ash Grey (regular acrylic paints) when it dried. With a quick run of Matt Black around the base rim and some white specular highlights on the goggles, he was ready for the table.
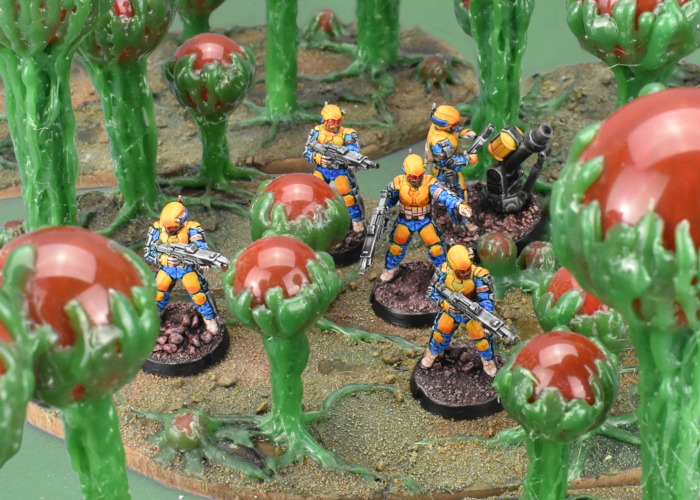
The unit assembled - regular SecDef models, with a custom made energy mortar using some plastic tubing and parts from the 2nd Maelstrom's Edge terrain sprue.
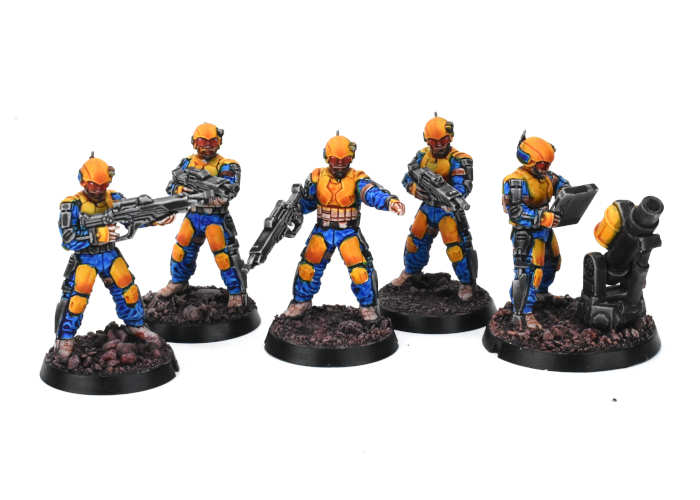
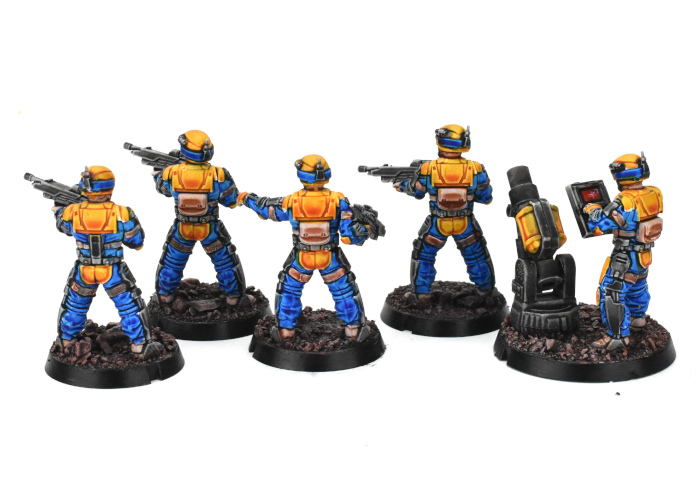
They're not perfectly neat, but for a quick, table-ready paintjob these paints are fantastic, giving some perfectly acceptable shading and highlights with a single coat. I'm looking forward to getting the rest of this force painted up!
To have a go yourself, pick up the plastic, multi-part SecDef kit from the Maelstrom's Edge webstore!
While you're there, you can download the V2 rules from the Trial Rules section of the Maelstrom's Edge website here. The Beta rules documents contain all of the rules for playing V2 games, but keep in mind that these are just 'preview' documents - some rules may be revised based on feedback, and the final layout including background material for the factions and the Maelstrom's Edge universe, artwork and other 'flavor' material is missing.
For other modeling ideas, tutorials, army spotlights and conversion walkthroughs, check out the Hobby section of the Maelstrom's Edge website here.
What are you working on? We would love to see your models and terrain in the Comm Guild Facebook group!
Terrain Spotlight: Terrain from 'Found' Objects
Posted on Tuesday May 03, 2022 at 05:00pm in Tutorials
- by Iain Wilson
One of my favourite parts of this hobby is building terrain from things that were originally intended for very different purposes. To this end, I tend to keep an eye out when I'm walking around a store or sending things to the recycle bin for anything that has an interesting shape. You can find quite a few of the resultant terrain projects in the Hobby section of the Maelstrom's Edge website, but here's a few highlights from the last couple of years.
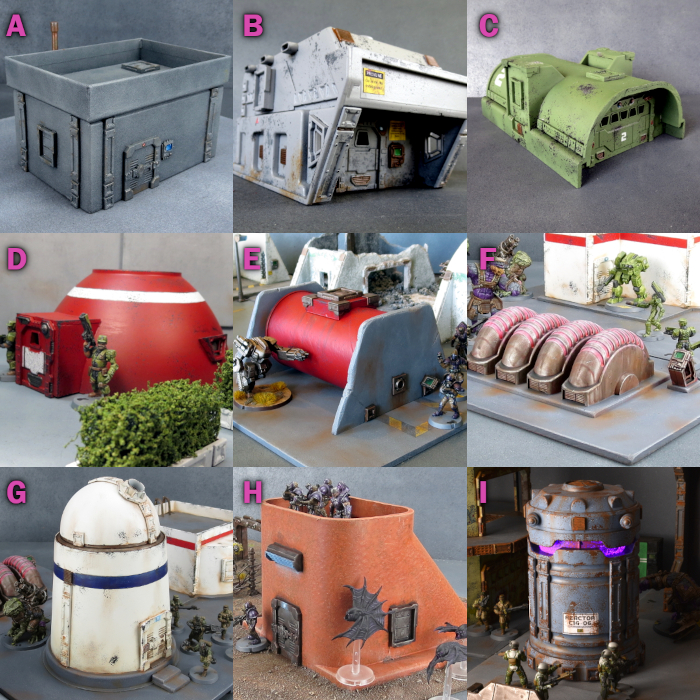
All of these make use of various assorted detail pieces from the Maelstrom's Edge terrain sprues. Click on the Walkthrough links to see how they were put together.
A - Basic building made from a cardboard gift box. Walkthrough
B - Portable building made from a plastic storage tray. Walkthrough
C - Military building made from a plastic stormwater drain. Walkthrough
D - Small Hab Dome made from a plastic bowl. Walkthrough
E - Storage Tank made from a Pringles tube. Walkthrough
F - Generator made from bubble gum tape canisters. Walkthrough
G - Observatory made from a yoghurt tub and a Christmas bauble. Walkthrough
H - Bunker made from a plastic air conditioning duct piece. Walkthrough
I - Generator made from a collapsible LED lamp. Walkthrough
To build your own battlefield terrain of recycled doom, you can pick up the terrain sprues along with the rest of the Maelstrom's Edge range from the webstore here.
What are you working on? We would love to see your models and terrain in the Comm Guild Facebook group!
For other building ideas, modeling tutorials, army spotlights and conversion walkthroughs, check out the Hobby section of the Maelstrom's Edge website here.
Tags: spotlight terrain terrainsprue
Terrain Spotlight: Plastic Packaging Firepoint
Posted on Wednesday Apr 20, 2022 at 05:00pm in Tutorials
- by Iain Wilson
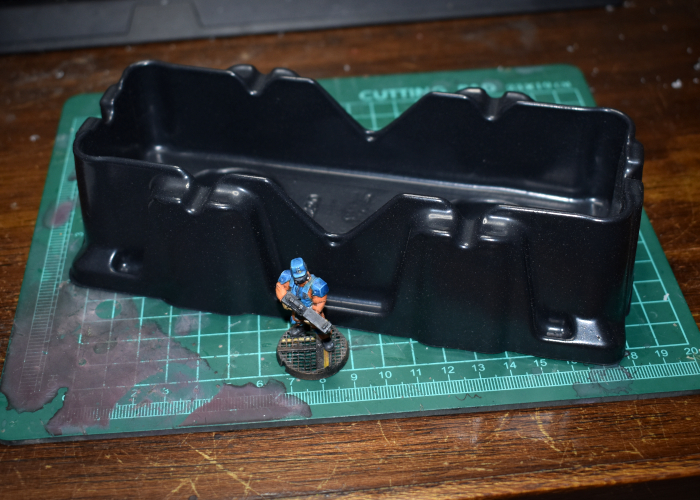
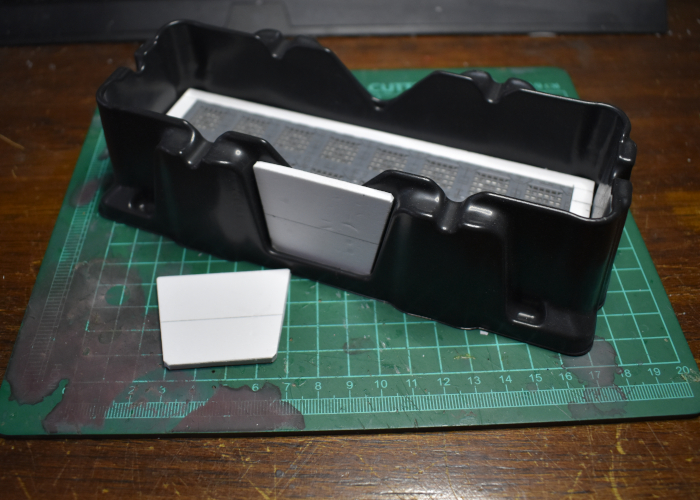
As you may have seen if you've been following the blog for a while, I make a lot of my terrain out of various bits and pieces that I come across here and there. This week I upgraded my external hard drive, and the new one came with some nifty plastic packaging pieces that I thought would be just perfect to turn into some small firepoint terrain pieces. And so I set to with some foamed PVC, superglue, and a couple of Maelstrom's Edge terrain sprues!
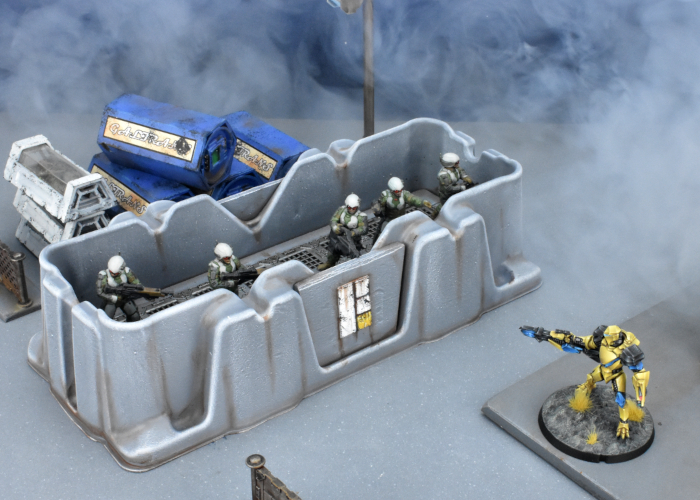
The 'floor' on the inside of the packaging piece was a fraction too low to allow models to see comfortably over the sides, and wasn't flat. Aside from that, I figured the contouring on the sides would give it some nice visual distinctiveness without the need for a lot of embellishment.
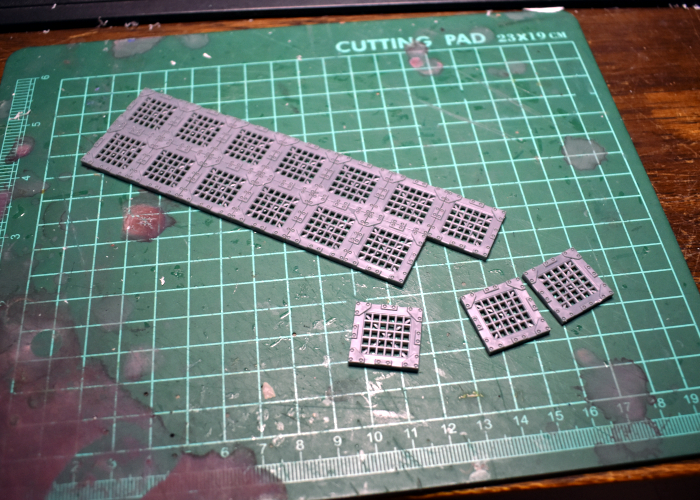
I started out by measuring up the inside dimensions, and putting together as many floor grating pieces from the 2nd Maelstrom's Edge terrain sprue as would fit in there.
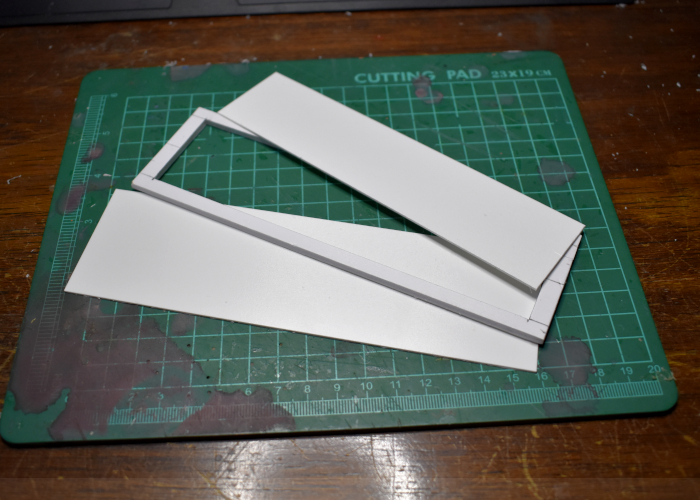
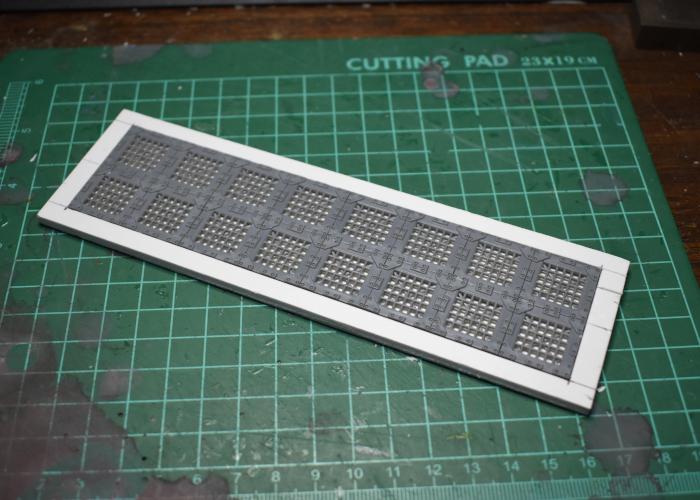
The grating left a small space around the edges, so to finish off the floor I cut a surround from 3mm foamed PVC to fit snug against the walls of the packaging, with a rectangle of 1mm PVC to sit underneath the grating to bring it up to the same height as the surround. Then I added a larger piece of 1mm PVC under the whole thing for rigidity and just that tiny bit of extra height.
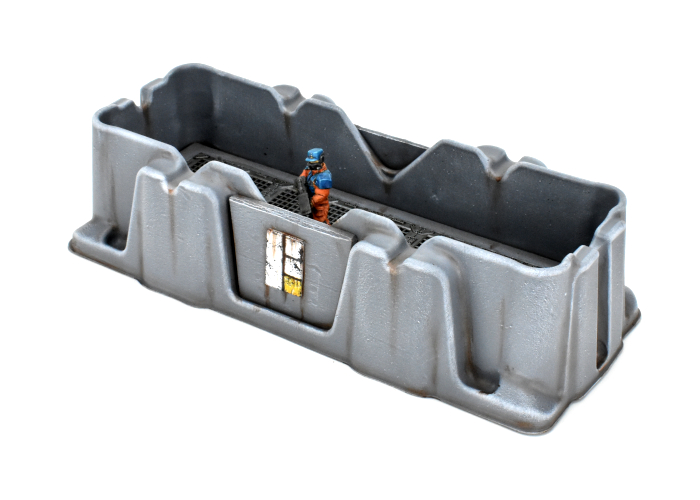
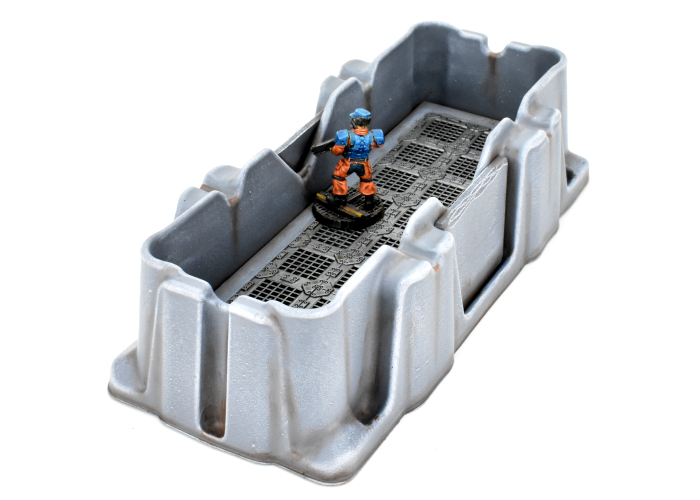
I used an all-plastic primer and superglue to fix the floor in place in the packaging piece. This left the walls a nice height for models to be mostly obscured while still being able to shoot over the walls, except for the middle section of the long walls, where it dipped down lower. I fixed this by cutting some trapezoid pieces of foamed PVC to glue over the gap.
I kept the painting relatively simple, starting with an Army Painter Uniform Grey basecoat and then a drybrush of AP Gorgon Hide, with some AP Dirt Spatter in the creases for some easy weathering. The metal grating was painted with AK Interactive Gun Metal and then washed with AP Strong Tone. Finally, I added an Epirian symbol cut from 1mm foamed PVC to the front, painted with Gorgon Hide and White, and Citadel Iyanden Darksun and AP Daemonic Yellow for the yellow bit. I used a light sponge of Vallejo Heavy Charcoal for chipping, and then finished up with some more dirt spatter weathering.
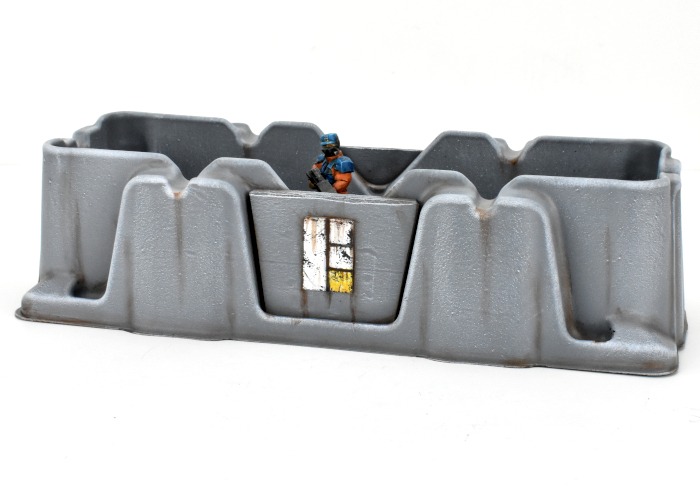
To build your own bunker of recycled doom, you can pick up the terrain sprues along with the rest of the Maelstrom's Edge range from the webstore here.
What are you working on? We would love to see your models and terrain in the Comm Guild Facebook group!
For other building ideas, modeling tutorials, army spotlights and conversion walkthroughs, check out the Hobby section of the Maelstrom's Edge website here. And while you're there, grab a copy of the Maelstrom's Edge V2 Beta rules!