Search Results for 'terrain'
Entries found for "terrain": 216Showing 31 - 40 of total 216 search results
Maelstrom's Edge V2 - Line of Sight
Posted on Tuesday Apr 05, 2022 at 05:00pm in Gaming
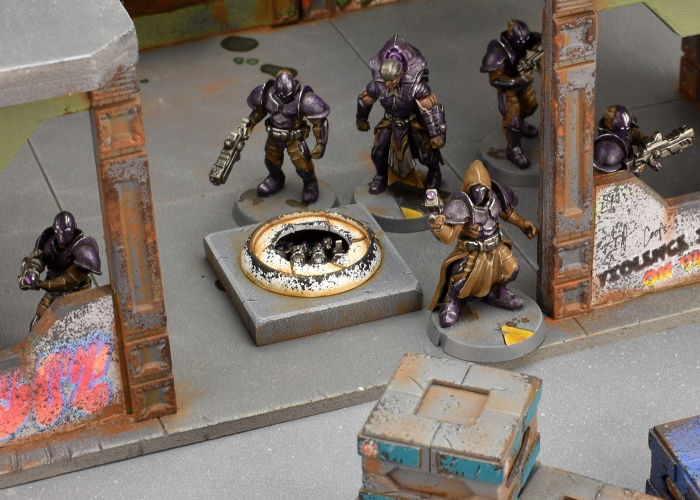
In order to shoot at an enemy, a unit generally needs to be able to see it. Maelstrom's Edge uses simple rules to establish whether or not an enemy is a valid target. Read on for details!
CHECKING LINE OF SIGHT
Maelstrom's Edge uses a model's eye view for determining line of sight. This means checking from behind and just above the model to check if they could see their target. If you can see any part of the enemy unit, then you have line of sight to them. For units of more than one model, line of sight is only checked from the squad leader, as they direct the shooting of the rest of the unit. This helps to speed up gameplay - having to check from each individual model in the unit can get a little tedious. If the squad leader can see the enemy, then the whole unit has line of sight.
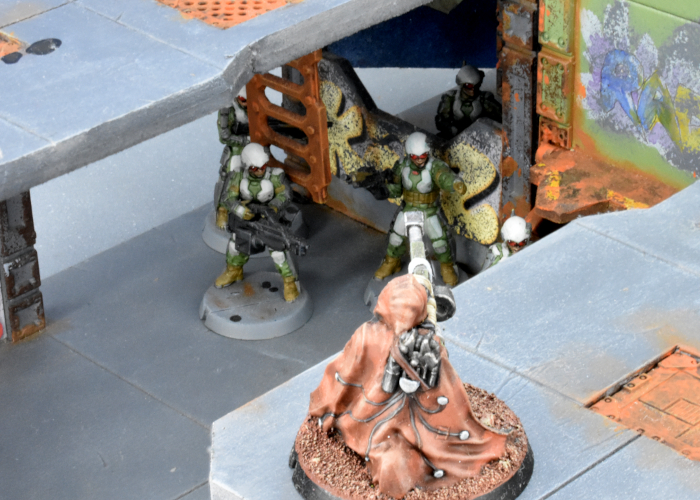
A Broken Sniper draws a bead on a squad of Epirian SecDef troops.
WIDE OPEN SHOTS
Generally on a battlefield, troops aren't actually just standing around in funky action poses waiting for their turn to move. With this in mind, Maelstrom's Edge assumes that models are making use of whatever cover is around them, and this is factored in to the Skill and Evasion stats that are used to resolve shooting attacks. (Check out the Sample Unit Activation article for more details on how that works!)
Sometimes, though, a unit will be caught completely in the open, and this can give an attacking enemy a boost to their shooting. Attacking units gain a +2 bonus to their Skill for that round of shooting if their target is completely visible, without being even partially obscured by intervening terrain or other models. This Wide Open Shot bonus can be negated by certain unit actions, however - units that are On The Move or Taking Cover will not confer the bonus. (See the Unit Actions article for details on what those actions do for your units!)
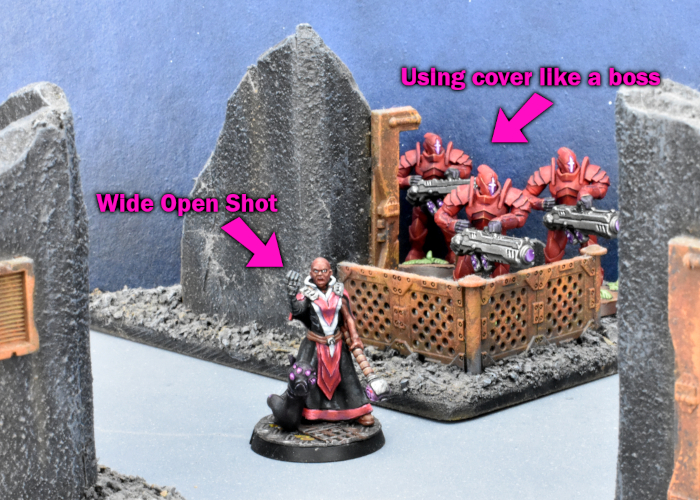
A Karist Alessi Novitiate gets a little caught up in the moment and breaks cover.
TAKING COVER
As mentioned above, units are generally assumed to be making use of whatever cover is available as they move. They also have the option of using the Taking Cover status action to maximise this protection by huddling up against obstacles or going prone in more open ground. This doesn't affect line of sight or attack resolution, but does give them a bonus to their defense before rolling for armor. We'll go into this in more detail in a future article.
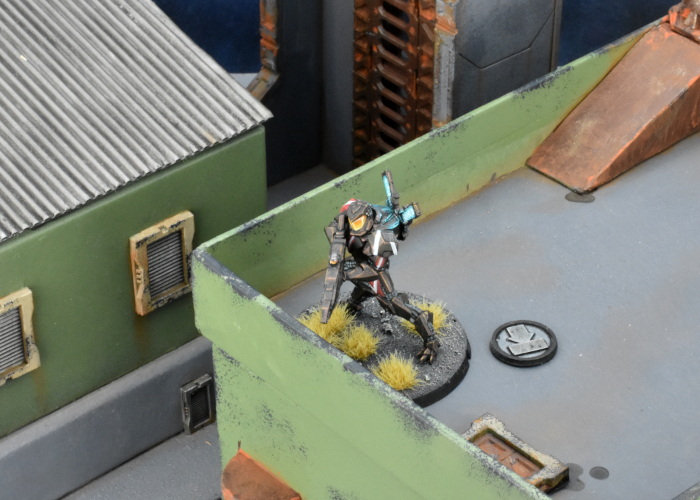
A Remnant Longshot takes cover on the roof, waiting patiently for a target to present itself.
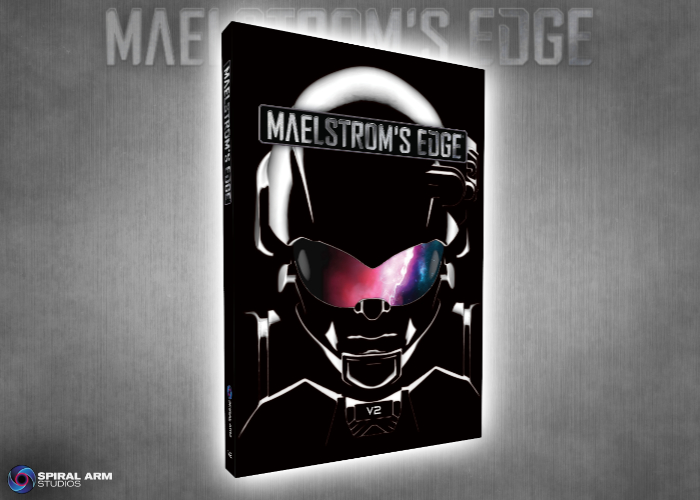
The Maelstrom's Edge V2 rulebook is now available! Grab your copy from the Maelstrom's Edge webstore now!
If you have any thoughts on the new rules, pop on over to the Comm Guild Facebook group, or start up a thread in the Maelstrom's Edge section on the Dakka Dakka forums. We welcome any feedback, and would love to hear how everyone's forces stack up in the new rules!
Model Spotlight: The plastic Faction Expansion Sprue
Posted on Tuesday Feb 22, 2022 at 06:00pm in Models
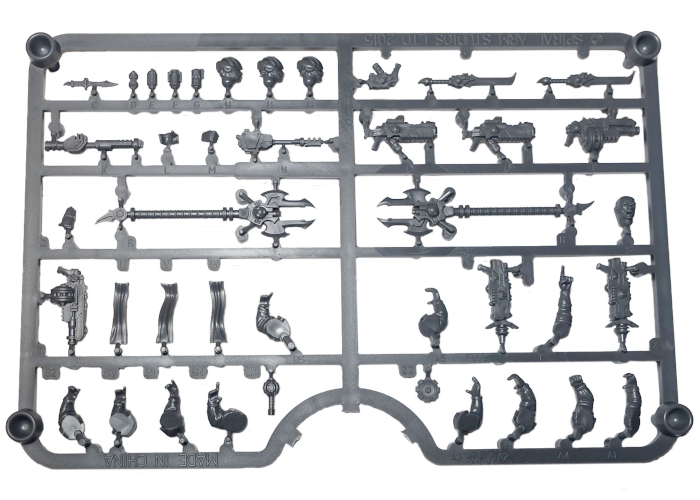
For the Epirians, the sprue includes some alternate helmeted heads to replace the caps on the Contractor sprue, and some arms with the sleeves rolled down for those wanting a sun-smart militia. It also includes some grenades and melee weapons that you can use to equip Contractor Suppression Teams.
For the Karists, the sprue offers a cybel sword and glaive, and some loincloths for setting up elite Karist Praetorian units.
You can also find a mine for the Shadow Walker, and some loose grenades and weapons that are handy for customising troops, scattering around on scenery, or building Secret Cache objectives!
To build your own elite units of melee doom, you can pick up the Faction Expansion sprue in a handy pack of three along with the rest of the Maelstrom's Edge range from the webstore here.
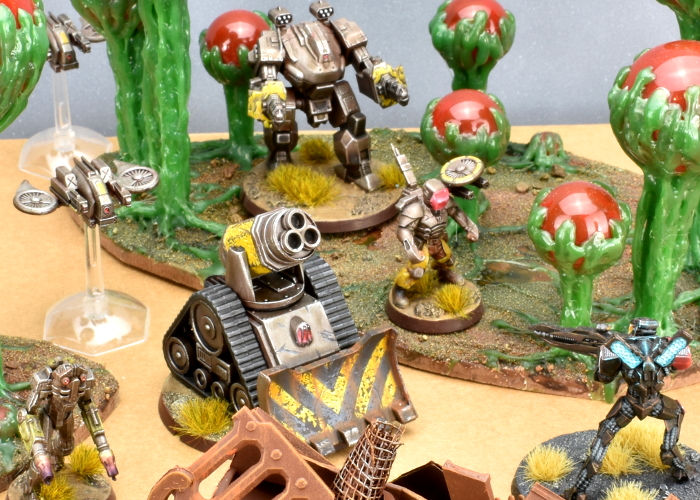
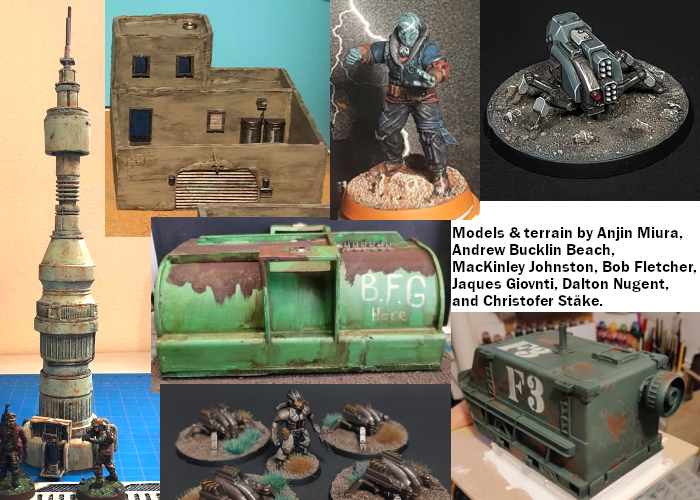
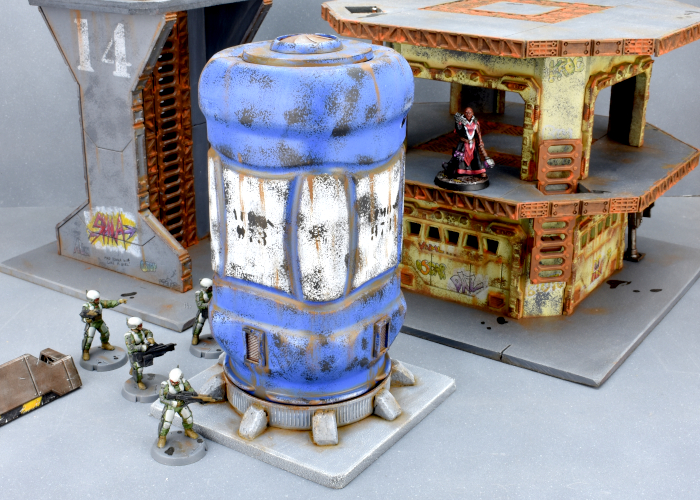
What are you working on? We would love to see your models and terrain in the Comm Guild Facebook group!
For other modeling ideas, army spotlights and conversion walkthroughs, check out the Hobby section of the Maelstrom's Edge website here.
Model Spotlight: The plastic Militus battlesuit!
Posted on Tuesday Jan 18, 2022 at 06:00pm in Models
The most versatile and common of these suits is the Militus, and our multi-part plastic kit lets you build this Artarian workhorse in a huge range of poses to suit your style!
The Militus kit was designed to be as customisable as possible, with articulated joints and a range of different weapon and head options right off the sprue.

Because it's plastic, it's also extremely easy to mix and match with parts from other kits, or to modify the parts to push posing even further!
Thanks to the kit's versatility, you can easily put together a force that includes multiple suits without no duplicates, making your Fire Team unique!
Pick up the Militus suit from the Maelstrom's Edge webstore as a single sprue or in a discounted bundle of four for the price of three - Find them here!
Make sure you share your assembled suits in the Comm Guild Facebook group!
For modeling and terrain tutorials, army spotlights and conversion walkthroughs, check out the Hobby section of the Maelstrom's Edge website here.
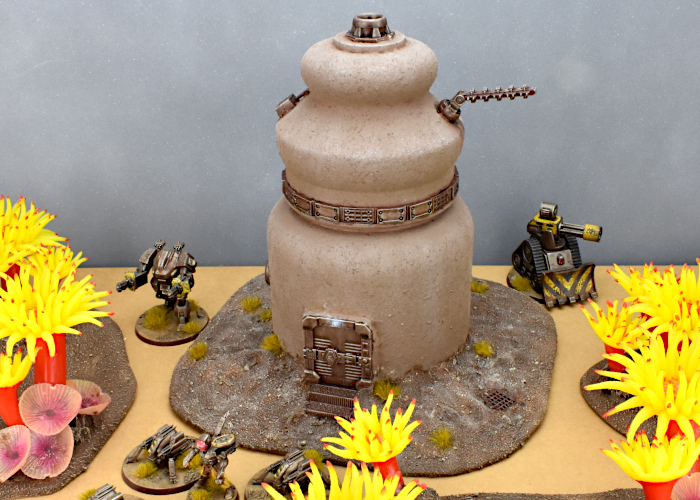
Terrain Spotlight: Candy Jar Desert Building
Posted on Tuesday Jan 11, 2022 at 06:00pm in Tutorials
 - by Iain Wilson
As a wise man once said, "With great Christmas comes a great big bunch of junk food!"
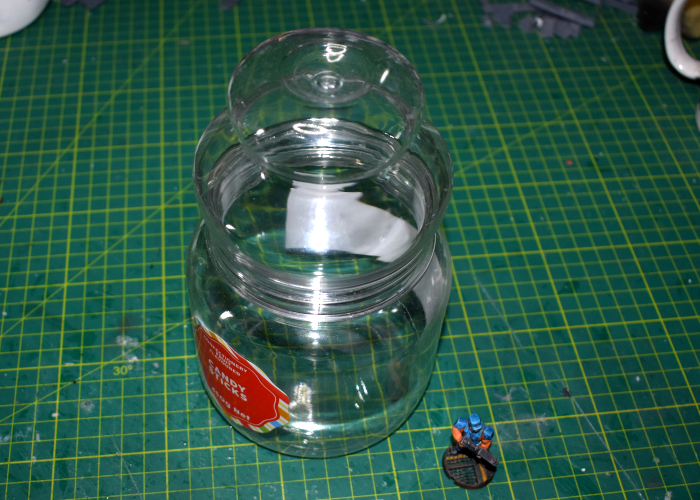
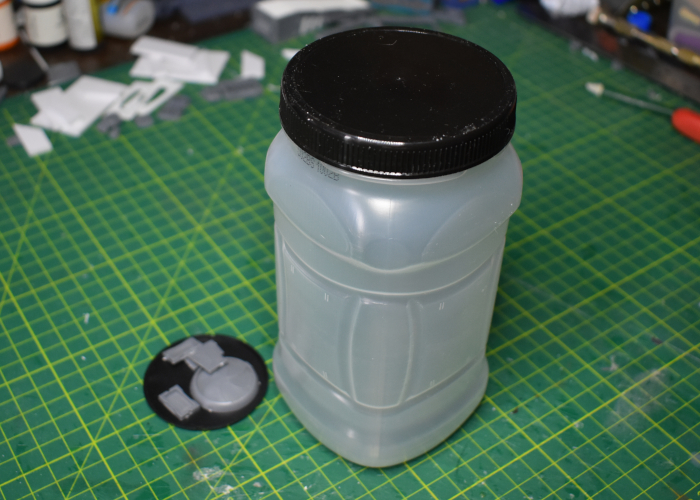
Amongst my family's collection of sugary delights this year was a plastic jar full of candy sticks, bought for my daughters to stuff into Christmas cards. Once empty, though, the jar itself was just too interesting a shape to toss it away. So, there was nothing else for it but to build something!
The jar in question, blissfully unaware that it was about to enter a whole different plane of existence.
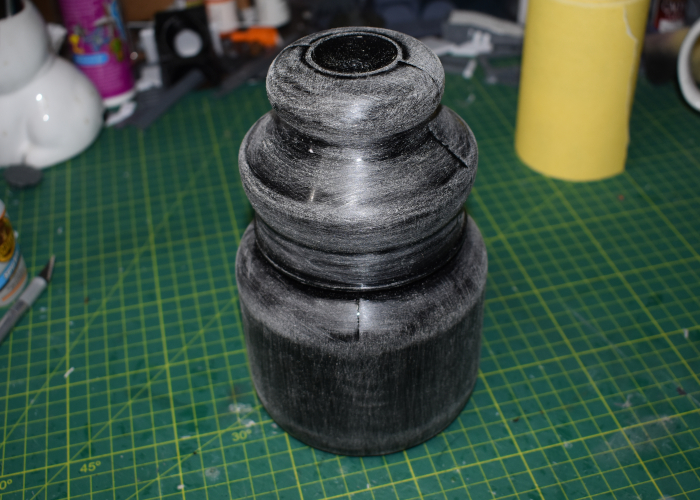
After removing the labels and cleaning off the glue residue with some isopropyl alcohol, I sprayed the inside of the jar with some matt black spray. I do this whenever I'm using something clear as a terrain base, as it prevents stray light bleeding through the paint, and also stops things looking weird if the paint on the outside gets scratched.
I also gave the outside a scrub with some sandpaper to break up the glossy surface. This gives a better surface for the glue and paint to adhere to.
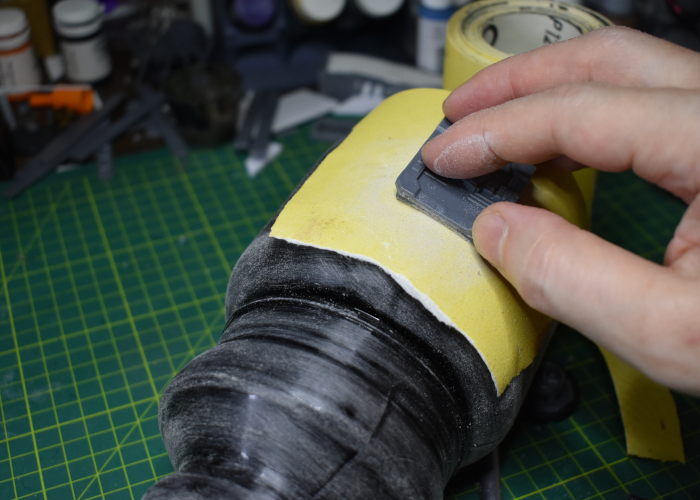
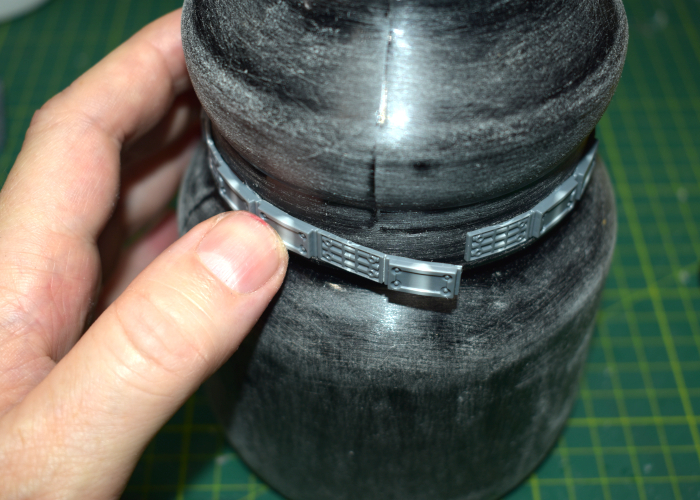
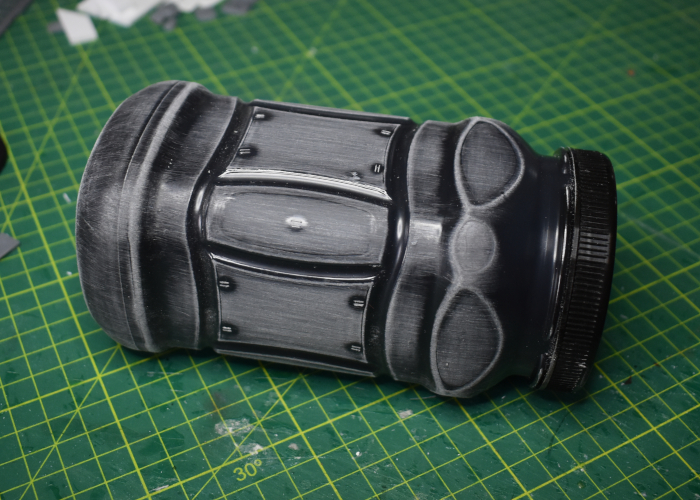
To fit doors and windows from the terrain sprue to the curved surface of the jar, rather than building a framework to square things up I decided to fit them to the curve. I laid a piece of sandpaper over the jar and used this as a curved sanding block to shape the back of the parts.
Adding the support struts around the rim of the lid was a little easier - I just bent them around the curve and glued them in place with superglue and a plastic primer.
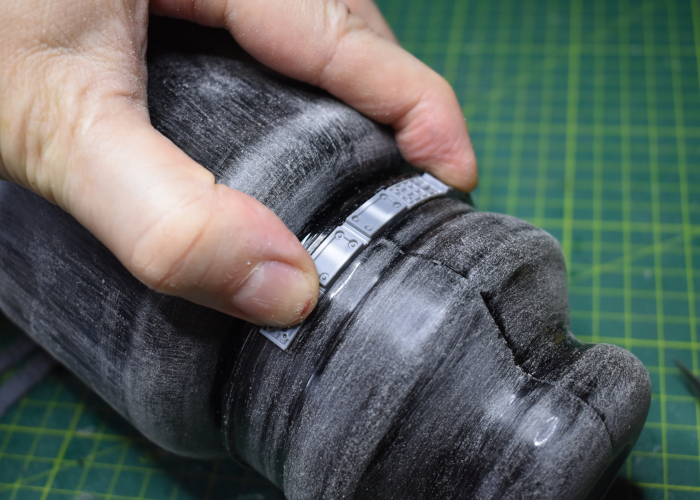
In a happy coincidence, the spacing worked out almost perfect. I used three full struts, and cut the last one down to three sections, needing to trim only a fraction off the end to make it fit perfectly.
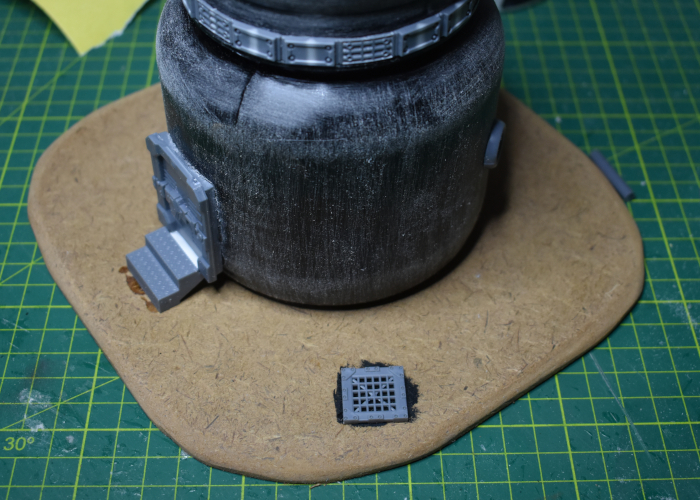
I glued the door and windows into place, adding some steps and gluing the jar down to a piece of hardboard. I also added a grating piece onto a bare patch of the board just for some extra visual interest, painting underneath it with some black as this was easier than doing it later.
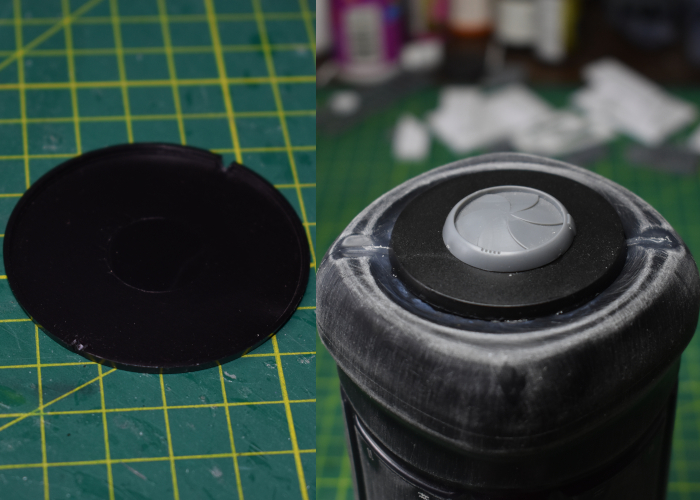
To dress up the top of the building, I grabbed a few assorted pieces from the terrain sprues, whipping together an aerial array, a control box and a chimney using a piece of the sprue and some plastic tube.
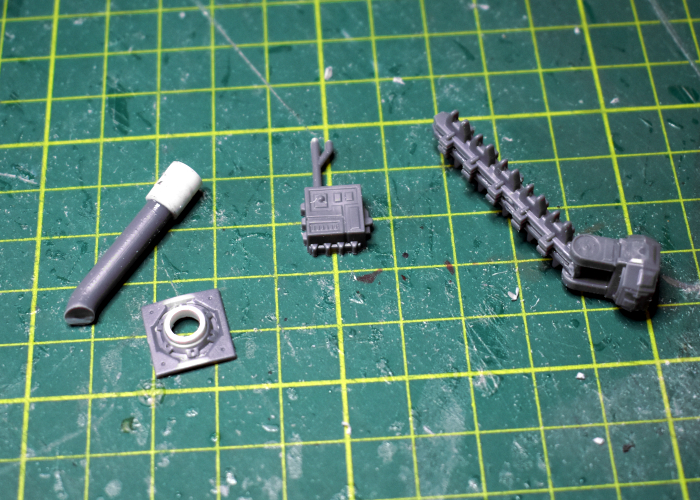
With these parts glued in place, I finished off the roof with a fan and large pipe fitting glued onto a base that fit just perfectly over the cavity in the top of the jar lid.

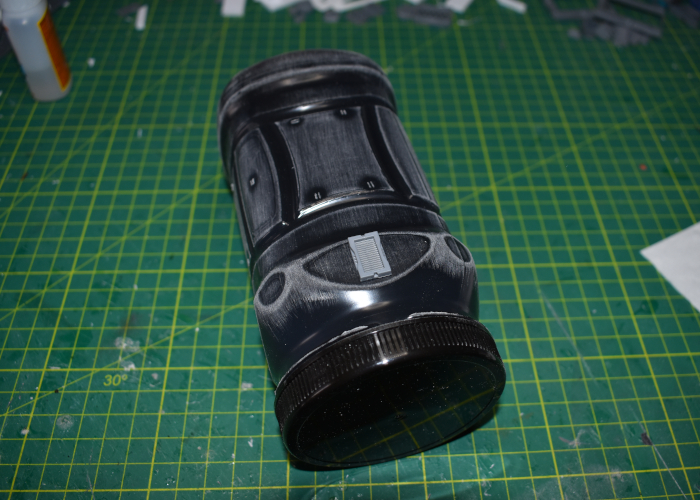
The jar needed some texture, so I added a coat of textured paint and while that was drying I built up the base with some filling plaster.
Finally, I added a layer of sand and gravel mix over the filling plaster, fixing it in place with some PVA glue.
After a quick bit of paint work, the new building was looking totally sweet and ready for the table!
To build your own desert habitat of sugary doom, you can pick up the terrain sprues along with the rest of the Maelstrom's Edge range from the webstore here.
What are you working on? We would love to see your models and terrain in the Comm Guild Facebook group!
For other building ideas, modeling tutorials, army spotlights and conversion walkthroughs, check out the Hobby section of the Maelstrom's Edge website here.
Tags: buildings scratchbuild spotlight terrain terrainsprue tutorial
Welcome to 2022!
Posted on Tuesday Jan 04, 2022 at 06:00pm in General
Along with the host of new models, there is also the ongoing Beta testing for the second edition of the Maelstrom's Edge rules. If you missed the announcement just before Christmas, you can find out about some of the changes and download a copy of the Beta rules, including force lists for all four current factions, from the article here.
Start building your 2nd edition force by heading over to the webstore here.
Then make sure you share your models, terrain and game reports on the Comm Guild Facebook group!
Maelstrom's Edge 2021 Christmas Special!
Posted on Saturday Dec 25, 2021 at 06:00pm in Tutorials
 - by Iain Wilson
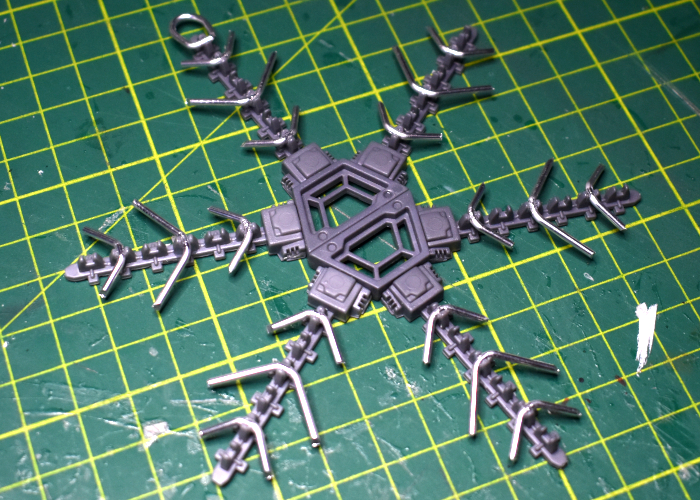
It's become a bit of a tradition around this time of year for me to grab some leftover sprues and throw together a sci-fi Christmas tree ornament. For this year's trinket, I grabbed some parts from the original Maelstrom's Edge terrain sprue and made myself a somewhat technological snowflake!

The build for this one was pretty simple. I started out with two trapezoid windows and half a dozen energy fence pylons.
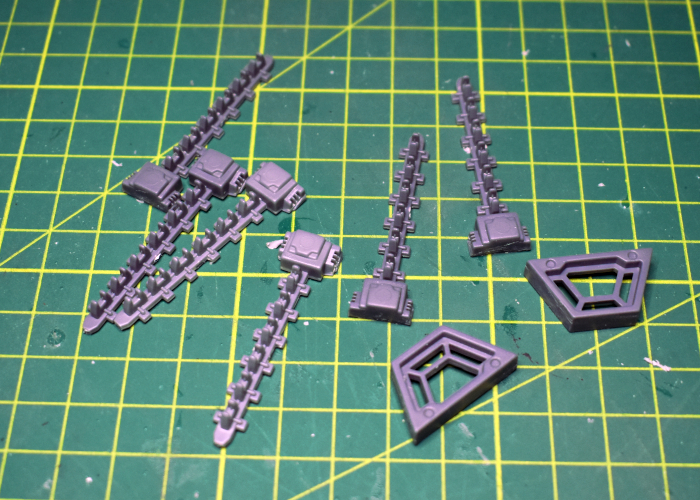
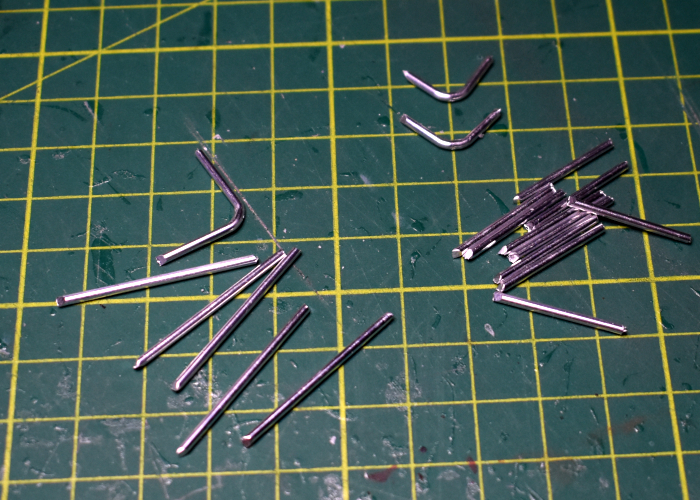
To make the branching parts of the snowflake 'arms', I grabbed some 1.5mm aluminium rod, cut it into 20mm and 30mm lengths, and bent them in the middle.
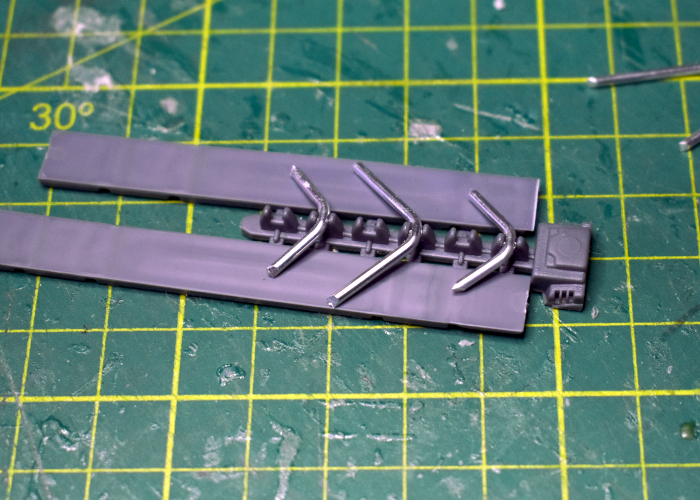
I made a simple formwork to glue the rod pieces in place, by laying a pair of struts from the terrain sprue on either side of the fence posts, adding a drop of glue into the grabby port on the post, and then sitting the bent rod in place. Another dollop of glue on top sealed the rods in place. I also added another piece of rod bent into a loop on the end of the 'top' fence post, to serve as a hanging loop.
Once the frankly horrific amount of glue I had used here had time to set, I used plastic cement to glue the windows together, and the bottoms of the fence posts to the window frames.
On to painting! I sprayed the whole thing with Army Painter Matt Black, and then with a layer of Plate Metal.
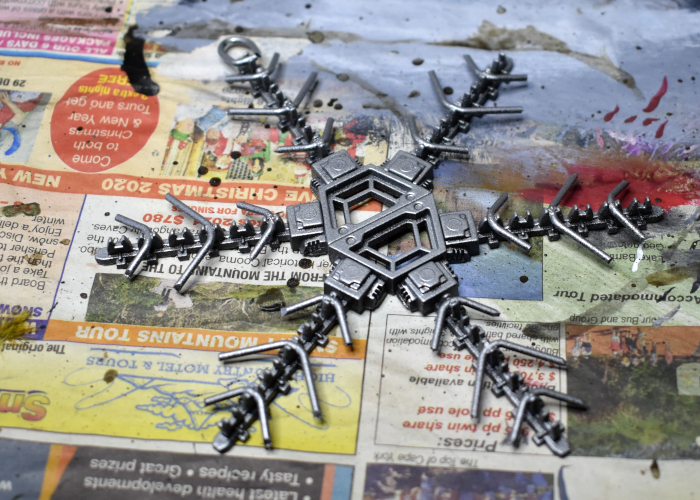
I then went over the window frams and fence posts with some Secret Weapon Soft Body Black wash that I had sitting around from an Adepticon goodie bag a few years back.
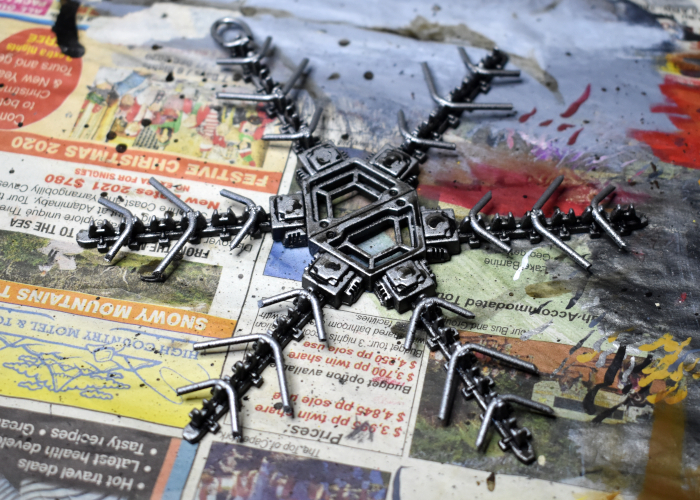
On the fence post bases and the window frames, I added a coat of Citadel Macragge Blue, with a highlight around the edges of Army Painter Ice Storm.
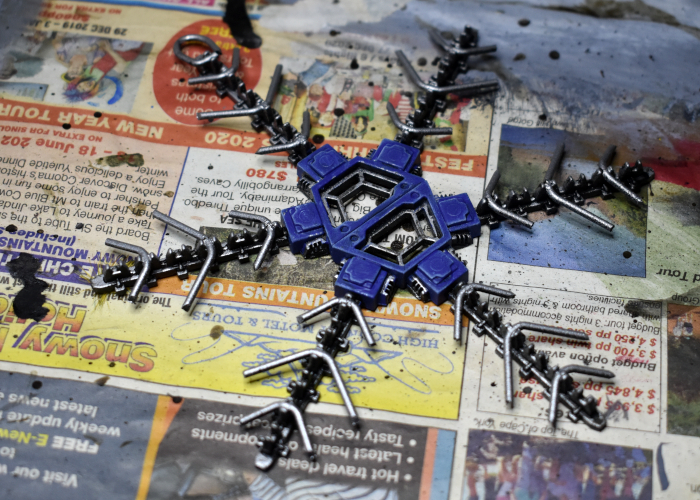
Then, because I apparently can't go for more than a week without weathering something, I took a sponge and some Vallejo Heavy Charcoal and added some chipping to the blue areas, highlighting with some more Ice Storm. As a final touch, I used some Army Painter blue tone to add a blue tint in the creases of the 'arm' attachments, for a little extra colour. And then on to the tree it went!
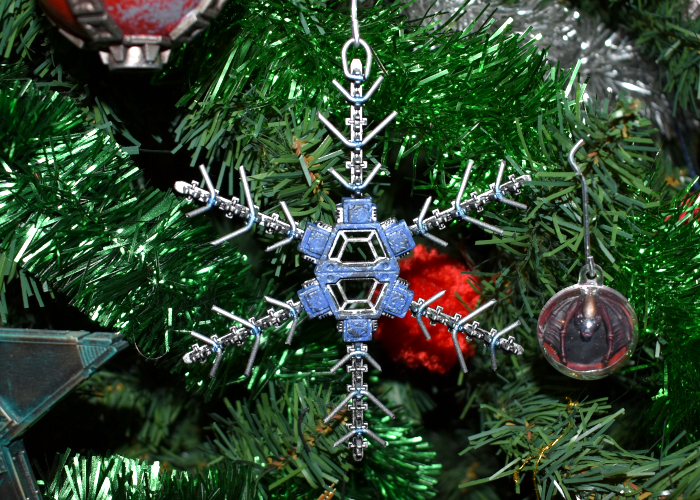
Here's wishing everyone a safe and happy time for whatever holidays you happen to celebrate around this time of year!
Build your own ornament of celebratory doom by picking up the Maelstrom's Edge terrain sprues along with the rest of the Maelstrom's Edge range from the webstore here.
What are you working on? We would love to see your models and terrain in the Comm Guild Facebook group!
For other building ideas, modeling tutorials, army spotlights and conversion walkthroughs, check out the Hobby section of the Maelstrom's Edge website here.
It's the 2021 Roundup!
Posted on Tuesday Dec 14, 2021 at 05:00pm in General
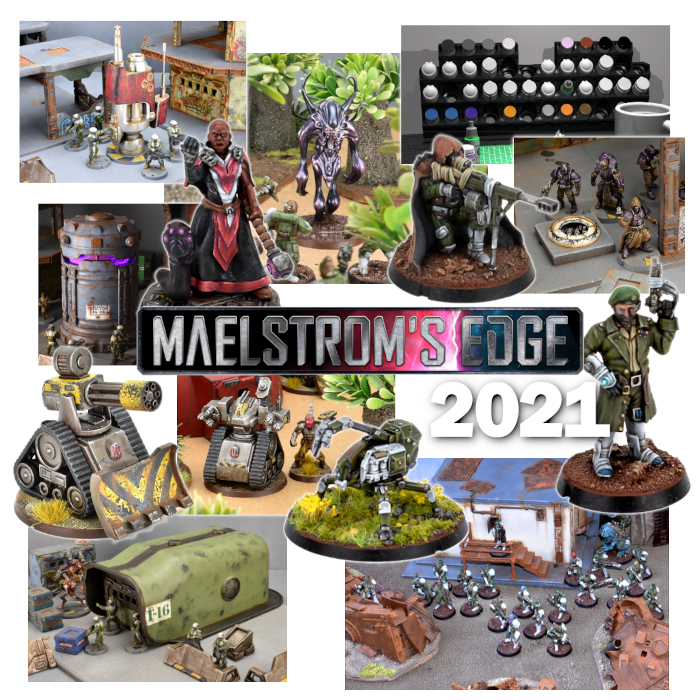
The Karist, Broken and Epirian factions all received some reinforcements this year. We also saw the end of the Battle for Zycanthus boxed set, as our existing stock sold out. With the second edition of the game on the horizon, rather than producing more of this set, we added some starter bundles and troop bundle deals for each faction to the Maelstrom's Edge webstore.
The Contractor Support Drone added some new equipment options to Epirian forces, allowing Contractors to field Engineer and Medic units and adding sensor drones to Contractor Scouts. This is the last full resin model to be released for Maelstrom's Edge as, with the exception of a couple of upcoming equipment options for the Artarian Remnant, we have now moved completely to plastic for our models.
The Kaddar Alessi Novitiate serves as an alternate command option for Karist forces. Slightly less unhinged than the typical Kaddar Nova, Kaddar Alessi use their charisma and oratory prowess to inspire the forces under their command, or to shake the resolve of any enemy within earshot.
The Spiral Arm Revolutionary Army are a new sub-faction for the Broken. These paramilitary groups tend to be more organised and disciplined than other Broken, and this is reflected in their command structure. Revolutionary Captains stands proudly at the head of their forces, co-ordinating strikes and holding the rabble steady with their iron discipline. While in the shadows, Broken Snipers lurk beneath advanced camouflage cloaks, picking out valuable targets amongst enemy forces.

As an added bonus, this year we also sourced some stock of the plastic gun carriage kit from PDC Gaming. This kit builds a range of variant weapon platforms, and is also a handy source of parts to build an Automated Uplink Relay for Epirian forces, as you can see in this spotlight article here.
As usual, Iain has been working away on a range of different modeling articles, often using found materials combined with the Maelstrom's Edge terrain sprues, including an energy plant built from a camping lamp, an air conditioner ducting barracks building and a communications relay made from a toy gun! You can find these and the rest of our various modeling articles compiled in the hobby section of the Maelstrom's Edge website here.
Fans on the Comm Guild Facebook group have also been sharing some great projects of their own!
You can check out all of these and more by joining the Comm Guild group here.
For the year to come, we'll be rolling up our sleeves and getting stuck into the second edition of the Maelstrom's Edge rules, with the Beta version of these scheduled for release very soon! Also coming in from the production queue we have some reinforcements for the Artarian Remnant, and that new faction that we've been teasing for a while now...
Stay tuned!
For the full plastic and resin Maelstrom's Edge model range, the ever-useful Maelstrom's Edge Terrain Sprues, novels and audiobooks, check out the webstore here.
For building ideas, modeling tutorials, army spotlights and conversion walkthroughs, have a look at the Hobby section of the Maelstrom's Edge website here.
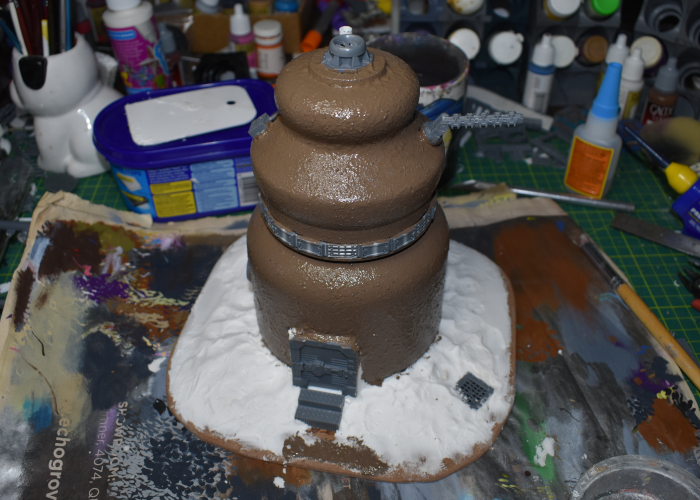
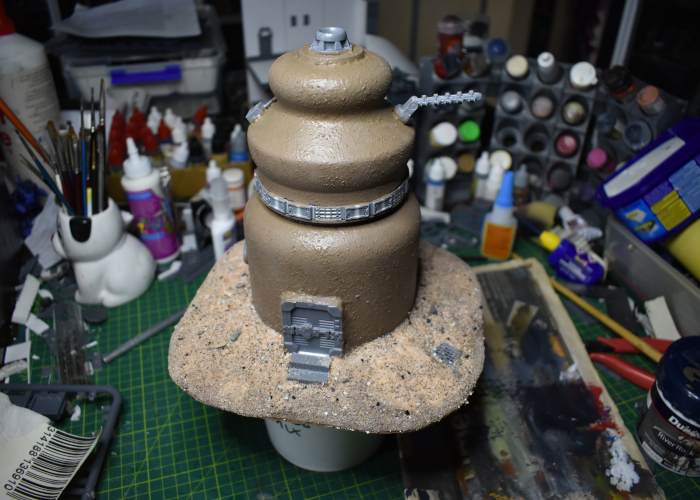
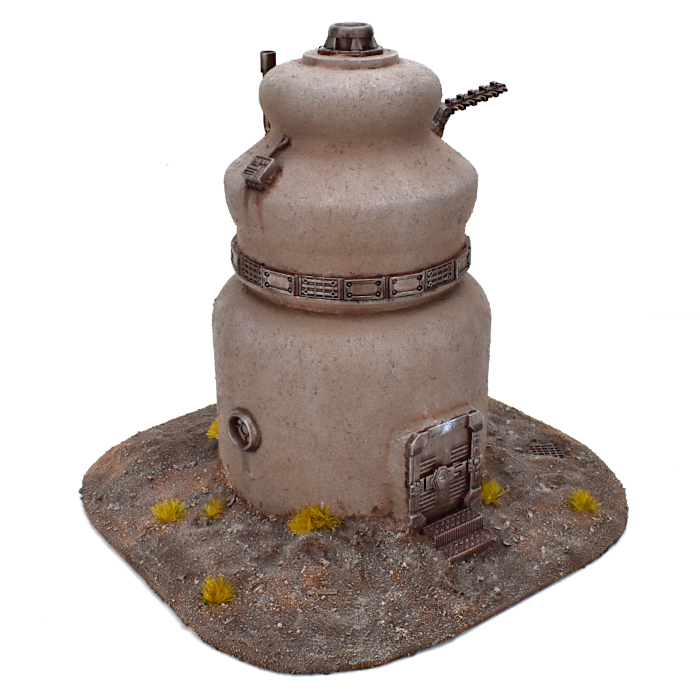
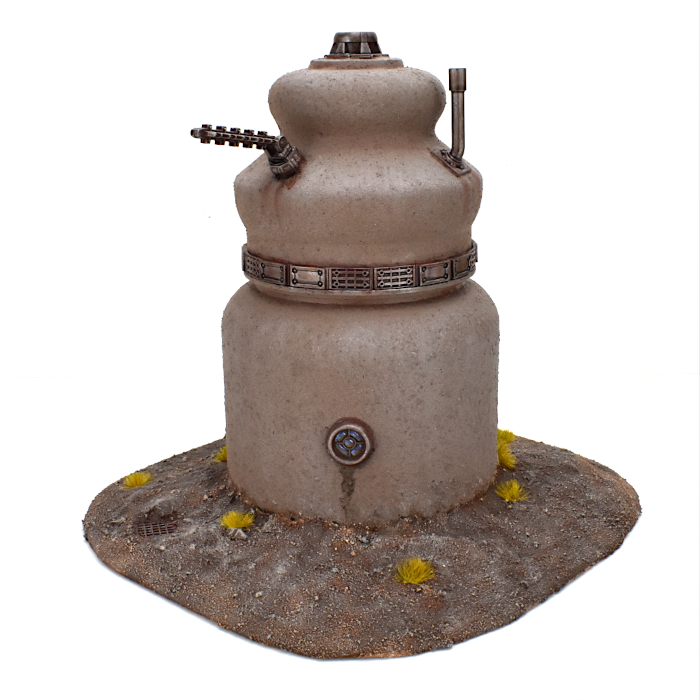
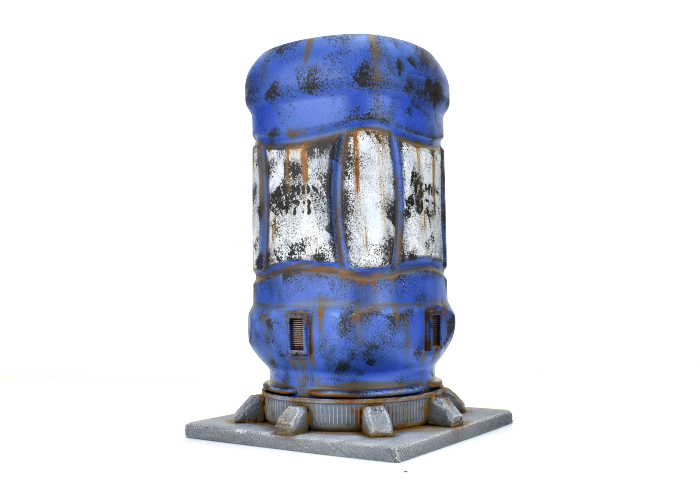
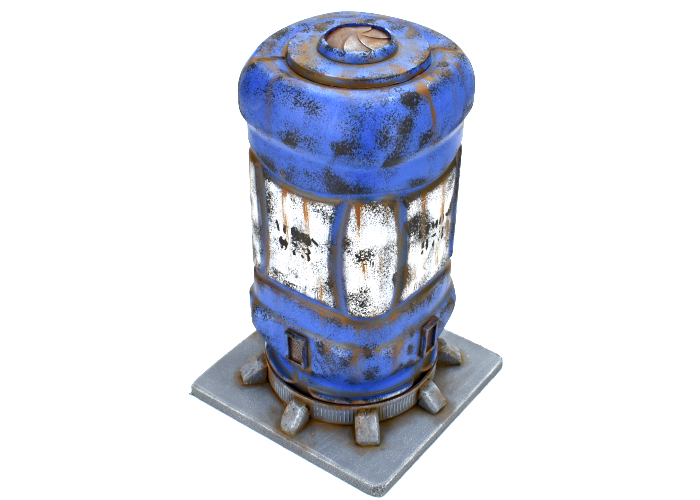
Terrain Spotlight: Fruit Jar Air Purifier!
Posted on Wednesday Dec 08, 2021 at 01:03am in Tutorials
- by Iain Wilson
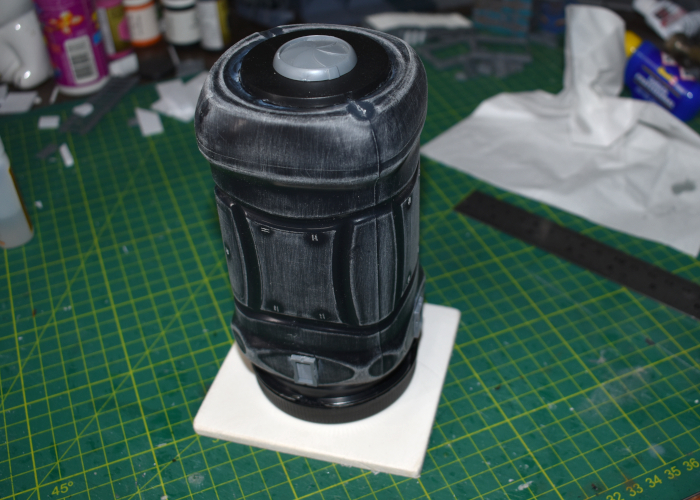
Time for a super-quick terrain build! In the grand tradition of painting things instead of throwing them into the recycling bin, this week I built an air purifier station out of a plastic fruit jar, with some help from the Maelstrom's Edge terrain sprue!
The bulk of this terrain piece uses the aforementioned plastic jar, which I think originally had plums in it. The plums weren't much good for modeling, but the jar itself was an interesting shape, so I figured it was worth hanging onto it.
I started out by spraying the inside of the jar with some black paint. This helps to avoid things looking weird if the outer layer of paint gets scratched with use, and also blocks light from showing through if the outer paint layer is thin in places. I also gave the outside a light sand to help the glue and paint to stick better.
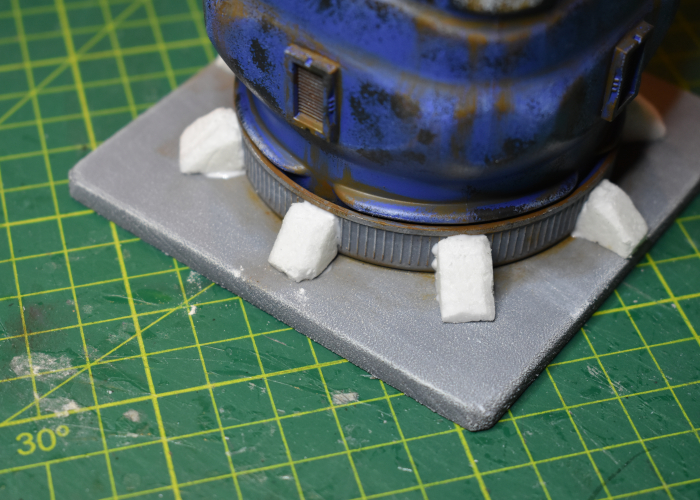
To cover over the embossed logos on the bottom of the jar, I took a large base and cut some indents into the bottom to sit over the mould line on the jar. I glued this in place using some all-plastic glue (a superglue with a primer pen that helps give a secure bond on different types of plastics). In the middle of the base I added an iris portal from the second Maelstrom's Edge terrain sprue.
I went light on additional details as I thought the shape of the jar was interesting enough by itself, but I added a vent on each side - the iris on top would be opened to suck in contaminated or otherwise unsuitable air, and the cleaned/chemically altered/now fit for breathing air would be pumped out through the vents, with all of the 'working gubbins' sealed away inside the unit.
Finally (or so I thought) I added a small base cut from a piece of 5mm foamed PVC.
While I was painting the purifier unit, I decided that it still looked a little too much like a jar turned upside down, largely because the lid is such a recognisable shape. So I broke it up a bit by adding some buttresses around it cut from a piece of polystyrene foam.
With some paint on, the air purifier wound up looking like this:
Build your own air purifier of respiratory doom by picking up the Maelstrom's Edge terrain sprues along with the rest of the Maelstrom's Edge range from the webstore here.
What are you working on? We would love to see your models and terrain in the Comm Guild Facebook group!
For other building ideas, modeling tutorials, army spotlights and conversion walkthroughs, check out the Hobby section of the Maelstrom's Edge website here.
Tags: spotlight terrain terrainsprue tutorial
Terrain Kitbash: Sector 16
Posted on Tuesday Nov 16, 2021 at 05:00pm in Tutorials
- by Iain Wilson
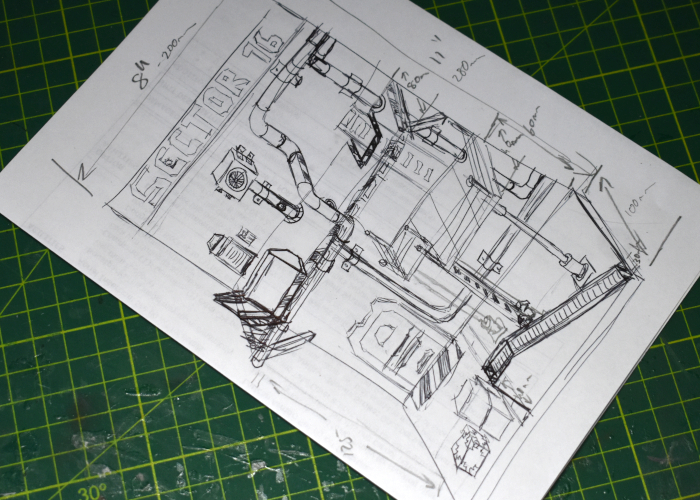
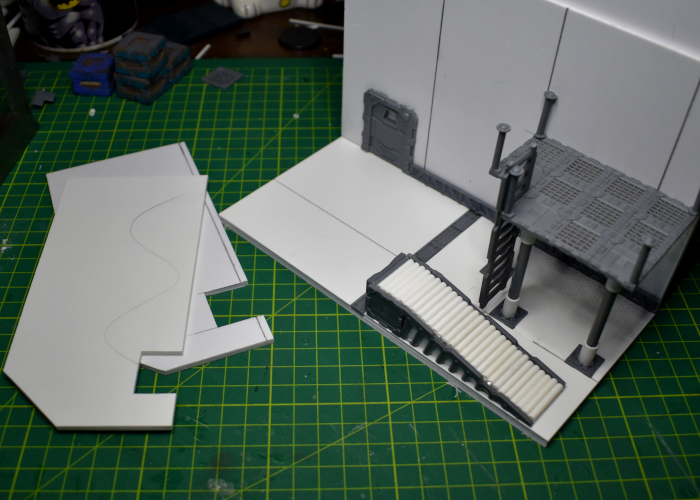
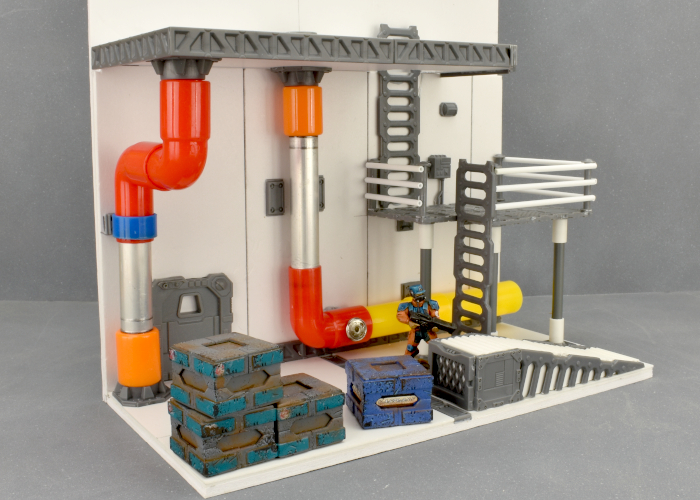
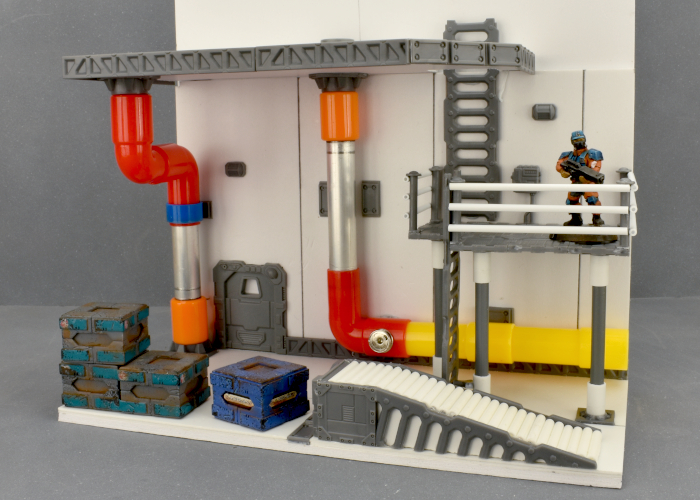
Sometimes I like to take a break from building things for the tabletop, and put something together just for the fun of it. That's what I had in mind this week, when I started work on a display backdrop piece that I'm calling 'Sector 16'
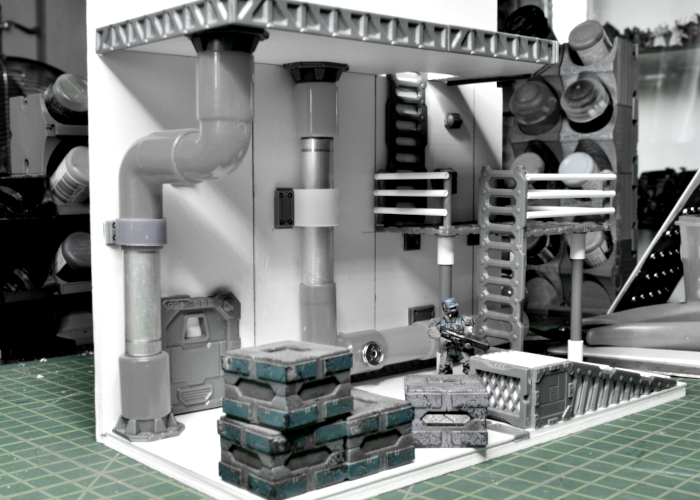
Most of the time, I get a rough idea of what I'm building in my head, and I just wing it from there. Some builds though require a little more planning to make sure everything will fit together correctly. My plan for Sector 16 wasn't particularly complicated, but with pipes running in multiple directions and platforms on several levels, I decided that a rough sketch would be a good idea. This still just serves as a starting point, and things tend to change along the way, but it helps to avoid those inadvertant 'oops' moments when something doesn't fit where it is supposed to.
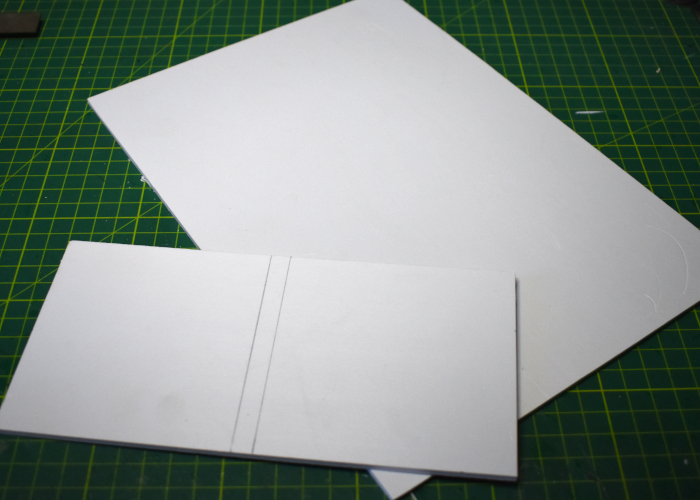
The bulk of the structure was made from foamed PVC sheet, cutting a base and back piece that would go together in an 'L' shape, with detail layered over the top.
I thought that adding some detail along the front of the base would help to add depth, and when using it as a photo backdrop would be useful for disguising its relatively shallow depth. To this end, I constructed a conveyor assembly using parts from the Maelstrom's Edge terrain sprues, some 1mm foamed PVC and plastic tubing.
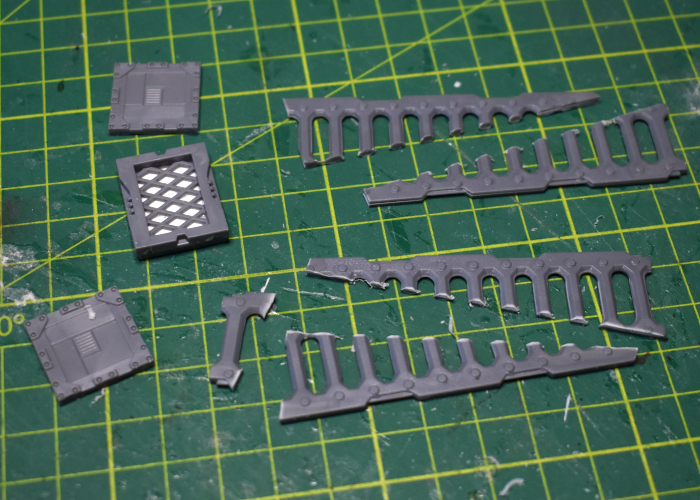
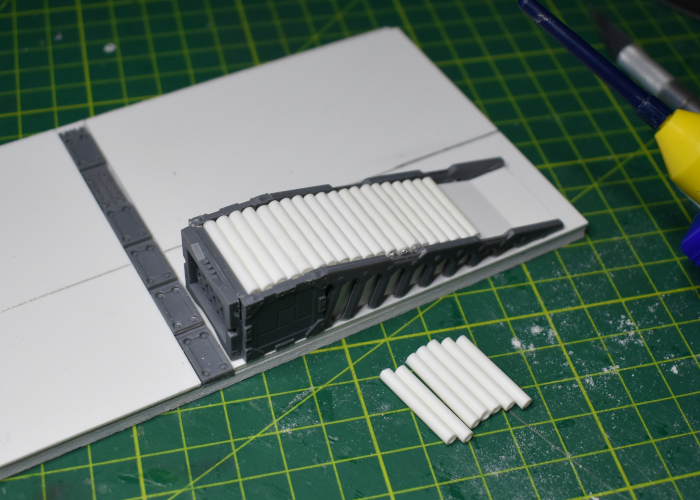
In the interests of mixing things up visually, I wanted the multiple level platforms to be constructed differently. The upper level was to be concrete, but for the lower level I used floor grating pieces from the second Maelstrom's Edge terrain sprue, with support poles cut from the sprue itself of the original terrain sprue.

To finish up the lower section, I put together some pipes made using pieces from a kid's toy pipe construction set (which looks a little technicolour right now, but should be a little less cartoony when they have some paint on!) and some 12mm aluminium tubing, and added some additional details like lights, edging and pipe support straps using more pieces from the terrain sprues.
Tune in next time, as I get to work on the upper level!
To build your own sector of unspecified doom, you can pick up the terrain sprues along with the rest of the Maelstrom's Edge range from the webstore here.
What are you working on? We would love to see your models and terrain in the Comm Guild Facebook group!
For other building ideas, modeling tutorials, army spotlights and conversion walkthroughs, check out the Hobby section of the Maelstrom's Edge website here.
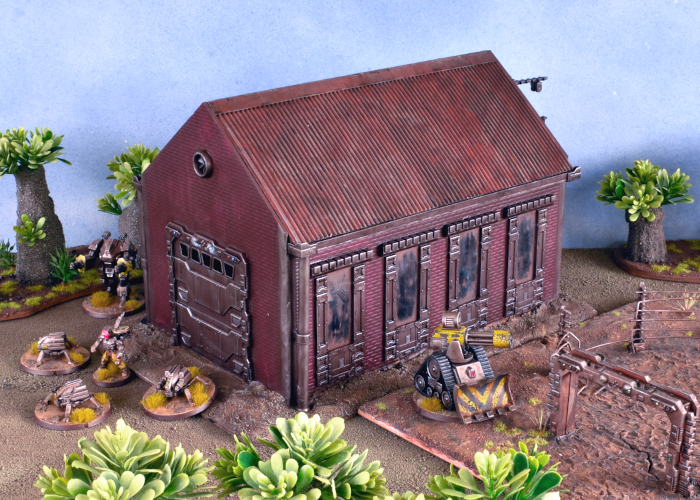
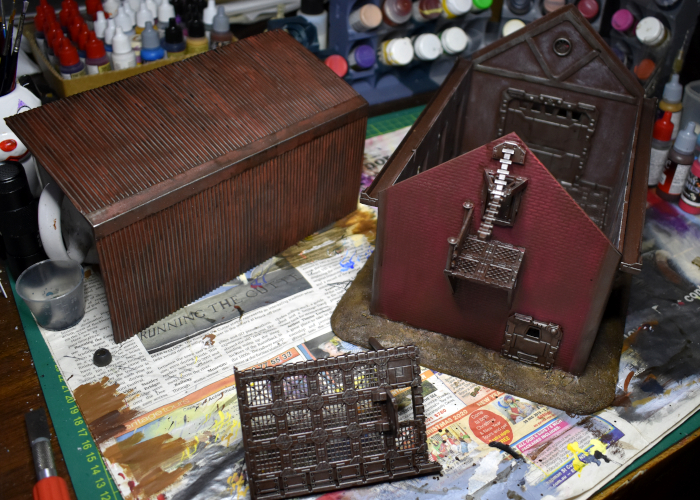
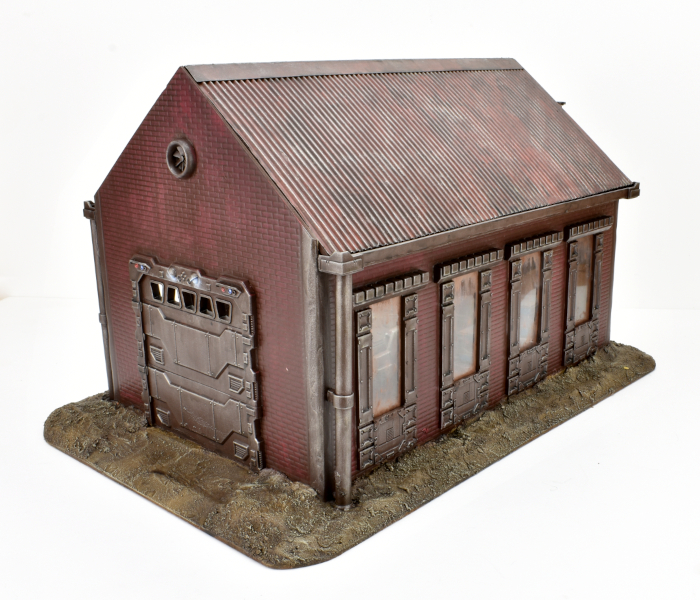
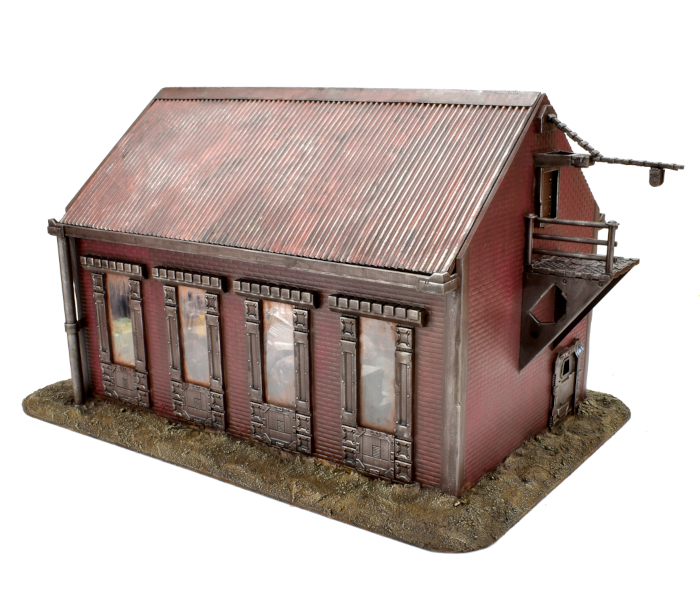
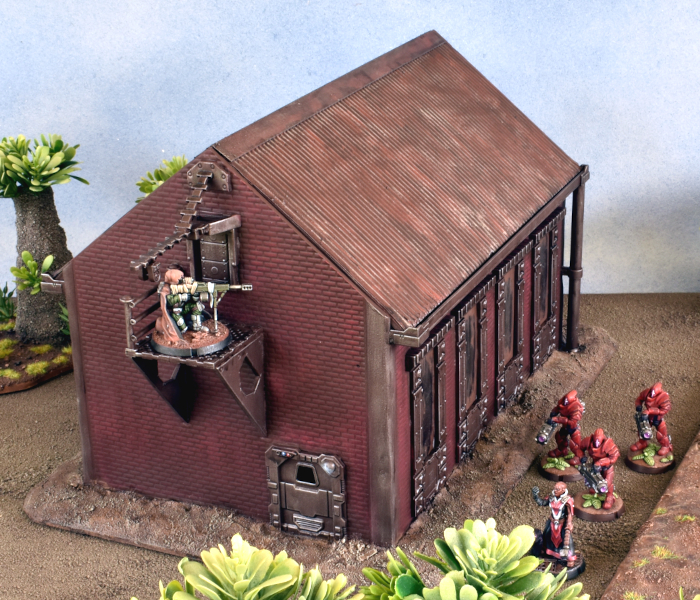
Terrain Kitbash: Sci-Fi Barn pt3
Posted on Monday Oct 25, 2021 at 06:00pm in Tutorials
- by Iain Wilson
Sci Fi Barn, episode 3: Now in Epirocolor!
In this latest installment, I finally get some paint on this barn build. If you're wandering in here wondering what it's all about, this was a kitbash of a Plast Craft Games warehouse with parts from the Maelstrom's Edge terrain sprues to build the a sci fi barn (you can find the first part here).
With assembly completed, I kicked off the painting by spraying the whole thing with a coat of a mediumish-dark brown satin spray paint that I had sitting on the shelf. Or, I would have, but it ran out on me. So I wound up spraying the top of the roof with some old Rustoleum flat red that I sometimes use as a base for rusty metal.

I went back over the red roof with some Vallejo Charred Brown before drybrushing over all of the metal parts with some Citadel Boltgun metal (Leadbelcher, for the newcomers). The non-metal parts of the interior walls were drybrushed with some Army Painter Skeleton Bone to pick up the texture on the foamed PVC, and the exterior bricks were given a heavy drybrush of Scalecolor Baal Crimson. Then before putting the drybrushes away, I gave the dirt on the base a layer of Vallejo Heavy Brown.
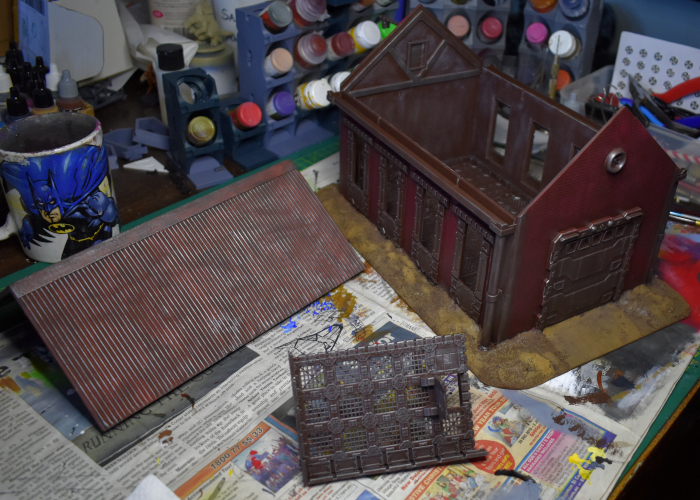
I was aiming for a weathered but not overly rusty metal look for this piece, as it's intended for a fairly arid 'western' themed table set. So over all of the metal parts and the base I added a generous coat of Army Painter Strong Tone and set it aside to dry.
At this point it was time to fit the window panes. The warehouse set came with painted clear plastic pieces that looked fine in the original warehouse, but turned out to not look right here. So instead, I used them as a template to cut some clear plastic sheet to size as a replacement.
I hadn't originally planned to add internal window frames, but with the panes in place the glue around the edges was very obvious , so I added some thin frames using some thin PVC.
After painting these new internal frames brown, all that was left was to add final detailing. I drybrushed the base dirt with some Army Painter Skeleton Bone and all of the metal parts with a light layer of Army Painter Shining Silver. Lights and sensors on the door frames were painted in with red and blue.
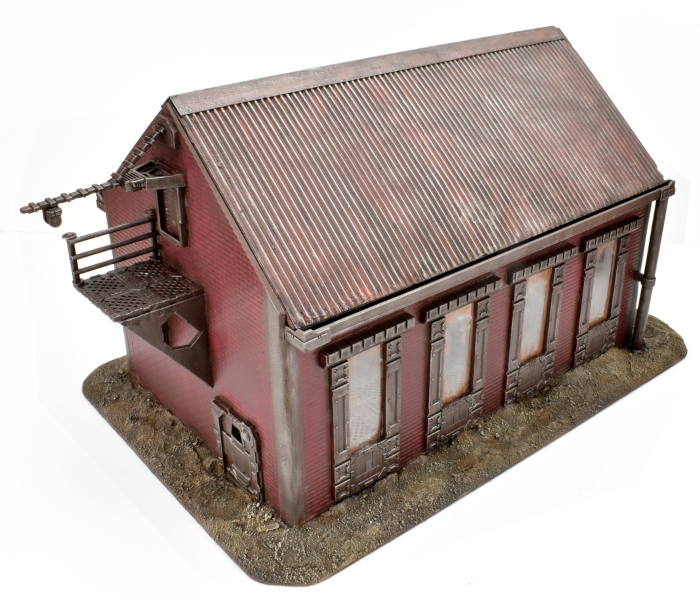
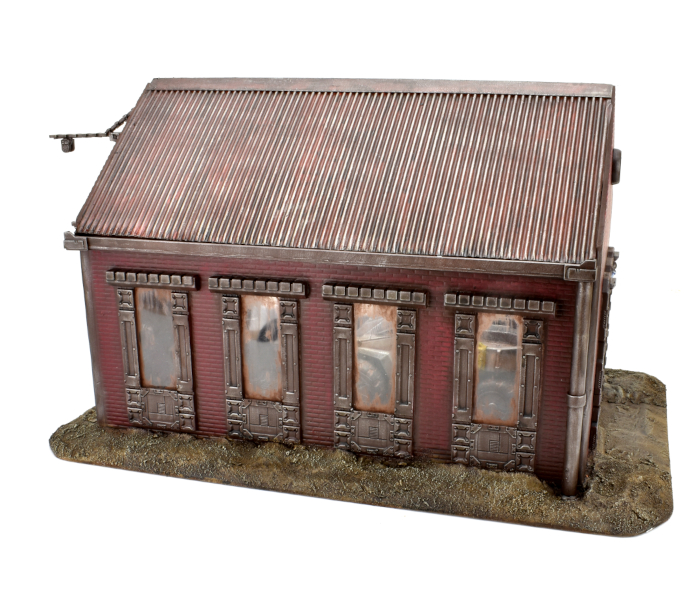
With the metal parts being quite dark, I didn't add a lot of dirt weathering, other than over the tops of the doorframes where it served to conceal a few messy over-brushes of red from the bricks. I did add some brown dirt smearing around the edges of the window panes, partly to give them a more weathered appearance, and partly to conceal any fogging from the glue.
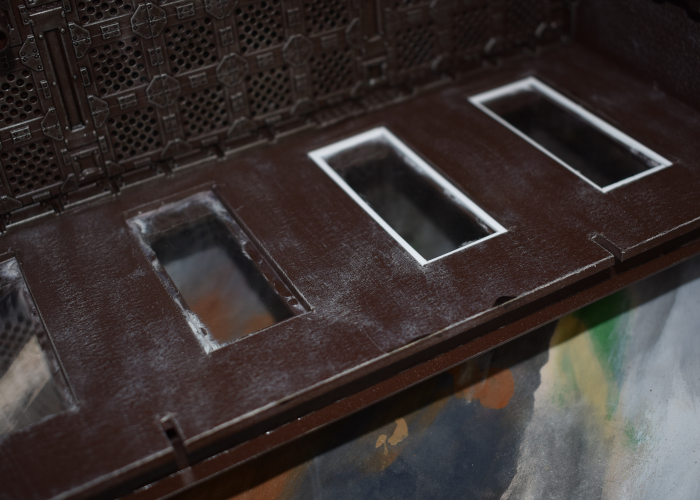
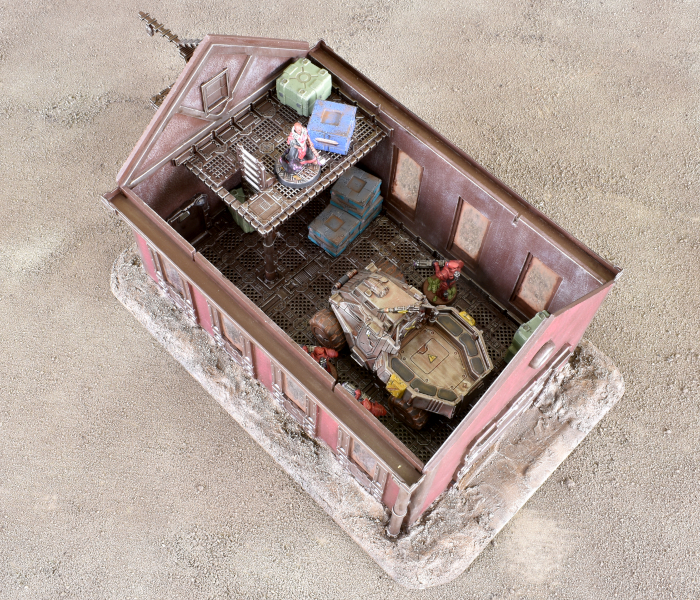
With some crates and an old vehicle thrown in for colour, when the roof is lifted off the interior winds up looking like this:
To build your own outbuilding of rural doom, you can pick up the terrain sprues along with the rest of the Maelstrom's Edge range from the webstore here.
What are you working on? We would love to see your models and terrain in the Comm Guild Facebook group!
For other building ideas, modeling tutorials, army spotlights and conversion walkthroughs, check out the Hobby section of the Maelstrom's Edge website here.
Tags: buildings conversion kitbash painting spotlight terrain terrainsprue tutorial