Search Results for 'terrain'
Entries found for "terrain": 216Showing 201 - 210 of total 216 search results
All Your Base, Tutorial Part 1
Posted on Tuesday Nov 29, 2016 at 05:00pm in Tutorials
 - by Iain Wilson
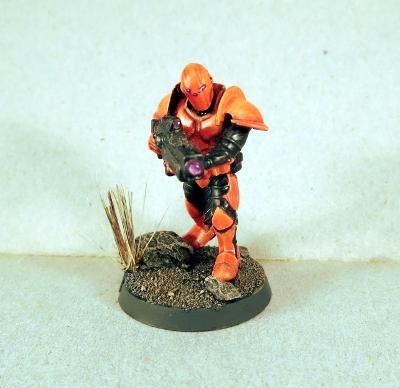
Once upon a time, there was an more-or-less universally accepted standard that gaming miniatures' bases would be either covered in flock (shudder) or covered in sand and painted light green. We've come a long way since then, with the common standard now to have sand painted brown with a couple of tufts of static grass to brighten things up a little.
If that's leaving you less than inspired, then this article might be for you! Over a couple of weeks, I'm going to run through a few different ways to pretty up your bases, ranging from easy to 'might need a little practice' in complexity.
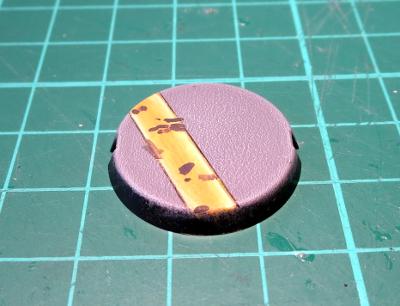
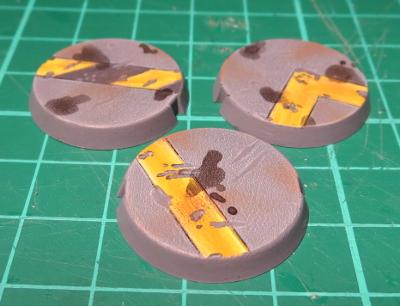
First off the blocks: Industrial Grey
This style is intended to represent industrial or urban cement-paved areas, and can be as simple or as complex as you want it to be (or as your painting skills will allow!)
Start with a medium grey - I've used Vallejo Basalt Grey.
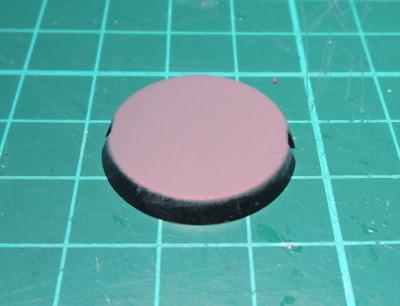
Then drybrush with a lighter grey - in this case, Vallejo Light Grey.
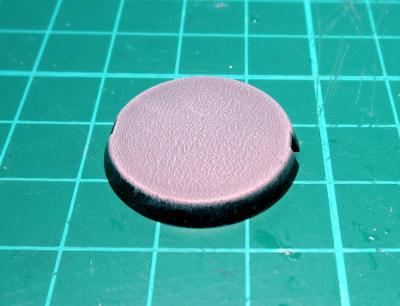
You could leave it there, but where's the fun in that?
You can use a ruler or a cast off piece of sprue to mark out lines on the cement, to represent part of the sorts of markings you might find on cement floors - hazard lines, lane markings, etc.
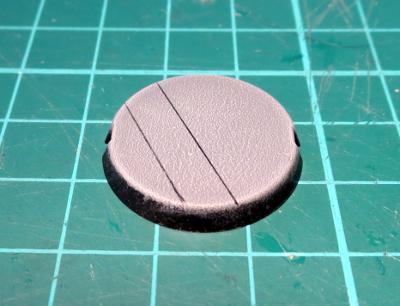
Paint in between the lines with an appropriate colour. Yellow is a great contrast against the grey, or white is good for a more subdued look.
Then you can add weathering, dirt and stains to your heart's content. For the chips, paint small splotches of your original medium grey and highlight around the edges with the light grey. Dirty things up by drybrushing with a little brown, and add drops of ink for oil or chemical stains.
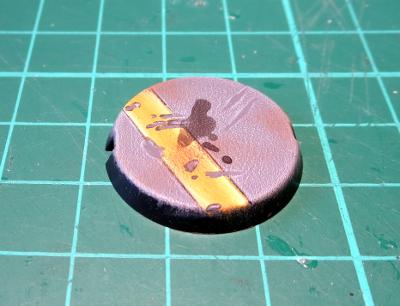
Finally, paint around your base edges.
There are several schools of thought on base edges. Some painters like to go with a colour that complements whatever is on top of the base. Some prefer a contrasting colour, or different colours to denote different units, or even just good old black. There's no right or wrong - just go with whatever you think looks best.
Next: Let it snow!
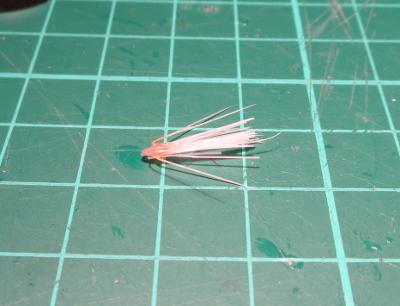
There are various hobby 'snow' products on the market for creating wintery bases or terrain, but to me they never look quite right, as they're too grainy. Instead, I like to go with something like this:
Start by gluing a few small lumps of sand or fine gravel to your bases for a little texture. If you're doing this with the bases separate to the models, make sure you leave space in between the rocky clumps for the model's feet.
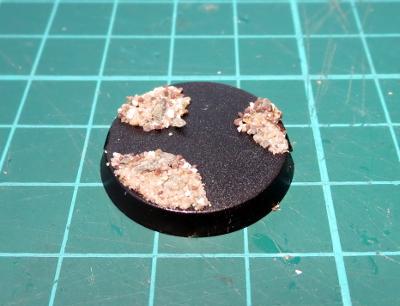
Once your glue has set, paint the rocks up. I've opted for a black wash to start out. This is followed by a heavy drybrush of brown (I used Citadel Tallarn Flesh here) and then a light drybrush of light grey (the Vallejo again). That's not a hard and fast formula - rocks come in all sorts of colours and textures, so use whatever colours will make for the nicest contrast with your miniatures.
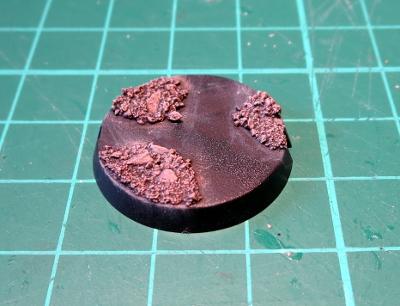
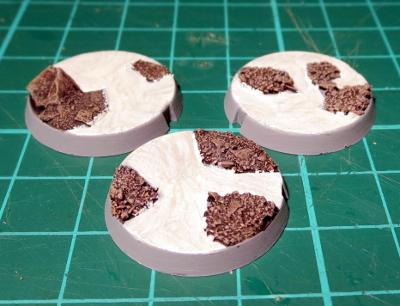
Once that's done, the flat space in between becomes snow. If you want to (and I would recommend it on larger bases), you can break up the flatness by adding smooth bumps with Green Stuff or Milliput, or just leave them flat. Paint with white.
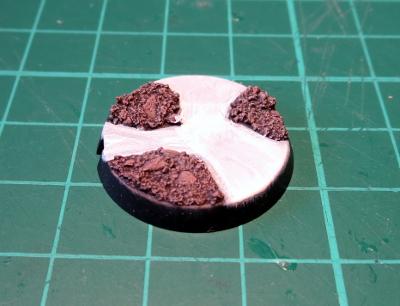
The last step is a little hard to photograph, so you'll have to take my word for it that it looks better in person. To get a nice, shiny snow look, I use a pearlescent paint. You can find a few variations on a similar theme in most craft shops - either a pearl white paint, a pearly gloss sealer, or a pearl medium which you add to your paint. Whichever you wind up with, paint a coat or two over your white, and then finish by painting the base edges.
Moving on: Rocky Wasteland
OK, so this one isn't actually too far removed from the standard sand-and-static-grass option, but without the static grass. Start by gluing some fine gravel mix - Mine is a mix of silver sand, regular sand and some crushed up slate. I like to add some bigger pieces of stone scattered around these bases as well to create a little bit of a feature.
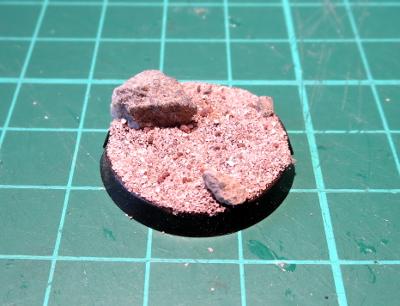
Paint: start with a black or brown wash to get into all the crevices.
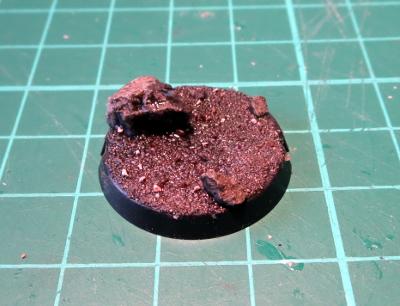
The drybrush with browns and/or greys (or whatever other colours you want your wasteland to be). I've used light grey and Coat D'Arms Hairy Brown here.
That's the boring part. Now to add some zing! Find yourself an old toothbrush, and pull out one of the clumps of bristles - use pointy pliers if they're reluctant to come out. There will sometimes be a small piece of metal in the fold at the bottom of the bristle that helps hold them in the toothbrush. If there is, discard that.
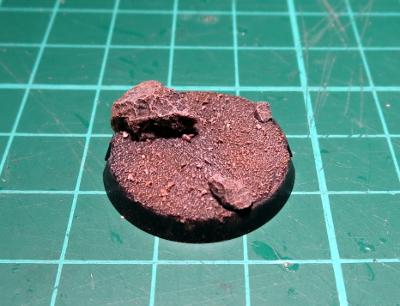
Before you let go, add a little superglue into the folded bottom of the bristle clump to hold it all together.
Then apply a small dollop of clear craft glue or superglue to the bottom of the bristles and press them into place on your base.
If you have a nice hollow to glue the bristles into, superglue will work fine. If they're sitting more on top of the gravel, the craft glue is better as it is thicker and will pool around the base of the bristles to give them a little stability.
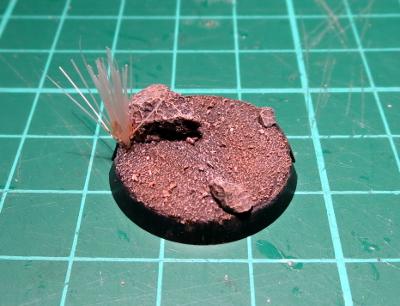
Once your glue is set, paint by washing with brown ink, and then drybrush a little bone or light green over the top to pick out the individual bristles again. Then paint your base edge.
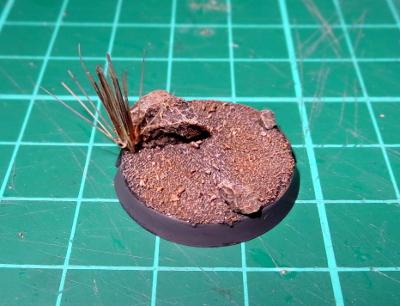
As a final note on this one - If you're making up your base separately to the model, it's a good idea to either leave a couple of spots with no gravel for the model's feet to glue into, or pin the model to the base, as model feet don't tend to glue well to sand or gravel due to the lack of flat surface to grab onto.
In part two, we try to make your bases more riveting, and wander off in search of a shrubbery. Stay tuned!
Feeling inspired? Want to share how you have based your models? Jump into the Comm Guild Facebook page (https://www.facebook.com/groups/MaelstromsEdge)!
The Comm Guild October Summary and Update
Posted on Monday Nov 07, 2016 at 05:00pm in General
Every month, we like to post a roundup of some of the awesome content posted to the Comm Guild Blog, just in case you missed anything! Below are some of the highlights from October:
This month saw the release of the first volume of the Tales From The Edge series of books, featuring short stories from the Maelstrom's Edge universe.

This book is titled Tales from the Edge: Emergence, and is available in digital format now.
Also released this month are our model bases, now available separately!
Our regular 'Spotlight' articles are intended to show some of the models from our range, and include notes on the design process, colour scheme options and building or conversion guides.
The October Spotlights included a rather sinister-looking Epirian Bot Handler, an even nastier looking dark red Angel, an Epirian Hunter toting some serious firepower, a Firefly drone in our box-art colour scheme, and a ruined hab block from our studio terrain collection.

We had a bit of a look at some great MEdge buildings made by Dakka Dakka user Panic, using plastic electrical boxes.

While we're talking about terrain, there was a tutorial by Iain Wilson (insaniak from Dakka Dakka) showing how you can create quick and easy buildings using the Maelstrom's Edge terrain sprue and cardboard gift boxes!
Iain also shared a tutorial on painting with washes; a valuable technique for getting a new force on the table as fast as possible.
Our rapidly expanding range of artwork and background features this month included the very first completed art piece for our Karists, the mature angel, an interstellar hydrogen harvester, some scout ship artwork, some fiction on terraforming, metalloceramic production, the Kasmenai, the birth of the Karist movement, a second and third weapon preview for the upcoming Broken faction, a better look at the artwork featured on the cover of Emergence, and a look at the digital rulebook.
On the community front, Sgt Oddball over on Dakka Dakka shared a fantastic kit-bashed Epirian objective marker:
Amongst the other great contributions by MEdge fans were Panic's Epirian Doom Marines, TP^DC Deputy Manager's Angel Minnow, and a desert-themed Hunter bot by Zambro.
If you like what you see here, or have questions about the game or the Maelstrom's Edge universe, head on over to the Comm Guild Facebook Group page and and join in the discussion.
Starting after this post, we'll be reducing our posting frequency from daily updates to a more sporadic output. The constant flow of content is now being penalised by social media algorithms and we actually get a much higher readership for less frequent posting. We've got a lot of great hobby articles in the pipeline, as well as more of the usual content. In addition, the more detailed articles will not be pushed off our homepage as quickly as they have been due to our frequency of posting model photos!
Tags: compilation news roundup
Terrain Thursday - Sgt. Oddball's Terrain
Posted on Thursday Nov 03, 2016 at 05:00pm in The Epirian Foundation
Today we share this nice compound by Sgt Oddball over on Dakka. The metals are weathered very nicely and the simple flocking at the base of the building and stencilling on the face of the building really pull the whole model together nicely.
Tags: buildings epirian terrain terrainsprue
Community Spotlight: Epirians on Guard
Posted on Wednesday Nov 02, 2016 at 05:00pm in The Epirian Foundation
Sgt Oddball's Epirians make an appearance once again, this time around a small structure he has built. The striking use of bright colour really helps the Epirians to stand out against the cool greys and metallics of the building.
The Comm Guild's community spotlight focuses on sharing something from the Maelstrom's Edge community each week, if you have anything you'd like to get in to the queue, please get in touch with us via the Maelstrom's Edge website
Tags: contractor epirian modeling painted terrain
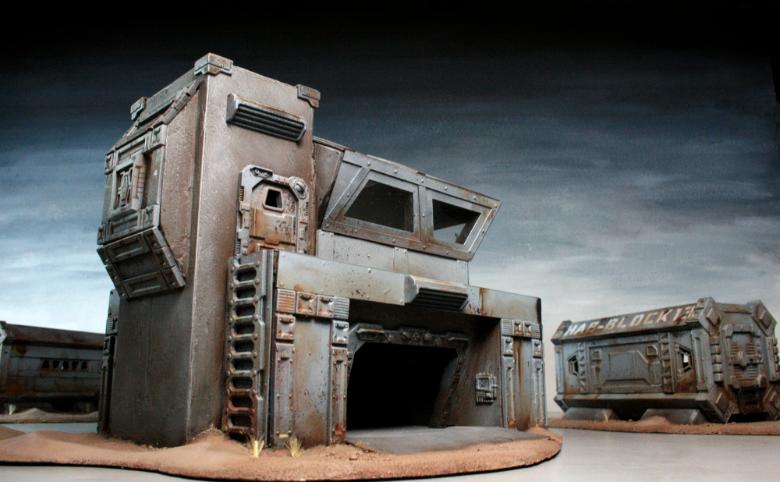
Terrain Thursday - Ruined Hab Block
Posted on Thursday Oct 27, 2016 at 05:00pm in General
From our studio collection is this nice piece which shows a building that has been destroyed and is being reclaimed by the ground. Similar to our other hab block buildings, this building serves as a nice reminder that ruins work very nicely in wargames, and not every building needs to have four walls and a roof!
Tags: buildings ruins terrain terrainsprue
Giftbox Terrain Video
Posted on Thursday Oct 20, 2016 at 05:00pm in General
We thought today we'd highlight the timelapse video above which shows the construction of a building from scratch using the Maelstrom's Edge terrain sprue, previously covered in step by step photos in a previous blog post here at The Comm Guild.
Tags: buildings terrain terrainsprue video
Terrain Thursday: Electric Box Buildings
Posted on Thursday Oct 13, 2016 at 05:00pm in General

Dakka user and friend of Maelstrom's Edge, Panic, has been an amazing early adopter of the terrain kits. He came up with the great idea of taking an electrical box from a hardware store, slicing some holes into it, and adding Maelstrom's Edge terrain components. The above image shows the finished piece all nicely painted up.


Any basic box that has texture on it already serves as an excellent base for terrain sprue components. One word of warning with electrical boxes though - they are a total pain to cut, so patience is definitely needed!
Gift Box Building with the Maelstrom's Edge Terrain Sprue
Posted on Thursday Oct 06, 2016 at 05:00pm in Models
- by Iain Wilson
The Maelstrom's Edge terrain sprue is a fantastic resource for enhancing your games. Packed as it is with different bits and pieces for crafting buildings and scifi accessories, it serves as a handy base to combine with foamcore, cardboard, plastic containers, the cat*, foam packaging inserts, plumbing supplies, or anything else you can think of to create distinctive and personalised battlefield terrain.
*Don't glue things to the cat. Seriously.
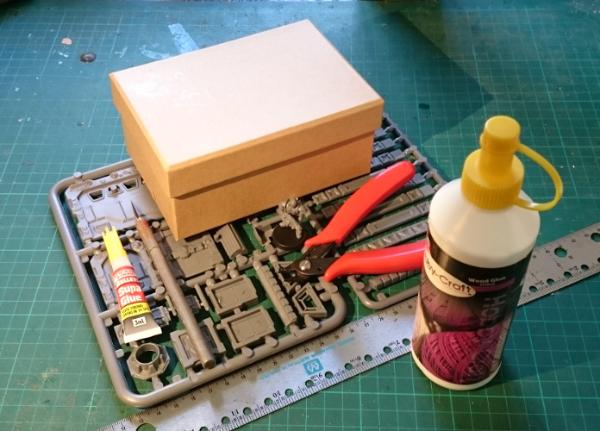
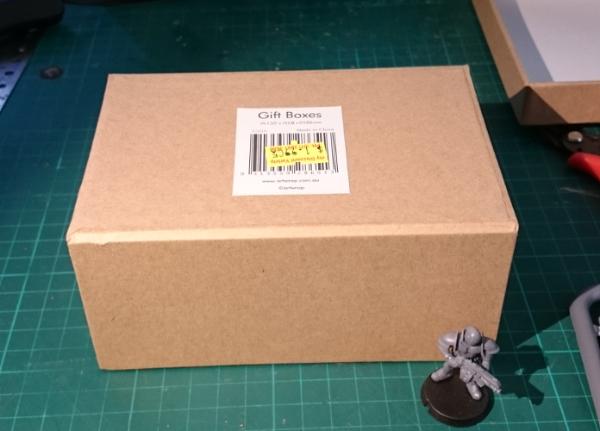
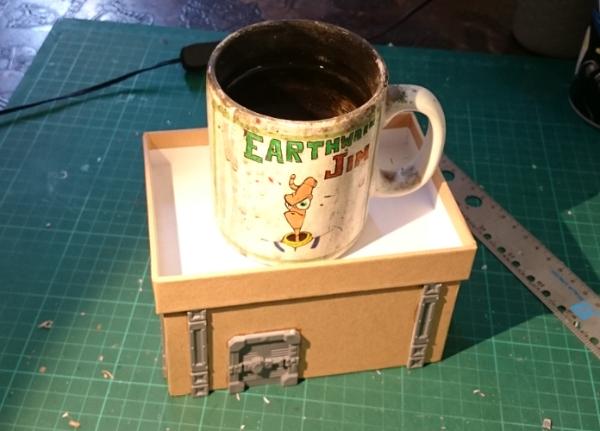
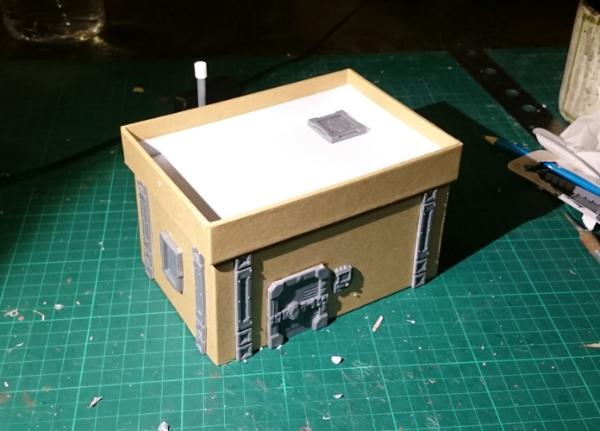
For now, I'd like to focus on one particular way to use the sprue, by crafting a basic building using a cardboard gift box.
These are fairly readily available all over the place, are generally made of a fairly sturdy cardboard, and are (best of all) cheap. You can also get them with all sorts of pretty patterns on them, but you'll probably want to paint them, so that’s less important, really.
Here’s a quick video showing the build process:
You will need: a giftbox, the terrain sprue, some glue (superglue for gluing the plastic parts on, PVA/wood glue for gluing the box lid on) clippers, a pencil, a sharp knife, and a ruler can be useful for marking out parts.
I want a building with a walled roof, as that gives some nice line of sight-blocking terrain while giving troops somewhere elevated to stand. So the box will be turned upside down, and the lid will eventually be glued on top, also upside down.
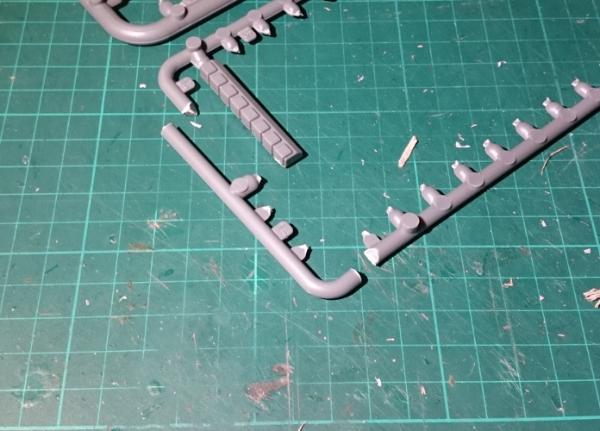
First step is to cut the parts you want to use off the sprue and clean up any mould lines.
I'm using the long support pieces vertically on the walls of the building, so they need to be trimmed down to the height of the box. That's simply a case of taking the lid off, holding one of the supports against the box to mark where to cut it, and then cutting them all off at that point.
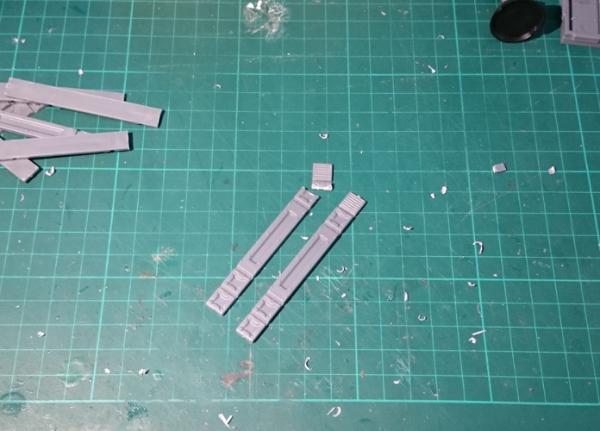
Put the leftover pieces aside - they'll come in handy for other projects.
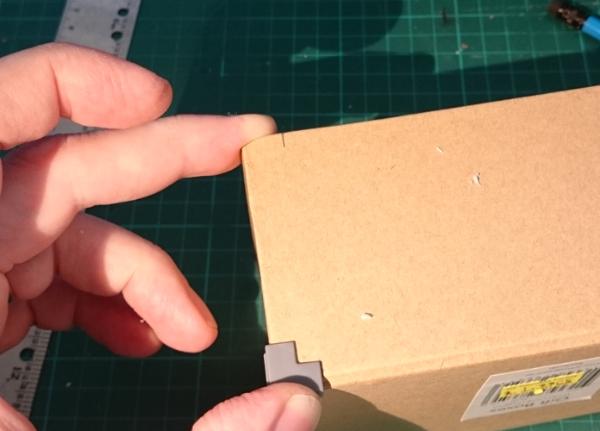
Next, measure out where the supports will go on the building. I tend to use them slightly in from the corners of my buildings, rather than as corner bracing - this looks neater, as they don't meet in a flush corner if you butt them up against each other right on the edge.
You can put them wherever you like, so long as it's consistently spaced around the building. Here, I've used a corner brace to mark out the spacing, by placing it up against the corner and marking against the side of it. Repeat top and bottom on both sides of each wall.
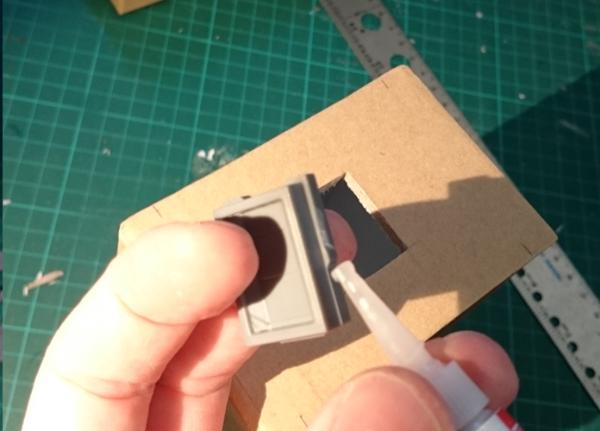
Next, work out where you want to put your door. Hold it in place against the building wall and draw around the back of the door frame with a pencil.
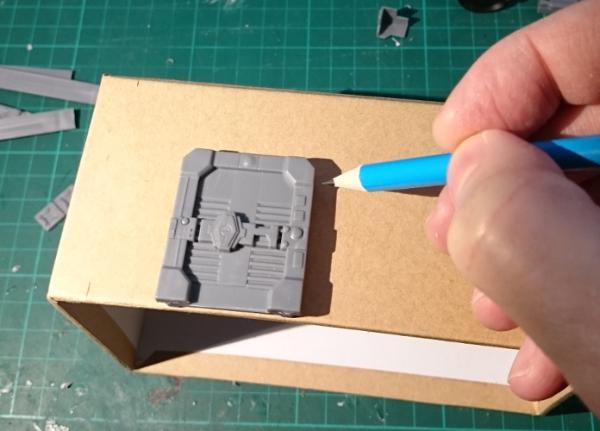
Do the same for the windows - I've gone for one on each end of the building.
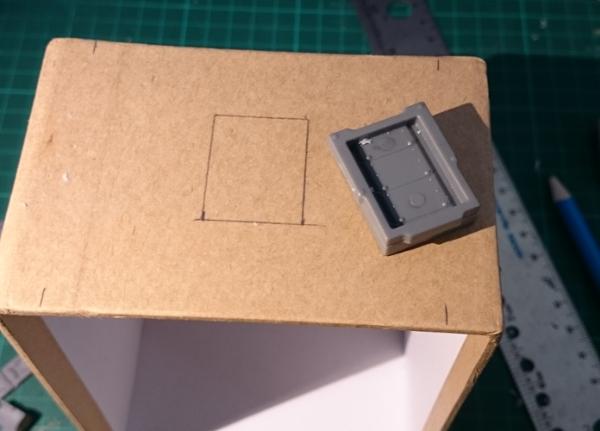
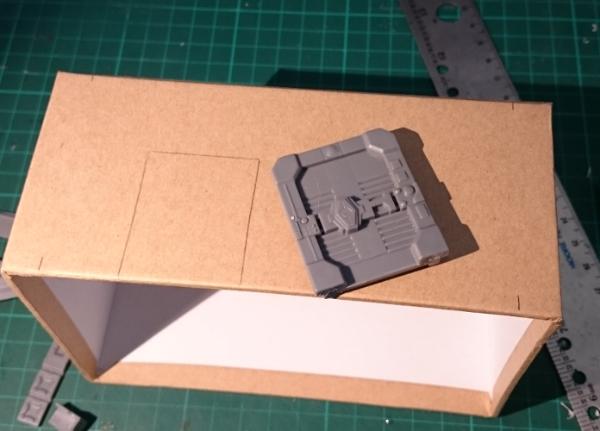
Then take your knife and carefully cut out the door and window holes. Note that the windows don't actually have to be inset into the walls - the box frame design means that they actually look pretty good just glued on the outside. So you can save yourself some cutting if you're in a hurry. I do prefer to inset them, though, as it looks a little more polished.
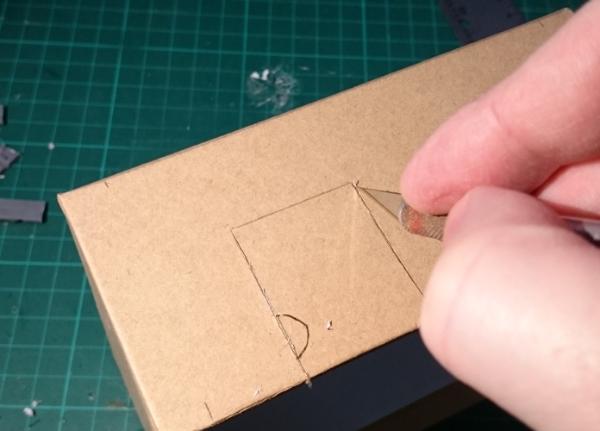
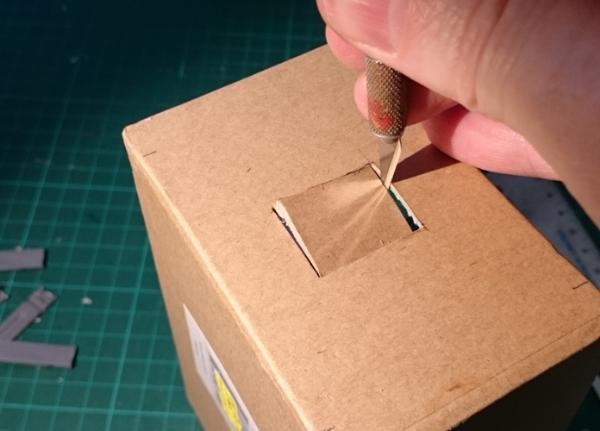
Once the holes are cut out, check that the parts fit in securely - trim up if necessary.
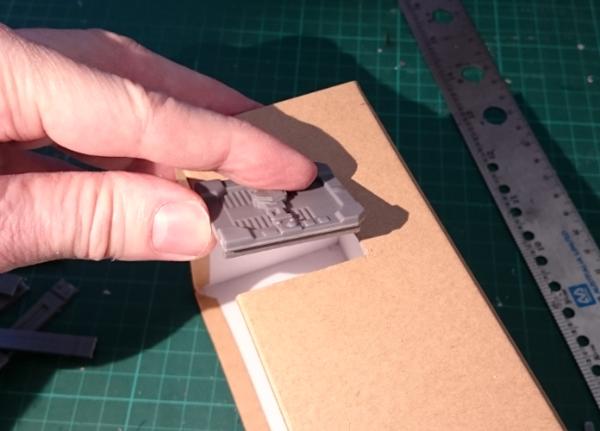
Then it's time to glue everything in place. Apply a small amount of glue around the door and window frames and push them into place. You can 'hide' the glue behind the protruding frame on the sides and bottom of the windows, so that you get less overflow onto the cardboard.
Run a line of glue down the back of the supports, and press them into place against your pencil marks on each wall.
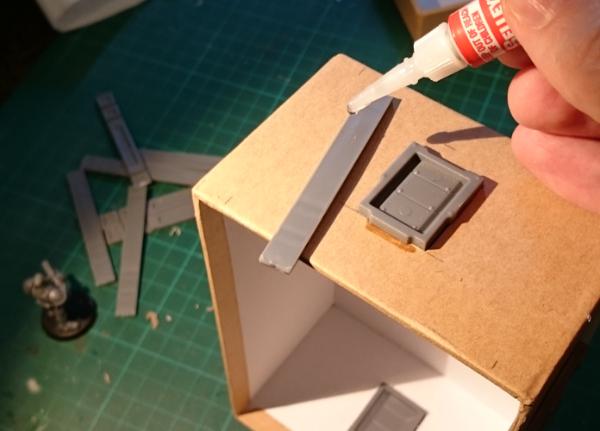
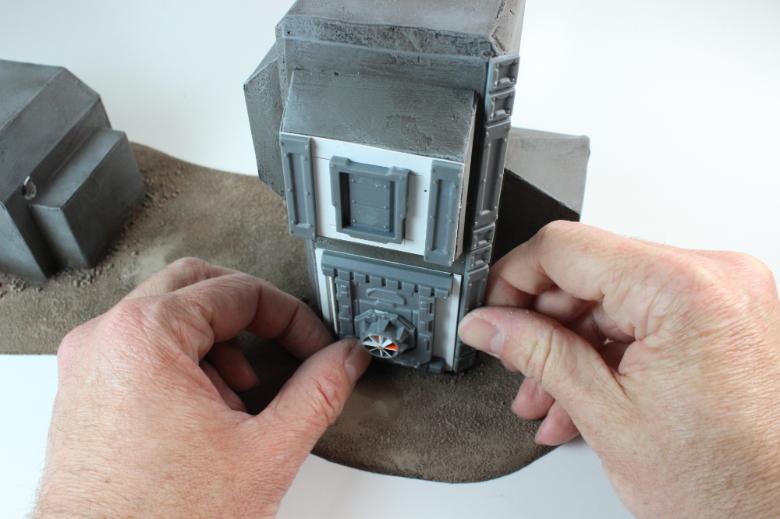
Next, grab your box lid, and on the inside mark out where you want the roof hatch to go. Once again I've used the corner brace to mark out an even distance from the sides of the box lid. Then glue the hatch in place.
Now we can glue the roof on. Spread some PVA glue liberally over the top side of the building, press the lid on upside down, and sit something heavy on top to hold it snugly in place while the glue sets.

You could use superglue for this if you don't have any PVA or if you're in a hurry, but the PVA glue gives a better bond if there are irregularities in the cardboard that stop the two pieces from meeting perfectly flush.
While the roof is setting, we can hack the sprue a little to add some extra detail to the back of the building. Cut a corner piece off the narrower side of the sprue, as below. This will become the pipe for a small chimney or air vent.
Clean off the extra tabs and the mould line, and grab the small pipe fitting off the sprue.
A handy feature of this part of the sprue is that it fits perfectly into a 1/4"(7mm) plasticard tube, which in turn fits snugly into the small pipe fitting. So cut yourself two short segments of tubing - one for each end of the 'pipe'. If you don't have any plasticard, you can also use a strip of thin cardboard (cereal packet or the like) wrapped around the sprue instead.
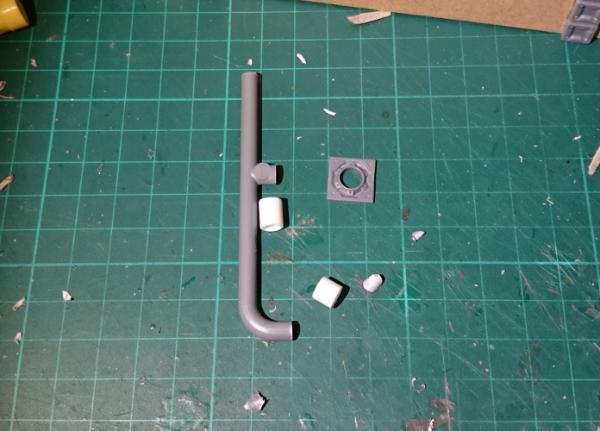
Glue the tubing (or cardboard strips) onto the 'pipe', glue the curved end into the pipe fitting, and check the fit against the back wall of the building. You can trim up the protruding sprue support as necessary to make sure the chimney sits vertically and the pipe fitting is flush against the wall. Then glue in place.
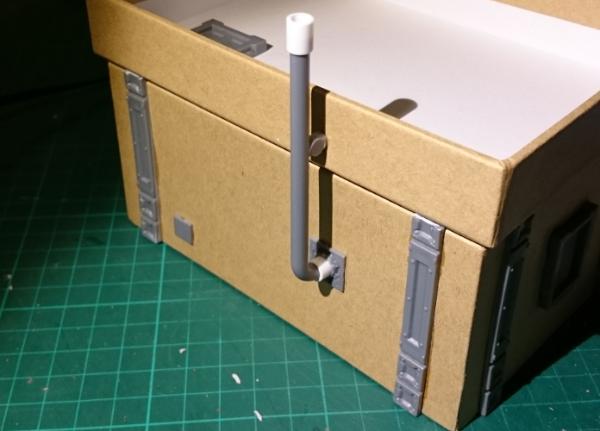
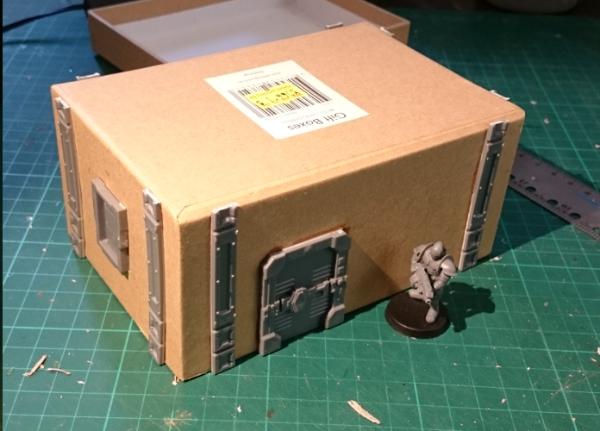
I have also added one of the small vent pieces that was trimmed off the wall supports right at the start, just for a little extra detail, and glued a comm panel onto the front wall beside the door.
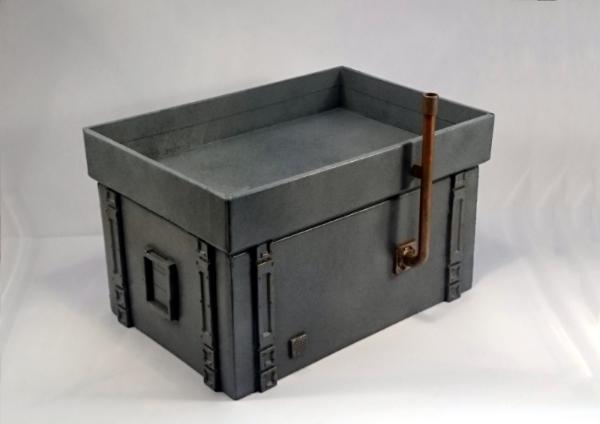
So the finished building looks something like this:
This can then be decorated however you like. I would recommend a good spray paint for the basecoat, particularly if the boxes you are using have a glossy finish. The building below was basecoated with black spray, and then given a spray coat of a medium grey, and a final highlight with a light grey spray from above, to leave the darker colour in the recesses and undercuts.
The 'chimney' pipe was painted in copper with a light drybrush of green to dirty it up, and some details like the comm panel screen and the light above the door picked out for a little extra colour. You could also add on building numbers, posters, warning signs, or anything else that you might find on a real building - we'll be covering some different ways to pretty up your battlefield terrain in a later article.
Pick up the terrain sprue from the Maelstrom's Edge online store here and give it a go! You can share your creations on the Comm Guild Facebook page here: https://www.facebook.com/groups/MaelstromsEdge
September Roundup
Posted on Monday Oct 03, 2016 at 06:00pm in General
Every month, we'll be posting a roundup of some of the awesome content posted to the Comm Guild Blog. Below are some of the highlights from September:
We kicked off the month by releasing our latest audiobook, Fracture.
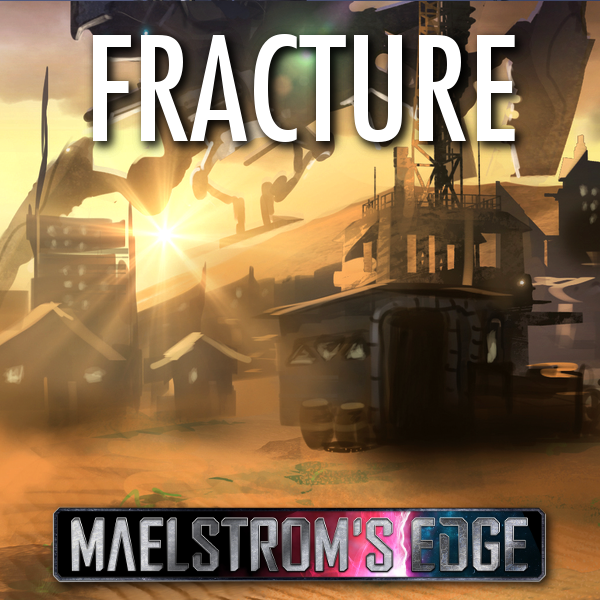
Written by Stephen Gaskell, Fracture continues the story of Kelvin and his family from our first audiobook, Transit.
Our regular 'Spotlight' articles are intended to show some of the models from our range, and include notes on the design process, colour scheme options and building or conversion guides.
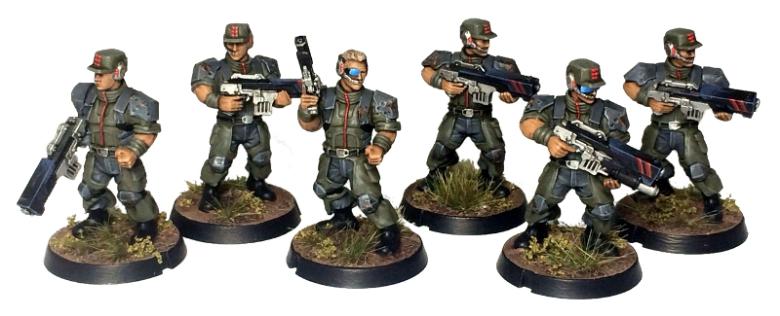
The September Spotlights included a look at the Angel Minnow, and some features on building and assembling Karist Praetorians and Epirian Suppressions teams built from the new Faction Expansion Sprue.
We also shared some alternate colour schemes for Epirian Contractors in white and blue, light blue and a more muted olive and grey, and some blue Karist Tempests and a Karist Trooper in yellow.
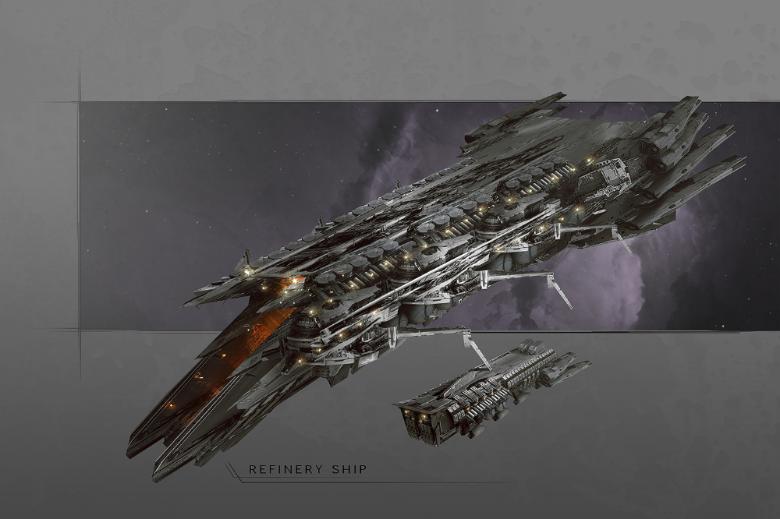
Over time, we've been releasing small articles focusing on different aspects of the Maelstrom's Edge universe. This month, these articles have included features on cybel energy, automated crop ships, Tunnelhuggers, mining ships, refinery ships, common foodstuffs, Karist Arks, Epirian Prospectors, and sneak peeks at the upcoming Epirian Master Handler and the next faction for Maelstrom's Edge: The Broken!
We also shared a walkthrough of the construction of one of our fantastic studio buildingsusing the Maelstrom's Edge Terrain Sprue, by 3t Studios.
And all of that is just scraping the surface of the material on the blog. You can find more pics of models and terrain, including some great stuff made by fans and posted on the Comm Guild Facebook Group page, with plenty more to come!
If you like what you see here, or have questions about the game or the Maelstrom's Edge universe, head on over to the Comm Guild Facebook Group page and and join in the discussion.
Tags: roundup
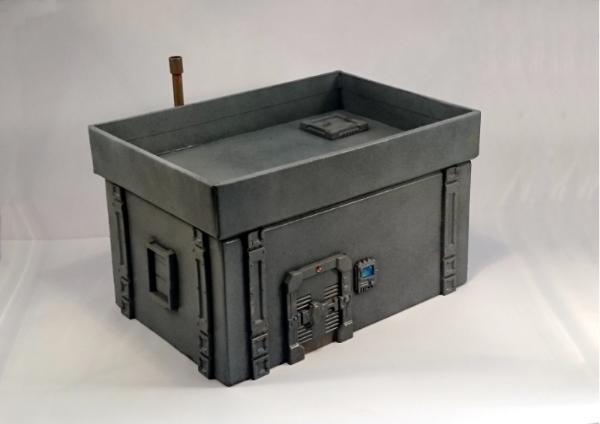
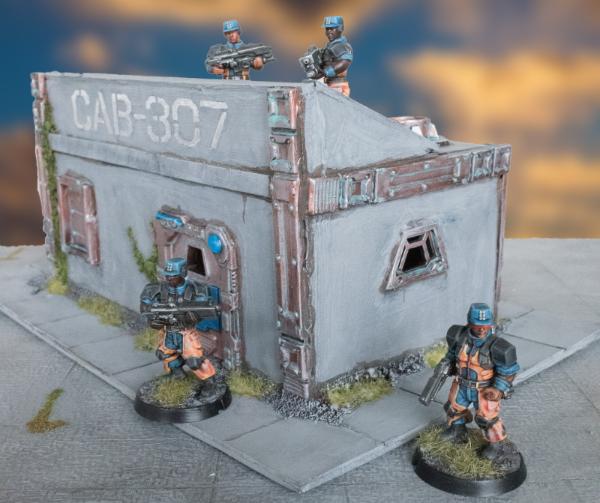
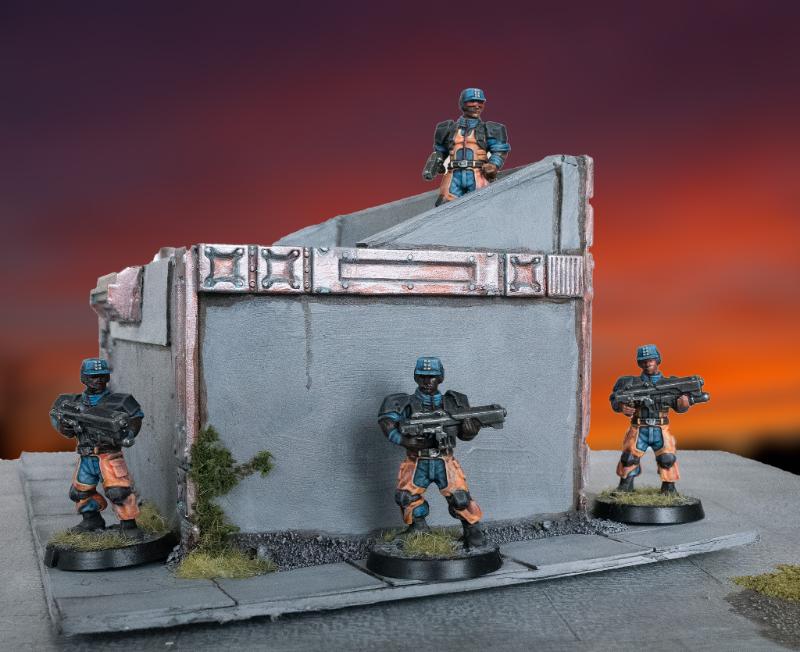
Terrain Thursday: Strategic Outpost
Posted on Thursday Sept 29, 2016 at 05:00pm in Models
We have quite a few pieces of terrain in our studio collection now. One of our absolute favourites is the strategic outpost.
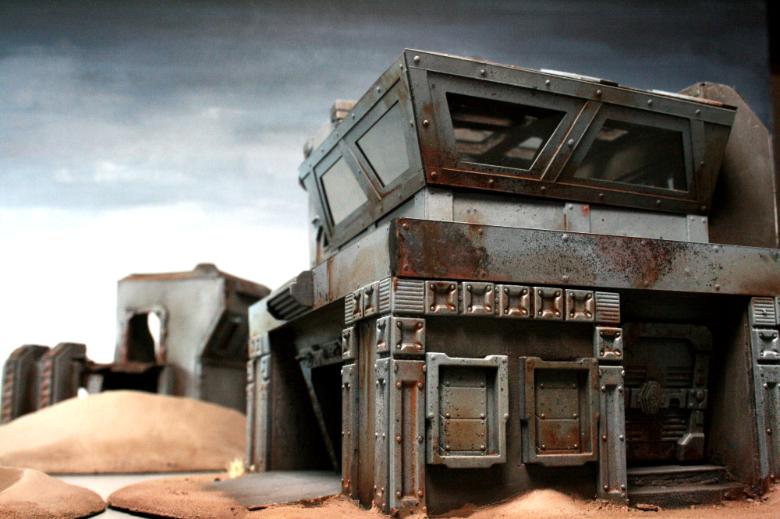
The upper floor's windows are transparent plastic, and not visible in the photos is a cool staircase leading to the upper floor.
This building was primarily made out of foamcore, thin plasticard and normal card, and the Maelstrom's Edge terrain sprue.