Entries tagged [secdef]
Painting Spotlight: 120-point Epirian SecDef Force
Posted on Tuesday Jul 24, 2018 at 12:49pm in Models
- by Iain Wilson
Last week, I built a 120-point force using the fantastic new Epirian SecDef models. If you missed it, you can find the article here: http://www.thecommguild.com/roller/thecommguild/entry/modeling-spotlight-120-point-epirian.
This week, my aim was to get this force painted up to a basic tabletop standard. This can be helpful for getting past the 'sea of grey' stage and allowing you to field a painted army faster than might happen if you're painting each unit up to a fully detailed level, or if you just want a quick and easy paintjob on your army and aren't interested in getting bogged down in detail work. The end result isn't going to win any painting awards, but looks fine on the table and can be updated later.
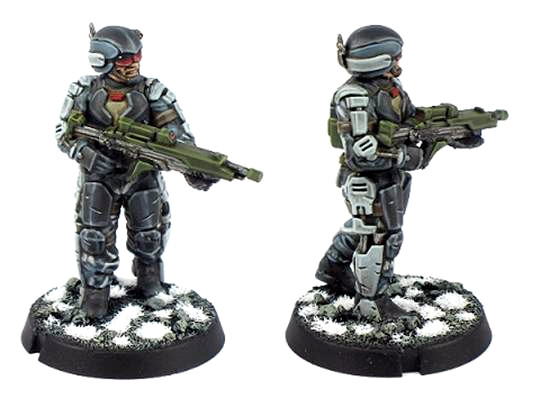
So, the painted force:
For painting up armies quickly I tend to rely heavily on ink washes, as they are so handy for adding shading quickly (if sometimes a little messier than doing it by a more manual and time-consuming method would allow for). This force was no exception to that. I started with a basecoat of Army Painter Army Green spray, and when that was dry added a wash of Army Painter Military Shader.
When the wash was dry, I went over the armour plates with Army Painter Ash Grey, the exo-skeleton sections in Vallejo Basalt Grey and the weapons on Vallejo Heavy Charcoal, before adding a layer of Army Painter Dark Tone over these areas with a detail brush. Any slight spillover onto the green is fairly unnoticeable, but excess wash was quickly removed with a wet brush where necessary.
On the Ash Grey armour plates, rather than covering them completely with the wash, I just painted a thin coat of the wash onto the lower surfaces of the plates, or on the innermost half of the thigh plates.
I then painted the face and neck with Citadel Tallarn Flesh, chosen by virtue of being the first flesh tone I came across in my paint box. I also painted the flesh tone over the goggles, to provide a nice base layer for the red that would come later. The pouches, straps, rifle stocks and boots were painted with Vallejo Heavy Brown and then the flesh and brown parts were washed with Army Painter Strong Tone.
Finally (for now) I painted the base with Vallejo Neutral Grey and the goggle lenses with Army Painter Pure Red. The helmet chinstrap had originally been painted in the Heavy Brown, but after the wash I found that the tone was too similar to the flesh colour, so I went over the brown with black, and also used a black fineliner pen to darken the lower frame of the goggles, around the bottom of the lenses and up the nose. I also used the Neutral Grey to add a quick drybrush over the black on the weapons to pick out the detail - I wanted them dark, but to still be recogniseable on the table.
At this point, all of the main colours are in place and they're ready for the table. To finish them off later, I can add a highlight to the green with some light green, some light brown or bone on the brown parts, and add some shading and a reflective spot on the goggle lenses, which gets something that looks more like this:
I will also need to go through and drybrush the bases and add some detail so that they match my other urban bases.
So, the 'finished' units:
Lieutenant
Tactical Teams
Snipers
Annihilator Teams
Recon Walker
The gang all together:
To start assembling your own SecDef force, you can pick up the Secdef sprue, or any of the rest of the Maelstrom's Edge model range, from the webstore here.
As always, feel free to pop along and share your work, or ask any Maelstrom's Edge- or hobby-related questions on the Comm Guild Facebook page!
For other Maelstrom's Edge modeling articles, including tutorials and walkthroughs of a wide range of different building and miniature projects, check out the article roundup here.
Modeling Spotlight: 120-point Epirian SecDef Force
Posted on Monday Jul 16, 2018 at 05:00pm in Models
- by Iain Wilson
With this week's article, I'm continuing the SecDef love because, well, they're awesome!
As nice as it is to include some elite supertroops in amongst the Epirian bots and contractors, I thought it would be fun to build an entire SecDef force. Obviously, with only a single Hammer option currently in the official rules, this required a bit of creativity, but two mocked-up new unit cards and a bunch of sprues later, my first 120 points were assembled and ready for painting.
To build even a bare-bones force within the army selection rules for Maelstrom's Edge, a Command unit is required. While there will no-doubt be a SecDef officer option released down the track, I'm far too impatient to wait for that, so I ran up an unofficial unit card for a lower-level officer, a Lieutenant, to command smaller SecDef strike forces. The aim was to create a commander on about the same level as the Journeyman Bot Handler, and one that could be built from existing parts with minimal conversion required. So I took a bare bones SecDef trooper built from the sprue, on the assumption that SecDef field officers would likely look little different to their troops, and just swapped his rifle for a pair of pistols taken from the Contractor sprue.
To allow for a viable force, the Lieutenant has the 'SecDef Commander' rule, which allows him to take up to two SecDef Tactical Teams as Core choices instead of in their usual Hammer slots. In the interests of fielding as many big guns as possible (because the SecDef heavy weapons look cool) I choose to give each of the Core teams two LM14 Machine Guns, and added two extra warm bodies to each to bring them up to full strength.
The models throughout the force are assembled largely straight off the sprue with minimal conversion. I switched around some of the leg pairs (as explained in last week's Modeling Spotlight) and changed around the left hands on the unit Sergeants to add some variety to their poses without having them all holding their rifles twp-handed like their troops, to help them stand out a little.
With the two available Core options filled, I decided to include a sniper unit in the Hammer slot (because why wouldn't you?). To keep them extra sneaky and to stay within my chosen 120 points, I went with the base unit of three, and gave the two troopers each a sniper rifle.
There was clearly not enough firepower on the table here yet, which called for some Chainguns! Rather than fill up my last remaining Hammer slot for the detachment, I made use of the Tactical Team rule that causes teams equipped with two CG100 Chainguns to become Anvil selections, and built up two five-man units accordingly.
To round out the detachment, I liked the idea of a SecDef force having access to a light vehicle that would serve as an advance scout, and potentially as a beacon to guide in teams arriving by Aerial Insertion. After some searching online, I found the Heron Light Battlewalker, a resin kit from Hexy-Shop. This is a small walker with an enclosed cockpit but a detailed interior, which allowed me to cut away the roof and part of the sides to create an open cockpit.
I replaced the Heron's original weapons with a pair of CG100 Chainguns glued together side-by-side, and added a driver by cutting up a pair of SecDef legs, re-assembling them in place in the seat and then filling in the resulting gaps with 'green stuff' putty.
There were no controls in the Heron's cockpit other than a screen down between the driver's feet, so I added a control loom made from a leftover resin piece and the pistol grip from a SecDef assault rifle. I also added some roll bars on the sides of the cockpit (these pieces normally go on the platform on the rear of the Heron), but these are only sticky-tacked in place so I can take them off for painting - this should make it easier to get into the nooks and crannies in the cockpit.
The final touch was to shorten the legs slightly, as the Heron turned out to be a bit taller than I had expected and wanted it to be. This was done by cutting out the lowest section of the legs and reattaching the legs to the ankle ball-joint.
All up, with an 11-point Lieutenant and 12-point walker, the above force comes in at 119 points - perfect for getting started, and ready to be taken as a detachment in a larger Epirian force or fleshed out later if and when more SecDef units are added to the roster. If you would like to build something similar, you can find the unit cards for the Lieutenant and the walker in the Force Builder section of the Maelstrom's Edge website here.
Next week - Painting!
To start assembling your own SecDef force, you can pick up the Secdef sprue, or any of the rest of the Maelstrom's Edge model range, from the webstore here.
As always, feel free to pop along and share your work, or ask any Maelstrom's Edge- or hobby-related questions on the Comm Guild Facebook page!
For other Maelstrom's Edge modeling articles, including tutorials and walkthroughs of a wide range of different building and miniature projects, check out the article roundup here.
Modeling Spotlight: Epirian Secdef
Posted on Monday Jul 09, 2018 at 05:00pm in Tutorials
- by Iain Wilson
Last week saw the release of the awesome new plastic Secdef to bolster the Epirian battleline with some elite military muscle. If you missed it, you can see the release article here: https://www.facebook.com/maelstromsedge/posts/2244261785589396, and you can also find an assembly guide here: http://www.thecommguild.com/roller/thecommguild/entry/assembly-guide-epirian-secdef.
This week, I'd like to go through some quick and easy modeling ideas to tweak your models. Novice modelers, fear not - nothing here requires extensive conversion experience or special tools!
To (ahem) kick things off, you may have noticed in the assembly guide that the sprue comes with 3 sets of legs - one in a walking pose, and two slightly different standing poses.
The left and right legs from each pair have matching locator pins to help them go together neatly, and these are different sizes for each pair to help you keep them sorted during assembly. You can easily mix-and-match the pairs to create some variation in the posing, though - the smaller pins will fit into the larger locator slots, and for pairings where the locator pins don't fit in you can just cut them off with a sharp hobby knife and glue the hips together without them.
One of the ongoing design goals for the Maelstrom's Edge range has been for the various kits to be compatible wherever possible to enable parts swaps. This is particularly useful for increasing the pool of available heads for any unit, and the open-hand design that has been adopted for weapon arms likewise adds extra options for switching gear around. On the below models, some slightly more hi-tech than usual Contractors have been made by using Contractor heads and weapons on the Secdef bodies.
You can also use heads from the Broken Infantry sprue to add unhelmeted human heads or aliens to your Secdef's ranks.
For an enclosed helmet option, you can use a spare head from the Epirian Bot Handler sprue.
The left arm on the above model has also been modified, removing the pointing hand at the wrist and replacing it with one of the open-palm left hands that normally hold the Secdef heavy guns. The heavy weapon arms are also useful for putting on Sergeants to show tactical hand signals.
Secdef troopers are equipped with a G20 pistol along with their assault rifles, although this isn't included on the sprue. As with other pistol and grenade options that come as standard on various units, there's no specific need, rules-wise, to show these. If you do want to show the pistol, though, the G20 is a variant of the standard Epirian Guardian pistol, so you can use the pistols included on the Contractor sprue to represent them, as has been done on the 'Lieutenant' model below.
(Lieutenants aren't an official unit option currently, although a HQ unit for the Secdef is in the pipeline. I'll be working up an unofficial rules card for this guy to go in the Online Force Builder for those who might want to try out an all-Secdef force.)
Finally for this week - While the designs are slightly different, the strength-boosting exoskeleton makes Secdef legs similar enough to the legs of the Master Bot Handler that you can make a walking Master Handler by simply swapping in the Secdef legs for the normal Master Handler legs, as below. I couldn't resist also taking the opportunity to replace this Master Handler's usual weapons with a modified pair of CG100 Chainguns taken from the Secdef sprue.
What have you done with your Secdef troopers? We would love to see your creations on the Comm Guild Facebook page!
To pick up the Secdef sprue, or any of the rest of the Maelstrom's Edge model range, visit the webstore here.
For other Maelstrom's Edge modeling articles, including tutorials and walkthroughs of a wide range of different building and miniature projects, check out the article roundup here.
Tags: conversion epirian modeling secdef spotlight
Assembly Guide - Epirian Secdef
Posted on Wednesday Jul 04, 2018 at 05:00pm in Tutorials
We are very proud to announce the immediate availability of our latest plastics - the Epirian SecDef. These guys have exo-augmented armour, allowing them to be a much more powerful and effective fighting force than their contractor allies.
Available now at https://www.maelstromsedge.com/store/41/3x%20Epirian%20Secdef%20Infantry, along with details of their history and background.
Below, you can find instructions for assembling these great new models!
Assembling Epirian Secdef
General Notes
Polystyrene cement - only use superglue if you want to go insane! All of our models are designed to be assembled with polystyrene cement as it gives some time to re-pose while gluing, fuses the models together and prevents brittle joins like other glues do. Make sure you have polystyrene cement in your toolkit before you begin!
We want you to experiment! We've broken our models up into lots of parts and given a fair few spare parts so that you can push yourself out of your comfort zone, learn new skills and create some really unique models. We've tried to price things so that it won't break the bank if you make a mistake, so please cut stuff up and have some fun. Start simple with a slice here and a re-pose there, and watch your confidence and skills increase until you are a master modeler!
Basing - Always make sure you glue your model to its base with an eye on the arc markers on the sides of the base. The arc marker indents should be at the halfway point between the front and back of the model to show the front and back halves of the model when gaming. See the Maelstrom's Edge rulebook for more detailed notes on this.
Dry fit before gluing! - There are lots of pose options possible, but that means there is also the freedom to screw up and make some bad poses! Sticking the parts together and seeing how things look will usually lead to a model that is fairly static and repetitive. You should consider knee, hip, torso, and arm positions when gluing and ensure that you have a pose in mind before you start gluing things together. If in doubt or insecure about your talents in the posing area, we recommend you try to copy the poses from some of our studio models found here in the gallery.
Epirian Secdef Assembly Notes
Three Secdef models can be made from one sprue. The sprue includes the following weapons: 2 x AR60 Assault Rifle, 1 x SR40 Sniper Rifle, 1 x CG100 Chaingun and 1 x LM14 Machine Gun.
Legs have three different poses and are paired, left and right, with differently-sized locator pins to keep them straight. Leg 5 goes with leg 7, 8 with 4 and 6 with 9.
The three torsos have two different designs (two with chest pouches and a backpack, one without), but the chestplate is identical for each, and any of the three torsos fit with any of the legs.
There are five 'sets' of arms, including two that have right hands with fingers together, and three with the fingers more splayed and the trigger finger separate. The closed-finger version works best for the Machine Gun or Chaingun, while the more open fingers work best for the Assault Rifles or Sniper Rifle. These are more-or-less matched with the extended left arms for the rifles and the left arms with more bent elbows for the heavier weapons. The pointing left arm obviously works with whichever right arm you choose, although there is one rifle arm that has the weapon held out to the side rather than across the body.
There are two small parts labelled as part 24 on the sprue. These are optional, and can be glued in between the belt and the heavier weapons as a support strut.
Finally, the three heads all fit with either of the two torso variants.
For some more ideas for building your Secdef models or to share your own creations, head on over to the Comm Guild Facebook page.
You can pick up the Secdef sprue, and the rest of the Maelstrom's Edge miniature range, from the webstore here.
For other Maelstrom's Edge modeling articles, including tutorials and walkthroughs of a wide range of different building and miniature projects, check out the article roundup here.