Entries tagged [modeling]
Terrain Spotlight: Tissue Box Building
Posted on Friday Jun 19, 2020 at 05:00pm in Tutorials
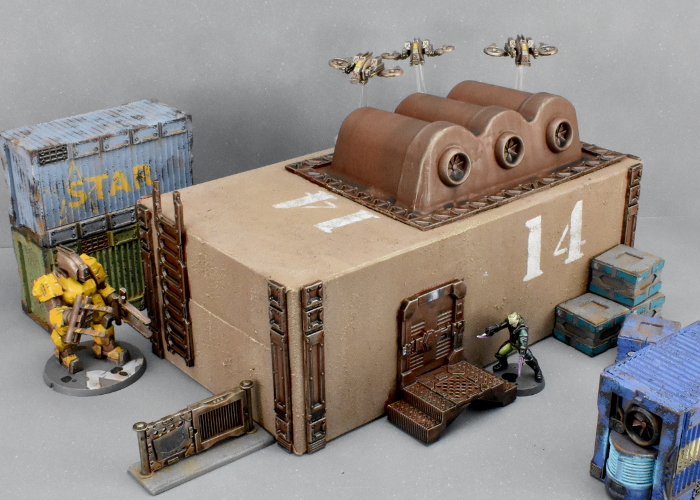
The big joy of the Maelstrom's Edge terrain sprue, for me, is that wandering around the house turns up an endless wealth of items just waiting to be turned into wargaming scenery by slapping some bits on it and painting it up. This week, I turned my attention to the recycling bin, where a humble tissue box was just calling out to be saved from the weekly rubbish collection. With a little cutting and gluing, and a lick of paint, I had Atmospheric Modification Plant #14 ready for the table!
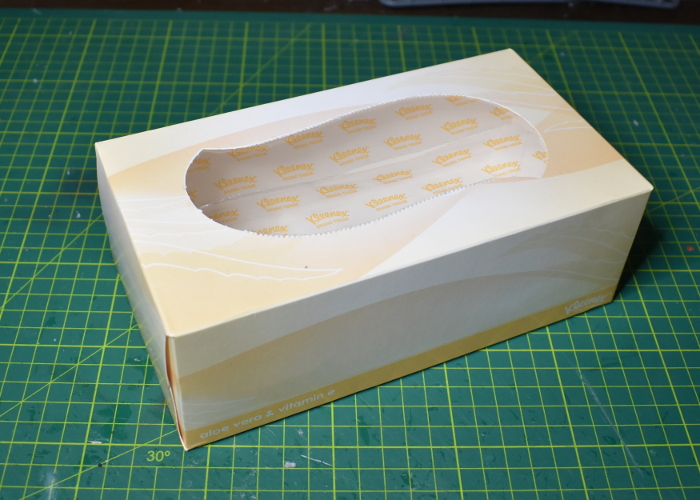
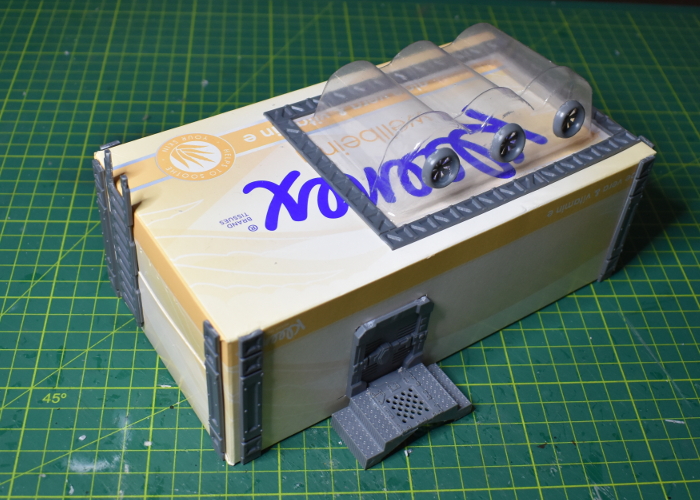
The base for this building, as mentioned above, was an empty tissue box. This isn't as robust a structure as some of my builds, but it does have the benefit of being inexpensive and with two small children in the house we have an endless supply of these to hand!
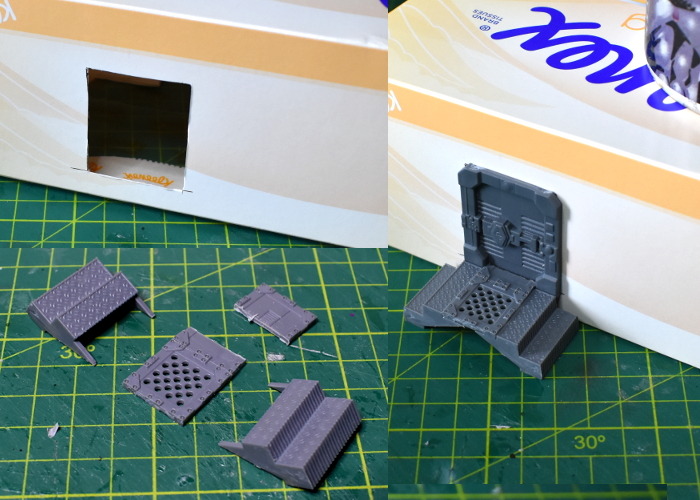
As I just intended this to be a quick and easy build, I didn't get too carried away with detailing. To be a functional building, however, it obviously needed a door. I used a door from Terrain Sprue #1 for this one, as the height of the doors on that sprue fit the box sides better than those on the newer sprue. I cut a hole for the door frame using an exacto knife, and also built a small landing using a couple of stair pieces and floor grates from Terrain Sprue #2, with a little trimming to make the solid floor piece fit neatly into the bottom of the doorway.
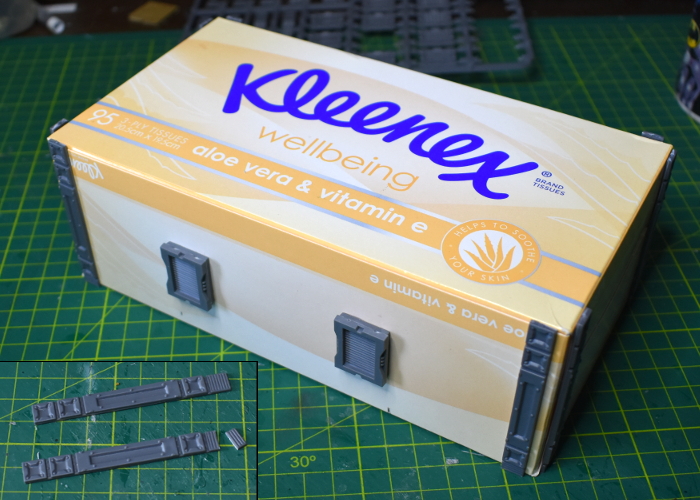
I added some reinforcing struts from Terrain Sprue #1 on the walls of the building, setting them in slightly from the corners. As well as adding some visual detail, this served to conceal the sides of the box flaps on the ends. The original sprue's struts were perfect for this as the vent pieces on the end could be easily trimmed down to make the strut the right height.
Spaced along the rear wall, I also added a pair of vent windows from Terrain Sprue #2. To avoid weakening the box structure any more than absolutely necessary, I just glued the windows directly onto the wall, rather than cutting holes and insetting the frames.
Plain box-shaped buildings are easy to build, but can be a little boring on the table, so I decided to add some raised detail on the roof to break it up a bit. Rummaging on my desk, I found a blister packet from some tubs of glitter that I picked up for a different project, that seemed like it would be an interesing shape with some paint on. So I glued it to the roof, added some industrial reinforcing struts from Terrain Sprue #1 around it to conceal the edges of the plastic, and also glued on some exhaust fans from Terrain Sprue #2.
Having cover on the roof is obviously not much use if models can't get up there, so I also added a ladder from sprue #1 on the end wall. I trimmed top couple of rungs off to make an extended handrail above the roof surface, to make that clamber onto the roof a little easier.
I could have also added some corrugated cardboard or textured plasticard to the remaining roof surface, but chose not to for this build. Instead, I painted the cardboard parts with some textured brown paint, drybrushing with a little bone. The metal parts were painted dark brown, drybrushed with Citadel Boltgun metal and then washed with Army Painter Strong Tone. With a little final detail work, the building looked like this:
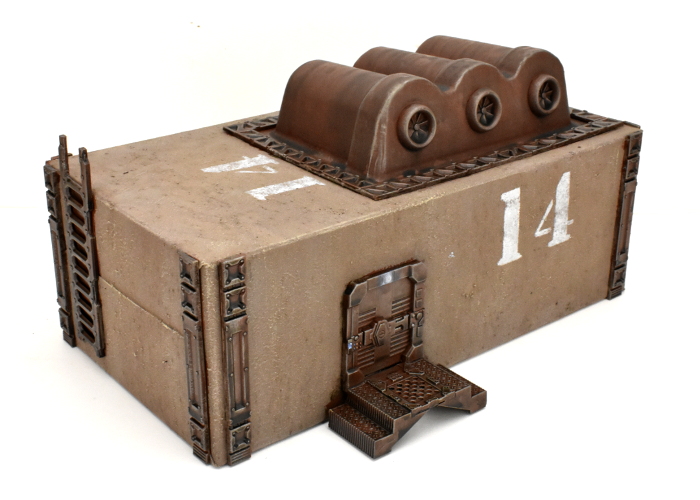
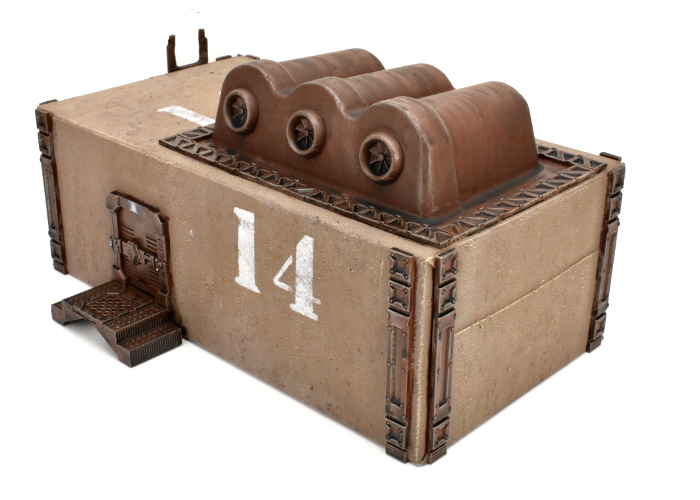
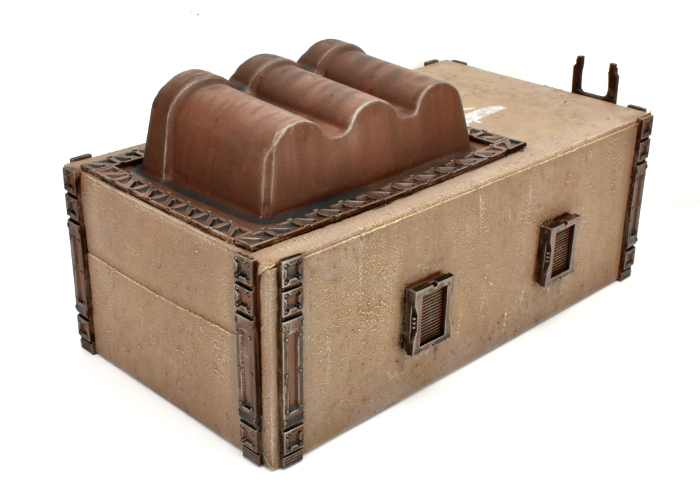
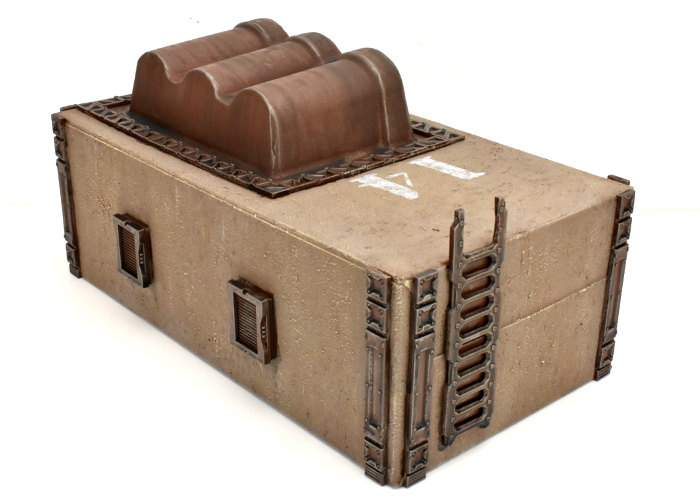
To build your own tissuebox building, you can pick up the terrain sprues along with the rest of the Maelstrom's Edge model range from the webstore here.
For other building ideas, modeling tutorials, army spotlights and conversion walkthroughs, check out the Hobby section of the Maelstrom's Edge website here.
What are you working on? We would love to see what your models and terrain in the Comm Guild Facebook group!
Tags: buildings modeling spotlight terrain terrainsprue walkthrough
Hobby Basics: Miniature Materials
Posted on Thursday Jun 11, 2020 at 05:00pm in Tutorials
I'm going back to basics this week! Bunging together structures from assorted odd and ends, and showcasing conversions is all well and good, but for those just getting into the hobby it can all be a lot to take in. So I'm launching a series of articles on the Maelstrom's Edge website aimed at beginners, covering a range of basic modeling and painting related topics. This week, I'm breaking down the different materials commonly used for making wargaming miniatures, and the differences between them. You can find the article here!
Stay tuned for more!
Modeling Spotlight: Rodent Ball Spaceship!
Posted on Thursday May 28, 2020 at 05:00pm in Tutorials
The Kaiser Industries OR-8 'Gaterunner' was originally designed as a small freighter. Sales were initially poor due to its limited cargo space compared to other ships in its class, combined with a lack of artificial gravity and other 'non-essential' crew-comfort systems in the interests of keeping the ship's mass as low as possible. Despite its ungainly appearance, the OR-8's speed and manoeuverability were excellent, however, resulting in the ship becoming popular with short-ranged couriers who used them primarily for 1- or 2-gate hops between systems. With the coming of the Maelstrom, many of these couriers were pressed into service as evacuation craft, with their non-pressurised cargo holds retrofitted to accomodate sleeper capsules.
This was a project spawned by a rodent ball habitat dome idea shared by Patrick Keith a while back on the Counterblast Facebook group. I had originally intended to do something similar, but when I received my ball it turned out to be a little smaller than I had pictured. While I was figuring out whether or not I needed another small hab dome alongside my salad bowl domes, I decided that the markings on the ball made for nice detailing for a cool ship design. And so the OR-8 was born!
As mentioned above, this all started with a plastic ball for exercising pet rodents.
I started out by giving the outside of the ball a light sand with fine sandpaper. This breaks the shiny outer surface of the hard plastic, giving glue and paint a better surface to which they can stick.
Next up, I sprayed the inside of the ball with a grey primer. This doesn't have to be a flawless coat, as it won't really ever been seen - it just provides a grey surface instead of a clear one, so if the paint on the outside gets scratched over time, things don't start to look a bit weird. Once this paint was dry, I also stuck strips of duct tape on the inside to cover over the vertical airhole strips.
From there, it was time to start detailing. I used some parts from the Maelstrom's Edge terrain sprues and a little plastic tubing to construct three telescoping legs, which I glued onto the ball just above the access hole. I also cut the top strip off a door and used a few more parts from terrain sprue #2, positioned above and below two of the longer airhole strips to make a closed access ramp.
Rather than trying to cut multiple holes in the ball for the trapezoid windows that would form the forward viewports on the ship, I decided to shape the windows to fit flush on the curved surface. I did this by laying a piece of sandpaper on the ball, and sanding the back of the window down to the height I wanted. This nicely replicated the curve of the ball onto the window. A piece of reinforcing strut from terrain sprue #1 served as a handy, bendable guide to mark out consistent spacing for the windows above the tops of the airholes.
I then carefully glued the windows in place, and added a round porthole from terrain sprue #2 in the middle.
Into the middle of the porthole, I built an antenna array using various pieces scavenged from the bits box.
For each of the engines, I took a pair of generators, a pair of iris doors, a fan and a weapon mount base from terrain sprue #2, and a large pipe fitting from terrain sprue #1. On the generators, I cut out the bottom to allow them to sit flat inside the iris door once glued back-to-back, and then sanded down the top surface to create a flat area for the pipe fitting to attach.
The weapon mounts have a naturally concave back surface, which sat quite neatly on the sides of the ball.
Finally, I glued the engines onto the weapon mounts, adding a pin of aluminium rod to help hold them in place securely.
With some paint on, the OR-8 was ready to fly!
To build your own orb ship of sphericalness, you can pick up the terrain sprues along with the rest of the Maelstrom's Edge model range from the webstore here.
What are you working on? We would love to see what your models and terrain in the Comm Guild Facebook group!
For other Maelstrom's Edge modeling articles, including tutorials and walkthroughs of a wide range of different building and miniature projects, check out the Hobby section of the Maelstrom's Edge website here.
Painting Spotlight: Escape Pod Diorama
Posted on Thursday May 21, 2020 at 05:00pm in Tutorials
There are a lot of examples out there in internet land of huge, sprawling, super-detailed dioramas that you can pore over for hours and dream of one day having the time (or the storage space!) to make something like that yourself... This is not one of those. Dioramas can also be just a quick, simple exercise in putting together something different to whatever else you're currently working on. I love putting together armies, but sometimes I just want to do something unrelated, or I'll have a little flash of inspiration for a mini scene, and letting that out and building whatever it leads to is a great way of flexing those creative 'muscles'.
That's sort of what happened here. When I put together my kitbashed escape pod a couple of weeks ago, I had the idea to throw together part of a launching bay for it, just to give it something to hang from for the photos. I hadn't originally even intended to paint this, but looking at it sitting on the table afterwards, I decided that it would make for a cute little mini-diorama. So, I broke out a few extra parts, slapped on some paint, and this was the end result:
To get started, I had to snap the escape pod off the hanging struts, as it had been glued in place to photograph it for the previous article. Luckily, I had used superglue here, and it snapped away cleanly without breaking anything. I then finished detailing around the door by adding a thin strip of foamed PVC into the gap between the door and the floor grating, and fleshing out the sides of the doorway with some more PVC and a couple of strut pieces from the terrain sprue to widen it out to match the floor.
A lot of my terrain tends to be rather worn and dirty-looking. I wanted this piece to be old and worn, but not as dirty, simulating a ship or station interior rather than a planet-based facility. To that end, I began painting with a base coat of Army Painter Wolf Grey spray, following by a downwards spray of white. This is sometimes called 'zenithal painting', and is used to allow the spray to natural add highlights and shading as the second spray catches raised areas while leaving the darker basecoat in the crevasses and undersides of detail pieces.
I used Citadel Boltgun Metal to pick out some exposed metal pieces, which I then washed with a layer of Army Painter Strong Tone. On the middle strip on the door, I applied a a coat of Vallejo Heavy Brown and then a couple of layers of Army Painter Pure Red. This was a little messy around the edges, due to the difficulty of painting around the protruding floor piece, so I had to clean up around the edges of the red with a little more grey and white.
At this point, it was time for detailing. I printed up a small sign for the middle of the door and stuck it in place with some PVA glue. On the upper edges of the red door strip, I added a highlight with some old Citadel Titillating Pink, and then applied some sponge weathering over the white and red areas with Army Painter Heavy Charcoal. I went back over the red on the door with some more pink to highlight the edges of the weathering, and blacklined around the white parts with a finepoint black pen to help pick out the details.
My initial intention was to have the floor painted the same as the walls, to accentuate that cleaner spaceship look, but in practice it just killed the detail on the floor grating and made the whole think look a bit bland. So I went back over the floor with some Army Painter Dark Tone, and then gave it a light drybrush with white.
While I wasn't intending to cram a whole heap of docking bay detail into this little diorama, I did want something other than the escape pod in there. I decided to throw in a service robot, assembled from most of an Epirian Scarecrow, with clamp-hands taken from the Master Handler kit and a head made from a trimmed down Firefly Drone turbine, with an eye lens cut from one of the Scarecrow heads.
The robot was painted with a spray of Army Painter Plate Metal, then a wash of Strong Tone. Over that, I gave it a light drybrush with some more Plate Metal, and then picked out some red bits using the same steps as the red on the door. Finally, I painted in the blue eye lens using some Vallejo Electric Blue, black and white. (You can find a handy tutorial on painting lenses here!)
The final detail before assembling everything was to print out a picture of the Maelstrom, to glue in behind the door to provide a nice view out the windows. I played around with various orientations of this for a bit to find what looked best, and then trimmed it to fit behind the door and glued it into place with some superglue. With the robot and pod glued in position, the diorama was done!
To build your own escape pod, you can pick up the terrain sprues, along with the rest of the Maelstrom's Edge model range from the webstore here.
What are you working on? We would love to see what your models and terrain in the Comm Guild Facebook group!
For other Maelstrom's Edge modeling articles, including tutorials and walkthroughs of a wide range of different building and miniature projects, check out the Hobby section of the Maelstrom's Edge website here.
Tags: diorama modeling painting spotlight terrain terrainsprue
Terrain Sprue Kitbash: Escape Pod
Posted on Friday May 08, 2020 at 02:11am in Tutorials
It probably won't surprise anyone who has been following my articles for any length of time that I spend a lot of time looking at sprues and figuring out different ways to fit parts together in new and interesting ways. This week, the power generators on Terrain Sprue #2 caught my eye, and I decided it was time to get away from it all, with a compact escape pod!
The main hull of the pod was built from two generators, and two reinforcing struts split into two and three segment pieces.
I glued the longer strut pieces, detail-side in, along the long edges of the back of the generator, and then trimmed the short pieces to fit neatly along the short edges, before fitting the second generator onto the other side.
For the jet nozzle on the rear of the pod, I used two large pipe fittings from Terrain Sprue #1, glued back-to-back. The inside piece needed some slight trimming on the flat edges to fit neatly between the protruding ends of the struts.
The viewport on the front of the pod was built from more parts from Terrain Sprue #2: a light, a round window and the base of the weapon mount with the sliderail trimmed down.
As a final step, I added some extra detail over the flat strut backs, using the energy fence posts from Terrain Sprue #1 with the bases cut off. For the bottom of the pod, I clipped off the energy projectors and sanded the post face down flat, gluing it with the back of the of the post facing out. On the top, I wanted a couple of clamps to hang the pod with, so I cut the top and bottom energy projector segments off the post, and then just trimmed, sanded and flipped the middle section.
That just left painting. I used a basecoat of Army Painter Necrotic Flesh, and then a wash of Citadel Iyanden Yellow Contrast, followed with a sponge of Vallejo Heavy Charcoal to weather it. For the metal sections, I used Citadel Boltgun Metal with a wash of Army Painter Strong Tone, followed by a light drybrush of Army Painter Shining Silver, and AK Interactive Pure Black over the jet exhaust. The viewport was painted with a mix of Army Painter Matt White, Ice Storm and Ultramarine Blue, and the lights on the rear panels with white, Army Painter Pure Red and AK Pure Black.
To build your own escape pod, you can pick up the terrain sprues, along with the rest of the Maelstrom's Edge model range from the webstore here.
What are you working on? We would love to see what your models and terrain in the Comm Guild Facebook group!
For other Maelstrom's Edge modeling articles, including tutorials and walkthroughs of a wide range of different building and miniature projects, check out the Hobby section of the Maelstrom's Edge website here.
Tags: conversion kitbash modeling spotlight terrain terrainsprue tutorial walkthrough
Modeling Spotlight: Epirian Aurochs Automated Transport Kitbash
Posted on Thursday Apr 23, 2020 at 05:00pm in Tutorials
Time to build something!
This week, I had a tinker with the Mule, from Mantic's Warpath game. I love the styling of this vehicle, and thought it would fit nicely into an Epirian force for Maelstrom's Edge with just a few minor tweaks. This was the end result:
The front end of the Mule is rather evocative of the torso of the Epirian Hunter Mech. This inspired me to turn the mule in to a bot-driven vehicle, rather than just another standard transport vehicle. My thinking is that this would be a general purpose vehicle, under the control of a bot handler, which could be used a cargo or troop transport, routine patrols or crowd control tasks.
To carry across the visual link to the Hunter, I took a Hunter torso and cut away the head piece from the top. On the Mule cab, I trimmed the hatch off the roof, and glued the Hunter head in place on the front of the roof.
The Mule comes with two different weapons, that slot into a socket on the back edge of the roof. I took one of these, sliced it off just in front of the mount, and attached a clingfire sprayer from the Epirian Scarecrow kit.
To give some potential variety, I took the second weapon, cut off the barrel and glued on the barrel from the Hunter's chaingun. The rest of the Mule was assembled as normal. I considered filling in or covering the windows and windscreen, but they're actually not super-well defined in the rather soft plastic used for this kit, so I figured with everything painted up they would just look like recessed detail panels.
Well, almost as normal. Just before painting, I decided to also add some cluster missiles. These were taken from the Hunter kit as well, with the mounting pegs cut off, and glued directly to the sides of the cab.
The assembled vehicle before painting:
To paint, I used the weathered metal process from my tutorial here.
And with final details in place, the Epirian 'Aurochs' automated transport vehicle is ready to go!
You can pick up the various Epirian robots, along with the rest of the Maelstrom's Edge model range from the webstore here.
What are you working on? We would love to see what your models and terrain in the Comm Guild Facebook group!
For other Maelstrom's Edge modeling articles, including tutorials and walkthroughs of a wide range of different building and miniature projects, check out the Hobby section of the Maelstrom's Edge website here.
Modeling Spotlight: Biker Bot Handler Conversion
Posted on Thursday Mar 26, 2020 at 05:00pm in Tutorials
Some time ago, I put together a biker conversion for a Bot Handler Spotlight article, which has been sitting in the cabinet ever since, staring at me accusingly when I walk past. Unable to take the abuse any longer, I decided the time had come to get some paint on him, and this was the result:
The model was put together from an Epirian Bot Handler, the chassis from an Epirian Drone, and most of a Citadel Space Marine bike from Warhammer 40000. I carved out the inside of the handler's legs and bent them outwards to fit around the bike seat.
To paint, I started out with a basecoat of Army Painter Wolf Grey spray.
I then blocked in the main colours - P3 Pig Iron for the metal parts, Vallejo Stormy Blue for the bike panels and Handler's uniform, and Vallejo Heavy Charcoal for everything else.
Next, I painted a generous layer of Army Painter Dark Tone over the top of everything, and put it aside to dry.
For final detailing, I highlighted the blue using a mix of Army Painter Ultramarine Blue and white. Over the black, I added a highlight of Vallejo Light Grey, and Army Painter Shining Silver finished off the metal parts. To brighten things up a little, I added some gold using Coat D'Arms Bright Gold washed with Army Painter Medium Brown. For the face, I painted on a coat of Army Painter Barbarian Flesh with some more MEdium Brown, and finally added the red parts with Army Painter Pure Red, shaded with black and highlighted with white.
And that's one biker bot handler, ready to cruise the backroads of the Edge!
You can pick up the Epirian Bot Handler, along with the rest of the Maelstrom's Edge model range from the webstore here.
As always, feel free to share your models and terrain, or ask any Maelstrom's Edge- or hobby-related questions on the Comm Guild Facebook page!
For other Maelstrom's Edge modeling articles, including tutorials and walkthroughs of a wide range of different building and miniature projects, check out the Hobby section of the Maelstrom's Edge website here.
Tags: conversion epirian modeling painting spotlight walkthough
Model Spotlight: Remnant Nimbus Suits.
Posted on Thursday Mar 19, 2020 at 05:00pm in Tutorials
This week, I'm taking a break from terrain and having a closer look at the fantastic resin kit for the Nimbus battlesuit for the Artarian Remnant!
A smaller suit than the more common Militus, the Nimbus comes in a few less pieces as a result of being resin rather than plastic. The kit includes options for both the Longshot's sniper rifle, and the Pathfinder's Incursion Blaster and pinpoint scanner, as well as the thermal tracker and hologram projector for the shoulders and a cloak generator backpack.
While there is only a single head includedin the kit, the neck joint is the same size as on the Militus. This allows you to use plastic heads in place of the regular Nimbus head.
While they may not fit as neatly without some tweaking, you can also borrow heads from other factions for a bare head option. The model below has the head from a Karist heavy weapon trooper kit.
For faster-moving Nimbus variants, you can use a boostpack from the Militus kit. If you're building a boostpacking Pathfinder, be sure to glue the boostpack in place before the weapon arm, as the back of the blaster overlaps the bottom of the boostpack.
Alternatively, you can make a removable boostpack by trimming off the triangular pieces on the bottom, and then sitting it in place with a little bluetack.
Including multiple shoulder pads would have made the kit a little too fiddly, so the pads were sculpted with the venting systems in place. If you're using any other shoulder mounted equipment, it just glues over the top of the vents, but if you not, and if you don't want the vents either, they can be easily covered over with a little putty. Just push the putty in place in the vent and smooth it down flush with the flat of a knife. If necessary, let it set and then give it a little sand to finish flattening it out.
The arms mount at the shoulders with square locator pegs. These are there to make it easier to get the sniper rifle arms to fit together. You can reposition the arms by just slicing off the peg, so that the inside of the shoulder is flat, and then gluing it on however suits you.
For some more extreme repositioning, resin is easy to cut through with a sharp knife or razor saw, and then reattach with superglue.
What have you done with your Remnant suits? We would love to see them on the Comm Guild Facebook page!
You can pick up the Nimbus suit, along with the rest of the Maelstrom's Edge model range from the webstore here.
For other Maelstrom's Edge modeling articles, including tutorials and walkthroughs of a wide range of different building and miniature projects, check out the Hobby section of the Maelstrom's Edge website here.
Tags: conversion modeling nimbus remnant spotlight
Terrain Spotlight: Crystal Outcrops!
Posted on Friday Mar 13, 2020 at 05:00pm in Tutorials
I recently picked up the fantastic Xenos Jungle terrain mat from Deep Cut Studio, as I really loved the unusual colouring. It shows an alien world covered in rocks, sinister looking ground mist or liquid, some yellowy-green plants, and large, shiny outcrops of purple crystals, and I was instantly in love when I saw it. The only problem with it was that I didn't have any suitable terrain to go with it, so I set out this week to rectify that problem, creating some crystal-encrusted rocky outcrops!
There are a large range of different ways to make crystals, or facsimiles thereof, for the table, but I decided to go the easiest route and just use something that already looked the part. After scouring the internet for a while, I found some acrylic 'ice crystals' on Amazon that looked like they would fit the bill. I wound up buying three packets from three different sellers, due to some unexpected one-per-customer rules on them, which netted me three packets of purple crystals that, while identical in shape, were all slightly different shades of purple. As this just winds up with a more natural overall effect, I couldn't have planned it better if I had tried!
As the crystals were all the same size, I glued some together using an all-plastics glue, and took some others and belted them with a hammer to break them down into smaller pieces (Wear eye protection if you want to try this!)
For the bulk of the outcrops, I decided to use expanded polystyrene, as it's quick and easy to cut to shape. I used an old kitchen knife to roughly cut the polystyrene to the shape I wanted, and then used small spots of PVA glue to glue it down to a piece of 3mm foamed PVC to give it a solid base. Using small amounts of PVA rather than covering the whole piece helps to avoid the base warping when the glue druies.
To cover the polystyrene, the common choice would be filling plaster. I'm not a fan of this, hoever, as it chips easily, so I decided to try something experimental. I ran a bunch of old cardboard boxes through a cross-cut paper shredder, to make a nice pile of tiny cardboard pieces.
I soaked the cardboard in water overnight in the hope of softening it up a bit, and then drained and squeezed out as much water as I could, before mixing it into a slurry with PVA glue, some cheap, black, acrylic paint and a little plaster to bind it all together. Then, I slopped the resultant mess over the polystyrene, smoothing it down as much as possible.
While the cardboard mess was wet, I took crystals and applied clear craft glue to the bottoms. These were then pushed them into the wet surface, so that they would be partially submerged. I then left it overnight for everything to set.
The cardboard slurry dried with a fairly obvious, rectangular texture, which was going to look a bit odd for a natural outcrop, so I painted over the whole thing with a generous layer of PVA glue and sprinkled a coarse sand mixture over it, leaving this to set.
After shaking off the excess sand the next day, I gave the rock surface a coat of black paint.
My intention was to drybrush it grey, to try to match the rock on the mat, but my test piece wound up far too dark and grey looking, so I wound up going back over it with a rough coat of a sandy brown craft paint.
Over this, I applied a generous layer of Army Painter Strong Tone.
When the wash had dried, I set to work with some Coat D'Arms Bone and Bilious Green, and some Vallejo Light Grey, drybrushing all over the rock. The colours don't show up well in the pic here, but the aim was to replicate somewhat the different tones found on the different areas of the mat, so that the terrain wouldn't look out of place wherever it was positioned. I finished up with a final highlight of white to tie everything together, and then added a purple blush around the crystals. This was again matching the style of the mat, and also hopefully adding some more colour under the small crystal pieces I was intending to add at the end.
Finally, I dabbed some more PVA glue around the crystal outcrops and sprinkled on some of the small crystal gravel that resulted from my earlier hammering efforts. I also added some statuic grass and some plants cut from plastic home-decorating sheets to break up some of the boring rock bits.
With a few bits together on the mat, it wound up looking like this:
It's not a perfect match for the terrain on the mat, but it's close enough to work! The next step will be to finish off the rest of the outcrops and a building that I have in progress (as soon as I finish panic-buying some more Strong Tone!), and then work up some sort of 'forest' bases to flesh out a full table.
Stay tuned for more!
In the meantime, you can pick up the Maelstrom's Edge terrain sprues, along with the rest of the Maelstrom's Edge range, from the webstore here.
As always, feel free to share your models and terrain, or ask any Maelstrom's Edge- or hobby-related questions on the Comm Guild Facebook page!
For other Maelstrom's Edge modeling articles, including tutorials and walkthroughs of a wide range of different building and miniature projects, check out the Hobby section of the Maelstrom's Edge website here.
Tags: modeling painting spotlight terrain tutorial walkthrough
Modeling Tutorial: Simple Marble Bases
Posted on Thursday Mar 05, 2020 at 05:00pm in Tutorials
While painted sand is quick and easy for finishing off your miniature bases, sometimes it's nice to go with something a little more unusual to set your force apart. This week, I'm sharing a handy tutorial for creating super-simple marble bases, with no painting required!
The marble texture comes from adhesive vinyl. This can be bought by the roll in a huge range of different patterns and colours, so you can find something to suit whatever colours you are painting your army.
The vinyl is made to stick to a wide range of different surfaces, and so you can just peel off the backing and stick it directly to the base. Over time, however, the adhesive around the edges can sometimes dry out, causing the edges of the vinyl to peel up. To avoid this, apply a thin circle of superglue around the perimeter of the base top.
Cut a piece of vinyl slightly larger then the base, and then peel off the backing paper from the vinyl, and press the base into place on the sticky side.
Remove the excess vinyl by cutting carefully around the edge of the base with a sharp knife.
If the cut vinyl winds up a little rough, you can smooth it out by sanding lightly around the edge with a fine grade sandpaper.
Finally, attach your model using superglue.
The final model, ready for the table. If you prefer a less clean look, you can also glue some gravel or other rubble on top of the vinyl, or drybrush on some brown to dirty things up a bit.
That's it for this week. Tune in next week for more modeling-related shenanigans!
You can pick up the Maelstrom's Edge model range from the webstore here.
As always, feel free to share your models and terrain, or ask any Maelstrom's Edge- or hobby-related questions on the Comm Guild Facebook page!
For other Maelstrom's Edge modeling articles, including tutorials and walkthroughs of a wide range of different building and miniature projects, check out the Hobby section of the Maelstrom's Edge website here.
Tags: bases modeling painting tutorial walkthrough
Modeling Spotlight: Adding Arc Markers to 3rd Party bases.
Posted on Thursday Feb 20, 2020 at 05:00pm in Tutorials
Someone on the DakkaDakka forums recently asked how they could go about adding arc markings to non-Maelstrom's Edge bases, for miniatures that they're using from other ranges. This prompted me to exclaim, "How have I not made an article about that yet?!?"
So this week, while I'm finishing off my last underhive building, I thought I would put that article together - and here it is!
In Maelstrom's Edge, certain things have a different effect when a unit is approached from the front or the rear. To facilitate these rules, our bases have markers on the sides, breaking the base into a front and rear arc. If you're using different bases for your models, you can make do without them by using the model's shoulders or face as a reference, but it can be a lot easier to have that visual reference on the base.
There are a couple of different ways to go about this, but in either case the first step is to find the middle line of the base. I've found the easiest way to do that is to use a gridded cutting mat. Sit the base neatly in between the gridlines - Depending on the size of the base, it obviously won't always run from line to line. 25mm bases, for example, would just be centered with 2.5mm either side. Eyeballing this is usually accurate enough, but you can always measure it, or use a piece of 1mm gridded graph paper instead of the cutting mat if you prefer more precision.
When you have the base lined up, count in halfway on the grid, and use a pencil to make a mark on either side.
For 30mm bases, or other 'odd number' sizes, where the middle point would fall halfway between the grid lines, you might find it easier to mark on the diagonal rather than estimating halfway along the grid.
Once you have your marks, the quickest and easiest way to finish up is to draw or paint a solid line over the marks. For some extra razzle-dazzle, you can add the illusion of a cut-in by highlighting down either side.
If you would prefer to have cut-ins on the bases to match the normal Maelstrom's Edge bases, you can use a small file to etch the line into the side of the base. Try to keep the file perpendicular to the base's top surface, and stop just before you cut right through the base edge.
Do this on both sides, and you wind up with something like this:
Note that if you do accidentally file through the inner wall of the base edge, you can stick a small strip of plastic or paper over the inside of the gap to close it over again.
With some paint on, the filed divot gives you an etched arc marker that looks right at home alongside your regular Maelstrom's Edge bases!
That's it for this week. Stay tuned next week for the completion of my first batch of underhive buildings!
Pick up the Maelstrom's Edge model range from the webstore here.
As always, feel free to share your models and terrain, or ask any Maelstrom's Edge- or hobby-related questions on the Comm Guild Facebook page!
For other Maelstrom's Edge modeling articles, including tutorials and walkthroughs of a wide range of different building and miniature projects, check out the Hobby section of the Maelstrom's Edge website here.
Modeling Spotlight: The 2019 Annual Christmas Special!
Posted on Thursday Dec 19, 2019 at 05:00pm in Tutorials
With Christmas fast approaching, I took a break this week from my ongoing underhive building project to put together my now traditional, annual Christmas ornament build. In previous years, I've built a bauble and a hanging star, and so this time around I thought I'd try something a little different, and build a robot reindeer!
This construct used most of an Epirian Scarecrow, including both head pieces, and the lower legs and feet from a second.
I trimmed the toes off the feet to give them a stubbier look. I wasn't aiming for a direct representation of a reindeer here, just something that gave the general impression.
The torso, oriented horizontally, needed a suitably bulky neck to mount the head on, so I trimmed the tank mounting ridge off the Sacrecrow's back and glued both heads on as below.
I then assembled the legs. For the forelegs, I used the Scarecrow's upper arms, and attached the knee disks from the second set of shin pieces onto the insides of the elbow disks. I also drilled a 1mm hole in the back of the torso and glued in a piece of wire for hanging the ornament.
I then glued the command array onto the new neck for a head, and added a tail cut from the muzzle of a chemtech sprayer.
To paint, I gave it a base spray with Army Painter Plate Metal. I followed this up with a coat of Citadel Iyanden Yellow Contrast paint, and then a layer of Army Painter Light Tone. When this was dry, I finished up with a light drybrush of Vallejo Silver and then painted in the eyes and nose with black and red. I also gave the wire a couple of coats of black, to keep it looking neat.
With that, it was ready to join the previous years' decorations on the tree. It's a little goofy looking, but was a lot of fun to put together!
Merry Christmas from all of the team here at Spiral Arm studios, and have a safe and happy time with whichever celebrations you happen to find yourself a part of at this time of year!
To build your own Scarecrowdeer, you can pick up the Epirian Scarecrow kit, along with the rest of the Maelstrom's Edge range, from the webstore here.
As always, feel free to share your models and terrain, or ask any Maelstrom's Edge- or hobby-related questions on the Comm Guild Facebook page!
For other Maelstrom's Edge modeling articles, including tutorials and walkthroughs of a wide range of different building and miniature projects, check out the Hobby section of the Maelstrom's Edge website here.
Tags: christmas conversion modeling
Conversion Spotlight: Epirian Pathfinders
Posted on Thursday Nov 14, 2019 at 05:00pm in Tutorials
I received a grab bag of all sorts of awesome resin parts from Victoria Miniatures this week, so decided it was time to take a break from terrain building and have a bit of a tinker with some infantry. I had thought a while back that Epirian Contractors were just crying out for shotguns, and so with some handy resin additions, I created a new unit of scouty Contractors, which I'm calling 'Pathfinders'.
There's very little converting required here - I just assembled the Contractors without arms. Although I couldn't resist a little bit of cutting things up, so I gave the squad leader a cap on his belt, by cutting off the top of a spare Contractor head.
Victoria's resin cloaks are designed to slot over the shoulders, and fit snugly around the Contractors' collars. These were glued in place with superglue. The shotgun arms needed just a little trimming at the shoulders to fit neatly, as the Victoria Miniatures torsos are slightly narrower than those of the Contractors.
Painting was a quick and easy 'paint in base colours and then give it a wash' job. It's not the prettiest, but it gets a unit on the table quickly. The green areas were painted with Army Painter Army Green, and Vallejo Yellow Green, and washed with Army Painter Military Shader. The metal parts were base coated with Vallejo Heavy Charcoal, given a light drybrush of P3 Pig Iron and washed with Dark Tone. For the shirt, I used Army Painter Barbarian Flesh, Vallejo Heavy Brown for the leather parts, and Coat D'Arms Bone for the shirt. These were washed with Army Painter Strong Tone - This is a fairly heavy contrast with the bone, so creates a bit of a dirty, muddy look. If you are looking for a softer shading effect, you could use Mid Brown or Soft Tone instead of the Strong Tone.
To finish things up, I highlighted the green areas with Coat D'Arms Putrid Green, gave the skin, shirt and leather a highlight of bone, and painted the eyeshades with Heavy Brown, P3 Cygnus Yellow and some white highlights. The bases were basecoated with AK Red Brown Leather and washed with Army Painter Mid Brown.
To build your own Pathfinder unit, you can pick up the plastic Contractor kit, along with the rest of the Maelstrom's Edge range, from the Maelstrom's Edge webstore.
As always, feel free to share your models and terrain, or ask any Maelstrom's Edge- or hobby-related questions on the Comm Guild Facebook page!
For other Maelstrom's Edge modeling articles, including tutorials and walkthroughs of a wide range of different building and miniature projects, check out the Hobby section of the Maelstrom's Edge website here.
Tags: contractor conversion epirian modeling spotlight walkthrough
Terrain Spotlight: Shipping Containers from Terrain Sprue 2
Posted on Thursday Oct 31, 2019 at 05:00pm in Tutorials
As one of my very first articles for Maelstrom's Edge, I put together some shipping containers/cages made from parts from the first terrain sprue and a little foamcore. With the recent release of the second terrain sprue, it seemed fitting to revisit the idea with the shiny, new parts available!
As with the original containers, I used doors to form the front and back of the container, with the rectangular doorframes from the new terrain sprue being perfect for the job. For the back of the container, I shaved off the control panelt and the gubbins up on top, as I planned to have the back as a wall. You could obviously just leave it alone and have a door at each end.
I linked the two doorframes together with the support struts from the terrain sprue, and glued in a floor cut from 3mm foamed PVC.
Inside the struts, I glued rectangles of 1mm foamed PVC, running up to about 1mm short of the top edge of the upper struts. This gives the container some strength, and provides something solid for the walls to glue onto and a ledge for the roof panel to sit on.
I glued another rectangle of PVC into the rear doorframe.
Onto the outer faces of the walls, I glued rectangles of corrugated cardboard, cut to fit flush against the edges of the doorframe and the struts with the corrugations running vertically. (There's no special significance to it being blue - it's just from a multicoloured pack of card I picked up a while back!)
Into the front doorframe, I added a piece of corrugated plasticard, cut with the corrugations running horizontally to simulate a roller door. Most modern-day shipping containers have hinged double doors, but since this doorframe is a little narrower I thought a roller seemed more appropriate. I used plasticard rather than more cardboard as the corrugations are slightly smaller, which helps to make it not look like just another wall.
With the door in place, I stuck another piece of corrugated cardboard into the top of the container for the roof.
The finished container, ready for paint:
And with some paint on:
To mix up the design, you could use plasticard with different textures in place of the corrugated cardboard.
You can also use other real-world container designs for inspiration, adding side doors, changing the length, or as below, using a trimmed down generator, a fan and a couple of other bits from the terrain sprue in place of the back wall to creat a refrigerated container.
And, of course, the discerning stellargee knows that nothing beats an old shipping container for knocking together your own little shanty cabin or business shack!
To give it a go yourself, you can grab the new terrain sprue, along with the rest of the Maelstrom's Edge range, from the Maelstrom's Edge webstore.
As always, feel free to share your models and terrain, or ask any Maelstrom's Edge- or hobby-related questions on the Comm Guild Facebook page!
For other Maelstrom's Edge modeling articles, including tutorials and walkthroughs of a wide range of different building and miniature projects, check out the Hobby section of the Maelstrom's Edge website here.
Tags: buildings conversion modeling spotlight terrain terrainsprue walkthrough
Conversion Spotlight: Karist Raptor Assault Skimmer Kitbash
Posted on Thursday Oct 24, 2019 at 05:00pm in Tutorials
This week, I'm continuing on my quest to add transport vehicles to all of my Maelstrom's Edge forces, with the probably exception of the Remnant (who really don't need them!). A while back, I shared a kitbashed Karist anti-grav buggy converted from a Games Workshop Genestealer Cult vehicle. This week, I'm revisiting the Karist Enclave to build them a transport vehicle from a Beyond the Gates of Antares skimmer.
The kit that I used was a Freeborn Solar Command Skimmer. This is a hybrid kit with metal and resin bits that go onto a basic plastic skimmer chassis. I went with this variant rather than the basic version because the resin add-ons make the cabin space look a little more practical for carrying troops.
The general styling of the vehicle was pretty much exactly what I wanted, and matches up quite well with the Genestealer buggy aesthetically, so I didn't actually make a lot of changes. I needed to swap out the crew for Karists, and chose to just replace the pilot and putty over the gunner's seat with 'green stuff' putty. The pilot was built using the top half of a plastic Karist trooper, with a head from the resin Karist heavy weapon trooper set.
The main weapons would also be replaced, but I kept the metal launchers for the sides of the cabin, as they'll do well enough to represent Karist grenade launchers.
The main gun on the Antares skimmer is fixed in place in the middle of the nose. I decided that something with a little more free movement was called for, so grabbed a sentry turret from the new Maelstrom's Edge terrain sprue and added a Ravager Pulse Cannon nabbed from the Tempest Elite kit.
The gun turret fit in nicely underneath the front of the skimmer, and with everything else glued in place it wound up looking like this:
I kept the original flight base on there for painting, but then switched it to a spare Games Workshop vehicle base that I had laying around, attaching the skimmer to it with one of the drone flight stems from the Antares kit.
Painting followed the same scheme as my Karist Strike Force, and the later anti-grav vehicle, after which it looked like this:
Stay tuned next week for some trial Transport Vehicle rules, and (unofficial) rules cards for this assault skimmer as well as some Epirian and Broken transport vehicles!
To build your own Raptor, you can pick up the Freeborn Skimmer from Warlord Games, and the new Maelstrom's Edge terrain sprue and other Maelstrom's Edge kits from the Maelstrom's Edge webstore.
As always, feel free to share your models and terrain, or ask any Maelstrom's Edge- or hobby-related questions on the Comm Guild Facebook page!
For other Maelstrom's Edge modeling articles, including tutorials and walkthroughs of a wide range of different building and miniature projects, check out the Hobby section of the Maelstrom's Edge website here.