Search Results for 'terrain'
Entries found for "terrain": 174Showing 1 - 10 of total 174 search results
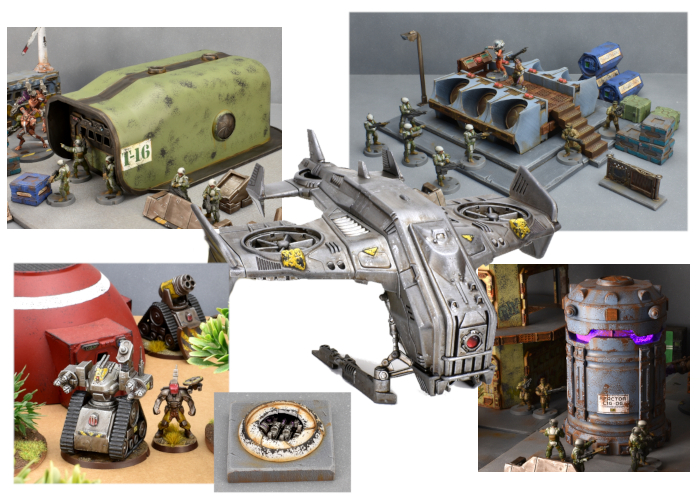
Terrain Kitbash: Sci-Fi Barn
Posted on Monday Sep 20, 2021 at 06:00pm in Tutorials
Time to get some terrain on!
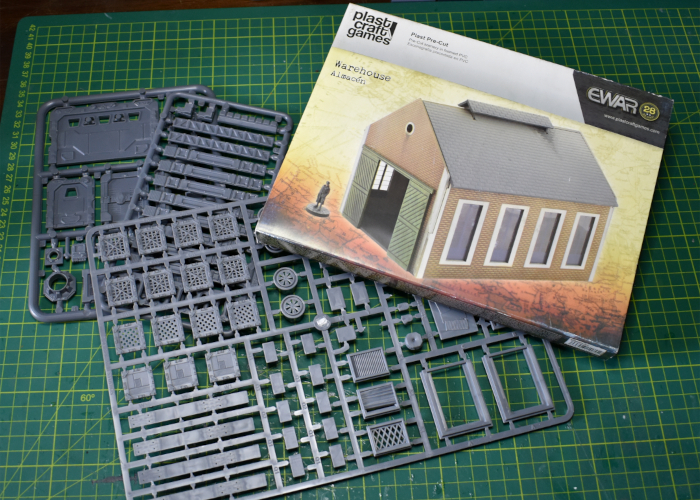
Back in 2017, I put together a sci-fi 'western' gunshop, using the Maelstrom's Edge terrain sprue and a foamed PVC western shop kit from Plast Craft Games. Plast Craft sadly appear to have gone out of business, but I picked up a few building kits on clearance from a local retailer to start fleshing out a themed table. The first (and probably largest) off the rank is an appopriately upgraded barn!
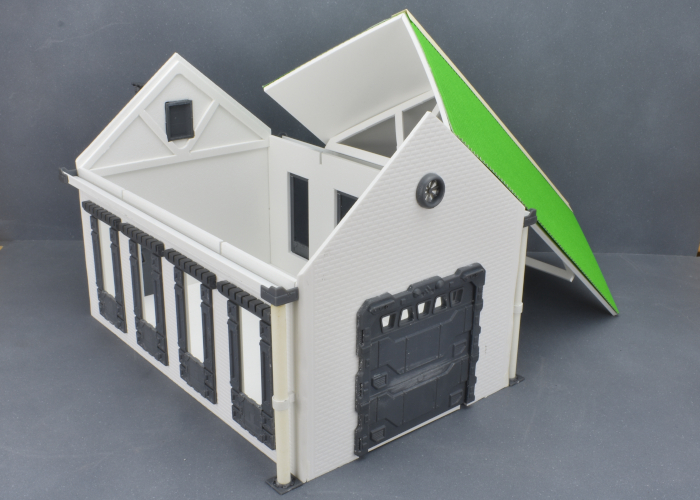
Along with the Maelstrom's Edge terrain sprues, the kit I used for this build is an urban warehouse. If you want to build something similar yourself, while you may not be able to still track down this specific kit, there are other similar buildings available in MDF from other manufacturers, or you could use foamed PVC or foamcore to build your own from scratch.
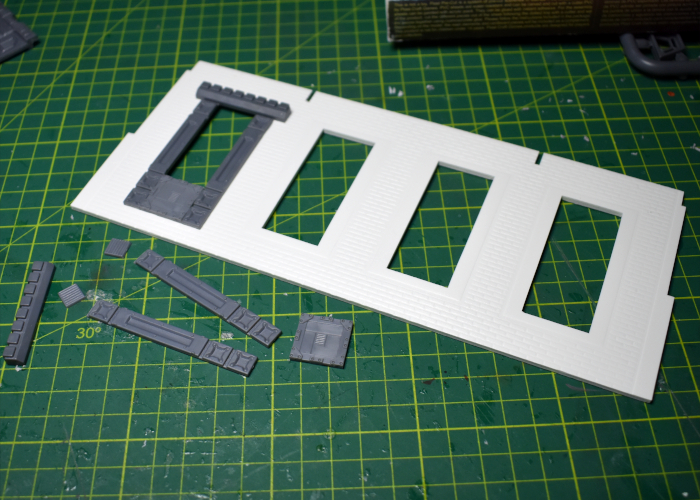
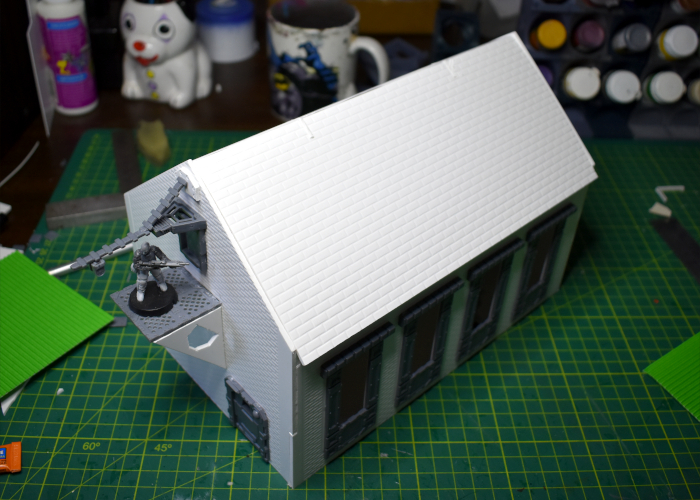
I started out by adding some tech details to the windows, bulking out the frames using support struts and lintel pieces from terrain sprue #1, and floor panels from terrain sprue #2.
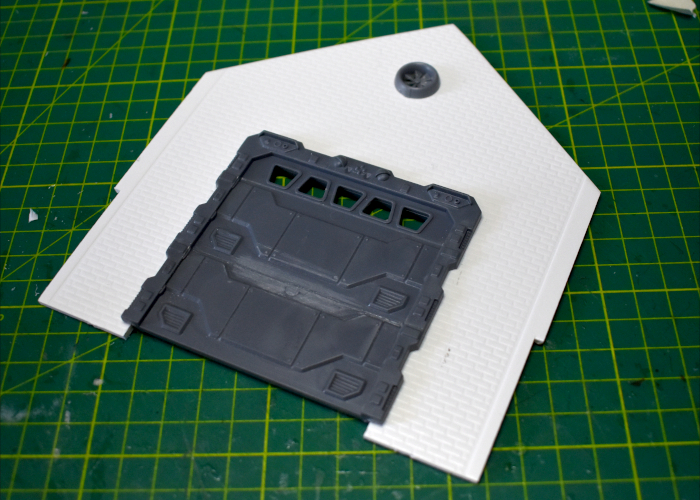
On the front of the building, I replaced the sliding wooden doors with a garage door from terrain sprue #1. To make up the extra height, I cut off the top of a second garage door with a razor saw and glued the two together.
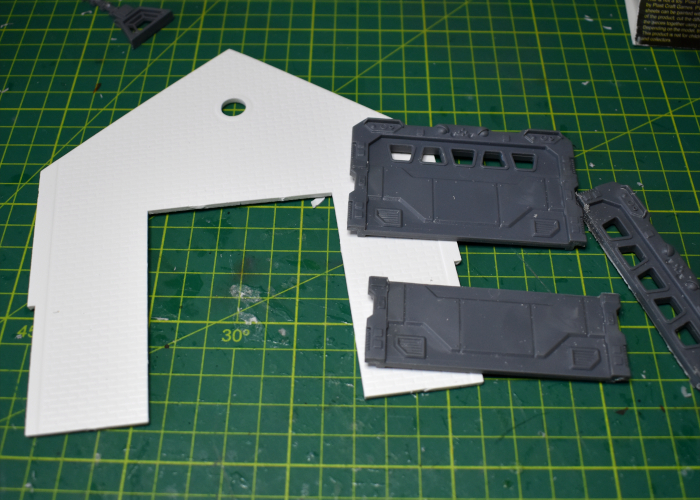
The resultant door was the right height, but too wide, so I also widened the door cavity in the wall with an exacto knife before gluing the door in place. The round window at the top of the wall turned out to be exactly the right size for the exhaust fan from sprue #2..
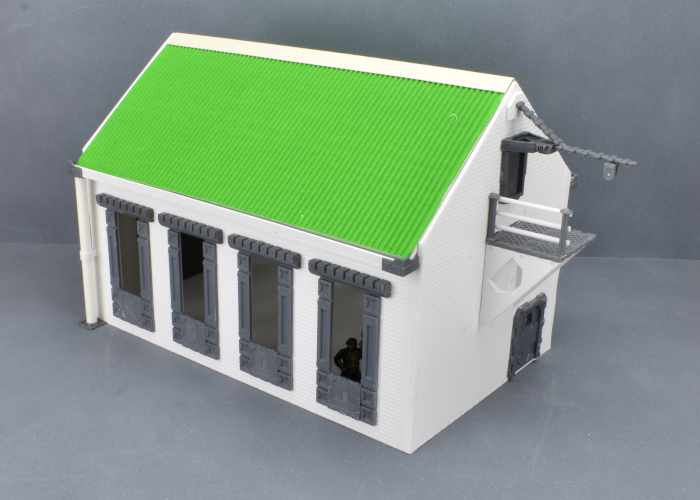
The other end of the building has a smaller door and a rectangular window up high. I enlarged the cavities slightly and glued in a shutter window and door from sprue #1.
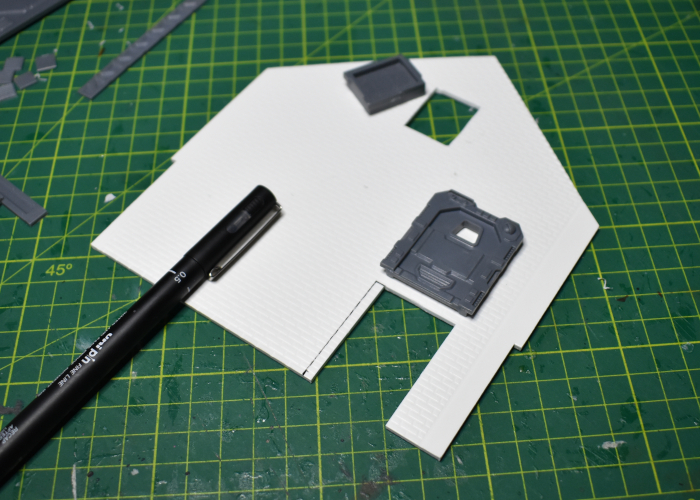
To avoid the building from just winding up looking like a plain box, I built a small platform and crane onto the wall, turning the small window into an access point for small freight. The platform was constructed from sprue #2 floor grates and some scrap pieces from the warehouse kit's roof trusses. The crane used a trapezoid window and a couple of energy fence pieces from sprue #1, the upright supports from the gun unit on sprue #2 and another scrap piece of PVC. I'll need to find some string or fine chain for it to finish up.
At that point, it was time to start slotting everything together.
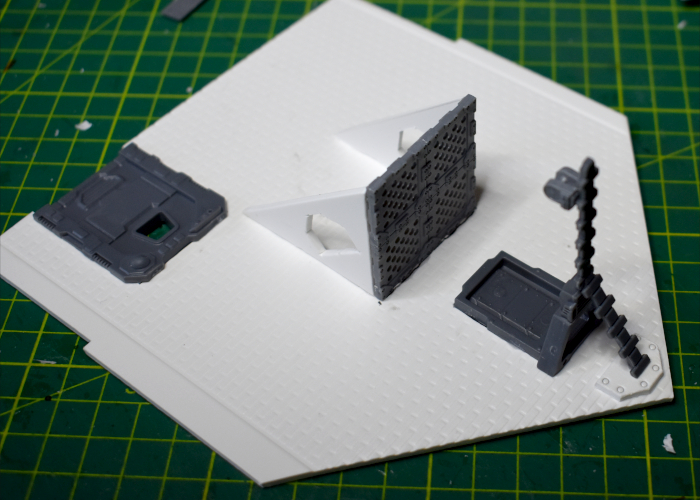
The warehouse kit has a tiled roof, but I wanted to go with corrugated iron instead, for a better contrast from the brick walls. With the top ventilation struts trimmed off, the assembled roof provides a solid base for the iron roof. I've left the middle two roof trusses and the roof itself unglued, so that the roof can be removed and the building interior used during a game.
Over the original roof, I glued two sheets of corrugated cardboard, adding a strip of thin, folded card for the ridge capping. That didn't look quite right as-is, so I decided to also add some rain guttering, using some plasticard and a few more components from terrain sprue #1.
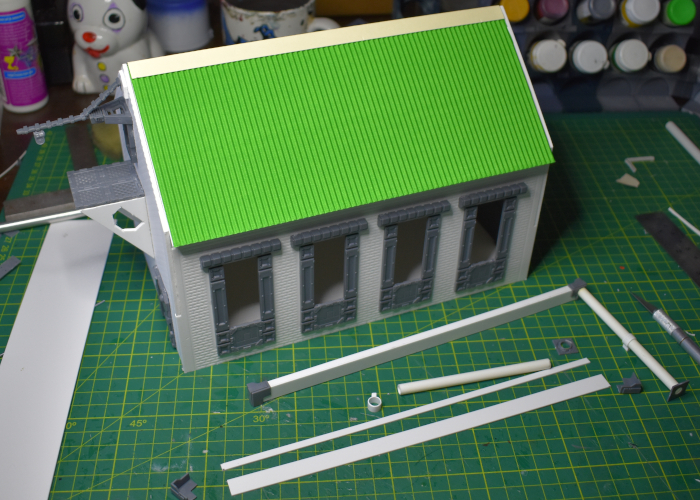
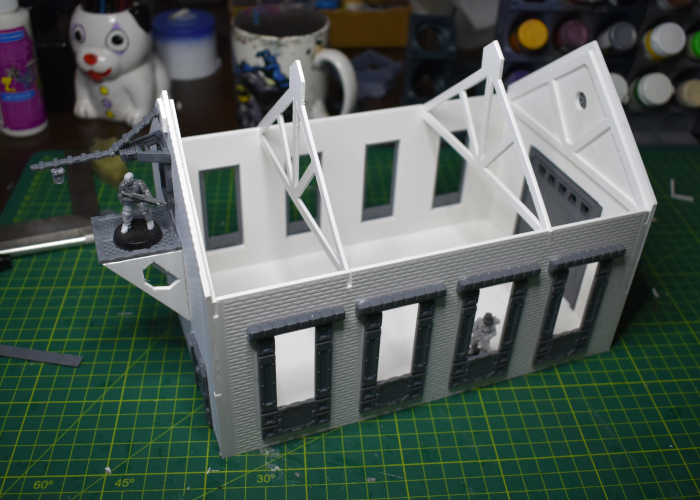
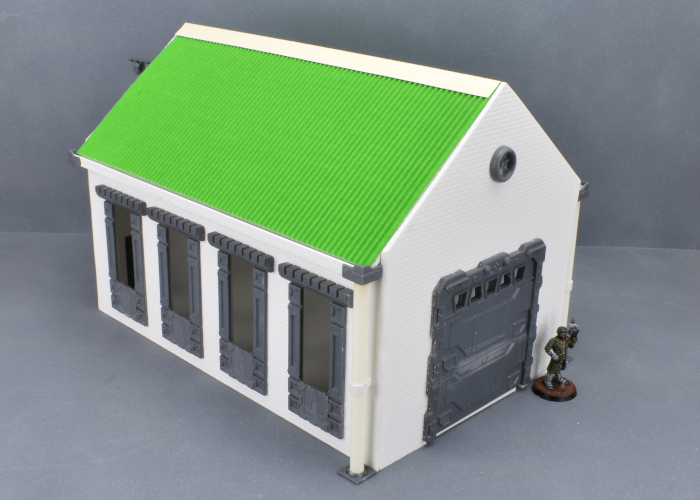
The windows are still missing their 'glass' - some thin, translucent plastic that comes with the warehouse kit. This will be glued in place after I've painted the barn. Otherwise, the finished exterior:
As a final touch, I decided the small platform needed a hand rail, so I whipped one up using a pair of posts from terrain sprue #2 and some thin plastic rod.
Coming up in part 2: I'll add some detail to the interior of the building before painting. Find it here!
To build your own outbuilding of rural doom, you can pick up the terrain sprues along with the rest of the Maelstrom's Edge range from the webstore here.

What are you working on? We would love to see your models and terrain in the Comm Guild Facebook group!
For other building ideas, modeling tutorials, army spotlights and conversion walkthroughs, check out the Hobby section of the Maelstrom's Edge website here.
Tags: buildings conversion kitbash spotlight terrain terrainsprue tutorial
What is the Artarian Remnant?
Posted on Wednesday Sep 15, 2021 at 06:00pm in The Remnant
Before the coming of the Maelstrom, the Artarian Republic was situated in a string of systems stretching out from the edge of the Capital Worlds of humanity towards the vast undiscovered reaches of the Spiral Arm. They enjoyed the close links to the old, well developed systems in the Capital Worlds, and room for expansion in the other direction. The Artarians harboured ambitions to accomplish what humanity had never managed to do – explore the other spiral arms of the galaxy. Their cybel gates and ships were more advanced than any other frontier empire, and their colonisation technology was the envy of the frontier. The Artarians wanted more room to expand, and saw no reason why the cybel network couldn’t route around the galactic core to link other spiral arms. It was never established whether the Artarians managed this feat – there was significant opposition in the Senate to proposals to forge new cybel links near the unstable galactic core as it had never been done before.
When the Maelstrom erupted, it completely obliterated the Capital Worlds of humanity - the oldest, most developed centres of civilisation. With alarming swiftness the Artarians and other societies were bordering on the edge of the coruscating purple-red cloud of energy, helplessly watching it consume untold trillions of lives. The Artarians were far too close to the Capital Worlds to have any hope of conducting any meaningful research into the tidal wave of energy before it swept over their planets. They could only determine that the energy release was apocalyptic – no attempt to measure its potential destructive power was successful. The Maelstrom’s epicentre was only a few hundred light-years away from the Republic, leaving the Artarians with only a few precious decades to prepare for evacuation before it inevitably destroyed their systems too.
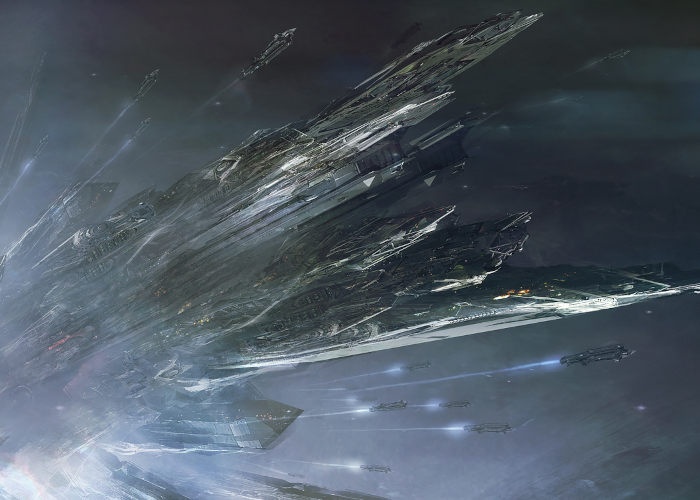
Their escape plan was ambitious: they would build ships that were entire countries – space-worthy versions of their arcologies and habitats, using their colonisation technology to move their entire society into space and away from the Maelstrom.
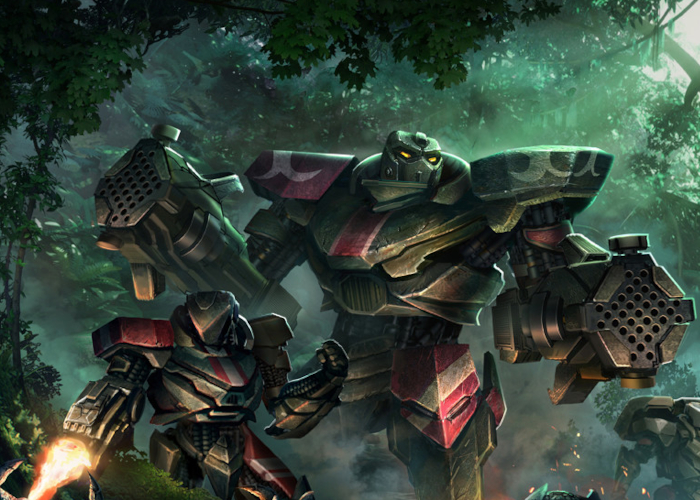
The Great Houses conduct gladiatorial duels or contests between Champions to settle disputes and conflicts. Each House spends considerable effort collecting a retinue of ritual champions in order to out-fight their rivals. This form of ‘polite warfare’ avoids risking damage to their limited ships and resources, and stops any dispute spiralling out of control into conventional warfare which would doom the Remnant. The resources that Great Houses spend on their individual Gladiatorial champions could fund an entire army in any other context and this, combined with their advanced technology makes the Champions one of the most powerful fighting forces in the galaxy. Lorican Fire Teams are equipped with such destructive weaponry and are so difficult to incapacitate, some worlds facing military action will surrender without much of a fight once they have witnessed them in combat. As the prospect of a few men fighting and beating hundreds is pretty cinematic, Artarian citizens thoroughly enjoy the heavily edited footage sent back of Fire Teams driving back large military forces on their own, often cheering on their favourite Champion.
The Remnant Fleet avoids conflict with outsiders as much as possible in order to protect their irreplaceable ships and resources. When they do fight, the Senate appoints a House which suits the task at hand, instructing them to deploy their Champions in a surgical strike, so that battles rarely escalate above a skirmish. In return, that House gains first rights on resources found after that planet is subdued, for example a House may be particularly interested in copper reserves on the planet and ask for rights to that resource.
In rare instances where a wider conflict is completely unavoidable, there are more conventional military units that can be deployed, such as the Fleetguard, drawn from the ranks of the population with high aptitude scores but not quite high enough for a Champion. In general though, Fire Teams will be deployed to crush resistance at a target site, crippling the planet’s military response long enough to either take apart their resistance piecemeal, or delay them long enough for the Remnant Fleets to harvest whatever resources they can and make their escape before the enemy can retaliate. Usually the fleet will not arrive at a planet until military resistance is subdued, in case of hidden orbital facilities or ground based defence weapons that could threaten the ships.
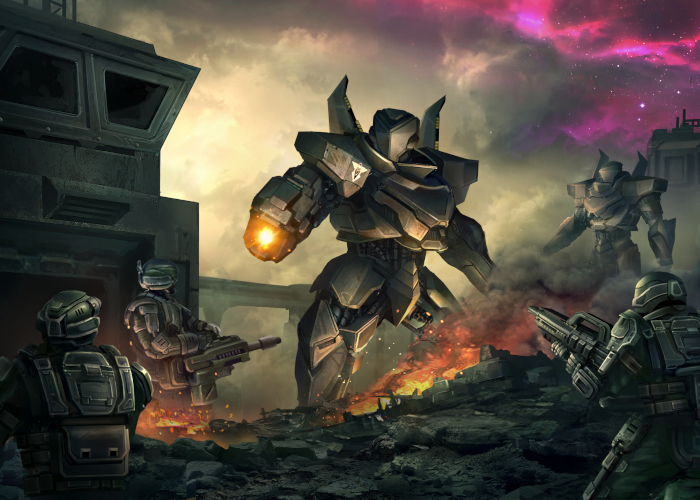
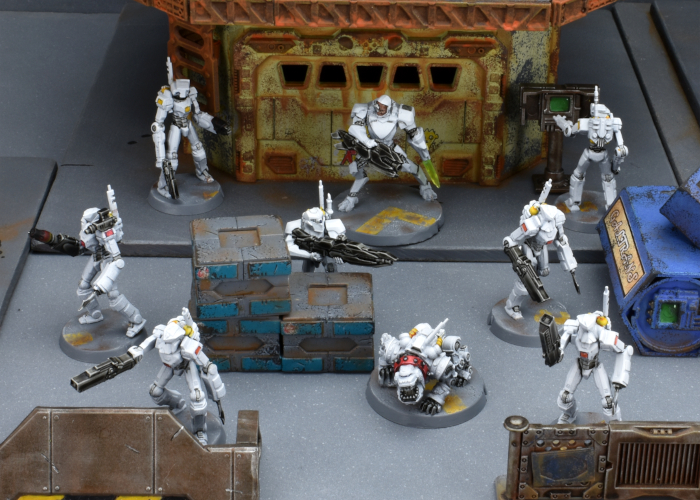
Lorican Combat Suits are the pinnacle of Artarian engineering, allowing a House Champion to have the utility and fighting prowess of many soldiers or workers. Each suit wearer is virtually a one man army, equipped with light but incredibly strong alloyed armour plating that is adapted from the same technology that is used in Remnant ship hull plating. It can absorb heat based weapons and even use it to recharge the suit's systems. The armour is quite capable of deflecting even heavy calibre ammunition, and is fully adapted to work in vacuum or underwater.
Each suit is assisted by sophisticated motion predicting micro-servo motors to give them unparalleled strength and mobility, moving with ease through dense terrain and being able to punch holes through conventional armour. Every suit also boasts a wealth of sensors including friend or foe recognition, communications frequencies, target acquisition and capability calculation, capable of identifying weak points on the target and providing suggestions as to what weapon to attack it with. All suits are slaved with targeting and intelligence information from the insertion ships in orbit, providing a strategic overview, co-ordination between strike teams and immunity to ambush.
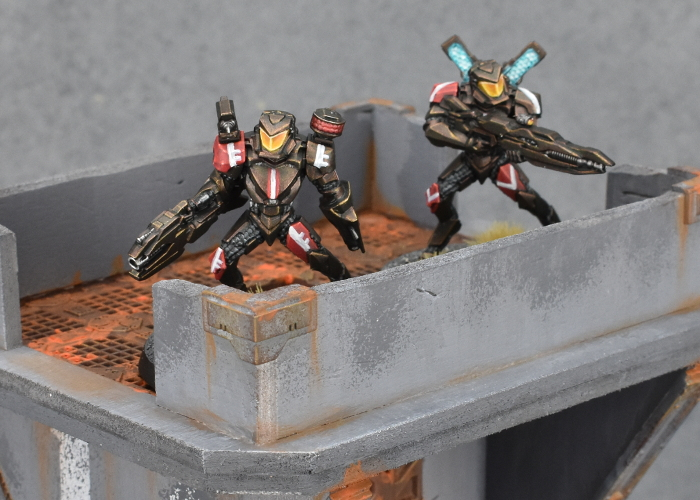
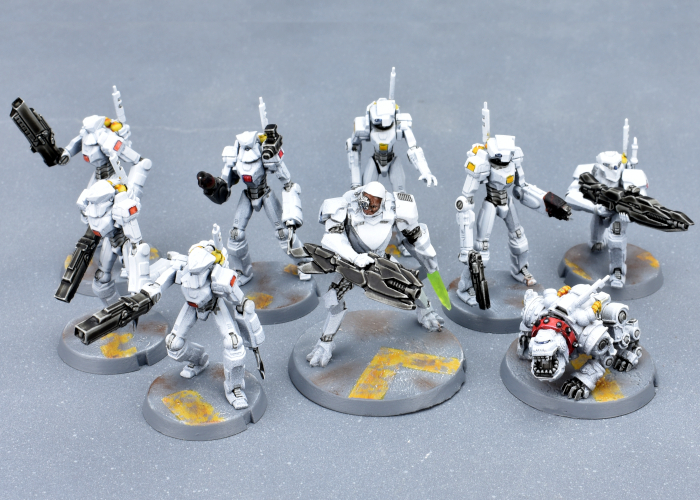
Fire Teams make use of a variety of suits specialised to the preferences of their Champion pilot. From the lighter, fast moving Nimbus suits, the more common, versatile Militus suits, to the huge, hard-hitting Brutus, Lorican suits are rightly feared by those who encounter them on the battlefields on the Edge.
You can find out more about the Artarian Remnant on the Maelstrom's Edge website. While you're there, you can pick up any of the Broken models, along with the rest of the Maelstrom's Edge range, from the webstore. Free shipping applies to qualifying orders - check your cart for details.
Meanwhile, if you have any questions on the Maelstrom's Edge background or gameplay, pop in to the Comm Guild Facebook group here.
Converting a Robot Stargrave Crew
Posted on Monday Sep 13, 2021 at 09:52pm in Tutorials
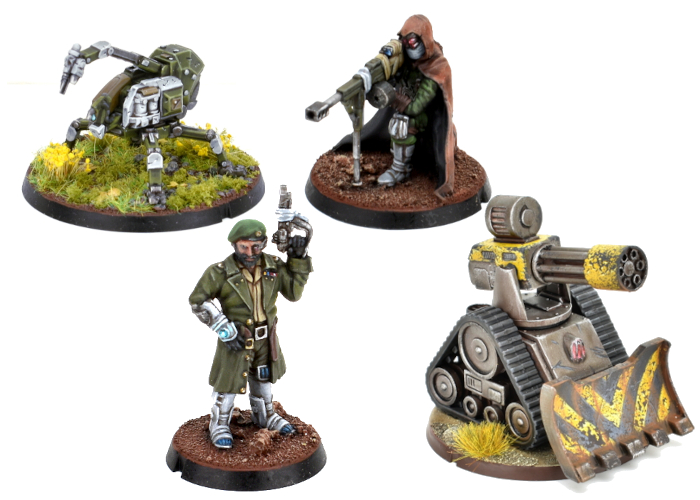
When Stargrave arrived on the gaming scene, bringing the popular Frostgrave rules into a sci-fi setting, it sparked all sorts of interesting ideas amongst gamers for building crews. While there is an official model range for the game, it also encourages players to use whatever miniatures they like, which is a perfect excuse to break out some models and get creative! I was particularly interested in the rule allowing any crew members to be robots, and set to work building up a crew using (mostly) the Maelstrom's Edge Epirian Scarecrow plastic kit!
The bulk of the crew was made up of very slightly converted Scarecrows with different heads taken from the Remnant Militus battlesuit kit to denote different 'classes' of robot. Thanks to how wonderfully poseable the Scarecrow kit is, it's really easy to get a range of different looking models out of it! I also used a resin robo-dog from Artel W for a guard dog, added a (still to be painted) space dwarf from Victoria Miniatures as a first mate, and a converted Remnant Nimbus battlesuit for the Captain.
I wanted an easy paint scheme that I could get done quickly, and used Army Painter paints for the bulk of it. I started with a base coat of Uniform Grey spray, followed by a top-down (or 'zenithal') spray of white, so that the grey would stay visible in the creases and underneath surfaces to provide some shading. I then went over the joints and other exposed metal parts with a coat of Dark Tone, and gave the weapons three generous coats of the same. The final details were done with Citadel Contrast - Iyanden Yellow for the tanks on the robot's backs and Leviadon Blue highlighted with Army Painter Ice Storm and white for the eye lenses. The different classes of robot also received some shaded panels to tell them apart - yellow for techs, orange for soldiers and red for specialists.
I'm still deciding how to paint up the first mate, and how closely he will mimic the colour scheme, but here's the rest of the the crew all assembled:
Captain and Guard Dog:
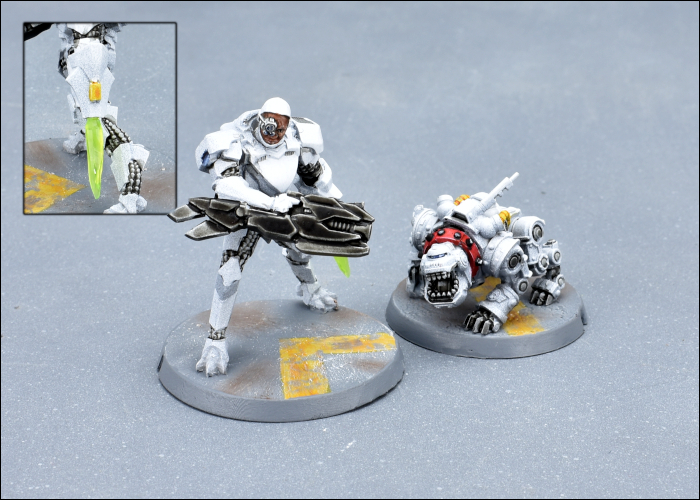
The Captain was built from a Nimbus battlesuit with the head taken from the Karist Heavy Weapons kit. The energy blade is part of a trimmed down lightsaber from a Star Wars figure, left over from an old project. He represents a cyborg in combat armour.
Tech crew - Hacker and Chiseler:
Chiselers are normally equipped with lockpicks. I decided to go a more direct route and gave him a cutting torch using part of a weapon from the Broken Rabble kit.
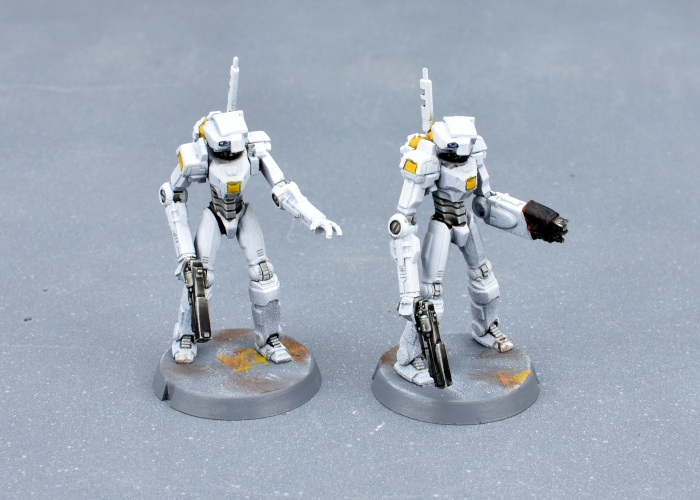
Troopers

I gave the troopers bulkier left arms to house their combat knives using spare Scarecrow shin pieces. The knives are taken from the Faction Expansion Sprue.
Specialists - Burner and Sniper:
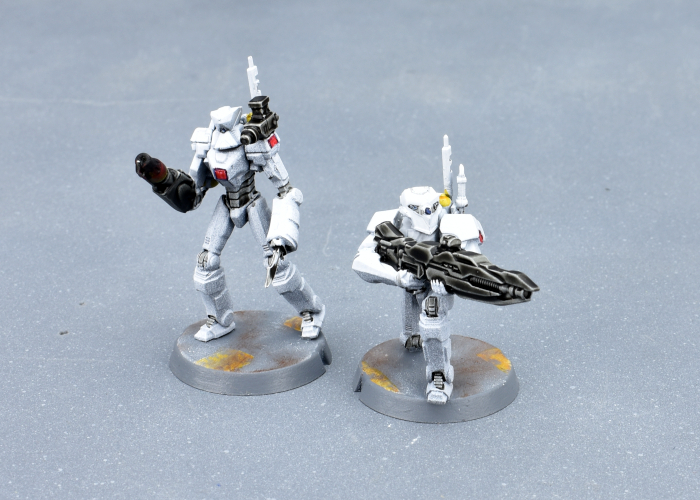
The Burner has a pistol and knife as well as the flamethrower, so I gave him the same knife arm as the regular troopers and mounted a mini grenade launcher taken from the Epirian Handler kit to his shoulder to represent the pistol. The sniper has a different head to the regular troopers, and his sniper rifle was a handy way to make use of the second set of arms that come with the Captain's Nimbus suit.
Time to get that mate painted up and send these bots out on into the black!
To build your own robot crew of clanking doom, you can pick up the Scarecrow kit along with the rest of the Maelstrom's Edge range from the webstore here.
What are you working on? We would love to see your models and terrain in the Comm Guild Facebook group!
For other building ideas, modeling tutorials, army spotlights and conversion walkthroughs, check out the Hobby section of the Maelstrom's Edge website here.
Tags: conversion epirian robot scarecrow spotlight stargrave
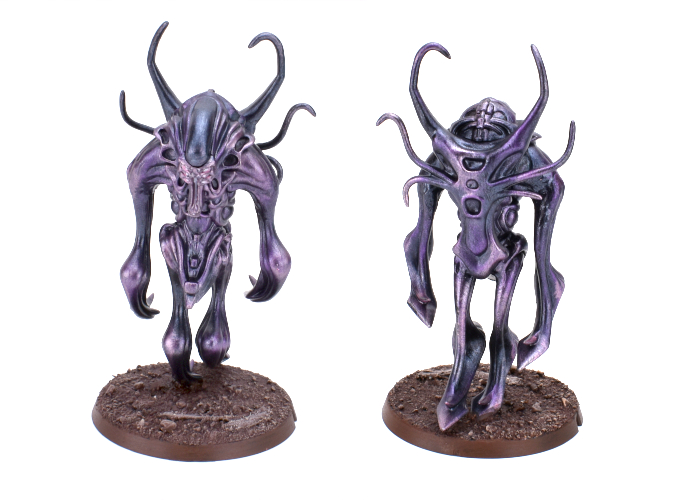
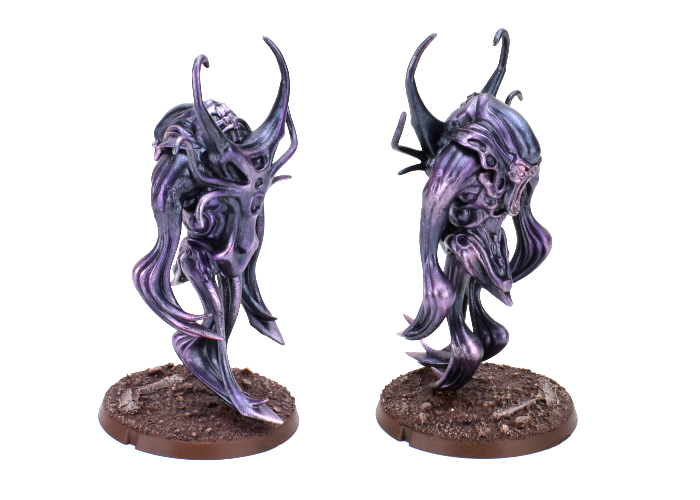
Painting Spotlight: Metallic Angel
Posted on Monday Sep 06, 2021 at 06:00pm in Tutorials
A while ago, I picked up a set of the Army Painter coloured metallic paints, and decided this week it was time to take them for a spin. The paint set includes some lovely purples that were just screaming out for a friendly little angel to bring to life. And so that's what I did.
The model I chose to use for this was a conversion that I put together some time ago while playing around with the Mature Angel kit. The end result is a slightly sinister-looking, floaty juvenile angel.
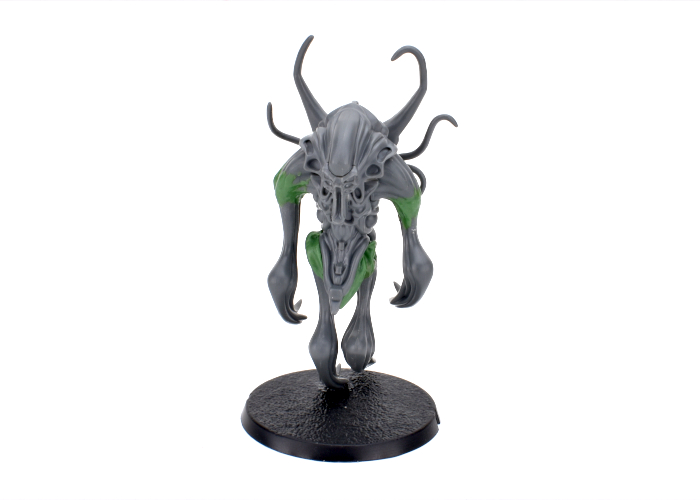
Metallic paint generally goes best over a dark basecoat, so I started out by spraying the model with some Army Painter black.
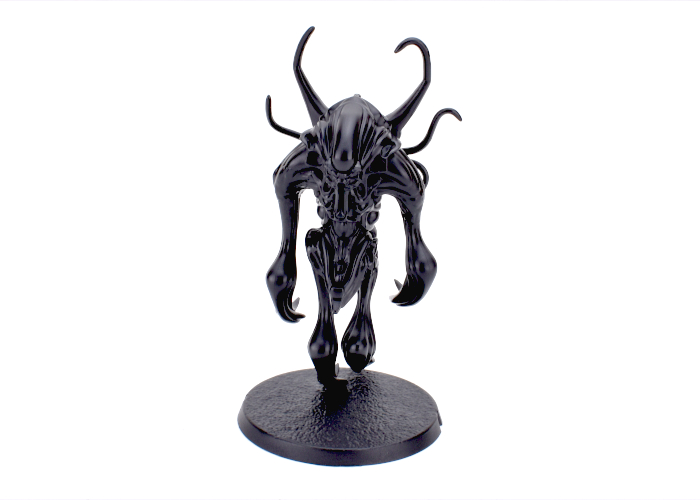
I then gave the whole model a coat of Night Scales, a metallic black from the Army Painter set. This has a slight bluey-purple tint to it that is just perfect for the angel. I was tempted to just leave it like this and call the job a good'un.
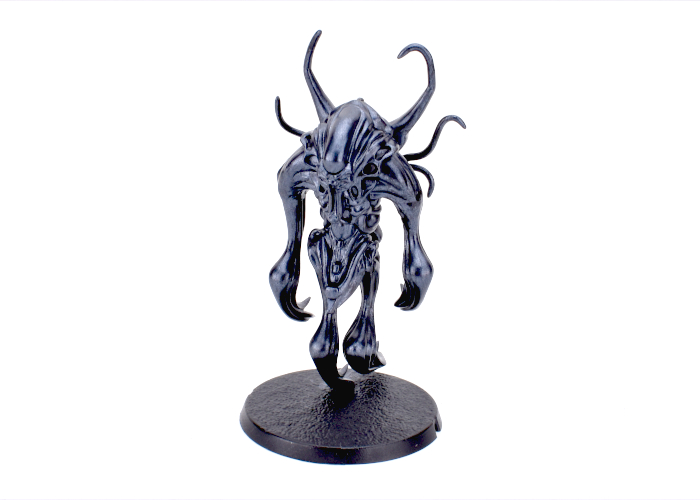
Deciding to go for a little more 'wow', though, I grabbed the bottle of Royal Purple, a midrange purple metal colour, and drybrushed the angel with it, building up more colour on raised areas and tentacle tips.
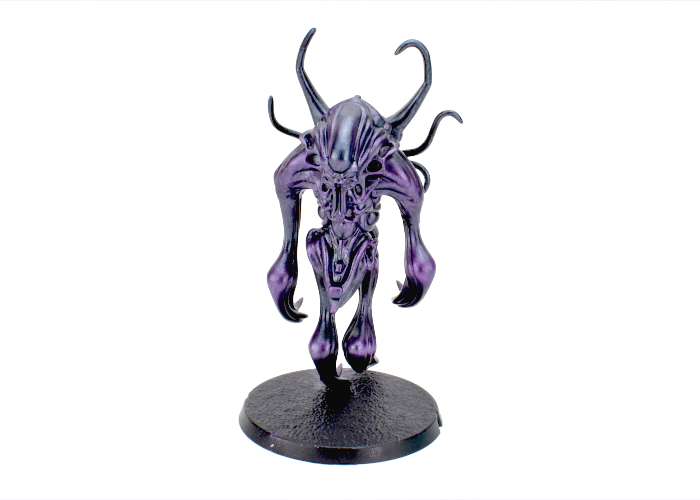
I used a light drybrush of Zephyr Pink to add some extra highlights wherever it seemed appropriate. I also went back over the top of the head with some more Night Scales, and picked out the eye sockets with Zephyr Pink before adding some white over on the eyeballs and inside the mouth. Finally, I added some coarse sand mix to the base with PVA glue, and then painted with Army Painter Dirt Spatter, then a wash of Mid Brown ink, and finally a drybrush with Kobold Skin, also picking out the base edge with more Dirt Spatter.
To build your own angel of floaty, screamy doom, you can pick up the Mature Angel kit along with the rest of the Maelstrom's Edge range from the webstore here.
What are you working on? We would love to see your models and terrain in the Comm Guild Facebook group!
For other building ideas, modeling tutorials, army spotlights and conversion walkthroughs, check out the Hobby section of the Maelstrom's Edge website here.
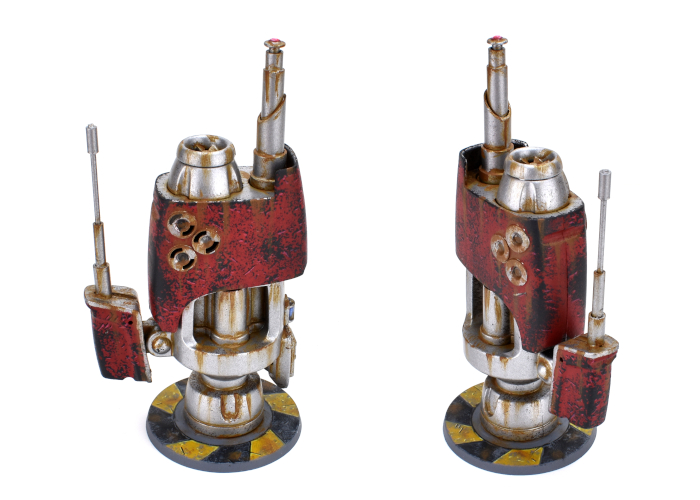
Terrain Kitbash: Communications Hub
Posted on Monday Aug 30, 2021 at 06:00pm in Tutorials
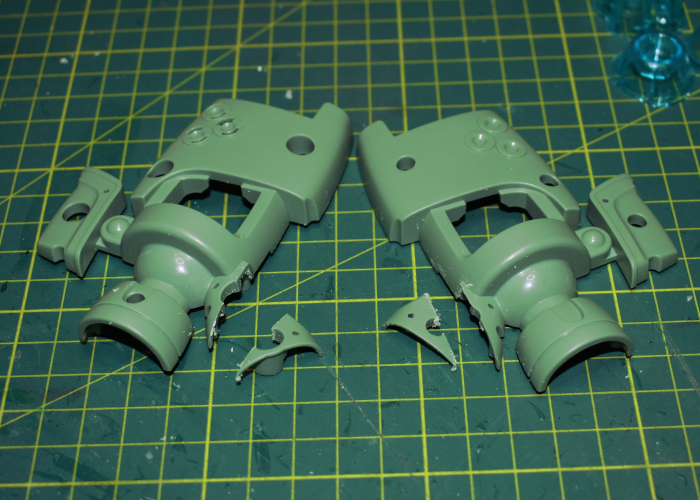
Regular readers would know by now that I have a habit of grabbing odd things from around the place that have interesting shapes and turning them into terrain. In the past, I've built terrain from various bits of building hardware, storage containers, food packaging, and Christmas tree decorations, amongst other things. This week, I ransacked Amazon's toy department to put together a communications hub!
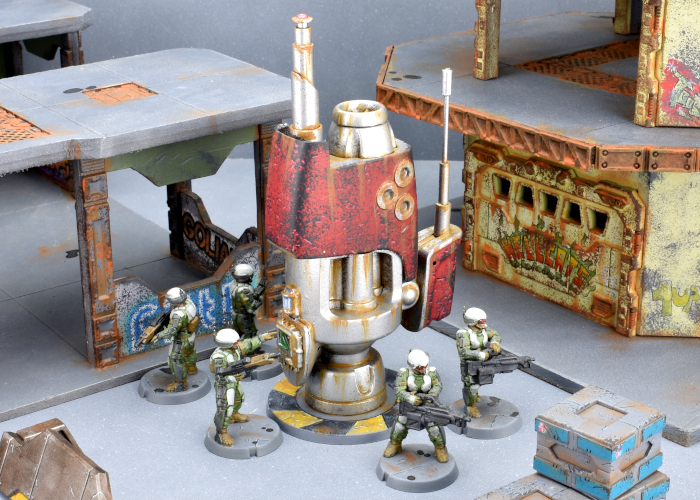
The base for this model was a small light up laser gun toy that I found while browsing Amazon. This particular toy came in a set of 4 - three of this same design in different colours, and another blockier design that I'll find a different use for later.
The first step was to take the gun apart so that I could remove the pistol grip and any other un-needed parts. The cowling from the front will likely wind up as a building entry at some point in the future, and I saved the light and speaker just on the off-chance that I want something to light up and make pew-pew noises.

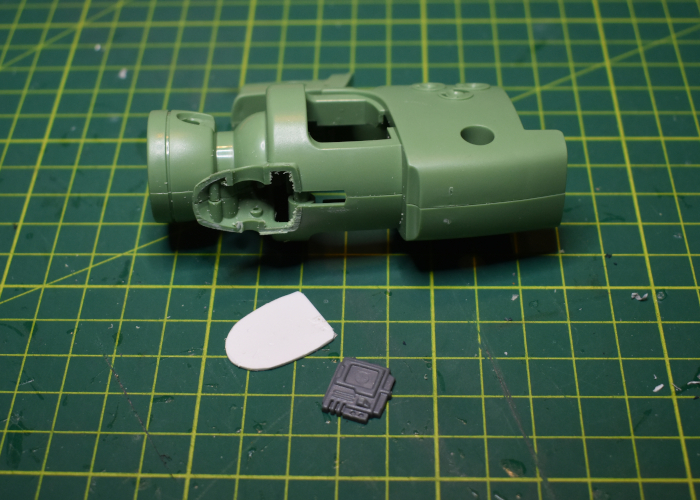
The main part of the gun was almost perfect as is, although I trimmed down the protrusion that the pistol grip originally clipped onto with a razor saw.
I then cut a piece of plasticard to fit neatly over the opening, and grabbed a computer panel from the first Maelstrom's Edge terrain sprue to add to this plate.
I reassembled the body of the gun, and added a couple of aerials made from plastic tubing, aluminium rod and a post piece from the second Maelstrom's Edge terrain sprue.
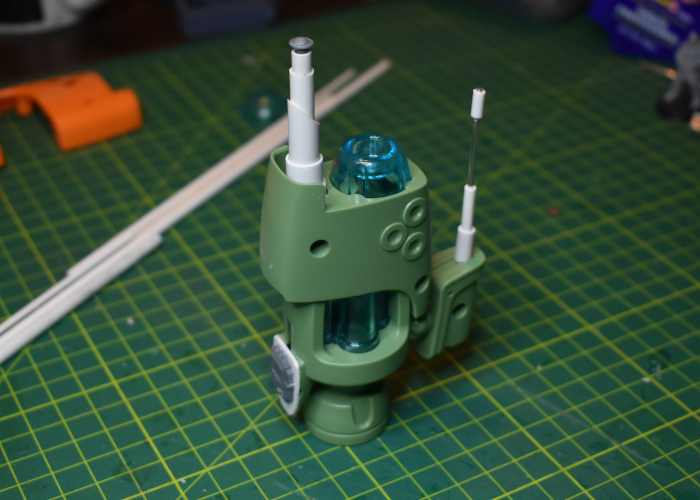
Finally, I added a base to make it a bit more stable, glued an exhaust fan from the second terrain sprue over the muzzle piece, and puttied over the screw holes.
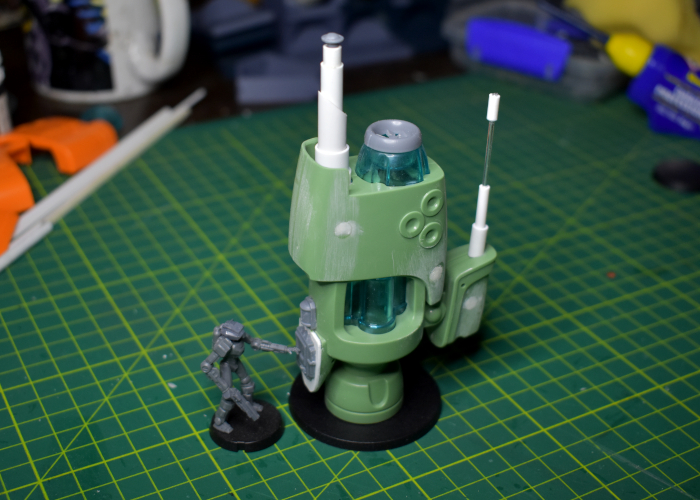
With some paint on, it wound up looking like this:
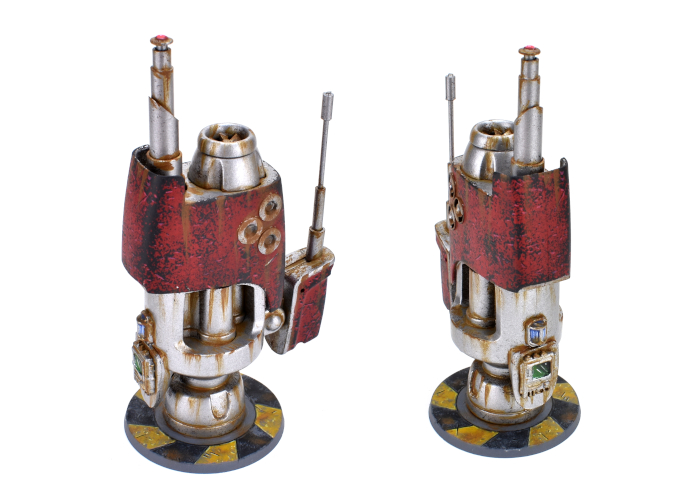
I considered leaving the blue central piece unpainted as a shiny, translucent feature, but decided against it as the three guns have different coloured pieces, so the translucent piece would be different on each comm hub... and that would offend me on a deeply spiritual level when I build the other two.
To build your own hub of communicative doom, you can pick up the Maelstrom's Edge terrain sprues along with the rest of the Maelstrom's Edge range from the webstore here.
What are you working on? We would love to see your models and terrain in the Comm Guild Facebook group!
For other building ideas, modeling tutorials, army spotlights and conversion walkthroughs, check out the Hobby section of the Maelstrom's Edge website here.
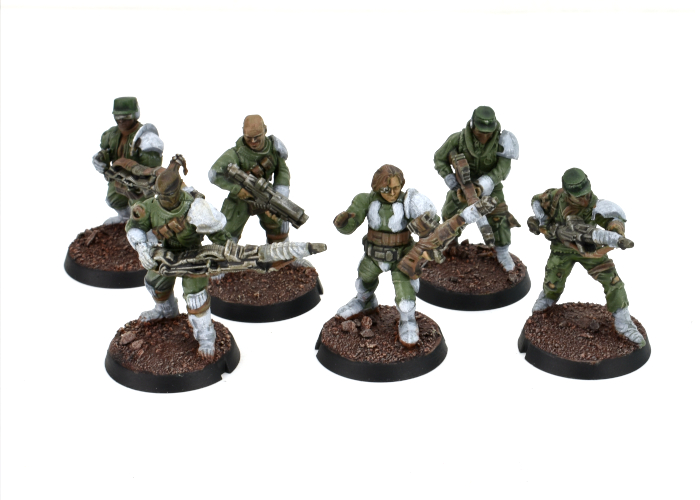
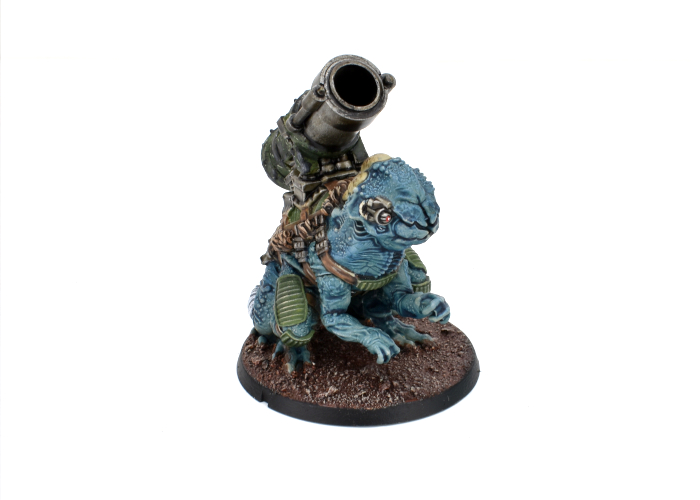
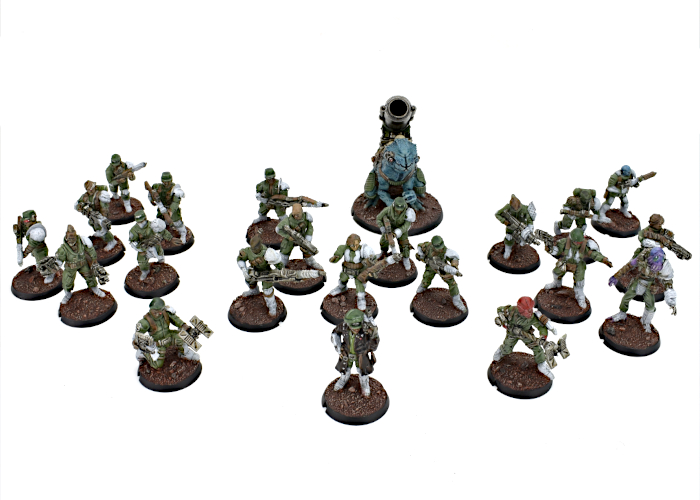
Army Spotlight: Broken SARA Detachment
Posted on Monday Aug 23, 2021 at 09:06pm in The Broken
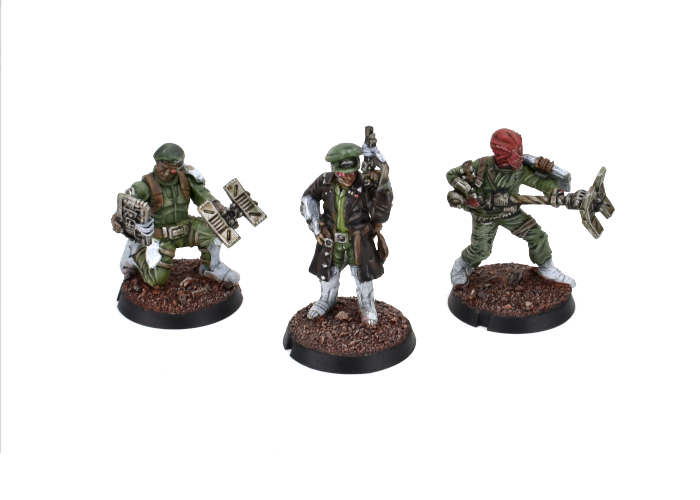
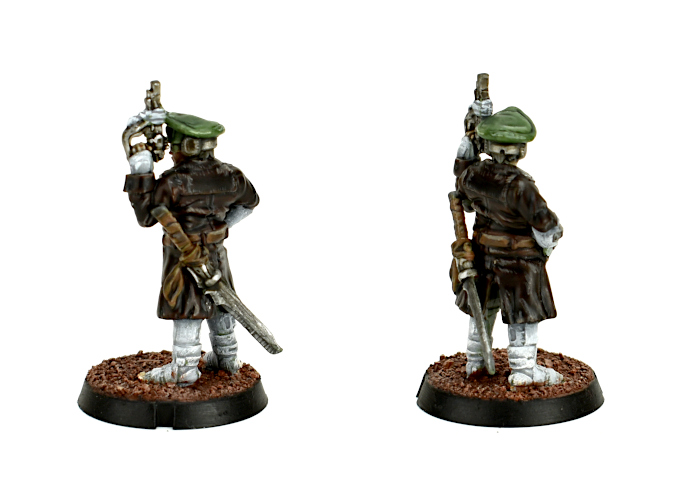
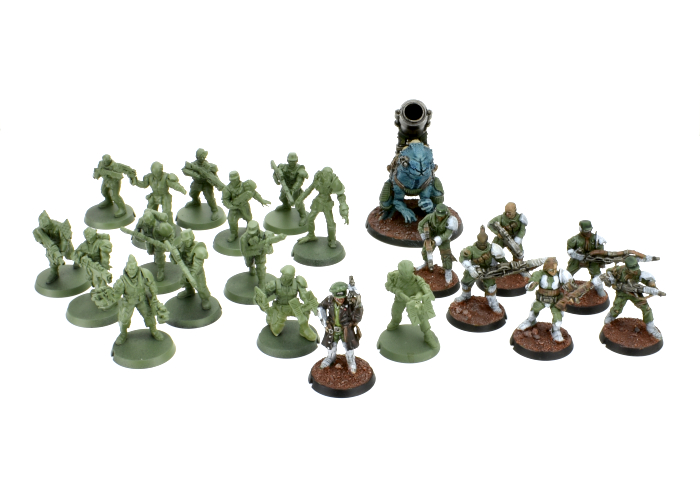
Last week, I shared a Revolutionary Captain conversion that I had painted up to lead a new SARA force for my army collection. This week, I completed work on the rest of his detachment!
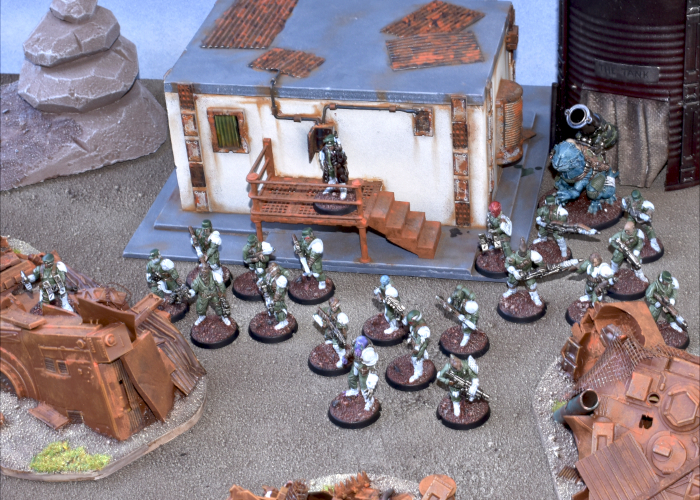
The leader for the detachment is obviously the aforementioned Revolutionary Captain, equipped with his signature pistol and an added trophy melee weapon. To accompany him into battle, I filled out a Vanguard slot with a pair of Sig Jammers, on using the regular resin model, and another converted up using a bunch of assorted parts, including the beret head that I didn't use on the Captain. Sig Jammers provide support to Broken forces by interfering with enemy Fields and forcing additional Suppression Points onto enemy units with their Tech Disruptors.
Rabble units make up the core of any Broken force. For my SARA, I wanted to give them a more military look than my Forsaken force, so I mostly stayed away from long coats and robes, and borrowed some extra armour parts from Epirian and Karist kits, and also a few bits and pieces from some Stargrave plastic models for a little extra variet. I also gave all of the models a shoulder pad on their left shoulder, as something to help unify the various assorted models... although in true Broken fashion, these pads are also sourced from a range of different places.
The second Rabble unit is accompanied by a Marsayan Hypnotist, to provide some tentacle-faced disruption to enemy shooting. Units accampanied by a Marsayan are difficult to hit, always counting as a Fleeting target and gaining a dodge against close range attacks.
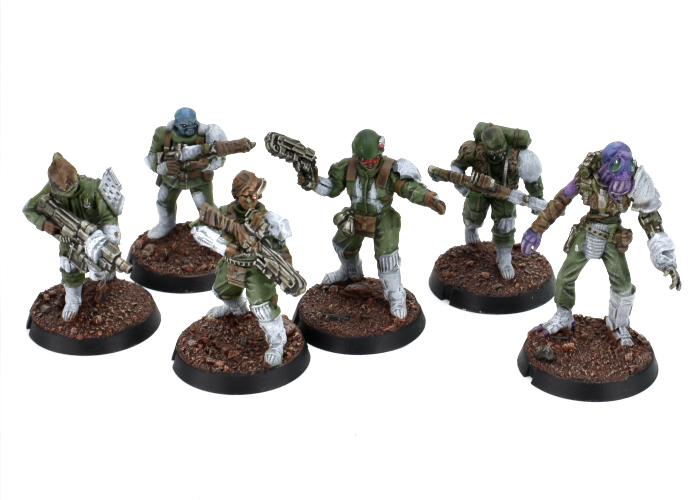
For a bit of long range coverage, I added a Rabble Fire Support unit with beam longrifles to fill one of my Anvil slots.
To round things out, I took a Pa'ku for the other Anvil slot, because how can you go past a giant toad with a cannon. The model I've used here is one I converted up for the spotlight article some time ago to count as a 'heavy EMP mortar' instead of the usual quad mortar... but could still be used as just a variant version of the usual gun if I want to keep things official. The Pa'ku's EMP mortar is great for dropping large blasts on enemy formations, although it works best in concert with other Pa'ku due to their Coordinated Barrage rule. So I'll probably look at painting up a second Pa'ku with the second detachment, potentially retrofitting it back into this detachment with the Multi-Unit Selection rule allowing both of them to count as a single Anvil choice.
All up, this detachment currently comes in at 67 points, so is just under half of a 'standard' 150 point force. I'll be working on the second detachment as I have time, putting in another Revolutionary Captain, some snipers, and an assault unit featuring a couple of Hakoyu for some up-close-and-personal, pointy doom. In the meantime, I can always use these as a detachment alongside my Forsaken force.
More to come - stay tuned!
To build your own army of revolutionary doom, you can pick up the Broken along with the rest of the Maelstrom's Edge range from the webstore here.
What are you working on? We would love to see your models and terrain in the Comm Guild Facebook group!
For other building ideas, modeling tutorials, army spotlights and conversion walkthroughs, check out the Hobby section of the Maelstrom's Edge website here.
Tags: broken conversion modeling painting sara
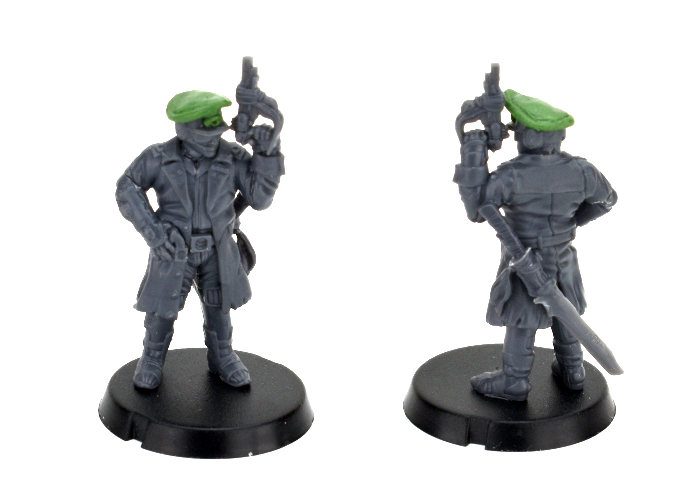
Painting Spotlight: Converted Broken Revolutionary Captain
Posted on Monday Aug 16, 2021 at 06:00pm in Tutorials
With the release of the Revolutionary Captain and Sniper models for the Broken, I couldn't resist the lure of that new army smell, and so I've been working away to put together a SARA force to sit alongside my existing Forsaken collection. The model I chose to lead the force was one that I showed back in the Conversion Spotlight article when the Revolutionary Captain was released, but this week I finally got some paint on him!
For those who haven't checked out the article linked above, this model was a conversion of the plastic SARA Captain model. The head was taken from an Epirian Contractor, with a hat added using 'green stuff' putty. I also gave him a sword built from a couple of chopped up weapons from the Broken Rabble sprue and a slightly reshaped Karist sword blade taken from the Faction Expansion sprue.
For this force, I chose to go with a colour scheme fairly similar to the Maelstrom's Edge studio model, using a lot of Army Green with white 'techy' bits. To make the Captain stand out a little more from the horde, though, I swapped out the studio model's green coat for a dark brown leather one. This was painted with Scalecolor Bosh Chestnut and several layers of Army Painter Dark Tone, before highlighting with Army Painter Leather Brown with a little Skeleton Bone mixed in.
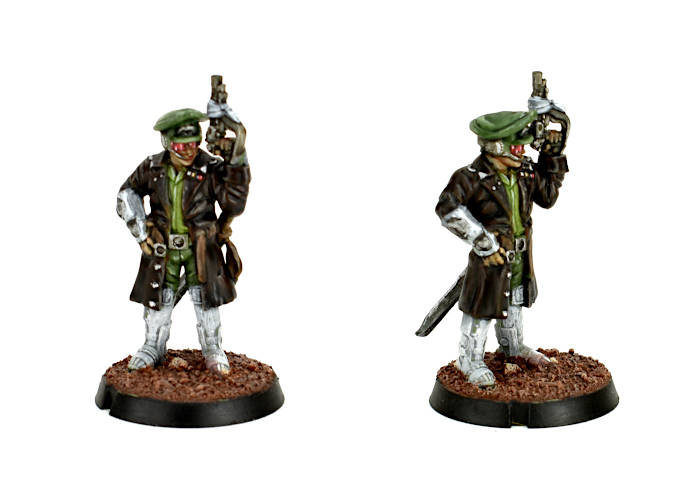
The rest of his uniform is Army Painter Army Green for the pants and hat, and Army Green mixed with Coat D'Arms Putrid Green for the shirt. These were washed with Army Painter Military Shader, and then the hat given two coats of Green Tone, before it was all highlighted with some more Putrid Green and Army Green mix. The metal was painted with Army Painter Plate Mail Metal and washed with Dark Tone and Strong Tone, with a Shining Silver highlight, while the white parts were given a coat of Army Painter Uniform Grey and then a heavy drybrush of white. It's a little rough up close, but quick and easy and looks suitably beaten up on the table!
The next job is to finish up the painting on the rest of his detachment, and then start on a second detachment so that I can work in a sniper or two!
To build your own army of revolutionary doom, you can pick up the Revolutionary Captain along with the rest of the Maelstrom's Edge range from the webstore here.
What are you working on? We would love to see your models and terrain in the Comm Guild Facebook group!
For other building ideas, modeling tutorials, army spotlights and conversion walkthroughs, check out the Hobby section of the Maelstrom's Edge website here.
Tags: broken conversion model painting sara
Modeling Tip: UV Resin Windows!
Posted on Monday Aug 09, 2021 at 06:00pm in Tutorials
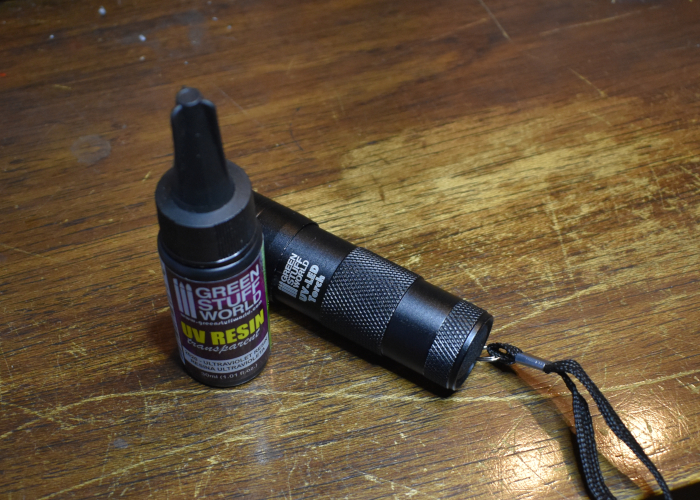
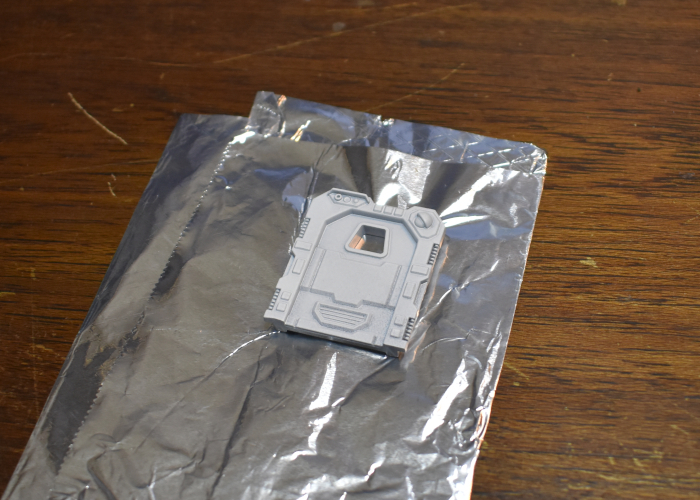
There are a few different options out there for filling in open windows on terrain. In the past, I've used clear plastic or aluminium mesh cut to shape and glued in. I recently picked up some Ultraviolet Resin intended for creating water effects, and it occurred to me that this might be a fun alternate way of adding panes to some windows.
The resin I'm working with is sold by Green Stuff World. It's a super-clear gel that you squeeze from the bottle and then set with a UV light, or by leaving it out in the sun. They also sell a UV torch, which I couldn't resist picking up.
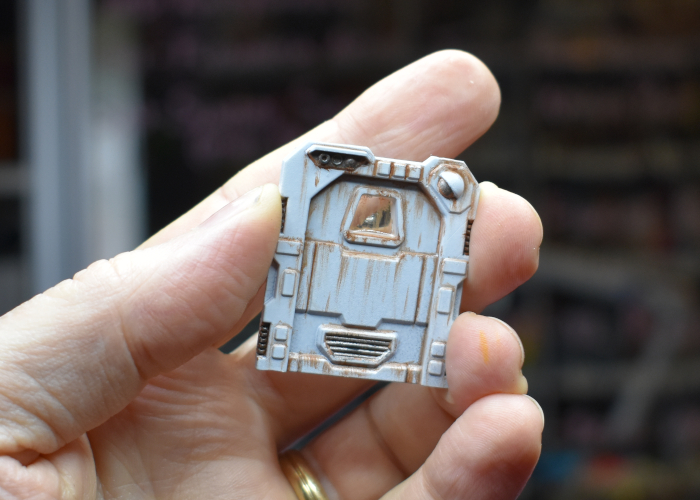
To create a window pane, I took a painted door from the Maelstrom's Edge terrain sprue and laid it down on some aluminium foil, with a small piece of thin plasticard in behind to push the foil snug against the back of the window frame.
(I used a painted door as it was going to be impossible to paint the inside of the window frame once the resin was in place.)
I then added a drop of resin into the middle of the window, leaving it a minute or so to settle out to the edges of the frame. There were very few airbubbles in the resin, but I used a pin to gently poke the few that were there to make them go away.
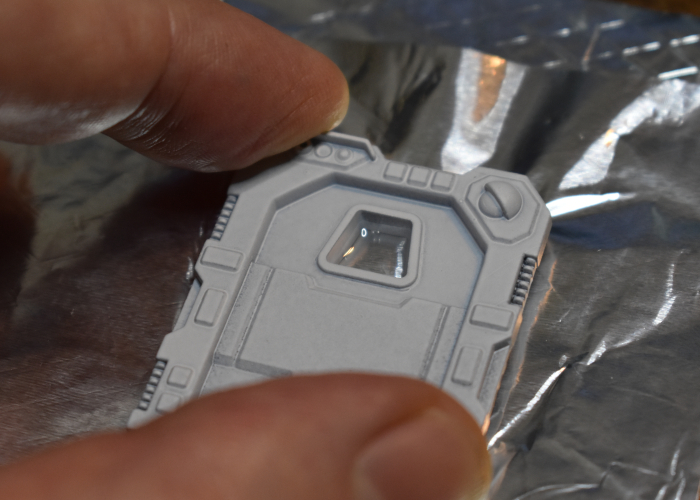
To set the resin, I sat the UV torch on top of the doorframe pointing directly at the window, and left it for a couple of minutes to let it do its thing. From further experimentation later, the resin starts to cure within a few seconds, but I wanted to leave it long enough to make sure.
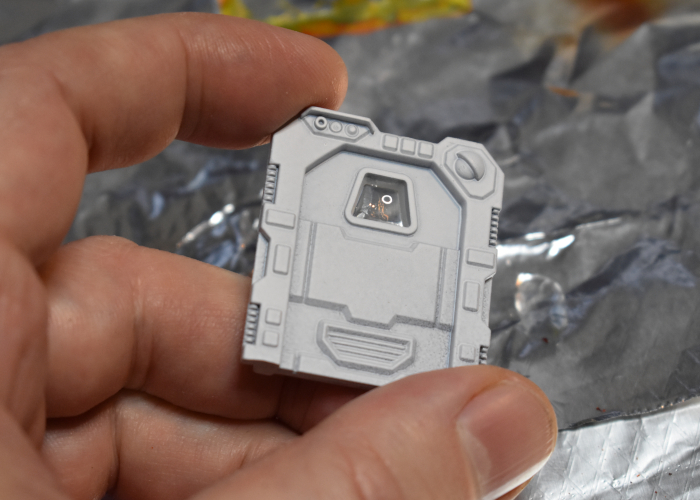
From there, the door was ready to be glued into a piece of terrain and detailed.
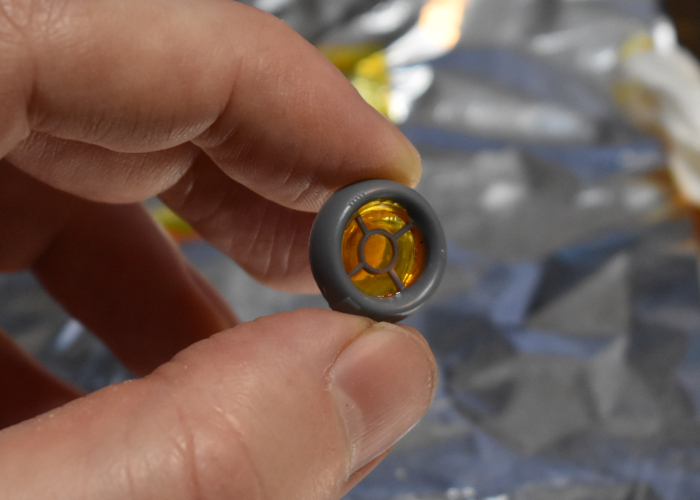
For coloured window glass, transparent paint gives a nice tint. This porthole was filled with resin in the centre, and then once set I painted the back of the resin with two coats of Tamiya Clear Orange.
To make your own windows of transparent doom, you can pick up the Maelstrom's Edge terrain sprues along with the rest of the Maelstrom's Edge range from the webstore here.
What are you working on? We would love to see your models and terrain in the Comm Guild Facebook group!
For other building ideas, modeling tutorials, army spotlights and conversion walkthroughs, check out the Hobby section of the Maelstrom's Edge website here.
Tags: modeling terrain terrainsprue tutorial
2021 Mid(ish)year Roundup!
Posted on Monday Jul 26, 2021 at 06:00pm in General
Iain continued to smoosh things together in the workshop, working through a range of the usual sorts of modeling articles - kitbashes of kits, buildings made from bits and pieces and just generally getting paint all over everything in sight. You can find all of these modeling articles in the Hobby section of the Maelstrom's Edge website here.
On the new release front, we've given Epirian Contractor units some support with a new resin drone, and launched the Spiral Arm Revolutionary Army as a subfaction for the Broken, with the addition of plastic kits for a Revolutionary Captain and a cam-cloaked sniper. We also picked up the PDC Gaming heavy weapons carriage - a plastic kit that lets you build a range of different mobile weapons platforms, for those gamers looking for some heavier firepower. You can find all of these in the Maelstrom's Edge webstore.
Our biggest reveal for this year so far was, of course, the launch of the kickstarter for StackaRack - a plastic, customisable paint storage system! Our Kickstarter funded successfully, and we're currently hard at work finalising the design work so that we can get it sent off to our plastics production people. If you missed the Kickstarter, you can find out more information and follow our progress on the StackaRack Facebook page here.
So... what's next?
In the coming months, we have new plastic model releases for the Karists and Remnant, a couple of resin upgrades for the Remnant Militus kit, and a whole new range of bases to add to the webstore. There's also a new faction - our fifth! - to crawl forth from the destruction of the Edge. On top of that, we're still beavering away behind the scenes on version 2 of the Maelstrom's Edge rules. Our original target had to be pushed back significantly thanks to the pandemic, but we're aiming to have the Beta version of the rules out before the end of this year. If you want to get in early, you can find a very early draft of the new rules in the development thread on the DakkaDakka forums here.
So much great stuff still to come - Stay tuned!
For the full range of Maelstrom's Edge products, including the Battle for Zycanthus starter set, the plastic and resin model range, the ever-useful Maelstrom's Edge Terrain Sprues, novels and audiobooks, check out the webstore here.
For building ideas, modeling tutorials, army spotlights and conversion walkthroughs, have a look at the Hobby section of the Maelstrom's Edge website here.
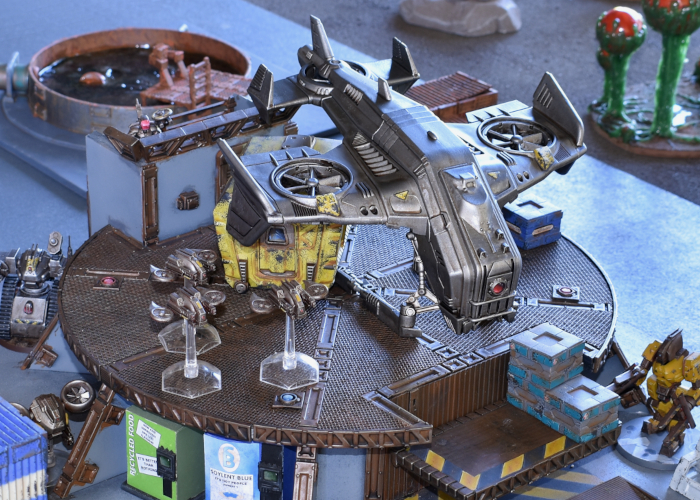
Modeling Spotlight: Kitbashed Pegasus Heavy Cargo Drone
Posted on Tuesday Jul 20, 2021 at 06:00pm in Tutorials
Time to hack something up, just because we can! I've had my eye on the Hornet dropship from Mantic's Warpath game for some time, as its general shape feels similar to the Epirian Firefly drone, just scaled up. So, I decided to take one and turn it into a heavy cargo drone to support Epirian forces behind the lines! Read on to see how it was built.
With its design already including wing-mounted turbines, the main alteration required was to make the front of the Hornet look like a standard Epirian drone. I used a small pipe fitting from the first Maelstrom's Edge terrain sprue for a sensor lens housing. For the lens itself, I rolled out some 'Green Stuff' putty into a thin sheet and used the pipe fitting as a stamp to cut out a circle. I also took a couple of pieces of aluminium rod and bent them to fit across the front section on the Hornet, to form the rectangular grill that Firefly and Spider drones have under their sensor lens.
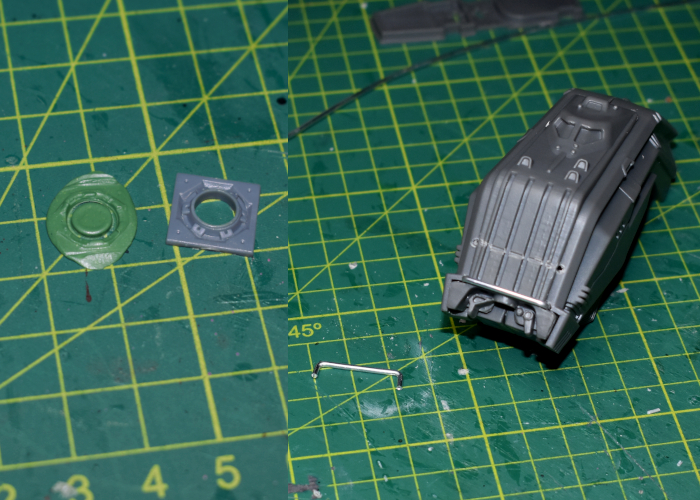
Once the Green Stuff was fully cured, I trimmed away the excess, and glued everything into place on the front of the Hornet. The Hornet's protruded above the lens housing, so I covered over it with a thin piece of plasticard. I had originally intended to cut off the cockpit bulge and seal over it with plasticard, but decided it would be easier to use some putty to fill in the windscreen recesses.
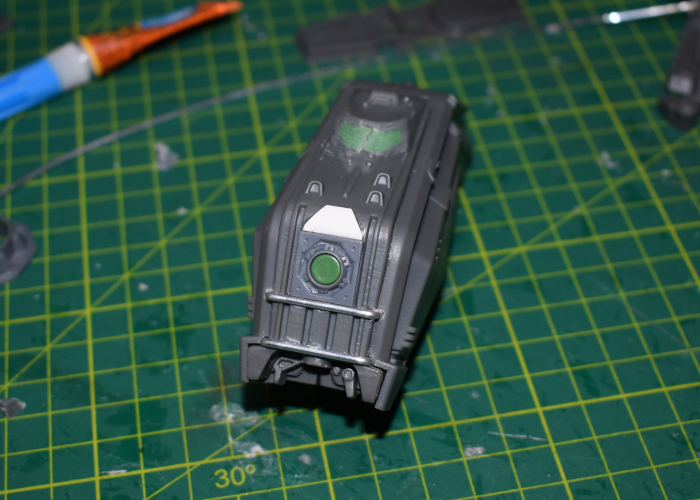
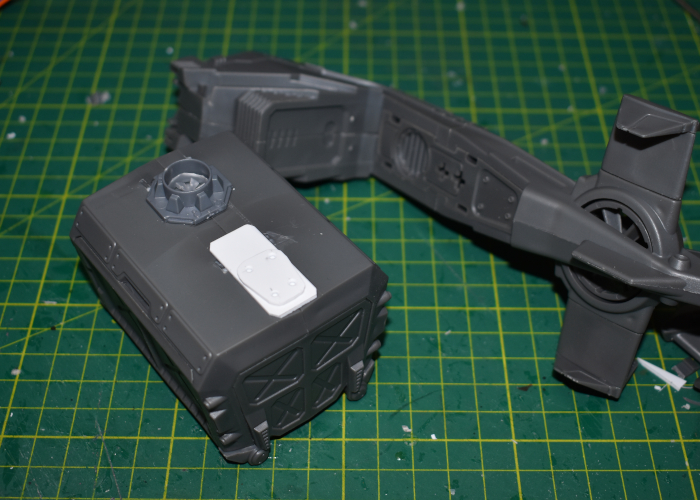
As this drone was intended as a scenery piece rather than for gaming, I decided to keep the cargo container as a separate piece. There is a doorway on one end with no door, as this normally sits up against the door on the back of the Hornet cockpit section. I took a door from the terrain sprue and trimmed it down to fit into the opening, adding a piece of plasticard to fill in the window. I also wanted to add some detail to the top of the container. Taking a fan from terrain sprue #2, I trimmed it down to fit inside the large pipe fitting from terrain sprue #1.
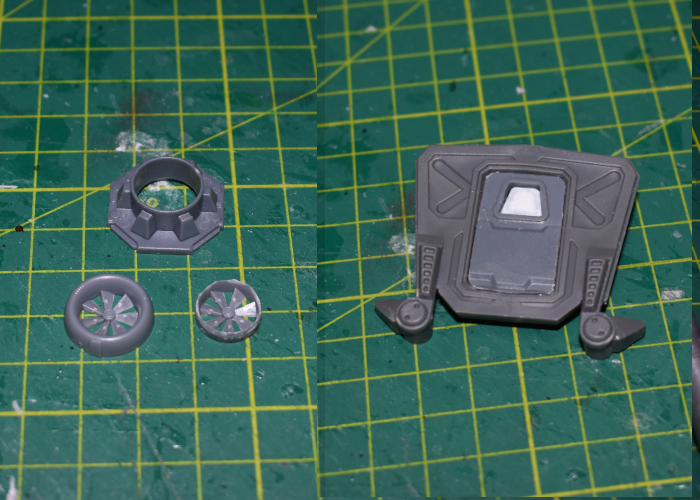
I glued the fan assembly onto the top of the container to line up with the circular vent on the underside of the Hornet's fuselage, and added some plasticard shaped to match the fuselage's trapezoid hatch.
With everything else just assembled as normal, the new drone was ready for paint!
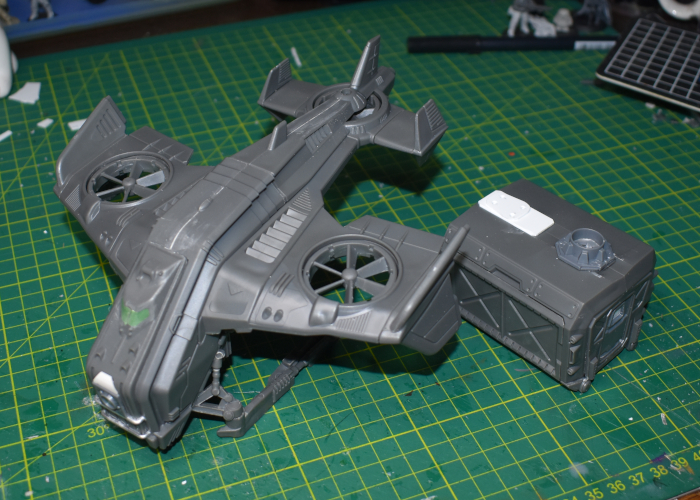
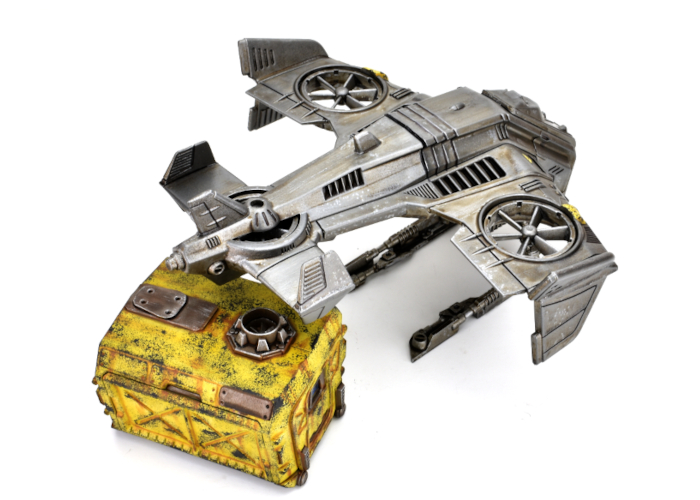
And the finished Pegasus Heavy Cargo Drone, ready to haul some heavy cargo:
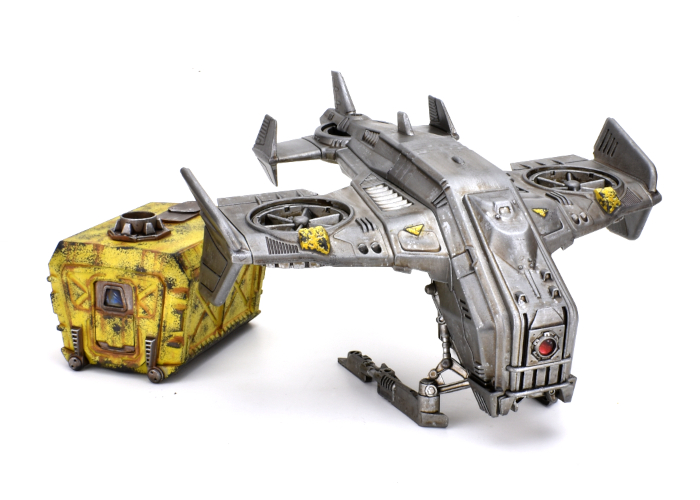
To turn your own Hornet into a heavy drone of logistical doom, you can pick up the Maelstrom's Edge terrain sprues along with the rest of the Maelstrom's Edge range from the webstore here.
What are you working on? We would love to see your models and terrain in the Comm Guild Facebook group!
For other building ideas, modeling tutorials, army spotlights and conversion walkthroughs, check out the Hobby section of the Maelstrom's Edge website here.
Tags: conversion drone kitbash modeling spotlight