Restocks in progress!
Posted on Monday Feb 22, 2021 at 05:00pm in Models
With London going through several lockdowns, keeping stock levels maintained in our warehouse has proven somewhat challenging, and as a result several products over the last few months have either run out or sunk dangerously low. The good news is that with things gradually easing up locally, we're now getting this all caught up again! Everything on the webstore aside from the largest of our base sizes is now back in stock!
Bases will return once we receive a currently in-progress production run, which will also include some new base sizes - part of our set-up for the new models on the release schedule for this year!
Stay tuned for new release models, coming very soon! In the meantime, you can pick up the entire Maelstrom's Edge range (aside from those pesky large bases) from the online store here!
Thanks for reading!
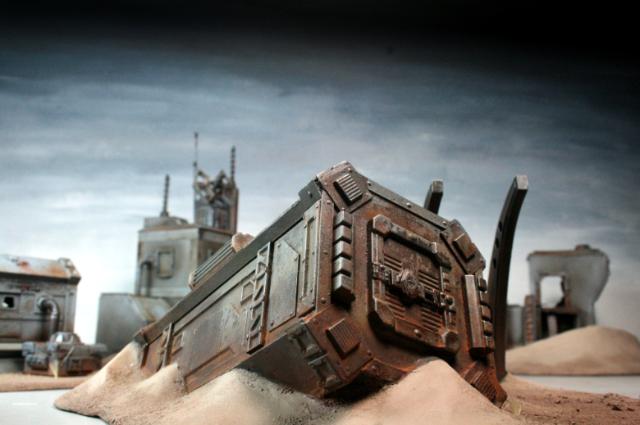
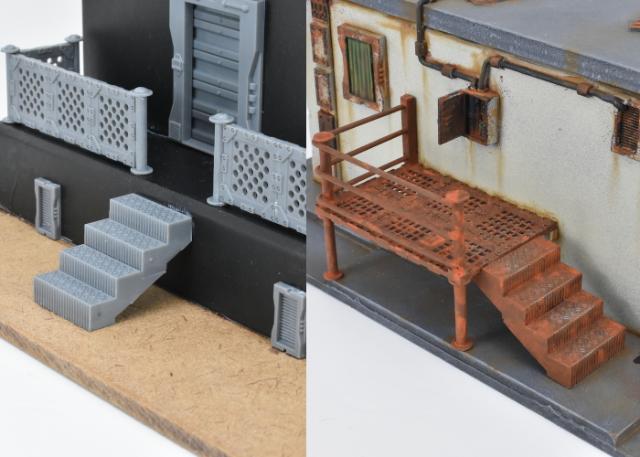
Edgepieces - Preview (also) Feb 2021
Posted on Monday Feb 15, 2021 at 05:00pm in Models
While the ongoing disruptions to everything all over the place continue to wreak havoc with our release schedule, we're still plugging away at a number of projects in the background. New models are on the way for every existing faction, and a new danger is stirring on the Edge. We're also working on a separate, hobby-related project that we're very excited to share with you all as soon as we can...
Our current priority is to get the current out-of-stock products on the webstore replenished as soon as possible (hopefully later this week!) and the we should be in a position to start rolling out some new models once again. In the meantime, here's another sneak peek at some of the things coming down the pipeline!
Stay tuned!
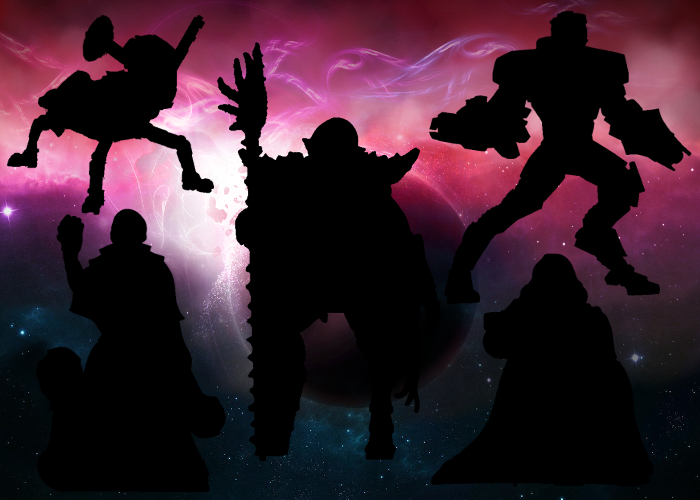
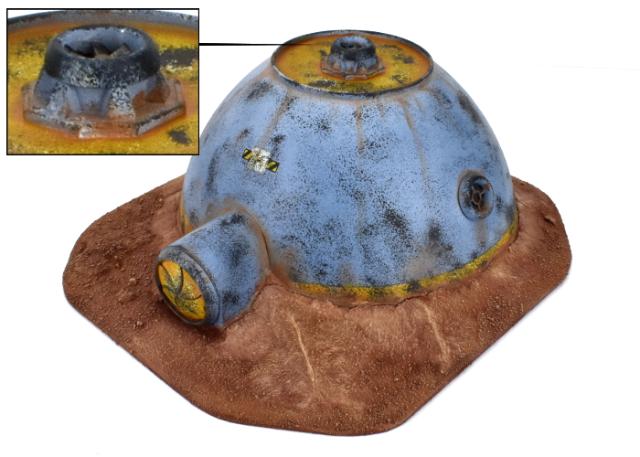
Edgepieces - Preview Feb 2021
Posted on Monday Feb 01, 2021 at 05:00pm in Models
After last year's disruptions to ... well, everything, we were all set to launch the new year with some of the backlog of models that we have been quietly working on in the background. Unfortunately, the new year actually started out with large chunks of the UK going back into lockdown, and everything sadly came once more to a screaming halt. So we have models, we just need to get them to where they need to be, and get some studio versions painted up, and this will happen as soon as we can make it so.
In the meantime, here's another sneak peek!
Stay tuned!
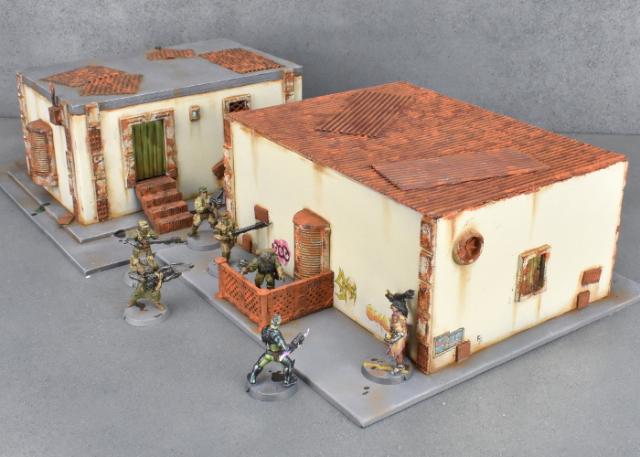
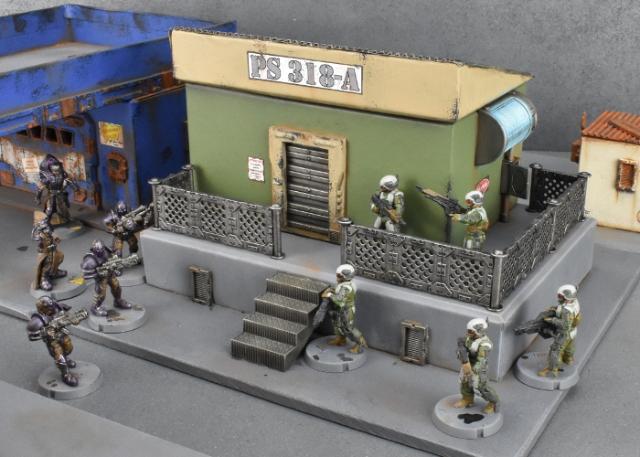
Edgepieces - a preview from the Maelstrom's Edge
Posted on Wednesday Dec 16, 2020 at 05:00pm in Models
The new Maelstrom's Edge Terrain Sprue is available now!
Posted on Monday Oct 07, 2019 at 05:00pm in Models
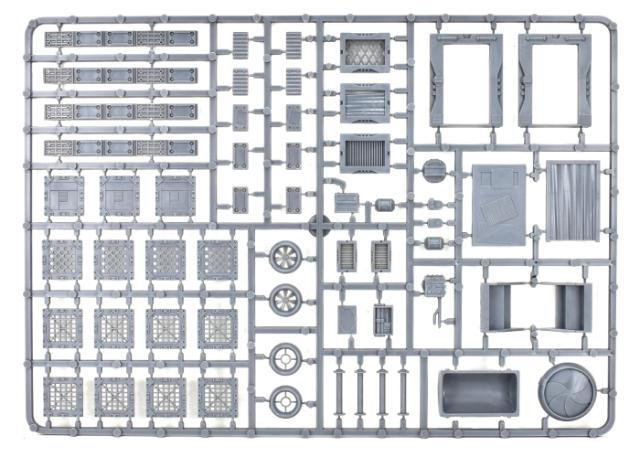
Sprue Front
Sprue Back
Each sprue contains a range of terrain elements, including customisable doors, stairs, windows and parts for creating catwalks or low walls and barricades.
Round detail pieces for an exhaust fan or porthole can fit onto the end of the large pipe fitting from terrain sprue #1, or attach flush to walls or roofs.
The sprue also includes customisable struts for reinforcing walls, and a host of smaller details like a computer terminal, small vents, a generator coil, a junction/control box, lights, an antenna, and parts to combine with our plastic Broken Infantry weapons to build an automated sentry turret!
This pack includes two sprues - 118 components in total!
Get yours from the Maelstrom's Edge Webstore now!
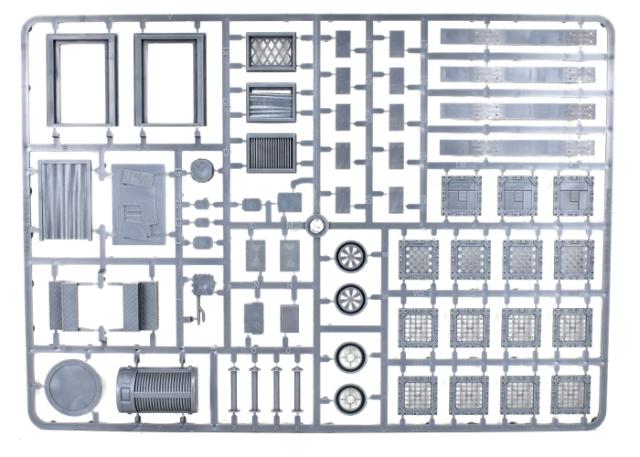
The New Maelstrom's Edge Terrain Sprue - Available October 7th!
Posted on Tuesday Oct 01, 2019 at 05:00pm in Models
Sprue Front
This new sprue is themed around the Broken faction, with detail pieces intended to help you build ruins and run-down structures, with a few extras to mix things up a bit.
Sprue Back
Unlike the solid doors on the first terrain sprue, this time around we've included a couple of empty door frames. These can be used as is, or you can fill them with an included solid door piece or a curtain, both of which are double sided so that you can mix up the facings for more variety.
Doors
The three windows on the sprue carry on the theme, with one covered with a curtain, one with metal mesh, and the third with a vent-style grill.
Windows
You can reinforce your walls with struts sized to match the similar struts on the first terrain sprue. This time around, though, the struts have missing panels which can be replaced (or not!) as you choose with several different patch pieces, included some that match the original panels. This lets you mix up the look of the struts to suit yourself. You can also use the extra panels to add patches to walls.
Windows
If you would rather get away from straight edges and corners, you can use the round porthole and iris portal to add some more rounded details. The iris can be used as a floor or roof hatch, or can also serve as a small access door. The porthole and a similarly-shaped fan piece can be glued straight onto a wall or roof, and are also designed to fit neatly onto the top of the large pipe fitting from the first terrain sprue.
Iris, Portholes and Fan (And a scifi shipping container from Laser Cut Card!)
Iris, Portholes and Fan
The first sprue included a ladder for getting up above ground level, but this time around we've included some stairs. The stair pieces are designed to stack up, so you can customise them to whatever height you want for your walkways or doors. The sprue also includes several different grating designs which can be used to make walkways and catwalks, or paired with the upright posts to make fences or barricades.
Stairs and Grates
Barricades
The rest of the sprue is filled up with technical details - a new computer terminal, light fittings, small vent pieces, an antenna, a generator coil and a junction/control box with a separate lid that can be attached open or closed, or used as a wall patch!
Barricades
And finally, we have also included the pieces to make a small, automated turret for securing your hard-won territory against rampaging gangs or bloodthirsty pirates. This is designed to work with the larger weapons from the Broken Infantry sprue, with the weapon mounting pieces attaching to a slide rail so they can be positioned as needed. This piece is just decorative for now, but we have some plans for ways to incorporate these into your games, to come later!
Barricades
The new sprue will be available from the Maelstrom's Edge webstore from the 7th of October. Like the previous terrain sprue, it will be sold as a two-pack, at the same price. Stay tuned for more terrain ideas featuring the new sprue!
Tags: release terrain terrainsprue
Modeling Spotlight: Epirian Boostpack Infantry
Posted on Monday Jan 14, 2019 at 05:00pm in Models
- by Iain Wilson
Following on from my improbably-mobile Pa'ku conversion, I'm continuing the jetpack theme this week with a bit of a closer look at the Epirian SecDef Boostpack Infantry models released last month.
Released in a pack of three models, Boostpack Infantry take to the table as a SecDef Rapid Intervention Team, where their boostpacks and twin carbines allow them to get in close to the enemy and lay down a withering hail of fire.
The high quality resin kit comes with the body and head as a single piece, with separate weapon arms, boostpacks and grenades. The unit's rules card also gives them access to a couple of special weapon options - these will be coming in a separate release very soon!
Assembly is really straightforward - the boostpack goes on the back, with a handy locator pin slotting into the model's backplate, and the arms go where you would expect, and are fully interchangeable between the three models.
There is no specific mounting point for the clingfire grenades - you can glue them to the belt, chestplate, thighs, or wherever else seems appropriate.
While the armour is the same as the regular plastic SecDef models (aside from the head!), the shoulders are slightly different to allow for the boostpack mounting plate extending up over them. You can sub in arms from the plastic sprue though by removing the small shoulder pad piece shown below in red.
With a little more work, you can create gasmask-equipped SecDef Tactical Teams, by using the plastic arms and filling in the boostpack mounting point with a little green stuff putty.
For a little more leg variety, you can use a sharp hobby knife or razor saw to cut through the bodies just below the belt. This allows you to glue on legs from the plastic SecDef to mix up your boostpack models, or use the resin legs on your regular SecDef teams to add some running models.
SecDef Sergeants have, from time to time, been known to requisition the best gear for themselves. This sergeant has given himself a bit of a boost with a twin-turbine boostpack, made by trimming off the locator pin on the pack and gluing two boostpacks side by side to the model's back.
Finally, why should SecDef have all of the fun? While boostpacks are notoriously unreliable and difficult to keep operational, it seems likely that some Broken chieftains or techs with the right technical knowledge would be unable to resist the lure of the extra speed afforded by a scavenged unit!
To add a Rapid Intervention Team to your Epirian force, you can pick them up along with the rest of the Maelstrom's Edge model range from the webstore here.
As always, feel free to pop along and share your work, or ask any Maelstrom's Edge- or hobby-related questions on the Comm Guild Facebook page!
For other Maelstrom's Edge modeling articles, including tutorials and walkthroughs of a wide range of different building and miniature projects, check out the article roundup here.
Tags: conversion epirian modeling secdef spotlight
Modeling Spotlight: Epirian Contractor Drones
Posted on Monday Dec 10, 2018 at 06:00pm in Models
- by Iain Wilson
The addition of the Contractor Drone to Epirian Contractor units gave them some new tactical options, with heavy weapon options for the re-titled Contractor Defender units, and supply drone options for the new Contractor Scout unit. This week I'm looking at some modeling options for the multi-part, resin Contractor Drone model.
Building one of four different options, the Contractor Drone kit comes with three different weapon options - a maglock chaingun, twin cluster missile pods and twin flakk guns. It also includes the Resupply Package for the Contractor Scout unit.
While sharing a superficially similar configuration, the Contractor Drone is a distinctly different model from the Spider Drone, with a chassis that is bulkier and taller. It also has weapon mounts situated beside its off-centre sensor unit as opposed to the Spider's side-mounted set-up.
The drone's legs all fit into any of the four shoulder sockets, with a barrel pivot allowing them to be positioned through a wide range of movement.
The equipment options slot in with a large locator tab. If you want to keep your options open, you can use a small piece of blu tac or similar re-usable adhesive to temporarily fix them in place and swap them out as you want.
Since I have problems assembling things the way they're supposed to be, I couldn't resist taking a knife to the kit to see what I could do with it. For a taller profile, I repositioned the feet on the below drone by soaking the legs in hot water and then bending them. I also cut through the legs right beside the shoulder assembly and glued them back on at a shallower angle.
One of the weapon options - Strike Missile Pods - didn't make it into the kit for the initial release. There are a couple of fairly easy ways to get around this problem if you want Strike Missile-equipped drones. For this one, I took a pair of Strike Missile pods from the Hunter Warmech kit, trimmed them up a little to fit onto the Contractor Drone front and glued them together.
If you don't have a Hunter kit to hand, you can also take the Cluster Missile pods, trim the missiles flush with the front of the pods, glue a 1.5mm hole into the front of each pod and glue in two pieces of 1.5mm plastic rod trimmed to points.
For a closed version of the Resupply drone, I cut through the supply cache directly behind the front panel using a razor saw, and then glued the panel directly to the front of the drone.
Legs are all well and good, but sometimes a more stable platform is called for. On the below drone, I replaced the legs with a skirt made from sections cut from a lintel piece found on the Maelstrom's Edge terrain sprue. Under that, I added some tracks purloined from an old Mechwarrior tank model.
The Contractor Drone chassis also makes a nice, solid foundation for a remote turret assembly, to be installed on fortification walls or vehicle hulls. In place of the legs, I added a mounting column cut from a length of plastic tube, and inserted that into the small pipe fitting from the Maelstrom's Edge terrain sprue.
You can pick up the Contractor Drone along with the rest of the Maelstrom's Edge model range from the webstore here.
As always, feel free to pop along and share your work, or ask any Maelstrom's Edge- or hobby-related questions on the Comm Guild Facebook page!
For other Maelstrom's Edge modeling articles, including tutorials and walkthroughs of a wide range of different building and miniature projects, check out the article roundup here.
Modeling Spotlight: Karist Kaddar Nova
Posted on Monday Oct 22, 2018 at 06:00pm in Models
- by Iain Wilson
This week, I'm having a play around with another of the original models released with the Battle for Zycanthus boxed set: The Kaddar Nova!
The Kaddar Nova is a member of the Karist Enclave priesthood, but they are often granted operational control on the battlefield due to their experience and the reverence paid to them by members of the Enclave. Equipped with an incredibly powerful cybel reactor that serves as both a power source and a weapon, the Kaddar Nova is a distinctive figure. Their bodies are enlarged and twisted by their constant exposure to cybel energy, and their ravaged faces cut a stark contrast to their powerful frames.
As the leader and figurehead of the Karist forces, the Kaddar Nova needed a suitably impressive model kit, and so the sprue comes with a nice array of parts to build them. But as always, of course, the sprue is only the starting point, and below I'll go through some quick and easy ways to further customise this fearsome individual.
Building your Kaddar Nova straight off the sprue lets you choose from three different sets of legs, two different arms for each side, two different heads, and an optional crown piece for the more formal-dressing Kaddar.
The indents in the crown mimic the extra eyes of the alien Angels that often accompany Karist forces. You can use this to make a more mysterious Kaddar Nova by taking the head with the scull-cap, trimming his nose down flat and gluing the crown piece on upside down over his face, so that the upper rim sits just below his eyes.
Headswaps are another easy way to mix things up on your models. The necks on the original Karist sets weren't all interchangeable (something that we've corrected in later Maelstrom's Edge models) but thanks to them being plastic that's easily fixed with a little cutting or filing. On the below model, I have used a head from the Tempest Elite set, with the helmet crust removed as it would hit up against the cybel reactor.
A more inscrutable look can be achieved using a Karist Trooper helmet with the neck trimmed down to fit, and the eye lenses sanded down to produce a blank faceplate. The staff on this model is a modified Cybel Glaive from the Faction Expansion sprue.
An advancing pose can be created with some careful cutting - trim a wedge out of the groin area where the legs join, so that they can be attached in a less spread position, and glue them so that one leg is to the rear slightly. Once the glue has set, cut or file the waist down flat and assemble the rest of the model - his robes largely hide the joint, but you can use a little modeling putty to fill any resulting gaps.
Alternatively, you can look for legs from elsewhere in the range. Trooper legs are too small, as they're not cybel-enhanced like the more elite Karist warriors, but by cutting through the waist of a Tempest Elite model with a razor saw, you can replace the Kaddar Nova's robed legs with walking, armoured legs instead.
Shadow Walker legs also work, although they're a fraction shorter. This Kaddar Nova is obviously just not quite as cybel-swollen as his compatriots yet.
The Kaddar Nova is only one aspect of the Kaddar priesthood, and others will be fleshed out eventually. In the meantime, though, it's fun to see where mashing bits together can lead you... The below model is a combination of Kaddar Nova and Shadow Walker parts, with some small tentacles taken from a couple of Mature Angel kits. I call him a 'Kaddar Noctis'.
Hopefully, this has given you some inspiration for your own Kaddar Nova builds! To get started, you can pick up the Kaddar Nova along with the rest of the Maelstrom's Edge model range from the webstore here.
As always, feel free to pop along and share your work, or ask any Maelstrom's Edge- or hobby-related questions on the Comm Guild Facebook page!
For other Maelstrom's Edge modeling articles, including tutorials and walkthroughs of a wide range of different building and miniature projects, check out the article roundup here.
Tags: conversion kaddar karist modeling nova spotlight tutorial
Modeling Spotlight: Converting Broken Chieftains
Posted on Monday Aug 06, 2018 at 06:00pm in Models
- by Iain Wilson
This week we released the second of our resin Forsaken Chieftain models for the Broken faction. These two models allow Chieftains to take a few extra options that weren't available from the plastic kit, and are a wonderfully characterful pair of models. However, since I find it physically painful* to assemble models the way they were intended to be built, I thought I would take this opportunity to slice a few of them into pieces and see what interesting conversion possibilities they opened up.
*May not be an actual medical condition, but why take the chance?
Built straight out of the package, the two models each come with a pair of weapon options. The 'regular' chieftain has a xeno spotter perched on his/her (it's deliberately ambiguous) raised right hand, and also has a two separate left forearms, one with a poisoned blade and the other with a trophy melee weapon. The 'tech' chieftain has two separate right arms, with a custom beam blastgun and a custom slug rifle.
You can easily double-up your command options by using the leftover weapons on plastic Broken Rabble bodies. On the below models, I equipped one with the leftover slug rifle by slicing off the locator peg and gluing it on in place of a regular plastic arm. The other has the leftover trophy weapon in place of the plastic forearm, which just requires cutting the lower arm off just below the elbow and gluing the weapon arm piece in its place.
Parts can also be mix-and-matched onto the resin Chieftain models to switch around the available options a little. On the below tech Chieftain model, I left off the resin right arm and equipped him with a plastic arm and beam pistol from the Rabble sprue, and cut off his left arm at the elbow and attached a trophy weapon from the other Chieftain model.
On the regular Chieftain below, I replaced the right forearm with a plastic one, and added a regular blastgun from the Rabble weapon sprue. I also cut off a plastic left forearm and added a grenade.
For a more action-posed Chieftain, I cut the legs off this one at the waist, using a razor saw. Then I glued on a pair of running legs from the Rabble sprue, added a slightly modified slug pistol hanging off the belt, and glued the xeno spotter on tilted just a little bit forwards.
Since I now had a pair of leftover Chieftain legs, I did the obvious thing and glued them to a Karist heavy weapon trooper torso I had left over from a previous conversion. This Chieftain has the right arm with custom beam blastgun from the tech Chieftain, and a left arm and alien head from the Rabble sprue.
Mixing things up a little more, I added a xeno spotter and trophy weapon to a Broken Sig Jammer body, to create a less ostentatious Chieftain model. A head and left hand from the Rabble sprue finished the conversion off nicely.
And finally, a Chieftain equipped with a trophy weapon from a more civilised age, which is apparently less clumsy and random than a blaster. The laser sword is made from an overcharged powercell from the Rabble sprue, with a cut-down blade stolen from a Star Wars figurine. I also cut the left arm off, carefully cutting around the cape so that a plastic arm would fit in neatly underneath it. This Chieftain will no doubt take to the battlefield and display his displeasure at the lack of faith shown by his underlings...
Hopefully, that's inspired you to have some fun with your own Chieftains. You can pick up the resin Chieftain models, the plastic Broken Rabble sprues, or any of the rest of the Maelstrom's Edge model range, from the webstore here.
As always, feel free to pop along and share your work, or ask any Maelstrom's Edge- or hobby-related questions on the Comm Guild Facebook page!
For other Maelstrom's Edge modeling articles, including tutorials and walkthroughs of a wide range of different building and miniature projects, check out the article roundup here.
Tags: broken chieftains conversion modeling models spotlight
Painting Spotlight: 120-point Epirian SecDef Force
Posted on Tuesday Jul 24, 2018 at 12:49pm in Models
- by Iain Wilson
Last week, I built a 120-point force using the fantastic new Epirian SecDef models. If you missed it, you can find the article here: http://www.thecommguild.com/roller/thecommguild/entry/modeling-spotlight-120-point-epirian.
This week, my aim was to get this force painted up to a basic tabletop standard. This can be helpful for getting past the 'sea of grey' stage and allowing you to field a painted army faster than might happen if you're painting each unit up to a fully detailed level, or if you just want a quick and easy paintjob on your army and aren't interested in getting bogged down in detail work. The end result isn't going to win any painting awards, but looks fine on the table and can be updated later.
So, the painted force:
For painting up armies quickly I tend to rely heavily on ink washes, as they are so handy for adding shading quickly (if sometimes a little messier than doing it by a more manual and time-consuming method would allow for). This force was no exception to that. I started with a basecoat of Army Painter Army Green spray, and when that was dry added a wash of Army Painter Military Shader.
When the wash was dry, I went over the armour plates with Army Painter Ash Grey, the exo-skeleton sections in Vallejo Basalt Grey and the weapons on Vallejo Heavy Charcoal, before adding a layer of Army Painter Dark Tone over these areas with a detail brush. Any slight spillover onto the green is fairly unnoticeable, but excess wash was quickly removed with a wet brush where necessary.
On the Ash Grey armour plates, rather than covering them completely with the wash, I just painted a thin coat of the wash onto the lower surfaces of the plates, or on the innermost half of the thigh plates.
I then painted the face and neck with Citadel Tallarn Flesh, chosen by virtue of being the first flesh tone I came across in my paint box. I also painted the flesh tone over the goggles, to provide a nice base layer for the red that would come later. The pouches, straps, rifle stocks and boots were painted with Vallejo Heavy Brown and then the flesh and brown parts were washed with Army Painter Strong Tone.
Finally (for now) I painted the base with Vallejo Neutral Grey and the goggle lenses with Army Painter Pure Red. The helmet chinstrap had originally been painted in the Heavy Brown, but after the wash I found that the tone was too similar to the flesh colour, so I went over the brown with black, and also used a black fineliner pen to darken the lower frame of the goggles, around the bottom of the lenses and up the nose. I also used the Neutral Grey to add a quick drybrush over the black on the weapons to pick out the detail - I wanted them dark, but to still be recogniseable on the table.
At this point, all of the main colours are in place and they're ready for the table. To finish them off later, I can add a highlight to the green with some light green, some light brown or bone on the brown parts, and add some shading and a reflective spot on the goggle lenses, which gets something that looks more like this:
I will also need to go through and drybrush the bases and add some detail so that they match my other urban bases.
So, the 'finished' units:
Lieutenant
Tactical Teams
Snipers
Annihilator Teams
Recon Walker
The gang all together:
To start assembling your own SecDef force, you can pick up the Secdef sprue, or any of the rest of the Maelstrom's Edge model range, from the webstore here.
As always, feel free to pop along and share your work, or ask any Maelstrom's Edge- or hobby-related questions on the Comm Guild Facebook page!
For other Maelstrom's Edge modeling articles, including tutorials and walkthroughs of a wide range of different building and miniature projects, check out the article roundup here.
Modeling Spotlight: 120-point Epirian SecDef Force
Posted on Monday Jul 16, 2018 at 05:00pm in Models
- by Iain Wilson
With this week's article, I'm continuing the SecDef love because, well, they're awesome!
As nice as it is to include some elite supertroops in amongst the Epirian bots and contractors, I thought it would be fun to build an entire SecDef force. Obviously, with only a single Hammer option currently in the official rules, this required a bit of creativity, but two mocked-up new unit cards and a bunch of sprues later, my first 120 points were assembled and ready for painting.
To build even a bare-bones force within the army selection rules for Maelstrom's Edge, a Command unit is required. While there will no-doubt be a SecDef officer option released down the track, I'm far too impatient to wait for that, so I ran up an unofficial unit card for a lower-level officer, a Lieutenant, to command smaller SecDef strike forces. The aim was to create a commander on about the same level as the Journeyman Bot Handler, and one that could be built from existing parts with minimal conversion required. So I took a bare bones SecDef trooper built from the sprue, on the assumption that SecDef field officers would likely look little different to their troops, and just swapped his rifle for a pair of pistols taken from the Contractor sprue.
To allow for a viable force, the Lieutenant has the 'SecDef Commander' rule, which allows him to take up to two SecDef Tactical Teams as Core choices instead of in their usual Hammer slots. In the interests of fielding as many big guns as possible (because the SecDef heavy weapons look cool) I choose to give each of the Core teams two LM14 Machine Guns, and added two extra warm bodies to each to bring them up to full strength.
The models throughout the force are assembled largely straight off the sprue with minimal conversion. I switched around some of the leg pairs (as explained in last week's Modeling Spotlight) and changed around the left hands on the unit Sergeants to add some variety to their poses without having them all holding their rifles twp-handed like their troops, to help them stand out a little.
With the two available Core options filled, I decided to include a sniper unit in the Hammer slot (because why wouldn't you?). To keep them extra sneaky and to stay within my chosen 120 points, I went with the base unit of three, and gave the two troopers each a sniper rifle.
There was clearly not enough firepower on the table here yet, which called for some Chainguns! Rather than fill up my last remaining Hammer slot for the detachment, I made use of the Tactical Team rule that causes teams equipped with two CG100 Chainguns to become Anvil selections, and built up two five-man units accordingly.
To round out the detachment, I liked the idea of a SecDef force having access to a light vehicle that would serve as an advance scout, and potentially as a beacon to guide in teams arriving by Aerial Insertion. After some searching online, I found the Heron Light Battlewalker, a resin kit from Hexy-Shop. This is a small walker with an enclosed cockpit but a detailed interior, which allowed me to cut away the roof and part of the sides to create an open cockpit.
I replaced the Heron's original weapons with a pair of CG100 Chainguns glued together side-by-side, and added a driver by cutting up a pair of SecDef legs, re-assembling them in place in the seat and then filling in the resulting gaps with 'green stuff' putty.
There were no controls in the Heron's cockpit other than a screen down between the driver's feet, so I added a control loom made from a leftover resin piece and the pistol grip from a SecDef assault rifle. I also added some roll bars on the sides of the cockpit (these pieces normally go on the platform on the rear of the Heron), but these are only sticky-tacked in place so I can take them off for painting - this should make it easier to get into the nooks and crannies in the cockpit.
The final touch was to shorten the legs slightly, as the Heron turned out to be a bit taller than I had expected and wanted it to be. This was done by cutting out the lowest section of the legs and reattaching the legs to the ankle ball-joint.
All up, with an 11-point Lieutenant and 12-point walker, the above force comes in at 119 points - perfect for getting started, and ready to be taken as a detachment in a larger Epirian force or fleshed out later if and when more SecDef units are added to the roster. If you would like to build something similar, you can find the unit cards for the Lieutenant and the walker in the Force Builder section of the Maelstrom's Edge website here.
Next week - Painting!
To start assembling your own SecDef force, you can pick up the Secdef sprue, or any of the rest of the Maelstrom's Edge model range, from the webstore here.
As always, feel free to pop along and share your work, or ask any Maelstrom's Edge- or hobby-related questions on the Comm Guild Facebook page!
For other Maelstrom's Edge modeling articles, including tutorials and walkthroughs of a wide range of different building and miniature projects, check out the article roundup here.
